

CONTENTS
1. SAFETY INFORMATION...................................................................................... 3
2. SAFETY INSTRUCTIONS.....................................................................................4
3. PRODUCT DESCRIPTION................................................................................... 5
4. CONTROL PANEL...............................................................................................6
5. PROGRAMMES...................................................................................................7
6. SETTINGS........................................................................................................... 9
7. OPTIONS...........................................................................................................10
8. BEFORE FIRST USE..........................................................................................11
9. DAILY USE........................................................................................................ 13
10. HINTS AND TIPS............................................................................................. 14
11. CARE AND CLEANING....................................................................................16
12. TROUBLESHOOTING......................................................................................17
13. TECHNICAL INFORMATION............................................................................18
14. GARANTIE, GARANZIA, GUARANTEE ............................................................19
WE’RE THINKING OF YOU
Thank you for purchasing an Electrolux appliance. You’ve chosen a product that
brings with it decades of professional experience and innovation. Ingenious and
stylish, it has been designed with you in mind. So whenever you use it, you can be
safe in the knowledge that you’ll get great results every time.
Welcome to Electrolux.
Visit our website for:
Get usage advice, brochures, trouble shooter, service information:
www.electrolux.com
Register your product for better service:
www.registerelectrolux.com
Buy Accessories, Consumables and Original spare parts for your appliance:
www.electrolux.com/shop
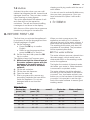
CUSTOMER CARE AND SERVICE
Always use original spare parts.
When contacting our Authorised Service Centre, ensure that you have the following
data available: Model, PNC, Serial Number.
The information can be found on the rating plate.
Warning / Caution-Safety information
General information and tips
Environmental information
Subject to change without notice.
www.electrolux.com2

1. SAFETY INFORMATION
Before the installation and use of the appliance, carefully
read the supplied instructions. The manufacturer is not
responsible if an incorrect installation and use causes
injuries and damages. Always keep the instructions with
the appliance for future reference.
1.1 General Safety
• This appliance is intended to be used in household and
similar applications such as:
– farm houses; staff kitchen areas in shops, offices and
other working environments;
– by clients in hotels, motels, bed & breakfast and
other residential type environments.
• Do not change the specification of this appliance.
• The operating water pressure (minimum and maximum)
must be between 0.5 (0.05) / 8 (0.8) bar (Mpa)
•
Obey the maximum number of 12 place settings.
• If the supply cord is damaged, it must be replaced by
the manufacturer, its Authorised Service Centre or
similarly qualified persons in order to avoid a hazard.
• Put knives and cutlery with sharp points in the cutlery
basket with the points down or in a horizontal position.
• Do not keep the appliance door open without
supervision to prevent to fall on it.
• Before maintenance, deactivate the appliance and
disconnect the mains plug from the mains socket.
• Do not use water spray and steam to clean the
appliance.
• The appliance is to be connected to the water mains
using the new supplied hose-sets. Old hose sets must
not be reused.
1.2 Children and vulnerable people safety
• This appliance can be used by children aged from 8
years and above and persons with reduced physical,
sensory or mental capabilities or lack of experience and
ENGLISH
3

knowledge if they have been given supervision or
instruction concerning use of the appliance in a safe
way and understand the hazards involved.
• Do not let children play with the appliance.
• Keep all detergents away from children.
• Keep children and pets away from the appliance door
when it is open.
• Cleaning and user maintenance shall not be made by
children without supervision.
2. SAFETY INSTRUCTIONS
2.1 Installation
• Remove all the packaging.
• Do not install or use a damaged
appliance.
• Do not install or use the appliance
where the temperature is less than 0
°C.
• Obey the installation instruction
supplied with the appliance.
• Make sure that the appliance is
installed below and adjacent to safe
structures.
2.2 Electrical connection
WARNING!
Risk of fire and electrical
shock.
• The appliance must be earthed.
• Make sure that the electrical
information on the rating plate agrees
with the power supply. If not, contact
an electrician.
• Always use a correctly installed
shockproof socket.
• Do not use multi-plug adapters and
extension cables.
• Make sure not to cause damage to the
mains plug and to the mains cable.
Should the mains cable need to be
replaced, this must be carried out by
our Authorised Service Centre.
• Connect the mains plug to the mains
socket only at the end of the
installation. Make sure that there is
access to the mains plug after the
installation.
• Do not pull the mains cable to
disconnect the appliance. Always pull
the mains plug.
• This appliance complies with the E.E.C.
Directives.
• Only for UK and Ireland. The appliance
has a 13 amp mains plug. If it is
necessary to change the fuse in the
mains plug, use a 13 amp ASTA (BS
1362) fuse.
2.3 Water connection
• Make sure not to cause damage to the
water hoses.
• Before you connect the appliance to
new pipes or pipes not used for a long
time, let the water flow until it is clean.
• The first time you use the appliance,
make sure that there is no leakage.
• The water inlet hose has a safety valve
and a sheath with an inner mains
cable.
WARNING!
Dangerous voltage.
• If the water inlet hose is damaged,
immediately disconnect the mains plug
www.electrolux.com4

from the mains socket. Contact the
Authorised Service Centre to replace
the water inlet hose.
2.4 Use
• Do not sit or stand on the open door.
• Dishwasher detergents are dangerous.
Obey the safety instructions on the
detergent packaging.
• Do not drink and play with the water in
the appliance.
• Do not remove the dishes from the
appliance until the programme is
completed. There can be detergent on
the dishes.
• The appliance can release hot steam if
you open the door while a programme
operates.
• Do not put flammable products or
items that are wet with flammable
products in, near or on the appliance.
2.5 Internal light
WARNING!
Risk of injury.
• This appliance has an internal lamp
that comes on when you open the
door and goes off when the door is
closed.
• The lamp in this appliance is not
suitable for household room
illumination.
• To replace the lamp, contact the
Service.
2.6 Disposal
WARNING!
Risk of injury or suffocation.
• Disconnect the appliance from the
mains supply.
• Cut off the mains cable and discard it.
• Remove the door catch to prevent
children and pets to get closed in the
appliance.
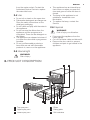
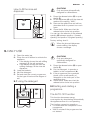
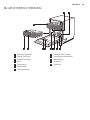
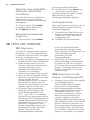
3. PRODUCT DESCRIPTION
4
3
7
9
8
10
56
11
1
2
1
Top spray arm
2
Upper spray arm
3
Lower spray arm
4
Filters
5
Rating plate
6
Salt container
ENGLISH
5

7
Air vent
8
Rinse aid dispenser
9
Detergent dispenser
10
Cutlery basket
11
Lower basket
12
Upper basket
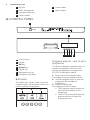
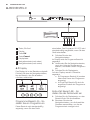
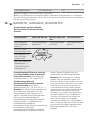
4. CONTROL PANEL
1
2
34567
1
On/off button
2
Display
3
OK key
4
Cancel key
5
Display key
6
Navigation key (up)
7
Navigation key (down)
4.1 Display
The display has 3 areas. Press one of the
navigation keys until the area in which you
need to operate is highlighted.
A
B
C
Programs area (A) - How to set a
programme
This area is selected by default when you
activate the appliance. Every time you
activate the appliance, the programme
50° ECO is selected by default.
1. Press one of the navigation keys.
The display shows the programme list.
2. Use the navigation keys to scroll the
programme list and select a
programme.
3. Press the display key.
The display shows the 3 areas.
• The Programs area (A) shows the
name and the duration of the
programme.
• The End Time area (B) shows the
approximate time of when the
programme ends.
www.electrolux.com6

End Time area (B) - How to set
the delay start
1. Use the display key to select the End
Time area.
2. Use one of the navigation keys and
select the hours of the delay start.
• The upper part of the area shows
the approximate start time of the
programme.
• The lower part of the area shows
the approximate end time of the
programme.
3. Press the OK key to confirm.
4. Press the display key to close the End
Time area and go back to the
Programs area.
Options area (C) - How to set
options and settings
When the programme is completed or is
cancelled the options are set to the default
value.
When a setting is changed it will remain
valid even if the programme is completed
or a running programme is cancelled.
1. Use the display key and select the
Options area.
2. Use the navigation keys to scroll the
list and select an option or a setting.
3. Press the OK key to confirm or to
enter the value level.
If you enter the value level, use the
navigation keys to select the new value
and then press OK to confirm.
4. Press the display key to close the
Options area and go back to the
Programs area.
5.
If you want to set another option or
change the value of another setting,
repeat the procedure.
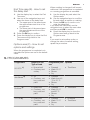
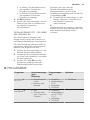
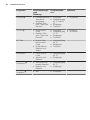
5. PROGRAMMES
Programme Degree of soil
Type of load
Programme pha-
ses
Options
50° ECO
1)
• Normal soil
• Crockery and
cutlery
• Prewash
• Wash 50 °C
• Rinses
• Dry
• TimeSaver
AutoSense
2)
• All
• Crockery, cut-
lery, pots and
pans
• Prewash
• Wash from 45
°C to 70 °C
• Rinses
• Dry
ProZone
3)
• Mixed soil
• Crockery, cut-
lery, pots and
pans
• Prewash
• Wash 50 °C
and 65 °C
• Rinses
• Dry
• TimeSaver
70° Pro
4)
• Heavy soil
• Crockery, cut-
lery, pots and
pans
• Prewash
• Wash 70 °C
• Rinses
• Dry
• ProBoost
• TimeSaver
ENGLISH
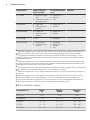
7

Programme Degree of soil
Type of load
Programme pha-
ses
Options
45° Glass • Normal or light
soil
• Delicate crockery
and glassware
• Wash 45 °C
• Rinses
• Dry
60 Minutes • Light soil
• Crockery and
cutlery
• Wash 55 °C
• Rinses
30 Minutes
5)
• Fresh soil
• Crockery and
cutlery
• Wash 60 °C
• Rinses
Prewash
6)
• All • Prewash
Extra silent
7)
• Normal soil
• Crockery and
cutlery
• Prewash
• Wash 50 °C
• Rinses
• Dry
1)
With this programme you have the most efficient use of water and energy consumption for
crockery and cutlery with normal soil. (This is the standard programme for test institutes).
2)
The appliance senses the degree of soil and the quantity of items in the baskets . It auto-
matically adjusts the temperature and the quantity of water, the energy consumption and the
programme duration.
3)
With this programme you can wash a load with mixed soil. Very heavy soil in the lower bas-
ket and normal soil in the upper basket. The pressure and the temperature of the water in the
lower basket are higher than in the upper basket.
4)
This programme has a high temperature rinsing phase for better hygiene results. During the
rinsing phase, the temperature stays at 70 °C for at least 10 minutes.
5)
With this programme you can wash a load with fresh soil. It gives good washing results in a
short time.
6)
With this programme you can quickly rinse dishes to prevent remains of food to bond on
dishes and odours to form in the appliance. Do not use detergent with this programme.
7)
This is the most silent programme. The pump works at a very low speed to decrease the
level of noise. Because of the low speed, the programme duration is long.
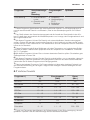
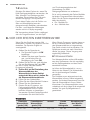
5.1 Consumption values
Programme
1)
Water
(l)
Energy
(kWh)
Duration
(min)
50° ECO 9.5 0.92 195
AutoSense 7 - 14 0.6 - 1.4 40 - 150
ProZone 14 - 15 1.2 - 1.3 130 - 140
70° Pro 13 - 14 1.4 - 1.6 150 - 160
45° Glass 11 - 12 0.7 - 0.9 70 - 80
www.electrolux.com8

Programme
1)
Water
(l)
Energy
(kWh)
Duration
(min)
60 Minutes 10 - 11 1.0 - 1.2 55 - 65
30 Minutes 9 0.9 30
Prewash 4 0.1 14
Extra silent 9 - 10 1.1 - 1.2 200 - 220
1)
The pressure and the temperature of the water, the variations of the mains supply, the op-
tions and the quantity of dishes can change the values.
5.2 Information for test institutes
For all the necessary information for test
performance, send an email to:
Write down the product number (PNC)
that is on the rating plate.
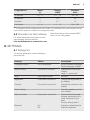
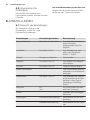
6. SETTINGS
6.1 Settings list
To see the settings list, select Settings in
the option list.
Settings Values Description
Language English List of languages. Set the preferred language.
Default language: English.
Sound volume From level 0 to level 5. Adjustment of the sound
volume.
Level 0 = sounds off.
Time Hours and minutes Set time.
Brightness From level 0 to level 10. Change the brightness of
the display.
Contrast From level 0 to level 10. Change the contrast of the
display.
Reset settings Reset the appliance to fac-
tory settings.
Water hardness From level 1 to level 10. Set the level of the water
softener according to the
water hardness in your
area.
Factory setting: level 5.
Rinse aid On
Off
Activate or deactivate the
rinse aid dispenser.
ENGLISH
9

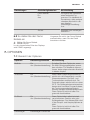
Settings Values Description
Back Goes back to the previous
screen.
Wash guide Program guide Information related to the
programmes.
Option guide Information related to the
options.
Demo mode
On
Off
Set the simulation of a run-
ning programme. Refer to
specific information provi-
ded in this chapter.
Factory setting: off.
Back Goes back to the previous
screen.
6.2 How to set the Demo mode
1. Select Demo mode.
2. Select On.
In the upper left corner of the display you
can see the word DEMO.
Remember to deactivate Demo mode if
you want to use the appliance.
7. OPTIONS
7.1 Option list
Options Values Description
Multitab On
Off (default value)
Activate this option if you want to use
multi-tablets. Refer to specific informa-
tion provided in this chapter.
TimeSaver On
Off (default value)
This option increases the pressure and
the temperature of the water. The
washing and drying phases are shorter.
The total programme duration decrea-
ses by approximately 50%. The wash-
ing results are the same as with the
normal programme duration but the
drying results can be less satisfactory.
This option is not applicable to all pro-
grammes.
ProBoost On
Off (default value)
The use of this option gives very good
washing results for heavy soiled dishes.
The water pressure in the prewash and
washing phases is increased.
This option is not applicable to all pro-
grammes.
Settings Enter appliance settings
www.electrolux.com10

7.2 Multitab
Activate this option when you use multi-
tablets that integrate the salt, rinse aid and
detergent functions. They can also contain
other cleaning or rinsing agents.
This option deactivates the release of salt
and rinse aid from the respective
containers. The salt and rinse aid refilling
messages do not show in the display.
With the use of this option the programme
duration is prolonged to increase the
cleaning and drying results with the use of
multi-tablets.
You do not need to activate Multitab every
time you start a programme. Once you
have activated the option it will remain
active.
• On : Multitab on.
• Off : Multitab off.
8. BEFORE FIRST USE
The first time you activate the appliance it
is necessary to set the language and time.
Default language is English.
1. Set the language
• Press the OK key to confirm
English
• Select a new language and then
press the OK key to confirm.
2. Set the time and then press the OK
key to confirm.
The display shows the Programs area.
3. Make sure that the current level of
the water softener agrees with the
hardness of the water supply. If
not, adjust the level of the water
softener.
4. Fill the salt container.
5. Fill the rinse aid dispenser.
6. Open the water tap.
7. Start a programme to remove any
processing residuals that can still be
inside the appliance. Do not use
detergent and do not load the
baskets.
When you start a programme, the
appliance can take up to 5 minutes to
recharge the resin in the water softener. It
seems that the appliance is not working.
The washing phase starts only after this
procedure is completed. The procedure
will be repeated periodically.
8.1 The water softener
The water softener removes minerals from
the water supply, which would have a
detrimental effect on the washing results
and on the appliance.
The higher the content of these minerals,
the harder your water is. Water hardness
is measured in equivalent scales.
The water softener should be adjusted
according to the hardness of the water in
your area. Your local water authority can
advise you on the hardness of the water in
your area. It is important to set the right
level of the water softener to assure good
washing results.
Water hardness
German de-
grees (°dH)
French de-
grees (°fH)
mmol/l Clarke de-
grees
Water softener
level
47 - 50 84 - 90 8.4 - 9.0 58 - 63 10
43 - 46 76 - 83 7.6 - 8.3 53 - 57 9
37 - 42 65 - 75 6.5 - 7.5 46 - 52 8
29 - 36 51 - 64 5.1 - 6.4 36 - 45 7
23 - 28 40 - 50 4.0 - 5.0 28 - 35 6
ENGLISH
11

German de-
grees (°dH)
French de-
grees (°fH)
mmol/l Clarke de-
grees
Water softener
level
19 - 22 33 - 39 3.3 - 3.9 23 - 27
5
1)
15 - 18 26 - 32 2.6 - 3.2 18 - 22 4
11 - 14 19 - 25 1.9 - 2.5 13 - 17 3
4 - 10 7 - 18 0.7 - 1.8 5 - 12 2
<4 <7 <0.7 < 5
1
2)
1)
Factory setting.
2)
Do not use salt at this level.
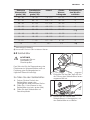
8.2 The salt container
CAUTION!
Only use salt specifically
designed for dishwashers.
The salt is used to recharge the resin in
the water softener and to assure good
washing results in the daily use.
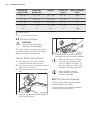
How to fill the salt container
1. Turn the cap of the salt container
counterclockwise and remove it.
2. Put 1 litre of water in the salt container
(Only for the first time).
3. Fill the salt container with dishwasher
salt.
4. Remove the salt around the opening
of the salt container.
5. Turn the cap of the salt container
clockwise to close the salt container.
Water and salt can come out
from the salt container when
you fill it. Risk of corrosion. To
prevent it, after you fill the salt
container, start a programme.
When the salt container
needs refilling, the display
shows a message.
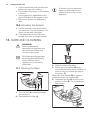
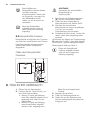
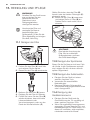
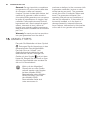
8.3 The rinse aid dispenser
The rinse aid helps to dry the dishes
without streaks and stains.
The rinse aid is automatically released
during the hot rinse phase.
www.electrolux.com12

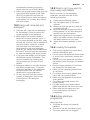
How to fill the rinse aid
dispenser
M
A
X
1
2
3
4
+
-
A B
D
C
CAUTION!
Only use rinse aid specifically
designed for dishwashers.
1. Press the release button (D) to open
the lid (C).
2. Fill the dispenser (A) until the rinse aid
reaches the marking ''MAX''.
3. Remove the spilled rinse aid with an
absorbent cloth to prevent too much
foam.
4. Close the lid. Make sure that the
release button locks into position.
You can turn the selector of the released
quantity (B) between position 1 (lowest
quantity) and position 4 (highest quantity).
Factory setting: level 4.
When the rinse aid dispenser
needs refilling, the display
shows a message.
9. DAILY USE
1. Open the water tap.
2. Press the on/off button to activate the
appliance.
• If the display shows the salt refilling
message, fill the salt container.
• If the display shows the rinse aid
refilling message, fill the rinse aid
dispenser.
3. Load the baskets.
4. Add the detergent.
5. Set and start the correct programme
for the type of load and the degree of
soil.
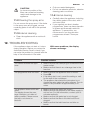
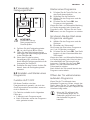
9.1 Using the detergent
20
30
A
B
C
CAUTION!
Only use detergent
specifically designed for
dishwashers.
1. Press the release button (B) to open
the lid (C).
2. Put the detergent, in powder or
tablets, in the compartment (A).
3. If the programme has a prewash
phase, put a small quantity of
detergent on the inner part of the
appliance door.
4. Close the lid. Make sure that the
release button locks into position.
9.2 Setting and starting a
programme
The AUTO OFF function
This function decreases energy
consumption by deactivating automatically
the appliance when it is not operating.
The function comes into operation:
• 5 minutes after the completion of the
programme.
• After 5 minutes if the programme has
not started.
ENGLISH
13

Starting a programme
1. Press the on/off button to activate the
appliance.
2. Close the appliance door.
3. Set the programme and options.
4. Press the OK key, the programme
starts.
If the salt and rinse aid refilling messages
show in the display, the programme will
not start. Press the OK key again to start
the programme.
How to delay the start of a
programme
1. Set the programme and options.
2. Set the delay start
You can delay the start of a programme
from 1 to 24 hours.
3. Press the OK key, the countdown
starts.
If the salt and rinse aid refilling messages
show in the display, the countdown will
not start. Press the OK key again to start
the countdown.
When the countdown is completed, the
programme starts automatically.
Opening the door while the
appliance operates
If you open the door while a programme is
running, the appliance stops. When you
close the door, the appliance continues
from the point of interruption.
If the door is opened for more
that 30 seconds during the
drying phase, the running
programme will end.
Cancelling the delay start while
the countdown operates
When you cancel the delay start the
programme and the options are set to
their default values.
1. Press the Cancel key.
The display shows Confirm cancel?.
2. Press the Cancel key to confirm.
Cancelling a running programme
1. Press the Cancel key.
The display shows Confirm cancel?.
2. Press the Cancel key, to cancel the
programme.
Make sure that there is detergent in the
detergent dispenser before you start a
new programme.
End of programme
When the programme is completed the
display shows Programme finished and
Please switch off.
1. Press the on/off button or wait for the
AUTO OFF function to automatically
deactivate the appliance.
2. Close the water tap.
10. HINTS AND TIPS
10.1 General
The following hints will ensure optimal
cleaning and drying results in daily use
and also help to protect the environment.
• Remove larger residues of food from
the dishes into the waste bin.
• Do not pre-rinse dishes by hand. When
needed, use the prewash programme
(if available) or select a programme with
a prewash phase.
• Always use the whole space of the
baskets.
• When loading the appliance, make
sure that the dishes can be completely
reached and washed by the water
released from the spray arm nozzles.
Make sure that items do not touch or
cover each other.
• You can use dishwasher detergent,
rinse aid and salt separately or you can
use the multi-tablets (e.g. ''3in1'',
''4in1'', ''All in 1''). Follow the
instructions written on the packaging.
Multi-tablets are usually suitable in
areas with a water hardness up to 21
°dH. In areas exceeding this limit, rinse
aid and salt must also be used. If you
use multi-tablets you can select the
Multitab option (if available). This option
www.electrolux.com14

increases the cleaning and drying
results with the use of multi-tablets.
• Select the programme according to the
type of load and degree of soil. With
the ECO programme you have the
most efficient use of water and energy
consumption for crockery and cutlery
with normal soil.
10.2 Using salt, rinse aid and
detergent
• Only use salt, rinse aid and detergent
for dishwasher. Other products can
cause damage to the appliance.
• Multi-tablets are usually suitable in
areas with a water hardness up to 21
°dH. In areas exceeding this limit, rinse
aid and salt must be used in addition to
the multi-tablets. However, in areas
with hard and very hard water we
recommend to use solo-detergent
(powder, gel, tablets without additional
functions), rinse aid and salt separately
for optimal cleaning and drying results.
• If you use multi-tablets you can select
the Multitab option (if available). This
option increases the cleaning and
drying results with the use of multi-
tablets.
• Detergent tablets do not fully dissolve
with short programmes. To prevent
detergent residues on the tableware,
we recommend that you use the
tablets with long programmes.
• Do not use more than the correct
quantity of detergent. Refer to the
instructions on the detergent
packaging.
10.3 What to do if you want to
stop using multi-tablets
Before you start to use separately
detergent, salt and rinse aid do the
following procedure.
1. Deactivate the Multitab option.
2. Set the highest level of the water
softener.
3. Make sure that the salt and rinse aid
containers are full.
4. Start the shortest programme with a
rinsing phase. Do not add detergent
and do not load the baskets.
5. When the programme is completed,
adjust the water softener according to
the water hardness in your area.
6. Adjust the released quantity of rinse
aid.
10.4 Loading the baskets
• Only use the appliance to wash items
that are dishwasher-safe.
• Do not put in the appliance items made
of wood, horn, aluminium, pewter and
copper.
• Do not put in the appliance items that
can absorb water (sponges, household
cloths).
• Remove larger residues of food from
the dishes into the waste bin.
• Make soft the remaining burned food
on the items.
• Put hollow items (cups, glasses and
pans) with the opening down.
• Make sure that glasses do not touch
other glasses.
• Put cutlery and small items in the
cutlery basket.
• Put light items in the upper basket.
Make sure that the items do not move.
• Make sure that the spray arm can
move freely before you start a
programme.
10.5 Before starting a
programme
Make sure that:
• The filters are clean and correctly
installed.
• The cap of the salt container is tight.
• The spray arms are not clogged.
ENGLISH
15

• There is dishwasher salt and rinse aid
(unless you use multi- tablets).
• The position of the items in the baskets
is correct.
• The programme is applicable for the
type of load and for the degree of soil.
• The correct quantity of detergent is
used.
10.6 Unloading the baskets
1. Let the tableware cool down before
you remove it from the appliance. Hot
items can be easily damaged.
2. First remove items from the lower
basket, then from the upper basket.
At the end of the programme
water can still remain on the
sides and on the door of the
appliance.
11. CARE AND CLEANING
WARNING!
Before maintenance,
deactivate the appliance and
disconnect the mains plug
from the main socket.
Dirty filters and clogged spay
arms decrease the washing
results. Make a check
regularly and, if necessary,
clean them.
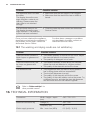
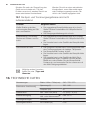
11.1 Cleaning the filters
A B C
C
1. Turn the filter (A) counterclockwise
and remove it.
2. Disassemble the filter (A).
3. Remove the filter (B).
4. Wash the filters with water.
5. Before you put the filter (B) back,
make sue that there are no residues of
food or soil in or around the edge of
the sump. (C).
Make sure that the filter (B) is correctly
positioned under the 2 guides (C).
6. Assemble the filter (A) and put it into
position in filter (B). Turn it clockwise
until it locks.
www.electrolux.com16

CAUTION!
An incorrect position of the
filters can cause bad washing
results and damage to the
appliance.
11.2 Cleaning the spray arms
Do not remove the spray arms. If the holes
in the spray arms are clogged, remove
remaining parts of soil with a thin pointed
object.
11.3 External cleaning
• Clean the appliance with a moist soft
cloth.
• Only use neutral detergents.
• Do not use abrasive products, abrasive
cleaning pads or solvents.
11.4 Internal cleaning
• Carefully clean the appliance, including
the rubber gasket of the door, with a
soft moist cloth.
• If you regularly use short duration
programmes, these can leave deposits
of grease and limescale inside the
appliance. To prevent this, we
recommend to run long duration
programmes at least 2 times per
month.
12. TROUBLESHOOTING
If the appliance does not start or it stops
during operation. Before you contact an
Authorised Service Centre, check if you
can solve the problem by yourself with the
help of the information in the table.
With some problems, the display
shows a message.
Problem Possible solution
You cannot activate the appli-
ance.
• Make sure that the mains plug is connected to the
mains socket.
• Make sure that there is no a damage fuse in the
fuse box.
The programme does not start. • Make sure that the appliance door is closed.
• Press OK
• If the delay start is set, cancel the setting or wait
for the end of the countdown.
• The appliance has started the procedure to re-
charge the resin inside the water softener. The du-
ration of the procedure is approximately 5 mi-
nutes.
The appliance does not fill with
water.
The display shows the mes-
sage: Attention: no intake of
water possible. Please ensure
the tap is not closed or
blocked.
• Make sure that the water tap is open.
• Make sure that the pressure of the water supply is
not too low. For this information, contact your lo-
cal water authority.
• Make sure that the water tap is not clogged.
• Make sure that the filter in the inlet hose is not
clogged.
• Make sure that the inlet hose has no kinks or
bends.
ENGLISH
17

Problem Possible solution
The appliance does not drain
the water.
The display shows the mes-
sage: Attention: water is not
draining. Please ensure the
drain tube is not attached
wrongly.
• Make sure that the sink spigot is not clogged.
• Make sure that the drain hose has no kinks or
bends.
The anti-flood device is on.
The display shows the mes-
sage: Attention: The antiflood
system has been activated.
• Close the water tap and contact an Authorised
Service Centre.
Once you have checked the appliance,
deactivate and activate the appliance. If
the problem occurs again, contact an
Authorised Service Centre.
For other alarm messages or problems
not described in the table, contact an
Authorised Service Centre.
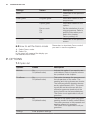
12.1 The washing and drying results are not satisfactory
Problem Possible solution
There are whitish streaks or
bluish layers on glasses and
dishes.
• The release quantity of rinse aid is too much. Adjust
the rinse aid selector to a lower position.
• The quantity of detergent is too much.
There are stains and dry wa-
ter drops on glasses and
dishes.
• The released quantity of rinse aid is not sufficient.
Adjust the rinse aid selector to a higher position.
• The quality of the rinse aid can be the cause.
The dishes are wet. • The programme does not have a drying phase or
has a drying phase with low temperature.
• The rinse aid dispenser is empty.
• The quality of the rinse aid can be the cause.
• The quality of the multi-tablets can be the cause. Try
a different brand or activate the rinse aid dispenser
and use rinse aid and multi-tablets together.
Refer to "Hints and tips" for
other possible causes.
13. TECHNICAL INFORMATION
Dimensions Width / height / depth
(mm)
546 / 759 / 570
Electrical connection
1)
Voltage (V) 220 - 240
Frequency (Hz) 50
Water supply pressure Min. / max. bar (MPa) 0.5 (0.05) / 8 (0.8)
www.electrolux.com18

Water supply
Cold water or hot water
2)
max 60 °C
Capacity Place settings 12
Power consumption Left-on mode (W) 0.99
Power consumption Off-mode (W) 0.10
1)
Refer to the rating plate for other values.
2)
f the hot water comes from alternative source of energy, (e.g. solar panels, aeolian energy),
use the hot water supply to decrease energy consumption.
14.
CH
GARANTIE, GARANZIA, GUARANTEE
Kundendienst, service-clientèle,
Servizio clienti, Customer Service
Centres
Servicestellen Points de Service Servizio dopo ven-
dita
Point of Service
5506 Mägenwil/
Zürich Industries-
trasse 10
3018 Bern Morgen-
strasse 131
1028 Préverenges
Le Trési 6
6928 Manno Via Vi-
olino 11
9000 St. Gallen
Zürcherstrasse 204e
4052 Basel St. Ja-
kob-Turm Birs-
strasse 320B
6020 Emmenbrücke
Seetalstrasse 11
7000 Chur Comer-
cialstrasse 19
Ersatzteilverkauf/Points de vente de
rechange/Vendita pezzi di ricambio/
spare parts service: 5506 Mägenwil,
Industriestrasse 10, Tel. 0848 848 111
Fachberatung/Verkauf/
Demonstration/Vente/Consulente
(cucina)/Vendita 8048 Zürich,
Badenerstrasse 587, Tel. 044 405 81 11
Garantie Für jedes Produkt gewähren wir
ab Verkauf bzw. Lieferdatum an den
Endverbraucher eine Garantie von 2
Jahren. (Ausweis durch Garantieschein,
Faktura oder Verkaufsbeleg). Die
Garantieleistung umfasst die Kosten für
Material, Arbeits- und Reisezeit. Die
Garantieleistung entfällt bei
Nichtbeachtung der Gebrauchsanweisung
und Betriebs-vorschriften,
unsachgerechter Installation, sowie bei
Beschädigung durch äussere Einflüsse,
höhere Gewalt, Eingriffe Dritter und
Verwendung von Nicht-Original Teilen.
Garantie Nous octroyons sur chaque
produit 2 ans de garantie à partir de la
date de livraison ou de la mise en service
au consommateur (documenté au moyen
d’une facture, d’un bon de garantie ou
d’un justificatif d’achat). Notre garantie
couvre les frais de mains d’œuvres et de
déplacement, ainsi que les pièces de
rechange. Les conditions de garantie ne
sont pas valables en cas d’intervention
ENGLISH
19

d’un tiers non autorisé, de l’emploi de
pièces de rechange non originales,
d’erreurs de maniement ou d’installation
dues à l’inobser-vation du mode d’emploi,
et pour des dommages causés par des
influences extérieures ou de force
majeure.
Garanzia Per ogni prodotto concediamo
una garanzia di 2 anni a partire dalla data
di consegna o dalla sua messa in
funzione. (fa stato la data della fattura, del
certificato di garanzia o dello scontrino
d’acquisto) Nella garanzia sono comprese
le spese di manodopera, di viaggio e del
materiale. Dalla copertura sono esclusi il
logoramento ed i danni causati da agenti
esterni, intervento di terzi, utilizzo di
ricambi non originali o dalla inosservanza
delle prescrizioni d’istallazione ed istruzioni
per l’uso.
Warranty For each product we provide a
two-year guarantee from the date of
purchase or delivery to the consumer (with
a guarantee certificate, invoice or sales
receipt serving as proof). The guarantee
covers the costs of materials, labour and
travel. The guarantee will lapse if the
operating instructions and conditions of
use are not adhered to, if the product is
incorrectly installed, or in the event of
damage caused by external influences,
force majeure, intervention by third parties
or the use of non-genuine components.
15. ENVIRONMENTAL CONCERNS
Recycle the materials with the symbol .
Put the packaging in applicable containers
to recycle it. Help protect the environment
and human health and to recycle waste of
electrical and electronic appliances. Do
not dispose appliances marked with the
symbol with the household waste.
Return the product to your local recycling
facility or contact your municipal office.
www.electrolux.com20
Seite wird geladen ...
Seite wird geladen ...
Seite wird geladen ...
Seite wird geladen ...
Seite wird geladen ...
Seite wird geladen ...
Seite wird geladen ...
Seite wird geladen ...
Seite wird geladen ...
Seite wird geladen ...
Seite wird geladen ...
Seite wird geladen ...
Seite wird geladen ...
Seite wird geladen ...
Seite wird geladen ...
Seite wird geladen ...
Seite wird geladen ...
Seite wird geladen ...
Seite wird geladen ...
Seite wird geladen ...
Seite wird geladen ...
Seite wird geladen ...
Seite wird geladen ...
Seite wird geladen ...
-
 1
1
-
 2
2
-
 3
3
-
 4
4
-
 5
5
-
 6
6
-
 7
7
-
 8
8
-
 9
9
-
 10
10
-
 11
11
-
 12
12
-
 13
13
-
 14
14
-
 15
15
-
 16
16
-
 17
17
-
 18
18
-
 19
19
-
 20
20
-
 21
21
-
 22
22
-
 23
23
-
 24
24
-
 25
25
-
 26
26
-
 27
27
-
 28
28
-
 29
29
-
 30
30
-
 31
31
-
 32
32
-
 33
33
-
 34
34
-
 35
35
-
 36
36
-
 37
37
-
 38
38
-
 39
39
-
 40
40
-
 41
41
-
 42
42
-
 43
43
-
 44
44


Electrolux GA55SLICN Benutzerhandbuch
- Kategorie
- Geschirrspüler
- Typ
- Benutzerhandbuch
in anderen Sprachen
- English: Electrolux GA55SLICN User manual
Verwandte Artikel
-
Electrolux GA955IFSIL Benutzerhandbuch
-
-
-
-
-
-
-
-