
COMMERCIAL SCRUBBER DRIER
Mod. BGUS1500 (15”) V. 120/60 W. 1,100
Mod. BGUS1500B (15”) V. 36DC W. 520
09/2022
Attention! Read the instruction manual
Attenzione! Leggere il manuale di istruzioni
Achtung! Lesen Sie die Bedienungsanleitung
Attention! Lisez le manuel d'instruction
¡Atención! Lea el manual de instrucciones
ORIGINAL INSTRUCTIONS MANUAL AND PARTS GUIDE.
“ SAVE THESE INSTRUCTIONS “
MANUALE ISTRUZIONI ORIGINALE E LISTA PARTI DI
RICAMBIO
“CONSERVARE QUESTE ISTRUZIONI”
ORIGINALE BEDIENUNGSANLEITUNG UND
ERSATZTEILE
„DIESE ANWEISUNGEN AUFBEWAHREN“
MANUEL D'INSTRUCTIONS ORIGINAL ET PIÈCES DE
RECHANGE
« CONSERVER CES INSTRUCTIONS »
ORIGINAL MANUAL DE INSTRUCCIONES Y LISTA DE
REPUESTOS
“GUARDE ESTAS INSTRUCCIONES”

WHEN USING AN
ELECTRICAL
APPLIANCE, BASIC
PRECAUTIONS
SHOULD ALWAYS BE
FOLLOWED,
INCLUDING THE
FOLLOWING
Read these operating
instructions carefully
1.Use the machine on hard
surfaces and only moistened by
the cleaning process.
2. Do not immerse.
3.Connect the machine to an
electricity supply at the voltage
shown on the rating label.
4.Always disconnect the plug
when the machine is not in use
and before doing any
maintenance or cleaning of the
machine.
5.The plug should not be
subjected to undue stress by
pulling on the power supply
cable.
6.Do not introduce anything into
the cooling slits and check
periodically the filters.
7. This appliance can be used by
children from 8 years of age and
people with reduced physical,
sensory or mental capacity or lack
of experience and knowledge only
if they have received supervision
or instructions concerning safe
use of the appliance and have
understood the risks involved.
Children should not play with the
appliance. Cleaning and
maintenance carried out by user
should not be done by children
without supervision.
QUANDO SI USANO
APPARECCHI ELETTRICI,
DEVONO ESSERE
SEGUITE NORMALI
PRECAUZIONI,
INCLUSE LE SEGUENTI
NORME DI SICUREZZA
Leggere attentamente il manuale
di Istruzioni
1. Utilizzare la macchina su
pavimenti duri e bagnati soltanto
per effetto della macchina stessa.
2. Non immergere la macchina.
Alimentare la macchina alla tensione
corrispondente a quella riportata
sulla targhetta caratteristiche.
3. Staccare sempre la spina dalla
presa di corrente quando l’ap-
parecchio non è in uso o prima di
eseguire regolazioni o
manutenzioni.
4. Non tirare mai il cavo di
alimentazione, o l’apparecchio
stesso, per staccare la spina dalla
presa di corrente.
5. Non introdurre oggetti nelle
feritoie di raffreddamento e
controllare periodicamente i
filtri.
7. Questo apparecchio può essere
utilizzato da bambini con età da 8
anni in su e da persone con ridotte
capacità fisiche, sensoriali o mentali
oppure con mancanza di esperienza
e conoscenza se hanno ricevuto
supervisione o istruzioni circa
l’utilizzo dell’apparecchio in modo
sicuro e hanno compreso i rischi
implicati. I bambini non devono
giocare con l’apparecchio. La
pulizia e la manutenzione effettuata
dall’ utilizzatore non devono essere
fatte dai bambini senza sorveglianza.
WENN MAN ELEKTRISCHE
GERÄTE BENÜTZT
SOLLTE MAN GEWISSE
VORSICHTSMASSNAHMEN
BEACHTEN,
EINSCHLIEßLICH
DER FOLGENDEN
Lesen Sie die ganze
Gebrauchsanweisung vor dem
Gebrauch durch
1.Die Maschine auf harte und nur von
der Maschine angefeuchten
Oberflächen benützen.
2.Maschine nicht eintauchen.
Die Maschine mit der auf dem
Leistungsschild angegebenen
Stromstärke anschliessen
3.Den Stecker immer aus der
Steckdose ziehen wenn das Gerät
nicht in Funktion ist sowie vor jeder
Wartungsarbeit .
4.Das Kabel stets am Stecker und
niemals am Kabel selbst aus der
Steckdose ziehen.
5.Es darf nichts in die Öffnungen
eingeführt werden; die Filter
periodisch kontrollieren
6.Dieses Gerät ist kein Spielzeug. Nie
unbeaufsichtigt lassen, wenn es in Betrieb
gesetzt wird
7.Dieses Gerät kann von Kindern ab
Jahren und Personen mit
eingeschränkten physischen,
sensorischen oder geistigen
Fähigkeiten oder mangelnder
Erfahrung und Wissen verwendet
werden, wenn sie Aufsicht oder
Anweisungen über eine sichere
Anwendung des Geräts erhalten
haben und die damit verbundenen
Risiken verstanden haben. Kinder
sollten nicht mit dem Gerät spielen.
QUAND ON UTILISE DES
APPAREILS
ELECTRIQUES ON
DOIT SUIVRE DES
RÈGLES
FONDAMENTALES
Y COMPRISES LES
SUIVANTES
CONSIGNES DE
SECURITE
Lire attentivement le manuel
d’instructions
1. Utiliser la machine sur sols
durs et mouillés par la machine-
même.
2. Ne la immerger la machine.
Alimenter la machine à la tension
indiquée dans la plaquette des
caractéristiques.
3. Débrancher toujours la fiche
de la prise de courant quand
l’appareil n’est pas utilisé ou
avant d’effectuer des réglages ou
des entretiens
4. Ne jamais tirer ni par le câble
d’alimentation ni par la machine
pour débrancher la fiche de la
prise de courant.
5. Ne pas introduire d’objets dans
les fentes de refroidissement et
contrôler périodiquement que les
filtres.
6. Ne jamais laisser l’appareil
sans surveillance et ne pas
permettre qu’il soit utilisé
comme un jouet.
7. Cet appareil peut être utilisé
par des enfants âgés de 8 ans et
plus, ainsi que des personnes
ayants des capacités réduites au
niveau physique, sensoriel ou
mental, ou un manque
d’expérience et de connaissances
CUANDO SE USAN
APARATOS ELÉCTRICOS
DEBEN TOMARSE
NORMALES
PRECAUCIONES
INCLUIDAS LAS
SIGUIENTES
INSTRUCCIONES DE
SEGURIDAD
Lea atentamente el manual
de instrucciones
1. Utilice la máquina sobre
pisos duros y mojado solo
por la máquina misma.
2. No sumergir la máquina.
Alimentar la máquina con la
tensión que está indicada en la
plaqueta de características.
3.Desconecte siempre el
enchufe cuando no use la
máquina y antes de hacer
alguna regulación o
manutención.
4.No tire nunca del cable de
alimentación o de la máquina
para desenchufarla.
5.No introduzca ningún objeto
en las ranuras de refrigeración y
controlar periódicamente los
filtros.
6.No descuide la máquina y no
permita que se use como un
juguete.
7.Este aparato podrá ser usado
por niños a partir de los 8 años
de edad y por personas con
capacidades físicas, sensoriales
o mentales disminuidas, o con
insuficiente experiencia y
conocimientos, siempre que
hubieran recibido supervisión o
instrucción respecto del uso del

8.Keep detergents out of
children’s reach
9.Always keep hands, hair,
feet and clothes away from
the moving brush
10.Do not vacuum over
electric cord, it can get
damaged and create electric
hazard.
11.If the electric cord is
damaged or the machine
appears to be faulty, do
not use it. Return it to a
Bissel authorized dealer
for service.
12.Do not suck matches, ash
or cigarettes that are still
burning
13.Do not suck inflammable
liquid materials.
14.Do not use nor suck
bleach, detergents for waste
water or pine products
15.Air the rooms when
using the machine with
detergents
16.Avoid vacuuming hard,
long or sharp objects in
order to avoid damage to the
suction nozzles and clogging
to the suction circuit.
17.Use the machine only for
what it is built for and as
described in the instructions
manual.
18.Use and keep this
machine in a dry
environment and at a
temperature between +5°C
+35°C (+41°F +95°F)
19.Do not expose to the sun
and UV rays
8. Custodire i detergenti fuori
dalla portata dei bambini.
9. Mantenere sempre mani,
piedi, capelli e indumenti
lontani dalla spazzola in
movimento.
10. Non passare l’apparecchio
sul cavo elettrico, per evitare
di danneggiarne l’isolamento.
11. Se il cavo elettrico viene
danneggiato o se la
macchina sembra difettosa,
non usatela. Ritornate la
macchina ad un centro
assistenza autorizzato Bissel
per le riparazioni del caso.
12. Non aspirare fiammiferi,
cenere e mozziconi di
sigarette accesi.
13. Non aspirare liquidi
infiammabili.
14. Non usare ne aspirare
candeggina, detergenti per
scarichi o a base di pino.
15. Quando si usa
l’apparecchio con l’aggiunta
di detergenti, aerare i locali.
16. Non aspirare oggetti duri ,
lunghi o taglienti per non
danneggiare le bocchette
aspiranti ed evitare ostruzioni.
17. Usare l’apparecchio solo
per l’uso previsto, descritto
nelle presenti istruzioni.
18. Usare e conservare
l'apparecchio all'interno di
ambienti asciutti e ad una
temperatura da +5°C +35°C
(+41°F +95°F).
19. Non esporre la macchina
ai raggi solari e UV.
Die Reinigung und Wartung durch
den Benützer sollte nicht von
Kindern ohne Aufsicht
erfolgen.
8.Die Waschmittel von Kindern
fernhalten
9.Hände, Füsse, Haare und Kleider
von der sich bewegenden Bürste
fernhalten
10.Gerät nie über das Kabel rollen
um Schäden an der Isolierung zu
verhindern
11.Falls das Netzkabel
beschädigt wird oder das Gerät
defekt erscheint, bitte nicht
mehr benützen. Gerät zur
Reparatur zum autorisierten
Bissel Service Center bringen
12.Keine Zündhölzer, Asche und
brennende Zigaretten aufsaugen
13.Keine brennbare Flüssigkeiten
aufsaugen
14.Keine Bleichlauge verwenden
oder aufsaugen und auch keine
Reinigungsmittel für Abflüsse oder
Kieferprodukte verwenden
15.Die Räume lüften wenn die
Maschine mit Waschmittel benützt
wird
16.Keine harte, lange oder
scharfkantige Gegenstände
aufsaugen damit die Saugdüsen
nicht beschädigt werden und der
Saugkreislauf nicht verstopft wird
17.Das Gerät darf nur für die dafür
vorgesehene Anwendung benützt
werden (siehe Arbeitsanleitung)
18.Gerät innen in trockene Räume
benützen und aufbewahren,
Temperatur zwischen +5°C
+35°C (+41°F 95°F)
19.Gerät nicht Sonnenstrahlen und
UV-Strahlen aussetzen
connaissances si ils ont été supervisés ou
instruits à propos de l’utilisation de
l’appareil de manière sûre et s’ils ont
compris les risques encourus. Les
enfants de devront pas jouer avec
l’appareil. Le nettoyage ou la
maintenance ne devra pas être
effectuée par des enfants, sauf si ces
derniers sont supervisés.
8.Garder les produits détergents hors de
la portée des enfants.
9.Garder toujours loin des brosses en
mouvement mains, pieds, cheveux et
vêtements
10.Ne pas passer l’appareil par dessus le
câble électrique, pour éviter d’abîmer
l’isolement.
11.Si le câble d’électricité est abîmé ou
si l’appareil semble défectueux, ne pas
l’utiliser. S’adresser à un centre
d’assistance autorisé Bissel pour les
réparations.
12.Ne pas aspirer d’allumettes, de cendre
et de mégots allumés.
13.Ne pas aspirer de liquides
inflammables.
14.Ne pas utiliser ni aspire d’eau de
javel, de détergents pour vidanges ou à
base de pin.
15.Quand l’appareil est utilisé en ajoutant
des détergents, il faut aérer les locaux.
16.Ne pas aspirer d’objets durs, longs ou
tranchants pour ne pas abîmer les suceurs
aspirants et éviter toute obstruction.
17.Utiliser l’appareil seulement à des fins
indiquées dans ce manuel.
18. Utiliser et garder l’appareil dans un
endroit sec et à une température de
+5°C +35°C (+41°F +95°F)
19. Ne pas exposer l’appareil aux rayons
solaires et UV
aparato de manera segura y entendido
los peligros involucrados. No se debe
permitir que los niños jueguen con el
aparato. La limpieza y mantenimiento
del aparato realizados por el usuario
no deberán ser realizados por niños a
menos que lo hagan bajo supervisión.
8.Poner todos los productos
detergentes lejos del alcance de los
niños.
9.Mantener siempre las manos, pies,
pelo y ropa lejos de los cepillos en
movimiento.
10.No pasar sobre el cable eléctrico,
para evitar estropear el aislamiento.
11.Si el cable eléctrico está
estropeado o si la maquina parece
defectuosa, no la use. Dirigirse a un
centro de asistencia autorizado
Bissel para hacer las reparaciones.
12.No aspire cerillas, ceniza o
cigarrillos que estén encendidos.
13.No aspire líquidos inflamables.
14.No utilizar lavandina ni tampoco
detergente para bajante o a base de
pino.
15.Cuando se utiliza el aparato con la
añadidura de detergentes, hay que
airear los cuartos.
16.No aspire objetos duros, largos o
afilados para no estropear las
boquillas aspiradoras y evitar
obstrucciones.
17.Use la máquina para lo que se le
indica y como se le describe en las
instrucciones.
18.Utilizar y reponer la máquina en un
lugar interior y seco y a una
temperatura de +5°C +35°C (+41°F
+95°F)
19.No exponga el aparato a los rayos
solares y UV
3

Warning!
1.Battery type allowed
Use only original Bissel
Commercial lithium-ion
batteries. Only these batteries
provide long life.
Battery user safety measures
for usage of Li-ion batteries.
2. Recharge
Use lithium-ion batteries
recommended by the producer.
The use of different batteries
may result in injuries and fire.
3. Observe special regulations
concerning transport, storage
and use of lithium-ion batteries.
Store in a dry room with
temperature between 10°C and
30°C (50°F – 95°F)
4. Also follow the battery use
instructions.
Please read the manufacturer’s
battery safety data sheet.
5. The power supply
terminals do not have to be
short-circuited.
6. Do not expose the lithium-
ion batteries to high
temperatures or fire.
There is a risk of explosion.
7. It is forbidden to break,
crush or set fire to the lithium-
ion batteries.
Otherwise there is a danger of
fire, explosion and corrosion.
Attenzione!
1.Batterie consentite
Per il funzionamento della
macchina sono necessarie batterie
agli ioni di litio originali Bissel
Commercial. Solo tali batterie
garantiscono una lunga durata.
Misure di sicurezza nell'uso delle
batterie agli Ioni di Litio.
2. Ricarica
Utilizzare batterie agli ioni di litio
consigliate dal produttore.
L'impiego di batterie diverse può
portare a lesioni e a pericolo di
incendi.
3. Rispettare le direttive speciali
in materia di trasporto,
conservazione e utilizzo di batterie
agli ioni di litio.
Stoccare in ambiente asciutto e ad
una temperatura compresa tra 10°C
e 30°C
4. Osservare anche le istruzioni
d'uso della batteria.
Osservare anche la scheda tecnica
di sicurezza del produttore della
batteria.
5. I terminali di alimentazione
non devono essere in corto
circuito.
6. Non esporre le batterie agli
ioni di litio ad alte temperature o al
fuoco.
Sussiste il rischio di esplosione.
7. È vietato scomporre,
schiacciare o dare fuoco alle
batterie agli ioni di litio. In caso
contrario sussiste il pericolo di
incendio, esplosione e corrosione.
Achtung!
1. Zugelassene Batterien
Für den Betrieb der Maschine
braucht es originale Bissel
Commercial Lithium-Ionen
Batterien. Nur solche Batterien
garantieren eine lange Lebensdauer.
Sicherheitsmaßnahmen bei der
Anwendung von Lithium-Ionen
Batterien
2. Aufladung
Nur vom Hersteller empfohlene
Lithium-Ionen Batterien verwenden.
Die Anwendung anderer Batterien
kann zu Verletzungen und
Brandgefahr führen.
3. Beachten Sie die Vorschriften für
Transport, Aufbewahrung und
Anwendung von Lithium-Ionen
Batterien. In einem trockenem Raum
bei einer Temperatur zwischen 10°C
und 30°C aufbewahren.
4. Beachten Sie auch die
Gebrauchsanweisung der Batterie.
Beachten Sie auch das Sicherheits-
Datenblatt des Batterieherstellers.
5. Die
Stromversorgungsanschlüsse
dürfen nicht kurzgeschlossen sein.
6. Die Lithium-Ionen Batterien
nicht hohen Temperaturen oder
Feuer aussetzen. Es besteht
Explosionsgefahr.
7. Es ist verboten Lithium-Ionen
Batterien zu zersetzen, zu
zerdrücken oder anzuzünden.
Andernfalls besteht Brand-,
Explosions- und Korrosionsgefahr.
Attention!
1.Batteries admises
Pour le fonctionnement de la
machine, des batteries Lithium-ion
originales Bissel Commercial sont
nécessaires. Seul ces batteries
garantissent une longue durée.
Mesures de sécurité dans l'usage
des batteries au Lithium-ion.
2. Recharge
Utilisez des batteries Lithium-ion
recommandées par le fabricant.
L'utilisation de batteries différentes
peut entraîner des blessures et des
risques d'incendie.
3. Respecter les directives spéciales
en matière de transport, stockage et
utilisation de batteries Lithium-ion.
Garder dans un endroit sec et à une
température entre 10 ° C et 30°C
4. Observer aussi les instructions
d'utilisation de la batterie.
Observer aussi la fiche technique de
sécurité du fabricant de la batterie.
5. Les bornes d'alimentation ne
doivent pas être en court-circuit.
6. Il est défendu d’exposer la
batterie Lithium-ion à des
températures élevées ou au feu. En
cas contraire il existe le risque
d’incendie, d'explosion et corrosion.
7. Il est interdit de démonter,
écraser ou incendier la batterie
Lithium-ion. En cas contraire il y
existe un risque d'incendie,
d'explosion et de corrosion.
¡Atención!
1.Baterías admitidas
Para el funcionamiento de la
máquina son necesarias baterías de
iones de Litio originales Bissel
Commercial. Sólo estas baterías
garantizan una larga duración.
Medidas de seguridad en el uso
de baterías de litio.
2. Recarga
Utilizar baterías de iones de Litio
recomendadas por el fabricante. El
uso de baterías diferentes podría
conducir a lesiones y peligros de
incendio.
3. Respectan las disposiciones
especiales relativas al transporte,
almacenamiento y uso de baterías
de iones de litio. Conservar en un
lugar seco y una temperatura entre
10 ° C y 30°C
4. Obervan también las
instrucciones de uso de la batería.
Observan también la ficha técnica
de seguridad del fabricante de la
batería.
5. Los terminales de alimentación
no deben estar en cortocircuito.
6. Está prohibido exponer las
baterías de iones de Litio a altas
temperaturas o fuego. En caso
contrario existe un riesgo de
incendio, explosión o corrosión.
7.Está prohibido romper, aplastar
o dar fuego a la batería de iones de
Litio. De lo contrario existe el
peligro de incendio, explosión y
corrosión.
4

8. It is forbidden to recharge
or reuse damaged Lithium-ion
batteries (eg.
batteries with cracks, broken or
detached parts, bent or pushed
inwards
and / or outside contacts).
9. Do not use lithium-ion
batteries as power source of
other unspecified uses.
10. If a lithium-ion battery is
extremely warm, it could be
faulty.
Remove the battery from the
machine and put it in a not
flammable place sufficiently
ventilated and away from
flammable materials, where it
can be kept
under control while it cools.
When the lithium-ion battery
has
cooled, contact the Bissel
Commercial service center.
11. Keep the batteries clean
and dry.
Recharge the lithium-ion
battery only with the original
Bissel Commercial charger.
In case of improper use there is
a danger of fire.
13. Before placing the
Lithium-ion battery, make sure
the contacts of the battery and
the contacts with the machine
are free from foreign bodies.
14. In the event the machine
is not used for a long time, the
batteries must be submitted to a
complete cycle charge before
storing.
8. È vietato ricaricare o riutilizzare
batterieagli ioni di litio
danneggiate (ad es.batterie con
crepe, componen-
ti rotti o staccati, contatti piegati o
spinti in dentro e/o in fuori).
9. Non utilizzare le batterie agli
ioni di litio come fonte di
alimentazione di altre utenze non
specificate.
10. Se una batteria agli ioni di
litio è ecessivamente calda al
tocco, potrebbe essere difettosa.
Togliere la batteria dalla macchina
e riporla in un luogo non
infiammabile suf-
ficientemente areato e lontano da
materiali infiammabili, dove possa
essere tenuta sotto controllo
mentre si raffredda. Dopo che la
batteria agli ioni di litio si è
raffreddata, rivolgersi al centro
assistenza Bissel Commercial
11.Tenere le batterie pulite e
asciutte.
12.Ricaricare le batterie agli ioni
di litio esclusivamente con il
caricabatterie originale Bissel
Commercial.
In caso di utilizzo improprio
sussiste il pericolo di incendio.
13.Prima di posizionare la
batteria agli ioni di litio, assicurarsi
che i contatti della batteria e i
contatti con la macchina siano
liberi da corpi estranei.
14.Prima di un lungo arresto
della macchina, le batterie devono
essere sottoposte a un ciclo di
ricarica completo.
8. Es ist verboten beschädigte
Lithium-Ionen Batterien wieder
aufzuladen oder wiederzuverwenden
(z.B. Batterien mit Rissen, defekte
oder freistehende Teile, gebogene
oder nach innen oder nach außen
gedrückte Kontakte)
9. Lithium-Ionen Batterien nicht
als Stromquelle für andere Geräte
verwenden.
10. Falls sich eine Lithium-Ionen
Batterie extrem warm anfühlt,
könnte sie defekt sein. Die Batterie
aus der Maschine herausnehmen und
in einem nicht entzündbaren, fern
von brennbaren Materialien und
genügend gelüfteten Raum lagern,
wo sie während der Abkühlung
unter Kontrolle gehalten werden
kann. Nachdem sich die Lithium-
Ionen Batterie abgekühlt hat,
wenden Sie sich an ein Bissel
Commercial Reparatur-Zentrum.
11. Die Batterien sauber und
trocken lagern.
12. Die Lithium-Ionen Batterien
nur mit dem originalen Bissel
Commercial Ladegerät aufladen. Bei
unsachgemäßem Gebrauch besteht
Brandgefahr.
13. Bevor die Lithium-Ionen
Batterie eingesetzt wird
sicherstellen, dass die Kontakte der
Batterie und die Kontakte mit der
Maschine frei von Fremdkörper
sind.
14. Vor einem langen
Maschinenstop müssen die
Batterien einem kompletten
Ladezyklus unterzogen werden.
8. Il est interdit de recharger ou
réutiliser des batteries Lithium-ion
endommagé (par ex. batterie avec
des fissures, parties cassées ou
parties détachées, contacts pliées ou
sortis vers l'extérieur).
9. Ne pas utiliser de batterie
Lithium-ion comme source
d'alimentation pour d'autres
utilisations non spécifiques.
10. Si une batterie Lithium-ion est
excessivement chaude au toucher,
elle pourrait être défectueuse.
Retirez la batterie de la machine et
la stocker dans un endroit non
inflammable , suffisamment aéré et
loin de matériaux inflammables, où
elle puisse être gardée sous contrôle
pendant qu’elle se refroidit. Après
que la batterie Lithium-ion s’est
refroidie, contactez le centre de
service Bissel Commercial
11.Garder les batteries propres et
sèches.
12.Recharger les batteries
Lithium-ion uniquement avec le
chargeur d'origine Bissel
Commercial.
En cas de mauvaise utilisation, il y a
un danger d'incendie.
13.Avant d’installer la batterie
Lithium-ion assurez-vous que les
contacts de la batterie et les contacts
avec la machine soient exempts de
corps étrangers.
14. Avant un long arrêt de la
machine, les batteries doivent être
soumises à un cycle de recharge
complet.
8. Está prohibido recargar o
volver a usar baterías de iones de
Litio dañadas (por ej. baterias con
grietas, componentes rotos o
sueltos, doblados o hundidos hacia
el exterior).
9. No utilice las baterías de iones
de Litio como fuente de energía
para otros usos no especificados.
10. Si una batería de iones de
Litio está excesivamente caliente
al tacto, puede ser defectuosa.
Retire la batería de la máquina y
guardarla en un lugar no
inflamable suficientemente
ventilado y lejos de materiales
inflamables, donde se puede
mantener bajo control mientras se
enfría. Después de que la batería
de ione de Litio se haya enfriado,
póngase en contacto con el centro
de servicio Bissel Commercial.
11.Mantengan las baterías limpias
y secas.
12. Recargan sólo las baterías de
litio con el cargador original Bissel
Commercial. En caso de un uso
inadecuado, existe el peligro de
incendio.
13.Antes de colocar la batería de
iones de Litio, asegúrese de que
los contactos de la batería y los
contactos con la máquina están
libres de objetos extraños.
14. Antes de una larga parada de
la máquina, las baterías deben
someterse a un ciclo de recarga
completo.
5

TABLE OF CONTENTS
Important safety instructions 2-3
Li-ion battery instruction 4-5
Grounding + Thermal protection 7
Know your machine 8
Assembly instructions 9-10
Operating instructions 11
Brush pressure adjustment 12
Spray / extraction kit 13
Charger instruction 14
Maintenance 15-16
Brush replacemenrt 17
Wiring diagrams 18
Tecnical specifications 19
Parts list 20-21-22-23
Warranty 24
RECORD THE MODEL AND SERIAL
NUMBER OF YOUR MACHINE AND
KEEP FOR FUTURE REFERENCE.
MODEL NUMBER______________
SERIAL NUMBER______________
INDICE
Norme di sicurezza 2-3
L-ion instruzioni 4-5
Conoscere la vostra macchina 8
Messa in funzione 9-10
Istruzioni per il funzionamento 11
Regolazione della pressione del rullo 12
Kit lava tappezzerie 13
Istruzioni carica batterie 14
Manutenzione 15-16
Sostituzione rullo 17
Schemi elettrici 18
Dati tecnici 19
Lista ricambi 20-21-22-23
Garanzia 24
REGISTRATE IL MODELLO E IL
NUMERO DI SERIE DELLA VS
MACCHINA E CUSTODITE PER
FUTURE REFERENZE.
MODELLO_____________________
NUMERO DI SERIE_____________
INHALTSVERZEICHNIS
Zur besonderen Beachtung 2-3
Anleitungen L-ion 4-5
Ihre Maschine kennenlernen 8
Die Maschine in Betrieb setzen 9-10
Bedienung der Maschine 11
Einstellung des Bürstendrucks 12
Waschkit für Stoffbezüge 13
Anweisungen Ladegerät 14
Wartung 15-16
Auswechslung der Bürstenrolle 17
Elektrischer Kreislauf 18
Technische Daten 19
Liste der Ersatzteile 20-21-22-23
Garantie 24
SCHREIBEN SIE SICH HIER DIE
SERIENNUMMER UND DEN
MODELLTYP AUF.
MODELLTYP_____________________
SERIENNUMMER_________________
TABLE DES MATIERES
Consignes des sécurité 2-3
Instructions mise a terre + L-ion 4-5
Pour connaître votre machine 8
Montage 9-10
Mise en service de la machine 11
Réglage de la pression du rouleau 12
Kit lavage tapisseries 13
Instructions chargeur de Batterie 14
Entretien 15-16
Remplacement du rouleau 17
Schémas electriques 18
Caractéristiques techniques 19
Liste des pièces 20-21-22-23
Garantie 24
MARQUER CI-DESSOUS LE MODÈLE ET
LE NUMÉRO DE SÉRIE ET LE GARDER
COMME RÉFÉRENCE.
MODÈLE_________________________
NUMÉRO DE SERIE________________
INDICE
Instrucciones de seguridad 2-3
Instrucciones para toma de tierra + L-ion 4-5
Conozca su máquina 8
Instrucciones para el montaje 9-10
Instrucciones de funcionamiento 11
Regulación de la pression del rodillo 12
Kit limpieza tapicerias
Instrucciones cargador de Batería 14
Mantenimiento 15-16
Sustitucion del rodillo 17
Esquemas eléctricos 18
Características técnicas 19
Lista de piezas de recambios 20-21-22-23
Garantía 24
RECUERDE EL MODELO Y EL N° DE
SERIE DE SU MÁQUINA, GUÁRDELO
COMO REFERENCIA PARA EL
FUTURO.
MODELO________________________
NÚMERO DE
SERIE___________________________
- MANUFACTURER
- COSTRUTTORE
- HERSTELLER
- CONSTRUCTEUR
- CONSTRUCTOR
SRL
Via Belgio,22 - Zona Ind.
35127 PADOVA – ITALY
The machine is distributed in
U.S.A. by:
Website
www.bissellcommercial.com
Or Call:
BISSELL Commercial
1-
800
-242-1
3
7
8
- CONGRATULATIONS: We wish to congratulate you on having purchased Bissel serie, certainly one of the best and technologically
advanced dual motor scrubber drier. We thank you for your choice and enjoy your new Bissel!
- CONGRATULAZIONI: Ci complimentiamo con voi per aver scelto Bissel, sicuramente una delle migliori e tecnologicamente più avanzate
lava pavimenti a due motori. RingraziandoVi per la preferenza accordataci, Vi auguriamo un piacevolissimo utilizzo della Vs. nuova Bissel!
- GLÜCKWUNSCH: Wir gratulieren Ihnen für Ihre Wahl, sicher ist Ihr Bissel einer der besten und fortschrittlichsten zweimotorigen
Schrubbautomaten. Wir danken Ihnen für Ihre Vorliebe und wünschen Ihnen eine angenehme Anwendung Ihrers neuen Bissel.
- FELICITATIONS: Nos meilleurs compliments pour avoir choisi Bissel, un des meilleurs aspiro-batteurs à deux moteurs fabriqué selon les
technologies les plus avancées. Nous vous remercions pour la préférence et vous souhaitons une agréable utilisation de la nouvelle Bissel!
- CONGRATULACIONES: Nos felicitamos con Ustedes por haber escogido Bissel, una de las mejores aspiradoras batidora de dos motores
tecnológicamente más avanzada. Les agradecemos por su preferencia y les deseamos un agradable uso de esta nueva Bissel!

FOR U.S.A. and CANADA COMMERCIAL MARKET ONLY
Connect to a properly grounded outlet only. See grounding instructions.
GROUNDING INSTRUCTIONS IN COMMERCIAL SITUATIONS
WARNING
This appliance must be grounded. If it should malfunction or breakdown, grounding
provides a path of last resistance for electric current to reduce the risk of electric shock.
This appliance is equipped with a cord having an equipment-grounding conductor and
grounding plug. The plug must be inserted into an appropriate outlet that is properly
installed and grounded in accordance with all local codes and ordinances.
WARNING – Improper connection of the equipment grounding conductor can result in a
risk of electric shock. Check with a qualified electrician or service person if you are in
doubt as to whether the outlet is properly grounded. Do not modify the plug provided
with the appliance – if it will not fit the outlet, have a proper outlet installed by a
qualified electrician.
This appliance is for use on nominal 120-V circuit,
and has a grounded plug that looks like the plug
illustrated in sketch A.
Make sure that the appliance is connected to an
outlet having the same configuration as the plug.
No adaptor should be used with this appliance.
(A)
(B C)
A temporary adapter that looks like the adapter
illustrated in sketch B C maybe used to connect
this plug to a 2 pole receptacle as shown in
sketch B if a properly grounded outlet is not
available. The temporary adaptor should be used
only until a properly grounded outlet is not
available. The green colored rigid ear, lug, or the
like extending from the adaptor must be
connected to a permanent ground such as a
properly grounded outlet box cover. Whenever
the adaptor is used., it must be held in place by a
metal screw.
Replace the plug if the grounding pin is damaged or broken.
The green or (green/yellow) wire in the cord is the grounding wire.
When replacing a plug, this wire must be attached to the grounding pin only.
Extension cords connected to this machine should be 12 gauge, three-wire
cords with three-prong plugs and outlets. Do not use extension cord more than 50 feet (15 m.)
long.
IMPORTANT
Thermal vacuum motor protector.
The vacuum motor is equipped with a safety thermal protector. Should the vacuum become overloaded
by vacuuming with the tank full, or vacuuming with clogged nozzles, the thermal protector will protect
the motor from overheating by shutting the motor down automatically. In this case, switch off the
vacuum, disconnect the plug and check for signs of clogging (see page 9). After the problem is
corrected you may resume vacuuming after the thermal protector resets itself (approximately 30-40
minutes).
IMPORTANTE
Protettore termo/amperometrico del motore aspirante
Il motore aspirante è provvisto di un termico di sicurezza. In caso di: sovraccarico lavorando con serbatoio
pieno, lavorare con bocchette ostruite, il protettore termico può intervenire per proteggere il motore da
eccessivo surriscaldamento. Spegnere la macchina, staccare la spina e controllare la macchina ed eventuali
ostruzioni (pag. 9). Dopo 30-40 min. circa si può riaccendere la macchina.
WICHTIG
Thermo/Amperemeterschutz des Saugmotors
Der Saugmotor ist mit einem Sicherheitstemperaturbegrenzer ausgestattet. Bei : Überlastung, (Saugen von
Teppichen mit hohem Floor mit der niedrigsten Einstellung), Saugen mit vollen Beutel, mit sehr
schmutzigem Mikrofilter oder Hepa Filter, greift der Schutz ein um eine Überheizung des Motors zu
vermeiden. Schalten Sie die Maschine ab, ziehen Sie den Netzstecker aus der Steckerdose und
kontrollieren Sie den Papierbeutel, den Mikrofilter/Hepa Filter und eventuelle Verstopfungen (auf Seite 9).
Nach 30-40 Min. können Sie die Maschine wieder benutzen.
IMPORTANT
Protecteur thermo/ampèremétric pour le moteur aspirant.
Le moteur aspirant est pourvu d’un système thermique de sécurité. En cas de: surcharge (aspirer tapis à poil
haut avec une régulation minimum), aspirer avec sac plein, aspirer avec microfiltre ou Hepa filtre très sales,
le thermo-protecteur intervient pour proteger le moteur d’une excessif surchauffage. Débrancher la
machine et détacher la fiche de la prise de courant et controller: le sac à poussière, le microfiltre/le filtre
Hepa et eventuelles obstructions (page 9).Après 30-40 min. on peut réutiliser la machine.
IMPORTANTE
Protector termo/amperométrico del motor aspirador
El motor aspirador tiene un protector térmico de seguridad. En caso de sobrecargo (aspirar alfombras de
pelo alto con regulación toda baja), trabajar con bolsa llena, trabajar con microfiltro /Hepa filtro
excesivamente sucios, el protector térmico puede intervenir para proteger el motor de excesivo
sobrecalentamiento.
Apagar la máquina, desenchufar y controlar: la bolsa, el microfiltro/ Hepa filtro y eventuales obstrucciones
(pág.9).Después de 30-40 min. se puede volver a encender la máquina.
Technical improvements
Bissel reserves the right to make technical improvements and modifications without prior notice. For this
reason, the appliance can deviate in details from the leaflet information.
Migliorie tecniche
Bissel si riserva il diritto di apportare delle migliorie tecniche e delle modifiche senza preavviso. In tal caso
alcuni dettagli potranno non risultare conformi alle informazioni riportate sulla documentazione tecnica.
Technische Verbesserungen
Bissel behält sich technische Verbesserungen im Rahmen der Modellpflege vor.
Daher kann das Gerät in Details von Prospektangaben abweichen.
Perfectionnements techniques
Bissel se réserve le droit de procéder à des perfectionnements techniques dans le cadre de la gestion de ses
modèles. Certain détails de la machine peuvent ainsi différer des donnés indiquées dans les prospectus
Mejoras técnicas
Bissel reserva el derecho a hacer cualquier modificatión y arreglo técnico sin previo aviso. Por esta razón,
los detalles acerca de la maquina podrían resultar diferentes de las informaciones indicadas en el manual de
información.
7

KNOW YOUR MACHINE
Handle grip
Water pump / electrovalve
switch
Vacuum motor switch
Main switch
Dosing cap
Tank release button
Brush pressure adj. knob
Electronic control lens
Top cover slide latches
Side wheels
Front bumper
Squeegee nozzles
Side brush support
Upper cord hook
Cord strain relief
Hose connector
Carrying handle
Lower cord hook
Non marking rubber wheels
Two position foot pedal:
pos. 1 quick parking
pos. 2 parking with front base
lifting
CONOSCI LA TUA
MACCHINA
Impugnatura
Interruttore pompa dosatrice /
elettrovalvola
Interruttore aspirazione
Interruttore generale
Tappo dosatore
Gancio serbatoio
Manopola reg. pressione rullo
Spie controllo elettronico
Ganci a slitta coperchio sup.
Ruote laterali
Paracolpi frontale
Bocchette con squeegee
Supporto rullo laterale
Gancio avvolgicavo superiore
Gancio passacavo
Connettore tubo
Impugnatura di trasporto
Gancio avvolgicavo inferiore
Ruote gommate
Pedalino a due posizioni:
pos. 1 sosta
pos. 2 parcheggio con
sollevamento della base
LERNEN SIE IHRE MASCHINE
KENNEN
Handgriff
Wasserpumpenschalter /
Elektroventil
Saugschalter
Hauptschalter
Dosierungsdeckel
Tankentriegelungshaken
Bürstendruck-Regulierungsknopf
Elektronik-Kontrollleuchten
Gleithaken für oberen Deckel
Seitliche Räder
Frontaler Stossfänger
Düsen mit Squeegee
Seitliche Bürstenhalterung
Oberer Aufwicklungshaken
Kabelhaken
Schlauchanschluss
Transport-Handgriff
Unterer Aufwicklungshaken
Gummierte Räder
Fusspedal mit zwei Positionen :
Pos. 1 kurze Pause
Pos. 2 parken mit Aufhebung des
Fusses
POUR CONNAITRE VOTRE
MACHINE
Poignée
Interrupteur pompe doseuse /
électro-valve
Interrupteur aspiration
Interrupteur général
Bouchon doseur
Croché réservoir
Bouton réglage pression rouleau
Voyant contrôle électronique
Crochets glissant couvercle sup.
Roues latérales
Pare-chocs frontaux
Suceurs avec squeegee
Support rouleau latéral
Crochet enrouleur câble
supérieur
Crochet passe-câble
Connecteur tube
Poignée de transport
Crochet enrouleur câble
inférieur
Roues caoutchoutées
Pédale à deux positions
pos. 1 arrêt
pos. 2 stationnement avec
soulèvement de la base
CONOZCA SU MÁQUINA
Empuñadura
Interruptor bomba dosador /
electrovàlvula
Interruptor aspiración
Interruptor general
Tapón dosador
Gancho depósito
Indicador regulación presión
rodillo
Indicador control electrónico
Gancho corredero tapa sup.
Ruedas laterales
Antigolpes frontales
Boquillas con squeegee
Soporte rodillo lateral
Ganchos enrollador cable
superior
Gancho pasacable
Conector tubo
Empuñadura de transporte
Gancho enrollador cable
inferior
Ruedas de goma
Pedal de dos posiciones
pos. 1 parado
pos. 2 aparcamiento con
levantamiento de la base
8

ASSEMBLY INSTRUCTIONS
Insert the femal connector located
inside the handle/electric panel, on
the male connector located on top
of the vertical body until the two
side safety hooks snap in.
Insert the handle/electric panel on
top of the vertical body making
sure you don’t punch the water
tubes and electric cords.
Screw the 4 attached screws:
2 on front
and 2 screws on the back.
ISTRUZIONI PER LA MESSA IN
FUNZIONE
Inserire il connettore femmina, posto
all’interno dell’impugnatura /
impianto elettrico, nel connettore
maschio, posto sopra il corpo
verticale fino a far scattare i due ganci
laterali di sicurezza.
Alloggiare l’impugnatura / impianto
elettrico nella propria sede sopra il
corpo verticale facendo attenzione a
non pizzicare i tubi dell’acqua ed i
cavi elettrici.
Fissare le 4 viti allegate:
2 frontali
e 2 posteriori.
MONTAGE
Den weiblichen Verbinder, der sich
innerhalb des Handgriffs/elektrische
Anlage befindet, in den männlichen
Verbinder oberhalb des senkrechten
Körpers einsetzen bis die zwei
seitlichen Sicherheitshaken
einschnappen. .
Den Handgriff / elektrische Anlage
oberhalb des senkrechten Körpers
einfügen. Darauf achten, dass die
Wasserrohre und elektrische Kabel
nicht gekniffen werden.
Die 4 beiliegenden Schrauben:
2 vorne
und 2 hinten einschrauben.
MONTAGE
Introduire le connecteur femelle
placé à l’intérieur de la poignée /
installation électrique, dans le
connecteur mâle situé sur le corps
vertical jusqu’à ce que les deux
crochets latéraux de sûreté
s’encastrent. Attention : le
connecteur a seulement un côté pour
l’introduire.
Placer la poignée/installation
électrique dans son propre logement
sur le corps vertical en faisant
attention à ne pas pincer les tubes de
l’eau et les fils électriques.
Fixer les 4 vis incluses :
2 frontales
et les 2 postérieures
INSTRUCCIONES PARA EL
MONTAJE
Introduzca el conector hembra puesto
en el interior de la empuñadura /
instalación eléctrica dentro del
conector macho que está encima del
cuerpo vertical, hasta que se encajen
los dos ganchos de seguridad.
Atención: el conector sòlo tiene un
lado de inserción.
Poner la empuñadura/instalación
eléctrica dentro de su lugar encima
del cuerpo vertical teniendo cuidado
de no pellizcar los tubos del agua y
los cables eléctricos.
Fijar los cuatro tornillos incluidos:
2 frontales
y 2 posteriores
9

Insert the aesthetic rubber cups on
top of the 4 screws.
Hook the cord in the upper anti
stress hook located below the
swivel upper cord hook
After use, always disconnect the
plug and wind the cord between
the upper and lower cord hook
located on the back of the
machine.
After use, always empty the clean
and dirty water tanks and carefully
wash them as explained later.
INSTRUCTIONS FOR USE
A. Fill the tank with
drinkable water at ambient
temperature until the
indicated level (2,6 lt.)
Montare gli appositi cappucci estetici
sopra le 4 viti.
Agganciare il cavo all’apposito gancio
para strappi superiore.
Dopo l’uso, staccare sempre la spina
dalla presa di corrente ed avvolgere il
cavo tra i ganci avvolgicavo superiore
e inferiore situati nel retro della
macchina.
Dopo l’uso, svuotare sempre il
serbatio di acqua pulita e sporca e
lavarlo accuratamente come spiegato
più avanti.
ISTRUZIONI PER IL
FUNZIONAMENTO
A. Riempire il serbatoio con
acqua potabile a temperatura
ambiente fino al livello
indicato (2,6 lt).
Die ästhetischen Kappen auf den 4
Schrauben montieren.
Das Kabel in den oberen Anti-Ruck
Haken befestigen.
Nach dem Gebrauch immer den
Stecker ausziehen und das Kabel
zwischen dem oberen und unteren
Kabelhaken, die sich hinter der
Maschine befinden, aufwickeln.
Nach dem Gebrauch immer den
Reinwasser/Schmutzwasser Tank
leeren und sorgfältig auswaschen wie
auf den nächsten Seiten beschrieben.
ANWEISUNGEN FÜR DIE
ARBEITSWEISE
A. Den Tank mit
Raumtemperatur Trinkwasser
bis zur angezeigten Stufe
auffüllen (2,6 lt.).
Monter les bouchons esthétiques sur
les 4 vis.
Enrouler le câble à son crochet
anti-détachable supérieur.
Après l’usage, débrancher toujours la
fiche de la prise de courant et
enrouler le câble aux crochets
supérieur et inférieur situé derrière la
machine.
Après l’usage vider toujours le
réservoir d’eau propre et sale et le
laver attentivement comme il est
expliqué dans les pages suivantes.
INSTRUCTIONS POUR LE
FONCTIONNEMENT
A. Remplir le réservoir d’eau
potable à température
ambience jusqu’au niveau
indiqué (2,6 l.).
Montar los capuchones adecuados
sobre los cuatros tornillos.
Enganchar el cable al gancho
adecuado gancho amortiguador
superior
Después del uso, siempre desenchufe
la ficha de la toma de corriente y
enrolle el cable entre los ganchos
adecuados superior y inferior puestos
detrás de la maquina.
Después del uso siempre vacíe el
deposito de agua limpia y sucia y
límpielo cuidadosamente como
explicado más adelante.
INSTRUCCIONES PARA EL
FUNCIONAMIENTO
A. Llenar el deposito de agua
potable a temperatura
ambiente hasta el nivel
indicado (2,6lt.).
10

B. Fill the dosing cap until the
indicated level (26ml = 1%) with
the Bissel Commercial detergent
suitable to the floor to be washed.
Pour the content of the cap into the
clean water tank and close the tank
with the same cap.
C. Remount the tank into the
machine positioning it in the lower
guide and rotating it until the upper
blocking hook snaps in.
BISSEL COMMERCIAL
DETERGENTS FOR HARD
FLOORS
All products are concentrated
and need to be watered down
1/100
Check the Bissel Commercial
cleaners available FOAM FREE
suitable for this machine
ATTENTION:
if you don’t have the Bissel
Commercial detergents available,
wash the floors with water only.
Put the machine in working
position, insert the
water tank making sure the hook is
all the way UP
B. riempire il tappo dosatore fino al
livello indicato (26ml. 1%) con il
prodotto Bissel Commercial adatto al
pavimento da lavare. Versare il
contenuto del tappo nel serbatoio di
acqua pulita e chiudere il serbatoio
con il tappo stesso.
C. Rimontare il serbatoio nella
macchina posizionandolo
nell’apposito nottolino inferiore e
facendolo ruotare fino a far scattare il
gancio di arresto superiore.
PRODOTTI DETERGENTI
BISSEL COMMERCIAL PER
PAVIMENTI DURI
Tutti prodotti concentrati da diluire
al 1/100
Controlla i detergenti Bissel
Commercial disponibili SENZA
SCHIUMA adatti a questa
macchina
ATTENZIONE:
Se non avete i detergenti Bissel
Commercial a disposizione, lavate i
pavimenti con solo acqua.
Inclinare la macchina in posizione di
lavoro, inserire il serbatoio e accertarsi
che il gancio sia tutto SU
B. Den Dosierungsdeckel bis zur
angezeigten Stufe (26 ml = 1%) mit
dem geeigneten Bissel Commercial
Waschmittel auffüllen. Den
Deckelinhalt in den Behälter mit
sauberem Wasser leeren und den Tank
mit demselben Deckel schliessen.
C. Den Tank wieder auf die Maschine
aufmontieren. Darauf achten, dass er in
die dafür vorgesehene untere Klinke
gestellt wird, dann rollen bis der obere
Haken einschnappt.
BISSEL COMMERCIAL
WASCHMITTEL FÜR HARTE
BÖDEN
Die Produkte sind alle konzentriert
und müssen 1/100 verdünnt werden
Überprüfen Sie die verfügbaren
Bissel Commercial-Reiniger
SCHAUMFREI, die für diese
Maschine geeignet sind
ACHTUNG:
Falls sie keine Bissel Commercial
Waschmittel zur Verfügung haben,
waschen sie den Boden nur mit
Wasser.
Die Maschine in arbeits position
bringen, den Tank einsetzen und
sicherstellen, dass der Haken ganz oben
ist
B. remplir le bouchon doseur jusqu’au
niveau indiqué ( 26ml. 1%) avec du
produit Bissel Commercial indiqué
pour le sol à laver. Verser le contenu
du bouchon dans le réservoir d’eau
propre et fermer le réservoir le même
bouchon.
C. Remonter le réservoir dans la
machine en le positionnant dans sa
demi coque inférieure et en le faisant
tourner jusqu’à faire cliquer le crochet
d’arrêt supérieur.
PRODUIT DETERGEANT BISSEL
COMMERCIAL POUR SOLS
DURS
Tous des produits concentrés à
diluer à 1/100
Vérifiez les nettoyants Bissel
Commercial disponibles SANS
MOUSSE adaptés à cette machine
ATTENTION:
Si vous n’avez pas de détergents Bissel
Commercial à disposition, laver vos
sols seulement avec de l’eau.
Incliner la machine en position de
trabail, introduire le bac et s’assurer
que la dent soit bien entrée.
B. Llenar el tapon dosador hasta el
nivel indicado (26ml. 1%) con
producto Bissel Commercial
indicado según el piso que hay que
limpiar. Echar el contenido del tapón
en el depósito de agua limpia y cerrar
con el tapón mismo.
C. Remontare l deposito en la
maquina poniéndolo en su
semicáscara inferior y haciéndolo
girar hasta que salte el gancho de
paro superior.
PRODUCTOS DETERGENTES
BISSEL COMMERCIAL PARA
PISOS DUROS
Todos los productos concentrados
para diluir 1/100
Consulte los limpiadores Bissel
Commercial disponibles SIN
ESPUMA adecuados para esta
máquina
ATENCIÓN:
Si no tienen detergentes Bissel
Commercial a su disposición,
limpiar los pisos con sólo agua.
Inclinar la máquina en position de
trabajo, introducir el depósito y
asegurarse de que el gancho esté
cerrado.
11

BRUSH HEIGHT
ADJUSTMENT
Your Bissel Commercial scrubber
has various safety devices to
protect the components from
damages due to overload. The
electronic circuit that activates the
red light on the base indicates that
the motor is overloaded because
there is too much pressure on the
brush roll.
If the overload is excessive, the
circuit will switch off the brush
motor and the red light will stay
on.
CORRECT BRUSH PRESSURE
ADJUSTMENT
STEP 1: With the machine ON
and the handle in operating
position, slowly rotate the brush
adjustment knob to the Pos. MAX.
STEP 2: if during the scrobbing,
the red light will turn ON, slowly
turn the knob couterclockwise until
the red light will turn OFF.
NOTE: the adjustment is correct
with red light OFF or intermittent.
Only if the red light is constantly
ON, adjust the brush pressure as
STEP 2.
CORRECT USE OF THE
BISSEL COMMERCIAL
SCRUBBER
After switching on all the 3
switches, the washing can start
following the direction of the
arrows (picture 1) without resting
on one place with the machine on.
This way the washing and the
drying will be perfect without
leaving wet areas.
In order to save detergent up to
50%, in case of washing of shiny,
delicate and not particularly dirty
floors it is possible to swith on the
pump when going forwards and
switching it off when going
backwards. In case of rough floors,
for outside or hygroscopic like
porous tiles etc. it is advisable to
leave the pump always on.
In case of big surfaces it is
advisable to wash following the
procedure in picture 2.
When the clean water is finished,
switch OFF the pump/electrovalve
to avoid overheating.
DISPOSITIVO PER REGOLARE
L’ALTEZZA
La vs. lava-asciuga pavimenti Bissel
Commercial ha diversi dispositivi di
sicurezza per proteggere i
componenti da danni dovuti a
sovraccarico. Il circuito elettronico
che mette in funzione la spia rossa
sulla base indica che il motore è in
sovraccarico perché
c’è troppa pressione sul rullo.
Se il sovraccarico è eccessivo il
circuito spegnerà il motore
elettrospazzola e la spia rossa rimarrà
accesa.
CORRETTA REGOLAZIONE
DELLA PRESSIONE RULLO
PASSO :1 con la macchina accesa e
con l’impugnatura in posizione di
lavoro, ruotate lentamente in senso
orario il regolatore fino a
raggiungere la Pos. MAX. per
ottenere la massima efficacia
pulente.
PASSO 2: se durante il lavaggio si
accende la spia rossa, ruotare il
regolatore lentamente in senso
antiorario fino a che la spia si
spegne.
NOTA: la regolazione è corretta con
spia rossa spenta o intermittente.
Solo in caso di spia rossa accesa
fissa, intervenire come da passo 2.
CORRETTO USO DELLA
LAVASCIUGA BISSEL
COMMERCIAL
Dopo aver acceso i 3 interruttori,
senza mai sostare su un punto con la
macchina accesa, iniziare il lavaggio
seguendo la direzione delle frecce
(fig. 1) In questo modo il lavaggio e
l’asciugatura saranno perfetti senza
lasciare zone bagnate.
Per risparmiare detergente fino al
50%, nel caso del lavaggio di
pavimenti lucidi, delicati e non
particolarmente sporchi, è possibile
accendere la pompa andando avanti e
spegnerla tornando indietro.
Nel caso di pavimenti grezzi, da
esterni o igroscopici come cotto ecc.
è consigliabile lasciare la pompa
sempre accesa.
Nel caso di grandi superfici è
consigliabile lavarle seguendo
l’andamento indicato in (fig. 2)
Quando finisce l’acqua pulita,
spegnere subito l’interruttore Pompa
o Elettrovalvola per evitarene il
surriscaldamento.
SAUGBÜRSTEN
HÖHENVERSTELLUNG
Ihr Bissel Commercial Boden
Schrubbautomat hat verschiedene
Sicherheitsvorrichtungen um die
Bestandteile vor Überlastungsschäden
zu schützen. Die Elektronikschaltung,
welche die rote Kontrolllampe auf dem
Fuss betätigt, zeigt an, dass der Motor
überlastet ist, weil die Bürstenrolle
unter zu viel Druck steht.
Falls die Überlastung übermässig ist,
stellt die Elektronikschaltung den
Motor der Elektrobürste ab und die rote
Leuchte bleibt an.
KORREKTE REGELUNG DES
DRUCKS AUF DER
BÜRSTENROLLE
SCHRITT 1: Bei eingeschalteter
Maschine und mit Griff in normaler
Arbeitsstellung, den Regler langsam im
Uhrzeigersinn drehen, bis die Pos.
MAX erreicht ist.
SCHRITT 2: Falls während des
Waschens die rote Kontrollampe
aufleuchtet, den Regler im
Gegenuhrzeigersinn drehen, bis sich
die rote Kontrollampe ausschaltet.
ANMERKUNG: Wenn die rote
Kontrollampe ab und zu aufleuchtet
während die Maschine arbeitet, ist die
Regelung korrekt, wenn sie hingegen
immer anbleibt, regulieren wie Schr. 2.
KORREKTE ANWENDUNG DES
SCHRUBBAUTOMATS
Nachdem alle 3 Schalter eingeschaltet
sind, mit dem Waschen beginnen wie
mit den Pfeilen (Bild 1) gezeigt, ohne
mit der eingeschalteten Maschine an
einer Stelle stehenzubleiben. Auf diese
Weise wird das Waschen und Trocknen
perfekt ohne nasse Stellen zu
hinterlassen. Um bis zu 50%
Waschmittel zu sparen, kann beim
Waschen von glänzenden, heiklen und
nicht besonders schmutzigen Böden
beim vorwärts gehen die Pumpe
eingeschaltet werden und beim
rückwärts gehen ausgeschaltet werden.
Im Falle von groben Böden, für aussen
oder hygroskopisch wie Backstein etc.
ist es empfehlenswert die Pumpe
immer eingeschaltet zu lassen. Bei
grossen Oberflächen ist es
empfehlenswert zu waschen wie in
Bild 2 gezeigt.
Sobald das Reinwasser aufgebraucht
ist, sofort die Pumpe/Elektroventil
ausschalten um Überhitzung zu
vermeiden.
CONTROLE ELECTRONIQUE DE
SURCHARGE
Votre autolaveuse pour sols Bissel
Commercial possède plusieurs dispositifs
de sécurité pour protéger les composants
contre tout danger de surcharge. Le
circuit électronique avec le voyant rouge,
indique que le moteur est en surcharge,
car il y a trop de pression sur le rouleau.
Si la surcharge est excessive, le circuit
arrêtera le moteur de la brosse
électronique et le voyant rouge restera
allumé.
CORRECT REGLAGE DE LA
PRESSION DU ROULEAU
PAS 1: avec la machine allumée et avec
la poignée en position de travail, tourner
doucement le régulateur en sens horaire
jusqu’à atteindre la Pos.MAX pour
obtenir le maximum d’efficacité
nettoyante.
PAS 2: si pendant le lavage le voyant
rouge s’allume, tourner doucement le
régulateur en sens anti-horaire, jusqu’à ce
que le voyant s’éteigne.
REMARQUE: le réglage est correct
avec le voyant rouge éteint ou
intermittent. Seul en cas où il reste allumé
fixe, il faut intervenir comme dans le
pas 2. CORRECT USAGE DE
L’AUTOLAVEUSE BISSEL
COMMERCIAL
Quand le rouleau et en marche, ne jamais
garder la machine arrèté s urun seul point.
La vitesse élevée de la rotation du
rouleau pourrait abbimer les sols délicats.
Après avoir allumer les 3 interrupteurs,
sans jamais s’arréter sur un seul point
avec la machine allumée, commencer le
lavage en suivant la direction des flèches
(fif. !). De cette façon le lavage et le
séchage seront parfaits sans laisser de
zones mouillées
Pour épargner du détergeant jusqu’à 50%,
en cas de lavage de sols non
particulièrement sales, il est possible
d’allumer la pompe en allant en avant et
de l’éteindre en allant en arrière.
En cas de sols mat, d’extérieur ou
igroscopique come cuit etc, il est
conseillé de laisser la pompe toujours
allumée. En cas de grandes surfaces il est
conseillé de les laver en suivant les
instructions indiquées dans la (fig.2)
Quand l’eau propre finit, éteindre tout de
suite l’interrupteur Pompe ou
électrovalve afin d’éviter tout
surchauffage.
CONTROL ELECTRÓNICO
DE SOBRECARGA
Su fregadora de pisos Bissel
Commercial tiene varios dispositivos
de seguridad para proteger los
componentes de daños debidos a
problemas de sobrecarga.
El circuito electrónico que con la luz
indicadora roja, indica que el motor
está sobrecargado porque hay
demasiado presión sobre el rodillo. Si
la sobrecarga es excesiva, el circuito
desconectará el motor del cepillo y la
luz roja permanecerá encendida.
CORRECTA REGULACIÓN DE
LA PRESIÓN DEL RODILLO
PASO 1: con la máquina encendida y
con el mango en posición de trabajo,
giren lentamente el regulador en el
sentido horario hasta lograr la Pos.
MAX para obtener la mejor eficacia
limpiadora.
PASO 2: si durante el lavado se
enciende la luz roja, giren el regulador
lentamente en sentido antihorario hasta
que la luz roja se apague.
NOTA: la regulación es correcta con la
luz roja apagada o intermitente. Sólo en
caso de luz roja encendida fija, actuar
como en el paso 2.
CORECTO USO DE LA
FREGADORA BISSEL
COMMERCIAL
Cuando el rodillo está girando, nunca
se debe tener parada la máquina en el
mismo sitio. La alta velocidad de giros
podría dañar los pisos delicados.
Tràs encender los 3 interruptores,
sin para nunca la máquina encendida en
el mismo sitio, empezar el lavado
siguiendo la dirección de las flechas
(fig.1). De esta manera el lavado y
secado seràn perfectos sin dejar zonas
mojadas.
Para ahorrar detergente hasta 50%, en
caso de lavado de pisos brillantes,
delicados y no mucho sucios, es
posible encender la bomba cuando se
va por adelante y apagarla mientras
regresa. En caso de pisos brutos o
higroscópicos como cocido etc, es
aconsejable dejar la bomba siempre
encendida. En caso de superficies
anchas, es aconsejable limpiar
siguiendo la marcha indicada en (fig.2).
Cuando termine el agua limpia, apague
enseguida el interruptor Bomba o
electroválvula para evitar que se
sobrecaliente.
2
1
12

SPRAY / EXTRACTION KIT
(optional only ELECTRIC version)
Your scrubber is also a handy
upholstery washer.
Rotate the connector blocking lever
upwarts. Pull out the connector
energically.
NEVER REMOVE THE
CONNECTOR BY PULLING
THE FLEXIBLE HOSE
Insert the connector placed at the
end of the upholstery wash hose.
Rotate downwarts the hook lever.
Switch on the main-, the pump- and
the suction switches.
This way the machine is ready to
wash your upholstery.
If the dirt is particularly stubborn,
we recommend to add 1% of Bissel
detergent specifically for textiles to
the water in the tank.
Once the upholstery washing is
finished, switch off the main
switch of the machine, disconnect
the plug, let the water in pression
discharge by pressing the lever
under the handle.
Remove the hose connector
repeating contrary the assembly
instructions and remount the suction
hose of the machine.
Using the extension hoses available
in the upholstery wash kit, it is
possible to wash with the
injection/extraction system not
delicate rugs and carpets.
SPRAY / EXTRACTION KIT
(optional)
The kit in the picture includes:
- Flex hose with handle
- N° 2 extension hoses
- Small nozzle with injector
- Window cleaning tool
KIT LAVAGGIO TAPPEZZERIE
(optional solo su versione
ELECTRIC)
La vs. lava pavimenti è anche un
comodo lava tappezzerie.
Ruotare la leva di bloccaggio
bocchettone verso l’alto.
Sfilare il bocchettone con una certa
forza.
NON SFILARE MAI IL
BOCCHETTONE TIRANDO IL
TUBO FLESSIBILE
Infilare il bocchettone posto
all’estremità del tubo lava tappezzerie.
Ruotare verso il basso la leva di
aggancio.
Accendere l’interruttore generale,
l’interruttore pompa e l’interruttore
aspirazione.
In questo modo la macchina è pronta
per lavare ed aspirare le vs.
tappezzerie.
Se lo sporco è particolarmente
ostinato, consigliamo di aggiungere
all’acqua nel serbatoio anche 1% di
detergente Bissel specifico per tessuti.
Finito il lavaggio tappezzerie,
spegnere l’interruttore generale
della macchina, staccare la spina di
corrente, far fuoriuscire l’acqua in
pressione schiacciando la leva sotto
l’impugnatura.
Togliere il bocchettone del tubo
ripetendo all’inverso le istruzioni per
il montaggio e rimontare il tubo
aspirante della macchina.
Utilizzando i tubi prolunga presenti
nel kit lava tappezzerie, è possibile
lavare ad iniezione / estrazione,
tappeti e moquette non delicati.
KIT LAVA TAPPEZZERIE
(optional)
Il kit nella foto comprende:
- Tubo flex con impugnatura
- N°2 tubi prolunga
- Bocchetta piccola con ugello
- Bocchetta lava vetri
WASCH-KIT FÜR STOFFBEZÜGE
(freigestellt nur für ELECTRIC)
Ihr Schrubbautomat ist auch ein
bequemer Reininger für Stoffbezüge.
Den Hebel, der den Rohrstutzen
festhält, nach oben drehen und den
Rohrstutzen mit etwas Kraft
herausziehen.
DEN ROHRSTUTZEN NIEMALS
DURCH ZIEHEN DES
FLEXIBLEN SCHLAUCHS
ENTFERNEN
Den Rohrstutzen, der sich am Ende des
Wasch-Kits für Stoffbezüge befindet,
einsetzen. Den Einhak-Hebel nach
unten drehen.
Den Hauptschalter, den
Pumpenschalter und den Saugschalter
einschalten.
Auf diese Art und Weise ist die
Maschine bereit, um Ihre Stoffbezüge
zu waschen und zu saugen.
Falls der Schmutz besonders hartnäckig
ist, schlagen wir vor, dem Wasser auch
1% Bissel Waschmittel spezifisch für
Textilien beizugeben.
Nach Beendigung dieses Vorgangs,
den Hauptschalter ausschalten, den
Netzstecker ausstecken und das
Druckwasser ausfliessen lassen, indem
der Hebel unterhalb des Handgriffs
gedrückt wird.
Den Rohrstutzen herausnehmen und
alle Montageanweisungen in
umgekehrter Folge wiederholen. Das
Saugrohr wieder aufmontieren.
Durch die Anwendung der
Verlängerungsrohre, die im Wasch-Kit
für Stoffbezüge vorhanden sind, kann
man mit dem Injektions-/Extraktions-
System nicht heikle Teppiche und
Läufer reinigen.
WASCH-KIT FÜR STOFFBEZÜGE
(freigestellt)
Der Kit im Foto umfasst:
-Flexibler Schlauch mit Handgriff
- N° 2 Verlängerungsrohre
- Kleine Düse mit Spritzer
- Scheibenreinigungs-Kit
KIT LAVAGE TAPISSERIES
(en option seulement sur version
ELECTRIC)
Votre autolaveuse est aussi un pratique
lave-tapisserie
Tourner le levier de blocage du raccord
vers le haut.
Oter le raccord avec une certaine force.
NE JAMAIS ENLEVER LE
RACCORD EN TIRANT PAR LE
TUBE FLEXIBLE
Enfiler le raccord placé à l’extrémité du
tube lave-tapisseries.
Tourner vers le bas le levier
d’accrochage.
Allumer l’interrupteur général,
l’interrupteur de la pompe et
l’interrupteur d’aspiration.
De cette façon, la machine est prête
pour laver et aspirer vos tapisseries.
Si la saleté est particulièrement obstiné,
nous vous conseillons d’ajouter à l’eau
du réservoir, même 1% de détergent
Bissel spécifique pour tissus.
Terminé le lavage des tapisseries,
éteindre l’interrupteur général de la
machine, débrancher la prise de
courant, faire sortir l’eau en pression,
en appuyant sur le levier sous la
poignée.
Enlever le raccord du tube en répétant à
l’envers les instructions pour le
montage et remonter le tube aspirant de
la machine.
En utilisant les tubes rallonge présents
dans le kit lave-tapisseries, il est
possible de laver à injection/extraction
les tapis et moquettes non délicats.
KIT LAVE-TAPISSERIES
(en option)
Le kit dans la photo contient :
- tube flex avec poignée
- n° 2 tubes rallonge
- petit suceur avec gicleur
- Kit lave-vitres
KIT LIMPIEZA TAPICERIAS
(opcional solo sobre version
ELECTRIC)
Su fregadora de pisos es también una
practica lava-tapicerías.
Girar la palanca de bloqueo del
empalme hacia arriba.
Soltar el empalme con cierto
esfuerzo.
NUNCA QUITE EL EMPALME
TIRANDO POR EL TUBO
FLEXIBLE
Introducir el empalme puesto a la
extremidad del tubo lava-tapicerías.
Girar la palanca de enganche hacia
abajo.
Encender el interruptor general, el
interruptor de la bomba y el
interruptor de aspiración.
De esa manera la maquina está lista
para limpiar y aspirar sus tapicerías.
En caso de suciedad particularmente
obstinada, aconsejamos añadir al
agua del depósito 1% de detergente
Bissel especifico para tejidos.
Una vez acabada la limpieza de
tapicerías, apagar el interruptor
general de la maquina,
desenchufar la toma de corriente,
dejar salir el agua bajo presión,
presionando la palanca debajo de la
empuñadura.
Soltar el empalme del tubo
repitiendo al contrario las
instrucciones para el montaje y
montar otra vez el tubo aspirante de
la máquina.
Utilizando los tubos alargadores
presentes en el kit lava tapicerías es
posible limpiar por inyección /
extracción las alfombras y moquetas
no delicadas.
KIT LAVA TAPICERIAS
(opcional)
El kit en la foto incluye:
- tubo flex con empuñadura
- n° 2 tubos alargadores
- boquilla pequeña con espita
- Juego lav cristales
13

BATTERY
REPLACEMENT
For safety reasons,
the battery is
supplied with a
maximum charge
of 30%. Fully
charge before use.
1.Slide a charged
battery in the slot
until it clicks
2. When the battery
is empty the
electronic boards in
the machine will
switch the machine
OFF. You’ll see the
two electronic
boards, one on the
base and the second
on the rear handle,
lighting.
3.Remove the
battery by pushing
the button and put it
in the Bissel
Commercial original
charger for fully
charge.
ALWAYS
RECHARGE THE
BATTERY
AFTER USE
SOSTITUZIONE
BATTERIA
Per motivi di sicurezza
la batteria viene fornita
con una carica
massima del 30%.
Ricaricare
completamente prima
dell’uso.
1. Inserire una batteria
carica nell’apposita sede
fino a che il gancio fa
clic.
2. Quando la batteria è
scarica le schede
elettroniche della
macchina spengono
tutto. Vedrete le due
schede elettroniche, una
nella base e la seconda
nell’impugnatura
posteriore, lampeggiare.
3. Rimuovere la batteria
schiacciando il pulsante
e inserirla nel carica
batterie originale Bissel
Commercial fino a
ricarica completa
RICARICARE
SEMPRE LA
BATTERIA DOPO
L’USO
AUSWECHSLUNG
DER BATTERIE
Aus
Sicherheitsgründen
wird die Batterie mit
maximal 30%Ladung
geliefert. Vor dem
Gebrauch vollständig
aufladen.
1. Eine geladene Batterie
im dafür vorgesehenen
Sitz einfügen bis ein
Klick zu hören ist.
2. Wenn die Batterie
entladen ist, schalten die
Elektronikplatinen die
Maschine aus. Die
beiden Elektroplatinen,
eine in der Basis und die
zweite im hinteren
Handgriff, werden
blinken.
3. Die Batterie durch
Knopfdruck entfernen
und in das Original
Bissel Commercial
Ladegerät einfügen bis
sie ganz aufgeladen ist.
DIE BATTERIE
NACH DEM
GEBRAUCH IMMER
AUFLADEN
REMPLACEMENT
BATTERIE
Pour des raisons de
sécurité, la batterie est
fournie avec un
maximum de 30% de
charge. Charger
complètement avant de
l'utiliser.
1. Introduire une batterie
chargée dans son
logement jusqu’à ce que
l’on entend un click
2. Quand la batterie est
déchargée les cartes
électroniques de la
machine éteignent tout.
Vous verrez les deux
cartes électroniques
clignoter, un sur la base
et la seconde sur la
poignée postérieure.
3. Retirer la batterie en
appuyant sur la languette
et la placer sur le
chargeur original Bissel
Commercial jusqu’à la
recharge complète
RECHARGER
TOUJOURS LA
BATTERIE APRÈS
L’UTILISATION
SUSTITUCIÓN
BATERÍA
Por razones de
seguridad, la batería se
suministra con un
máximo de 30% de
carga. Cargar
completamente antes
de su uso.
1.Insertar una batería
cargada en su
ajojamiento hasta que se
oye un click.
2. Cuando la batería está
descargada la placas
electrónicas apagan todo.
Verán las dos placas
electrónicas parpadear,
una encima de la base y
la segunda detrás de la
empuñadura.
3. Quitar la batería
apretando el botón y
ponerla en el cargador
original Bissel
Commercial hasta la
recarga completa.
RECARGAR
SIEMPRE LA
BATERÍA DESPUÉS
DE SU USO
ATTENTION In upright parking position (standby condition) both motors stop
running, while the water is controlled by its own switch. Make sure you switch OFF
the water in parking position. Switch OFF the main switch to switch OFF the entire
machine.
ATTENZIONE In posizione verticale di parcheggio (condizione di standby)
entrambi i motori si spengono, mentre l’acqua è controllata dal suo interruttore.
Accertarsi di spegnere l’acqua in parcheggio.
Spegnere l’interruttore generale per spegnere l’intera macchina.
ACHTUNG In senkrechter Parkposition (Standby-Zustand) werden beide Motoren
abgestellt, während das Wasser vom eigenen Schalter kontrolliert wird. Darauf
achten, dass das Wasser in Parkposition abgestellt ist. Den Hauptschalter ausschalten
um die ganze Maschine abzustellen.
ATTENTION En position verticale d’arrêt (condition standby) les deux moteurs
s’éteignent, tandis que l’eau est contrôlée par l interrupteur.
S’assurer d’éteindre l’eau en fin d’utilisation.
Ėteindre l’interrupteur général pour éteindre toute la machine
ATENCIÓN En posición vertical de almacenamiento (condición standby) ambos
motores se apagan, mientras el agua está controlada por su interruptor.
Asegúrese de apagar el agua si no use la máquina
Apagar el interruptor general para apagar toda la máquina.
INDICAZIONI CARICA BATTERIE
1. Spia verde accesa = Batteria scarica
2. Spia verde lampeggiante = Batteria carica 100%
3. Spia rossa accesa = Batteria difettosa, da sostituire
4. Spia rossa lampeggiante = Sovratemperatura. Carica batteria in attesa di raffreddamento
INDICATIONS BATTERY CHARGER
1. Green light on = Low battery
2. Green light blinking = Battery charged 100%
3. Red on = Battery defected, to be replaced
4. Red light flashing = Overtemperature. Charger waiting for cooling
INDIKATIONEN LADEGERÄTS
1. Grünes Licht = Schwache Batterie
2. Grünes Licht blinkt = Batterieladung 100%
3. Rotes Licht = Defekte Batterie, muss ersetzt werden
4. Rotes Licht blinkt = Übertemperatur . Ladegerät wartet auf Abkühlung
INDICATIONS CHARGEUR DE BATTERIE
1. Feu vert = Batterie faible
2. Feu vert clignotant = Carge de la batterie 100%
3. Feu rouge = Batterie défecteuse ,doit être remplacée
4. Feu rouge clignotant = Surchauffage, Chargeur en attente de refroidissement
INDICACIONES CARGADOR DE BATERÍA
1. Luz verde = Batería baja
2.Luz verde intermitente = Carga de la batería = 100%
3. Luz roja difetosa = Batería defectuosa, sustituirla
4. Luz roja intermitente = Exceso de temperatura. Cargador espera de enfriamiento
1
4

CAUTION !
ALWAYS DISCONNECT
THE POWER CORD
BEFORE PERFORMING
ANY MACHINE
MAINTENANCE.
After using the machine it is
important to effect some easy
maintenance operations in order to
assure the machine a long lifetime.
AFTER USE, ALWAYS
EMPTY THE TANKS AND
EFFECT THE FOLLOWING
MAINTENANCE
OPERATIONS:
1. TANK WASHING
Remove the tank from the
machine.
Empty completely the dirty water
in a WC or in waste water.
Unhook the levers front and rear
the filterhousing and separate the
tank from the filterhousing.
Wash the inside of the tank with
room temperature water and a non
abrasive sponge.
Rinse well both the clean water
and the dirty water tank.
2. WASHING OF THE MOTOR
PROTECTION FILTER
The filter is placed in the filter
housing above the tank.
Unhook the transparent filter cover
and remove the filter.
ATTENZIONE!
STACCARE SEMPRE LA
SPINA DALLA PRESA DI
CORRENTE PRIMA DI
ESEGUIRE QUALSIASI
MANUTENZIONE.
Dopo l’uso della macchina è
importante per ottenere la massima
durata, effettuare semplici operazioni
di manutenzione.
A FINE UTILIZZO, SVUOTARE
SEMPRE I SERBATOI ED
EFFETTUARE LE SEGUENTI
OPERAZIONI DI
MANUTENZIONE:
1. LAVAGGIO DEL SERBATOIO
Togliere il serbatoio dalla macchina.
Svuotare completamente l’acqua
sporca su un WC o su uno scarico di
acque nere.
Sganciare le leve davanti e dietro il
portafiltro e separare il serbatio dal
portafiltro stesso.
Lavare l’interno del serbatioio con
acqua a temperatura ambiente e
l’aiuto di una spugna non abrasiva.
Risciacquare bene entrambi i serbatoi
di acqua pulita e di recupero.
2. LAVAGGIO DEL FILTRO
PROTEZIONE MOTORE
Il filtro è posto nel porta filtro sopra il
serbatoio.
Sganciare il coperchio filtro
trasparente e togliere il filtro.
ACHTUNG!
DAS NETZKABEL IMMER
AUS DER STECKDOSE
ZIEHEN, WENN DIE
MASCHINE WEGGERÄUMT
ODER GEWARTET WIRD.
Damit Ihnen die Maschine lange
erhalten bleibt ist es wichtig, nach dem
Gebrauch einige einfache
Wartungsarbeiten durchzuführen.
NACH DEM GEBRAUCH IMMER
DIE BEHÄLTER LEEREN UND
DIE FOLGENDEN
WARTUNGSARBEITEN
DURCHFÜHREN:
1. REINIGUNG DES TANKS
Den Tank abmontieren.
Das schmutzige Wasser in einem WC
oder in einem Schmutzwasserabfluss
leeren.
Die Hebel vorne und hinten am
Filtergehäuse aushängen und den Tank
vom Filtergehäuse trennen.
Das Innere des Tanks mit
Raumtemperatur-Wasser und mit Hilfe
eines scheuerfreien Schwamms
auswaschen.
Den Reinwasser- und den
Schmutzwasserbehälter gut ausspülen.
2. AUSWASCHEN DES
MOTORSCHUTZFILTERS
Der Filter befindet sich im
Filtergehäuse oberhalb des Tanks.
Den durchsichtigen Filterdeckel
abhaken und den Filter herausnehmen.
ATTENTION!
DEBRANCHER TOUJOURS
LE CABLE
D’ALIMENTATION AVANT
TOUT TRAVAUX
D’ENTRETIEN.
Après l’utilisation de la machine il
est important, afin d’obtenir le
maximum de durée, d’effectuer de
simples opérations de maintenance.
APRES L’UTILISATION, VIDER
TOUJOURS LES RESERVOIRS
ET EFFECTUER LES
OPERATIONS SUIVANTES DE
MAINTENANCE :
1. LAVAGE DU RESERVOIR
Enlever le réservoir de la machine.
Vider complètement l’eau sale dans
un WC ou à une vidange.
Décrochez les leviers devant et
derrière le porte-filtre et séparez le
réservoir du porte-filtre lui-même.
Laver l’intérieur du réservoir à l’eau
à température ambiante à l’aide
d’une éponge non abrasive.
Rincer bien les deux réservoirs d’eau
propre et de récupération.
2. LAVAGE DU FILTRE
PROTECTION MOTEUR
Le filtre est placé dans le porte-filtre
sur le réservoir.
Oter le couvercle filtre transparent et
enlever le filtre.
¡ATENCIÓN!
DESCONECTE SIEMPRE EL
CABLE ANTES DE LLEVAR
A CABO CUALQUIER
MANTENIMIENTO
Después del uso de la máquina, es
importante, para obtener la duración
máxima, hacer la siguientes sencillas
operaciones de mantenimiento
AL FINAL DE USO, VACIAR
SIEMPRE LOS DEPÓSITOS Y
EFECTUAR LAS SIGUIENTES
OPERACIONES DE
MANTENIMIENTO:
1. LIMPIEZA DEL DEPÓSITO
Quitar el depósito de la maquina.
Vaciar completamente el agua sucia
en un WC o en un bajante.
Desenganche las palancas delante y
detrás del portafiltro y separe el
depósito del propio portafiltros.
Limpiar el interior del depósito con
agua a temperatura ambiental con
una esponja no abrasiva.
Enjuague bien ambos depósitos de
agua limpia y de recuperación.
2. LIMPIEZA DEL FILTRO
PROTECCIÓN MOTOR
El filtro está puesto en el porta filtro
sobre el depósito.
Desenganchar la tapa filtro
trasparente y sacar el filtro.
15

Wash the filter under running
room temperature water and wring
it so that the water can flow out.
In order to speed up the drying,
you can use compressed
dehumidified air.
Do not remount the filter before
it is completely dry.
3. WASHING OF THE
FILTERHOUSING / FLOAT
SYSTEM
After removing the motor
protection filter, also wash with
room temperature water the whole
filterhousing, on top (filter zone)
and underneath (float system
zone).
After the washing procedure,
remount the tank in the machine.
REMOUNTING THE FILTER
HOUSING IN THE TANK
Insert the filter housing completely
until the gasket adheres perfectly
to the tank and hook the rear and
front levers.
4. WASHING THE PUMP
PROTECTION FILTERS
Remove the water tank.
With a punch, remove the plastic
filter and consequently the light
blue sponge filter. Wash both
filters A every 3 times you use the
machine and replace the filters kit
if necessary. If you don’t use the
original Bissel Commercial
detergents, the filters may clog
more often.
Filtre B needs to be replaced at
least once a Year.
5. WASHING OF THE
SUCTION NOZZLES
After each use, the suction nozzles
will become dirty. Hair will be
held back and will have to be
removed.
Remove the upper cover of the
base unsliding the two side latches.
Lavare il filtro con acqua corrente a
temperatura ambiente e strizzarlo al
fine di far defluire l’acqua.
Per velocizzare l’ascuigatura, si può
usare aria compressa deumidificata.
Non rimontare il filtro fino a
quando non sia completamente
asciutto.
3. LAVAGGIO DEL PORTA
FILTRO / GALLEGGIANTE
Dopo aver tolto il filtro protezione
motore, lavare con acqua a temp.
ambiente anche tutto il porta filtro sia
sopra (zona filtro) che sotto (zona
galleggiante)
Finite le operazioni di lavaggio,
rimontare il serbatoio nella macchina.
RIMONTARE LA SEDE FILTRO
NEL SERBATOIO
Inserire la sede filtro completamente
fino a far aderire perfettamente la
guarnizione al serbatoio e agganciare
le leve dietro e davanti.
4. LAVAGGIO DEI FILTRI
PROTEZIONE POMPA
Rimuovere il serbatoio.
Con una pinza, sfilare il filtro in
plastica e di conseguenza il filtro in
spugna azzurro. Lavare bene entrambi
i filtri A ogni tre volte la macchina
viene usata e sostituire il kit filtri se
necessario. Se non vengono usati i
detergenti originali Bissel Commercial
i filtri possono ostruirsi più
frequentemente.
Il filtro B deve essere sostituito
almeno una volta l’anno.
5. LAVAGGIO DELLE
BOCCHETTE ASPIRANTI
Dopo ogni utilizzo, le bocchette
aspiranti si sporcheranno. Peli e
capelli si fermeranno e dovranno
essere rimossi.
Togliere il coperchio superiore della
base, sganciando le due slitte laterali.
Den Filter unter fliessendem
Raumtemperatur-Wasser auswaschen
und auswinden, damit das Wasser
ausfliesen kann.
Um die Trocknung zu beschleunigen,
kann entfeuchte Pressluft verwendet
werden.
Den Filter nicht wieder aufmontieren
bevor er vollkommen trocken ist.
3. AUSWASCHEN DES
FILTERGEHÄUSES /
SCHWIMMERS
Den Motorschutzfilter herausnehmen
und auch das ganze Filtergehäuse oben
(Filterzone) wie unten
(Schwimmerzone) auswaschen.
Nach diesem Waschvorgang den Tank
wieder in die Maschine aufmontieren.
DAS FILTERGEHÄUSE WIEDER
IM TANK EINMONTIEREN
Setzen Sie das Filtergehäuse
vollständig ein, bis die Dichtung
perfekt am Tank haftet, und haken Sie
die Hebel hinten und vorne ein.
4. AUSWASCHEN DER PUMPEN-
SCHUTZ FILTER
Den Tank entfernen.
Den Plastikfilter mit einer Zange
entfernen und demzufolge den
hellblauen Schwammfilter. Beide
Filter A jeweils nach drei
Anwendungen der Maschine
auswaschen und den Filterkit falls
notwendig auswechseln. Falls keine
originalen Bissel Commercial
Waschmittel verwendet werden,
können sich die Filter öfter verstopfen.
Filter B sollte wenigstens einmal im
Jahr ersetzt werden.
5. AUSWASCHEN DER
SAUGDÜSEN
Nach jeder Anwendung werden die
Saugdüsen verschmutzt. Haare und
anderes bleiben hängen und müssen
entfernt werden.
Den oberen Deckel des Fusses
entfernen und die zwei seitlichen
Gleitöffnungen loslösen.
Laver le filtre à l’eau courante à
température ambiante et le tordre
afin d’enlever l’eau.
Pour un séchage rapide, on peut
utilitser de l’air compressée
déhumidifié.
Ne pas remonter le filtre avant
qu’il ne soit complètement sec.
3. LAVAGE DU PORTE
FILTRE / FLOTTEUR
Après avoir enlever le filtre de
protection du moteur, laver à l’eau à
temp. ambiante tout le porte-filtre,
soit dessus (zone filtre), soit dessous
(zone flottante).
Terminé les opérations de lavage,
remonter le réservoir dans la
machine.
REMONTER LE LOGEMENT
FILTRE DANS LE RESERVOIR
Insérez complètement le corps du
filtre jusqu'à ce que le joint adhère
parfaitement au réservoir et
accrochez les leviers en avant et en
arrière.
4. LAVAGE DES FILTRES
PROTECTION POMPE
Enlever le réservoir.
A l’aide d’une pince, enlever le filtre
en plastique et ensuite le filtre en
éponge bleu. Laver bien les deux
filtres A toutes les trois fois que la
machine est utilisée et remplacer le
kit filtre s’il est necessaire. Si les
détergents utilisés ne sont pas
originaux Bissel Commercial, les
filtres peuvent se boucher plus
souvent. Le filtre B doit être
remplacé au moins une fois par an.
5. LAVAGE DES SUCEURS
ASPIRANTS
Après chaque utilisation, les suceurs
se saliront. Poils et cheveux devront
être enlevés.
Enlever le couvercle supérieur de la
base, en décrochant les deux
entraineurs latéraux.
Lavar el filtro con agua corriente a
temperatura ambiental y estrujarlo
para que el agua fluye.
Para un secado rápido, se puede
utilizar aire comprimido
deshumedificada.
No montar el filtro hasta que no
esté completamente seco.
3. LIMPIEZA DEL PORTA
FILTRO / FLOTANTE
Después de haber sacado el filtro de
protección motor, limpie también
con agua a temp. ambiental todo el
porta filtro, tanto arriba (zona filtro)
como abajo (zona flotante).
Terminadas las operaciones de
lavado, montar otra vez el deposito
en la máquina
VOLVER A MONTAR EL
ALOJAMIENTO FILTRO EN EL
DEPÓSITO
Inserte la carcasa del filtro
completamente hasta que la junta se
adhiera perfectamente al tanque y
enganche las palancas hacia atrás y
hacia adelante.
4.LIMPIEZA DE LOS FILTROS
PROTECCIÓN BOMBA
Quitar el depósito. Con una pinza,
quitar el filtro de plástico y luego el
filtro esponja azul. Limpiar bien
ambos filtros A cada 3 veces que
utilizan la máquina y reemplazar el
kit filtros si es necesario. Si no
utilizan detergentes originales Bissel
Commercial, los filtros se podrían
atascar más a menudo.
El filtro B tiene que ser cambiado
por lo menos una vez al año.
5. LIMPIEZA DE LAS
BOQUILLAS DE ASPIRACION
Después de cada uso, las boquillas de
aspiración se ensuciarán. Pelos y
cabellos tendrán que ser quitados.
Quitar la tapa superior de la base,
desenganchando desde las dos
correderas laterales.
16
A
B

9. REPLACEMENT OF THE
BRUSH ROLLER
REMOVE THE TANK
Put the machine on the left side.
Rotate the side support
counterclockwise.
Push the brush roll up against the
support and remove the support.
Put back the brush roll in to the
brush housing and pull it out from
underneath.
To remount the brush roll insert it
from underneath with the white
drive joint of the brush roll on the
same side as the white drive joint
of the base.
Rotate it until it gets in the right
position. Remount the lateral
support and hook it by rotating it
clockwise until it blocks.
10. CLOGGING
In case of clogging it is easy to
check the whole suction circuit:
a. remove the tank and check that
the motor protection filter is clean.
If it’s dirty, wash it under running
water , wring it and let it dry
completely before remounting it.
b. rotate the red clip and remove
the transparent converter cover.
Check inside the suction converter
making sure it is completely free
from debris.
Remount the cover and hook the
red clip.
c. unhook the suction connector
rotating first the hooking lever
upwards.
d. unhook the hose from the nozzle
group and check that the hose is
free from debris.
Should the hose be completely
clogged, insert a small flexible
tube with rounded point and let it
run through until it comes out on
the opposite side.
9. SOSTITUZIONE DEL RULLO
TOGLIERE IL SERBATOIO
Stendere l’apparecchio sul lato
sinistro.
Ruotare in senso anti orario il
supporto laterale.
Sfilare il rullo verso il supporto e
togliere il supporto.
Riportare in sede il rullo e poi sfilarlo
da sotto.
Per rimontare il rullo, inserirlo da
sotto mantenendo il trascinatore
bianco nello stesso lato del
trascinatore bianco della base.
Farlo ruotare fino a portarlo in
posizione. Rimontare il supporto
laterale ed agganciarlo facendolo
ruotare in senso orario fino al blocco
sui fermi.
10. OSTRUZIONI
In caso di ostruzioni, è semplice
controllare l'intero circuito di
aspirazione:
a. togliere il serbatoio e controllare
che il filtro protezione motore sia
pulito. Se è sporco, lavarlo sotto acqua
corrente, strizzarlo e poi farlo
asciugare completamente prima di
rimontarlo.
b. ruotare la clip rossa e smontare il
coperchio convogliatore trasparente
dal gruppo bocchette aspiranti e
controllare che l’interno del
convogliatore sia completamente
libero da detriti.
Rimontare il coperchio ed agganciare
la clip rossa.
c. sganciare il bocchettone aspirante
ruotando prima la leva di aggancio
verso l’alto.
d. sganciare il tubo dal gruppo
bocchette e controllare che sia libero
da detriti.
Se il tubo risultasse completamente
ostruito, infilare un tubetto flessibile a
punta arrotondata e farlo scorrere fino
a farlo uscire dal lato opposto.
9. AUSWECHSLUNG DER
BÜRSTENROLLE
DEN TANK ABNEHMEN
Die Maschine auf die linke Seite
stellen.
Die seitliche Halterung im
Gegenuhrzeigersinn drehen.
Die Bürstenrolle gegen die Halterung
abdrehen und die Halterung entfernen.
Die Bürstenrolle wieder in ihren Sitz
bringen und von unten herausnehmen.
Um die Bürstenrolle wieder
aufzumontieren wird sie von unten mit
dem weissen Mitnehmer der Rolle auf
derselben Seite des weissen
Mitnehmers des Fusses eingefügt.
Abdrehen bis sie in die richtige
Position gebracht wird. Die seitliche
Halterung wieder aufmontieren und
zuhaken, indem sie bis zur Blockierung
im Gegenuhrzeigersinn gedreht wird.
10. VERSTOPFUNGEN
Im Falle von Verstopfungen ist es
einfach den ganzen Saugkreislauf zu
kontrollieren:
a. den Tank abnehmen und
kontrollieren, dass der
Motorschutzfilter sauber ist. Falls er
schmutzig ist, unter fliessendem
Wasser auswaschen, auswinden und
vollkommen trocknen lassen, bevor er
wieder aufmontiert wird.
b. den roten Klipp drehen und den
durchsichtigen Konverterdeckel
herausnehmen. Kontrollieren dass der
Saugkonverter innen vollkommen frei
ist von Trümmerstücken.
Den Deckel wieder aufmontieren und
den roten Klipp zuhaken.
c. den Saugrohrstutzen loslösen indem
zuerst der Einhakhebel nach oben
gedreht wird.
d. den Schlauch von der Düsengruppe
loslösen und kontrollieren, dass er frei
ist von Trümmerstücken.
Sollte der Schlauch völlig verstopft
sein, kann ein flexibles Schläuchen mit
abgerundeter Spitze eingefügt werden
und entlanglaufen lassen, bis er auf der
Gegenseite wieder rauskommt.
9. REMPLACEMENT DU
ROULEAU
ENLEVER LE RESERVOIR
Poser l’appareil sur le coté gauche.
Tourner en sens anti-horaire le
support latéral.
Faire glisser le rouleau vers le
support et ôter le support.
Remettre le rouleau dans son
logement et ensuite le ôter par-
dessous
Pour réinstaller le rouleau,
l’introduire par dessous par
l’entraîneur blanc du rouleau, du
même coté de l’entraîneur blanc de la
base.Le faire tourner jusqu’à ce qu’il
soit en place. Remonter le support
latéral et l’accrocher en le faisant
tourner en sens horaire jusqu’au
blocage.
10. OBSTRUCTIONS
En cas d’obstructions, il est simple
de contrôler le circuit entier
d’aspiration.
a. Enlever le réservoir et vérifier
que le filtre de protection moteur soit
propre. S’il est sale, le laver à l’eau
courante et ensuite le faire sécher
complètement avant de le remonter.
b. tourner la clips rouge et démonter
le couvercle transparent du groupe
suceurs aspirants et vérifier qu’ils
soient libres de détritus.
Remonter le couvercle et accrocher
les clips rouges.
c. Décrocher le raccord aspirant en
tournant d’abord le levier
d’accrochage vers le haut.
d. Décrocher le tube du groupe de
suceurs et vérifier que le tube soit
libre de tout détritus.
Si le tube apparaît complètement
bouché, enfiler un petit tube flexible
à pointe arrondie et le faire glisser
jusqu’à le faire sortir de l’autre côté.
9. SUSTITUCIÓN DEL RODILLO
QUITE EL DEPÓSITO
Poner el aparato sobre su lado
izquierdo
Girar en sentido antihorario el soporte
lateral.
Deslizar el rodillo hacia el soporte y
quitar el soporte
Poner otra vez el rodillo dentro de su
lugar y luego quitarlo desde abajo
Para montar otra vez el rodillo,
insertarlo desde abajo por medio del
arrastrador blanco, desde el lado del
arrastrador blanco de la base. Gírelo
hasta ponerlo en posición. Montar otra
vez el soporte lateral y fíjelo mientras
lo gire en sentido horario hasta que se
bloquea.
10. ATASCOS
En caso de atascos, es muy sencillo
verificar el circuito entero de
aspiración.
a. Quite el depósito y verifique que el
filtro de protección motor esté limpio.
Si esté sucio, límpielo con agua
corriente y luego deje que seque
completamente antes de montarlo.
b. girar el clip rojo y desmontar la tapa
transparente desde el grupo boquillas
aspirantes y verificar que el interior
esté completamente libre de detritos.
Volver a montar la tapa y enganchar la
clip roja.
c. Desenganche la boquilla aspirante
girando primero la palanca de
enganche hacia arriba.
d. Desenganche el tubo desde el grupo
boquillas y controle que el tubo esté
libre de detritos.
Si el tubo resultara completamente
atascado, ensarte un tubo pequeño
flexible con punta redonda hasta salga
del otro lado.
17

18

SPECIFICATIONS
Suction body
-Voltage (see data place on the machine)
- Total power - 1100W
- Battery 520W
- By-Pass Vacuum motor
Input power - 800W
- Battery 36V – 350W
- Rotor assembled on two ball bearings
- Double insulation
- Protection: IPX 4
Ground wire for USA and Canada
- Water pump 27W
- Electrovalve 9W on Battery
Power head
- Imput power 250 W (150W Battery)
- Bar type commutator
- Rotor assembled on two ball bearings
- Electronic r.p.m. and overload control
- Brush pressure height adjustment
- Width: 15”(380)
DECLARATION OF CONFORMITY
Conforms to the following norms:
IEC 60335-2-2: 2009 (Sixth Edition) + A1 :
2012 in conjunction with
IEC 60335-1:2010 (Fifth Edition) (incl.
Corrigendum 1:2010)
EN 60335-1:2012 + A11:2014
EN 60335-2-2:2010 + A11:2012 + A1:2013
EN 62233:2008; EN60335-1(ed.5)
EN60335-2-2(ed.6);am1
EMC standard IEC 61000-3-2:2014 (Ed. 4);
IEC 61000-3-3:2013 (Ed. 3);
CISPR 14-1:2005 (Ed. 5) + A1:2008+
A2:2011; CISPR 14-2:2015 (Ed. 2)
Products meeting the essential requirements
of L.V.D. 2006/95/EC
LW30 –ion – LW38 L-ion
EN 60335-1: 2012; EN 60335-2-69;
EN 61000-3-2: 2014; EN 61000-3-3: 2013;
EN 55014-1: 2006+A1: 2012; EN 55014-2:
2015; UN 3480 -3481 LITHIUM ION
BATTERY Direttives of reference:
2006/42/EC; 2014/30/EU,
CEE 89/336; 2002/95 CE (ROHS)
APPROVALS:
U.S.A. and Canada:
DATI TECNICI
Corpo aspirante
-Tensione di alimentazione (vedi targhetta
caratteristica sulla macchina)
- Potenza totale - 1100W
- Battery 520W
- Motore Aspirante By-Pass
Potenza assorbita - 800 W
- Battery 36V – 350W
- Rotore montato su 2 cuscinetti a sfere
- Doppio isolamento
- Protezione: IPX 4
Per USA e Canada con filo terra
- Pompa 27W
- Elettrovalvola 9W su Battery
Elettrospazzola
- Potenza assorbita 250 W (150W Battery)
- Collettore ad intaglio
- Rotore montato su 2 cuscinetti a sfere
- Controllo elettronico del numero di giri e del
sovraccarico
- Regolazione della pressione rullo
- Larghezza: 15”(380)
DICHIARAZIONE DI CONFORMITA’
Conforme alle seguenti norme:
IEC 60335-2-2: 2009 (Sixth Edition) + A1 :
2012 in conjunction with
IEC 60335-1:2010 (Fifth Edition) (incl.
Corrigendum 1:2010)
EN 60335-1:2012 + A11:2014
EN 60335-2-2:2010 + A11:2012 + A1:2013
EN 62233:2008; EN60335-1(ed.5)
EN60335-2-2(ed.6);am1
EMC secondo norme IEC 61000-3-2:2014 (Ed.
4); IEC 61000-3-3:2013 (Ed. 3);
CISPR 14-1:2005 (Ed. 5) + A1:2008+ A2:2011;
CISPR 14-2:2015 (Ed. 2)
Products meeting the essential requirements of
L.V.D. 2006/95/EC
LW30 –ion – LW38 L-ion
EN 60335-1: 2012; EN 60335-2-69;
EN 61000-3-2: 2014; EN 61000-3-3: 2013; EN
55014-1: 2006+A1: 2012; EN 55014-2: 2015;
UN 3480 -3481 LITHIUM ION BATTERY
Direttives of reference:
2006/42/EC; 2014/30/EU,
CEE 89/336; 2002/95 CE (ROHS)
APPROVAZIONI
U.S.A. and Canada:
TECHNISCHE DATEN
Sauggerät
- Versorgungsspannung (siehe Typenschild auf
der Maschine)
- Totale Lieistung - 1100W
- Battey 520W
- By-Pass Saugmotor
Leistungsaufnahme - 800 W
- Battery 36V – 350W
- Rotor auf zwei Kugellager montiert
- Doppelte Isolie rung
- Schutz: IPX 4
Für den USA und Canada mit Erdleitung
- Pumpe 27W
- Elektroventil 9W Battery
Saugbürste
- Leistungsaufnahme 250 W (150W Battery)
- Kerbkollektor
- Rotor auf zwei Kugellager montiert
- Elektronische Kontrolle der Drehzahl und der
Überladung
- Regelung des Bürstenrollendrucks
- Breite: 15”(380)
KONFORMITÄTSERKLÄRUNG
Diese Erklärung stimmt mit folgenden Normen
überein:
IEC 60335-2-2: 2009 (Sixth Edition) + A1 :
2012 in conjunction with
IEC 60335-1:2010 (Fifth Edition) (incl.
Corrigendum 1:2010)
EN 60335-1:2012 + A11:2014
EN 60335-2-2:2010 + A11:2012 + A1:2013
EN 62233:2008; EN60335-1(ed.5)
EN60335-2-2(ed.6);am1
EMC standard IEC 61000-3-2:2014 (Ed. 4);
IEC 61000-3-3:2013 (Ed. 3);
CISPR 14-1:2005 (Ed. 5) + A1:2008+ A2:2011;
CISPR 14-2:2015 (Ed. 2)
Products meeting the essential requirements of
L.V.D. 2006/95/EC
LW30 –ion – LW38 L-ion
EN 60335-1: 2012; EN 60335-2-69;
EN 61000-3-2: 2014; EN 61000-3-3: 2013; EN
55014-1: 2006+A1: 2012; EN 55014-2: 2015;
UN 3480 -3481 LITHIUM ION BATTERY
Direttives of reference:
2006/42/EC; 2014/30/EU,
CEE 89/336; 2002/95 CE (ROHS)
BILLIGUNG elektrische Versionen:
U.S.A. and Canada:
CARACTÉRISTIQUES TECHNIQUES
Corps aspirant
- Tension d’alimentation (voir plaquettes des
caractéristiques de la machine)
- Puissance total - 1100W
- L-ion 520W
- Moteur aspirant By-Pass
Puissance absorbée - 800 W
- Battery 36V – 350W
- Roteur monté sur 2 roulements à billes
- Double isolation
- Protection: IPX 4
Pour les USA et le Canada avec fil terre
- Pompe 27W.
- électrovalve 9W Battery
Brosse electronicque
- Puissance absobée 250 W (150W Battery)
- Collecteur à entaille
- Roteur monté sur 2 roulements à billes
- Contrôle électronique du nombre de tours et
de la surcharge
- Réglage de la pression du rouleau
- Largeur: 15”(380)
DECLARATION DE CONFORMITÉ
En conforminté suivant les normes:
IEC 60335-2-2: 2009 (Sixth Edition) + A1 :
2012 in conjunction with
IEC 60335-1:2010 (Fifth Edition) (incl.
Corrigendum 1:2010)
EN 60335-1:2012 + A11:2014
EN 60335-2-2:2010 + A11:2012 + A1:2013
EN 62233:2008; EN60335-1(ed.5)
EN60335-2-2(ed.6);am1
EMC standard IEC 61000-3-2:2014 (Ed. 4);
IEC 61000-3-3:2013 (Ed. 3);
CISPR 14-1:2005 (Ed. 5) + A1:2008+ A2:2011;
CISPR 14-2:2015 (Ed. 2)
Products meeting the essential requirements of
L.V.D. 2006/95/EC
LW30 –ion – LW38 L-ion
EN 60335-1: 2012; EN 60335-2-69;
EN 61000-3-2: 2014; EN 61000-3-3: 2013; EN
55014-1: 2006+A1: 2012; EN 55014-2: 2015;
UN 3480 -3481 LITHIUM ION BATTERY
Direttives of reference:
2006/42/EC; 2014/30/EU,
CEE 89/336; 2002/95 CE (ROHS)
APPROBATIONS versions électriques:
U.S.A. and Canada:
CARACTERÍSTICAS TÉCNICAS
Cuerpo de Aspiración
- Tension Alimentación (ver la placa sobre la
máquina).
- Potencia total - 1100W
- Battery 520W
- Motor aspiración By-Pass
Energía absorbida - 800
- Battery 36V – 350W
- Rotor montado sobre 2 cojinetes.
- Doble aislamiento
-Protección: IPX 4
Para el mercado americano:toma de tierra.
-Bomba 27W
- electroválvula 9W Battery
Cepillo eléctrico
- Energía absorbida 250 W (150W Battery)
- Colector encastrado
- Rotor montado sobre 2 cojinetes.
- Control electrónico de las vueltas del motor
y de sobrecarga
- Regulación de la presión del rodillo
- Ancho: 15”(380
DECLARACIÓN DE CONFORMIDAD
En conformidad con las siguentes normas:
IEC 60335-2-2: 2009 (Sixth Edition) + A1 :
2012 in conjunction with
IEC 60335-1:2010 (Fifth Edition) (incl.
Corrigendum 1:2010)
EN 60335-1:2012 + A11:2014
EN 60335-2-2:2010 + A11:2012 + A1:2013
EN 62233:2008; EN60335-1(ed.5)
EN60335-2-2(ed.6);am1
EMC standard IEC 61000-3-2:2014 (Ed. 4);
IEC 61000-3-3:2013 (Ed. 3);
CISPR 14-1:2005 (Ed. 5) + A1:2008+
A2:2011; CISPR 14-2:2015 (Ed. 2)
Products meeting the essential requirements
of L.V.D. 2006/95/EC
LW30 –ion – LW38 L-ion
EN 60335-1: 2012; EN 60335-2-69;
EN 61000-3-2: 2014; EN 61000-3-3: 2013;
EN 55014-1: 2006+A1: 2012; EN 55014-2:
2015; UN 3480 -3481 LITHIUM ION
BATTERY Direttives of reference:
2006/42/EC; 2014/30/EU,
CEE 89/336; 2002/95 CE (ROHS)
APROVACIONES versiones eléctricas:
U.S.A. and Canada:
19

20
Seite wird geladen ...
Seite wird geladen ...
Seite wird geladen ...
Seite wird geladen ...
-
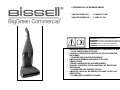 1
1
-
 2
2
-
 3
3
-
 4
4
-
 5
5
-
 6
6
-
 7
7
-
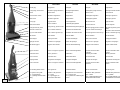 8
8
-
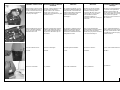 9
9
-
 10
10
-
 11
11
-
 12
12
-
 13
13
-
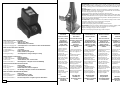 14
14
-
 15
15
-
 16
16
-
 17
17
-
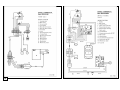 18
18
-
 19
19
-
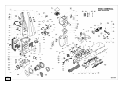 20
20
-
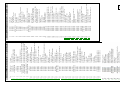 21
21
-
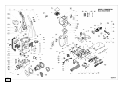 22
22
-
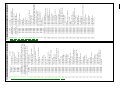 23
23
-
 24
24


Bissell BGUS1500, BGUS1500B Commercial Scrubber Drier Bedienungsanleitung
- Typ
- Bedienungsanleitung
- Dieses Handbuch eignet sich auch für
in anderen Sprachen
- English: Bissell BGUS1500, BGUS1500B Commercial Scrubber Drier Operating instructions
- français: Bissell BGUS1500, BGUS1500B Commercial Scrubber Drier Mode d'emploi
- español: Bissell BGUS1500, BGUS1500B Commercial Scrubber Drier Instrucciones de operación
- italiano: Bissell BGUS1500, BGUS1500B Commercial Scrubber Drier Istruzioni per l'uso