IKEA 605.237.65 UDDARP Washing Machine Benutzerhandbuch
- Kategorie
- Waschmaschinen
- Typ
- Benutzerhandbuch


ENGLISH 5
DEUTSCH 20
ITALIANO 36
FRANÇAIS 51
Consultare l'ultima pagina
di questo manuale dove è
riportato l'elenco completo
dei Centri Assistenza IKEA
con i relativi numeri telefonici
nazionali.
Die vollständige Liste
aller autorisierten IKEA
Kundendienste sowie die
zugehörigen Telefonnummern
nden Sie auf der letzten Seite
in diesem Handbuch.
Consultez la liste complète
des centres d'entretien et de
réparation agréés IKEA ainsi
que des numéros de téléphone
nationaux correspondants à la
dernière page de ce manuel.
Please refer to the last page
of this manual for the full list
of IKEA appointed Authorized
Service Centre and relative
national phone numbers.


5
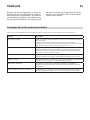
Table of Contents
ENGLISH
IMPORTANT TO BE READ AND OBSERVED
Before using the appliance, read these
safety instructions. Keep them nearby for
future reference. These instructions and
the appliance itself provide important
safety warnings, to be observed at all
times.
The manufacturer declines any liability for
failure to observe these safety instructions,
for inappropriate use of the appliance or
incorrect setting of controls.
Very young children (0-3 years) should
be kept away from the appliance. Young
children (3-8 years) should be kept away
from the appliance unless continuously
supervised. Children from 8 years old and
above and persons with reduced physical,
sensory or mental capabilities or lack of
experience and knowledge can use this
appliance only if they are supervised or
have been given instructions on safe use
and understand the hazards involved.
Children must not play with the appliance.
Cleaning and user maintenance must
not be carried out by children without
supervision.
Never open the door forcibly or use it as a
step.
PERMITTED USE
CAUTION: The appliance is not
intended to be operated by means of an
external switching device, such as a timer,
or separate remote controlled system.
This appliance is intended to be used
in household and similar applications
such as: sta kitchen areas in shops,
oces and other working environments;
farm houses; by clients in hotels, motels,
bed & breakfast and other residential
environments; areas for communal use in
blocks of ats or in launderettes.
Do not load the machine above the
maximum capacity (kg of dry cloth)
indicated in the programme table.
This appliance is not for professional
use. Do not use the appliance outdoors.
Do not use any solvents (e.g.
turpentine, benzene), detergents
containing solvents, scouring powder,
glass or general purpose cleaners, or
ammable uids; do not machine wash
fabrics that have been treated with
solvents or ammable liquids.
INSTALLATION
The appliance must be handled and
installed by two or more persons - risk of
injury. Use protective gloves to unpack and
install - risk of cuts. If you want to stack
a dryer on top of your washing machine,
rst contact our After-Sales Service or your
specialist dealer to verify whether this is
possible. This is only possible if the dryer
is attached to the washing machine by
means of appropriate stacking kit available
through our stores.
Move the appliance without lifting it by
the worktop or top lid.
Installation, including water supply
(if any) and electrical connections and
repairs must be carried out by a qualied
technician. Do not repair or replace any
part of the appliance unless specically
stated in the user manual. Keep children
away from the installation site.
After unpacking the appliance, make sure
that it has not been damaged during
transport. Once installed, packaging
waste (plastic, styrofoam parts etc.) must
be stored out of reach of children - risk
of suocation. The appliance must be
disconnected from the power supply
before any installation operation - risk of
electric shock. During installation, make
sure the appliance does not damage the
power cable - risk of re or electric shock.
Only activate the appliance when the
installation has been completed.
Safety Information 5
About your new product 7
Product description 8
Control Panel 9
First Use 9
Daily use 10
Programmes 11
Functions 12
Cleaning and maintenance 14
Hints and Tips 16
What to do if... 17
After-Sales Service 18
Technical Data 18
Environmental concerns 18
IKEA GUARANTEE 19
GB
Safety Information

ENGLISH 6
Do not install your appliance where it
may be exposed to extreme conditions,
such as: poor ventilation, temperatures
below 5 °C or above 35 °C.
When installing the appliance make
sure that the four feet are stable and
resting on the oor, adjusting them as
required, and check that the appliance is
perfectly to level using a spirit level.
If the appliance is being installed on
wood or “oating” oors (certain parquet
and laminate materials), secure a 60 x 60
x 3 cm (at least) sheet of plywood to the
oor then place the appliance on top of
this.
Connect the water inlet hose(s) to
the water supply in accordance with the
regulations of your local water company.
The washing machine is tted with
transport bolts to prevent any possible
damage to the interior during transport.
Before using the machine, it is imperative
that the transport bolts are removed.
After their removal, cover the openings
with the 4 enclosed plastic caps.
Make sure that the ventilation openings
in the base of your washing machine
(if available on your model) are not
obstructed by a carpet or other material.
Use only new hoses to connect the
appliance to the water supply. The old
hose-sets should not be reused.
The supply water pressure must be in
the 0.1-1 MPa range.
Do not repair or replace any part of the
appliance unless specically stated in the
user manual. Use only authorized After-
sales Service.
Self or non-professional repair may lead
to dangerous incident resulting in live
or health threatening and/or signicant
property damage.
The spare parts for the household
machine will be available for 10 years
after placing the last unit on the market
as dictated by the European Ecodesign
regulation.
ELECTRICAL WARNINGS
It must be possible to disconnect
the appliance from the power supply by
unplugging it if plug is accessible, or by
a multi-pole switch installed upstream of
the socket in accordance with the wiring
rules and the appliance must be earthed in
conformity with national electrical safety
standards.
Do not use extension leads, multiple
sockets or adapters. The electrical
components must not be accessible to
the user after installation. Do not use the
appliance when you are wet or barefoot.
Do not operate this appliance if it has
a damaged power cable or plug, if it is
not working properly, or if it has been
damaged or dropped.
If the supply cord is damaged, it must
be replaced with an identical one by the
manufacturer, its service agent or similarly
qualied persons in order to avoid a
hazard - risk of electric shock.
CLEANING AND MAINTENANCE
WARNING: Ensure that the appliance
is switched o and disconnected from
the power supply before performing any
maintenance operation. To avoid risk
of personal injury use protective gloves
(risk of laceration) and safety shoes (risk
of contusion); be sure to handle by two
persons (reduce load); never use steam
cleaning equipment (risk of electric shock).
Non-professional repairs not authorized
by the manufacturer could result in a
risk to health and safety, for which the
manufacturer cannot be held liable. Any
defect or damage caused from non-
professional repairs or maintenance
will not be covered by the guarantee,
the terms of which are outlined in the
document delivered with the unit.

ENGLISH 7
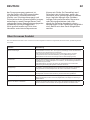
About your new product
Feature Description
Sensor Technology Advanced sensors able to adapt resources detecting the amount and the type of load.
This allows to save up to 50%* on energy water and time. (*Comparison between
maximum load and 1Kg load on washer with sensors technology and Cotton 60°
program).
Fresh Plus End of cycle treatment. After the cycle ends, a perfect combination of gentle steaming
and tumbling starts, keeping the garments fresh for up to 6 hours.
This treatment reduces the risk of creases formation, and inhibits the proliferation of the
main bad odour sources
Steam Care A delicate steam-only program designed to refresh clothes, remove unpleasant odours,
relax bers and smooth creases.
Inverter Motor The motor reliability is ensured by the brushless technology and the inverter control
achieve high energy eciency.
Drum moves Drum moves frequency and duration are tailored to each type of washed items (fabrics,
colours and shape) ensuring care and performance.
Pause / Open the Door / Reload Simply press the “Pause” button if you wish to add or remove laundry, then press it
again to continue the programme.
Your new washing-machine / dryer is equipped with the following features to help you achieve perfect results.

ENGLISH 8
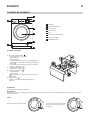
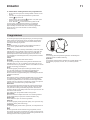
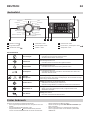
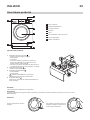
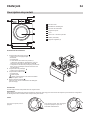
Product description
1 Worktop
2 Detergent dispenser
3 Control panel
4 Door handle
5 Door
6 Water lter - behind plinth
7 Plinth (removable)
8 Adjustable feet (4)
DETERGENT DISPENSER
1. Main wash compartment
• Detergent for the main wash
• Stain remover
• Water softener
• If powder detergent is used, the “removable plastic
partition A” is not needed and it could be placed in
the slot B.
• Removable plastic partition (A) comes in a plastic
bag as a tting with caps.
2. Prewash compartment
• Detergent for the prewash
3. Softener compartment
• Fabric softener
• Liquid starch
Pour softener or starch solution only up to the
“MAX” mark.
4. Release button
(press to remove the detergent dispenser for
cleaning)
ACCESSORIES
The Stacking Kit is available at IKEA stores.
STACKING KIT
By which your dryer can be xed on top of your washing machine to save space and to facilitate loading and unloading your dryer in
the higher position.
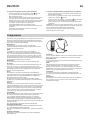
To open the door, pull the handle.
A
B
DOOR
2
7
6
1
3
4
5
8
To close the door, hold the handle
and push so that you can hear it
click shut.

ENGLISH 9
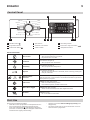
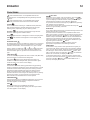
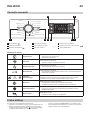
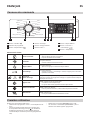
Control Panel
1 “ON/OFF” button
2 Programme selector
3 “Start/Pause” button
4 “Spin” button
5 “Intensive rinse” button
6 “Clean+” button
7 “Start delay” button
8 “Fresh Plus”/ “Key lock“ button
9 “Temperature” button
9 8
7654321
DISPLAY INDICATORS
Door locked
This indicator will light up
• after you have started a programme
• the porthole door is locked
Fresh Plus This indicator will light up
• after you press Fresh Plus button
Start delay This indicator will light up
• after you press Start delay button
Key lock
This indicator will light up
• after the “Key lock” function is activated, which is done by pressing the
8 key for 3 seconds
Washing phase
indicator
This indicator shows the current programme phase, running from left to
right through wash, rinse and drain. The illuminated indicator light shows
which phase is in progress.
Call Service
Failure: Call After-sales service
• Refer to Troubleshooting section
• If the indicator persist, call After-sales service
Water lter clogged Failure: Water lter clogged
• Water cannot be drained; water lter might be blocked
No water Failure: No water
• No or not sucient inlet water.
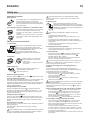
First Use
Remove any manufacturing debris:
• Select the “Cotton” programme at a temperature of 60°C.
• Pour a small quantity of detergent powder into the
main wash compartment of the detergent dispenser
(maximum 1/3 of the quantity the detergent manufacturer
recommends for lightly soiled laundry).
• Start the programme without adding any laundry (with
empty drum).
• See section “DAILY USE” for more information on how to
select and start a programme.
7 Kg
Mixed
Synthetics White
Cotton
Eco 40-60
Sport
Duvet
Steam Care
Spin & Drain
Delicates
Wool
Quick 30’
Rinse & Spin
Cotton 20°C

ENGLISH 10
Daily use
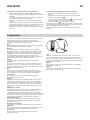
PREPARING THE LAUNDRY
Empty pockets
Close all zippers, buttons, and hooks. Tie all ribbons or belts
HOW TO USE THE WASHING MACHINE
1. Load laundry
2. Close door
3. Open water tap
Switch on washing machine
Press the “ON/OFF” , the “Start/Pause” lamp ashes slowly.
4. Set the desired programme
Select the required programme with the “Program selector” dial.
The washing machine automatically displays the default
temperature setting and then the duration of the washing cycle.
Adjust the temperature and/or spin speed settings if needed
with the relative buttons.
Change temperature, if needed
Press the “Temperature” button to progressively lower
the temperature setting until cold wash has been set (“- -“ will
be shown on the display). Pressing the button again sets the
highest possible setting.
Change spin speed, if needed
Press the “Spin” button to progressively decrease the spin
speed until the spin cycle is turned o (“0” will be shown on the
display). Pressing the button again sets the highest possible
setting.
Select functions, if needed
Press the button to select the function; the respective symbol on
display illuminates.
Press the button again to cancel the option; the light
extinguishes.
If the selected function is incompatible with the programme
set, the incompatibility will be signalled by a buzzer (3 beeps)
and the corresponding indicator light will ash.
If the selected function is incompatible with another
previously set function, only the most recent selection will
remain active.
5. Add detergent
Correct dosing of detergent / additives is important,
because:
• it optimizes the cleaning result
• it avoids irritating residues of surplus detergent in your
laundry
• it saves money by avoiding waste of surplus detergent
• it protects the washing machine by avoiding calcication of
components
• it respects the environment by avoiding unnecessary
environmental burden.
6. Delaying the start of a programme
• To set a programme to start at a later time, see the section
“FUNCTIONS / START DELAY” at page 12.
7. Start programme
• Press the “Start/Pause” . The relative indicator lamp
illuminates, the door locks and the “Door locked”
indicator lights up with a “beep”.
• To avoid overow, do not open the detergent dispenser
during a running programme anymore.
The remaining programme duration can vary. Factors like
unbalance in the wash load, or foam formation, can have an
eect on the programme duration.
8. Change the settings of a running programme, if
needed
You can still change the settings while a programme is
running. The changes will be applied, provided the respective
programme phase has not nished yet.
To change the settings of a running programme:
• Press “Start/Pause” (conrmation “beep”) to put the
running programme on pause.
• Change your settings.
• Press “Start/Pause” (conrmation “beep”) again to
continue the programme.
If you have changed the programme, do not add detergent
for the new programme.
To prevent that a running programme is changed by accident
(for instance by children), use the “Key lock” (see section
“FUNCTIONS”).
Pause a running programme and open the door, if needed
• Press “Start/Pause” to pause a running programme.
• Provided water level or temperature is not too high, the
“Door locked” indicator light turns o. You can open
the door, for example to add more laundry, or to remove
laundry which was loaded by mistake.
• Press “Start/Pause” to proceed with the programme.
9. Cancelling a running programme, if needed
• Press and hold the “ON/OFF“ button: a count down is
shown in the display until the washing machine stops.
• If the water level and temperature are low enough, the door
unlocks and may be opened.
• The door remains locked if there is water in the drum.
To unlock the door, switch the washing machine on, select
the “Spin & Drain” programme and turn the spin option o
by setting the spin speed to “0“.
• The water is emptied and the door unlocks at the end of the
programme.
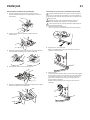
• Coins, paper clips, etc. could damage the load
and the washing machine components.
• Tissues will break down during the wash cycle,
and the fragments will have to be subsequently
removed by hand.
• Insert the smaller garments (e.g. nylon hosiery,
belts, etc.) and garments with hooks (e.g.
braziers) into a fabric bag or a pillowcase with
a zipper.
• Remove any rings from curtains, or else place
the curtains inside a fabric bag together with
the rings.
Open the door and load the laundry. Load the
articles one at a time loosely into the drum,
without overlling. Observe the load sizes given
in the “PROGRAMME CHART” table.
Overloading the machine will result in
unsatisfactory washing results and creased
laundry.
Make sure that no laundry gets
stuck between door glass and
rubber seal.
Close the door so that you can hear
it click shut.
Make sure that the washing machine is
connected to the water mains.
Open the water tap.
Pull out the detergent dispenser and add
detergent (and additives/softener) into the relative
compartments as described in section “DETERGENT
DISPENSER”. Observe the dosing recommendations
on the detergent pack.

ENGLISH 11
10. Switch o the washing machine after programme End
• At the end of the cycle, the message “END” is shown on the
display.
• The door can only be opened when the symbol “Door
locked” light turns o.
• Check that the “Door locked” indicator is o, then open
the door and take out the laundry.
• Press “ON/OFF” to switch the washing machine o.
To save energy, if the washing machine is not switched
o manually with the button, it turns o automatically
approximately 30 minutes after the end of the programme.
Leave the door ajar to let the interior of the washing
machine to dry.
Programmes
For choosing the appropriate programme for your kind of laundry,
always respect the instructions on the care labels of the laundry.
The value given in the tub symbol is the maximum temperature
possible for washing the garment.
Mixed
For washing lightly to normally soiled resilient garments in
cotton, linen, synthetic bres and mixed bres.
White
For washing normally to heavily soiled towels, underwear, table
and bed linen, etc in resilient cotton and linen. Only when the
temperature is selected at 90°C the cycle is provided with a
prewash phase before main washing phase. In this case it is
recommended to add detergent both, in the prewash and main
wash section.
Cotton
Normally to heavily soiled and robust cottons.
Eco 40-60
For washing normally soiled cotton garments declared to be
washable at 40 °C or 60 °C, together in the same cycle. This is
the standard cotton programme and the most ecient in terms
of water and energy consumption.
Sport
For washing lightly soiled sports clothing (tracksuits, shorts,
etc.). For best results, we recommend not exceeding the
maximum load indicated in the‚‘‘PROGRAMME CHART‘‘.
We recommend using liquid detergent, and adding the amount
suitable for half-load.
Duvet
Designed for washing eiderdown padded items such as double
or single duvets, cushions and anoraks. It is recommended
to load such padded items in the drum with the edges folded
inwards and not to exceed ¾ of the drum’s volume. For optimal
washing, we recommend using a liquid detergent.
Steam Care
This programme refreshes garments by removing bad odours
and relaxing the bres (1 kg, roughly 3 items). Insert dry items
only (that are not dirty) and select programme “Steam Care”.
Garments will be a little damp at the end of the cycle and can be
worn after a few minutes.
The “Steam Care” programme makes ironing easier.
Spin & Drain
Spins the load then empties the water. For resilient garments.
If you exclude the spin cycle, the machine will drain only.
Rinse & Spin
Rinses and then spins. For resilient garments.
Quick 30’
For washing lightly soiled garments quickly. This cycle lasts only
30 minutes, saving time and energy.
Cotton 20°C
For washing lightly soiled cotton garments, at a temperature of
20 °C.
Wool
All wool garments can be washed using programme ‚“Wool“
even those carryng the “hand-wash only “ label. For best results,
use special detergents and do not exceed max kg declaration of
laundry present in the Programme chart.
Delicates
For washing particularly delicate garments. Preferably turn
garments inside out before washing.
Synthetics
For washing soiled garments made from synthetic bres (such
as polyester, polyacrylic, viscose, etc.) or cotton/synthetic
blends.

ENGLISH 12
If the selected function is incompatible with the set
programme, the incompatibility will be signalled by a buzzer
(3 beeps).
If the selected function is incompatible with another
previously set function the function will not be enabled.
CLEAN+
Clean+ is an function working on 3 dierent levels (Intensive,
Daily and Fast) that are specially designed to set the right
washing action, depending on your cleaning needs:
Intensive : this function is designed for high levels of
dirtiness, removing most stubborn stains.
Daily : this function is designed to remove everyday stains.
Fast : this function is designed to remove lightly soiled
stains.
INTENSIVE RINSE
By selecting this function, the eciency of the rinse is increased
and optimal detergent removal is guaranteed. It is particularly
useful for sensitive skin. Press the button once, two or three
times to select an additional 1 , 2 or 3 rinses after
the standard cycle rinse and remove all traces of detergent.
Press the button again to go back to the “Normal rinse” rinse
type.
START DELAY
To set the selected programme to start at a later time (Max 24h),
press the button to set the desired delay time.
The symbol lights on the display when this fuction is
enabled. To cancel the delayed start, press the button again
untile the value ‚‘‘0‘‘ is shown on the display.
FRESH PLUS
This function enhances washing performance by generating
steam to inhibit the proliferation of the main bad odour sources
inside the machine. After steam phase, the washing machine
will perform gentle tumbling through slow rotations of the
drum. Fresh Plus function starts after the cycle ends for a
maximum duration of 6h and you can interrupt it at any time by
pressing any button on control panel or turning the knob.
Wait around 5 minutes before door can be opened.
TEMPERATURE
Every programme has a predened temperature. If you want to
change the temperature, press the “temperature” button.
The value appears on the display.
SPIN
Every programme has a predened spin speed.
If you want to change the spin speed, press the “Spin” button.
The value appears on the display.
Functions
KEY LOCK
To lock the control panel, press and hold the “Key lock”
button for approximately 3 seconds. The symbol will light
up on the display to indicate that the control panel has been
locked (with the exception of the “ON/OFF“ button).
This prevents unintentional changes to programmes, especially
with children near the machine.
To unlock the control panel, press and hold the “Key lock”
button for approximately 3 seconds.
BLEACHING
If you wish to bleach the laundry, load the washing machine and
set the “Rinse & Spin” programme.
Start the machine and wait for it to complete the rst water
lling cycle (roughly 2 minutes). Put the machine in pause mode
by pressing the “Start/Pause” button, open the detergent
drawer and pour the bleach (observe the recommended doses
indicated on the package) into the main wash compartment
where the partition was previously mounted. Restart the cycle
by pressing the “Start/Pause” button.
If desired, it is possible to add fabric softener into the
appropriate compartment of the detergent drawer.
DEMO MODE
This function is only used for sales presentations. By this you
can interact with washing machine and see it working without
water. To enter Demo mode, switch the washing machine ON
and OFF again. Press and hold “Start/Pause” button, then
within 5 seconds press also “ON/OFF“ button and hold both
buttons for 10 seconds, the display shows “dOn”.
To deactivate this function, switch the washing machine OFF.
Than press and hold “Start/Pause” button, within 5 seconds
press also “ON/OFF“ button and hold both buttons for 2
seconds, the display shows “dOf”.

ENGLISH 13
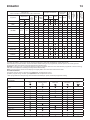
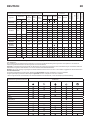
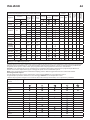
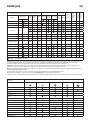
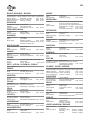
Max load 7 Kg
Power consumption in o-mode 0.5 W / in left-on mode 8.0 W Detergents and additives Recommended
detergent
Residual
dampness % (*)
Energy
consumption
kWh
Total water lt
Laundry
temperature °C
Programme Temperatures Max.
spin
speed
(rpm)
Max
load
(kg)
Duration
(h : mm)
Prewash Main
wash Softener Powder Liquid
Setting Range
Mixed 40°C
-
40°C 1000 7.0 1:00
- - - - -
White 60°C
-
90°C 1200 7.0 2:30 (90°)
52
1.36 75 55
Cotton 40°C
-
60°C 1200 7.0 3:40
-
53 0.98 75 45
Eco 40-60 40°C
40°C
1151 7.0 3:25
-
53 0.89 47 35
1151 3.5 2:40
-
53 0.58 45 34
1151 2.0 2:10 53 0.51 39 33
Sport 40°C
-
40°C 600 3.5 1:30
- - - - - -
Duvet 30°C
-
30°C 1000 3.0 1:30
- - - - - -
Steam Care
–- -
10:20
- - - - - - - - -
Spin & Drain
–-
1200 7.0 0:10
- - - - - - - - -
Rinse & Spin
–-
1200 7.0 0:55
- - - - - - - -
Quick 30’ 30°C
-
30°C 800 3.5 0:30
- -
73 0.19
31
27
Cotton 20°C 20°C
-
20°C 1200 7.0 1:50
- -
52 0.16 64 22
Wool 40°C
-
40°C 800 1.5 1:15
- - - - - -
Delicates 30°C
-
30°C
-
1.0 1:20
- - - - - -
Synthetics 40°C
-
60°C 1200 4.0 2:55
-
53 0.86 60 43
Dosing required
Dosing optional
This data may dier in your home due to changing conditions in inlet water temperature, water pressure etc.
Approximate programme duration values refer to the default setting of the programmes, without options. The values given for
programmes other than the Eco 40-60 programme are indicative only.
Eco 40-60 - Test wash cycle in compliance with EU Ecodesign regulation 2019/2014. The most ecient programme in terms of energy
and water consumption for washing normally soiled cotton laundry.
Note: spin speed values shown on the display can slightly diers from the values stated in the table.
For all Test Institutes
Long wash cycle for cottons: set wash cycle Cotton with a temperature of 40°C.
Synthetic program along: set wash cycle Synthetics with a temperature of 40°C.
* After programme end and spinning with maximum selectable spin speed, in default programme setting.
Programme / Functions
compatibility
Functions
Spin
Intensive Rinse Fresh Plus
Start Delay
Clean +
Mixed
White
Cotton
Eco 40-60
Sport
Duvet
Steam Care
Spin&Drain
Rinse&Spin
Quick 30’
Cotton 20°C
Wool
Delicates
Synthetics

ENGLISH 14
For any cleaning and maintenance, switch o and unplug the
washing machine.
Do not use ammable uids to clean the washing machine.
CLEANING THE OUTSIDE OF THE WASHING MACHINE
Use a soft damp cloth to clean the outer parts of the washing
machine.
Do not use glass or general purpose cleaners, scouring powder
or similar to clean the control panel – these substances might
damage the printing.
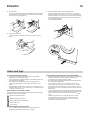
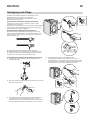
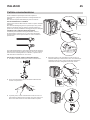
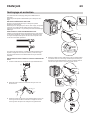
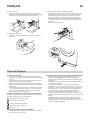
CHECKING THE WATER SUPPLY HOSE
Check the inlet hose regularly for brittleness and cracks. If
damaged, replace it by a new hose available through our
After-Sales Service or your specialist dealer.
For water stop hoses: check the small safety valve inspection
window (see arrow). If it is red, the water stop function was
triggered, and the hose must be replaced by a new one.
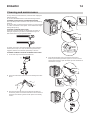
CLEANING THE MESH FILTERS IN THE WATER SUPPLY HOSE
1. Close water tap and unscrew the inlet hose.
2. Clean the mesh lter at the hose’s end carefully with a ne
brush.
3. Now unscrew the inlet hose on the back of the washing
machine by hand. Pull out the mesh lter from the valve on
the back of the washing machine with pliers and carefully
clean it.
Cleaning and maintenance
4. Insert the mesh lter again. Connect the inlet hose to
water tap and washing machine again. Do not use a tool to
connect the inlet hose. Open the water tap and check that all
connections are tight.

ENGLISH 15
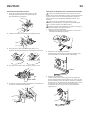
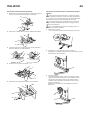
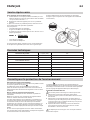
CLEANING THE DETERGENT DISPENSER
1. Remove the detergent dispenser by pressing on the release
button and at the same time pulling out the detergent
dispenser.
2. Remove the insert from the softener compartment.
3. Clean all parts under running water, removing all detergent
or softener residues.
4. Wipe the parts dry with a soft cloth.
5. Reinstall the detergent dispenser and push it back into the
detergent compartment.
1
2
CLEANING THE WATER FILTER / DRAINING RESIDUAL WATER
Switch o and unplug the washing machine before cleaning
the water lter or draining residual water. If you used a hot
wash programme, wait until the water has cooled down before
draining any water.
Clean the water lter regularly, to avoid that the water
cannot drain after the wash due to obstruction of the lter.
If the water cannot drain, the display indicates that the
water lter may be clogged.
1. Remove the kick panel:
using a screwdriver, do that which is shown in the following
gure.
2. Container for the drained water:
place a low and wide container under the water lter in
order to collect the residual water.
3. Drain the water:
slowly turn the lter counter-clockwise until all the water
has come out. Allow the water to ow out without removing
the lter. Once the container is full, close the water lter by
turning it clockwise. Empty the container.
Repeat the procedure until all the water has been drained.

ENGLISH 16
Hints and Tips
RULES FOR SEPARATING LAUNDRY
• Fabric type / indications on label (cotton, mixed bres,
synthetic, wool, handwash items)
• Colour (separate coloured garments from whites, wash new
coloured items separately)
• Size (wash items of dierent sizes in the same load to
improve washing ecacy and weight distribution in the
drum)
• Delicates (place small items – such as nylon stockings – and
garments with clasps – such as braziers – in a laundry bag or
in a pillow case with a zip).
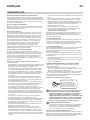
WASH SYMBOLS ON GARMENT LABELS
The value given in the tub symbol is the maximum temperature
possible for washing the garment.
Normal mechanical action
Reduced mechanical action
Much reduced mechanical action
Hand wash only
Do not wash
CLEAN THE WATER FILTER REGULARLY
• This is needed to prevent the lter from blocking and
preventing the water from draining correctly.
SAVING ENERGY AND PROTECTING THE ENVIRONMENT
• Keeping within the load limits indicated in the “PROGRAMM
CHART” will optimise energy, water and detergent
consumption and reduce washing times.
• Do not exceed the detergent quantities recommended by
the detergent manufacturer.
• Save energy by using a 60 °C instead of a 90 °C wash
programme, or by using a 40 °C instead of a 60 °C wash
programme. We recommend using the “ Cotton “ the 60 °C
programme for cotton garments, which is longer, but uses
less energy.
• To save energy and time when washing, select highest spin
speed available for the programme to reduce the residual
water remaining in the garments at the end of the wash
cycle.
• Pretreat any stains with an appropriate stain remover,
or else dampen any dried-on stains with water prior
to washing, as this will reduce the need to use a high
temperature wash programme.
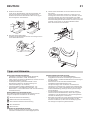
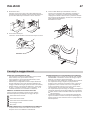
4. Remove lter:
lay a cotton cloth beneath the water lter, which can absorb
a small amount of rest water. Then remove the water lter
by turning it out anticlockwise.
5. Clean the water lter:
remove residues in the lter and clean it under running
water.
6. Insert the water lter and reinstall the plinth:
reinsert the water lter again by turning it in clockwise
direction. Make sure to turn it in as far as it goes; the lter
handle must be in vertical position. To test water tightness
of the water lter, you can pour about 1 liter of water into
the detergent dispenser.
Then reinstall the plinth.

ENGLISH 17
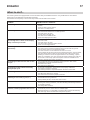
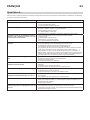
What to do if...
Your washing machine is equipped with various automatic safety and feedback functions. They enable failures and needed
maintenance to be detected and indicated accordingly.
These failures are frequently so minor that they can be removed within a few minutes.
Problem Possible causes / Solutions:
The washing machine does not turn on. • The plug is not inserted into the electrical outlet, or not enough to make
contact.
• There has been a power failure.
• The door is not fully closed.
The wash cycle does not start. • The “ON/OFF” button has not been pressed.
• The “Start/Pause” button has not been pressed.
• The water tap is not open.
• A “Start delay” has been set.
• The machine is in DEMO mode.
• Check if the display shows “dOn”.
The washing machine does not ll with water
(the message “h2o” is shown on the display).
“Beep” sound every 5 seconds.
• The water intake hose is not connected to the tap.
• The hose is bent.
• The water tap is not open.
• The mains water supply has been shut o.
• There is not enough pressure.
The washing machine loads and drains water
continuously.
• The “Start/Pause” button has not been pressed.
• The drain hose has not been installed at 65 to 100 cm from the ground.
• The end of the drain hose is immersed in water.
• The drain connector on the wall does not have an air vent.
• If the problem persists after having performed these checks, close the water
tap, shut o the washing machine, and call the After-sales service. If the
dwelling is located on one of the uppermost oors of a building, a siphon
eect can sometimes occur, thus causing the washing machine to load and
drain water continuously. Special anti-siphon valves are available on the
market to prevent these types of problems.
The washing machine does not drain or does
not spin.
• The programme does not include the draining function: with certain
programmes it must be activated manually.
• The drain hose is bent.
• The drain line is obstructed.
The washing machine vibrates excessively
during the spin cycle.
• At the time of installation, the drum was not properly unblocked.
• The washing machine is not level.
• The washing machine is squeezed between furniture and the wall.
The washing machine leaks water • The water intake hose has not been tightened properly.
• The detergent dispenser is clogged.
• The drain hose has not been properly fastened.
The machine is locked and the display ashes,
indicating an error code (e.g. F-01, F-..).
• Shut o the machine, disconnect the plug from the outlet, and wait about 1
minute before turning it back on.
• If the problem persists, call the After-sales service.
Too much foam is formed. • The detergent is not compatible with the washing machine (it must bear the
wording “for washing machines”, “for hand washing and washing machines”,
or something similar).
• The dosage was excessive.
Door is locked, with or without failure
indication, and the programme does not run.
• Door is locked in case of power breakdown. Programme will continue
automatically as soon as the mains is available again.
• Washing machine is in a standstill. Programme will continue automatically
after the origin of the standstill does not persist anymore.

ENGLISH 18
TRANSPORT AND HANDLING
Never lift the washing machine by holding it at the worktop.
1. Pull out the mains plug, and close the water tap.
2. Make sure that door and detergent dispenser are properly
closed.
3. Disconnect the inlet hose from the water tap, and remove
the drain hose from your draining point. Remove all rest
water from the hoses, and x them so that they cannot get
damaged during transport.
4. Ret the transport bolts. Follow the instructions for
removing the transport bolts in the “Installation Guide” in
reverse order.
Do not transport the washing machine without having xed
the transport bolts.
Disposal of packaging materials
The packaging material is 100% recyclable and is marked with
the recycle symbol .
The various parts of the packaging must therefore be disposed
of responsibly and in full compliance with local authority
regulations governing waste disposal.
Disposal of household appliances
This appliance is manufactured with recyclable or reusable
materials.
Dispose of it in accordance with local waste disposal regulations.
For further information on the treatment, recovery and recycling
of household electrical appliances, contact your local authority,
the collection service for household waste or the store where
you purchased the appliance. This appliance is marked in
compliance with European Directive 2012/19/EU, Waste Electrical
and Electronic Equipment (WEEE).
By ensuring this product is disposed of correctly, you will help
prevent negative consequences for the environment and human
health.
The symbol on the product or on the accompanying
documentation indicates that it should not be treated as domestic
waste but must be taken to an appropriate collection center for the
recycling of electrical and electronic equipment.
Environmental concerns
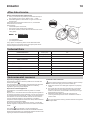
Technical Data
Product Dimension Width (mm) 595
Height (mm) 845 - 855
Depth (mm) 572
Water connection
Water supply Cold
Water tap 3/4” threaded hose connector
Minimum water supply pressure 100 kPa (1 bar)
Maximum water supply pressure 1000 kPa (10 bar)
Voltage Rating [V / Hz / A] 220-240 V / 50 Hz / 10 A
Before contacting the After-Sales Service:
1. See if you can solve the problem yourself with the help of
the suggestions given in the “What to do if ...” table.
2. Switch the appliance o and back on again it to see if the
fault persists.
If after the above checks the fault still occurs, contact IKEA
Authorized Service Centre.
Always specify:
• a brief description of the fault;
• the type and exact model of the appliance;
• the service number (number after the word Service on the
rating plate)
• your full address;
• your telephone number.
If any repairs are required, please contact IKEA Authorized
Service Centre (to guarantee that original spare parts will be
used and repairs carried out correctly).
XXXXXXXXXX
After-Sales Service

ENGLISH 19
How long is the IKEA guarantee valid?
This guarantee is valid for ve years from the original date of
purchase of your appliance at IKEA. The original sales receipt,
is required as proof of purchase. If service work is carried out
under guarantee, this will not extend the guarantee period for
the appliance.
Who will execute the service?
IKEA service provider will provide the service through its own
service operations or authorized service partner network.
What does this guarantee cover?
The guarantee covers faults of the appliance, which have been
caused by faulty construction or material faults from the date
of purchase from IKEA. This guarantee applies to domestic use
only. The exceptions are specied under the headline “What is
not covered under this guarantee?” Within the guarantee period,
the costs to remedy the fault e.g. repairs, parts, labour and
travel will be covered, provided that the appliance is accessible
for repair without special expenditure. On these conditions the
EU guidelines (Nr. 99/44/EG) and the respective local regulations
are applicable. Replaced parts become the property of IKEA.
What will IKEA do to correct the problem?
IKEA appointed Service Provider will examine the product
and decide, at its sole discretion, if it is covered under this
guarantee. If considered covered, IKEA Service Provider or its
authorized service partner through its own service operations,
will then, at its sole discretion, either repair the defective
product or replace it with the same or a comparable product.
What is not covered under this guarantee?
• Normal wear and tear.
• Deliberate or negligent damage, damage caused by failure
to observe operating instructions, incorrect installation or by
connection to the wrong voltage, damage caused by chemical
or electrochemical reaction, rust, corrosion or water damage
including but not limited to damage caused by excessive
lime in the water supply, damage caused by abnormal
environmental conditions.
• Consumable parts including batteries and lamps.
• Non-functional and decorative parts which do not aect
normal use of the appliance, including any scratches and
possible color dierences.
• Accidental damage caused by foreign objects or substances
and cleaning or unblocking of lters, drainage systems or
soap drawers.
• Damage to the following parts: ceramic glass, accessories,
crockery and cutlery baskets, feed and drainage pipes, seals,
lamps and lamp covers, screens, knobs, casings and parts of
casings. Unless such damages can be proved to have been
caused by production faults.
• Cases where no fault could be found during a technician’s
visit.
• Repairs not carried out by our appointed service providers
and/or an authorized service contractual partner or where
non-original parts have been used.
• Repairs caused by installation which is faulty or not according
to specication.
• The use of the appliance in a non-domestic environment i.e.
professional use.
• Transportation damages. If a customer transports the product
to his home or another address, IKEA is not liable for any
damage that may occur during transport. However, if IKEA
delivers the product to the customer’s delivery address, then
damage to the product that occurs during this delivery will be
covered by IKEA.
• Cost for carrying out the initial installation of the IKEA
appliance.
• However, if an IKEA appointed Service Provider or its
authorized service partner repairs or replaces the appliance
under the terms of this guarantee, the appointed Service
Provider or its authorized service partner will reinstall the
repaired appliance or install the replacement, if necessary.
• This does not apply within Ireland, customer should contact
the local IKEA dedicated after sales line or the appointed
Service Provider for further information.
(just for GB)
These restrictions do not apply to fault-free work carried out by
a qualied specialist using our original parts in order to adapt
the appliance to the technical safety specications of another EU
country.
How country law applies
The IKEA guarantee gives you specic legal rights, which cover
or exceed all the local legal demands. However these conditions
do not limit in any way consumer rights described in the local
legislation.
Area of validity
For appliances which are purchased in one EU country and
taken to another EU country, the services will be provided in
the framework of the guarantee conditions normal in the new
country.
An obligation to carry out services in the framework of the
guarantee exists only if the appliance complies and is installed
in accordance with:
• the technical specications of the country in which the
guarantee claim is made;
• the Assembly Instructions and User Manual Safety
Information.
The dedicated AFTER SALES for IKEA appliances
Please don’t hesitate to contact IKEA appointed Authorized
Service Centre to:
• make a service request under this guarantee;
• ask for clarications on installation of the IKEA appliance in
the dedicated IKEA kitchen furniture;
• ask for clarication on functions of IKEA appliances.
To ensure that we provide you with the best assistance, please
read carefully the Assembly Instructions and/or the User Manual
before contacting us.
How to reach us if you need our service
Please refer to the last page
of this manual for the full list
of IKEA appointed Authorized
Service Centre and relative
national phone numbers.
In order to provide you a quicker service, we
recommend to use the specic phone numbers listed
on this manual. Always refer to the numbers listed
in the booklet of the specic appliance you need an
assistance for. Please also always refer to the IKEA
article number (8 digit code) and 12 digit service
number placed on the rating plate of your appliance.
SAVE THE SALES RECEIPT!
It is your proof of purchase and required for the guarantee
to apply. The sales receipt also reports the IKEA name and
article number (8 digit code) for each of the appliances you
have purchased.
Do you need extra help?
For any additional questions not related to After Sales of your
appliances please contact your nearest IKEA store call centre.
We recommend you read the appliance documentation carefully
before contacting us.
IKEA GUARANTEE

20
Inhaltsverzeichnis
DEUTSCH
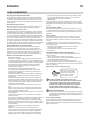
WICHTIG - DURCHLESEN UND BEACHTEN
Diese Sicherheitsanweisungen vor dem
Gebrauch durchlesen. Diese Anweisungen
zum Nachschlagen leicht zugänglich
aufbewahren. In diesen Anweisungen
sowie auf dem Gerät selbst werden
wichtige Sicherheitshinweise angegeben,
die stets beachtet werden müssen.
Der Hersteller übernimmt keine
Haftung für die Nichtbeachtung dieser
Sicherheitshinweise, für unsachgemäße
Verwendung des Geräts oder falsche
Bedienungseinstellung.
Babys und Kleinkinder (0-3 Jahre)
müssen vom Gerät ferngehalten werden.
Jüngere Kinder (3-8 Jahre) müssen vom
Gerät ferngehalten werden, es sei denn,
sie werden ständig beaufsichtigt. Dieses
Gerät darf von Kindern ab 8 Jahren
sowie Personen mit herabgesetzten
physischen, sensorischen oder geistigen
Fähigkeiten und Mangel an Erfahrung und
Kenntnissen nur unter Aufsicht oder nach
ausreichender Einweisung durch eine für
ihre Sicherheit verantwortliche Person
verwendet werden. Kinder dürfen nicht
mit dem Gerät spielen. Die Reinigung und
Pege des Gerätes darf von Kindern nicht
ohne Aufsicht durchgeführt werden.
Önen Sie die Tür niemals mit Gewalt
önen und verwenden Sie diese nicht als
Trittbrett.
ZULÄSSIGE NUTZUNG
VORSICHT: Das Gerät ist nicht
für den Betrieb mit einer externen
Schaltvorrichtung, z. B. einem Timer
oder einer separaten Fernbedienung,
ausgelegt.
Dieses Gerät ist für
Haushaltsanwendungen und
ähnliche Anwendungen konzipiert,
zum Beispiel: Mitarbeiterküchen im
Einzelhandel, in Büros oder in anderen
Arbeitsbereichen; Gutshäuser; für
Gäste in Hotels, Motels, Bed-and-
Breakfast-Anwendungen und anderen
Wohnumgebungen, Gemeinschaftsräume
in Mehrfamilienhäusern oder in
Waschsalons.
Das Gerät nicht über die maximale
Kapazität (kg trockene Kleidung) beladen,
die in der Programmtabelle angegeben ist.
Dieses Gerät ist nicht für den
professionellen Gebrauch ausgelegt. Das
Gerät ist nicht für die Benutzung im Freien
geeignet.
Keine Lösungsmittel (z.B. Terpentin,
Benzol), Waschmittel, die Lösungsmittel
enthalten, Scheuerpulver, Glas- oder
Allzweckreiniger oder brennbare
Flüssigkeiten verwenden; keine mit
Lösungsmitteln oder brennbaren
Flüssigkeiten behandelten Textilien in der
Waschmaschine waschen.
AUFSTELLUNG
Das Gerät muss von zwei oder mehr
Personen gehandhabt und aufgestellt
werden – Verletzungsgefahr. Tragen
Sie Schutzhandschuhe zum Auspacken
und zur Installation - Risiko von
Schnittverletzungen. Wenn der Trockner
auf der Waschmaschine gestapelt werden
soll, fragen Sie unseren Kundendienst
oder Ihren Händler, ob dies möglich ist. Es
ist nur möglich, wenn der Trockner mittels
einem geeigneten Stapelbausatz, der in
unseren Geschäften erhältlich ist, an der
Waschmaschine befestigt wird.
Verschieben Sie die Waschmaschine,
ohne sie an der Arbeitsplatte oder dem
Deckel anzuheben.
Die Installation, einschließlich der
Wasserversorgung (falls vorhanden) und
elektrische Anschlüsse und Reparaturen
müssen von einem qualizierten Techniker
durchgeführt werden. Reparieren Sie
das Gerät nicht selbst und tauschen
Sicherheitshinweise 20
Über Ihr neues Produkt 22
Produktbeschreibung 23
Bedienfeld 24
Erster Gebrauch 24
Täglicher Gebrauch 25
Programme 26
Funktionen 27
Reinigung und Pege 29
Tipps und Hinweise 31
Was tun, wenn... 32
Kundenservice 33
Technische Daten 33
Hinweise zum Umweltschutz 33
IKEA GARANTIE 35
DE
Sicherheitshinweise
Seite wird geladen ...
Seite wird geladen ...
Seite wird geladen ...
Seite wird geladen ...
Seite wird geladen ...
Seite wird geladen ...
Seite wird geladen ...
Seite wird geladen ...
Seite wird geladen ...
Seite wird geladen ...
Seite wird geladen ...
Seite wird geladen ...
Seite wird geladen ...
Seite wird geladen ...
Seite wird geladen ...
Seite wird geladen ...
Seite wird geladen ...
Seite wird geladen ...
Seite wird geladen ...
Seite wird geladen ...
Seite wird geladen ...
Seite wird geladen ...
Seite wird geladen ...
Seite wird geladen ...
Seite wird geladen ...
Seite wird geladen ...
Seite wird geladen ...
Seite wird geladen ...
Seite wird geladen ...
Seite wird geladen ...
Seite wird geladen ...
Seite wird geladen ...
Seite wird geladen ...
Seite wird geladen ...
Seite wird geladen ...
Seite wird geladen ...
Seite wird geladen ...
Seite wird geladen ...
Seite wird geladen ...
Seite wird geladen ...
Seite wird geladen ...
Seite wird geladen ...
Seite wird geladen ...
Seite wird geladen ...
Seite wird geladen ...
Seite wird geladen ...
Seite wird geladen ...
Seite wird geladen ...
-
 1
1
-
 2
2
-
 3
3
-
 4
4
-
 5
5
-
 6
6
-
 7
7
-
 8
8
-
 9
9
-
 10
10
-
 11
11
-
 12
12
-
 13
13
-
 14
14
-
 15
15
-
 16
16
-
 17
17
-
 18
18
-
 19
19
-
 20
20
-
 21
21
-
 22
22
-
 23
23
-
 24
24
-
 25
25
-
 26
26
-
 27
27
-
 28
28
-
 29
29
-
 30
30
-
 31
31
-
 32
32
-
 33
33
-
 34
34
-
 35
35
-
 36
36
-
 37
37
-
 38
38
-
 39
39
-
 40
40
-
 41
41
-
 42
42
-
 43
43
-
 44
44
-
 45
45
-
 46
46
-
 47
47
-
 48
48
-
 49
49
-
 50
50
-
 51
51
-
 52
52
-
 53
53
-
 54
54
-
 55
55
-
 56
56
-
 57
57
-
 58
58
-
 59
59
-
 60
60
-
 61
61
-
 62
62
-
 63
63
-
 64
64
-
 65
65
-
 66
66
-
 67
67
-
 68
68


IKEA 605.237.65 UDDARP Washing Machine Benutzerhandbuch
- Kategorie
- Waschmaschinen
- Typ
- Benutzerhandbuch