
JUMP STARTER
USER MANUAL
FOR 12 VOLT LEAD-ACID BATTERIES
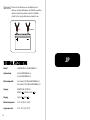
Hotline
Email
Website
Facebook
Twitter
(+1)833-629-4832
www.topdon.com
@TopdonOicial
@TopdonOicial

EN
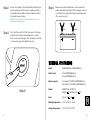
To ensure your safety, please read carefully and understand
thoroughly all safety instructions before using this product.
Go to www.topdon.com for more information.
To be environmentally friendly and consider other factors, our
paper manuals are only in English, German and Japanese. For other
languages, please visit our oicial website https://www.topdon.com/,
go to the corresponding product page and click "DOWNLOADS" to
download the online user manuals, or scan the QR code to visit our
website and obtain online user manuals.
(JUMPSURGE 1200) (JUMPSURGE 2000)

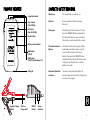
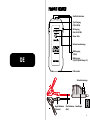
Power Button
Type-C Input
(5V/3A 9V/2A)
Jump Start Socket
USB Output
(5/9/12V Quick Charge 3.0)
USB Output
(5V/2A)
DC Output
(Max 16.8V/10A)
LED Light
Positive
Clamp (Red)
BOOST
Button
Safety
Indicator
Negative Clamp
(Black)
Battery Level Indicator
Solid green
Solid red
Flash green
The indicator doesn't
light up
Alternately Flash Red
and Green
The Jump Starter is ready for use.
Reverse polarity of battery clamps is
detected.
The battery level of the vehicle is too low.
Press the "BOOST" Button and wait until
the Safety Indicator becomes solid green.
Then start your vehicle within 30 seconds.
The battery of the vehicle may be totally
dead. Make sure that you have correctly
connected the clamps to the vehicle
battery. Then press the "BOOST" Button
and wait until the Safety Indicator becomes
solid green. And then start your vehicle
within 30 seconds.
You have tried 4 jump starts within 10
minutes. Please disconnect the clamps and
reconnect to try again.
1 2
EN

1. Press the Power Button once to turn on the jump starter.
2. Press and hold the Power Button for 3 seconds to turn on the
LED Light. Then press the Power Button once separately to toggle
between Flashlight, Strobe, SOS and OFF in turn.
The jump starter comes partially charged and needs to be fully
charged prior to use. Please charge it through the Type-C Input port
once you receive it.
NOTE: Please jump start vehicles only when the battery level of the jump
starter is more than 50%.
IMPORTANT: Make sure you have turned o all of the power loads
of the vehicle, including headlights, radio, air conditioner, etc.,
before attempting to jump start the vehicle.
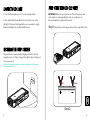
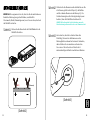
Step1
(Step2)
Plug the blue end of jumper cable into the Jump Start Socket.
(RED) (Black)
3 4
EN

Step2
(Step3)
Connect the clamps to the vehicle battery. Red clamp to
positive polarity(+), black clamp to negative polarity(-).
The Safety Indicator will be solid green which indicates
it is ready for jump starting.
NOTE: Please check the connection if the Safety Indicator is
abnormal or the buzzer rings.
Step3 Try to start the vehicle. If it fails, disconnect the clamps
from the vehicle battery and wait about 20 seconds,
then reconnect and try again. Do not attempt more than
3 consecutive jump starts within 2 minutes.
Step4 Remove the clamps from batteries, then separate the
jumper cable and jump starter aer cranking the vehicle
successfully. Your jump starter will automatically power
o in several seconds.
(RED) (Black)
Model
Peak Current
Battery capacity
Output
Input
WorkingTemperature
Storage Temperature
JUMPSURGE1200/JUMPSURGE2000
1200A(JUMPSURGE1200);
2000A(JUMPSURGE2000)
10000mAh, 3.7V/37Wh(JUMPSURGE1200);
16000mAh, 3.7V/59.2Wh(JUMPSURGE2000)
USB1 QC18W, 5V/9V/12V;
USB2 5V 2A; DC Max 16.8V 10A
Type-C 5V 3A, 9V 2A
-10°C~40°C(14°F~104°F)
-20°C~75°C(-4°F~167°F)
5 6
EN

DE
Power-Taste
Typ-C Eingang
(5V/3A 9V/2A)
Starthilfe-Steckdose
USB Ausgang
(5/9/12V Quick Charge 3.0)
USB Ausgang
(5V/2A)
DC Ausgang
(Max 16.8V/10A)
LED-Leuchte
Positivklemme
(Rot)
Boostknopf
Sicherheitsanzeige
Negaitvklemme
(Schwarz)
Batteriestandsanzeige
8
DE

Durchgehend grün
Durchgehend rot
Blinkt grün
Die Anzeige leuchtet
nicht
Blinkt Abwechselnd
rot und grün
Die Starthilfe ist betriebsbereit.
Umgekehrte Polarität der Klemmen wurde
erkannt.
Die Batteriespannung des Autos ist zu
niedrig. Halten Sie die "BOOST"-Taste
gedrückt, bis die Sicherheitsanzeige
durchgehend grün leuchtet. Dann starten
Sie Ihr Auto innerhalb von 30 Sekunden.
Die Autobatterie ist völlig leer. Stellen Sie
fest, dass Sie die Klemmen korrekt an
die Autobatterie angeschlossen haben.
Halten Sie anschließend die "BOOST"-
Taste gedrückt, bis die Sicherheitsanzeige
durchgehend grün leuchtet. Und dann
starten Sie Ihr Auto innerhalb von 30
Sekunden.
Sie haben innerhalb von 10 Minuten 4
Starthilfeversuche durchgeführt. Bitte
trennen Sie die Klemmen und schließen Sie
sie erneut an, um es erneut zu starten.
1. Drücken Sie auf die Power-Taste, um die Starthilfe einzuschalten.
2. Halten Sie die Power-Taste 3 Sekunden lang gedrückt, um die LED-
Leuchte einzuschalten. Drücken Sie anschließend nochmal separat
auf die Power-Taste, um abwechselnd zwischen Taschenlampe, Blitz,
SOS und AUS umzuschalten.
Diese Starthilfe wird teilweise aufgeladen ausgeliefert und muss vor
der Verwendung vollständig aufgeladen werden. Bitte laden Sie es
nach Empfang des Gerätes über den Typ-C-Eingang auf.
HINWEIS: Bitte starten Sie das Auto nur, wenn der Batteriestand der Starthilfe
mehr als 50 % beträgt.
910
DE

WICHTIG: Bitte vergewissern Sie sich, dass Sie alle strombetriebenen
Geräte des Fahrzeugs ausgeschaltet haben, einschließlich
Scheinwerfer, Radio, Klimaanlage usw., bevor Sie versuchen, das Auto
mit Starthilfe zu starten.
Schritt1
(Schritt2)
Stecken Sie das blaue Ende des Starthilfekabels in die
Starthilfe-Steckdose.
(ROT) (Schwarz)
Schritt2
Schritt3
(Schritt3)
Schließen Sie die Klemmen an die Autobatterie an. Die
rote Klemme gehört an den Pluspol (+) der Batterie
und die schwarze Klemme an den Minuspol (-). Die
Sicherheitsanzeige leuchtet durchgehend grün, was
bedeutet, dass die Starthilfe betriebsbereit ist.
HINWEIS: Bitte überprüfen Sie die Verbindung, wenn die
Sicherheitsanzeige abnormal ist oder es ein Summton ertönt.
Versuchen Sie, das Auto zu starten. Wenn dies
fehlschlägt, trennen Sie die Klemmen von der
Fahrzeugbatterie und warten Sie etwa 20 Sekunden,
dann schließen Sie sie wieder an und versuchen
Sie es erneut. Versuchen Sie nicht mehr als 3
aufeinanderfolgende Starts innerhalb von 2 Minuten.
11 12
DE

Schritt4 Trennen Sie die Klemmen von den Batterien und
entfernen Sie dann die Klemmen der Starthilfe, nachdem
das Auto erfolgreich gestartet wurde. Ihre Starthilfe
schaltet sich in einigen Sekunden automatisch aus.
Modell
Spitzenstrom
Batteriekapazität
Ausgang
Eingang
Betriebstemperatur
Lagertemperatur
JUMPSURGE1200/JUMPSURGE2000
1200A(JUMPSURGE1200);
2000A(JUMPSURGE2000)
10000mAh,3.7V/37Wh(JUMPSURGE1200);
16000mAh,3.7V/59.2Wh(JUMPSURGE2000)
USB1 QC18W, 5V/9V/12V;
USB2 5V 2A; DC Max 16.8V 10A
Typ-C 5V 3A, 9V 2A
-10°C~40°C(14°F~104°F)
-20°C~75°C(-4°F~167°F)
JP
(ROT) (Schwarz)
13

製品概要
電源ボタン
Type-C インプット
(5V/3A 9V/2A)
ジャンプスタートソケット
USB アウトプット
(5/9/12V クイックチャ
ージ 3.0)
USB アウトプット
(5V/2A)
DC アウトプット
(Max 16.8V/10A)
LED ライト
正極クランプ
( 赤)
ブーストボタン
セーフティーイ
ンジケーター
負極クランプ
( 黒)
バッテリー残量インジ
ケーター
緑に点灯
赤に点灯
緑にフラッシュ
インジケーターが点
灯しないこと
赤と緑が交互に点滅
ジャンプスターターは使用可能状態にな
っています。
バッテリー クランプの逆極性が検出され
ました。
車のバッテリー残量が少なく過ぎます。
「BOOST」ボタンを押して、セーフティ
ーインジケータが緑に点灯するまで待ち
ます。 その後、30 秒以内に車を始動し
てください。
車のバッテリーが完全になくなっている
可能性があります。クランプが車のバッ
テリーに正しく接続されていることを確
認してください。次に、「BOOST」ボタ
ンを押して、セーフティーインジケータ
が緑に点灯するまで待ちます。そして、
30 秒以内に車を始動してください。
10 分以内にジャンプ スタートを 4 回ト
ライしました。クランプを取り外し、再
接続して改めて試してください。
セーフティーインジケーター
ガイド
15 16
JP

1. 電源ボタンを一回押して、ジャンプスターターをオンにします。
2. 電源ボタンを 3 秒ほど長く押して、LED ライトをオンにします。
また、電源ボタンを一回押すたびに、ライトがフラッシュライト
・ストロボ・SOS・オフの順番で順次に切り替えます。
LED ライトガイド
ジャンプスターター
を再充電すること
ジャンプスターターが充電されましたが、フル状態ではありませ
ん。使用前に、フル状態まで充電してください。また、受け取っ
た後に、Type-C インプットポートを使って充電してください。
ご注意:ジャンプスターターのバッテリー残量が 50% 以上の場合のみ、
本製品を使って車をジャンプスタートすることができます。
ご注意:車をジャンプスタートしようとする前に、まずは、車の
ヘッドライトやラジオやエアコンなどの電気系を全て、オフにし
たことを確認してください。
車をジャンプスタートす
ること(12V のみ)
STEP1
(STEP2)
ジャンパーケーブルの青い方をジャンプスタートソケ
ットに差し込みます。
(赤) (黒)
17 18
JP

STEP2
(STEP3)
クランプを車バッテリーに接続します。赤は正極(+)
の方にクランプし、黒は負極(-)の方にクランプし
ます。セーフティーインジケーターが緑に点灯する
ことはジャンプスタートしていいと意味します。
ご注意:セーフティーインジケーター異常の場合またはブ
ザーが鳴った場合、接続状態を確認してください。
STEP3 車を始動してみてください。失敗した場合は、クラ
ンプを車バッテリーから外し、約 20 秒待ってから、
再接続して試してください。2 分以内に 3 回以上連
続してジャンプスタートをすることをしないでくだ
さい。
Step4 バッテリーからクランプを取り外します。車を始動
した後に、クランプとジャンプスターターを分け離
します。ご愛用のジャンプスターターは数秒のうち
に自動的に電源オフになります。
仕様
モデル
ピーク電流
バッテリー容量
アウトプット
インプット
動作温度
保存温度
JUMPSURGE1200/JUMPSURGE2000
1200A(JUMPSURGE1200);
2000A(JUMPSURGE2000)
10000mAh,3.7V/37Wh(JUMPSURGE1200);
16000mAh,3.7V/59.2Wh(JUMPSURGE2000)
USB1 QC18W, 5V/9V/12V;
USB2 5V 2A; DC Max 16.8V 10A
Type-C 5V 3A, 9V 2A
-10°C~40°C(14°F~104°F)
-20°C~75°C(-4°F~167°F)
(赤) (黒)
19 20
JP
-
 1
1
-
 2
2
-
 3
3
-
 4
4
-
 5
5
-
 6
6
-
 7
7
-
 8
8
-
 9
9
-
 10
10
-
 11
11
-
 12
12


in anderen Sprachen
Verwandte Artikel
Andere Dokumente
-
Goalzero Venture Jump Benutzerhandbuch
-
 GOOLOO GP2000 Benutzerhandbuch
-
 NOCO Genius GB70 2.0 Benutzerhandbuch
-
NOCO GB150 Benutzerhandbuch
-
 GOOLOO GP80 Benutzerhandbuch
-
NOCO GB40 Boost Plus 1000A Jump Starter Benutzerhandbuch
-
 GOOLOO GP37-Plus Benutzerhandbuch
-
Hummer H8 Multifunctional Jump Starter Power Bank Benutzerhandbuch


