Samsung le 32b551a6 Benutzerhandbuch
- Kategorie
- LCD-Fernseher
- Typ
- Benutzerhandbuch

BN68-02324A-03
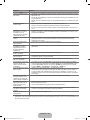
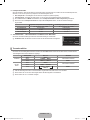
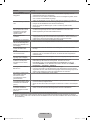
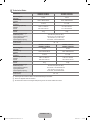
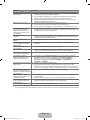
Contact SAMSUNG WORLDWIDE
If you have any questions or comments relating to Samsung products, please contact the SAMSUNG customer care centre.
Country Customer Care Centre Web Site
AUSTRIA 0810 - SAMSUNG (7267864, € 0.07/min) www.samsung.com/at
BELGIUM
02 201 2418 www.samsung.com/be
www.samsung.com/be_fr
CZECH REPUBLIC
800 - SAMSUNG (800-726786) www.samsung.com/cz
Distributor pro Českou republiku:
Samsung Zrt., česká organizační složka, Oasis Florenc, Sokolovská394/17, 180 00, Praha 8
DENMARK 8 - SAMSUNG (7267864) www.samsung.com/dk
EIRE 0818 717 100 www.samsung.com/ie
FINLAND 30 - 6227 515 www.samsung.com/
FRANCE 01 4863 0000 www.samsung.com/fr
GERMANY 01805 - SAMSUNG (7267864, € 0.14/Min) www.samsung.de
HUNGARY 06 - 80 - SAMSUNG (7267864) www.samsung.com/hu
ITALIA 800 - SAMSUNG (7267864) www.samsung.com/it
LUXEMBURG 02 261 03 710 www.samsung.com/lu
NETHERLANDS 0900-SAMSUNG (0900-7267864) (€ 0,10/Min) www.samsung.com/nl
NORWAY 3 - SAMSUNG (7267864) www.samsung.com/no
POLAND
0 801 1SAMSUNG(172678)
022 - 607 - 93 - 33
www.samsung.com/pl
PORTUGAL 808 20 - SAMSUNG (7267864) www.samsung.com/pt
SLOVAKIA 0800 - SAMSUNG (7267864) www.samsung.com/sk
SPAIN 902 - 1 - SAMSUNG (902 172 678) www.samsung.com/es
SWEDEN 0771 726 7864 (SAMSUNG) www.samsung.com/se
SWITZERLAND 0848 - SAMSUNG (7267864, CHF 0.08/min) www.samsung.com/ch
U.K 0845 SAMSUNG (7267864) www.samsung.com/uk
TURKEY 444 77 11 www.samsung.com/tr
BELARUS 810-800-500-55-500 -
ESTONIA 800-7267 www.samsung.com/ee
LATVIA 8000-7267 www.samsung.com/lv
LITHUANIA 8-800-77777 www.samsung.com/lt
MOLDOVA 00-800-500-55-500 -
KAZAHSTAN 8-10-800-500-55-500 www.samsung.com/kz_ru
KYRGYZSTAN 00-800-500-55-500 -
RUSSIA 8-800-555-55-55 www.samsung.ru
TADJIKISTAN 8-10-800-500-55-500 -
UKRAINE 8-800-502-0000
www.samsung.com/ua
www.samsung.com/ua_ru
UZBEKISTAN 8-10-800-500-55-500 www.samsung.com/kz_ru
LCD TV
user manual
imagine the possibilities
Thank you for purchasing this Samsung product.
To receive more complete service, please register
your product at
www.samsung.com/register
Model Serial No.
[550-W.Euro]BN68-02324A-03L09.in1 1 2009-10-09 �� 2:59:01

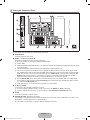
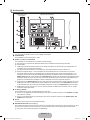
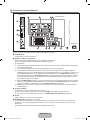
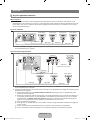
Digital TV Notice
1. Functionalities related to Digital TV(DVB) are only available in countries/areas where DVB-T (MPEG2 and MPEG4 AVC) digital
terrestrial signals are broadcasted or where you are able to access to a compatible DVB-C(MPEG2 and MPEG4 AAC) cable-
TV service. Please check with your local dealer the possibility to receive DVB-T or DVB-C signal.
2.
DVB-T is the DVB European consortium standard for the broadcast transmission of digital terrestrial television and DVB-
C is that for the broadcast transmission of digital TV over cable. However, some differentiated features like EPG (Electric
Programme Guide), VOD (Video on Demand) and so on, are not included in this specification. So, they cannot be workable at
this moment.
3.
Although this TV set meets the latest DVB-T and DVB-C standards, as of [August, 2008], the compatibility with future DVB-T
digital terrestrial and DVB-C digital cable broadcasts cannot be guaranteed.
4.
Depending on the countries/areas where this TV set is used some cable-TV providers may charge an additional fee for such a
service and you may be required to agree to terms and conditions of their business.
5.
Some Digital TV functions might be unavailable in some countries or regions and DVB-C might not work correctly with some
cable service providers.
6.
For more information, please contact your local Samsung customer care centre.
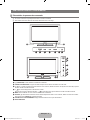
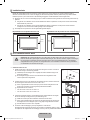
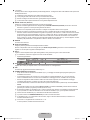
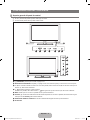
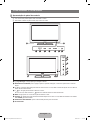
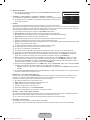
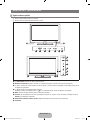
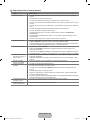
Precautions When Displaying a Still Image
A still image may cause permanent damage to the TV screen
Do not display still image and partially still on the LCD panel for more than 2 hours as it can cause screen image retention.
This image retention is also known as screen burn. To avoid such image retention, reduce the degree of brightness and
contrast of the screen when displaying a still image.
Watching the LCD TV in 4:3 format for a long period of time may leave traces of borders displayed on the
left, right and centre of the screen caused by the difference of light emission on the screen. Playing a DVD or
a game console may cause a similar effect to the screen. Damages caused by the above effect are not
covered by the Warranty.
Displaying still images from Video games and PC for longer than a certain period of time may produce partial after-images. To
prevent this effect, reduce the ‘brightness’ and ‘contrast’ when displaying still images.
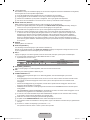
© 2009 Samsung Electronics Co., Ltd. All rights reserved.
❑
❑
●
●
●
Figures and illustrations in this User Manual are provided for reference only and may differ from actual product appearance.
Product design and specications may be changed without notice.
[550-W.Euro]BN68-02324A-03L09.in1 1 2009-10-09 �� 2:59:01
Seite wird geladen ...
Seite wird geladen ...
Seite wird geladen ...
Seite wird geladen ...
Seite wird geladen ...
Seite wird geladen ...

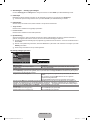
English - 7
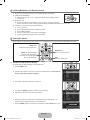
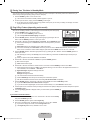
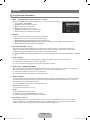
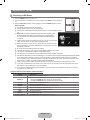
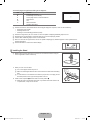
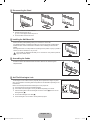
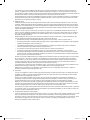
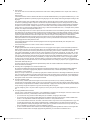
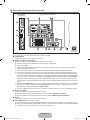
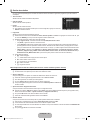
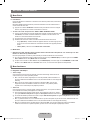
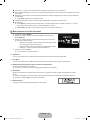
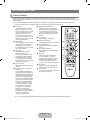
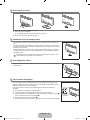
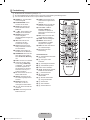
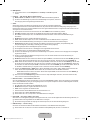
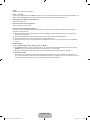
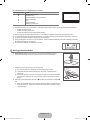
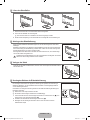
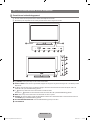
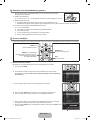
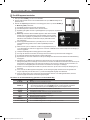
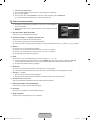
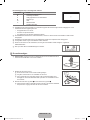
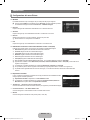
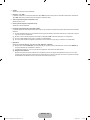
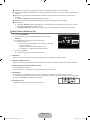
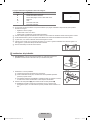
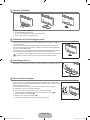
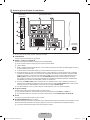
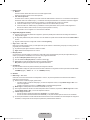
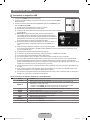
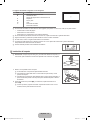
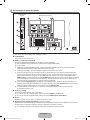
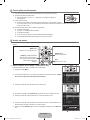
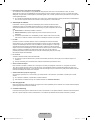
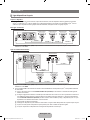
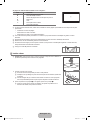
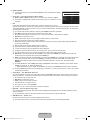
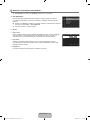
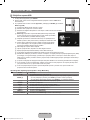
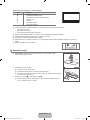
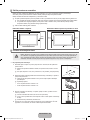
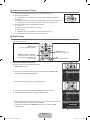
Installing Batteries in the Remote Control
1. Lift the cover at the back of the remote control upward as shown in the figure.
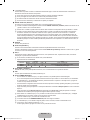
2.
Install two AAA size batteries.
Make sure to match the ‘+’ and ‘–’ ends of the batteries with the diagram inside the
compartment.
3.
Replace the cover.
Remove the batteries and store them in a cool, dry place if you won’t be using the
remote control for a long time. (Assuming typical TV usage, the batteries should last for about one year.)
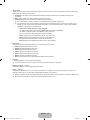
If the remote control doesn’t work, check the following:
Is the TV power on?
Are the plus and minus ends of the batteries reversed?
Are the batteries drained?
Is there a power outage or is the power cord unplugged?
Is there a special fluorescent light or neon sign nearby?
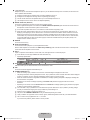
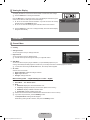
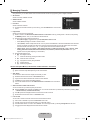
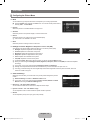
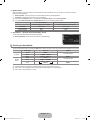
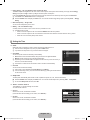
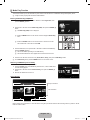
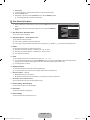
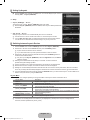
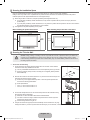
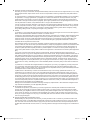
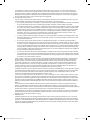
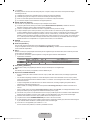
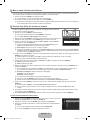
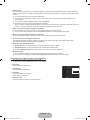
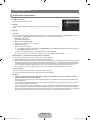
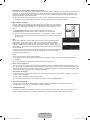
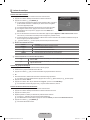
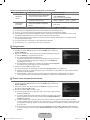
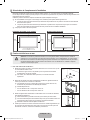
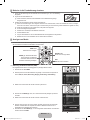
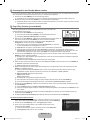
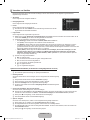
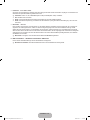
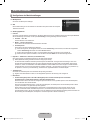
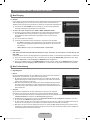
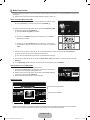
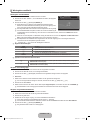
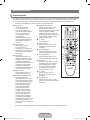
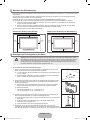
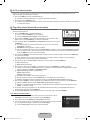
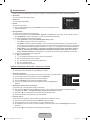
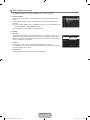
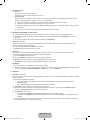
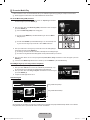
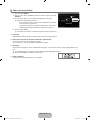
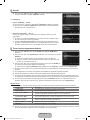
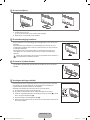
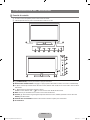
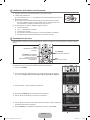
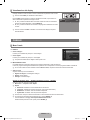
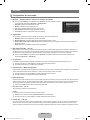
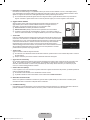
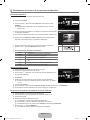
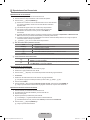
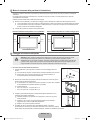
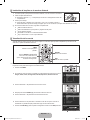
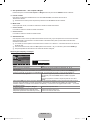
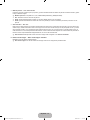
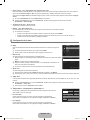
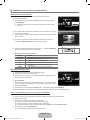
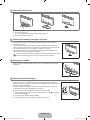
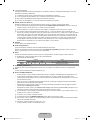
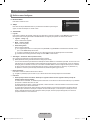
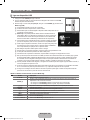
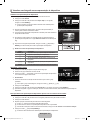
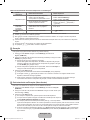
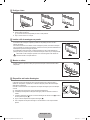
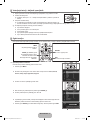
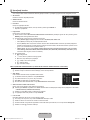
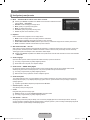
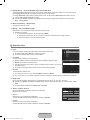
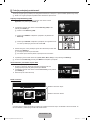
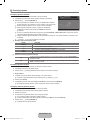
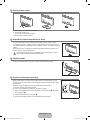
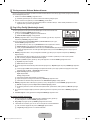
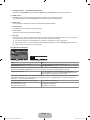
Viewing the menus
Before using the TV, follow the steps below to learn how to navigate the menu in order to select and adjust different functions.
Operation the OSD (On Screen Display)
The access step may differ depending on the selected menu.
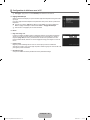
1.
Press the MENU button.
2.
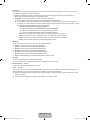
The main menu appears on the screen. The menu’s left side has icons : Picture, Sound,
Channel, Setup, Input, Application, Support.
3. Press the ▲ or ▼ button to select one of the icons.
4.
Then press the ENTER
E
button to access the icon’s sub-menu.
5.
Press the ▲ or ▼ button to select the icon’s submenu.
6.
Press the ◄ or ► button to decrease or increase the value of a particular item. The
adjustment OSD may differ depending on the selected menu.
7.
Press the ENTER
E
button to complete the configuration. Press the EXIT button to exit.
¦
N
N
N
¦
❑
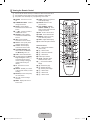
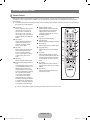
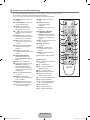
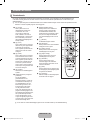
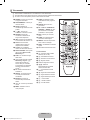
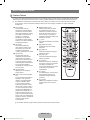
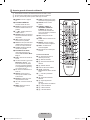
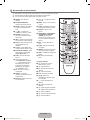
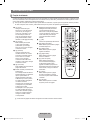
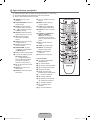
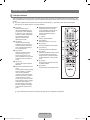
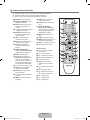
INFO
AD
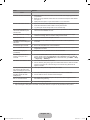
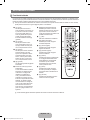
MENU Button
Display the main on-screen menu.
ENTER
E
/ Direction Buttons
Move the cursor and select an
item. Select the currently selected
item. Confirm the setting.
RETURN Button
Return to the previous menu.
EXIT
Exit the on-screen menu.
INFO
AD
INFO
AD
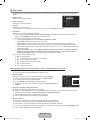
Mode :Standard ▶
Backlight :7
Contrast :95
Brightness :45
Sharpness :50
Colour :50
Tint(G/R) :G50/R50
AdvancedSettings
Picture
Mode :Standard
Backlight :7 ▶
Contrast :95
Brightness :45
Sharpness :50
Colour :50
Tint(G/R) :G50/R50
AdvancedSettings
PictureOptions
Picture
7
U
Move
L
Adjust
E
Enter
R
Return
▲
Backlight
▼
Help icon
[550-W.Euro]BN68-02324A-03L09.in7 7 2009-10-09 �� 2:59:04
Seite wird geladen ...
Seite wird geladen ...
Seite wird geladen ...
Seite wird geladen ...

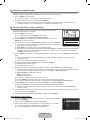
English - 12
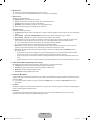
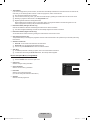
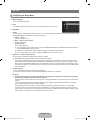
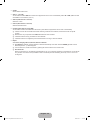
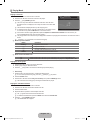
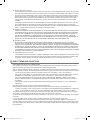
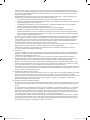
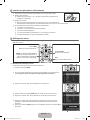
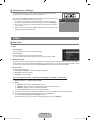
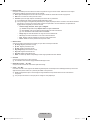
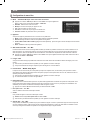
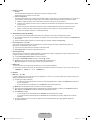
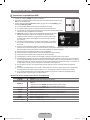
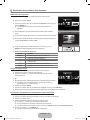
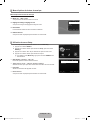
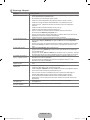
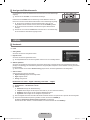
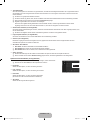
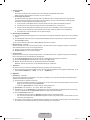
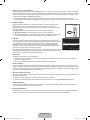
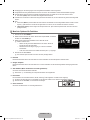
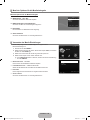
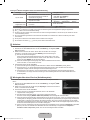
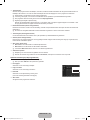
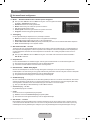
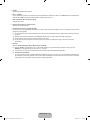
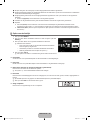
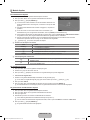
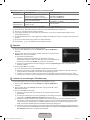
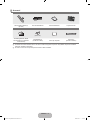
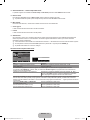
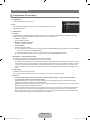
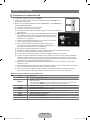
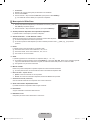
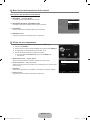
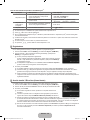
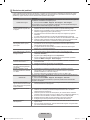
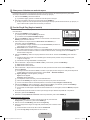
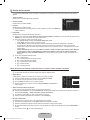
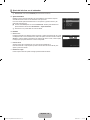
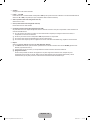
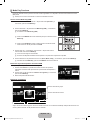
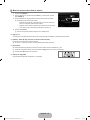
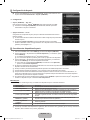
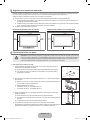
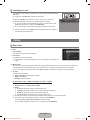
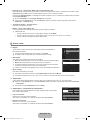
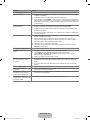
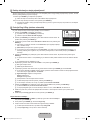
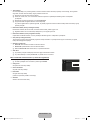
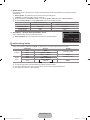
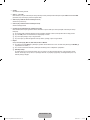
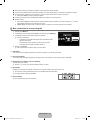
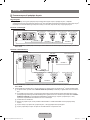
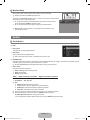
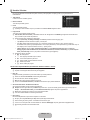
Managing Channels
Using this menu, you can add / delete or set favourites channels and use the programme guide for digital broadcasts.
All Channels
Shows all currently available channels.
Added Channels
Shows all added channels.
Favourites
Shows all favourite channels.
To select the favourites channels you have set up, press the FAV.CH button on the remote
control.
Programmed
Shows all current reserved programmes.
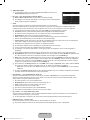
Select a channel in the All Channels, Added Channels or Favourites screen by pressing the ▲ / ▼ buttons, and pressing
the ENTER
E
button. Then you can watch the selected channel.
Using the Colour buttons with the Channel List
Red (Channel Type): Toggle between your TV, Radio, Data / Other and All.
Green (Zoom): Enlarges or shrinks a channel number.
Yellow (Select): Selects multiple channel lists. You can perform the add/delete or add to favourites/delete from favourites
function for multiple channels at the same time. Select the required channels and press the Yellow button to set all the
selected channels at the same time. The
c
mark appears to the left of the selected channels.
TOOLS (Tools): Displays the Delete (or Add), Add to Favourite (or Delete from Favourite), Lock (or Unlock), Timer
Viewing, Edit Channel Name, Edit Channel Number, Sort, Select All (or Deselect All), Auto Store menu. (The
Options menus may differ depending on the situation.)
Channel Status Display Icons
A
: An Analogue channel.
c
: A channel selected by pressing the Yellow button.
*
: A channel set as a Favourite.
(
: A programme currently being broadcast.
\
: A locked channel.
)
: A reserved programme
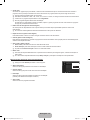
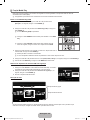
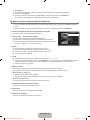
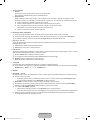
Channel List Option Menu (in All Channels / Added Channels / Favourites)
Press the TOOLS button to use the option menu.
Option menu items may differ depending on the channel status.
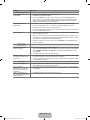
Add / Delete
You can delete or add a channel to display the channels you want.
All deleted channels will be shown on All Channels menu.
A gray-coloured channel indicates the channel has been deleted.
The Add menu only appears for deleted channels.
You can also delete a channel to the Added Channels or Favourites menu in the same
manner.
Add to Favourite / Delete from Favourite
You can set channels you watch frequently as favourites.
Press the TOOLS button to display the Tools menu. You can also set the add to (or delete from) Favourite by selecting Tools
(or Delete from Favourite).
The ‘
*
’ symbol will be displayed and the channel will be set as a favourite.
All favourite channels will be shown on Favourites menu.
Lock / Unlock
You can lock a channel so that the channel cannot be selected and viewed.
This function is available only when the Child Lock is set to On.
The PIN number input screen appears. Enter your 4 digit PIN number.
The default PIN number of a new TV set is ‘0-0-0-0’. You can change the PIN, by selecting Change PIN from the menu.
The ‘
\
’ symbol will be displayed and the channel will be locked.
¦
■
■
■
O
■
N
N
N
N
N
■
N
N
N
N
■
T
N
N
■
N
N
N
N
AllChannels
824UKTVGold
825UKTVstyle
A
1C--
A
2C--
A
3C--
A
4C--
A
5C--
A
6C--
A
7C--
A
8C--
All ChannelType Zoom Select
T
Tools
Delete
AddtoFavourite
Lock
TimerViewing
EditChannelName
Sort
AddedChannels
824UKTVGold
825UKTVstyle
A
1C--
A
2C--
A
3C--
A
4C--
A
5C--
A
6C--
A
7C--
A
8C--
All ChannelType Zoom Select
T
Tools
[550-W.Euro]BN68-02324A-03L09.in12 12 2009-10-09 �� 2:59:06
Seite wird geladen ...
Seite wird geladen ...
Seite wird geladen ...
Seite wird geladen ...
Seite wird geladen ...

English - 18
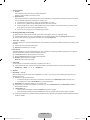
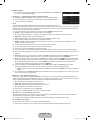
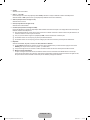
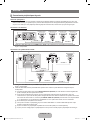
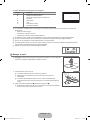
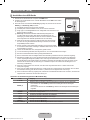
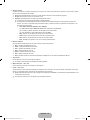
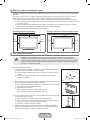
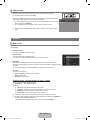
Using Your TV as a Computer (PC) Display
Setting Up Your PC Software (Based on Windows XP)
The Windows display-settings for a typical computer are shown below. The actual screens on
your PC will probably be different, depending upon your particular version of Windows and
your particular video card. However, even if your actual screens look different, the same basic
set-up information will apply in almost all cases. (If not, contact your computer manufacturer or
Samsung Dealer.)
1.
First, click on ‘Control Panel’ on the Windows start menu.
2.
When the control panel window appears, click on ‘Appearance and Themes’ and a display
dialog-box will appear.
3.
When the control panel window appears, click on ‘Display’ and a display dialogbox will
appear.
4.
Navigate to the ‘Settings’ tab on the display dialog-box.
The correct size setting (resolution) - Optimum: 1920 X 1080 pixels
If a vertical-frequency option exists on your display settings dialog box, the correct
value is ‘60’ or ‘60 Hz’. Otherwise, just click ‘OK’ and exit the dialog box.
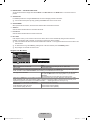
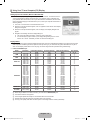
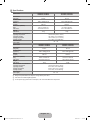
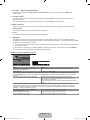
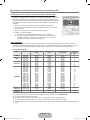
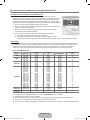
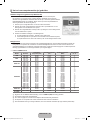
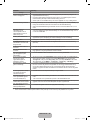
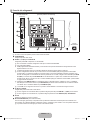
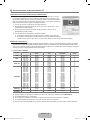
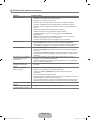
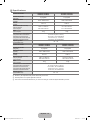
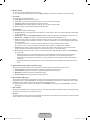
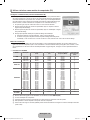
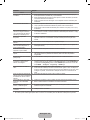
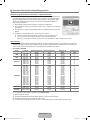
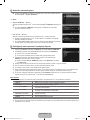
Display Modes
If the signal from the system equals the standard signal mode, the screen is adjusted automatically. If the signal from the system
doesn’t equal the standard signal mode, adjust the mode by referring to your videocard user guide; otherwise there may be no
video. For the display modes listed on the next page, the screen image has been optimized during manufacturing.
D-Sub and HDMI/DVI Input
Mode Resolution Horizontal Frequency
(KHz)
Vertical Frequency
(Hz)
Pixel Clock Frequency
(MHz)
Sync Polarity
(H / V)
IBM
640 x 350 31.469 70.086 25.175 +/-
720 x 400 31.469 70.087 28.322 -/+
MAC
640 x 480 35.000 66.667 30.240 -/-
832 x 624 49.726 74.551 57.284 -/-
1152 x 870 68.681 75.062 100.000 -/-
VESA CVT
720 x 576 35.910 59.950 32.750 -/+
1152 x 864 53.783 59.959 81.750 -/+
1280 x 720 44.772 59.855 74.500 -/+
1280 x 720 56.456 74.777 95.750 -/+
1280 x 960 75.231 74.857 130.000 -/+
VESA DMT
640 x 480 31.469 59.940 25.175 -/-
640 x 480 37.861 72.809 31.500 -/-
640 x 480 37.500 75.000 31.500 -/-
800 x 600 37.879 60.317 40.000 +/+
800 x 600 48.077 72.188 50.000 +/+
800 x 600 46.875 75.000 49.500 +/+
1024 x 768 48.363 60.004 65.000 -/-
1024 x 768 56.476 70.069 75.000 -/-
1024 x 768 60.023 75.029 78.750 +/+
1152 x 864 67.500 75.000 108.000 +/+
1280 x 1024 63.981 60.020 108.000 +/+
1280 x 1024 79.976 75.025 135.000 +/+
1280 x 800 49.702 59.810 83.500 -/+
1280 x 800 62.795 74.934 106.500 -/+
1280 x 960 60.000 60.000 108.000 +/+
1360 x 768 47.712 60.015 85.500 +/+
1440 x 900 55.935 59.887 106.500 -/+
1440 x 900 70.635 74.984 136.750 -/+
1680 x 1050 65.290 59.954 146.250 -/+
VESA GTF
1280 x 720 52.500 70.000 89.040 -/+
1280 x 1024 74.620 70.000 128.943 -/-
VESA DMT /
DTV CEA
1920 x 1080p 67.500 60.000 148.500 +/+
When using an HDMI / DVI cable connection, you must use the HDMI IN 3(DVI) jack.
The interlace mode is not supported.
The set might operate abnormally if a non-standard video format is selected.
Separate and Composite modes are supported. SOG is not supported.
Too long or low quality VGA cable can cause picture noise at high resolution modes (1920x1080).
¦
■
N
N
N
N
N
[550-W.Euro]BN68-02324A-03L09.in18 18 2009-10-09 �� 2:59:07

English - 19
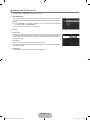
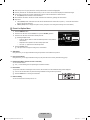
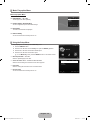
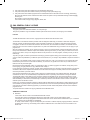
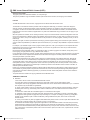
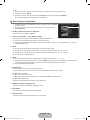
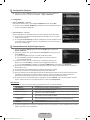
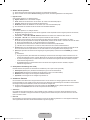
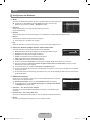
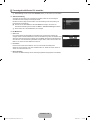
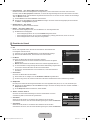
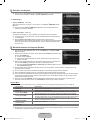
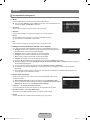
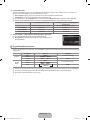
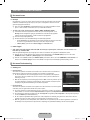
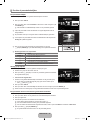
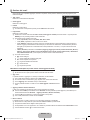
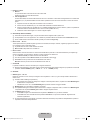
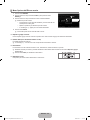
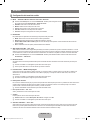
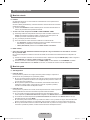
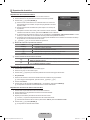
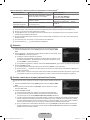
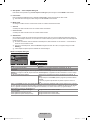
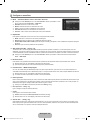
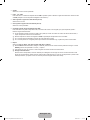
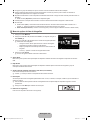
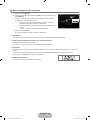
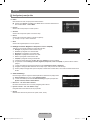
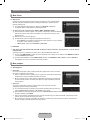
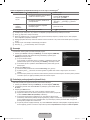
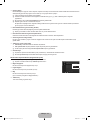
Setting up the TV with your PC
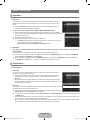
Preset: Press the SOURCE button to select PC mode.
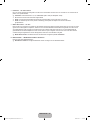
Auto Adjustment
Use the Auto Adjust function to have the TV automatically adjust the video signals it receives.
The function also automatically fine-tunes the settings and adjusts the frequency values and
positions.
Press the TOOLS button to display the Tools menu. You can also set the Auto Adjustment
by selecting .
This function does not work in DVI-HDMI mode.
Screen
Coarse / Fine
The purpose of picture quality adjustment is to remove or reduce picture noise. If the noise is
not removed by Fine-tuning alone, then adjust the frequency as best as possible (Coarse) and
Fine-tune again. After the noise has been reduced, readjust the picture so that it is aligned on
the centre of screen.
PC Position
Adjust the PC’s screen positioning if it does not fit the TV screen.
Press the ▲ or ▼ button to adjusting the Vertical-Position. Press the ◄ or ► button to adjust
the Horizontal-Position.
Image Reset
You can replace all image settings with the factory default values.
¦
N
❑
T
N
❑
■
■
■
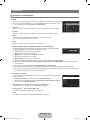
Brightness :45
Sharpness :50
AutoAdjustment ▶
Screen
AdvancedSettings
PictureOptions
PictureReset
Picture
Coarse 50
Fine 0
PCPosition
ImageReset
U
Move
E
Enter
R
Return
Screen
[550-W.Euro]BN68-02324A-03L09.in19 19 2009-10-09 �� 2:59:08
Seite wird geladen ...

English - 21
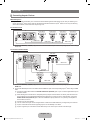
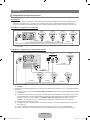
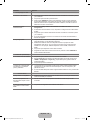
Speaker Select
When you watch TV with it connecting to a Home theatre, turn the TV speakers off so you can listen to sound from the Home
theatre’s (external) speakers.
External Speaker: Used to listen to the sound of the External (Home Theatre) Speakers.
TV Speaker: Used to listen to the sound of the TV Speakers.
The volume and MUTE buttons do not operate when the Speaker Select is set to External Speaker.
If you select External Speaker in the Speaker Select menu, the sound settings will be limited
TV’s Internal Speakers Audio Out (Optical, L/R Out) to Sound System
RF / AV / Component / PC / HDMI RF / AV / Component / PC / HDMI
TV Speaker Sound Output Sound Output
External Speaker Mute Sound Output
Video No Signal Mute Mute
You can restore the Sound settings to the factory defaults.
Reset Sound Mode: Current sound values return to default settings.
Selecting the Sound Mode
You can set the sound mode by pressing the DUAL button. When you press it, the current sound mode is displayed on the screen.
Audio Type Dual 1 / 2 Default
A2 Stereo
Mono MONO
Automatic change
Stereo STEREO ↔ MONO
Dual DUAL 1 ↔ DUAL 2 DUAL 1
NICAM
Stereo
Mono MONO
Automatic change
Stereo MONO ↔ STEREO
Dual
MONO ↔ DUAL 1
DUAL 2
DUAL 1
If the stereo signal is weak and an automatic switching occurs, then switch to the mono.
This function is only activated in stereo sound signal. It is deactivated in mono sound signal.
This function is only available in TV mode.
❑
●
●
N
N
❑
N
¦
N
N
N
SoundReset
L
Move
E
Enter
R
Return
Cancelsoundreset.
ResetAll ResetSoundMode Cancel
[550-W.Euro]BN68-02324A-03L09.in21 21 2009-10-09 �� 2:59:08
Seite wird geladen ...
Seite wird geladen ...
Seite wird geladen ...
Seite wird geladen ...
Seite wird geladen ...
Seite wird geladen ...
Seite wird geladen ...

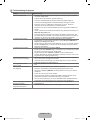
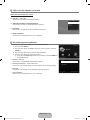
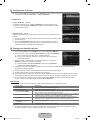
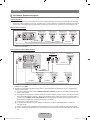
English - 29
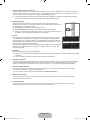
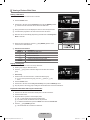
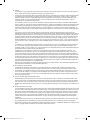
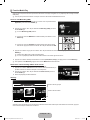
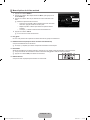
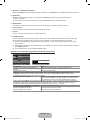
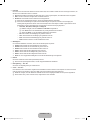
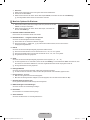
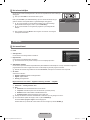
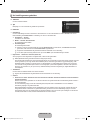
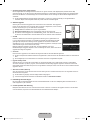
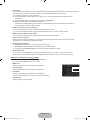
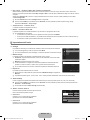
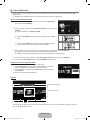
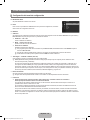
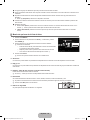
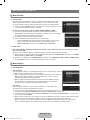
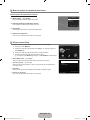
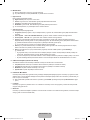
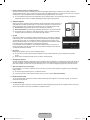
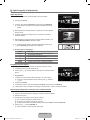
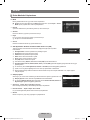
Media Play Function
This function enables you to view and listen to photo and/or music files saved on a USB Mass Storage Class (MSC) device.
It might not work properly with unlicensed multimedia files.
Entering the Media Play (USB) Menu
1. Press the MENU button. Press the ▲ or ▼ button to select Application, then
press the ENTER
E
button.
2.
Press the ▲ or ▼ button to select Media Play (USB), then press the ENTER
E
button.
The Media Play (USB) menu is displayed.
Press the MEDIA.P button on the remote control to display the Media Play
menu.
Press the SOURCE button on the remote control to view the source list.
Then Press the ▲ or ▼ button to select USB.
3.
Press the Red button, then press the ▲ or ▼ button to select the USB Memory.
Press the ENTER
E
button.
This function differs depending on the USB Memory.
The selected USB device name appears at the bottom left of the screen.
4.
Press the ◄ or ► button to select an icon (Photo, Music, Setup), then press the ENTER
E
button.
To exit Media Play mode, press the MEDIA.P button on the remote control.
Removing a USB Memory Device Safely
You can remove the device safely from the TV.
1.
Press the TOOLS button in the Media Play file list screen, or while a Slide Show
or music is being played.
2.
Press the ▲ or ▼ button to select Remove Safely, then press the ENTER
E
button.
3.
Remove the USB device from the TV.
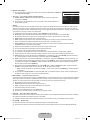
Screen Display
Move to either ‘Group List Section’ or ‘File List Section’ using the Up and Down buttons. After selecting a section, press the ◄ or ►
buttons to select an item.
¦
N
N
O
O
N
N
N
INFO
AD
INFO
AD
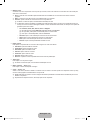
851.86MB/993.02MBFree
Photo
SUM
SUM
Device
PHOTO
R
Return
Music Setup
SUM Device
Select
T
Tools
R
UpperFolder
1234.jpg
1235.jpg
1236.jpg
1237.jpg
1233.jpg
1232.jpg
1231.jpg
SlideShow
PlayCurrentGroup
Information
RemoveSafely
5/15
1 2
../Photo/
Group List Section
File List Section
SUM Device
Select
T
Tools
R
UpperFolder
1234.jpg
1235.jpg
1236.jpg
1237.jpg
1233.jpg
1232.jpg
1231.jpg
1File(s)Selected
2
3 5
4
1 2
1
5/15
c
../Photo/
[550-W.Euro]BN68-02324A-03L09.in29 29 2009-10-09 �� 2:59:13
Seite wird geladen ...

English - 31
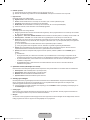
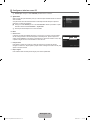
Viewing a Photo or Slide Show
Viewing a Slide Show
1. Press the ▼ button to select the File List Section.
2.
Press the TOOLS button.
3.
Press the ▲ or ▼ button to select Slide Show, then press the ENTER
E
button.
All files in the File List Section will be used for the Slide Show.
During the slide show, files are displayed in order from the currently shown file.
The Slide Show progresses in the order sorted in the File List Section.
Music files can be automatically played during the Slide Show if the Background
Music is set to On.
While a photo list is displayed, press the
∂
(Play)/ENTER
E
button on the
remote control to start slide show.
SlideShow Control Buttons
Button Operations
ENTER
E
Play/Pause the Slide Show.
∂
Play the Slide Show.
∑
Pause the Slide Show.
∫
Exit Slide Show and return to the photo list.
π
/
μ
Change the SlideShow playing speed.
TOOLS Run various functions from the Photo menus.
Playing current group
1. Press the ▲ button to move to the Group List Section.
2.
Select a group using the ◄ and ► buttons.
3.
Press the
∂
(Play) button. A slideshow begins with the files of the selected
group.
Alternatively
1.
Select the files In the File List Section, contained the desired group.
To move to the previous/next group, press the
π
(REW) or
μ
(FF)
button.
2.
Press the TOOLS button.
3.
Press the ▲ or ▼ button to select Play Current Group, then press the ENTER
E
button.
Only the photos in the sorting group including the selected files will be used for the Slide Show.
1. Press the ▼ button to select the File List Section.
2.
Press the ◄ or ► button to select the desired photo in the File List Section.
3.
Press the Yellow button.
4.
Repeat the above operation to select multiple photos.
The
c
mark appears to the left of the selected photo.
If you select one file, the Slide Show will not be performed.
To deselect all selected files, press the TOOLS button and select Deselect All.
5.
Press the
∂
(Play)/ENTER
E
button.
The selected files will be used for the Slide Show.
¦
N
N
N
N
O
N
●
N
N
N
N
N
N
INFO
AD
E
Pause◀▶Previous/Next
T
Tools
R
Return
SUM
1234.jpg
580x7652009/01/025/15
▶Normal
SUM Device
Select
T
Tools
R
UpperFolder
1234.jpg
1235.jpg
1236.jpg
1237.jpg
1233.jpg
1232.jpg
1231.jpg
SlideShow
PlayCurrentGroup
Information
RemoveSafely
5/15
1 2
../Photo/
SUM Device
Select
T
Tools
R
UpperFolder
1234.jpg
1235.jpg
1236.jpg
1237.jpg
1233.jpg
1232.jpg
1231.jpg
5/15
1 2
../Photo/
[550-W.Euro]BN68-02324A-03L09.in31 31 2009-10-09 �� 2:59:17
Seite wird geladen ...

English - 33
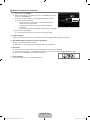
Music List Option Menu
1. Press the MEDIA.P button.
2.
Press the ◄ or ► button to select Music, then press the ENTER
E
button.
3.
Press the ◄ or ► button to select the desired Music file.
Selecting Multiple Music Files
Press the ◄ or ► button to select the desired music file. Then press the
Yellow button.
Repeat the above operation to select multiple music files.
The mark
c
appears to the selected music file.
4.
Press the TOOLS button.
The option menu changes according to the current status.
Play Current Group
Using this menu, you can only play music files in the currently selected sorting group.
Deselect All (When at least one file is selected)
You can deselect all files.
The
c
mark indicating the corresponding file is selected is hidden.
Information
The music file information including the name, the size, the date modified and the path is displayed.
You can view the music file information during Play Current Group using the same procedures.
Press the INFO button to viewing the information.
Remove Safely
You can remove the device safely from the TV.
¦
N
N
❑
❑
N
❑
N
O
❑
INFO
AD
SUM Device
Select
T
Tools
R
UpperFolder
HaHaHa
Gold
Shine
Way
WantMe
Lies
ILoveYou
GlenHans
OnceOst
2007
Soundtrack
3/37Energetic
PlayCurrentGroup
Information
RemoveSafely
5 1 2 34
../Music/
[550-W.Euro]BN68-02324A-03L09.in33 33 2009-10-09 �� 2:59:18
Seite wird geladen ...
Seite wird geladen ...
Seite wird geladen ...
Seite wird geladen ...
Seite wird geladen ...
Seite wird geladen ...
Seite wird geladen ...
Seite wird geladen ...
Seite wird geladen ...
Seite wird geladen ...
Seite wird geladen ...
Seite wird geladen ...
Seite wird geladen ...

English - 47
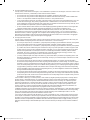
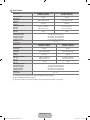
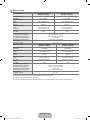
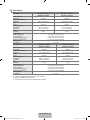
Specifications
Model Name LE32B550, LE32B551
LE32B553, LE32B554
LE37B550, LE37B551
LE37B553, LE37B554
Screen Size
(Diagonal) 32 inch 37 inch
PC Resolution
(Optimum) 1920 x 1080 @ 60 Hz 1920 x 1080 @ 60 Hz
Sound
(Output) 10W X 2 10W X 2
Dimensions (WxDxH)
Body
With stand
794 X 77 X 524 mm
794 X 240 X 570 mm
917 X 79 X 592 mm
917 X 255 X 658 mm
Weight
With Stand 13 kg 16 kg
Environmental Considerations
Operating Temperature
Operating Humidity
Storage Temperature
Storage Humidity
10°C to 40°C (50°F to 104°F)
10% to 80%, non-condensing
-20°C to 45°C (-4°F to 113°F)
5% to 95%, non-condensing
Stand Swivel
(Left / Right)
-20˚ ~ 20˚
Model Name LE40B550, LE40B551
LE40B553, LE40B554
LE46B550, LE46B551
LE46B553, LE46B554
Screen Size
(Diagonal) 40 inch 46 inch
PC Resolution
(Optimum) 1920 x 1080 @ 60 Hz 1920 x 1080 @ 60 Hz
Sound
(Output) 10W X 2 10W X 2
Dimensions (WxDxH)
Body
With stand
982 X 79 X 626 mm
982 X 255 X 676 mm
1116 X 79 X 706 mm
1116 X 275 X 770 mm
Weight
With Stand 18 kg 23 kg
Environmental Considerations
Operating Temperature
Operating Humidity
Storage Temperature
Storage Humidity
10°C to 40°C (50°F to 104°F)
10% to 80%, non-condensing
-20°C to 45°C (-4°F to 113°F)
5% to 95%, non-condensing
Stand Swivel
(Left / Right) -20˚ ~ 20˚
Design and specifications are subject to change without prior notice.
This device is a Class B digital apparatus.
For the power supply and Power Consumption, refer to the label attached to the product.
¦
N
N
N
[550-W.Euro]BN68-02324A-03L09.in47 47 2009-10-09 �� 2:59:28
Seite wird geladen ...
Seite wird geladen ...
Seite wird geladen ...
Seite wird geladen ...
Seite wird geladen ...
Seite wird geladen ...
Seite wird geladen ...
Seite wird geladen ...
Seite wird geladen ...
Seite wird geladen ...
Seite wird geladen ...
Seite wird geladen ...
Seite wird geladen ...

This page is intentionally
left blank.
[550-W.Euro]BN68-02324A-03L09.in61 61 2009-10-09 �� 2:59:30
Seite wird geladen ...
Seite wird geladen ...
Seite wird geladen ...
Seite wird geladen ...
Seite wird geladen ...
Seite wird geladen ...
Seite wird geladen ...
Seite wird geladen ...
Seite wird geladen ...
Seite wird geladen ...
Seite wird geladen ...

Français - 11
Vous pouvez choisir d'afficher le Guide Complet ou le Mini Guide lorsque vous appuyez sur le bouton GUIDE de la
télécommande.
Liste des chaînes
Pour obtenir plus de détails sur les procédures d'utilisation de la Liste des chaînes, reportez-vous aux instructions de
‘Gestion des chaînes’.
Vous pouvez sélectionner ces options en appuyant sur le bouton CH LIST de la télécommande.
Mode des chaînes
Lorsque vous appuyez sur le bouton P
>
/
<
, les chaînes seront sélectionnées dans la liste des chaînes sélectionnée.
Chaînes ajoutées
Les chaînes sont sélectionnées dans la liste des chaînes mémorisée.
Favoris
Les chaînes sont sélectionnées dans la liste des chaînes mémorisée.
Réglage fin
Si la réception est claire, vous n'avez pas besoin d'effectuer une syntonisation fine du canal, car cette opération s'effectue
automatiquement pendant la recherche et la mémorisation. Si le signal est faible ou distordu, vous pouvez être amené à effectuer
manuellement une syntonisation fine du canal.
Les canaux finement syntonisés qui ont été mémorisés sont repérés par un astérisque "*" placé à droite de leur numéro dans
la bannière des canaux.
Pour rétablir la syntonisation fine, sélectionnez Réinit. à l'aide du bouton ▲ ou ▼, puis appuyez sur le bouton ENTER
E
.
La syntonisation fine n'est possible que pour des chaînes analogiques.
Utilisation du guide complet / mini-guide
Pour… Alors…
Regarder un programme de la liste du guide
électronique des programmes
Sélectionnez un programme à l'aide des boutons ▲, ▼, ◄, ►.
Quitter le guide Appuyez sur le bouton bleu.
Si le programme suivant est sélectionné, il est planifié avec l'icône de l'horloge affichée. Si vous appuyez de nouveau sur
le bouton ENTER
E
puis sur ◄, ► pour sélectionner Annuler progr., la programmation est annulée et l'icône de l'horloge
disparaît.
Voir les informations relatives aux programmes Sélectionnez un programme à l'aide des boutons ▲, ▼, ◄, ►.
Appuyez ensuite sur le bouton INFO lorsque le programme de votre
choix apparaît en surbrillance.
Le titre du programme se trouve dans la partie supérieure du centre de
l'écran.
Cliquez sur le bouton INFO pour obtenir des informations détaillées. Numéro de canal, temps de fonctionnement du
programme, barre d'état, niveau de contrôle parental, informations sur la qualité vidéo (HD/SD), modes son, sous-titres ou
télétexte, langue des sous-titres ou du télétexte et bref résumé du programme en surbrillance font partie des informations
détaillées. ‘...’ s'affiche si le résumé est long.
Basculer entre Guide Complet et Mini Guide Appuyez à plusieurs reprises sur le bouton rouge.
Dans le guide complet
Reculer rapidement (24 heures).
Avancer rapidement (24 heures).
Appuyez à plusieurs reprises sur le bouton vert.
Appuyez à plusieurs reprises sur le bouton jaune.
❑
❑
O
❑
■
■
❑
N
N
N
GuideComplet
E
Regarder Information Page MiniGuide +24heures Quitter
DTVCable900ftn2:10Mar1Jui
FreshmenOnCampus
2:00-2:30
NoDetailedInformation
Aujourd'hui
2:00-3:00 3:00-4:00
MintExtra
Loaded
40withDynamiteMC
TheDistillery
SmashHits!Sunday
900ftn
901ITVPlay
902Kerrang!
903Kiss
904oneword
905Hits
▼
StreetHypn..
Kisstory
NoInformation
NoInformation
NoInformation
FreshmenO..
900
E
Regarder Information Page GuideComplet Quitter
MiniGuide DTVCable900ftn
StreetHypnosis
BoozeBritain
2:00
2:30
5:00
FreshmenOnCampus
▼
[550-W.Euro]BN68-02324A-03L09.in11 11 2009-10-09 �� 2:59:34
Seite wird geladen ...
Seite wird geladen ...
Seite wird geladen ...
Seite wird geladen ...
Seite wird geladen ...
Seite wird geladen ...

Français - 18
Utilisation de votre téléviseur comme écran d'ordinateur (PC)
Les paramètres d'affichage Windows indiqués ci-dessous sont valables pour ordinateur
standard. Les affichages écran sur votre PC seront probablement différents, en fonction de
votre version de Windows et votre carte vidéo. Cependant, même si les affichages réels
diffèrent, les mêmes informations de configuration de base s'appliquent dans la plupart des
cas. (Dans le cas contraire, contactez le fabricant de votre ordinateur ou votre revendeur
Samsung.)
1.
Dans le menu Démarrer de Windows, cliquez sur ‘Panneau de configuration’.
2.
Dans le Panneau de configuration, cliquez sur ‘Apparence et thèmes’. Une boîte de
dialogue s'affiche.
3.
Cliquez sur ‘Affichage’. Une nouvelle boîte de dialogue s'affiche.
4.
Cliquez sur l'onglet ‘Paramètres’.
Réglage correct de la taille (résolution) - Optimal : 1920 x 1080 pixels.
S’il existe une option de fréquence verticale sur votre boîte de dialogue des
paramètres d’affichage, la valeur correcte est ‘60’ ou ‘60 Hz’. Sinon, cliquez
simplement sur ‘OK’ pour quitter la boîte de dialogue.
Si le signal du système équivaut au mode de signal standard, l'écran se règle automatiquement. Si le signal du système ne
correspond pas au mode de signal standard, réglez le mode en vous reportant le cas échéant au manuel d'utilisation de la carte
vidéo. Pour les modes d'affichage répertoriés en page suivante, l'image de l'écran a été optimisée lors de la fabrication.
Entrée D-Sub et HDMI/DVI
Mode Résolution Fréquence horizontale
(KHz)
Fréquence verticale
(kHz)
Fréquence d'horloge
pixels (MHz)
Polarité
synchronisée
(H/V)
IBM
640 x 350 31,469 70,086 25,175 +/-
720 x 400 31,469 70,087 28,322 -/+
MAC
640 x 480 35,000 66,667 30,240 -/-
832 x 624 49,726 74,551 57,284 -/-
1152 x 870 68,681 75,062 100,000 -/-
VESA CVT
720 x 576 35,910 59,950 32,750 -/+
1152 x 864 53,783 59,959 81,750 -/+
1280 x 720 44,772 59,855 74,500 -/+
1280 x 720 56,456 74,777 95,750 -/+
1280 x 960 75,231 74,857 130,000 -/+
VESA DMT
640 x 480 31,469 59,940 25,175 -/-
640 x 480 37,861 72,809 31,500 -/-
640 x 480 37,500 75,000 31,500 -/-
800 x 600 37,879 60,317 40,000 +/+
800 x 600 48,077 72,188 50,000 +/+
800 x 600 46,875 75,000 49,500 +/+
1024 x 768 48,363 60,004 65,000 -/-
1024 x 768 56,476 70,069 75,000 -/-
1024 x 768 60,023 75,029 78,750 +/+
1152 x 864 67,500 75,000 108,000 +/+
1280 x 1024 63,981 60,020 108,000 +/+
1280 x 1024 79,976 75,025 135,000 +/+
1280 x 800 49,702 59,810 83,500 -/+
1280 x 800 62,795 74,934 106,500 -/+
1280 x 960 60,000 60,000 108,000 +/+
1360 x 768 47,712 60,015 85,500 +/+
1440 x 900 55,935 59,887 106,500 -/+
1440 x 900 70,635 74,984 136,750 -/+
1680 x 1050 65,290 59,954 146,250 -/+
VESA GTF
1280 x 720 52,500 70,000 89,040 -/+
1280 x 1024 74,620 70,000 128,943 -/-
VESA DMT /
DTV CEA
1920 x 1080p 67,500 60,000 148,500 +/+
Lorsque vous utilisez une connexion avec câble HDMI/DVI, vous devez utiliser la prise HDMI IN 3(DVI).
Le mode entrelacé n'est pas pris en charge.
Le téléviseur peut fonctionner de façon anormale si le format vidéo sélectionné n'est pas standard.
Les modes Séparé et Composite sont pris en charge. Le format SOG (SVSV) n'est pas pris en charge.
Un câble VGA trop long ou de qualité médiocre peut être source de parasites visuels dans les modes haute résolution (1920 x
1080).
¦
■
N
N
N
N
N
[550-W.Euro]BN68-02324A-03L09.in18 18 2009-10-09 �� 2:59:36

Français - 19
Configuration du téléviseur avec le PC
Préréglage : Appuyez sur le bouton SOURCE pour sélectionner le mode PC.
Réglage Automatique
Utilisez la fonction Auto Adjust pour que le téléviseur règle automatiquement les signaux vidéo
qu'il reçoit.
La fonction règle aussi automatiquement les paramètres ainsi que les valeurs et positions de
fréquences.
Appuyez sur le bouton TOOLS pour afcher le menu Outils. Vous pouvez également
dénir le réglage automatique en sélectionnant .
Cette fonction ne s'applique pas en mode DVI-HDMI.
Ecran
Regl. Base / Regl. Prec
Lorsque vous réglez la qualité de l'image, l'objectif est d'éliminer ou de réduire les parasites
visuels. Si vous ne pouvez pas éliminer ces parasites par une syntonisation fine, réglez la
fréquence (Regl. Base) au mieux, puis effectuez de nouveau une syntonisation fine. Une
fois les parasites réduits, effectuez un nouveau réglage de l'image pour l'aligner au centre de
l'écran.
Position du PC
Réglez la position d'affichage du PC si elle ne convient pas pour l'écran du téléviseur.
Appuyez sur le bouton ▲ ou ▼ pour régler la position verticale. Appuyez sur le bouton ◄ ou ►
pour régler la position horizontale.
Réinitialiser Image
Vous pouvez rétablir les valeurs par défaut de tous les paramètres d'image.
¦
N
❑
T
N
❑
■
■
■
Luminosité :45
Netteté :50
RéglageAutomatique ▶
Ecran
Paramètresavancés
Optionsd'image
Réinitialisationdel'image
Image
Regl.Base 50
Regl.Prec 0
PositionduPC
RéinitialiserImage
U
Déplacer
E
Entrer
R
Retour
Ecran
[550-W.Euro]BN68-02324A-03L09.in19 19 2009-10-09 �� 2:59:37
Seite wird geladen ...
Seite wird geladen ...
Seite wird geladen ...
Seite wird geladen ...
Seite wird geladen ...
Seite wird geladen ...
Seite wird geladen ...
Seite wird geladen ...
Seite wird geladen ...

Français - 29
Fonction Media Play
Cette fonction vous permet de lire les photos et/ou les fichiers de musique enregistrés sur un périphérique de stockage de masse
USB (MSC).
Il est se peut que le fonctionnement ne soit pas correct avec des fichiers multimédias sans licence.
Accès au menuMedia Play (USB)
1. Appuyez sur le bouton MENU. Appuyez sur le bouton ▲ ou ▼ pour sélectionner
Application, puis sur le bouton ENTER
E
.
2.
Appuyez sur le bouton ▲ ou ▼ pour sélectionner Media Play (USB), puis sur le
bouton ENTER
E
.
Le menu Media Play (USB) s'affiche.
Appuyez sur le bouton MEDIA.P de la télécommande pour afficher le menu
Media Play.
Appuyez sur le bouton SOURCE de la télécommande pour afficher la liste
des sources. Appuyez ensuite sur le bouton ▲ ou ▼ pour sélectionner USB.
3.
Appuyez sur le bouton rouge, puis sur le bouton ▲ ou ▼ pour sélectionner la mémoire USB. Appuyez sur le bouton
ENTER
E
.
Cette fonction diffère selon l'unité de stockage USB.
Le nom du périphérique USB sélectionné s'affiche dans le coin inférieur gauche de l'écran.
4.
Appuyez sur le bouton◄ ou ►pour sélectionner une icône (Photo, Music, Setup), puis appuyez sur le bouton ENTER
E
.
Pour quitter le mode Media Play, appuyez sur le bouton MEDIA.P de la télécommande.
Retrait d'une unité de stockage USB en toute sécurité
Vous pouvez retirer le périphérique du téléviseur en toute sécurité.
1.
Appuyez sur le bouton TOOLS dans l'écran de la liste des fichiers Media Play ou
pendant la lecture d'un fichier de musique ou d'un diaporama.
2.
Appuyez sur le bouton ▲ ou ▼ pour sélectionner Retrait sécurisé puis sur le
bouton ENTER
E
.
3.
Retirez le périphérique USB du téléviseur.
Accédez à Group List Section ou File List Section à l'aide des boutons Haut et Bas. Après avoir sélectionné une section, appuyez
sur le bouton◄ ou ►pour sélectionner un élément.
¦
N
N
O
O
N
N
N
INFO
AD
INFO
AD
851.86MB/993.02MBLibre
Photo
SUM
SUM
Périph.
PHOTO
R
Retour
Music Setup
SUM Périph.
Sélection
T
Outils
R
Dossiersupérieur
1234.jpg
1235.jpg
1236.jpg
1237.jpg
1233.jpg
1232.jpg
1231.jpg
Diaporama
Liregpact.
Information
Retraitsécurisé
5/15
1 2
../Photo/
Section Liste de groupes
Section Liste de fichiers
SUM Périph.
Sélection
T
Outils
R
Dossiersupérieur
1234.jpg
1235.jpg
1236.jpg
1237.jpg
1233.jpg
1232.jpg
1231.jpg
1Fich.sél.
2
3 5
4
1 2
1
5/15
c
../Photo/
[550-W.Euro]BN68-02324A-03L09.in29 29 2009-10-09 �� 2:59:42
Seite wird geladen ...

Français - 31
Visualisation d'une photo ou d'un diaporama
Visualisation d'un diaporama
1. Appuyez sur le bouton ▼ pour sélectionner Section Liste de fichiers.
2.
Appuyez sur le bouton TOOLS.
3.
Appuyez sur le bouton ▲ ou ▼ pour sélectionner Diaporama, puis appuyez sur
le bouton ENTER
E
.
Tous les fichiers de la section Liste de fichiers seront utilisés pour le
diaporama.
Durant le diaporama, les fichiers s'affichent dans l'ordre à partir du fichier à
l'écran.
Le diaporama progresse dans l'ordre de tri choisi dans la section Liste de fichiers.
Des fichiers musicaux peuvent être lus automatiquement pendant le diaporama,
si l'option Fond musical est définie sur Mar..
Lorsqu'une liste de photos est affichée, appuyez sur le bouton
∂
(Lire)/
ENTER
E
de la télécommande pour lancer le diaporama.
Boutons de commande du diaporama
Bouton Opération
ENTER
E
Lance/interrompt la lecture du diaporama.
∂
Lance la lecture du diaporama.
∑
Interrompt la lecture du diaporama.
∫
Permet de quitter le mode diaporama et de revenir à la
liste des photos.
π
/
μ
Modifie la vitesse de lecture du diaporama.
TOOLS Exécute diverses fonctions dans les menus Photo.
Lecture du groupe courant
1. Appuyez sur le bouton ▲ pour accéder à Section Liste de groupes.
2.
Sélectionnez un groupe à l'aide des boutons ◄ et ►.
3.
Appuyez sur le bouton
∂
(Lire). Un diaporama débute par les fichiers du
groupe sélectionné.
Ou
1.
Dans File List Section, sélectionnez les fichiers contenus dans le groupe désiré.
Pour passer au groupe précédent/suivant, appuyez sur le bouton
π
(Retour arrière) ou
μ
(Avance rapide).
2.
Appuyez sur le bouton TOOLS.
3.
Appuyez sur le bouton ▲ ou ▼ pour sélectionner Lire gp act., puis sur le bouton ENTER
E
.
Seules les photos du groupe contenant les fichiers sélectionnés seront utilisées pour le diaporama.
1. Appuyez sur le bouton ▼ pour sélectionner Section Liste de fichiers.
2.
Appuyez sur le bouton◄ ou ►pour sélectionner la photo voulue dans File List Section.
3.
Appuyez sur le bouton jaune.
4.
Répétez l'opération ci-dessus pour sélectionner plusieurs photos.
La marque
c
s'affiche à gauche des photos sélectionnées.
Si vous sélectionnez un seul fichier, le diaporama ne s'exécute pas.
Pour désélectionner tous les fichiers, appuyez sur le bouton TOOLS, puis sélectionnez Désélectionner tout.
5.
Appuyez sur le bouton
∂
(Lire)/ENTER
E
.
Les fichiers sélectionnés seront utilisés pour le diaporama.
¦
N
N
N
N
O
N
●
N
N
N
N
N
N
INFO
AD
E
Pause◀▶Préc/Suiv
T
Outils
R
Retour
SUM
1234.jpg
580x7652009/01/025/15
▶Normal
SUM Périph.
Sélection
T
Outils
R
Dossiersupérieur
1234.jpg
1235.jpg
1236.jpg
1237.jpg
1233.jpg
1232.jpg
1231.jpg
Diaporama
Liregpact.
Information
Retraitsécurisé
5/15
1 2
../Photo/
SUM Périph.
Sélection
T
Outils
R
Dossiersupérieur
1234.jpg
1235.jpg
1236.jpg
1237.jpg
1233.jpg
1232.jpg
1231.jpg
5/15
1 2
../Photo/
[550-W.Euro]BN68-02324A-03L09.in31 31 2009-10-09 �� 2:59:47

Français - 32
Ou
1.
Dans File List Section, appuyez sur les boutons jaunes pour sélectionner les photos de votre choix.
2.
Appuyez sur le bouton TOOLS.
3.
Appuyez sur le bouton ▲ ou ▼ pour sélectionner Diaporama, puis appuyez sur le bouton ENTER
E
.
Les fichiers sélectionnés seront utilisés pour le diaporama.
Menu d'options du diaporama
1. Pendant un diaporama (ou l'affichage d'une photo), appuyez sur le bouton TOOLS
pour définir l'option.
2.
Appuyez sur le bouton ◄ ou ► pour sélectionner l'option, puis appuyez sur le
bouton ENTER
E
.
Arrêter le diaporama / Lancer le diaporama
Vous pouvez lancer ou arrêter un diaporama.
Sélectionnez cette option pour modifier la vitesse de défilement du diaporama.
Cette fonction est uniquement disponible au cours d'un diaporama.
Vous pouvez également modifier la vitesse du diaporama en appuyant sur la touche
π
(Retour arrière) ou
μ
(Avance
rapide) pendant la lecture.
Rotat.
Vous pouvez faire pivoter les photos enregistrées sur une unité de stockage USB.
Chaque fois que vous appuyez sur le bouton ◄, la photo pivote successivement à 270˚, 180˚, 90˚ et 0˚.
Chaque fois que vous appuyez sur le bouton ►, la photo pivote successivement de 90˚, 180˚, 270˚ et 0˚.
Le fichier pivoté n'est pas enregistré.
Zoom
Vous pouvez faire agrandir les photos enregistrées sur une unité de stockage USB. (x1 → x2 → x4)
Pour déplacer l'image agrandie, appuyez sur le bouton ENTER
E
, puis sur les boutons ▲/▼/◄/►. Notez que lorsque la
taille de l'image agrandie est inférieure à celle de l'écran, la fonction de déplacement est inopérante.
Le fichier agrandi n'est pas enregistré.
Fond musical
Vous pouvez sélectionner le fond musical d'un diaporama.
Pour utiliser cette fonction, de la musique et des photos doivent être stockées sur l'unité USB.
Arr. : le fond musical n'est pas lu.
Mar.: lorsque le fond musical est disponible, si vous sélectionnez Mar., la musique est lue.
Sél. fich. music. (0 Fich. sél.)
Seul le fichier musical sélectionné est défini comme fond musical.
Réglage de l'image / Réglage du son
Vous pouvez sélectionner les réglages de l'image et du son.
Information
Les informations relatives au fichier photo sont affichées.
Retrait sécurisé
Vous pouvez retirer le périphérique du téléviseur en toute sécurité.
●
N
¦
❑
❑
N
N
❑
N
N
N
❑
N
N
❑
N
■
●
●
■
❑
❑
❑
Arrêterlediaporama
Vitessedudiaporama : Normal
Rotat.
Zoom
Fondmusical
Réglagedel'image
Réglageduson
Information
Retraitsécurisé
U
Déplacer
E
Entrer
e
Quitter
Outils
[550-W.Euro]BN68-02324A-03L09.in32 32 2009-10-09 �� 2:59:48

Français - 33
Menu d'options de la liste musicale
1. Appuyez sur le bouton MEDIA.P.
2.
Appuyez sur le bouton ◄ ou ►pour sélectionner Music, puis appuyez sur le
bouton ENTER
E
.
3.
Appuyez sur le bouton ◄ ou ► pour sélectionner le fichier musical de votre
choix.
Sélection de plusieurs fichiers musicaux
Appuyez sur le bouton◄ ou ►pour sélectionner le fichier musical de
votre choix. Appuyez ensuite sur le bouton jaune.
Répétez l'opération ci-dessus pour sélectionner plusieurs fichiers
musicaux.
La marque
c
s'affiche à côté du fichier musical sélectionné.
4.
Appuyez sur le bouton TOOLS.
Le menu varie en fonction de l'état actuel.
Lire gp act.
Ce menu vous permet de lire uniquement les fichiers musicaux du groupe de tri sélectionné.
Désélectionner tout (lorsqu'au moins un fichier est sélectionné)
Vous pouvez désélectionner tous les fichiers.
La marque
c
indiquant que le fichier correspondant est sélectionné est masquée.
Information
Affiche des informations sur les fichiers musicaux, notamment le nom, la taille, la date de modification et le chemin d'accès.
Vous pouvez afficher les informations du fichier musical durant Lire gp act. à l'aide des mêmes procédures.
Appuyez sur le bouton INFO pour afficher les informations.
Retrait sécurisé
Vous pouvez retirer le périphérique du téléviseur en toute sécurité.
¦
N
N
❑
❑
N
❑
N
O
❑
INFO
AD
SUM Périph.
Sélection
T
Outils
R
Dossiersupérieur
HaHaHa
Gold
Shine
Way
WantMe
Lies
ILoveYou
GlenHans
OnceOst
2007
Soundtrack
3/37Energique
Liregpact.
Information
Retraitsécurisé
5 1 2 34
../Music/
[550-W.Euro]BN68-02324A-03L09.in33 33 2009-10-09 �� 2:59:48
Seite wird geladen ...

Français - 35
Menu d'options de lecture de musique
Menu d'options de lecture de musique
Vous pouvez lire des fichiers musicaux en boucle.
Réglage de l'image / Réglage du son
Vous pouvez configurer les réglages de l'image et du son.
Information
Les informations relatives au fichier musical sont affichées.
Retrait sécurisé
Vous pouvez retirer le périphérique du téléviseur en toute sécurité.
¦
❑
❑
❑
❑
Utilisation du menu Setup
Le menu Setup affiche les paramètres utilisateur du menu Media Play.
1.
Appuyez sur le bouton MEDIA.P.
2.
Appuyez sur le bouton◄ ou ► pour sélectionner Setup, puis sur le bouton
ENTER
E
.
3.
Appuyez sur le bouton ▲ ou ▼ pour sélectionner l'option de votre choix.
4.
Appuyez sur le bouton◄ ou ► pour sélectionner l'option.
Pour quitter le mode Media Play, appuyez sur le bouton MEDIA.P de la
télécommande.
. / Arr.
Permet de répéter la lecture de fichiers musicaux.
Sélectionnez cette option pour définir le délai avant l'activation de l'écran de veille.
Information
Affiche les informations de l'appareil connecté.
Retrait sécurisé
Vous pouvez retirer le périphérique du téléviseur en toute sécurité.
¦
N
■
■
■
■
Modorep. ◀Mar.▶
Réglagedel'image
Réglageduson
Information
Retraitsécurisé
U
Déplacer
L
Régler
e
Quitter
Outils
851.86MB/993.02MBLibre
Photo
SUM
SUM Périph.
SETUP
e
Quitter
Music Setup
ModeRépéterlamusique ◀Mar.▶
Tempsd'ex.éco.écran :2heures
Information
Retraitsécurisé
U
Déplacer
L
Régler
R
Retour
SUM Périph.
[550-W.Euro]BN68-02324A-03L09.in35 35 2009-10-09 �� 2:59:49
Seite wird geladen ...
Seite wird geladen ...
Seite wird geladen ...
Seite wird geladen ...
Seite wird geladen ...
Seite wird geladen ...
Seite wird geladen ...
Seite wird geladen ...
Seite wird geladen ...
Seite wird geladen ...
Seite wird geladen ...
Seite wird geladen ...
Seite wird geladen ...
Seite wird geladen ...
Seite wird geladen ...
Seite wird geladen ...
Seite wird geladen ...
Seite wird geladen ...
Seite wird geladen ...
Seite wird geladen ...
Seite wird geladen ...
Seite wird geladen ...
Seite wird geladen ...
Seite wird geladen ...
Seite wird geladen ...
Seite wird geladen ...
Seite wird geladen ...
Seite wird geladen ...
Seite wird geladen ...
Seite wird geladen ...
Seite wird geladen ...
Seite wird geladen ...
Seite wird geladen ...
Seite wird geladen ...
Seite wird geladen ...
Seite wird geladen ...
Seite wird geladen ...
Seite wird geladen ...
Seite wird geladen ...
Seite wird geladen ...
Seite wird geladen ...
Seite wird geladen ...
Seite wird geladen ...
Seite wird geladen ...
Seite wird geladen ...
Seite wird geladen ...
Seite wird geladen ...
Seite wird geladen ...
Seite wird geladen ...
Seite wird geladen ...
Seite wird geladen ...
Seite wird geladen ...
Seite wird geladen ...
Seite wird geladen ...
Seite wird geladen ...
Seite wird geladen ...
Seite wird geladen ...
Seite wird geladen ...
Seite wird geladen ...
Seite wird geladen ...
Seite wird geladen ...
Seite wird geladen ...
Seite wird geladen ...
Seite wird geladen ...
Seite wird geladen ...
Seite wird geladen ...
Seite wird geladen ...
Seite wird geladen ...
Seite wird geladen ...
Seite wird geladen ...
Seite wird geladen ...
Seite wird geladen ...
Seite wird geladen ...
Seite wird geladen ...
Seite wird geladen ...
Seite wird geladen ...
Seite wird geladen ...
Seite wird geladen ...
Seite wird geladen ...
Seite wird geladen ...
Seite wird geladen ...
Seite wird geladen ...
Seite wird geladen ...
Seite wird geladen ...
Seite wird geladen ...
Seite wird geladen ...
Seite wird geladen ...
Seite wird geladen ...
Seite wird geladen ...
Seite wird geladen ...
Seite wird geladen ...
Seite wird geladen ...
Seite wird geladen ...
Seite wird geladen ...
Seite wird geladen ...
Seite wird geladen ...
Seite wird geladen ...
Seite wird geladen ...
Seite wird geladen ...
Seite wird geladen ...
Seite wird geladen ...
Seite wird geladen ...
Seite wird geladen ...
Seite wird geladen ...
Seite wird geladen ...
Seite wird geladen ...
Seite wird geladen ...
Seite wird geladen ...
Seite wird geladen ...
Seite wird geladen ...
Seite wird geladen ...
Seite wird geladen ...
Seite wird geladen ...
Seite wird geladen ...
Seite wird geladen ...
Seite wird geladen ...
Seite wird geladen ...
Seite wird geladen ...
Seite wird geladen ...
Seite wird geladen ...
Seite wird geladen ...
Seite wird geladen ...
Seite wird geladen ...
Seite wird geladen ...
Seite wird geladen ...
Seite wird geladen ...
Seite wird geladen ...
Seite wird geladen ...
Seite wird geladen ...
Seite wird geladen ...
Seite wird geladen ...
Seite wird geladen ...
Seite wird geladen ...
Seite wird geladen ...
Seite wird geladen ...
Seite wird geladen ...
Seite wird geladen ...
Seite wird geladen ...
Seite wird geladen ...
Seite wird geladen ...
Seite wird geladen ...
Seite wird geladen ...
Seite wird geladen ...
Seite wird geladen ...
Seite wird geladen ...
Seite wird geladen ...
Seite wird geladen ...
Seite wird geladen ...
Seite wird geladen ...
Seite wird geladen ...
Seite wird geladen ...
Seite wird geladen ...
Seite wird geladen ...
Seite wird geladen ...
Seite wird geladen ...
Seite wird geladen ...
Seite wird geladen ...
Seite wird geladen ...
Seite wird geladen ...
Seite wird geladen ...
Seite wird geladen ...
Seite wird geladen ...
Seite wird geladen ...
Seite wird geladen ...
Seite wird geladen ...
Seite wird geladen ...
Seite wird geladen ...
Seite wird geladen ...
Seite wird geladen ...
Seite wird geladen ...
Seite wird geladen ...
Seite wird geladen ...
Seite wird geladen ...
Seite wird geladen ...
Seite wird geladen ...
Seite wird geladen ...
Seite wird geladen ...
Seite wird geladen ...
Seite wird geladen ...
Seite wird geladen ...
Seite wird geladen ...
Seite wird geladen ...
Seite wird geladen ...
Seite wird geladen ...
Seite wird geladen ...
Seite wird geladen ...
Seite wird geladen ...
Seite wird geladen ...
Seite wird geladen ...
Seite wird geladen ...
Seite wird geladen ...
Seite wird geladen ...
Seite wird geladen ...
Seite wird geladen ...
Seite wird geladen ...
Seite wird geladen ...
Seite wird geladen ...
Seite wird geladen ...
Seite wird geladen ...
Seite wird geladen ...
Seite wird geladen ...
Seite wird geladen ...
Seite wird geladen ...
Seite wird geladen ...
Seite wird geladen ...
Seite wird geladen ...
Seite wird geladen ...
Seite wird geladen ...
Seite wird geladen ...
Seite wird geladen ...
Seite wird geladen ...
Seite wird geladen ...
Seite wird geladen ...
Seite wird geladen ...
Seite wird geladen ...
Seite wird geladen ...
Seite wird geladen ...
Seite wird geladen ...
Seite wird geladen ...
Seite wird geladen ...
Seite wird geladen ...
Seite wird geladen ...
Seite wird geladen ...
Seite wird geladen ...
Seite wird geladen ...
Seite wird geladen ...
Seite wird geladen ...
Seite wird geladen ...
Seite wird geladen ...
Seite wird geladen ...
Seite wird geladen ...
Seite wird geladen ...
Seite wird geladen ...
Seite wird geladen ...
Seite wird geladen ...
Seite wird geladen ...
Seite wird geladen ...
Seite wird geladen ...
Seite wird geladen ...
Seite wird geladen ...
Seite wird geladen ...
Seite wird geladen ...
Seite wird geladen ...
Seite wird geladen ...
Seite wird geladen ...
Seite wird geladen ...
Seite wird geladen ...
Seite wird geladen ...
Seite wird geladen ...
Seite wird geladen ...
Seite wird geladen ...
Seite wird geladen ...
Seite wird geladen ...
Seite wird geladen ...
Seite wird geladen ...
Seite wird geladen ...
Seite wird geladen ...
Seite wird geladen ...
Seite wird geladen ...
Seite wird geladen ...
Seite wird geladen ...
Seite wird geladen ...
Seite wird geladen ...
Seite wird geladen ...
Seite wird geladen ...
Seite wird geladen ...
Seite wird geladen ...
Seite wird geladen ...
Seite wird geladen ...
Seite wird geladen ...
Seite wird geladen ...
Seite wird geladen ...
Seite wird geladen ...
Seite wird geladen ...
Seite wird geladen ...
Seite wird geladen ...
Seite wird geladen ...
Seite wird geladen ...
Seite wird geladen ...
Seite wird geladen ...
Seite wird geladen ...
Seite wird geladen ...
Seite wird geladen ...
Seite wird geladen ...
Seite wird geladen ...
Seite wird geladen ...
Seite wird geladen ...
Seite wird geladen ...
Seite wird geladen ...
Seite wird geladen ...
Seite wird geladen ...
Seite wird geladen ...
Seite wird geladen ...
Seite wird geladen ...
Seite wird geladen ...
Seite wird geladen ...
Seite wird geladen ...
Seite wird geladen ...
Seite wird geladen ...
Seite wird geladen ...
Seite wird geladen ...
Seite wird geladen ...
Seite wird geladen ...
Seite wird geladen ...
Seite wird geladen ...
Seite wird geladen ...
Seite wird geladen ...
Seite wird geladen ...
Seite wird geladen ...
Seite wird geladen ...
Seite wird geladen ...
Seite wird geladen ...
Seite wird geladen ...
Seite wird geladen ...
Seite wird geladen ...
Seite wird geladen ...
Seite wird geladen ...
Seite wird geladen ...
Seite wird geladen ...
Seite wird geladen ...
Seite wird geladen ...
Seite wird geladen ...
Seite wird geladen ...
Seite wird geladen ...
Seite wird geladen ...
Seite wird geladen ...
Seite wird geladen ...
Seite wird geladen ...
Seite wird geladen ...
Seite wird geladen ...
Seite wird geladen ...
Seite wird geladen ...
Seite wird geladen ...
Seite wird geladen ...
Seite wird geladen ...
Seite wird geladen ...
Seite wird geladen ...
Seite wird geladen ...
Seite wird geladen ...
Seite wird geladen ...
Seite wird geladen ...
Seite wird geladen ...
Seite wird geladen ...
Seite wird geladen ...
Seite wird geladen ...
Seite wird geladen ...
Seite wird geladen ...
Seite wird geladen ...
Seite wird geladen ...
Seite wird geladen ...
Seite wird geladen ...
Seite wird geladen ...
Seite wird geladen ...
Seite wird geladen ...
Seite wird geladen ...
Seite wird geladen ...
Seite wird geladen ...
Seite wird geladen ...
Seite wird geladen ...
-
 1
1
-
 2
2
-
 3
3
-
 4
4
-
 5
5
-
 6
6
-
 7
7
-
 8
8
-
 9
9
-
 10
10
-
 11
11
-
 12
12
-
 13
13
-
 14
14
-
 15
15
-
 16
16
-
 17
17
-
 18
18
-
 19
19
-
 20
20
-
 21
21
-
 22
22
-
 23
23
-
 24
24
-
 25
25
-
 26
26
-
 27
27
-
 28
28
-
 29
29
-
 30
30
-
 31
31
-
 32
32
-
 33
33
-
 34
34
-
 35
35
-
 36
36
-
 37
37
-
 38
38
-
 39
39
-
 40
40
-
 41
41
-
 42
42
-
 43
43
-
 44
44
-
 45
45
-
 46
46
-
 47
47
-
 48
48
-
 49
49
-
 50
50
-
 51
51
-
 52
52
-
 53
53
-
 54
54
-
 55
55
-
 56
56
-
 57
57
-
 58
58
-
 59
59
-
 60
60
-
 61
61
-
 62
62
-
 63
63
-
 64
64
-
 65
65
-
 66
66
-
 67
67
-
 68
68
-
 69
69
-
 70
70
-
 71
71
-
 72
72
-
 73
73
-
 74
74
-
 75
75
-
 76
76
-
 77
77
-
 78
78
-
 79
79
-
 80
80
-
 81
81
-
 82
82
-
 83
83
-
 84
84
-
 85
85
-
 86
86
-
 87
87
-
 88
88
-
 89
89
-
 90
90
-
 91
91
-
 92
92
-
 93
93
-
 94
94
-
 95
95
-
 96
96
-
 97
97
-
 98
98
-
 99
99
-
 100
100
-
 101
101
-
 102
102
-
 103
103
-
 104
104
-
 105
105
-
 106
106
-
 107
107
-
 108
108
-
 109
109
-
 110
110
-
 111
111
-
 112
112
-
 113
113
-
 114
114
-
 115
115
-
 116
116
-
 117
117
-
 118
118
-
 119
119
-
 120
120
-
 121
121
-
 122
122
-
 123
123
-
 124
124
-
 125
125
-
 126
126
-
 127
127
-
 128
128
-
 129
129
-
 130
130
-
 131
131
-
 132
132
-
 133
133
-
 134
134
-
 135
135
-
 136
136
-
 137
137
-
 138
138
-
 139
139
-
 140
140
-
 141
141
-
 142
142
-
 143
143
-
 144
144
-
 145
145
-
 146
146
-
 147
147
-
 148
148
-
 149
149
-
 150
150
-
 151
151
-
 152
152
-
 153
153
-
 154
154
-
 155
155
-
 156
156
-
 157
157
-
 158
158
-
 159
159
-
 160
160
-
 161
161
-
 162
162
-
 163
163
-
 164
164
-
 165
165
-
 166
166
-
 167
167
-
 168
168
-
 169
169
-
 170
170
-
 171
171
-
 172
172
-
 173
173
-
 174
174
-
 175
175
-
 176
176
-
 177
177
-
 178
178
-
 179
179
-
 180
180
-
 181
181
-
 182
182
-
 183
183
-
 184
184
-
 185
185
-
 186
186
-
 187
187
-
 188
188
-
 189
189
-
 190
190
-
 191
191
-
 192
192
-
 193
193
-
 194
194
-
 195
195
-
 196
196
-
 197
197
-
 198
198
-
 199
199
-
 200
200
-
 201
201
-
 202
202
-
 203
203
-
 204
204
-
 205
205
-
 206
206
-
 207
207
-
 208
208
-
 209
209
-
 210
210
-
 211
211
-
 212
212
-
 213
213
-
 214
214
-
 215
215
-
 216
216
-
 217
217
-
 218
218
-
 219
219
-
 220
220
-
 221
221
-
 222
222
-
 223
223
-
 224
224
-
 225
225
-
 226
226
-
 227
227
-
 228
228
-
 229
229
-
 230
230
-
 231
231
-
 232
232
-
 233
233
-
 234
234
-
 235
235
-
 236
236
-
 237
237
-
 238
238
-
 239
239
-
 240
240
-
 241
241
-
 242
242
-
 243
243
-
 244
244
-
 245
245
-
 246
246
-
 247
247
-
 248
248
-
 249
249
-
 250
250
-
 251
251
-
 252
252
-
 253
253
-
 254
254
-
 255
255
-
 256
256
-
 257
257
-
 258
258
-
 259
259
-
 260
260
-
 261
261
-
 262
262
-
 263
263
-
 264
264
-
 265
265
-
 266
266
-
 267
267
-
 268
268
-
 269
269
-
 270
270
-
 271
271
-
 272
272
-
 273
273
-
 274
274
-
 275
275
-
 276
276
-
 277
277
-
 278
278
-
 279
279
-
 280
280
-
 281
281
-
 282
282
-
 283
283
-
 284
284
-
 285
285
-
 286
286
-
 287
287
-
 288
288
-
 289
289
-
 290
290
-
 291
291
-
 292
292
-
 293
293
-
 294
294
-
 295
295
-
 296
296
-
 297
297
-
 298
298
-
 299
299
-
 300
300
-
 301
301
-
 302
302
-
 303
303
-
 304
304
-
 305
305
-
 306
306
-
 307
307
-
 308
308
-
 309
309
-
 310
310
-
 311
311
-
 312
312
-
 313
313
-
 314
314
-
 315
315
-
 316
316
-
 317
317
-
 318
318
-
 319
319
-
 320
320
-
 321
321
-
 322
322
-
 323
323
-
 324
324
-
 325
325
-
 326
326
-
 327
327
-
 328
328
-
 329
329
-
 330
330
-
 331
331
-
 332
332
-
 333
333
-
 334
334
-
 335
335
-
 336
336
-
 337
337
-
 338
338
-
 339
339
-
 340
340
-
 341
341
-
 342
342
-
 343
343
-
 344
344
-
 345
345
-
 346
346
-
 347
347
-
 348
348
-
 349
349
-
 350
350
-
 351
351
-
 352
352
-
 353
353
-
 354
354
-
 355
355
-
 356
356
-
 357
357
-
 358
358
-
 359
359
-
 360
360
-
 361
361
-
 362
362
-
 363
363
-
 364
364
-
 365
365
-
 366
366
-
 367
367
-
 368
368
-
 369
369
-
 370
370
-
 371
371
-
 372
372
-
 373
373
-
 374
374
-
 375
375
-
 376
376
-
 377
377
-
 378
378
-
 379
379
-
 380
380
-
 381
381
-
 382
382
-
 383
383
-
 384
384
-
 385
385
-
 386
386
-
 387
387
-
 388
388
-
 389
389
-
 390
390
-
 391
391
-
 392
392
-
 393
393
-
 394
394
-
 395
395
-
 396
396
-
 397
397
-
 398
398
-
 399
399
-
 400
400
-
 401
401
-
 402
402
-
 403
403
-
 404
404
-
 405
405
-
 406
406
-
 407
407
-
 408
408
-
 409
409
-
 410
410
-
 411
411
-
 412
412
-
 413
413
-
 414
414
-
 415
415
-
 416
416
-
 417
417
-
 418
418
-
 419
419
-
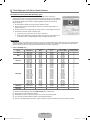 420
420
-
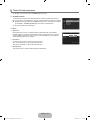 421
421
-
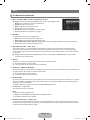 422
422
-
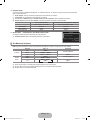 423
423
-
 424
424
-
 425
425
-
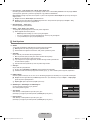 426
426
-
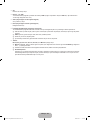 427
427
-
 428
428
-
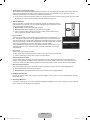 429
429
-
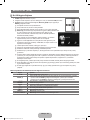 430
430
-
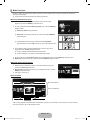 431
431
-
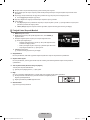 432
432
-
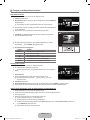 433
433
-
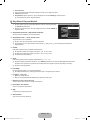 434
434
-
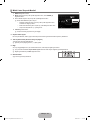 435
435
-
 436
436
-
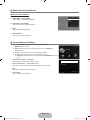 437
437
-
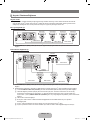 438
438
-
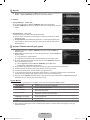 439
439
-
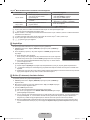 440
440
-
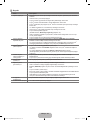 441
441
-
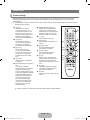 442
442
-
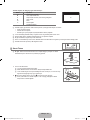 443
443
-
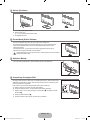 444
444
-
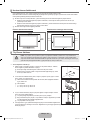 445
445
-
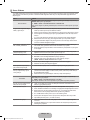 446
446
-
 447
447
-
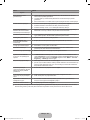 448
448
-
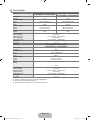 449
449
-
 450
450
-
 451
451
-
 452
452
-
 453
453
-
 454
454
-
 455
455
-
 456
456
-
 457
457
-
 458
458


Samsung le 32b551a6 Benutzerhandbuch
- Kategorie
- LCD-Fernseher
- Typ
- Benutzerhandbuch
in anderen Sprachen
- English: Samsung le 32b551a6 User manual
- français: Samsung le 32b551a6 Manuel utilisateur
- español: Samsung le 32b551a6 Manual de usuario
- italiano: Samsung le 32b551a6 Manuale utente
- Nederlands: Samsung le 32b551a6 Handleiding
- português: Samsung le 32b551a6 Manual do usuário
- Türkçe: Samsung le 32b551a6 Kullanım kılavuzu
Verwandte Artikel
-
Samsung UE46B6000VP Benutzerhandbuch
-
Samsung LE46B620 Benutzerhandbuch
-
Samsung LE40B551 Benutzerhandbuch
-
-
Samsung ue55b7090 Benutzerhandbuch
-
Samsung LE32B679T2S Benutzerhandbuch
-
-
Samsung LE52B750U1W Benutzerhandbuch
-