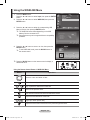
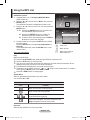
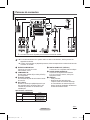
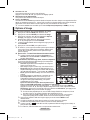
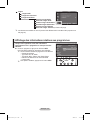
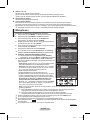
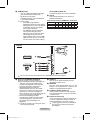
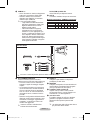
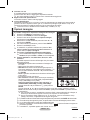
Samsung PS50A556 Benutzerhandbuch
- Kategorie
- LCD-Fernseher
- Typ
- Benutzerhandbuch

imagine the possibilities
Plasma TV
user manual
BN68-01427A-00
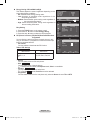
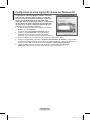
Contact SAMSUNG WORLD-WIDE
If you have any questions or comments relating to Samsung products, please contact the SAMSUNG
customer care centre.
Country
Customer Care Centre
Web Site
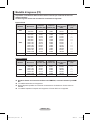
AUSTRIA 0800-SAMSUNG(726-7864) www.samsung.com/at
BELGIUM 0032 (0)2 201 24 18 www.samsung.com/be
CZECH REPUBLIC
844 000 844 www.samsung.com/cz
Distributor pro Českou republiku:
Samsung Zrt., česka organizační složka Vyskočilova 4, 14000 Praha 4
DENMARK 70 70 19 70 www.samsung.com/dk
EIRE 0818 717 100 www.samsung.com/ie
ESTONIA 800-7267 www.samsung.ee
FINLAND 030-6227 515 www.samsung.com/fi
FRANCE
"3260 SAMSUNG (€ 0,15/Min)
08 25 08 65 65 (€ 0,15/Min)"
www.samsung.com
GERMANY 01805 - SAMSUNG(726-7864 € 0,14/Min) www.samsung.com
HUNGARY 06-80-SAMSUNG(726-7864) www.samsung.com
ITALIA 800-SAMSUNG(726-7864) www.samsung.com
KAZAKHSTAN 8-10-800-500-55-500 www.samsung.kz
KYRGYZSTAN 00-800-500-55-500 -
LATVIA 800-7267 www.samsung.com/lv
LITHUANIA 8-800-77777 www.samsung.lt
LUXEMBURG 0035 (0)2 261 03 710 www.samsung.com/be
NETHERLANDS 0900-SAMSUNG (726-7864 € 0,10/Min) www.samsung.com/nl
NORWAY 815-56 480 www.samsung.com/no
POLAND
"0 801 801 881
022-607-93-33"
www.samsung.com/pl
PORTUGAL 80820-SAMSUNG(726-7864) www.samsung.com/pt
RUSSIA 8-800-555-55-55 www.samsung.com
SLOVAKIA 0800-SAMSUNG(726-7864) www.samsung.com/sk
SPAIN 902 10 11 30 www.samsung.com
SWEDEN 0771-400 200 www.samsung.com/se
SWITZERLAND 0800-SAMSUNG(726-7864) www.samsung.com/ch
TURKEY 444 77 11 www.samsung.com
TADJIKISTAN 8-10-800-500-55-500 -
U.K 0845 SAMSUNG (7267864) www.samsung.com
UKRAINE 8-800-502-0000 www.samsung.com
UZBEKISTAN 8-10-800-500-55-500 www.samsung.uz
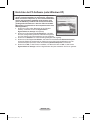
Thank you for purchasing this Samsung product.
To receive more complete service, please
register your product at
www.samsung.com/global/register
Model Serial No.
BN68-01427A-Eng.indb 1 2008-03-10 오후 3:13:58

English - 2
© 2008 Samsung Electronics Co., Ltd. All rights reserved.
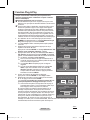
User Instructions
Screen Image retention
Do not display a still image (such as on a video game or when hooking up a PC to this PDP) on the
plasma monitor panel for more than 2 hours as it can cause screen image retention. This image
retention is also known as “screen burn”. To avoid such image retention, reduce the degree of
brightness and contrast of the screen when displaying a still image.
Height
The PDP can normally operate only under 2000m in height. It might abnormally function at a place
over 2000m in height so do not install and operate there.
Heat on the top of the PDP TV
The top side of the product may be hot after long period of use as heat dissipates from the panel
through the vent hole in the upper part of the product. This is normal and does not indicate any defect
or operation failure of the product. However, children should be prevented from touching the upper
part of the product.
The product is making a ‘cracking’ noise.
A ‘cracking’ noise may occur when the product contracts or expands due to a change of surrounding
environment such as temperature or humidity. This is normal and not a defect of the unit.
Cell Defects
The PDP uses a panel consisting of 1,230,000(SD-level) to 3,150,000(HD-level) pixels which require
sophisticated technology to produce. However, there may be few bright or dark pixels on the screen.
These pixels will have no impact on the performance of the product.
Avoid operating the TV at temperatures below 5°C(41°F)
A still image displayed too long may cause permanent damage to the PDP Panel.
Watching the PDP TV in 4:3 format for a long period of time may leave traces
of borders displayed on the left, right and centre of the screen caused by the
difference of light emission on the screen. Playing a DVD or a game console
may cause similar effect to the screen. Damages caused by the above effect are
not covered by the Warranty.
Afterimage on the Screen.
Displaying still images from Video games and PC for longer than a certain period of time may
produce partial afterimages. To prevent this effect, reduce the ‘brightness’ and ‘contrast’ when
displaying still images.
Warranty
- Warranty does not cover any damage caused by image retention.
- Burn-in is not covered by the warranty.
Installation
Be sure to contact an authorized service centre, when installing your set in a location with heavy
dust, high or low temperatures, high humidity, chemical substance and where it operates continually
such as the airport, the train station etc. Failure to do so may cause a serious damage to your set.
Any functions related to Digital TV (DVB) will only work in countries or areas where DVB-T (MPEG2)
digital terrestrial signals are broadcasted. Please confirm with your local dealer if you can receive
DVB-T signals. Although this TV set follows the DVB-T specification, maintaining compatibility with
the future coming DVB-T digital terrestrial broadcasts is not guaranteed. Several functions may not be
available in some countries.
Contact SAMSUNG WORLDWIDE
If you have any questions or comments relating to Samsung products, please contact the SAMSUNG
customer care centre. (See back cover for more informations.)
BN68-01427A-Eng.indb 2 2008-03-10 오후 3:13:59

English - 3
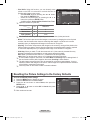
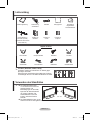
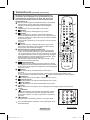
Symbols
Press
Important
Note
Contents
General Information
User Instructions ............................................. 2
Checking Parts ................................................ 4
Using the Stand-Base ..................................... 4
Control Panel ................................................. 5
Connection Panel ............................................ 6
Viewing the Remote Control ........................... 8
Operation
Switching Your Television On and Off ............. 9
Viewing the Menus .......................................... 9
Plug & Play Feature ...................................... 10
Using the TOOLS Button .............................. 12
Viewing External Signal Sources .................. 12
Editing Device Names ................................... 13
Channel Control
Storing Channels Automatically .................... 13
Storing Channels Manually ........................... 14
Adding / Locking Channels ........................... 15
Sorting the Stored Channels ......................... 16
Assigning Names to Channels ...................... 16
Fine Tuning Channel Reception .................... 17
LNA (Low Noise Amplier) ............................ 17
Picture Control
Changing the Picture Standard ..................... 18
Customizing the Picture Settings .................. 18
Conguring Detailed Settings on the Picture
.... 19
Picture Options .............................................20
Resetting the Picture Settings to the Factory
Defaults ......................................................... 22
Sound Control
Sound Features ............................................23
Selecting the Sound Mode
(depending on the model) ............................. 24
Connecting Headphones (Sold separately) .. 24
Function Description
Time Features ............................................... 25
Language / Light Effect / Melody /
Entertainment / Energy Saving / PIP ............ 26
PC Display
Setting up Your PC Software
(Based on Windows XP) ............................... 28
Input Mode (PC) ............................................ 29
Setting the PC ............................................... 30
Using the DTV Feature
Previewing the DTV Menu System ............... 31
Displaying Programme Information ............... 32
Operating the DTV Menu .............................. 33
WISELINK
Using the WISELINK Function ...................... 43
Using the WISELINK Menu ........................... 44
Using the PHOTO (JPEG) List ...................... 45
Using the MP3 List ........................................ 48
Using the Setup Menu .................................. 49
About Anynet
+
What is Anynet
+
? .......................................... 51
Connecting Anynet
+
Devices ........................ 51
Setting Up Anynet
+ ....................................... 52
Scanning and Switching between
Anynet
+
Devices ........................................... 52
Recording ...................................................... 53
Listening through a Receiver ........................ 54
Check Points before Requesting Service ..... 54
Appendix
Teletext Feature (depending on the model) .. 55
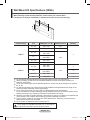
Wall Mount Kit Specications (VESA) ........... 57
Wall- mount adjustment (Sold separately) .... 58
How to assemble the Stand-Base
(depending on the model) ............................. 59
Troubleshooting ............................................60
Specications ................................................ 61
English
BN68-01427A-Eng.indb 3 2008-03-10 오후 3:14:00

English - 4
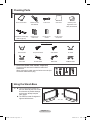
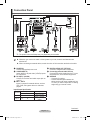
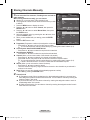
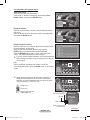
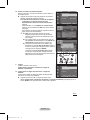
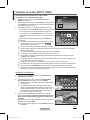
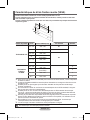
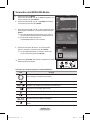
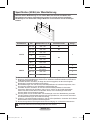
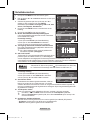
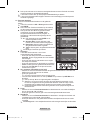
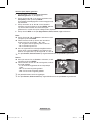
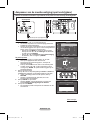
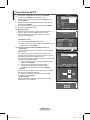
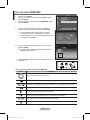
Checking Parts
Owner’s Instructions Remote Control/
AAA Batteries
Power Cord Cloth-Clean Warranty Card/
Registration Card/
Safety Guide Manual
Cover-Bottom / Screws (2ea)
(Refer to page 59)
Ferrite Core for
Power Cord
Ferrite Core for
S-Video
Ferrite Core for
Component
Sold Separately
Antenna Cable Component Cables Audio Cables PC Cable
Scart Cable PC Audio Cable HDMI Cable HDMI/DVI Cable
Ferrite Core (Power Cord, S-Video, Component)
The ferrite cores are used to shield the cables from
interference.
When connecting a cable, open the ferrite core and clip it
around the cable near the plug.
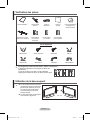
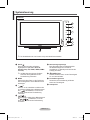
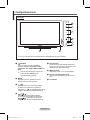
Using the Stand-Base
Two or more people should carry
the PDP. Never lay the PDP on the
floor because of possible damage
to the screen. Always keep the
PDP upright.
The PDP can rotate 20 degrees in
right and left directions.
-20° ~ 20°
BN68-01427A-Eng.indb 4 2008-03-10 오후 3:14:05

English - 5
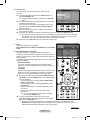
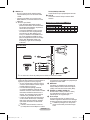
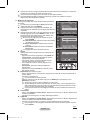
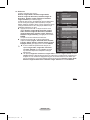
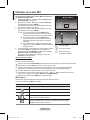
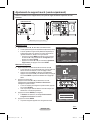
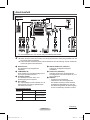
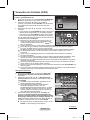
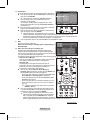
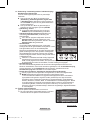
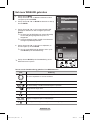
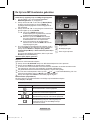
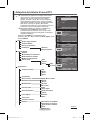
Control Panel
1
SOURCE
Toggles between all the available input sources
(TV, Ext.1, Ext.2, AV, S-Video, Component, PC,
HDMI1, HDMI2, HDMI3, DTV).
In the on-screen menu, use this button as
you would use the ENTER button on the
remote control.
2
MENU
Press to see an on-screen menu of your TV’s
features.
3
– +
Press to increase or decrease the volume. In
the on-screen menu, use the – + buttons
as you would use the ◄ and ► buttons on the
remote control.
4
Press to change channels.
In the on-screen menu, use the
buttons as you would use the ▲ and ▼ buttons
on the remote control.
5
Power Indicator
Blinks and turns off when the power is on and
lights up in stand-by mode.
6
POWER
Press to turn the TV on and off.
7
Remote Control Sensor
Aim the remote control towards this spot on the
TV.
8
Speakers
The product colour and shape may vary depending on the model.
Front Panel
BN68-01427A-Eng.indb 5 2008-03-10 오후 3:14:06

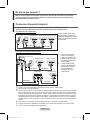
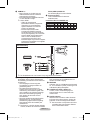
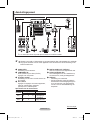
English - 6
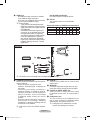
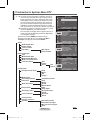
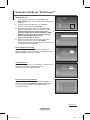
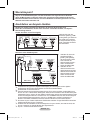
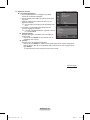
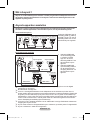
Connection Panel
Continued...
Whenever you connect an audio or video system to your set, ensure that all elements are
switched off.
When connecting an external device, match the colour of the connection terminal to the cable.
1
POWER IN
Connect the supplied power cord.
2
COMPONENT IN
Audio (AUDIO L/R) and video (Y/P
B/PR) inputs
for Component.
3
PC IN(PC) / (AUDIO)
Connect to the video and audio output jack on
your PC.
4
EXT 1, EXT 2
Inputs or outputs for external devices, such as
VCR, DVD, video game device or video disc
players.
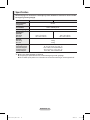
Input/Output Specification
Connector
Input Output
Video Audio(L/R) RGB
Video + Audio(L/R)
EXT 1
Only TV or DTV
output is available.
EXT 2
Output you can
choose.
5
DIGITAL AUDIO OUT (OPTICAL)
Connect to a Digital Audio Component.
6
Connecting external Audio Devices
Connect RCA audio signals from the TV to an
external source, such as Audio equipment.
7
SERVICE
− Connector for service.
− Connect the serial jack between the
electro-motion wall mount bracket and your
TV when you want to adjust the TV viewing
angle using your remote control.
Rear Panel
The product colour and shape may vary depending on the model.
Cable Television
Network
or
or
1
432 6 85
9
7
BN68-01427A-Eng.indb 6 2008-03-10 오후 3:14:12

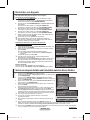
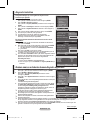
English - 7
8
HDMI IN 1,2
− No additional Audio connection is needed
for an HDMI to HDMI connection.
- When using an HDMI/DVI cable connection,
you must use the HDMI IN 2 jack.
What is HDMI?
- “High Definition Multimedia interface”
allows the ansmission of high definition
digital video data and multiple channels
of digital audio.
- The HDMI/DVI terminal supports DVI
connection to an extended device with
the appropriate cable (not supplied).
The difference between HDMI and DVI
is that the HDMI device is smaller in
size, has the HDCP (High Bandwidth
Digital Copy Protection) coding feature
installed, and supports multi - channel
digital audio.
DVI IN (HDMI 2) AUDIO R/L
DVI audio outputs for external devices.
9
ANT IN
75Ω Coaxial connector for Aerial/Cable
Network.
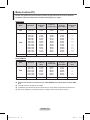
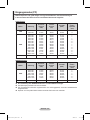
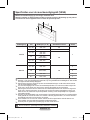
Supported modes for HDMI/DVI and Component
480i 480p 576i 576p 720p 1080i
1080p
HDMI/DVI 50Hz X X X O O O O
HDMI/DVI 60Hz X O X X O O O
Component O O O O O O O
The product colour and shape may vary depending on the model.
Side Panel
or
1
COMMON INTERFACE Slot
Insert CI (Common Interface) card into the slot.
(refer to page 42)
−
When ‘CI Card’ isn’t inserted in some
channels, “Scramble Signal” is displayed on
the screen.
− The pairing information containing a
telephone number, CI CARD ID, Host ID,
and other information will be displayed in
about 2~3 minutes. If an error message
is displayed, please contact your service
provider.
− When the channel information configuration
has finished, the message “Updating
Completed” is displayed, indicating that the
channel list is now updated.
Insert the CI-Card in the direction marked
on it.
2
HDMI IN 3
Connect to the HDMI jack of a device with
HDMI output.
3
WISELINK
Connect a USB mass storage device to view
photo files (JPEG) and play audio files (MP3).
4
S-VIDEO or VIDEO / AUDIO L/R
Video (S-Video or Video) and audio inputs
for external devices, such as a camcorder or
VCR.
5
Headphones jack
You can connect a set of headphones if you
wish to watch a television programme without
disturbing the other people in the room.
Prolonged use of headphones at a high
volume may damage your hearing.
5
2
4
1
3
BN68-01427A-Eng.indb 7 2008-03-10 오후 3:14:15

English - 8
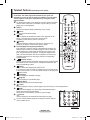
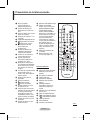
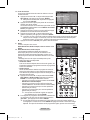
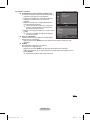
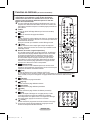
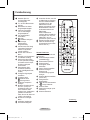
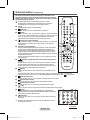
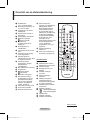
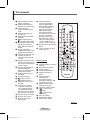
Viewing the Remote Control
The performance of the remote control may be affected by bright light.
1
POWER button
(turns the TV on and off)
2
Selects the TV and DTV
mode directly
3
Number buttons for direct
channel access
4
One/Two-digit channel
selection
5
Temporary sound switch-off
6
Volume increase
Volume decrease
7
Electronic Program Guide
(EPG) display
8
Use to quickly select
frequently used functions.
9
Control the cursor in the
menu
0
Use to see information on
the current broadcast
#
Press to select the optional
display and sound modes for
sports, cinema and games.
$
VCR/DVD Function (Rewind,
Stop, Play/Pause, Fast/
Forward)
%
Available source selection
^
Previous channel
&
Next channel
Previous channel
*
Displays the main on-screen
menu
(
This function enables you to
view and play photo (JPEG)
and audio files (MP3) from
an external device. (See
page 45 (JPEG), 48 (MP3))
)
Returns to the previous
menu
a
Exit the on-screen menu
b
Picture size selection
c
Use this when connecting
a SAMSUNG DMA (Digital
Media Adapter) device
through an HDMI interface
and switching to DMA mode.
(The DMA button is optional.)
For more information on the
operating procedures, refer
to the user manual of the
DMA. This button is available
when “Anynet+(HDMI-CEC)"
is “On” (see page 52)
d
Digital subtitle display
e
Channel control button
(Refer to page 15)
Teletext Functions
(Refer to page 55)
2
Exit from the teletext display
(depending on the model)
7
Teletext store
8
Teletext size
0
Teletext reveal
!
Fastext topic selection
@
Teletext display/mix both
teletext information and the
normal broadcast
%
Teletext mode selection
(LIST/FLOF)
^
Teletext sub page
&
P :Teletext next page
P :Teletext previous page
*
Teletext index
)
Teletext hold
a
Teletext cancel
Continued...
BN68-01427A-Eng.indb 8 2008-03-10 오후 3:14:17

English - 9
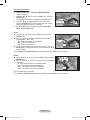
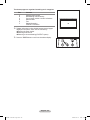
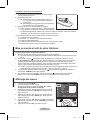
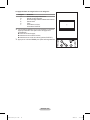
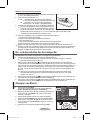
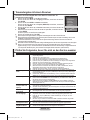
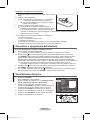
Installing Batteries in the Remote Control
1 Lift the cover at the back of the remote control upward as
shown in the figure.
2 Install two AAA size batteries.
Make sure to match the “+” and “–” ends of the
batteries with the diagram inside the compartment.
Do not mix battery types, i.e. alkaline and manganese.
3 Close the cover as shown in the figure.
Remove the batteries and store them in a cool and dry
place if you won’t be using the remote control for a long
time. The remote control can be used up to about 23 feet
from the TV. (Assuming typical TV usage, the batteries last
for about one year.)
If the remote control doesn’t work! Check the following:
1. Is the TV power on?
2. Are the plus and minus ends of the batteries reversed?
3. Are the batteries drained?
4. Is there a power cut, or is the power cord unplugged?
5. Is there a special fluorescent light or a neon sign nearby?
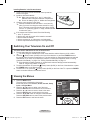
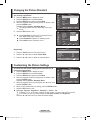
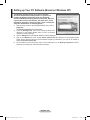
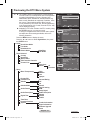
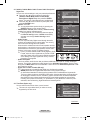
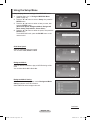
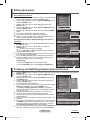
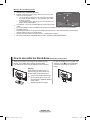
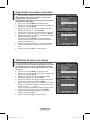
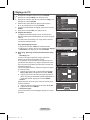
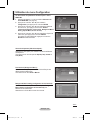
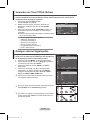
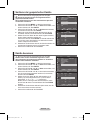
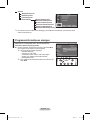
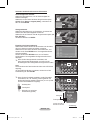
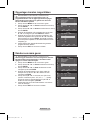
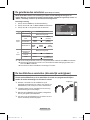
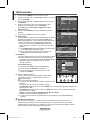
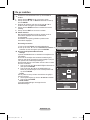
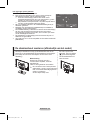
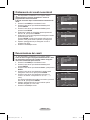
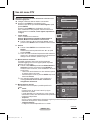
Switching Your Television On and Off
The mains lead is attached to the rear of the television.
1 Plug the mains lead into an appropriate socket.
The main voltage is indicated on the rear of the television and the frequency is 50 or 60Hz.
2 Press the (Power) button (On/Off) on the front of the television or press the POWER button on
the remote control to switch the television on. The channel that you were watching last is re-selected
automatically. If you have not yet stored any channels, no clear picture appears. Refer to “Storing
Channels Automatically” on page 13 or “Storing Channels Manually” on page 14.
If the television is initially powered on, several basic customer settings proceed automatically.
Refer to “Plug & Play Feature” on page 10.
3 To switch the television off, press the (Power) button (On/Off) on the front of the television or press
the POWER button on the remote control.
4 To switch the TV on, press the (Power) button (On/Off) on the front of the TV or press the POWER
button or number buttons on the remote control.
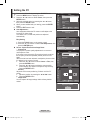
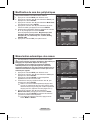
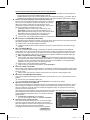
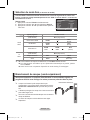
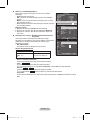
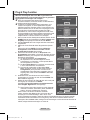
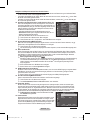
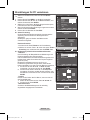
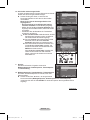
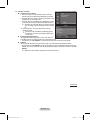
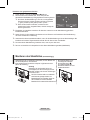
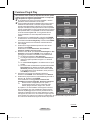
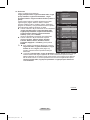
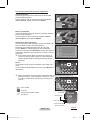
Viewing the Menus
1 Press the MENU button.
The main menu is displayed on the screen.
Its left side has six icons: Picture, Sound, Channel, Setup,
Input, and Digital Menu.
2 Press the ▲ or ▼ button to select one of the icons.
Press the ENTER button to access the icon’s sub-menu.
3 Press the ▲ or ▼ button to move to items in the menu.
Press the ENTER button to enter items in the menu.
4 Press the ▲/▼/◄/► button to change the selected items.
Press the RETURN button to return to the previous menu.
5 Press the EXIT button to exit from the menu.
Move
Enter
Exit
Mode : Standard
Cell Light 7
Contrast 80
Brightness 45
Sharpness 50
Colour 50
Tint G50 R50
Detailed Settings
More
Picture
T V
BN68-01427A-Eng.indb 9 2008-03-10 오후 3:14:19

English - 10
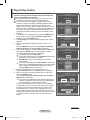
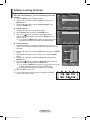
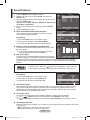
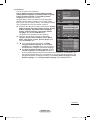
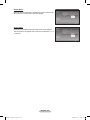
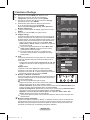
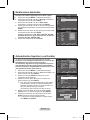
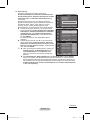
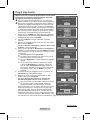
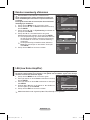
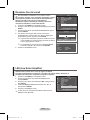
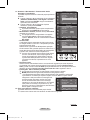
Plug & Play Feature
When the television is initially powered on, several basic
customer settings proceed automatically and subsequently.
The following settings are available.
If you accidentally select the wrong country for your TV, the
characters on the screen may be wrongly displayed.
Any functions related to Digital TV (DVB) will only work in
countries or areas where DVB-T (MPEG2) digital terrestrial
signals are broadcasted. Please confirm with your local
dealer if you can receive DVB-T signals. Although this TV set
follows the DVB-T specification, maintaining compatibility with
the future coming DVB-T digital terrestrial broadcasts is not
guaranteed. Several functions may not be available in some
countries.
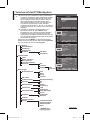
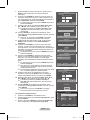
1 If the television is in standby mode, press the POWER button
on the remote control. The message Start Plug & Play is
displayed. Press the ENTER button.
2 The Language menu will automatically appear after several
seconds.
3 Select the appropriate language by pressing the ▲ or ▼
button.
Press the ENTER button. The message Select ‘Home Use’
when installing this TV in your home. is displayed.
4 Press the ◄ or ► button to select Store Demo or Home Use,
then press the ENTER button. The message to check the
connected status of the antenna is displayed.
The default selection is Home Use.
We recommend setting the TV to Home Use mode for the
best picture in your home environment.
Store Demo mode is only intended for use in retail
environments.
If the unit is accidentally set to Store Demo mode and you
want to return to Home Use (Standard): Press the Volume
button. When the volume OSD is displayed, press and
hold the MENU button for 5 seconds.
5 Make sure that the antenna is connected to the TV.
Press the ENTER button. The Country menu is displayed.
6 Select your country or area by pressing the ▲ or ▼ button.
Press the ENTER button.
The message Some DTV functions may not be available.
Digital Scan? is displayed.
This function is supported for all countries except for the
following countries: France, Germany, Italy, Netherlands,
Spain, Switzerland, United Kingdom, Austria.
If your country supports the DTV functions, the message is
not displayed. Then you can follow the instructions from step
12
. When the local service provider does not support DTV
broadcasting but you choose a DTV supporting country, it
enters the DTV Plug & Play but DTV functions may not work
properly.When No is selected, follow the instructions from step
7 to 10. When Yes is selected, follow the instructions from
step 11.
Continued...
Plug & Play
Start Plug & Play.
OK
Enter
Plug & Play
Language
Move
Enter
English
Deutsch
Français
Italiano
▼
Plug & Play
Select ‘Home Use’
when installing this TV in your home.
Move
Enter
Store Demo Home Use
Plug & Play
Check antenna input.
Enter
OK
Plug & Play
Country
Move
Enter
▲
United Kingdom
Austria
Eastern Europe
Others
Plug & Play
Some DTV functions may not be available.
Digital Scan?
Move
Enter
Skip
Yes No
Plug & Play
P 1 C -- 40 MHz
0 %
Enter
Skip
Start
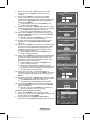
BN68-01427A-Eng.indb 10 2008-03-10 오후 3:14:20

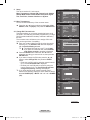
English - 11
Plug & Play
0%
Services found: 0 Channel:
-
Enter
Skip
Start
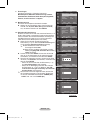
Plug & Play
Scanning for digital services...
29%
Services found: 6 Channel: 35
Enter
Skip
Stop
OK
Enjoy your viewing
Move
Enter
Return
Plug & Play
Language : English
Time
Light Effect
:
In Watching TV
Auto Wall-Mount
Melody : Off
Entertainment
: Off
Energy Saving :
Off
PIP
Setup
T V
7 Select No pressing the ◄ or ► button, then press the ENTER
button. Auto Store menu is displayed.
8 Press the ENTER button to start search the channels. The
channel search will start and end automatically. After all the
available channels are stored, Clock Set menu is automatically
displayed. Press the ENTER button.
To stop the search before it has finished, press the
ENTER button with Stop selected.
9 Press the ◄ or ► button to select Month, Day, Year, Hour, or
Minute. Set these by pressing the ▲ or ▼ button.
You can set the Month, Day, Year, Hour, or Minute
directly by pressing the numeric buttons on the remote
control.
10 Press the ENTER button to confirm your setting. The message
Enjoy your viewing is displayed. When you have finished,
press the ENTER button.
Even if the ENTER button is not pressed, the message will
automatically disappear after several seconds.
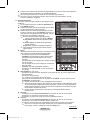
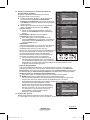
11 Select Yes pressing the ◄ or ► button, then press the
ENTER button. Auto Store menu is displayed.
12 Press the
ENTER button to start search the analog channels.
The analog channel search will start and end automatically.
After all the available analog channels are stored, the screen
for searching digital channels is automatically displayed.
To stop the search before it has finished, press the
ENTER button with Stop selected.
13 Press the
ENTER button to start search the digital channels.
The digital channel search will start and end automatically.
After all the available digital channels are stored, the screen to
select a time zone is displayed depending on the country.
To stop the search before it has finished, press the
ENTER button with Stop selected.
If the DTV channel is updated, the Source in the source
list of the Input menu is automatically changed to DTV.
For detailed descriptions about DTV channel update, refer
to page 33 of this manual.
14 Press the ▲ or ▼ button to select required time zone, then
press the ENTER button. The screen for setting the time is
displayed. Press the ENTER button.
15 Press the ◄ or ► button to select Month, Day, Year, Hour, or
Min. Set these by pressing the ▲ or ▼ button.
You can set the Month, Day, Year, Hour, or Min directly
by pressing the numeric buttons on the remote control.
16 Press the
ENTER button to confirm your setting. The message
Enjoy your viewing is displayed. When you have finished,
press the ENTER button.
Even if the ENTER button is not pressed, the message will
automatically disappear after several seconds.
If you want to reset this feature …
1
Press the MENU button to display the menu.
2 Press the ▲ or ▼ button to select Setup, then press the
ENTER button.
3 Press the ENTER button again to select Plug & Play.
The message Start Plug & Play is displayed.
Plug & Play
Set the current time.
Adjust
Move
Enter
Skip
15
Month Day Year
Hour Min
2008
12 00
01
Plug & Play
Move
Select
Skip
The Iberian Peninsula and Balears Islands
Canarian Islands
<Spain only>
Plug & Play
Clock Set
Move
Adjust
Enter
15
Month Day Year
Hour Min
2008
12 00
01
BN68-01427A-Eng.indb 11 2008-03-10 오후 3:14:22

English - 12
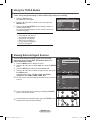
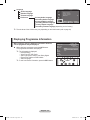
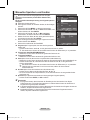
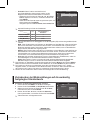
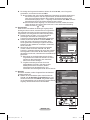
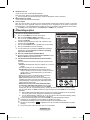
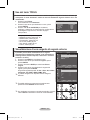
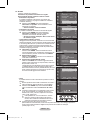
Viewing External Signal Sources
You can switch between viewing signals from connected
equipment, such as a VCR, DVD, Set-Top Box, and the TV
source (broadcast or cable).
1 Press the MENU button to display the menu.
2 Press the ▲ or ▼ button to select Input, then press the ENTER
button.
3 Press the ENTER button again to select Source List.
4 Press the ▲ or ▼ button to select the signal source, then press
the ENTER button.
Available signal sources:
TV, Ext.1, Ext.2, AV, S-Video,
Component, PC, HDMI1, HDMI2, HDMI3, DTV
You can choose only those external devices that are connected
to the TV.
You can select these options simply by pressing the SOURCE
button on the remote control.
To watch television programme again, press the TV/DTV button
and select the channel number required.
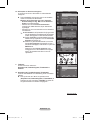
Using the TOOLS Button
You can use the TOOLS button to select your frequently used functions quickly and easily. The
“Tools” menu changes depending on which external input mode you are viewing.
1 Press the TOOLS button.
The Tools menu will appear.
2 Press the ▲ or ▼ button to select a menu, then press the
ENTER button.
3 Press the ▲/▼/◄/►/ENTER buttons to display, change, or
use the selected items.
For a more detailed description of each function, refer to the
corresponding page.
• Anynet+(HDMI-CEC), see page 52
• Picture Mode, see page 18
• Sound Mode, see page 23
• Sleep Timer, see page 25
• SRS TS XT, see page 23
• Energy Saving, see page 27
• Dual I-II, see page 24
Move
Enter
Return
Source List :
TV
Edit Name
Anynet + (HDMI-CEC)
WISELINK
Input
T V
Move
Enter
Return
TV
Ext.1 :−−−−
Ext.2 :−−−−
AV :−−−−
S-Video :−−−−
Component :−−−−
PC :−−−−
More
Source List
T V
Tools
Anynet+ (HDMI-CEC)
Picture Mode : Standard
Sound Mode : Custom
Sleep Timer : Off
SRS TS XT : Off
Energy Saving : Off
Dual I-II : Mono
Move
Enter
Exit
BN68-01427A-Eng.indb 12 2008-03-10 오후 3:14:24

English - 13
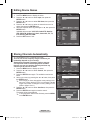
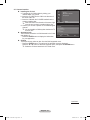
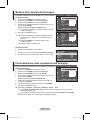
Editing Device Names
You can give a name to the external source.
1 Press the MENU button to display the menu.
2 Press the ▲ or ▼ button to select Input, then press the
ENTER button.
3 Press the ▲ or ▼ button to select Edit Name, then press the
ENTER button.
4 Press the ▲ or ▼ button to select the external source to be
edited, then press the ENTER button.
5 Select the required device by pressing ▲ or ▼, then press the
ENTER button.
Available device names:
VCR, DVD, Cable STB, Satellite
STB, PVR STB, AV Receiver, Game, Camcorder, PC, TV,
IPTV, Blu-Ray, HD DVD, DMA.
6 Press the EXIT button to exit.
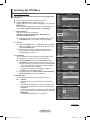
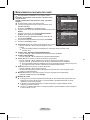
Storing Channels Automatically
Not available in DTV or external input mode.
You can scan for the frequency ranges available to you
(availability depends on your country).
Automatically allocated programme numbers may not
correspond to actual or desired programme numbers.
However you can sort numbers manually and clear any
channels you do not wish to watch.
1 Press the MENU button to display the menu.
2 Press the ▲ or ▼ button to select Channel, then press the
ENTER button.
3 Press the ENTER button again. The available countries are
listed.
4 Select your country by pressing the ▲ or ▼ button, then press
the ENTER button.
Even though you have changed the country setting in this
menu, the country setting for DTV is not changed. Use the
Plug & Play function to change the country setting for DTV.
(Refer to pages 10 to 11)
5 Press the ▲ or ▼ button to select Auto Store, then press the
ENTER button.
6 Press the ENTER button again to start the search.
The search will end automatically.
To stop the search before it has finished, press the MENU
or the ENTER button.
Move
Enter
Return
Source List :
TV
Edit Name
Anynet + (HDMI-CEC)
WISELINK
Input
T V
Move
Enter
Return
Country :
United Kingdom
Auto Store
Manual Store
Channel Manager
Sort
Name
Fine Tune
LNA :
Off
Channel
T V
Auto Store
P 1 C -- 40 MHz
0 %
Enter
Return
Start
Move
Enter
Return
Country :
United Kingdom
Auto Store
Manual Store
Channel Manager
Sort
Name
Fine Tune
LNA :
Off
Channel
▲
Switzerland
United Kingdom
Austria
Eastern Europe
Others
T V
Move
Enter
Return
Ext.1 :−−−−
Ext.2 : −−−−
AV :
S-Video :
Component : −−−−
PC : −−−−
HDMI1 :
HDMI2 : −−−−
HDMI3 :
−−−−
Edit Name
T V
−−−−
VCR
DVD
Cable STB
Satellite STB
PVR STB
AV Receiver
BN68-01427A-Eng.indb 13 2008-03-10 오후 3:14:25

English - 14
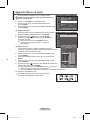
Storing Channels Manually
Not available in DTV or external input mode.
You can store television channels, including those received via
cable networks.
When storing channels manually, you can choose:
Whether or not to store each of the channels found.
The programme number of each stored channel which you wish
to identify.
1 Press the MENU button to display the menu.
2 Press the ▲ or ▼ button to select Channel, then press the
ENTER button.
3 Press the ▲ or ▼ button to select Manual Store, then press
the ENTER button.
4 Select the required option by pressing the ▲ or ▼ button, then
press the ENTER button.
5 When you are satisfied with your setting, press the ENTER
button.
6 Press the EXIT button to exit.
Programme (Programme number to be assigned to a channel)
− Press the ▲ or ▼ button until you find the correct number.
You can also select the channel number directly by pressing the numeric buttons (0~9).
Colour System: Auto/PAL/SECAM/NTSC4.43
− Press the ▲ or ▼ button to select the required colour standard.
Sound System: BG/DK/I/L
− Press the ▲ or ▼ button to select the required sound standard.
Channel (When you know the number of the channel to be stored)
− Press the ▲ or ▼ button to select
C (Air channel) or S (Cable channel).
− Press the ► button, then press the ▲ or ▼ button to select the required number.
You can also select the channel number directly by pressing the numeric buttons (0~9).
If there is abnormal sound or no sound, re-select the sound standard required.
Search (When you do not know the channel numbers)
− Press the ▲ or ▼ button to start the search.
− The tuner scans the frequency range until the first channel or the channel that you selected is
received on the screen.
Store (When you store the channel and associated programme number)
− Set to
OK by pressing the ENTER button.
Channel mode
P (Programme mode): When completing tuning, the broadcasting stations in your area have
been assigned to position numbers from P00 to P99. You can select a channel by entering the
position number in this mode.
C (Air channel mode): You can select a channel by entering the assigned number to each air
broadcasting station in this mode.
S (Cable channel mode): You can select a channel by entering the assigned number for each
cable channel in this mode.
Move
Enter
Return
Country :
United Kingdom
Auto Store
Manual Store
Channel Manager
Sort
Name
Fine Tune
LNA :
Off
Channel
T V
Move
Enter
Return
Programme :
P 1
Colour System : Auto
Sound System : BG
Channel : C
Search : 175 MHz
Store : ?
Manual Store
T V
BN68-01427A-Eng.indb 14 2008-03-10 오후 3:14:26

English - 15
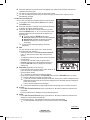
Adding / Locking Channels
Not available in DTV or external input mode.
Using the Channel Manager, you can conveniently lock or add
channels.
1 Press the MENU button to display the menu.
2 Press the ▲ or ▼ button to select Channel, then press the
ENTER button.
3 Press the ▲ or ▼ button to select Channel Manager, then
press the ENTER button.
Adding channels
Using the Channel List, you can add channels.
4 Select Channel List by pressing the ENTER button.
5 Move to the ( ) field by pressing the ▲/▼/◄/► buttons,
select a channel to be added, and press the ENTER button to
add the channel.
If you press the ENTER button again, the ( ) symbol next
to the channel disappears and the channel is not added.
Locking channels
This feature allows you to prevent unauthorized users, such as
children, from watching unsuitable programmes by muting out video
and audio.
6 Press the ▲ or ▼ button to select Child Lock, then press the ENTER
button.
7 Select On by pressing the ▲ or ▼ button, then press the ENTER
button.
8 Press the ▲ or ▼ button to select Channel List, then press the
ENTER button.
9 Move to the ( ) field by pressing the ▲/▼/◄/► buttons, select a
channel to be locked, and press the ENTER button.
If you press the ENTER button again, the ( ) symbol next to the
channel disappears and the channel lock is canceled.
A blue screen is displayed when Child Lock is activated.
10 Press the EXIT button to exit.
You can select these options simply by pressing the CH LIST
button on the remote control.
Move
Enter
Return
Country :
United Kingdom
Auto Store
Manual Store
Channel Manager
Sort
Name
Fine Tune
LNA :
Off
Channel
T V
Move
Enter
Return
Channel List
Child Lock : Off
Channel Manager
T V
Channel List
P 1 C 6
1 / 10
▲
▼
Prog.
0
C 1
1 C 6
2 C 5
3 C 8
4 C 11
5 C 22
6 C 26
7 C 36
8 C 52
9 C 24
Add Lock
Move Enter
Page Return
BN68-01427A-Eng.indb 15 2008-03-10 오후 3:14:28

English - 16
Sorting the Stored Channels
Not available in DTV or external input mode.
This operation allows you to change the programme numbers
of the stored channels.
This operation may be necessary after using the auto store.
1 Press the MENU button to display the menu.
2 Press the ▲ or ▼ button to select Channel, then press the
ENTER button.
3 Press the ▲ or ▼ button to select Sort, then press the
ENTER button.
4 Select the channel that you wish to move by pressing the
▲ or ▼ button, then press the ENTER button.
5 Select the number of the programme to which the channel is to
be moved by pressing the ▲ or ▼ button.
Press the ENTER button. The channel is moved to its new
position and all other channels are shifted accordingly.
6 Repeat steps 4 to 5 until you have moved all the channels to
the required programme numbers.
7 Press the EXIT button to exit.
Assigning Names to Channels
Not available in DTV or external input mode.
Channel names will be assigned automatically when channel
information is broadcast. These names can be changed,
allowing you to assign new names.
1 Press the MENU button to display the menu.
2 Press the ▲ or ▼ button to select Channel, then press the
ENTER button.
3 Press the ▲ or ▼ button to select Name, then press the
ENTER button.
4 Press the ▲ or ▼ button to select the channel to be assigned
to a new name, then press the ENTER button.
5 Press the ▲ or ▼ button to select a letter, a number, or a
symbol (Results in this sequence: A~Z, 0~9, +, -, *, /, blank).
Move on to the previous or next letter by pressing the ◄ or ►
button, then press the ENTER button.
6 Repeat steps 4 to 5 for each channel to be assigned to a new
name.
7 Press the EXIT button to exit.
Move
Enter
Return
Country :
United Kingdom
Auto Store
Manual Store
Channel Manager
Sort
Name
Fine Tune
LNA :
Off
Channel
T V
Move
Enter
Return
Prog. Ch. Name
0 C- -
1 C04
2 C05
3 C08
4 C09
Sort
T V
Move
Enter
Return
Prog. Ch. Name
0 C-- −−−−−
1 C04 −−−−−
2 C05 −−−−−
3 C08 −−−−−
4 C09 −−−−−
Name
T V
Move
Enter
Return
Country :
United Kingdom
Auto Store
Manual Store
Channel Manager
Sort
Name
Fine Tune
LNA :
Off
Channel
T V
BN68-01427A-Eng.indb 16 2008-03-10 오후 3:14:29

English - 17
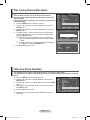
Fine Tuning Channel Reception
Not available in DTV or external input mode.
If the reception is clear, you do not have to fine tune the
channel, as this is done automatically during the search and
store operation.
If the signal is weak or distorted, you may have to fine tune the
channel manually.
1 Press the MENU button to display the menu.
2 Press the ▲ or ▼ button to select Channel, then press the
ENTER button.
3 Press the ▲ or ▼ button to select Fine Tune, then press the
ENTER button.
4 To obtain a sharp, and clear picture and good sound quality,
press the ◄ or ► button until you reach the optimal setting.
Press the ENTER button.
Fine Tune Store will change the colour of the Channel
OSD (On Screen Display) from White to Red and add the
“*” mark.
To reset the fine tuning to 0, select Reset by pressing the
▲ or ▼ button. Press the ENTER button.
5 Press the EXIT button to exit.
LNA (Low Noise Amplifier)
This function is very useful in the situation that the TV is used in weak signal.
LNA amplifies the TV signal in the weak signal area, a low-noise preamplifier boosts the incoming
signal.
1 Press the MENU button to display the menu.
2 Press the ▲ or ▼ button to select Channel, then press the
ENTER button.
3 Press the ▲ or ▼ button to select LNA, then press the ENTER
button.
4 Select Off or On by pressing the ▲ or ▼ button, then press
the ENTER button.
5 Press the EXIT button to exit.
Depending on areas, factory mode of LNA, will be set up as
On or Off.
Fine Tune
P 1
+ 3
Adjust
Save
Return
Reset
P 1 *
Mono
Picture : Dynamic
Sound : Custom
SRS TS XT : Off
−−
:
−−
Move
Enter
Return
Country :
United Kingdom
Auto Store
Manual Store
Channel Manager
Sort
Name
Fine Tune
LNA :
Off
Channel
T V
Move
Enter
Return
Country :
United Kingdom
Auto Store
Manual Store
Channel Manager
Sort
Name
Fine Tune
LNA :
Off
Channel
T V
BN68-01427A-Eng.indb 17 2008-03-10 오후 3:14:30

English - 18
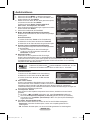
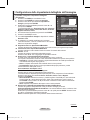
Customizing the Picture Settings
Your television has several setting options that allow you to
control the picture quality.
1 Press the MENU button to display the menu.
2 Press the ENTER button to select Picture.
3 Press the ENTER button again to select Mode.
4 Select the required mode by pressing the ▲ or ▼ button, then
press the ENTER button.
Available modes:
Dynamic, Standard, Movie
5 Select the required option by pressing the ▲ or ▼ button, then
press the ENTER button.
6 When you are satisfied with your setting, press the ENTER button.
7 Press the EXIT button to exit.
Cell Light - Contrast – Brightness – Sharpness – Colour – Tint
In Analog TV, Ext., AV, S-Video modes of the PAL system, you cannot use the Tint Function.
In PC mode, you can only make changes to Cell Light, Contrast, and Brightness.
Press the ◄ or ► button until you reach the optimal setting.
Changing the Picture Standard
You can select the type of picture which best corresponds to
your viewing requirements.
1 Press the MENU button to display the menu.
2 Press the ENTER button to select Picture.
3 Press the ENTER button again to select Mode.
4 Select the required mode by pressing the ▲ or ▼ button, then
press the ENTER button.
Available modes:
Dynamic, Standard, Movie
The settings values may vary depending on the input
source.
5 Press the EXIT button to exit.
Choose Dynamic for viewing the TV during the day or
when there is bright light in the room.
Choose Standard for general TV watching mode.
Choose Movie when viewing the movie.
Easy Setting
1 Press the TOOLS button on the remote control.
2 Press the ▲ or ▼ button to select Picture Mode.
3 Press the ◄ or ► button to select the required option.
Move
Enter
Return
Mode : Standard
Cell Light 7
Contrast 80
Brightness 45
Sharpness 50
Colour 50
Tint G50 R50
Detailed Settings
More
Picture
T V
Move
Enter
Return
Mode : Standard
Cell Light 7
Contrast 80
Brightness 45
Sharpness 50
Colour 50
Tint G50 R50
Detailed Settings
More
Picture
Dynamic
Standard
Movie
T V
Tools
Anynet+ (HDMI-CEC)
PictureMode ◄ Standard ►
Sound Mode : Custom
Sleep Timer : Off
SRS TS XT : Off
Energy Saving : Off
Dual I-II : Mono
Move Adjust
Exit
Move
Enter
Return
Mode : Standard
Cell Light 7
Contrast 80
Brightness 45
Sharpness 50
Colour 50
Tint G50 R50
Detailed Settings
More
Picture
T V
BN68-01427A-Eng.indb 18 2008-03-10 오후 3:14:31

English - 19
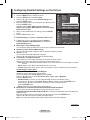
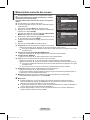
Configuring Detailed Settings on the Picture
You can set detailed picture settings.
1 Press the MENU button to display the menu.
2 Press the ENTER button to select Picture.
3 Press the ▲ or ▼ button to select Detailed Settings, then
press the ENTER button.
4 Select the required option by pressing the ▲ or ▼ button, then
press the ENTER button.
Available options:
Black Adjust, Dynamic Contrast,
Gamma, Colour Space, White Balance, Flesh Tone, Edge
Enhancement, xvYCC
5 When you are satisfied with your setting, press the ENTER
button.
6 Press the EXIT button to exit.
Detailed Settings is available in Standard or Movie mode.
In PC mode, you can only make changes to Dynamic
Contrast, Gamma and White Balance from among the
Detailed Settings items.
Black Adjust: Off/Low/Medium/High
You can directly select the black level on the screen to adjust the screen depth.
Dynamic Contrast: Off/Low/Medium/High
You can adjust the screen contrast so that the optimal contrast is provided.
Gamma: -3 ~ +3
You can adjust the middle brightness of pictures.
Press the ◄ or ► button until you reach the optimal setting.
Colour Space : Auto/Native/Custom
Colour space is a colour matrix composed of red, green and blue colours.
Select your favorite colour space to experience the most natural colour.
− Auto: Auto Colour Space automatically adjusts to the most natural colour tone based on program
sources.
− Native: Native Colour Space offers deep and rich colour tone.
− Custom: Adjusts the colour range to suit your preference. (see “Customizing the Colour Space”)
Customizing the Colour Space
Colour: Red/Green/Blue/Yellow/Cyan/Magenta
Adjusts the Colour range to suit your preference.
Colour is available when Colour Space is set to Custom.
Press the ▲ or ▼ button to select Red, Green, Blue, Yellow, Cyan or Magenta.
Press the ENTER button.
− Red/Green/Blue: In Colour, you can adjust the RGB values for the selected colour.
Press the ▲ or ▼ button to select Red, Green or Blue to change it. Press the ENTER button.
Press the ◄ or ► button to decrease or increase the value of a particular item.
Press the ENTER button.
− Reset: Resets the colour space to the default values.
White Balance: R-Offset/G-Offset/B-Offset/R-Gain/G-Gain/B-Gain/Reset
You can adjust the colour temperature for more natural picture colours.
R-Offset/G-Offset/B-Offset/R-Gain/G-Gain/B-Gain: Changing the adjustment value will refresh the
adjusted screen.
Select the required option by pressing the ▲ or ▼ button, then press the ENTER button.
Press the ◄ or ► button until you reach the optimal setting.
Reset: The previously adjusted white balance will be reset to the factory defaults.
Continued...
Move
Enter
Return
Black Adjust :
Off
Dynamic Contrast : Low
Gamma : 0
Colour Space : Native
White Balance
Flesh Tone : 0
Edge Enhancement
: On
xvYCC : Off
Detailed Settings
T V
Move
Enter
Return
Mode : Standard
Cell Light 7
Contrast 80
Brightness 45
Sharpness 50
Colour 50
Tint G50 R50
Detailed Settings
More
Picture
T V
BN68-01427A-Eng.indb 19 2008-03-10 오후 3:14:32

English - 20
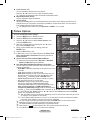
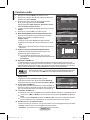
Picture Options
You can set detailed picture settings.
1 Press the MENU button to display the menu.
2 Press the ENTER button to select Picture.
3 Press the ▲ or ▼ button to select Picture Options, then
press the ENTER button.
4 Select the required option by pressing the ▲ or ▼ button,
then press the ENTER button.
5 When you are satisfied with your setting, press the
ENTER button.
6 Press the EXIT button to exit.
In PC mode, you can only make changes to the Colour Tone,
Size and Screen Burn Protection from among the items in
Picture Options.
Colour Tone: Cool2/Cool1/Normal/Warm1/Warm2
When the picture mode is set to Dynamic or Standard,
Warm1 and Warm2 cannot be selected.
Size: Auto Wide/16:9/Wide Zoom/Zoom/4:3/Just Scan
You can select the picture size which best corresponds to your
viewing requirements.
−
Auto Wide: Expanding and pulling up the picture from 4:3 to
16:9 ratio.
− 16:9
: Sets the picture to 16:9 wide mode.
−
Wide Zoom: Magnify the size of the picture more than 4:3.
Move the screen up/down using the ▲ or ▼ button after
selecting the by pressing the ► or ENTER button.
−
Zoom: Magnify the size of the picture vertically on screen.
− 4:3
: Sets the picture to 4:3 normal mode.
−
Just Scan: Use this function to see the full image
without any cutoff when HDMI(720p/1080i/1080p),
Component(1080i/1080p) or DTV(1080i) signals are input.
After selecting Just Scan in HDMI (1080i/1080p) or
Component (1080i/1080p) mode: Press the ◄ or ► button
to select , then press the ENTER button. Press the ▲, ▼, ◄ or ► button to move the picture
up, down, left and right. Reset: Press the ◄ or ► button to select Reset, then press the ENTER
button. You can initialize the setting.
With the HDMI Just Scan picture size, depending on the AV devices, the screen may be cut off
or a specific colour appears on the screen.
For an HDMI (1080p) connection of 24, 25, 30, 50, and 60 Hz, and for a Component (1080p)
connection of 50 and 60Hz, only the input source is supported.
You can change the picture size simply by pressing the P.SIZE button on the remote control.
Depending on the input source, the picture size options may vary.
The items available may differ depending on the selected mode.
When Double ( , ) mode has been set in PIP, the Picture Size cannot be set.
In PC Mode, only "16:9" and "4:3" mode can be adjusted.
Continued...
Flesh Tone:-15~+15
You can emphasize the pink tone in the picture.
Press the ◄ or ► button until you reach the optimal setting.
Changing the adjustment value will refresh the adjusted screen.
Edge Enhancement: Off/On
You can emphasize object boundaries.
xvYCC: Off/On
Setting the xvYCC mode to On increases detail and colour space when watching movies from an
external device (ie. DVD player) connected to the HDMI or Component IN jacks. You must set the
Picture Mode to Movie to enjoy this feature.
The xvYCC function works only in Component or HDMI(Y, Cb, Cr) mode.
Move
Enter
Return
Auto Wide
16:9
Wide Zoom
Zoom
4:3
Just Scan
Size
T V
Move
Enter
Exit
Mode : Standard
Cell Light 7
Contrast 80
Brightness 45
Sharpness 50
Colour 50
Tint G50 R50
Detailed Settings
More
Picture
T V
Move
Enter
Return
Colour Tone : Normal
Size : Auto Wide
Screen Mode : 16:9
Digital NR : Auto
DNle : On
HDMI Black Level : Normal
Movie Plus : Low
Blue only mode : Off
Screen Burn Protection
Picture Options
T V
BN68-01427A-Eng.indb 20 2008-03-10 오후 3:14:34
Seite wird geladen ...
Seite wird geladen ...
Seite wird geladen ...
Seite wird geladen ...
Seite wird geladen ...
Seite wird geladen ...
Seite wird geladen ...
Seite wird geladen ...
Seite wird geladen ...
Seite wird geladen ...
Seite wird geladen ...
Seite wird geladen ...
Seite wird geladen ...
Seite wird geladen ...
Seite wird geladen ...
Seite wird geladen ...
Seite wird geladen ...
Seite wird geladen ...
Seite wird geladen ...
Seite wird geladen ...
Seite wird geladen ...
Seite wird geladen ...
Seite wird geladen ...
Seite wird geladen ...
Seite wird geladen ...
Seite wird geladen ...
Seite wird geladen ...
Seite wird geladen ...
Seite wird geladen ...
Seite wird geladen ...
Seite wird geladen ...
Seite wird geladen ...
Seite wird geladen ...
Seite wird geladen ...
Seite wird geladen ...
Seite wird geladen ...
Seite wird geladen ...
Seite wird geladen ...
Seite wird geladen ...
Seite wird geladen ...
Seite wird geladen ...
Seite wird geladen ...
Seite wird geladen ...
Seite wird geladen ...
Seite wird geladen ...
Seite wird geladen ...
Seite wird geladen ...
Seite wird geladen ...
Seite wird geladen ...
Seite wird geladen ...
Seite wird geladen ...
Seite wird geladen ...
Seite wird geladen ...
Seite wird geladen ...
Seite wird geladen ...
Seite wird geladen ...
Seite wird geladen ...
Seite wird geladen ...
Seite wird geladen ...
Seite wird geladen ...
Seite wird geladen ...
Seite wird geladen ...
Seite wird geladen ...
Seite wird geladen ...
Seite wird geladen ...
Seite wird geladen ...
Seite wird geladen ...
Seite wird geladen ...
Seite wird geladen ...
Seite wird geladen ...
Seite wird geladen ...
Seite wird geladen ...
Seite wird geladen ...
Seite wird geladen ...
Seite wird geladen ...
Seite wird geladen ...
Seite wird geladen ...
Seite wird geladen ...
Seite wird geladen ...
Seite wird geladen ...
Seite wird geladen ...
Seite wird geladen ...
Seite wird geladen ...
Seite wird geladen ...
Seite wird geladen ...
Seite wird geladen ...
Seite wird geladen ...
Seite wird geladen ...
Seite wird geladen ...
Seite wird geladen ...
Seite wird geladen ...
Seite wird geladen ...
Seite wird geladen ...
Seite wird geladen ...
Seite wird geladen ...
Seite wird geladen ...
Seite wird geladen ...
Seite wird geladen ...
Seite wird geladen ...
Seite wird geladen ...
Seite wird geladen ...
Seite wird geladen ...
Seite wird geladen ...
Seite wird geladen ...
Seite wird geladen ...
Seite wird geladen ...
Seite wird geladen ...
Seite wird geladen ...
Seite wird geladen ...
Seite wird geladen ...
Seite wird geladen ...
Seite wird geladen ...
Seite wird geladen ...
Seite wird geladen ...
Seite wird geladen ...
Seite wird geladen ...
Seite wird geladen ...
Seite wird geladen ...
Seite wird geladen ...
Seite wird geladen ...
Seite wird geladen ...
Seite wird geladen ...
Seite wird geladen ...
Seite wird geladen ...
Seite wird geladen ...
Seite wird geladen ...
Seite wird geladen ...
Seite wird geladen ...
Seite wird geladen ...
Seite wird geladen ...
Seite wird geladen ...
Seite wird geladen ...
Seite wird geladen ...
Seite wird geladen ...
Seite wird geladen ...
Seite wird geladen ...
Seite wird geladen ...
Seite wird geladen ...
Seite wird geladen ...
Seite wird geladen ...
Seite wird geladen ...
Seite wird geladen ...
Seite wird geladen ...
Seite wird geladen ...
Seite wird geladen ...
Seite wird geladen ...
Seite wird geladen ...
Seite wird geladen ...
Seite wird geladen ...
Seite wird geladen ...
Seite wird geladen ...
Seite wird geladen ...
Seite wird geladen ...
Seite wird geladen ...
Seite wird geladen ...
Seite wird geladen ...
Seite wird geladen ...
Seite wird geladen ...
Seite wird geladen ...
Seite wird geladen ...
Seite wird geladen ...
Seite wird geladen ...
Seite wird geladen ...
Seite wird geladen ...
Seite wird geladen ...
Seite wird geladen ...
Seite wird geladen ...
Seite wird geladen ...
Seite wird geladen ...
Seite wird geladen ...
Seite wird geladen ...
Seite wird geladen ...
Seite wird geladen ...
Seite wird geladen ...
Seite wird geladen ...
Seite wird geladen ...
Seite wird geladen ...
Seite wird geladen ...
Seite wird geladen ...
Seite wird geladen ...
Seite wird geladen ...
Seite wird geladen ...
Seite wird geladen ...
Seite wird geladen ...
Seite wird geladen ...
Seite wird geladen ...
Seite wird geladen ...
Seite wird geladen ...
Seite wird geladen ...
Seite wird geladen ...
Seite wird geladen ...
Seite wird geladen ...
Seite wird geladen ...
Seite wird geladen ...
Seite wird geladen ...
Seite wird geladen ...
Seite wird geladen ...
Seite wird geladen ...
Seite wird geladen ...
Seite wird geladen ...
Seite wird geladen ...
Seite wird geladen ...
Seite wird geladen ...
Seite wird geladen ...
Seite wird geladen ...
Seite wird geladen ...
Seite wird geladen ...
Seite wird geladen ...
Seite wird geladen ...
Seite wird geladen ...
Seite wird geladen ...
Seite wird geladen ...
Seite wird geladen ...
Seite wird geladen ...
Seite wird geladen ...
Seite wird geladen ...
Seite wird geladen ...
Seite wird geladen ...
Seite wird geladen ...
Seite wird geladen ...
Seite wird geladen ...
Seite wird geladen ...
Seite wird geladen ...
Seite wird geladen ...
Seite wird geladen ...
Seite wird geladen ...
Seite wird geladen ...
Seite wird geladen ...
Seite wird geladen ...
Seite wird geladen ...
Seite wird geladen ...
Seite wird geladen ...
Seite wird geladen ...
Seite wird geladen ...
Seite wird geladen ...
Seite wird geladen ...
Seite wird geladen ...
Seite wird geladen ...
Seite wird geladen ...
Seite wird geladen ...
Seite wird geladen ...
Seite wird geladen ...
Seite wird geladen ...
Seite wird geladen ...
Seite wird geladen ...
Seite wird geladen ...
Seite wird geladen ...
Seite wird geladen ...
Seite wird geladen ...
Seite wird geladen ...
Seite wird geladen ...
Seite wird geladen ...
Seite wird geladen ...
Seite wird geladen ...
Seite wird geladen ...
Seite wird geladen ...
Seite wird geladen ...
Seite wird geladen ...
Seite wird geladen ...
Seite wird geladen ...
Seite wird geladen ...
Seite wird geladen ...
Seite wird geladen ...
Seite wird geladen ...
Seite wird geladen ...
Seite wird geladen ...
Seite wird geladen ...
Seite wird geladen ...
Seite wird geladen ...
Seite wird geladen ...
Seite wird geladen ...
Seite wird geladen ...
Seite wird geladen ...
Seite wird geladen ...
Seite wird geladen ...
Seite wird geladen ...
Seite wird geladen ...
Seite wird geladen ...
Seite wird geladen ...
Seite wird geladen ...
Seite wird geladen ...
Seite wird geladen ...
Seite wird geladen ...
Seite wird geladen ...
Seite wird geladen ...
Seite wird geladen ...
Seite wird geladen ...
Seite wird geladen ...
Seite wird geladen ...
Seite wird geladen ...
Seite wird geladen ...
Seite wird geladen ...
Seite wird geladen ...
Seite wird geladen ...
Seite wird geladen ...
Seite wird geladen ...
Seite wird geladen ...
Seite wird geladen ...
Seite wird geladen ...
Seite wird geladen ...
Seite wird geladen ...
Seite wird geladen ...
Seite wird geladen ...
Seite wird geladen ...
Seite wird geladen ...
Seite wird geladen ...
Seite wird geladen ...
Seite wird geladen ...
Seite wird geladen ...
Seite wird geladen ...
Seite wird geladen ...
Seite wird geladen ...
Seite wird geladen ...
Seite wird geladen ...
Seite wird geladen ...
Seite wird geladen ...
Seite wird geladen ...
Seite wird geladen ...
Seite wird geladen ...
Seite wird geladen ...
Seite wird geladen ...
Seite wird geladen ...
Seite wird geladen ...
Seite wird geladen ...
Seite wird geladen ...
Seite wird geladen ...
Seite wird geladen ...
Seite wird geladen ...
Seite wird geladen ...
Seite wird geladen ...
Seite wird geladen ...
Seite wird geladen ...
Seite wird geladen ...
Seite wird geladen ...
Seite wird geladen ...
Seite wird geladen ...
Seite wird geladen ...
Seite wird geladen ...
Seite wird geladen ...
Seite wird geladen ...
Seite wird geladen ...
Seite wird geladen ...
Seite wird geladen ...
Seite wird geladen ...
Seite wird geladen ...
Seite wird geladen ...
Seite wird geladen ...
Seite wird geladen ...
Seite wird geladen ...
Seite wird geladen ...
Seite wird geladen ...
Seite wird geladen ...
Seite wird geladen ...
Seite wird geladen ...
Seite wird geladen ...
Seite wird geladen ...
Seite wird geladen ...
Seite wird geladen ...
Seite wird geladen ...
Seite wird geladen ...
Seite wird geladen ...
Seite wird geladen ...
Seite wird geladen ...
Seite wird geladen ...
Seite wird geladen ...
Seite wird geladen ...
Seite wird geladen ...
Seite wird geladen ...
Seite wird geladen ...
Seite wird geladen ...
Seite wird geladen ...
Seite wird geladen ...
Seite wird geladen ...
Seite wird geladen ...
Seite wird geladen ...
Seite wird geladen ...
Seite wird geladen ...
Seite wird geladen ...
Seite wird geladen ...
Seite wird geladen ...
Seite wird geladen ...
Seite wird geladen ...
Seite wird geladen ...
Seite wird geladen ...
Seite wird geladen ...
Seite wird geladen ...
Seite wird geladen ...
Seite wird geladen ...
Seite wird geladen ...
Seite wird geladen ...
Seite wird geladen ...
Seite wird geladen ...
Seite wird geladen ...
Seite wird geladen ...
Seite wird geladen ...
Seite wird geladen ...
Seite wird geladen ...
Seite wird geladen ...
Seite wird geladen ...
Seite wird geladen ...
Seite wird geladen ...
Seite wird geladen ...
Seite wird geladen ...
Seite wird geladen ...
Seite wird geladen ...
Seite wird geladen ...
Seite wird geladen ...
Seite wird geladen ...
Seite wird geladen ...
Seite wird geladen ...
Seite wird geladen ...
Seite wird geladen ...
Seite wird geladen ...
Seite wird geladen ...
Seite wird geladen ...
Seite wird geladen ...
Seite wird geladen ...
Seite wird geladen ...
Seite wird geladen ...
Seite wird geladen ...
Seite wird geladen ...
Seite wird geladen ...
Seite wird geladen ...
Seite wird geladen ...
Seite wird geladen ...
Seite wird geladen ...
Seite wird geladen ...
Seite wird geladen ...
Seite wird geladen ...
Seite wird geladen ...
Seite wird geladen ...
Seite wird geladen ...
Seite wird geladen ...
Seite wird geladen ...
Seite wird geladen ...
Seite wird geladen ...
Seite wird geladen ...
Seite wird geladen ...
Seite wird geladen ...
Seite wird geladen ...
Seite wird geladen ...
Seite wird geladen ...
Seite wird geladen ...
Seite wird geladen ...
Seite wird geladen ...
Seite wird geladen ...
Seite wird geladen ...
Seite wird geladen ...
Seite wird geladen ...
Seite wird geladen ...
Seite wird geladen ...
Seite wird geladen ...
Seite wird geladen ...
Seite wird geladen ...
Seite wird geladen ...
Seite wird geladen ...
Seite wird geladen ...
Seite wird geladen ...
Seite wird geladen ...
Seite wird geladen ...
Seite wird geladen ...
Seite wird geladen ...
Seite wird geladen ...
Seite wird geladen ...
Seite wird geladen ...
Seite wird geladen ...
Seite wird geladen ...
Seite wird geladen ...
Seite wird geladen ...
Seite wird geladen ...
Seite wird geladen ...
Seite wird geladen ...
Seite wird geladen ...
Seite wird geladen ...
Seite wird geladen ...
-
 1
1
-
 2
2
-
 3
3
-
 4
4
-
 5
5
-
 6
6
-
 7
7
-
 8
8
-
 9
9
-
 10
10
-
 11
11
-
 12
12
-
 13
13
-
 14
14
-
 15
15
-
 16
16
-
 17
17
-
 18
18
-
 19
19
-
 20
20
-
 21
21
-
 22
22
-
 23
23
-
 24
24
-
 25
25
-
 26
26
-
 27
27
-
 28
28
-
 29
29
-
 30
30
-
 31
31
-
 32
32
-
 33
33
-
 34
34
-
 35
35
-
 36
36
-
 37
37
-
 38
38
-
 39
39
-
 40
40
-
 41
41
-
 42
42
-
 43
43
-
 44
44
-
 45
45
-
 46
46
-
 47
47
-
 48
48
-
 49
49
-
 50
50
-
 51
51
-
 52
52
-
 53
53
-
 54
54
-
 55
55
-
 56
56
-
 57
57
-
 58
58
-
 59
59
-
 60
60
-
 61
61
-
 62
62
-
 63
63
-
 64
64
-
 65
65
-
 66
66
-
 67
67
-
 68
68
-
 69
69
-
 70
70
-
 71
71
-
 72
72
-
 73
73
-
 74
74
-
 75
75
-
 76
76
-
 77
77
-
 78
78
-
 79
79
-
 80
80
-
 81
81
-
 82
82
-
 83
83
-
 84
84
-
 85
85
-
 86
86
-
 87
87
-
 88
88
-
 89
89
-
 90
90
-
 91
91
-
 92
92
-
 93
93
-
 94
94
-
 95
95
-
 96
96
-
 97
97
-
 98
98
-
 99
99
-
 100
100
-
 101
101
-
 102
102
-
 103
103
-
 104
104
-
 105
105
-
 106
106
-
 107
107
-
 108
108
-
 109
109
-
 110
110
-
 111
111
-
 112
112
-
 113
113
-
 114
114
-
 115
115
-
 116
116
-
 117
117
-
 118
118
-
 119
119
-
 120
120
-
 121
121
-
 122
122
-
 123
123
-
 124
124
-
 125
125
-
 126
126
-
 127
127
-
 128
128
-
 129
129
-
 130
130
-
 131
131
-
 132
132
-
 133
133
-
 134
134
-
 135
135
-
 136
136
-
 137
137
-
 138
138
-
 139
139
-
 140
140
-
 141
141
-
 142
142
-
 143
143
-
 144
144
-
 145
145
-
 146
146
-
 147
147
-
 148
148
-
 149
149
-
 150
150
-
 151
151
-
 152
152
-
 153
153
-
 154
154
-
 155
155
-
 156
156
-
 157
157
-
 158
158
-
 159
159
-
 160
160
-
 161
161
-
 162
162
-
 163
163
-
 164
164
-
 165
165
-
 166
166
-
 167
167
-
 168
168
-
 169
169
-
 170
170
-
 171
171
-
 172
172
-
 173
173
-
 174
174
-
 175
175
-
 176
176
-
 177
177
-
 178
178
-
 179
179
-
 180
180
-
 181
181
-
 182
182
-
 183
183
-
 184
184
-
 185
185
-
 186
186
-
 187
187
-
 188
188
-
 189
189
-
 190
190
-
 191
191
-
 192
192
-
 193
193
-
 194
194
-
 195
195
-
 196
196
-
 197
197
-
 198
198
-
 199
199
-
 200
200
-
 201
201
-
 202
202
-
 203
203
-
 204
204
-
 205
205
-
 206
206
-
 207
207
-
 208
208
-
 209
209
-
 210
210
-
 211
211
-
 212
212
-
 213
213
-
 214
214
-
 215
215
-
 216
216
-
 217
217
-
 218
218
-
 219
219
-
 220
220
-
 221
221
-
 222
222
-
 223
223
-
 224
224
-
 225
225
-
 226
226
-
 227
227
-
 228
228
-
 229
229
-
 230
230
-
 231
231
-
 232
232
-
 233
233
-
 234
234
-
 235
235
-
 236
236
-
 237
237
-
 238
238
-
 239
239
-
 240
240
-
 241
241
-
 242
242
-
 243
243
-
 244
244
-
 245
245
-
 246
246
-
 247
247
-
 248
248
-
 249
249
-
 250
250
-
 251
251
-
 252
252
-
 253
253
-
 254
254
-
 255
255
-
 256
256
-
 257
257
-
 258
258
-
 259
259
-
 260
260
-
 261
261
-
 262
262
-
 263
263
-
 264
264
-
 265
265
-
 266
266
-
 267
267
-
 268
268
-
 269
269
-
 270
270
-
 271
271
-
 272
272
-
 273
273
-
 274
274
-
 275
275
-
 276
276
-
 277
277
-
 278
278
-
 279
279
-
 280
280
-
 281
281
-
 282
282
-
 283
283
-
 284
284
-
 285
285
-
 286
286
-
 287
287
-
 288
288
-
 289
289
-
 290
290
-
 291
291
-
 292
292
-
 293
293
-
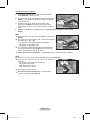 294
294
-
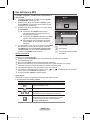 295
295
-
 296
296
-
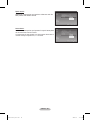 297
297
-
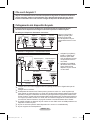 298
298
-
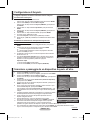 299
299
-
 300
300
-
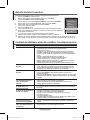 301
301
-
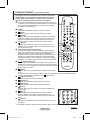 302
302
-
 303
303
-
 304
304
-
 305
305
-
 306
306
-
 307
307
-
 308
308
-
 309
309
-
 310
310
-
 311
311
-
 312
312
-
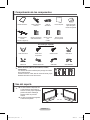 313
313
-
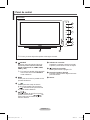 314
314
-
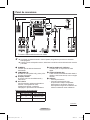 315
315
-
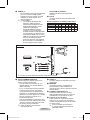 316
316
-
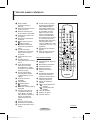 317
317
-
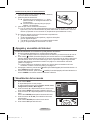 318
318
-
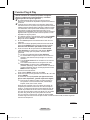 319
319
-
 320
320
-
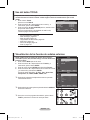 321
321
-
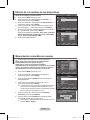 322
322
-
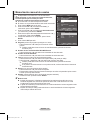 323
323
-
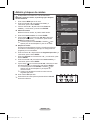 324
324
-
 325
325
-
 326
326
-
 327
327
-
 328
328
-
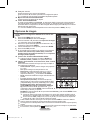 329
329
-
 330
330
-
 331
331
-
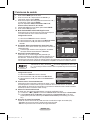 332
332
-
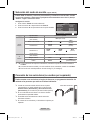 333
333
-
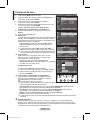 334
334
-
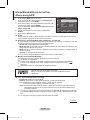 335
335
-
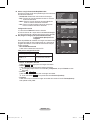 336
336
-
 337
337
-
 338
338
-
 339
339
-
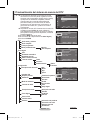 340
340
-
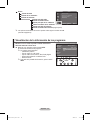 341
341
-
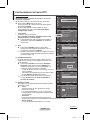 342
342
-
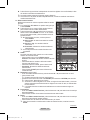 343
343
-
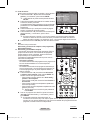 344
344
-
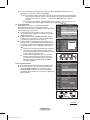 345
345
-
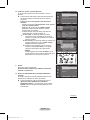 346
346
-
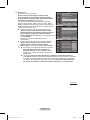 347
347
-
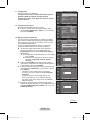 348
348
-
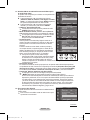 349
349
-
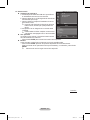 350
350
-
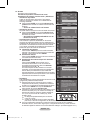 351
351
-
 352
352
-
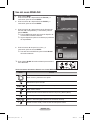 353
353
-
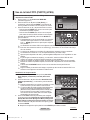 354
354
-
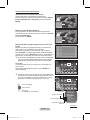 355
355
-
 356
356
-
 357
357
-
 358
358
-
 359
359
-
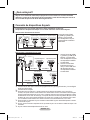 360
360
-
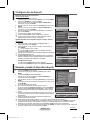 361
361
-
 362
362
-
 363
363
-
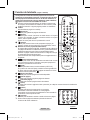 364
364
-
 365
365
-
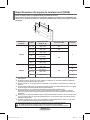 366
366
-
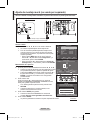 367
367
-
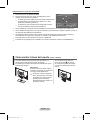 368
368
-
 369
369
-
 370
370
-
 371
371
-
 372
372
-
 373
373
-
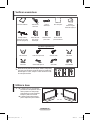 374
374
-
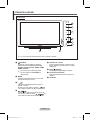 375
375
-
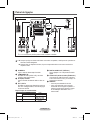 376
376
-
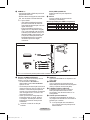 377
377
-
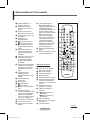 378
378
-
 379
379
-
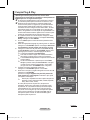 380
380
-
 381
381
-
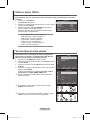 382
382
-
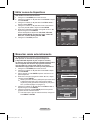 383
383
-
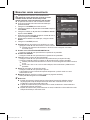 384
384
-
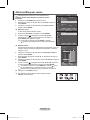 385
385
-
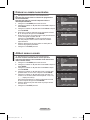 386
386
-
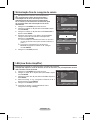 387
387
-
 388
388
-
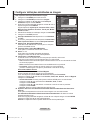 389
389
-
 390
390
-
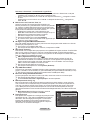 391
391
-
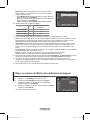 392
392
-
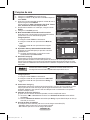 393
393
-
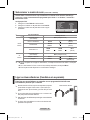 394
394
-
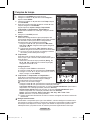 395
395
-
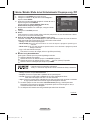 396
396
-
 397
397
-
 398
398
-
 399
399
-
 400
400
-
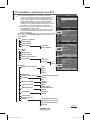 401
401
-
 402
402
-
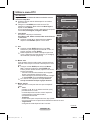 403
403
-
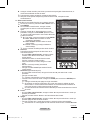 404
404
-
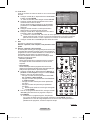 405
405
-
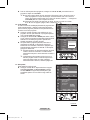 406
406
-
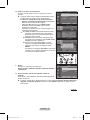 407
407
-
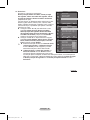 408
408
-
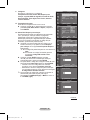 409
409
-
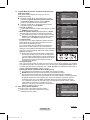 410
410
-
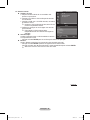 411
411
-
 412
412
-
 413
413
-
 414
414
-
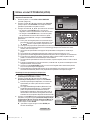 415
415
-
 416
416
-
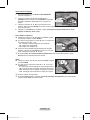 417
417
-
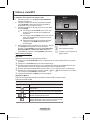 418
418
-
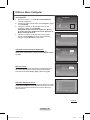 419
419
-
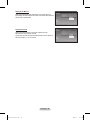 420
420
-
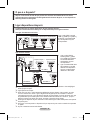 421
421
-
 422
422
-
 423
423
-
 424
424
-
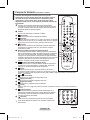 425
425
-
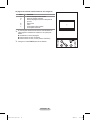 426
426
-
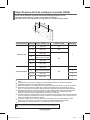 427
427
-
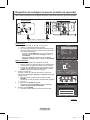 428
428
-
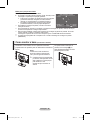 429
429
-
 430
430
-
 431
431
-
 432
432
-
 433
433
-
 434
434
-
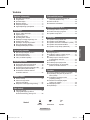 435
435
-
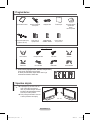 436
436
-
 437
437
-
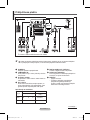 438
438
-
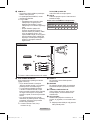 439
439
-
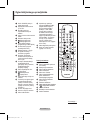 440
440
-
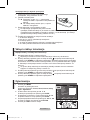 441
441
-
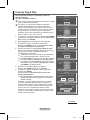 442
442
-
 443
443
-
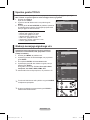 444
444
-
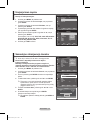 445
445
-
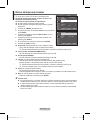 446
446
-
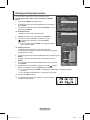 447
447
-
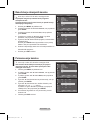 448
448
-
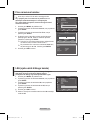 449
449
-
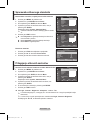 450
450
-
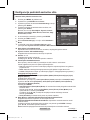 451
451
-
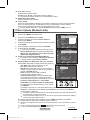 452
452
-
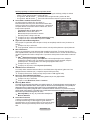 453
453
-
 454
454
-
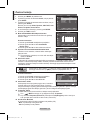 455
455
-
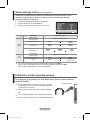 456
456
-
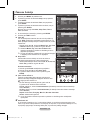 457
457
-
 458
458
-
 459
459
-
 460
460
-
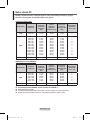 461
461
-
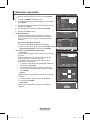 462
462
-
 463
463
-
 464
464
-
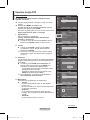 465
465
-
 466
466
-
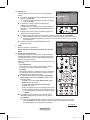 467
467
-
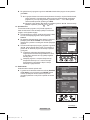 468
468
-
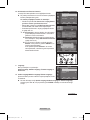 469
469
-
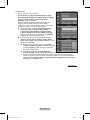 470
470
-
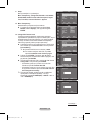 471
471
-
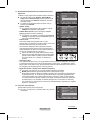 472
472
-
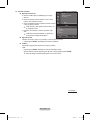 473
473
-
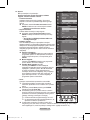 474
474
-
 475
475
-
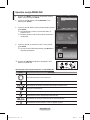 476
476
-
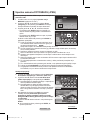 477
477
-
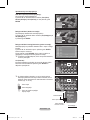 478
478
-
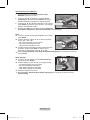 479
479
-
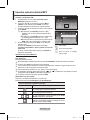 480
480
-
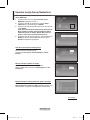 481
481
-
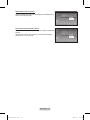 482
482
-
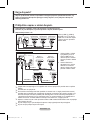 483
483
-
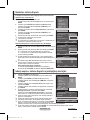 484
484
-
 485
485
-
 486
486
-
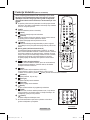 487
487
-
 488
488
-
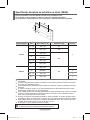 489
489
-
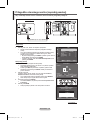 490
490
-
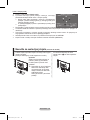 491
491
-
 492
492
-
 493
493
-
 494
494
-
 495
495


Samsung PS50A556 Benutzerhandbuch
- Kategorie
- LCD-Fernseher
- Typ
- Benutzerhandbuch
in anderen Sprachen
- English: Samsung PS50A556 User manual
- français: Samsung PS50A556 Manuel utilisateur
- español: Samsung PS50A556 Manual de usuario
- italiano: Samsung PS50A556 Manuale utente
- Nederlands: Samsung PS50A556 Handleiding
- português: Samsung PS50A556 Manual do usuário
Verwandte Artikel
-
Samsung PS50A417 Benutzerhandbuch
-
Samsung PS50A418C4D Benutzerhandbuch
-
Samsung PS50A416C1D Benutzerhandbuch
-
-
-
Samsung PS50B530S2W Benutzerhandbuch
-
Samsung PS42A450P2 Benutzerhandbuch
-
Samsung LE46A756R1M Schnellstartanleitung
-
-
Samsung PS50B451B2W Benutzerhandbuch