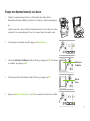
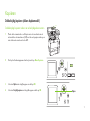
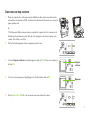
HP Color LaserJet CM2320 Multifunction Printer series Referenzhandbuch
- Kategorie
- Multifunktionale
- Typ
- Referenzhandbuch

HP Color LaserJet CM2320 MFP Series
MFP HP Color LaserJet série CM2320
Apprenez à :
Copier
Télécopier
Numériser
Entretenir
Themen:
Kopieren
Faxen
Scannen
Wartung
Learn how to:
Copy
Fax
Scan
Maintain
Meer informatie over:
Kopiëren
Fax
Scannen
Onderhoud
www.hp.com

Quick Reference Guide
Table of Contents
Copy on both sides (duplex) ..................................................................................................................................................1
Make my copy look better .....................................................................................................................................................5
Print on both sides (duplex) ....................................................................................................................................................6
Scan from the PC .................................................................................................................................................................8
Send my scan to a folder ......................................................................................................................................................9
Make my scan look better ...................................................................................................................................................10
Schedule a fax .................................................................................................................................................................. 11
Create and edit speed dials ................................................................................................................................................13
Delete faxes from memory ...................................................................................................................................................15
Print individual photos from memory card .............................................................................................................................16
Adjust color settings ...........................................................................................................................................................18
Clean the paper path .........................................................................................................................................................20
www.hp.com

English
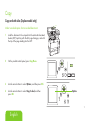
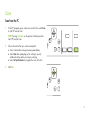
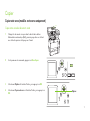
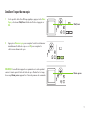
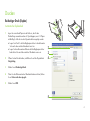
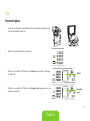
Copy
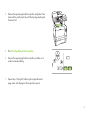
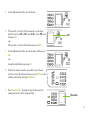
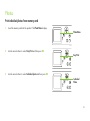
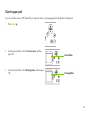
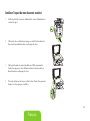
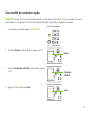
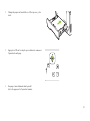
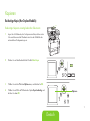
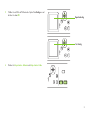
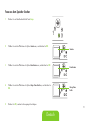
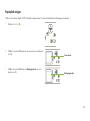
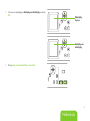
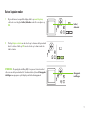
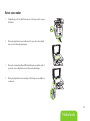
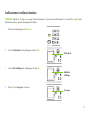
Copy on both sides (Duplex model only)
Make two-sided copies from one-sided documents
1
Load the documents to be copied into the automatic document
feeder (ADF) input tray with the rst page facing up, and with
the top of the page leading into the ADF.
2
On the product control panel, press Copy Menu.
?
3
Use the arrow buttons to select Options, and then press OK.
?
4
Use the arrow buttons to select Copy 2-sided, and then
press
OK.
Options

5
Use the arrow buttons to select 1-sided to 2-sided, and then
press OK.
?
?
6
Press Start Copy Black or Start Copy Color.
?
Copy 2-sided
1-sided to
2-sided

English
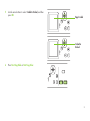
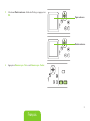
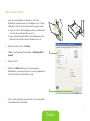
Make two-sided copies from two-sided documents
1
Load the rst page of the document to be copied face-down
onto the atbed scanner, and then close the scanner lid.
2
Press Start Copy Black or Start Copy Color on the product
control panel to start copying.
?
3
Flip the page on the scanner to the second side, and then close
the scanner lid.

4
Remove the copied page from the output bin and place it face
down into the priority input tray with the top edge feeding into
the device rst.
5
Press Start Copy Black or Start Copy Color.
?
6
Remove the copied page from the output bin, and then set it
aside for manual collating.
7
Repeat steps through 6, following the original document
page order, until all pages of the original are copied.

English
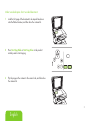
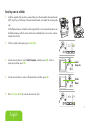
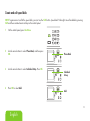
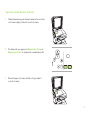
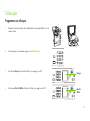
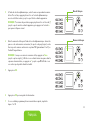
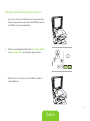
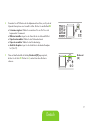
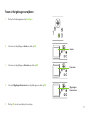
Make my copy look better
1
On products with a graphical display, press Copy Menu, then
use the arrow buttons to select Lighter/Darker, and then press
OK.
?
2
Press Start Copy to save the selection and immediately start the
copy job, or press OK to save the selection without starting the
job.
?
NOTE: The change in the setting remains active for about minutes
after the copy job has been completed. During this time, Custom
settings appears on the product control-panel display.
?
Lighter/
Darker
Custom
Settings

6
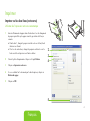
Print
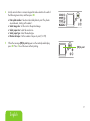
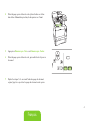
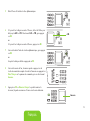
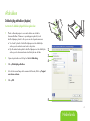
Print on both sides (duplex)
Use automatic duplex printing
1
Insert enough paper into one of the trays to accommodate the
print job. If you are loading special paper such as letterhead,
load it in one of the following ways:
● For tray , load the letterhead paper face-up with the bottom
edge feeding into the printer rst.
● For all other trays, load the letterhead paper face-up with
the top edge at the back of the tray.
2
Open the printer driver and click the Finishing tab.
3
Click Print on both sides.
4
If you will bind the document along the top edge, click Flip
pages up.
5
Click OK.
2
3
4
5

English
Print on both sides manually
1
Insert enough paper into one of the trays to accommodate the
print job. If you are loading special paper such as letterhead,
load it in one of the following ways:
● For tray , load the letterhead paper face-up with the bottom
edge feeding into the printer rst.
● For all other trays, load the letterhead paper face-up with
the top edge at the back of the tray.
2
On the File menu, click Print.
3
On the Finishing pop-up menu, select Print on both sides
(manually).
4
Click OK.
5
Click Print. Follow the instructions in the pop-up window that
appears on the computer screen before replacing the output
stack in the tray for printing the second half.
6
If prompted, press the appropriate control-panel button to
continue.
3
4

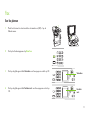
Scan
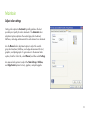
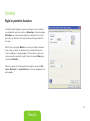
Scan from the PC
1
In the HP program group, select your product, then select Scan
to start HP LaserJet Scan.
NOTE: Pressing Start Scan on the product control panel also
starts HP LaserJet Scan.
?
2
Choose the action that you want to accomplish.
● Select a destination to begin scanning immediately.
● Select Scan after prompting me for settings to specify
additional settings before you begin scanning.
● Select Set up the device to program the Scan To button.
3
Click OK.
?

English
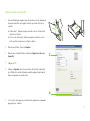
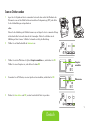
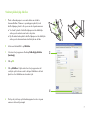
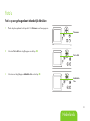
Send my scan to a folder
1
Load the originals that are to be scanned face-up in the automatic document feeder
(ADF) input tray, with the top of the document forward, and adjust the media guides.
-or-
Lift the atbed scanner lid and load the original that is to be scanned face-down on
the atbed scanner with the corner located as indicated by the icon on the scanner.
Gently close the lid.
2
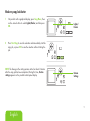
On the product control panel, press Scan Menu.
?
3
Use the arrow buttons to select Select Computer, and then press OK. Select a
computer, and then press OK.
?
4
Use the arrow buttons to select a le destination, and then press OK.
?
5
Press Start Scan or OK to scan the document to a le.
?
Select
Computer
Folder
Name

0
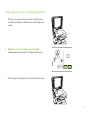
Make my scan look better
1
Turn off the product, unplug the power cord from the electrical
socket, and raise the lid.
2
Clean the glass by using a soft cloth or sponge that has been
moistened with nonabrasive glass cleaner.
3
Clean the scanner strip (ADF models only) by using a soft cloth
or sponge that has been moistened with nonabrasive glass
cleaner.
4
To prevent spotting, dry the glass by using a chamois or
cellulose sponge.

English
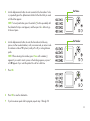
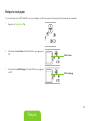
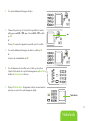
Fax
Schedule a fax
1
Load the document into the automatic document feeder (ADF) input tray
or onto the atbed scanner.
2
On the control panel, press Fax Menu.
.
.
3
Use the arrow buttons until Send appears, and then press OK.
?
.
.
4
Use the arrow buttons until Send fax later appears, and then press OK.
?
.
.
Send
Send Fax
Later

5
Use the alphanumeric buttons to enter the time.
?
.
.
6
If the product is set to the -hour time mode, use the arrow
buttons to move to A.M. or P.M. Select A.M. or select P.M., and
then press OK.
-or-
If the product is set to the -hour time mode, press
OK.
?
7
Use the alphanumeric buttons to enter the date, and then press
OK.
-or-
Accept the default date by pressing OK.
?
.
.
8
Enter the fax number, enter the speed dial, or press the one-
touch key. Access the phone book by pressing Fax Menu on the
control panel and then selecting Phone Book.
.
.
9
Press OK or Start Fax. The product scans the document into
memory and sends it at the designated time.
.
.
A.M.
Phone Book

English
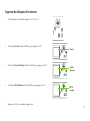
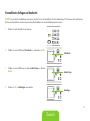
Create and edit speed dials
NOTE: To gain access to all of the speed dials, you must use the Shift button. Speed dials through are all available by pressing
Shift and the associated one-touch key on the control panel.
1
On the control panel, press Fax Menu.
.
.
2
Use the arrow buttons to select Phone Book, and then press
OK.
?
3
Use the arrow buttons to select Individual Setup. Press OK.
?
4
Press OK to select Add.
?
Phone Book
Individual
Set-up
Add

5
Use the alphanumeric buttons to enter a name for the fax number. To do
so, repeatedly press the alphanumeric button for the letter that you need
until the letter appears.
NOTE: To insert punctuation, press the asterisk (*) button repeatedly until
the character that you want appears, and then press the > button to go
to the next space.
?
.
.
6
Use the alphanumeric buttons to enter the fax number. Include any
pauses or other needed numbers, such as an area code, an access code
for numbers outside a PBX system (usually a or 0), or a long distance
prex.
NOTE: When entering a fax number, press Pause until a comma (,)
appears if you want to insert a pause in the dialing sequence, or press *
until W appears if you want the product to wait for a dial tone.
?
.
.
7
Press OK.
?
.
.
8
Press OK to save the information.
9
If you have more speed dials to program, repeat steps through 0.
Fax Number
Fax Name

English
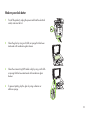
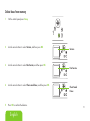
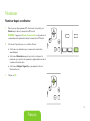
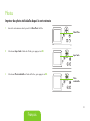
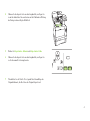
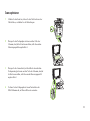
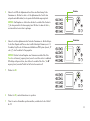
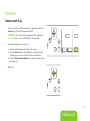
Delete faxes from memory
1
On the control panel press Setup.
?
2
Use the arrow buttons to select Service, and then press OK.
?
3
Use the arrow buttons to select Fax Service, and then press OK.
?
4
Use the arrow buttons to select Clear saved faxes, and then press OK.
?
5
Press OK to conrm the deletion.
Service
Fax Service
Clear Saved
Faxes

6
Photos
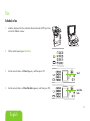
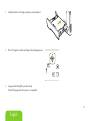
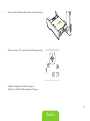
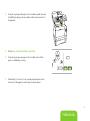
Print individual photos from memory card
1
Insert the memory card into the product. The Photo Menu displays.
?
2
Use the arrow buttons to select Easy Print and then press OK.
?
3
Use the arrow buttons to select Individual photo and then press OK.
?
Photo Menu
Easy Print
Individual
Photo

English
4
Use the arrow buttons or numeric keypad to make selections for each of
the following menu items, and then press OK.
● Enter photo number: Select an individual photo to print. The photos
are numbered, starting with number .
● Select image size: Set the size for the printed image.
● Select paper size: Select the media size.
● Select paper type: Select the media type.
● Number of copies: Set the number of copies to print ( to ).
?
.
.
5
When the message [OK] to print appears on the control-panel display,
press OK. Press X to exit the menu without printing.
?
[OK] to print

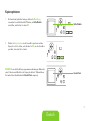
Maintain
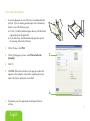
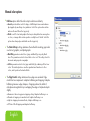
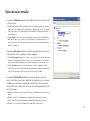
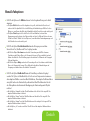
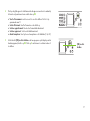
Adjust color settings
Setting color options to Automatic typically produces the best
possible print quality for color documents. The Automatic color
adjustment option optimizes the neutral-gray color treatment,
halftones, and edge enhancements for each element in a document.
Use the Manual color adjustment option to adjust the neutral-
gray color treatment, halftones, and edge enhancements for text,
graphics, and photographs. To gain access to the manual color
options, from the Color tab, select Manual, and then select Settings.
Use manual color options to adjust the Neutral Grays, Halftone,
and Edge Control options for text, graphics, and photographs.
Seite wird geladen ...
Seite wird geladen ...
Seite wird geladen ...
Seite wird geladen ...
Seite wird geladen ...
Seite wird geladen ...
Seite wird geladen ...
Seite wird geladen ...
Seite wird geladen ...
Seite wird geladen ...
Seite wird geladen ...
Seite wird geladen ...
Seite wird geladen ...
Seite wird geladen ...
Seite wird geladen ...
Seite wird geladen ...
Seite wird geladen ...
Seite wird geladen ...
Seite wird geladen ...
Seite wird geladen ...
Seite wird geladen ...
Seite wird geladen ...
Seite wird geladen ...
Seite wird geladen ...
Seite wird geladen ...
Seite wird geladen ...
Seite wird geladen ...
Seite wird geladen ...
Seite wird geladen ...
Seite wird geladen ...
Seite wird geladen ...
Seite wird geladen ...
Seite wird geladen ...
Seite wird geladen ...
Seite wird geladen ...
Seite wird geladen ...
Seite wird geladen ...
Seite wird geladen ...
Seite wird geladen ...
Seite wird geladen ...
Seite wird geladen ...
Seite wird geladen ...
Seite wird geladen ...
Seite wird geladen ...
Seite wird geladen ...
Seite wird geladen ...
Seite wird geladen ...
Seite wird geladen ...
Seite wird geladen ...
Seite wird geladen ...
Seite wird geladen ...
Seite wird geladen ...
Seite wird geladen ...
Seite wird geladen ...
Seite wird geladen ...
Seite wird geladen ...
Seite wird geladen ...
Seite wird geladen ...
Seite wird geladen ...
Seite wird geladen ...
Seite wird geladen ...
Seite wird geladen ...
Seite wird geladen ...
Seite wird geladen ...
Seite wird geladen ...
Seite wird geladen ...
Seite wird geladen ...
Seite wird geladen ...
Seite wird geladen ...
Seite wird geladen ...
Seite wird geladen ...
Seite wird geladen ...
Seite wird geladen ...
Seite wird geladen ...
Seite wird geladen ...
Seite wird geladen ...
-
 1
1
-
 2
2
-
 3
3
-
 4
4
-
 5
5
-
 6
6
-
 7
7
-
 8
8
-
 9
9
-
 10
10
-
 11
11
-
 12
12
-
 13
13
-
 14
14
-
 15
15
-
 16
16
-
 17
17
-
 18
18
-
 19
19
-
 20
20
-
 21
21
-
 22
22
-
 23
23
-
 24
24
-
 25
25
-
 26
26
-
 27
27
-
 28
28
-
 29
29
-
 30
30
-
 31
31
-
 32
32
-
 33
33
-
 34
34
-
 35
35
-
 36
36
-
 37
37
-
 38
38
-
 39
39
-
 40
40
-
 41
41
-
 42
42
-
 43
43
-
 44
44
-
 45
45
-
 46
46
-
 47
47
-
 48
48
-
 49
49
-
 50
50
-
 51
51
-
 52
52
-
 53
53
-
 54
54
-
 55
55
-
 56
56
-
 57
57
-
 58
58
-
 59
59
-
 60
60
-
 61
61
-
 62
62
-
 63
63
-
 64
64
-
 65
65
-
 66
66
-
 67
67
-
 68
68
-
 69
69
-
 70
70
-
 71
71
-
 72
72
-
 73
73
-
 74
74
-
 75
75
-
 76
76
-
 77
77
-
 78
78
-
 79
79
-
 80
80
-
 81
81
-
 82
82
-
 83
83
-
 84
84
-
 85
85
-
 86
86
-
 87
87
-
 88
88
-
 89
89
-
 90
90
-
 91
91
-
 92
92
-
 93
93
-
 94
94
-
 95
95
-
 96
96


HP Color LaserJet CM2320 Multifunction Printer series Referenzhandbuch
- Kategorie
- Multifunktionale
- Typ
- Referenzhandbuch
in anderen Sprachen
Verwandte Artikel
Andere Dokumente
-
Epson WORKFORCE WF-7515 Bedienungsanleitung
-
Epson Stylus Office BX625FWD Bedienungsanleitung
-
Epson Stylus Photo PX830FWD Bedienungsanleitung
-
Epson PHOTO PX820FWD Bedienungsanleitung
-
Epson WorkForce 645 Bedienungsanleitung
-
Epson Stylus Office BX925FWD Bedienungsanleitung
-
-
-
-
KYOCERA FS-1116MFP Bedienungsanleitung