Philips AQUATOUCH S5400 Bedienungsanleitung
- Kategorie
- Haarschneider
- Typ
- Bedienungsanleitung

© 2015 Koninklijke Philips N.V.
All rights reserved
4222.003.0112.2 (1/2016)
2
3
4
BRE65x, BRE64x, BRE63x, BRE62x, BRE61x
1
2
5
6
7
8
9
10
11
12
13
14
15
16
17
18
19
20
21
22
>75% recycled paper
>75% papier recyclé

English
Introduction
Congratulations on your purchase and welcome to Philips! To fully benefit
from the support that Philips offers, register your product at
www.philips.com/welcome.
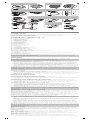
General description (Fig. 1)
1 Handle
2 Speed lights (I and II)
3 On/off button
4 Battery indicator
5 Release button
6 Socket for small plug
7 Epilating head
8 Integrated light
9 Massage cap
10 Facial cap
11 Delicate area cap
12 Skin stretcher cap
13 Shaving head
14 Foil
15 Trimmers
16 Comb for shaving head
17 Trimming head
18 Comb for trimming head
19 Coupling unit
20 Body massage head
21 Body exfoliation brush
22 Protection cap for body exfoliation brush
23 Cleaning brush
24 Adapter (HQ8505; input: 100-240Vac; 50/60Hz; 9W, output: 15Vdc;
5.4W)
25 Tweezers with light
Not shown: Pouch
Note: The heads and accessories supplied vary for different type numbers.
Consult the overview illustration for the heads and accessories supplied
with your particular appliance.
Charging
Note: Charge the appliance fully before you use it for the first time.
Note: This appliance can only be used without cord.
To charge the appliance, insert the small plug into the socket in the bottom
of the appliance and put the adapter in the wall socket.
- The charge indicator flashes white (Fig. 2): the appliance is charging.
Charging takes up to 1.5 hours.
- The charge indicator lights up white continuously (Fig. 3): the appliance
is fully charged and has a cordless operating time up to 40 minutes.
- The charge indicator does not light up when the appliance is switched
on: the appliance contains enough energy to be used.
- The battery indicator flashes orange (Fig. 2): the battery is almost empty
and needs to be charged. Charge the appliance when you have finished
using it.
Note: If the appliance is fully charged but still connected to the mains, the
battery indicator flashes a few times when you press the on/off button. This
indicates that you should disconnect the appliance from the mains before
you can switch it on.
Quick charge
- When the battery is completely empty and you start charging it, the
battery indicator flashes white quickly.
- After approximately 15 minutes, the battery indicator starts flashing white
slowly. At this point, the battery contains enough energy for up to 10
minutes of epilation.
Using the appliance
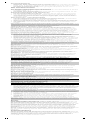
Attaching and detaching heads
1 To attach a head, press it onto the handle ('click') (Fig. 4).
2 To detach a head, press the release button on the back of the appliance
(Fig. 5).
Attaching and detaching accessories
1 To attach an accessory, simply snap it onto the head ('click') (Fig. 6).
2 To detach an accessory, grab its front and back and pull it upwards off
the head (Fig. 7). To detach a comb, pull its back upwards with a
fingernail (Fig. 8).
Switching the appliance on and off
1 To switch on the appliance, press the on/off button once. Speed 2 is
selected automatically and speed light II lights up (Fig. 9).
2 If you want to select speed 1, press the on/off button again. Speed light I
lights up (Fig. 10).
3 To switch off the appliance, press the on/off button once more.
The integrated light goes on automatically to give you a better view while
you use the epilating head (Fig. 11). If you want to switch off the integrated
light, keep the on/off button pressed for 3 seconds when you switch on the
appliance.
Epilating, shaving and trimming
The appliance is suitable for use in the bath or shower, but it can also be
used dry. If you want to use creams or body lotion, apply them after you
have used the appliance.
For gentle, less painful epilation, use the appliance on wet skin with or
without your regular shower gel.
Slight skin irritation like red skin or red dots may occur after epilation. This is
normal. We advise you to epilate before you go to bed at night, as any
redness or skin irritation usually disappears overnight.
Note: The appliance can only be used without cord.
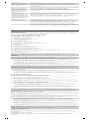
1 When you epilate (with or without an accessory on the epilating head),
place the appliance on the skin at the angle shown in the illustration (Fig.
12).
2 When you use the appliance with other heads and accessories than the
epilating head, make sure you place the heads and accessories flat onto
the skin (Fig. 13).
3 When you use the appliance on sensitive areas, stretch the skin with
your free hand. When you use the appliance on your underarms, raise
your arm and put your hand on the back of your head to stretch the skin
(Fig. 14).
4 Move the appliance slowly against the direction of hair growth (Fig. 15).
Note: If you move the appliance over your skin too fast, you may not obtain
a smooth result.
Note: If your hairs are longer than 3-4mm, pretrim them for easier and more
comfortable epilation.
Epilating head
You can use the epilating head to epilate your legs, underarms and bikini
line.
Select speed 2 for most efficient epilation. Select speed 1 for areas with little
hair growth and for hard-to-reach areas such as knees and ankles.
Massage cap
You can attach the massage cap onto the epilating head to massage the
skin and minimize the pulling sensation of epilation during use.
Skin stretcher cap
You can attach the skin stretcher cap onto the epilating head. It keeps the
skin tight during epilation to reduce pain.
Delicate area cap
You can attach the delicate area cap onto the epilating head for more
comfortable epilation of delicate areas (e.g. the underarms and bikini line).
BRE651/00
BRE650/10
BRE650/00
BRE644/10
BRE644/00
BRE651/00
BRE650/00
BRE650/10
BRE640/10
BRE640/00
BRE634/10
BRE630/10
BRE630/01
BRE630/00
BRE620/00
BRE651/00
BRE650/10
BRE650/00
BRE644/10
BRE644/00
BRE644/10
BRE644/00
BRE651/00BRE640/00
BRE640/10
BRE651/00
BRE650/10
BRE650/00
BRE651/00
BRE650/10
BRE650/00
BRE644/10
BRE644/00
BRE640/10
BRE640/00
BRE634/10
BRE630/10
BRE630/00
BRE620/00
BRE610/00
BRE651/00
BRE650/10
BRE650/00
BRE640/00
BRE644/00
BRE644/10
BRE640/10
BRE630/10
BRE630/00
BRE651/00
BRE650/10
BRE650/00
BRE644/10
BRE644/00
BRE640/10
BRE640/00
BRE634/10
BRE630/10
BRE630/01
BRE630/00
BRE651/00
BRE650/10
BRE650/00
BRE644/10
BRE644/00
BRE640/10
BRE640/00
BRE634/10
BRE630/01
2
1
7 9 10 12
11
24
25
23
8
13
19 20 21 22
16
17
18
3
4
5
6
14
15
1

Facial cap
You can attach the facial cap onto the epilating head for precise epilation of
facial hair (e.g. above your upper lip).
Do not use the appliance to epilate eyelashes, eyebrows or scalp
hair.
Shaving head
You can use the shaving head to shave your legs and body.
Note: The appliance can be moved in two directions, for easier shaving of
underarms.
Note: Always check the foil before use. If it is damaged in any way, replace
the cutting unit right away (see 'Replacement').
Comb for shaving head
You can attach the comb onto the shaving head to trim hairs to a length of
3mm.
Trimming head
You can use the trimming head to trim hard-to-reach areas in the bikini
zone.
Place the trimming head flat onto the skin to trim (Fig. 16). Place the
trimming head perpendicularly onto the skin for styling and shaping (Fig. 17).
Comb for trimming head
You can attach the comb onto the trimming head to trim hairs in the bikini
area to a length of 3mm (Fig. 18).
Body massage head
The body massage head rotates firmly to relax your muscles.
Note: You have to put the body massage head on the coupling unit before
you can attach it onto the handle (Fig. 19).
Body exfoliation brush
You can use the body exfoliation brush to remove dead skin cells.
Do not use the body exfoliation brush on your face.
Note: You have to put the body exfoliation brush on the coupling unit
before you can attach it onto the handle (Fig. 20).
Cleaning and storage
Keep the adapter dry.
1 To clean the epilating head, hold the appliance upside down, switch it
on and rinse it with cold water for 15 seconds after every use (Fig. 21).
2 To clean the shaving head (if supplied): Use the cleaning brush to brush
away any hairs that have collected under the trimmers. Grab the two
trimmers of the cutting unit and pull the cutting unit out of the shaving
head (Fig. 22). Clean all parts of the shaving head with the cleaning
brush, except the foil.
Note: Lubricate trimmer teeth and foils with a drop of sewing machine oil
every six weeks for optimal performance.
3 Rinse the cutting unit, heads and accessories under the tap. Shake them
firmly to remove water drops.
4 Let all parts dry completely.
5 Place the cutting unit back into the shaving head ('click').
6 Put protection caps or combs on the heads to prevent damage to the
heads when you store them.
7 Store the appliance, its heads and accessories in the pouch.
Note: Lubricate trimmer teeth and foils with a drop of sewing machine oil
every six weeks for optimal performance.
Replacement
To buy accessories or spare parts, visit www.shop.philips.com/service or go
to your Philips dealer. You can also contact the Philips Consumer Care
Centre in your country (see the worldwide guarantee leaflet for contact
details).
Shaving head (if supplied): For optimal performance, we advise you to
replace the cutting unit of the shaving head every two years. If you use the
shaving head twice or more times a week, replace the cutting unit more
often. Always replace the cutting unit with one of the original type (BRL384).
Body exfoliation brush (if supplied): If you use the body exfoliation brush
2-3 times a week, it lasts approximately 3 months. Replace the body
exfoliation brush every 3 months with one of the original type (BRE351).
Troubleshooting
This chapter summarises the most common problems you could encounter
with the appliance. If you are unable to solve the problem with the
information below, visit www.philips.com/support for a list of frequently
asked questions or contact the Consumer Care Centre in your country.
Problem Solution
The appliance
does not work as
well as it should.
Make sure you hold the appliance at the correct
angle (Fig. 12) and move it across the skin slowly,
against the direction of hair growth.
Clean the heads and accessories after every use.
After charging, the
battery indicator
flashes when I
press the on/off
button, but the
appliance does not
switch on.
The appliance is still connected to the mains. In this
case, the battery indicator flashes to indicate that
you should disconnect the appliance from the mains
before you can switch it on.
During use, the
appliance
becomes hot and
suddenly stops
operating. Then the
speed lights and
the battery
indicator flash red
for 30 seconds.
The overheat protection has been activated. The
overheat protection switches off the appliance
automatically if it becomes too hot. To reset the
overheat protection, let the appliance cool down and
then switch it on again. To avoid overheating of the
appliance, do not press it too hard onto you skin.
My skin is irritated
after I have used
the appliance.
Slight skin irritation like red skin or red dots may
occur. This is normal. To avoid irritated skin, make
sure that you gently move the appliance against the
direction of hair growth. Do not apply too much
pressure. If the irritation lasts longer than 3 days, we
advise you to consult a doctor.
Always stretch the skin with your free hand. When
you use the appliance on your underarms, raise your
arm and put your hand on the back of your head to
stretch the skin (Fig. 14).
Deutsch
Einführung
Herzlichen Glückwunsch zu Ihrem Kauf und willkommen bei Philips! Um die
Unterstützung von Philips optimal nutzen zu können, sollten Sie Ihr Produkt
unter www.philips.com/welcome registrieren.
Allgemeine Beschreibung (Abb. 1)
1 Griff
2 Geschwindigkeitsanzeigen (I und II)
3 Ein-/Ausschalter
4 Akkuanzeige
5 Entriegelungstaste
6 Buchse für Gerätestecker
7 Epilierkopf
8 Integriertes Licht
9 Massageaufsatz
10 Gesichtsaufsatz
11 Aufsatz für empfindliche Hautpartien
12 Hautstraffungsaufsatz
13 Scherkopf
14 Folie
15 Schermesser
16 Kamm für Scherkopf
17 Schneidekopf
18 Kamm für Schneidekopf
19 Verbindungseinheit
20 Körpermassagekopf
21 Körper-Peeling-Bürste
22 Schutzaufsatz für Körper-Peeling-Bürste
23 Reinigungsbürste
24 Ladegerät (HQ8505; Eingang: 100-240 V AC; 50/60 Hz; 9 W, Ausgang:
15 V DC; 5,4 W)
25 Pinzette mit Licht
Nicht abgebildet: Tasche
Hinweis: Die Köpfe und mitgeliefertes Zubehör kann für verschiedene
Typnummern variieren. Werfen Sie einen Blick auf die Übersicht, um zu
erfahren, welche Köpfe und welches Zubehör mit Ihrem Gerät geliefert
werden.
Laden
Hinweis: Laden Sie den Akku voll auf, bevor Sie das Gerät zum ersten Mal
benutzen.
Hinweis: Dieses Gerät kann nur ohne Kabel verwendet werden.
Um das Gerät aufzuladen, stecken Sie den kleinen Stecker in die Steckdose
an der Geräteunterseite und stecken Sie den Adapter in eine
Wandsteckdose.
- Die Ladeanzeige blinkt weiß (Abb. 2): das Gerät wird aufgeladen. Das
Laden dauert ca. 1,5 Stunden.
- Die Ladeanzeige leuchtet dauerhaft weiß (Abb. 3): das Gerät ist
vollständig aufgeladen und kann bis zu 40 Minuten lang kabellos
betrieben werden.
- Die Ladeanzeige leuchtet nicht, wenn das Gerät eingeschaltet ist: Das
Gerät weist eine ausreichende Ladung für die Verwendung auf.
- Die Akkuanzeige blinkt orange (Abb. 2): der Akku ist fast leer und muss
aufgeladen werden. Laden Sie das Gerät, wenn Sie mit dem Gebrauch
fertig sind.
Hinweis: Wenn das Gerät vollständig geladen ist, aber noch an die
Stromversorgung angeschlossen ist, blinkt die Akkuanzeige ein paar Mal,
wenn Sie den Ein/Ausschalter drücken. Dies bedeutet, dass Sie das Gerät
vom Stromnetz trennen sollten, bevor Sie es einschalten.

Schnellaufladung
- Wenn der Akku vollständig leer ist und Sie mit dem Aufladen des Akkus
beginnen, blinkt das Akkusymbol schnell weiß.
- Nach etwa 15 Minuten beginnt die Akkuanzeige langsam weiß zu blinken.
Zu diesem Zeitpunkt hat der Akku genügend Kapazität für bis zu 10
Minuten an Haarentfernung.
Das Gerät benutzen
Die Köpfe befestigen und abnehmen
1 Um einen Kopf zu befestigen, drücken Sie ihn auf den Griff bis er hörbar
einrastet (Abb. 4).
2 Um einen Kopf abzunehmen, drücken Sie den Freigabeschalter an der
Rückseite des Gerätes (Abb. 5).
Zubehör befestigen und abnehmen
1 Um ein Zubehörteil aufzusetzen, drücken Sie es einfach auf den Kopf,
bis es hörbar einrastet (Abb. 6).
2 Um das Zubehör abzunehmen, fassen Sie es an seiner Vorderseite an
und ziehen Sie es nach oben weg vom Kopf (Abb. 7). Um den Kamm
abzunehmen, ziehen Sie ihn mit dem Fingernagel (Abb. 8) nach hinten
und nach oben.
Das Gerät ein- und ausschalten
1 Um das Gerät einzuschalten, drücken Sie einmal den Ein-/Ausschalter.
Geschwindigkeitsstufe 2 ist automatisch gewählt und die
Geschwindigkeitsanzeige 2 leuchtet auf (Abb. 9).
2 Wenn Sie die Geschwindigkeitsstufe 1 auswählen möchten, drücken Sie
den Ein-/Ausschalter noch einmal. Geschwindigkeitsanzeige I leuchtet
auf (Abb. 10).
3 Um das Gerät auszuschalten, drücken Sie den Ein-/Ausschalter noch
einmal.
Das integrierte Licht schaltet sich automatisch ein, um Ihnen beim Gebrauch
des Epilierkopfes (Abb. 11) eine bessere Sicht zu geben. Wenn Sie das
integrierte Licht ausschalten möchten, halten Sie den Ein-/Ausschalter beim
Einschalten des Gerätes für 3 Sekunden lang gedrückt.
Haarentfernen, rasieren und trimmen
Das Gerät ist für den Einsatz im Bad oder unter der Dusche geeignet ist,
kann aber auch trocken verwendet werden. Wenn Sie Cremes oder
Körpermilch verwenden möchten, tragen Sie sie nach dem Gebrauch des
Gerätes auf.
Für eine sanfte, weniger schmerzvolle Haarentfernung verwenden Sie das
Gerät auf nasser Haut mit oder ohne Ihrem regulären Duschgel.
Eine leichte Hautreizung wie z.B. gerötete Haut oder rote Punkte können
nach der Haarentfernung auftreten. Das ist normal. Wir empfehlen das
Epilieren vor dem Schlafengehen, da alle Rötungen oder Hautreizungen in
der Regel über Nacht abklingen.
Hinweis: Das Gerät kann nur ohne Kabel verwendet werden.
1 Wenn Sie epilieren (mit oder ohne Zubehör auf dem Epilierkopf),
platzieren Sie das Gerät in dem Winkel auf der Haut, wie es in der
Abbildung gezeigt wird (Abb. 12).
2 Wenn Sie das Gerät mit anderen Köpfen oder Zubehörteilen als dem
Epilierkopf verwenden, achten Sie darauf, dass Sie die Köpfe und
Zubehörteile flach auf der Haut platzieren (Abb. 13).
3 Wenn Sie das Gerät in empfindlichen Bereichen verwenden, straffen Sie
die Haut mit Ihrer freien Hand. Wenn Sie das Gerät in den Achselhöhlen
verwenden, heben Sie Ihren Arm und legen Sie die Hand auf den
Hinterkopf, um die Haut zu straffen (Abb. 14).
4 Führen Sie das Gerät langsam gegen die Haarwuchsrichtung (Abb. 15).
Hinweis: Wenn Sie das Gerät zu schnell über Ihre Haut führen, erzielen Sie
möglicherweise kein glattes Ergebnis.
Hinweis: Falls Ihre Haare länger als 3-4 mm sind, kürzen Sie sie, um die
Haarentfernung leichter und angenehmer zu gestalten.
Epilierkopf
Sie können den Epilierkopf zum Epilieren Ihrer Beine, Achseln und der
Bikinizone verwenden.
Wählen Sie Geschwindigkeitsstufe 2 für die gründlichste Epilation. Wählen
Sie Geschwindigkeitsstufe 1 für Hautpartien mit geringer Behaarung und für
schwer erreichbare Zonen, wie z. B. Knie und Knöchel.
Massageaufsatz
Sie können den Massageaufsatz auf den Epilierkopf aufsetzen, um die Haut
zu massieren und das Zupfgefühl während des Epilierens zu lindern.
Hautstraffungsaufsatz
Sie können den Skin Stretcher-Aufsatz auf den Epilierkopf aufsetzen.
Dadurch wird die Haut während des Epilierens gestrafft, um den Schmerz
zu lindern.
Aufsatz für empfindliche Hautpartien
Sie können den Aufsatz für empfindliche Hautpartien auf den Epilierkopf
aufsetzen, um sensible Bereichen (z.B. Achselhöhlen und Bikinibereich)
angenehmer epilieren zu können.
Gesichtsaufsatz
Sie können den Gesichtsaufsatz auf den Epilierkopf aufsetzen, um
Gesichtsbehaarung Bereichen (z.B. Oberlippe) präzise epilieren zu können.
Verwenden Sie das Gerät nicht zum Epilieren von Wimpern,
Augenbrauen oder Kopfhauthaaren.
Scherkopf
Sie können den Scherkopf zum Rasieren Ihrer Beine, Achseln und der
Körperbehaarung verwenden.
Hinweis: Das Gerät kann in zwei Richtungen bewegt werden, um die
Achselhöhlen leichter zu rasieren.
Hinweis: Überprüfen Sie die Folie vor jedem Gebrauch. Falls sie in
irgendeiner Weise beschädigt ist, sollten Sie die Schneideeinheit
unverzüglich ersetzen (siehe „Ersatz“).
Kamm für Scherkopf
Sie können den Kamm auf den Scherkopf aufsetzen, um Haare auf eine
Länge von 3 mm zu trimmen.
Schneidekopf
Sie können den Schneidekopf zum Trimmen von schwer erreichbaren
Bereichen in der Bikinizone verwenden.
Setzen Sie den Schneidekopf zum Trimmen (Abb. 16)flach auf die Haut auf.
Setzen Sie den Schneidekopf senkrecht zur Gestaltung und Formgebung
(Abb. 17) auf die Haut auf.
Kamm für Schneidekopf
Sie können den Kamm auf den Schneidekopf aufsetzen, um Haare auf eine
Länge von 3 mm (Abb. 18) zu trimmen.
Körpermassagekopf
Der Körpermassagekopf rotiert kräftig, um Ihre Muskeln zu entspannen.
Hinweis: Sie müssen den Körpermassagekopf auf das Verbindungsteil
aufsetzen, bevor Sie ihn an dem Griff (Abb. 19) befestigen können.
Körper-Peeling-Bürste
Sie können die Körper-Peeling-Bürste zur Entfernung abgestorbener
Hautzellen verwenden.
Verwenden Sie die Körper-Peeling-Bürste nicht im Gesicht.
Hinweis: Sie müssen die Körper-Peeling-Bürste auf das Verbindungsteil
aufsetzen, bevor Sie sie an dem Griff (Abb. 20) befestigen können.
Reinigung und Aufbewahrung
Halten Sie das Ladegerät trocken.
1 Zum Reinigen des Epilierkopfes halten Sie das Gerät auf den Kopf
gedreht, schalten Sie es ein und spülen es nach jedem Gebrauch (Abb.
21) für 15 Sekunden lang mit kaltem Wasser ab.
2 So reinigen Sie den Scherkopf (falls mitgeliefert): Verwenden Sie die
Reinigungsbürste, um die Härchen zu entfernen, die sich möglicherweise
unter den Messern angesammelt haben. Greifen Sie die zwei Messer des
Schneideteils und ziehen Sie das Schneideteil aus dem Scherkopf (Abb.
22). Reinigen Sie alle Teile des Scherkopfes mit der Reinigungsbürste
unter Aussparung der Folie.
Hinweis: Ölen Sie die Zähne und Folien des Langhaarschneiders alle
sechs Wochen mit einem Tropfen Nähmaschinenöl, um eine optimale
Leistung zu gewährleisten.
3 Spülen Sie das Schneideteil, Köpfe und Zubehörteile unter fließendem
Wasser ab. Schütteln Sie sie kräftig, um die Wassertropfen zu entfernen.
4 Lassen alle Teile vollständig trocknen.
5 Setzen Sie die Schneideeinheit wieder in den Scherkopf, bis sie hörbar
einrastet.
6 Setzen Sie die Schutzaufsätze oder Kämme nach Gebrauch auf die
Köpfe, um Beschädigungen der Scherköpfen bei der Lagerung zu
vermeiden.
7 Verwahren Sie das Gerät mit den Köpfen und Zubehörteilen in dem
Beutel.
Hinweis: Ölen Sie die Zähne und Folien des Langhaarschneiders alle sechs
Wochen mit einem Tropfen Nähmaschinenöl, um eine optimale Leistung zu
gewährleisten.
Ersatz
Um Zubehör oder Ersatzteile zu kaufen, gehen Sie auf
www.shop.philips.com/service, oder suchen Sie Ihren Philips Händler auf.
Sie können sich auch an ein Philips Service-Center in Ihrem Land wenden.
Die Kontaktdaten finden Sie in der internationalen Garantieschrift.
Scherkopf (falls mitgeliefert): Für eine optimale Leistung empfehlen wir, das
Schneideteil des Scherkopfes alle 2 Jahre auszuwechseln. Wenn Sie den
Scherkopf zweimal wöchentlich oder häufiger verwenden, sollten Sie die
Schneideeinheit nach ein bis zwei Jahren, oder wenn sie beschädigt ist,
auswechseln. Ersetzen Sie die Schneideeinheit nur durch ein Originalteil
(BRL384).
Körper-Peeling-Bürste (falls mitgeliefert): Wenn Sie die Köper-Peeling-
Bürste 2-3 Mal in der Woche verwenden, reicht sie etwa 3 Monate. Ersetzen
Sie die Köper-Peeling-Bürste alle 3 Monate nur durch ein Originalteil
(BRE351).
Fehlerbehebung
Dieses Kapitel fasst die häufigsten Probleme zusammen, die beim
Gebrauch des Geräts auftreten können. Sollten Sie ein Problem mithilfe der
nachstehenden Informationen nicht beheben können, besuchen Sie unsere
Website unter: www.philips.com/support und schauen Sie in der Liste
„Häufig gestellte Fragen“ nach oder wenden Sie sich an das Philips
Consumer Care-Center in Ihrem Land.

Problem Die Lösung
Die Ergebnisse mit
dem Gerät sind
nicht so, wie sie
sein sollten.
Achten Sie darauf, dass Sie das Gerät im korrekten
Winkel (Abb. 12) auf der Haut halten und führen Sie
das Gerät langsam gegen die Haarwuchsrichtung
über die Haut.
Reinigen Sie die Köpfe und Zubehörteile nach jedem
Gebrauch.
Wenn das Gerät
geladen ist, blinkt
die Akkuanzeige,
wenn ich den
Ein/Ausschalter
drücke, aber das
Gerät schaltet sich
nicht ein.
Das Gerät ist noch an die Stromversorgung
angeschlossen. In diesem Fall blinkt die
Akkuanzeige, um anzuzeigen, dass Sie das Gerät
vom Stromnetz nehmen sollten, bevor Sie es
einschalten.
Während des
Gebrauchs wird
das Gerät heiß und
stellt plötzlich
seinen Betrieb ein.
Danach blinken die
Geschwindigkeits
anzeigen sowie die
Akkuanzeige
30 Sekunden lang
rot.
Der Überhitzungsschutz wurde aktiviert. Der
Überhitzungsschutz schaltet das Gerät automatisch
ab, wenn es zu heiß wird. Um den
Überhitzungsschutz zurückzusetzen, lassen Sie das
Gerät abkühlen, und schalten Sie es dann wieder ein.
Um eine Überhitzung des Gerätes zu vermeiden,
drücken Sie es nicht zu stark auf die Haut.
Meine Haut ist
gereizt, nachdem
ich das Gerät
verwendet habe.
Eine leichte Hautreizung wie z.B. gerötete Haut oder
rote Punkte können auftreten. Das ist normal. Um
Hautreizungen zu vermeiden, achten Sie darauf, dass
Sie das Gerät vorsichtig gegen die
Haarwuchsrichtung führen. Üben Sie nicht zu viel
Druck aus. Sollte die Reizung länger als drei Tage
anhalten, raten wir Ihnen, einen Arzt zu konsultieren.
Straffen Sie Ihre Haut immer mit der freien Hand.
Wenn Sie das Gerät in den Achselhöhlen verwenden,
heben Sie Ihren Arm und legen Sie die Hand auf den
Hinterkopf, um die Haut (Abb. 14) zu straffen.
Español
Introducción
Enhorabuena por la adquisición de este producto, y bienvenido a Philips
Para sacar el mayor partido a la asistencia que Philips le ofrece, registre el
producto en www.philips.com/welcome.
Descripción general (Fig. 1)
1 Mango
2 Pilotos de velocidad (I y II)
3 Botón de encendido/apagado
4 Indicador de batería
5 Botón de liberación
6 Toma para clavija pequeña
7 Cabezal depilador
8 Luz integrada
9 Adaptador de masaje
10 Adaptador facial
11 Adaptador para zonas sensibles
12 Adaptador de estiramiento de la piel
13 Cabezal de afeitado
14 Lámina
15 Recortadores
16 Peine de afeitado
17 Cabezal de corte
18 Peine para cabezal de afeitado
19 Unidad de acoplamiento
20 Cabezal de masaje corporal
21 Cepillo de exfoliación corporal
22 Tapa protectora para cepillo de exfoliación corporal
23 Cepillo de limpieza
24 Adaptador de corriente (HQ8505; entrada: 100 - 240 V c.a., 50/60Hz;
9W, salida: 15 V CC; 5,4 W)
25 Pinzas con luz
No se muestra: Funda
Nota: Los cabezales y accesorios suministrados pueden variar según los
diferentes modelos. Consulte la ilustración genérica para cabezales y
accesorios que puede encontrar en su dispositivo particular.
Carga
Nota: Cargue completamente el aparato antes de usarlo por primera vez.
Nota: Este aparato solo puede utilizarse sin cable.
Para cargar el aparato, inserte la clavija pequeña en el conector de la parte
inferior del aparato y enchufe el adaptador a la toma de corriente.
- El indicador de carga parpadea en blanco (Fig. 2): el aparato se está
cargando. Tarda una hora y media en cargarse.
- El indicador de carga permanece encendido en blanco (Fig. 3): el
aparato está completamente cargado y puede utilizarse sin cable hasta
40 minutos.
- El indicador de carga no se ilumina cuándo el aparato está encendido: el
aparato contiene suficiente energía para utilizarse.
- El indicador de batería parpadea en naranja (Fig. 2): la batería está a
punto de agotarse y debe cargarse. Cargue el aparato cuando haya
terminado de utilizarlo.
Nota: Si el aparato está completamente cargado pero sigue conectado a la
red eléctrica, el indicador de batería parpadea unos segundos al pulsar el
botón de encendido/apagado. Esto indica que deberá desconectar el
aparato de la red eléctrica para poder encenderlo.
Carga rápida
- Cuando la batería está completamente agotada y empieza a cargarla, el
indicador de batería parpadea rápido en blanco.
- Al cabo de 15 minutos aproximadamente, el indicador de batería
empieza a parpadear lentamente en blanco. En ese momento, la batería
tendrá suficiente energía para utilizar el aparato durante 10 minutos.
Uso del aparato
Colocación y retirada de cabezales
1 Para colocar un cabezal, presiónelo sobre el mango (oirá un "clic") (Fig.
4).
2 Para retirar un cabezal, presione el botón de liberación de la parte
posterior del aparato (Fig. 5).
Colocación y retirada de accesorios
1 Para colocar un accesorio, solo tiene que insertarlo en el cabezal (oirá
un "clic") (Fig. 6).
2 Para retirar un accesorio, agárrelo por la parte delantera y trasera y tire
de él hacia arriba hasta quitarlo del cabezal (Fig. 7). Para retirar un peine,
tire de la parte trasera hacia arriba con una uña (Fig. 8).
Encendido y apagado del aparato
1 Para encender el aparato, pulse el botón de encendido/apagado una
vez. Se seleccionará automáticamente la velocidad 2 y se encenderá
(Fig. 9) el piloto de velocidad II.
2 Si desea seleccionar la velocidad 1, pulse de nuevo el botón de
encendido/apagado. Se encenderá (Fig. 10) el piloto de velocidad I.
3 Para apagar el aparato, pulse el botón de encendido/apagado una vez
más.
La luz integrada se enciende automáticamente para que pueda ver mejor al
utilizar el cabezal (Fig. 11) depilador. Si desea apagar la luz integrada,
mantenga pulsado el botón de encendido/apagado durante 3 segundos al
encender el aparato.
Depilación, afeitado y recorte
El aparato puede utilizarse en la bañera o en la ducha, pero también en
seco. Si desea aplicarse alguna crema o loción corporal, hágalo después de
haber utilizado el aparato.
Para una depilación suave y menos dolorosa, utilice el aparato sobre la piel
mojada con o sin su gel de ducha habitual.
Tras la depilación, la piel podría mostrarse ligeramente irritada, con puntos
o zonas enrojecidas. Esto es normal. Le aconsejamos que se depile por la
noche antes de acostarse, ya que, de este modo, cualquier posible irritación
o enrojecimiento de la piel desaparecerá durante la noche.
Nota: El aparato solo puede utilizarse sin cable.
1 Cuando se depile (con o sin un accesorio en el cabezal depilador),
coloque el aparato sobre la piel en el ángulo que se muestra en la
ilustración (Fig. 12).
2 Cuando utilice el aparato con otros cabezales y accesorios diferentes al
cabezal depilador, asegúrese de colocar dichos cabezales y accesorios
planos sobre la piel (Fig. 13).
3 Cuando utilice el aparato en zonas sensibles, estire la piel con la mano
que le queda libre. Cuando utilice el aparato en las axilas, levante el
brazo y coloque la mano detrás de la cabeza para estirar la piel (Fig. 14).
4 Mueva el aparato lentamente en dirección contraria a la del crecimiento
del vello (Fig. 15).
Nota: Si mueve el aparato demasiado rápido, puede que la piel no quede
tan suave.
Nota: Si el vello tiene más de 3-4 mm de largo, recórtelo previamente para
que la depilación resulte más cómoda y sencilla.
Cabezal depilador
Puede utilizar el cabezal depilador para depilarse las piernas, las axilas y la
línea del bikini.
Seleccione la velocidad 2 para una depilación más eficaz. Seleccione la
velocidad 1 para zonas con poco vello y de difícil acceso, como las rodillas y
los tobillos.
Adaptador de masaje
Puede colocar el adaptador de masaje en el cabezal depilador para
masajear la piel y reducir al mínimo la sensación de tirón que produce la
depilación.
Seite wird geladen ...
Seite wird geladen ...
Seite wird geladen ...
Seite wird geladen ...
Seite wird geladen ...
Seite wird geladen ...

Nota: Se os seus pêlos tiverem mais de 3-4 mm, apare-os previamente para
uma depilação mais fácil e confortável.
Cabeça de depilação
Pode utilizar a cabeça de depilação para depilar as suas pernas, as axilas e
as virilhas.
Seleccione a velocidade 2 para uma maior eficácia de depilação.
Seleccione a velocidade 1 para zonas com crescimento reduzido de pêlos e
para zonas difíceis de alcançar, como joelhos e tornozelos.
Acessório de massagem
Pode encaixar o acessório de massagem na cabeça de depilação para
massajar a pele e minimizar a sensação de puxão da depilação durante a
utilização.
Acessório para esticar a pele
Pode encaixar o acessório para esticar a pele na cabeça de depilação. Este
mantém a pele firme durante a depilação para reduzir a dor.
Adaptador para zonas delicadas
Pode encaixar o adaptador para zonas delicadas na cabeça de depilação
para uma depilação mais confortável das zonas delicadas (por exemplo, as
axilas e a linha do biquíni).
Adaptador facial
Pode encaixar o adaptador facial na cabeça de depilação para uma
depilação precisa do pelo facial (por exemplo, do buço).
Não utilize o aparelho para depilar as pestanas, as sobrancelhas ou
o cabelo.
Cabeça de corte
Pode utilizar a cabeça de corte para depilar as pernas e o corpo.
Nota: o aparelho pode ser movido em duas direções, para um corte mais
fácil das axilas.
Nota: Verifique sempre a lâmina antes de utilizar. Se tiver algum tipo de
dano, substitua a unidade de corte imediatamente (consulte "Substituição").
Pente para cabeça de corte
pode encaixar o pente na cabeça de corte para aparar pelos com um
comprimento de 3 mm.
Cabeça do aparador
Pode utilizar a cabeça aparadora para aparar as zonas de difícil acesso nas
virilhas.
Coloque a cabeça aparadora assente na pele a aparar (Fig. 16). Coloque a
cabeça aparadora perpendicularmente à pele para modelar e delinear (Fig.
17).
Pente para cabeça aparadora
Pode encaixar o pente na cabeça aparadora para aparar pelos nas virilhas
com um comprimento de 3 mm (Fig. 18).
Cabeça de massagem corporal
A cabeça de massagem corporal roda firmemente para relaxar os seus
músculos.
Nota: tem de colocar a cabeça de massagem corporal na unidade de
encaixe para a poder encaixar na pega (Fig. 19).
Escova de esfoliação corporal
Pode utilizar a escova de esfoliação corporal para remover as células
mortas da pele.
Não utilize a escova de esfoliação corporal no rosto.
Nota: tem de colocar a escova de esfoliação corporal na unidade de
encaixe para a poder encaixar na pega (Fig. 20).
Limpeza e arrumação
Mantenha o adaptador seco.
1 Para limpar a cabeça depiladora, segure o aparelho virado para baixo,
ligue-o e enxague-o com água fria durante 15 segundos após cada
utilização (Fig. 21).
2 Para limpar a cabeça de corte (se incluída): utilize a escova de limpeza
para escovar os pelos que se tenham introduzido debaixo dos
aparadores. Agarre nos dois aparadores da unidade de corte e retire-a
da cabeça de corte (Fig. 22). Limpe todas as peças da cabeça de corte
com a escova de limpeza, exceto a lâmina.
Nota: A cada seis semanas, lubrifique os dentes e as lâminas do
aparador com uma gota de óleo para máquinas de costura para obter o
melhor desempenho.
3 enxague a unidade de corte, as cabeças e os acessórios com água
corrente. Agite firmemente para remover as gotas de água.
4 Deixe todas as peças secar completamente.
5 Coloque a unidade de corte novamente na cabeça de corte (ouve-se
um estalido).
6 Coloque as tampas de proteção ou os pentes nas cabeças para evitar
danos nas cabeças quando as arrumar.
7 arrume o aparelho, as cabeças e os acessórios na bolsa.
Nota: A cada seis semanas, lubrifique os dentes e as lâminas do aparador
com uma gota de óleo para máquinas de costura para obter o melhor
desempenho.
Substituição
Para comprar acessórios ou peças sobresselentes, visite
www.shop.philips.com/service ou dirija-se ao seu revendedor Philips.
Também pode contactar o Centro de Apoio ao Cliente da Philips no seu
país (consulte os dados de contacto no folheto de garantia mundial).
Cabeça de corte (se incluída): para obter o melhor desempenho, é
aconselhável substituir a unidade de corte da cabeça de corte a cada dois
anos. Se utilizar a cabeça de corte duas ou mais vezes por semana,
substitua a unidade de corte com maior frequência. Substitua sempre a
unidade de corte por uma equivalente de origem (BRL384).
Escova de esfoliação corporal (se incluída): se utilizar a escova de
esfoliação corporal 2 a 3 vezes por semana, esta dura aproximadamente 3
meses. Substitua a escova de esfoliação corporal a cada 3 meses por uma
equivalente de origem (BRE351).
Resolução de problemas
Este capítulo resume os problemas mais comuns que pode ter com o
aparelho. Se não conseguir resolver o problema com as informações
fornecidas a seguir, visite www.philips.com/support para consultar uma lista
de perguntas frequentes ou contacte o Centro de Apoio ao Cliente no seu
país.
Problema Solução
O aparelho não
funciona tão bem
como deveria.
Certifique-se de que segura no aparelho num ângulo
(Fig. 12) correcto e que o movimenta pela pele
lentamente na direcção oposta à do crescimento do
pêlo.
Limpe as cabeças e os acessórios após cada
utilização.
Depois de carregar,
o indicador de
bateria pisca
quando primo o
botão
ligar/desligar, mas
o aparelho não
liga.
O aparelho ainda está ligado à corrente. Neste caso,
o indicador de bateria pisca para indicar que deve
desligar o aparelho da corrente antes de o poder
ligar.
Durante a
utilização, o
aparelho fica
quente e pára
subitamente de
funcionar. Em
seguida, as luzes
da velocidade e o
indicador de
bateria piscam a
vermelho durante
30 segundos.
A proteção contra o sobreaquecimento foi activada.
A protecção contra sobreaquecimento desliga
automaticamente o aparelho se este ficar
demasiado quente. Para repor a protecção contra
sobreaquecimento, deixe o aparelho arrefecer e, em
seguida, ligue-o novamente. Para evitar o
sobreaquecimento do aparelho, não o pressione
demasiado contra a pele.
A minha pele fica
irritada depois de
utilizar o aparelho.
Pode surgir uma ligeira irritação da pele, como
vermelhidão ou pontos vermelhos. É normal. Para
evitar a pele irritada, certifique-se de que move o
aparelho de forma suave na direcção contrária à do
crescimento do pêlo. Não exerça demasiada
pressão. Se a irritação permanecer após 3 dias, é
aconselhável consultar um médico.
Estique sempre a pele com a mão livre. Quando
utilizar o aparelho nas axilas, levante o seu braço e
coloque a sua mão na parte de trás da cabeça para
esticar a pele (Fig. 14).
-
 1
1
-
 2
2
-
 3
3
-
 4
4
-
 5
5
-
 6
6
-
 7
7
-
 8
8
-
 9
9
-
 10
10
-
 11
11
-
 12
12


Philips AQUATOUCH S5400 Bedienungsanleitung
- Kategorie
- Haarschneider
- Typ
- Bedienungsanleitung
in anderen Sprachen
- English: Philips AQUATOUCH S5400 Owner's manual
- français: Philips AQUATOUCH S5400 Le manuel du propriétaire
- español: Philips AQUATOUCH S5400 El manual del propietario
- italiano: Philips AQUATOUCH S5400 Manuale del proprietario
- Nederlands: Philips AQUATOUCH S5400 de handleiding
- português: Philips AQUATOUCH S5400 Manual do proprietário
Verwandte Artikel
-
Philips BRE650/10 Benutzerhandbuch
-
Philips BRE632/00 Benutzerhandbuch
-
-
Philips BRE605/00 Wichtige Informationen
-
Philips HP6576/00 Benutzerhandbuch
-
Philips BRL130 Benutzerhandbuch
-
-
Philips BRE275/00 Wichtige Informationen
-
Philips BRL170 Benutzerhandbuch
-
Philips HP6512/00 Benutzerhandbuch