
F
GUIDE D'UTILISATION DE VOTRE CONGELATEUR
GB
OPERATING INSTRUCTIONS FOR YOUR FREEZER
RU
NL
D
GR
GEBRUIKSAANWIJZING VAN UW DIEPVRIEZER
BEDIENUNGSANLEITUNG FÜR IHR TIEFKÜHLGERÄT
DK
DKBETJENINGSVEJLEDNING FOR FRYSESKAB


2
Chère Cliente, Cher Client,
Vous venez d'acquérir un congélateur BRANDT et nous vous en remercions.
Nos équipes de recherche ont conçu pour vous une nouvelle génération
d'appareils pour vous faciliter la vie.
Avec des espaces dédiés pour un rangement optimal en toute liberté, un design
sobre et fluide et des performances appréciables, les nouveaux réfrigérateurs
Brandt ont toutes les qualités pour conserver au mieux vos aliments et répondre
à vos habitudes de consommation.
Vous trouverez également dans la gamme des produits Brandt, un vaste choix
de lave-vaisselle, lave-linge et sèche-linge, congélateurs, cuisinières et fours,
tables de cuisson et hottes, que vous pourrez associer à votre nouveau
congélateur BRANDT.
A la pointe de l'innovation, BRANDT contribue ainsi à l'amélioration de la
qualité de la vie quotidienne en vous apportant des produits toujours plus
performants, simples d'utilisation, respectueux de l'environnement, esthétiques
et fiables.
La Marque BRANDT

3
INDEX
Page
Normes de sécurité / Recommandations.............................................. 3
Installation............................................................................................... 4
Description générale .............................................................................. 5
Utilisation du congélateur...................................................................... 5
Dégivrage ................................................................................................ 5
Nettoyage et entretien............................................................................ 6
Changement du sens d'ouverture de la porte ...................................... 5
Problèmes de fonctionnement / Spécifications.................................... 7
NORMES DE SECURITE
Cet appareil a été conçu pour conserver des denrées alimentaires à usage domestique. Tout
autre usage serait incorrect.
L'installation doit être effectuée selon les instructions de ce manuel ; une mauvaise
installation pourrait détériorer l'appareil.
Pour les problèmes éventuels de fonctionnement de l'appareil, adressez-vous toujours et
exclusivement aux centres autorisés de Service Après-Vente ou bien à du personnel qualifié.
Pour toute opération d'entretien, débrancher préalablement l'appareil en évitant de
tirer sur le câble d'alimentation.
Si ce congélateur en remplace un autre, qui ait un dispositif de fermeture à loquet, à ressort,
à serrure ou autre, n'oubliez pas de détruire le dispositif de fermeture ou, mieux encore, de
démonter la porte de votre ancien appareil afin d'éviter que quelqu'un puisse être bloqué à
l'intérieur (des enfants qui jouent, des animaux, etc…).
RECOMMANDATIONS
Après avoir déballé l'appareil, assurez-vous qu'il n'a pas été endommagé. Dans cette
éventualité, les détériorations devront être signalées au revendeur dans les 24h qui suivent
la livraison. Les matériaux employés pour l'emballage sont entièrement recyclables (carton,
plastique à bulles de PE, EPS…). Tenir ces matériaux hors de portée des enfants.
Pour un fonctionnement optimal de l'appareil, installez-le loin des sources de chaleur et
assurez-vous que l'air puisse bien circuler autour (voir Installation de l'appareil).
Le circuit de réfrigération de l'appareil renferme de l'isobutane réfrigérant , un gaz naturel
peu polluant mais néanmoins inflammable. Pendant le transport et l'installation de l'appareil,
assurez vous qu'aucun des composants du circuit de réfrigération n'est endommagé. En cas
de dommage, le laisser à l'écart des flammes et des sources d'inflammation et bien aérer la
pièce où il se trouve.

4
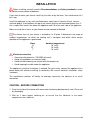
INSTALLATION
Avant de procéder à l'installation, lisez attentivement les Recommandations et les
Normes de sécurité, afin d'éviter certains inconvénients.
Lorsque vous souhaitez déplacer votre congélateur, tenez le par les côtés ou par la base.
Vous ne devez en aucun cas le soulever par la partie supérieure.
Installez l'appareil dans une pièce sans humidité et bien aérée, loin de toute source de
chaleur et à une distance minimum de 10 cm entre le haut du congélateur et tout meuble de
cuisine fixé au mur. Si cela est impossible, laissez 5 cm au dessus de l'appareil et 2,5 cm sur
les côtés. Veillez à ne pas recouvrir ni obstruer les ouvertures d'aération de votre
congélateur.
La classe climatique de votre congélateur est indiquée sur la plaque signalétique. Elle
détermine le rang des températures ambiantes pour lequel l'unité frigorifique est conçue, en
garantissant le bon fonctionnement de l'appareil
Classe Températures ambiantes
N 16° à 32°
ST 18° à 38°
T 18° à 43°
Branchement électrique
Caractéristiques de la prise : 220-230V avec prise de terre.
Eviter d'utiliser des adaptateurs ou des rallonges.
Eviter que le câble soit en contact avec le compresseur.
Eviter que le câble soit pris sous l'appareil.
L'installation électrique de l'appareil est dotée d'une mise à la terre. Pour votre sécurité,
connectez l'appareil à une prise de courant dotée d'une mise à la terre efficace
(conformément aux normes en vigueur sur la sécurité de l'installation électrique).
Le constructeur décline toute responsabilité pour les dommages qui auraient été causés par
le manque de mise à la terre.
ATTENTION AVANT DE BRANCHER
1. Nettoyer l'intérieur du congélateur à l'eau tiède additionnée de bicarbonate. Rincer et
sécher soigneusement.
2. Attendre 2 heures avant la mise en fonctionnement pour assurer la stabilisation des
lubrifiants du moto-compresseur.

5
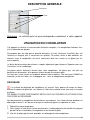
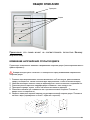
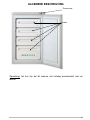
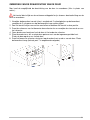
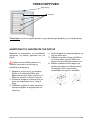
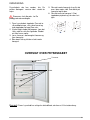
DESCRIPTION GENERALE
Remarque : ce schéma peut ne pas correspondre exactement à votre appareil.
UTILISATION DU CONGELATEUR
Cet appareil est destiné à la conservation d'aliments congelés, à la congélation d'aliments frais
et à la fabrication de glaçons.
Ne congelez pas une trop grosse quantité d'aliments à la fois (maximum 4 kg/24h), plus vite
l'aliment est congelé, plus il conservera ses qualités. De même, veillez à bien emballer vos
aliments avant la congélation, afin qu'ils conservent toute leur saveur et ne gâtent pas les
autres produits.
La durée de conservation des aliments surgelés dépend du type d'aliments. Reportez vous aux
instructions sur les emballages.
Ne placez jamais d'aliments chauds dans votre congélateur. Ne placez pas non plus de
bouteilles ou de canettes, elles peuvent éclater lorsque leur contenu gèle.
Les boissons à forte teneur en carbonate peuvent même exploser ! Ne conservez JAMAIS de
limonade, jus de fruit, bière, vin, champagne, etc… dans le compartiment congélateur.
DEGIVRAGE
Le système de dégivrage du congélateur est manuel. Vous pouvez de temps en temps
éliminer la couche de glace qui s'est formée à l'aide d'une raclette ou de tout autre instrument
plastique.
NE JAMAIS UTILISER D'INSTRUMENT METALLIQUE OU D'APPAREIL ELECTRIQUE POUR
PROCEDER AU DEGIVRAGE.
Afin de permettre au congélateur de fonctionner correctement, il est nécessaire de procéder au
dégivrage au moins 1 fois par an ou lorsque la couche de glace est supérieure à 4 mm :
1. Débranchez votre congélateur.
2. Otez la glace à l'aide d'une raclette en plastique. Le dégivrage peut être accéléré en plaçant
des bols d'eau chaude dans le congélateur et en fermant la porte.
3.
Une fois le dégivrage terminé, procédez au nettoyage de votre congélateur.
Thermostat
Tiroirs

6
NETTOYAGE ET ENTRETIEN
Débranchez le congélateur avant de procéder au nettoyage.
Nettoyez l'intérieur à l'eau et au bicarbonate à l'aide d'une éponge ou d'une lavette, vous
éviterez ainsi la formation de mauvaises odeurs.
N'utilisez en aucun cas une centrale vapeur, du dissolvant ou du détergent abrasif, car ils
pourraient endommager l'intérieur de votre appareil. Ne mettez pas non plus les accessoires
intérieurs au lave-vaisselle.
Il est recommandé de passer un chiffon une fois par an sur le dos de l'appareil, car s'il est sale,
le rendement du congélateur diminue et la consommation augmente.
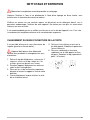
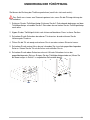
CHANGEMENT DU SENS D'OUVERTURE DE LA PORTE
Il est possible d'inverser le sens d'ouverture de
la porte (gauche au lieu de droite) :
L'appareil doit toujours être débranché
lorsque vous procédez au changement du sens
d'ouverture.
1. Retirez le top du réfrigérateur : enlevez les 2
cache-vis situés sur le top, retirez les 2 vis
et faites glisser ce dernier vers l'avant.
2. Penchez l'appareil légèrement en arrière et
calez le dans cette position.
3. Dévissez les vis de la charnière supérieure
de porte et retirez le support et l'axe de cette
dernière.
4. Ouvrez légèrement la porte et faites la sortir
de sa charnière basse.
5. Dévissez l'axe inférieur et revissez le
du côté opposé. Emboîtez la porte dans
l'axe et fermez la.
6. Revissez solidement la charnière
supérieure sur le côté opposé et l'axe
de porte. Remettez le top (reprendre le
point 1 à l'envers).

Dear Customer,
You have just purchased a BRANDT freezer, for which we thank you.
Our research teams have designed a new generation of appliances to make
your life easier.
With its dedicated areas for optimum, flexible storage, clean and fluid lines
allied with appreciable performance, the new Brandt fridges have everything
you need to conserve your food and provide the answers to your everyday
consumption needs.
The Brandt range of products also includes a wide choice of dishwashers,
washing machines and clothes driers, fridges, cookers and ovens, hot-plates
and extractor hoods, that you can combine with your new BRANDT freezer.
At the innovative cutting edge, BRANDT thus helps to improve the quality of life
on a daily basis, by offering you simple but high-performance products that are
respectful of the environment, good-looking and reliable.
BRANDT

3
INDEX
Page
Safety standards / Recommendations .................................................. 4
Installation............................................................................................... 5
Reversing the door opening direction .................................................. 6
General description................................................................................ 6
Using the freezer .................................................................................... 7
De-icing ................................................................................................... 7
Cleaning and maintenance .................................................................... 7
Operating problems / Specifications..................................................... 8

4
SAFETY STANDARDS
This appliance is designed ONLY for domestic conservation of foodstuffs.
Installation must be as instructed in this guide. Incorrect installation could damage the
appliance.
For any operating problems, always and only contact authorised After Sales Service centres,
or qualified personnel.
Before carrying out any maintenance, disconnect the appliance, but not by pulling
on the power supply cable.
If this freezer replaces another, which had a latching, spring-mounted, locking or other
closure system, do not forget to destroy the closure device or better yet remove the door of
your old freezer, so that no-one could become trapped inside (children playing, animals, etc.).
RECOMMENDATIONS
After unpacking the appliance, make sure that it is undamaged. If it is, the reseller should be
notified of any damage within 24 hours of delivery. The packaging materials used are entirely
recyclable (cardboard, PE bubble wrap, EPS, etc.). Keep these materials out of the reach
of children.
For optimum operation of the appliance, install it away from sources of heat and make sure
that air can circulate freely around it (see appliance installation).
The appliance's cooling circuit contains a coolant called isobutane, a relatively clean
natural gas which is nonetheless flammable. During transport and installation of the
appliance, make sure that none of the components of the cooling circuit is damaged. In the
event of damage, keep away from flames and ignition sources, and ventilate the room well.

5
INSTALLATION
Before installing, carefully read the Recommendations and Safety standards in order
to avoid a certain number of problems.
If you want to move your freezer, hold it by the sides or by the base. You should never lift it
by its top.
Install the appliance in a dry, well-ventilated room, away from all sources of heat. Leave a
minimum gap of 10 cm between the top of the freezer and any wall-mounted kitchen units. If
this is impossible, leave 5 cm above the appliance and 2.5 cm on each side of the appliance.
Make sure that the air vents on your freezer are not covered or blocked.
The climate class of your freezer is marked on its ID plate. It determines the range of
ambient temperatures for which the cooling unit is designed, and within which correct
operation of the appliance is guaranteed.
Class Ambient temperatures
N 16° to 32°
ST 18° to 38°
T 18° to 43°
Electrical connection
Connector characteristics: 220-230V with earth.
Avoid using adapters or extension leads.
Avoid the cable coming into contact with the compressor.
Avoid trapping the cable under the appliance.
The appliance's electrical installation is earthed. For your safety, connect the appliance to a
power outlet with effective earthing (in conformity with current electrical installation safety
standards).
The manufacture declines all liability for damage caused by the absence of an earth
connection.
CAUTION – BEFORE CONNECTING
1. Clean the inside of the freezer with warm water containing bicarbonate of soda. Rinse and
dry thoroughly.
2. Wait for 2 hours before switching on, to ensure that the lubricants in the motor
compressor have stabilised.

6
REVERSING THE DOOR OPENING DIRECTION
You can reverse the direction of opening of
the door (left instead of right):
The appliance must always be
disconnected when you change the door
opening direction.
1. Remove the top of the fridge: remove the
2 screw covers on the top, remove the 2
screws and slide the top forwards.
2. Slightly tilt the appliance towards the rear
and wedge it in this position.
3. Unscrew the screws from the door upper
hinge and remove the hinge support and
pin.
4. Slightly open the door and extract it from
its lower hinge.
5. Unscrew the lower pin and screw it in
on the opposite side. Insert the door in
the pin and close it.
6. Firmly screw the upper hinge to the
opposite side and the door pin. Fit the
fridge top (carry out point 1 in reverse).
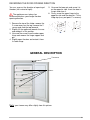
GENERAL DESCRIPTION
Note:
your freezer may differ slightly from this picture
.
Thermostat
Drawers

7
USING THE FREEZER
This appliance is designed to conserve frozen foods, to freeze fresh food and to make ice-
cubes.
Do not freeze a large quantity of food at any one time (maximum of 4 kg/24h), as the faster
an item is frozen, the more it will keep its qualities. Similarly, make sure that you wrap your
foodstuffs before freezing, so that they retain their full flavour and do not spoil the other
products.
The conservation time for frozen foods depends on the type of food. Refer to the instructions
on the packaging.
Never place hot foods in your freezer. Never place bottles or drinks cans in it either, as they
can burst when their contents freeze.
Highly carbonated drinks can even explode! NEVER keep lemonade, fruit juice, beer, wine,
champagne, etc… in the freezer compartment.
DE-ICING
The freezer de-icing system is manual. You can from time to time remove the layer of ice
that forms, using a scraper or other plastic instrument.
NEVER USE A METAL INSTRUMENT OR ELECTRICAL DEVICE TO DE-ICE THE
FREEZER.
The freezer must always be de-iced when the layer of frost reaches a thickness of about 4
mm. In any case, this compartment should be de-iced at least once a year:
1. Switch off and disconnect the freezer.
2. Remove the ice with a plastic scraper. De-icing can be made quicker by placing bowls of
hot water in the freezer and closing the door.
3. Once de-icing is completed, you can then clean your appliance.
CLEANING AND MAINTENANCE
Disconnect the freezer before cleaning it.
Clean the inside with water plus bicarbonate of soda, using a sponge or cloth. This will
prevent the build-up of unpleasant odours.
Never use a steam cleaner, solvent or abrasive detergent, as they could damage the interior
of your appliance. Never wash the interior accessories in the dishwasher.
We recommend that you wipe the back of the appliance once a year with a cloth
over the
back of the appliance once a year, as if it is dirty, its efficiency drops and its energy
consumption rises.

8
OPERATING PROBLEMS
The freezer creates a number of noises that are perfectly normal:
The coolant gas can create a gurgling sound as it circulates through the system.
The compressor can rumble, a sound which can be more intense when it starts up.
Sharp cracking sounds produced by expansion and contraction of the materials used.
PROBLEM SOLUTION
The freezer does not operate
Check that it is properly plugged in, that the fuse
has not blown or that the circuit-breaker has not
tripped.
The freezer is too warm
Check the thermostat and make sure that the
door stays open as little as possible. Also check
that the door closes properly.
The motor runs continuously
Make sure that the freezer is well ventilated,
leaving gaps as mentioned in the "Installation"
chapter. Also check that your appliance is not
exposed to a direct source of heat.
You may also have placed too much food inside
or the door may not close properly.
TECHNICAL ASSISTANCE SERVICE
If you have carried out the above checks, and your problem persists, ATTEMPT NO
REPAIRS YOURSELF. Contact the nearest Technical Assistance Service.
SPECIFICATIONS
Dimensions in mm (HxWxD)____________________________________ 845x545x570
THIS APPLIANCE IS IN CONFORMITY WITH EC DIRECTIVES
73/23, 93/68, 89/336, 96/57, 92/31, 94/62

2
!
! "#$%&#'( BRANDT.
,
.
Brandt , !
,
: ,
! ,
.
" Brandt
,
, , !
#, , ! "#$%&#' BRANDT,
.
$ BRANDT
% , !
,
, , & ,
& .
$ BRANDT

3
)
".
!(*#$( +,-&#'# .," /(0& 0+# / ,' ,&1(2## ............................. 4
0+(& *'(............................................................................................... 5
.3,, /#0(&#,.................................................................................... 6
",&,&#, &(/!(*$, +'!5+#4 1*,!# ........................................ 6
0/ $%" *(&#, ! "#$%&#'(........................................................... 7
(" !(6#*(&#,................................................................................... 7
7#0+'( # 8- 1 "( ! "#$%&#' .................................................... 7
0+!(&,&#, &,#0/!(*& 0+,9 / ,-,0'#, -(!('+,!#0+#'# ......... 8

4
: ); <)
' %.
( % .
% !
; .
) , , !
%
#% %.
!# $=. 9 !(. +,, 0*4"(&& 9 0 8- 1 "( (//(!(+ , 0&(7($( *5&%+, '(.,$%
/#+( #" 0,+#.
* , !
!, , ..,
, ! , , -
(! , , ..).
))>
) , . &
! % .
$ (,
&, , .). >,+# &, 1 $6&5
#,+% 1 0+8/ ' ?+# (+,!#($(.
+
, %% (0.
0+(& *'( (//(!(+().
, - ,
! , &
! . ,
.
, !, .

5
:
) ,' ,&1(2## !(*#$(
+,-&#'# .," /(0& 0+#, .
) ! .
.
!,
. - 10
, . * & ,
5 2,5 .
% .
, # . -
! ,
! .
$(00 ,/,!(+8!( '!86(=3,9 0!,15
N 16° 32°
ST 18° 38°
T 18° 43°
&: 220-230 .
( .
.
, .
' . " %
, ! &## (
! &).
( !,
.
))> :@ A)) )<;>
1. -
. .! .
2. ) 2 , %
.

6
<B )) )
): &
.
))) :)C D C >:)
"! (
):
/ &
.
1. " : 2 &-,
, ! , , .
2. # & , .
3. - .
4. ) ; , .
5. - . )
.
6. . )
( 1 ).
.
0!

7
:)
' ,
, .
(
4 / ). 1 ,
. " ,
.
" .
%.
! . !
, .
$ ! (,-2+/
, # , , , , ..
.
E :)
" .
!
.
(,-2+/ * )-3456.*"4 $*./33(1*",($ (".7$*.-$ (3(
'3*,.7(1*",($ )7(-7-$ )7( 7/5$-7/8 (/((.
+ , ,
1 , ! 4 :
1. - .
2. " ! . +
.
3. ) .
A ;>
) , .
- ,
. ' .
, !
, .
.
7 ! ,
,
&& .
Seite laden ...
Seite laden ...
Seite laden ...
Seite laden ...
Seite laden ...
Seite laden ...
Seite laden ...
Seite laden ...
Seite laden ...
Seite laden ...
Seite laden ...
Seite laden ...
Seite laden ...
Seite laden ...
Seite laden ...
Seite laden ...
Seite laden ...
Seite laden ...
Seite laden ...
Seite laden ...
Seite laden ...
Seite laden ...
Seite laden ...
Seite laden ...
Seite laden ...
Seite laden ...
Seite laden ...
Seite laden ...
Seite laden ...
Seite laden ...
Seite laden ...
Seite laden ...
-
 1
1
-
 2
2
-
 3
3
-
 4
4
-
 5
5
-
 6
6
-
 7
7
-
 8
8
-
 9
9
-
 10
10
-
 11
11
-
 12
12
-
 13
13
-
 14
14
-
 15
15
-
 16
16
-
 17
17
-
 18
18
-
 19
19
-
 20
20
-
 21
21
-
 22
22
-
 23
23
-
 24
24
-
 25
25
-
 26
26
-
 27
27
-
 28
28
-
 29
29
-
 30
30
-
 31
31
-
 32
32
-
 33
33
-
 34
34
-
 35
35
-
 36
36
-
 37
37
-
 38
38
-
 39
39
-
 40
40
-
 41
41
-
 42
42
-
 43
43
-
 44
44
-
 45
45
-
 46
46
-
 47
47
-
 48
48
-
 49
49
-
 50
50
-
 51
51
-
 52
52


Brandt UM1000 Bedienungsanleitung
- Typ
- Bedienungsanleitung
- Dieses Handbuch ist auch geeignet für
in anderen Sprachen
- English: Brandt UM1000 Owner's manual
- français: Brandt UM1000 Le manuel du propriétaire
- Nederlands: Brandt UM1000 de handleiding
- dansk: Brandt UM1000 Brugervejledning