Silvercrest SFW 250 A1 Operating Instructions Manual
- Kategorie
- Fleischwolf
- Typ
- Operating Instructions Manual

KOMPERNASS GMBH
BURGSTRASSE 21 · D-44867 BOCHUM
www.kompernass.com
ID-Nr.: SFW250A1-09/10-V1
IAN: 62025
KITCHEN TOOLS
Mincer SFW 250 A1
7
Mincer
Operating instructions
Fleischwolf
Bedienungsanleitung
Stroj za mljevenje mesa
Upute za upotrebu
Месомелачка
Ръководство за експлоатация
Κρεατομηχανή
Οδηγίες χρήσης
CV_62025_SFW250A1_LB7.qxd 05.11.2010 13:52 Uhr Seite 1

SFW 250 A1
q
w
e
r
tyuioa
d
s
f
CV_62025_SFW250A1_LB7.qxd 05.11.2010 13:52 Uhr Seite 4

- 1 -
Content Page
1. Intended use 2
2. Technical data 2
3. Items supplied 2
4. Safety Instructions 2
5. Assembly / Disassembly 3
a) Assembling the meat grinder......................................................................................................3
b) Assembling the sausage attachment..........................................................................................4
c) Assembling the kubbe attachment..............................................................................................4
d) Assembling the biscuit pastry attachments................................................................................4
6. Operation 5
a) Operating the appliance ............................................................................................................5
b) Processing meat ...........................................................................................................................5
c) Processing sausage meat ............................................................................................................6
d) Using the kubbe attachment.......................................................................................................6
e) Making biscuit pastry ..................................................................................................................6
7. Troubleshooting 7
8. Cleaning 7
a) Cleaning the motor block ...........................................................................................................7
b) Cleaning the accessories ............................................................................................................7
9. Storage 8
10. Disposal 8
11. Warranty and service 8
12. Importer 9
13. Recipes 9
Kubbe ................................................................................................................................................9
Fresh Grill Sausages......................................................................................................................10
Biscuits.............................................................................................................................................10
Read the operating instructions carefully before using the device for the first time and preserve this booklet
for later reference. Pass this manual on to whoever might acquire the device at a future date.
IB_62025_SFW250A1_LB7 05.11.2010 14:00 Uhr Seite 1

- 2 -
MINCER
1. Intended use
This appliance is intended for use in domestic house-
holds and for the processing of foodstuffs in small
quantities .
• Mincing fresh meat,
• Making sausages with natural or artificial sausage
skin,
• Making shortbread biscuits
This appliance is not intended for the processing of
frozen foods or other hard foodstuffs, e.g. bones or
nuts, or for use in commercial or industrial environ-
ments.
2. Technical data
Voltage : 220-240 V /
~
50 Hz
Power consumption : 250 W
Protection class: II
C.O. time: 15 minutes
C.O.-Time
The C.O. Time (Continuous Operation) details how
long an appliance may be used without the motor
overheating and being damaged. When the given
C.O. Time has lapsed, the appliance must be switched
off until the motor has cooled itself down.
3. Items supplied
q
Biscuit attachment with pattern strips
w
Stodger
e
Feed tray
r
Motor block
t
Meat grinder casing made of metal
y
Transport screw
u
Spring
i
Cross blade
o
Coarse and fine cutting discs
a
Clamping ring
s
Sausage attachment
d
Sausage disc
f
Kubbe attachment
4. Safety Instructions
To avoid potentially fatal electric
shocks:
• Ensure that the power cable does not become
damaged. Protect the cable from heat and ensure
that it cannot be trapped or clamped.
• Arrange for damaged power cables and/or
plugs to be replaced as soon as possible by
a qualified specialist or by Customer Services.
• Use the appliance only in dry rooms, not
outdoors.
• Never immerse the motor in water or other liquids!
If you do, you risk receiving a potentially fatal
electric shock.
Warning!
Never use the appliance for purposes other than
those listed here. There will be a major risk of serious
accidents should you try to neutralise the safety
devices on the appliance!
IB_62025_SFW250A1_LB7 05.11.2010 14:00 Uhr Seite 2

- 3 -
To avoid the risk of accidents and
injuries:
• Never put your hand into the openings of the ap-
pliance. Do not insert any objects of any kind
into the openings – except for the appropriate
stodger and the foodstuff to be processed. If you
do, there will be a serious risk of accidents!
• Unplug the appliance from the power source be-
fore attaching or removing accessories.
• Do not leave the appliance unsupervised when it
is ready for use. To avoid it being switched on
accidentally, always unplug the appliance after
use or during breaks.
• Use only original accessories for this appliance.
Other accessories may not meet the safety
requirements.
• This appliance is not intended for use by individuals
(including children) with restricted physical, physio-lo-
gical or intellectual abilities or deficiences in
experience and/or knowledge unless they are
supervised by a person responsible for their
safety or receive from this person instruction in
how the appliance is to be used.
• Children should be supervised to ensure that
they do not play with the appliance.
• Never operate the appliance in a no-load condi-
tion. This could irreparably damage the
appliance.
5. Assembly / Disassembly
IMPORTANT: All accessories are coated with
a thin film of oil to protect them from corrosion.
Therefore carefully clean all of the parts before
using the appliance for the first time, as com-
prehensively described on chapter "8 Clea-
ning". After subsequent usage, always apply a
light coating of cooking oil to the metallic
components.
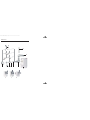
a) Assembling the meat grinder
Unfold the fold-out side. There you will find the
step-by-step illustrations for assembling the appliance.
• Place the transport screw
y
into the mincer
casing
t
.
• Place the spring
u
onto the transport screw
y
.
• Then place on the cross blade
i
so that the
sharp side points away from the spring
u
.
Caution:
The cross blade
i
is very sharp! Risk of injury!
Important!:
The appliance will be damaged if the cross blade
i
is inserted the other way around!
• Select the desired cutting disc. The cutting discs
that are not required can be stored in the small
compartment on the appliance (Fig.
).
To open it, press on the symbol on the cover.
The cover can now be opened. Insert the two
unrequired cutting discs.
• Insert the selected cutting disc
o
into the meat
grinder casing
t
, so that the indentations on the
cutting disc
o
lie on the fixing points in the meat
grinder casing
t
.
• When everything has been correctly assembled,
screw the ring clamp
a
on until it is handtight.
IB_62025_SFW250A1_LB7 05.11.2010 14:00 Uhr Seite 3

- 4 -
• The assembled meat grinder
t
is connected
to the motor block
r
by a bayonet connector:
- Insert the meat grinder casing
t
into the motor
block
r
, such that the arrow on the feeding
shaft lies against the symbol on the motor
block
r
. The locking button presses itself in
(Fig.
).
- Lightly press the meat grinder casing
t
in and
at the same time turn the feeding shaft on the
meat grinder casing
t
into the middle position
(Fig.
), so that the arrow on the feeding shaft
lies against the symbol . When the meat
grinder casing
t
engages, the locking button
springs out.
- Finally place the feed tray
e
on top of the
feeding funnel.
- To dismantle it, press the locking button and
turn the feeding funnel to the right (Fig.
) .
You can now pull the meat grinder casing
t
out.
b) Assembling the sausage attachment
Unfold the fold-out side. There you will find the
step-by-step illustrations for assembling the appliance.
• Remove the meat grinder casing
t
as described
under a).
• Disassemble any attachments that might be fitted
and clean the meat grinder casing
t
.
Note:
The cross blade
i
with the spring
u
is not requi-
red for the sausage attachment
s
! If need be, re-
move them both from the meat grinder casing
t
.
• Coat all metal parts with cooking oil.
• Take the sausage disc
d
from the small com-
partment on the top of the appliance (Fig.
).
• Position the sausage disc
d
so that the indenta-
tions in the sausage disc
d
lie on the fixing
points in the meat grinder casing
t
.
• Then place the sausage attachment
s
before
the sausage disc
d
.
• Screw the ring clamp
a
on hand-tight.
• Assemble the meat grinder casing
t
as described
under a).
c) Assembling the kubbe attachment
Unfold the fold-out side. There you will find the
step-by-step illustrations for assembling the appliance.
• Disassemble the meat grinder casing
t
as de-
scribed under a).
• Disassemble any attachments that might be fitted
and clean the meat grinder casing
t
.
Note:
The cross blade
i
with the spring
u
is not requi-
red for the Kubbe attachment
f
! If need be, remo-
ve them both from the meat grinder casing
t
.
• Coat all metal parts with cooking oil.
• Insert both plastic parts of the Kubbe attachment
f
so that the indentations on the Kubbe attach-
ment
f
lie on the fixing points in the meat grin-
der casing
t
.
• When everything has been correctly assembled,
screw the ring clamp
a
on until it is handtight.
• Assemble the meat grinder casing
t
as described
under a).
d) Assembling the biscuit pastry
attachments
Unfold the fold-out side. There you will find the
step-by-step illustrations for assembling the appliance.
• Remove the meat grinder casing
t
as described
under a).
• Disassemble any attachments that might be fitted
and clean the meat grinder casing
t
.
Note:
The cross blade
i
with the spring
u
is not requi-
red for the biscuit attachment
q
! If need be, remo-
ve them both from the meat grinder casing
t
.
• Coat all metal parts with cooking oil.
• Remove the pattern strips
q
from the front of the
biscuit attachment
q
.
IB_62025_SFW250A1_LB7 05.11.2010 14:00 Uhr Seite 4

- 5 -
• First place the plastic disc and then the metal
disc of the biscuit attachment
q
into the meat
grinder casing
t
(see fold-out side).
Position the biscuit attachment
q
so that the
indentations on the biscuit attachment
q
lie on
the fixing points in the meat grinder casing
t
.
• When everything has been correctly assembled,
screw the ring clamp
a
on until it is handtight.
• Re-attach the pattern strips
q
to the front part of
the biscuit attachment
q
. Ensure that the grip on
the pattern strips
q
points away from the
appliance. If it does not, you will not be able to
adjust the pattern, which is located directly on
the grip.
• Assemble the meat grinder casing
t
as described
under a).
• To dismantle it, you must first remove the pattern
strips
q
before you can screw open the ring
clamp
a
and take the biscuit attachment
q
out.
6. Operation
Important!:
Do not use the appliance for longer than 15 minutes
continuously. To avoid an overheating of the app-
liance, after such a period switch it off and allow it
to cool down for ca. 30 minutes.
Important!:
NEVER activate the buttons ON or REV, with a
change of rotation direction, if the appliance motor
has not come to a complete stop. This could
damage the motor.
Warning:
NEVER open the housing of the motor block
r
– it
does not contain any user-serviceable elements. If
the housing is opened, the warranty becomes void.
If the housing is opened, there is a risk of receiving
a potentially fatal electric shock.
a) Operating the appliance
Once the appropriate attachments have been fixed:
• Place the appliance where it will at all times be
absolutely stable and under no circumstances
could it fall off of the work surface or in any way
come into contact with water (due to vibrations
or becoming snagged in the power cable). Vi-
bration is unavoidable when it is working.
Warning:
Never touch a machine, which is plugged in or is
operational when it happens to fall or land in water
– or in the case of other emergencies! First unplug
the appliance in all emergency situations! Otherwise
one runs the risk of serious injury or loss of life!
• Place the food to be processed into the feed tray
e
and position a container under the exit ope-
ning to collect the processed food.
• First press the OFF button to check that the appli-
ance is still switched off. Otherwise there is a risk
that the appliance could unintentionally start
when the plug is inserted into the power socket.
• Then put the plug into the socket.
• Press the button ON to start the appliance.
Important!:
Now push the foodstuff into the feeding shaft ONLY
with the round stodger
w
– NEVER with one’s fingers,
forks, spoonhandles or similar objects. This could
lead to injury and also damage the appliance.
Important!:
Do not ever press so hard that the motor gets audibly
slower. This could overburden the machine under
pressure and damage it.
b) Processing meat
• Use pieces of meat that fit without problem into
the feeding shaft. If needs be, cut the meat up
into smaller pieces. Check that the meat does not
have any bones and or tendons.
IB_62025_SFW250A1_LB7 05.11.2010 14:00 Uhr Seite 5

- 6 -
Caution:
Minced meat is very prone to bacterial contamina-
tion. Therefore take care to maintain good hygiene
when processing meat.
• When you have read all the instructions on the
topic ”Meat“, you can take the appliance into
use as described under 6.a).
c) Processing sausage meat
• Pass meat through the meat grinder twice before
using it as sausage stuffing.
• To make sausage stuffing, add some chopped
onions, spices and other ingredients to the minced
meat, as per your recipe, and knead the mixture
well.Refrigerate it for 30 minutes before proces-
sing it further.
• Position the sausage skin (natural or artificial) on
the sausage attachment
s
and close the other
end with a knot. For 1 kg of the filling, you will
need approximately 1.60 m of sausage skin.
Tip:
Soak the natural sausage skin in lukewarm water
for about 3 hours before using it and wring it out
before fixing it. This will make the natural sausage
skin more elastic. Natural sausage skins are available
from butcher suppliers close to slaughter houses or
from your family butcher.
• The sausage mixture will be pressed through the
sausage attachment
s
and into the sausage
skin. When it is long enough switch the appliance
off, press the sausage together at the ends and
rotate it a couple of times along its longitudinal
axis.
Tip:
Sausage meat tends to expand when cooked or fro-
zen. Therefore, to prevent it from bursting it is best
not to overstuff the sausage.
• When you have read all of the instructions about
the topic “Sausage“, you can take the appliance
into use as described under 6 a).
d) Using the kubbe attachment
With the kubbe attachment
f
foodstuffs can be
processed to form hollow rolls of meat or vegeta-
bles, which can then be stuffed as desired.
• Put the meat through the meat grinder twice be-
fore pressing it through the kubbe attachment
f
.
• When you have read all the instructions about
the topic “Kubbe attachment“, you can take the
appliance into use as described under 6 a).
e) Making biscuit pastry
When you have prepared a biscuit pastry accor-
ding to your recipe, and have fixed the biscuit at-
tachment
q
:
• When you have read all the instructions about
the topic ”biscuit attachment", you can take the
appliance into use as described under 6 a).
• Line a small baking tray with greaseproof paper
and place or hold it directly under the exit opening
at the front of the appliance.
• Press pastry evenly into the meat grinder casing
t
– the transport screw
y
then pushes it through
the design on the pattern strip of the biscuit at-
tachment
q
.
• When the biscuit is the required length, stop the
appliance and break the pastry off at the exit
opening. Lay the biscuits on the baking tray.
IB_62025_SFW250A1_LB7 05.11.2010 14:00 Uhr Seite 6

- 7 -
7. Troubleshooting
If the drive is blocked by accumulated food:
• Press the OFF button to stop the meat grinder.
• Hold the REV button pressed down. The app-
liance will now run in the reverse direction. This
enables you to transport the food which has be-
come stuck a short way backwards, and the motor
to run freely again.
• When the drive runs smoothly again, release the
REV button.
• Press the ON button to re-start the meat grinder.
• If you do not succeed in getting the drive free
with this, clean the appliance as described in
chapter "8. Cleaning“.
Should the motor suddenly stop, it could be due to
automatic activation of the internal overload device.
This is intended to protect the motor.
• Switch the appliance off and allow it cool down
for approximately 30 minutes before continuing
to use it.
• Should this time period not be sufficient, wait for
a further 15 minutes.
• If it still does not function at the end of this period,
this indicates a technical problem. In this case,
contact the Service Centre.
If the power cable is damaged or the accessories
are visibly damaged:
• Immediately switch the appliance off by pressing
the OFF button!
• If there is no risk to personal safety, unplug the
appliance.
• Arrange for the defective parts be repaired by
Customer Services before re-using the appliance.
8. Cleaning
Warning:
Pull out the plug from the socket, before cleaning
the appliance. In this way accidents caused by the
unexpected switching on of the machine and electric
shocks can be prevented.
a) Cleaning the motor block
• Clean the exterior surfaces and the power cable
with a slighly damp cloth. Dry the appliance
well before re-using it.
Warning:
Never immerse the motor block in water or any
other liquid! Should this occur, you are at risk of
a potentially fatal electric shock if permeating
moisture makes contact with the electrical wiring.
• Never use detergents, abrasive cleaners or sol-
vents. These could damage the appliance and
leave residues on the foodstuffs.
b) Cleaning the accessories
Note:
Do not clean the accessories in a dishwasher! This
could cause damage to them!
• Clean the accessories that could come in
contact with foodstuffs, ...
- by hand only, the accessories are not dish-
washer safe.
- with hot water and a household detergent
suitable for use with foods.
Caution:
The cross blade is very sharp! Risk of injury!
• Dry all parts thoroughly, before re-using the
appliance.
IB_62025_SFW250A1_LB7 05.11.2010 14:00 Uhr Seite 7

- 8 -
Note:
After every cleaning, apply a light coating of
cooking oil to all metallic components.
9. Storage
• Push the power cable (but not the plug) into the
cable storage shaft under the appliance base.
There it is protected from damage.
• Store the two cutting discs
o
that are not currently
fitted into the appliance in the small compartment
(Fig.
) on the appliance.
• Store the appliance in a dry place.
• After drying the metal attachments coat them
lightly with a little cooking oil – if you are not go-
ing to use the device immediately. This will pro-
tect them from corrosion.
• Store the appliance where it will be out of reach
of children and people requiring supervision.
They are not always able to correctly assess
the potential risks involved with using electrical
appliances.
10. Disposal
Do not dispose of the appliance in your
normal domestic waste. This appliance
is subject to the European Guidelines
2002/96/EC.
Dispose of the appliance through an approved dis-
posal centre or at your community waste facility.
Observe the currently applicable regulations. In
case of doubt, please contact your waste disposal
centre.
Dispose of all packaging materials in an
environmentally friendly manner.
11. Warranty and service
The warranty for this appliance is for 3 years from
the date of purchase. The appliance has been ma-
nufactured with care and meticulously examined be-
fore delivery. Please retain your receipt as proof of
purchase. In the event of a warranty claim, please
make contact by telephone with our Service Depart-
ment. Only in this way can a post-free despatch for
your goods be assured.
The warranty covers only claims for material and
maufacturing defects, but not for transport damage,
for wearing parts or for damage to fragile compo-
nents, e.g. buttons or batteries. This product is for
private use only and is not intended for commercial
use. The warranty is void in the case of abusive and
improper handling, use of force and internal tampe-
ring not carried out by our authorized service
branch. Your statutory rights are not restricted in
any way by this warranty.
The warranty period will not be extended by repairs
made under warranty. This applies also to replaced
and repaired parts. Any damage and defects extant
on purchase must be reported immediately after un-
packing the appliance, at the latest, two days after
the purchase date. Repairs made after the expira-
tion of the warranty period are subject to payment.
DES UK LTD
Tel.: 0871 5000 700
(£ 0.10 / minute)
e-mail: support.uk@kompernass.com
Kompernass Service Ireland
Tel.: 1850 930 412 (0,082 EUR/Min.)
Standard call rates apply. Mobile operators may vary.
e-mail: support.ie@kompernass.com
Kompernass Service Cyprus
Tel.: 800 9 44 01
e-mail: support.cy@kompernass.com
CY
IB_62025_SFW250A1_LB7 05.11.2010 14:00 Uhr Seite 8

- 9 -
12. Importer
KOMPERNASS GMBH
BURGSTRASSE 21
D-44867 BOCHUM
www.kompernass.com
13. Recipes
Kubbe
Ingredients for the wrapping
450g of lean mutton, veal or beef
150g flour
1 Tsp Pimento (type of pepper)
1 Tsp Nutmeg
1 Pinch Chili powder
1 Pinch Pepper
Ingredients for the meat filling
700g Mutton
1 1/2 Tbsp. olive oil
1 1/2 Tbsp Onions, finely chopped
1/2 Tsp Pimento (type of pepper)
1/2 Tsp. Salt
1 1/2 Tbsp Flour
Pass the meat for the wrapping through the meat
grinder twice (first with the coarse and then with the
fine cutting discs
o
) and then combine it with the in-
gredients. Then pass this mixture through the meat
grinder twice. Exchange the cutting disc
o
for the
Kubbe attachment
f
(see chapter " Assembling the
kubbe attachment").Shape the Kubbe wrappers
with the Kubbe attachment
f
then freeze them.
Filling:
Pass the meat through the meat grinder twice (first
with the coarse and then with the fine cutting discs
o
). Saute the onions and then mix them well with
the meat and other ingredients. Fill the Kubbe wrap-
pers and fry until done.
Alternative Fillings:
250g steamed broccoli
or 250g steamed zucchini
or 250g cooked rice
IB_62025_SFW250A1_LB7 05.11.2010 14:00 Uhr Seite 9

- 10 -
Fresh Grill Sausages
Ingredients:
300g lean Beef
500g lean Pork
200g Shoulder bacon
20g Salt
1/2 Tbsp ground white Pepper
1 Tsp Caraway
1/2 Tsp Nutmeg
Pass the beef, pork and bacon through the meat
grinder twice.
Add the mixed spices and salt and thoroughly
knead for 5 minutes.
Place the sausage filling in the refrigerator for ca.
30 minutes. Fill the skins with sausage meat as de-
tailed (see chapter "Preparing sausage") and make
sausages of ca. 25 cm in length.
Grill the sausages well and eat them on the same
day.
Biscuits
Ingredients:
125g Butter
125g Sugar
1 Packet of Vanilla sugar
1 pinch Salt
1 Egg
1 Egg white
250g Plain flour
1 Tbsp Baking powder
Scraped peel of half a lemon
Beat the butter until foamy. Add the sugar, vanilla
sugar, lemon peel and the eggs. Mix the flour, baking
powder and salt and, with a mixing spoon,stir it into
the mixture.
Allow the pastry to stand for ca. 30 minutes in the
refrigerator. Then pass it through the meat grinder
with the biscuit attachment
q
fitted.
Lay the biscuits on a baking tray lined with baking
paper.
Bake the biscuits in a pre-heated oven at 180°C for
ca.10-15 minutes until golden brown.
IB_62025_SFW250A1_LB7 05.11.2010 14:00 Uhr Seite 10

- 11 -
Sadrˇzaj Strana
1. Uporabna namjena 12
2. Tehnički podaci 12
3. Obim isporuke 12
4. Sigurnosne upute 12
5. Sastavljanje / Rastavljanje 13
a) Sastavljanje stroja za meso . . . . . . . . . . . . . . . . . . . . . . . . . . . . . . . . . . . . . . . . . . . . . . . .13
b) Montiranje nastavka za umetanje kobasica . . . . . . . . . . . . . . . . . . . . . . . . . . . . . . . . . . .14
c) Montiranje Kubbe-nastavka . . . . . . . . . . . . . . . . . . . . . . . . . . . . . . . . . . . . . . . . . . . . . . . .14
d) Montiranje nastavka za brizgano pecivo . . . . . . . . . . . . . . . . . . . . . . . . . . . . . . . . . . . . .14
6. Rukovanje 15
a) Rukovanje sa uređajem . . . . . . . . . . . . . . . . . . . . . . . . . . . . . . . . . . . . . . . . . . . . . . . . . . .15
b) Prerađivanje mesa . . . . . . . . . . . . . . . . . . . . . . . . . . . . . . . . . . . . . . . . . . . . . . . . . . . . . . .16
c) Izrada kobasica . . . . . . . . . . . . . . . . . . . . . . . . . . . . . . . . . . . . . . . . . . . . . . . . . . . . . . . . .16
d) Rad sa Kubbe-nastavkom . . . . . . . . . . . . . . . . . . . . . . . . . . . . . . . . . . . . . . . . . . . . . . . . . .16
e) Izrada brizganog peciva . . . . . . . . . . . . . . . . . . . . . . . . . . . . . . . . . . . . . . . . . . . . . . . . . .16
7. U slučaju greške 17
8. Čišćenje 17
a) Čišćenje bloka motora . . . . . . . . . . . . . . . . . . . . . . . . . . . . . . . . . . . . . . . . . . . . . . . . . . . .17
b) Čišćenje dijelova opreme . . . . . . . . . . . . . . . . . . . . . . . . . . . . . . . . . . . . . . . . . . . . . . . . . .17
9. Čuvanje 18
10. Zbrinjavanje 18
11. Jamstvo i servis 18
12. Uvoznik 19
13. Recepti 19
Kubbe . . . . . . . . . . . . . . . . . . . . . . . . . . . . . . . . . . . . . . . . . . . . . . . . . . . . . . . . . . . . . . . . . . .19
Svježa pečenica . . . . . . . . . . . . . . . . . . . . . . . . . . . . . . . . . . . . . . . . . . . . . . . . . . . . . . . . . . .20
Brizgano pecivo . . . . . . . . . . . . . . . . . . . . . . . . . . . . . . . . . . . . . . . . . . . . . . . . . . . . . . . . . . .20
Upute za rukovanje prije prve upotrebe pažljivo pročitajte i sačuvajte ih za kasnije korištenje. Ukoliko uređaj
dajete trećim osobama, priložite i ove upute.
IB_62025_SFW250A1_LB7 05.11.2010 14:00 Uhr Seite 11

- 12 -
STROJ ZA MLJEVENJE
MESA
1. Uporabna namjena
Ovaj uređaj je predviđen isključivo za prerađivanje
namirnica u količinama uobičajenim za privatna do-
maćinstva:
• Usitnjavanje svježeg mesa,
• Izrada kobasica u prirodnom ili umjetnom crijevu,
• Proizvodnja brizganog peciva
Uređaj nije predviđen za prerađivanje zamrznutih i
tvrdih namirnica, na primjer kostiju ili oraha, kao niti
za pogon u komercijalnim ili industrijskim područjima
2. Tehnički podaci
Napon: 220-240 V /
~
50 Hz
Snaga: 250 W
Zaštitna klasa: II
KB-vrijeme: 15 minuta
KB-vrijeme
KB-vrijeme (vrijeme kratkotrajnog pogona) označava,
koliko dugo uređaj može biti u pogonu, bez da se
motor pregrije i pretrpi oštećenje. Nakon navedenog
KB-vremena uređaj morate isključiti toliko dugo, dok
se motor ne ohladi.
Izjava o sukladnosti za ovaj proizvod dostupna je
na internet stranici www.lidl.hr.
3. Obim isporuke
q
Nastavak za brizgano pecivo sa uzornim trakama
w
Čep
e
Zdjela za punjenje
r
Blok motora
t
Metalni nastavak za usitnjivač mesa
y
Transportni puž
u
Feder
i
Križni nož
o
ploča sa grubim i finim otvorima
a
Prsten za zatvaranje
s
Nastavak čepa za umetanje mase za kobasice
d
Ploča za kobasice
f
Kubbe-nastavak
4. Sigurnosne upute
Da biste izbjegli opasnost po život
uslijed strujnog udara:
• Obratite pažnju na to, da mrežni kabel ne bude
oštećen. Držite ga dalje od vrućih područja i
vodite ga tako, da ne može biti ukliješten.
• Oštećeni mrežni kabel ili mrežni utikač na popra-
vak dajte autoriziranom stručnom osoblju, kako
bi bile izbjegnute moguće opasnosti.
• Uređaj koristite isključivo u suhim prostorijama, a
ne na otvorenom.
• Blok motora nikada ne uronite u vodu ili druge
tekućine! U protivnom postoji opasnost po život
uslijed strujnog udara.
Upozorenje!
Uređaj nikada ne koristite u svrhe druge od onih,
koje su ovdje opisane. Postoji velika opasnost od
nezgode, kada pogrešnim rukovanjem zaštitne
mehanizme uređaja stavite van funkcije!
IB_62025_SFW250A1_LB7 05.11.2010 14:00 Uhr Seite 12

- 13 -
Da biste izbjegli opasnost od
nezgode i ozljeđivanja:
• Nikada ruku ne gurajte u otvore uređaja. Nikada
ne umetnite predmete u otvore – sa izuzetkom
čepa za umetanje namirnica, kao i samih namir-
nica. U protivnom može doći do velike opasnost
od nezgode!
• Izvucite utikač iz utičnice, prije nego što postav-
ljate dijelove opreme ili iste skidate.
• Uređaj nikada ne ostavite bez nadzora, kada je
spreman za pogon. Nakon uporabe ili u pauzama
rada uvijek izvucite utikač iz utičnice, kako biste
spriječili nehotično pokretanje.
• Koristite isključivo originalne dijelove opreme za-
jedno sa ovim uređajem. Dijelovi drugih proiz-
vođača za to možda nisu dovoljno sigurni.
• Ovaj uređaj nije namijenjen da bude korišten od
strane osoba (uključujući djecu) sa ograničenim fizi-
čkim, senzoričnim i mentalnim osobinama
i nedostatkom iskustva ili znanja, osim ako ove
osobe stoje pod nadzorom druge osobe zadu-
žene za njihovu sigurnost, ili ako su od nje primili
upute za ispravno korištenje uređaja.
• Djeca bi trebala biti pod nadzorom, čime treba
biti osigurano da se ne mogu igrati ovim
uređajem.
• Uređaj nikada ne pogonite, kada je prazan.
Uređaj bi mogao biti nepopravljivo oštećen.
5. Sastavljanje / Rastavljanje
Pažnja: Svi dijelovi opreme prevučeni su sa
tankim uljnim filmom, kako bi bili zaštićeni od
korozije. Stoga prije prve uporabe temeljito oč-
istite sve dijelove na način detaljno opisan u
poglavlju „8. Čišćenje“. Nakon toga na sve
metalne dijelove nanesite malo jestivog ulja.
a) Sastavljanje stroja za meso
Isklopite stranicu za rasklapanje - tamo ćete redoslijed
za sastavljanje pronaći u obliku slikovnog prikaza.
• Postavite transportni puž
y
u nastavak za mlje-
venje mesa
t
.
• Nataknite feder
u
na transportni puž
y
.
• Zatim križni nož
i
umetnite tako, da oštra
strana bude okrenuta od federa
u
.
Oprez:
Nož
i
je vrlo oštar! Opasnost od ozljeđivanja!
Pažnja:
Uređaj će biti oštećen, ako križni
i
nož umetnete
obrnuto!
• Odaberite željenu ploču sa otvorima. Ploče sa
otvorima, koje Vam nisu potrebne, možete čuvati
u malom pretincu na uređaju (slika
).
U tu svrhu pritisnite simbol na pokrovu. Pokrov
sada možete otvoriti. Umetnite dvije ploče sa ot-
vorima, koje Vam nisu potrebne.
• Umetnite odabranu ploču sa otvorima
o
tako u
nastavak za mljevenje
t
, da utor na ploči sa
otvorima
o
leži na fiksiranju u nastavku za
mljevenje
t
.
• Kada ste sve ispravno postavili, zavrnite prsten
za zatvaranje
a
rukom.
IB_62025_SFW250A1_LB7 05.11.2010 14:00 Uhr Seite 13

- 14 -
• Gotovo montirani nastavak usitnjivača mesa
t
se preko bajonet-zatvarača spaja sa blokom mo-
tora
r
:
- Utaknite nastavak usitnjivača za meso
t
u
blok motora
r
, tako da strelica na otvoru za
umetanje sa simbolom naliježe na bloku
motora
r
. Tipka za aretiranje će uleći. (Slika
).
- Pritisnite nastavak usitnjivača za meso
t
blago
unutra i pritom okrenite otvor za umetanje na
usitnjivaču
t
u središnji položaj (slika
), tako
da strelica na otvoru za umetanje bude upere-
na u pravcu simbola . Kada nastavak za
mljevenje mesa
t
ulegne, gumb za aretiranje
iskače.
- Na koncu zdjelu za punjenje
e
postavite gore
na otvor za umetanje.
- Za skidanje pritisnite tipku za aretiranje i otvor
za umetanje ponovo okrenite na desnu stranu
(slika
) . Nakon toga možete nastavak
usitnjivača mesa
t
izvući.
b) Montiranje nastavka za umetanje
kobasica
Isklopite stranicu za rasklapanje - tamo ćete redoslijed
za sastavljanje pronaći u obliku slikovnog prikaza.
• Skinite nastavak za mljevenje
t
na način opi-
san pod točkom a).
• Eventualno prisutne nastavke skinite i očistite
nastavak za mljevenje mesa
t
.
Napomena:
Za nastavak za umetanje kobasica
s
križni nož
i
sa federom
u
nije potreban! Oba elementa po po-
trebi izvadite iz nastavka usitnjivača mesa
t
.
• Trljanjem na sve metalne dijelove nanesite jestivo
ulje.
• Izvadite ploču za kobasice
d
iz malog pretinca
(slika
) na gornjoj strani uređaja.
• Ploču za kobasice
d
umetnite tako, da utor na
ploči za kobasice
d
bude pozicioniran na učv-
rščivaču nastavka za mljevenje
t
.
• Nakon toga nastavak za umetanje kobasica
s
pred ploču za kobasice
d
.
• Zavrnite prsten za zatvaranje
a
čvrsto rukom.
• Montirajte nastavak za mljevenje
t
na način
opisan pod točkom a).
c) Montiranje Kubbe-nastavka
Isklopite stranicu za rasklapanje - tamo ćete redoslijed
za sastavljanje pronaći u obliku slikovnog prikaza.
• Skinite nastavak za mljevenje
t
na način opi-
san pod točkom a).
• Eventualno prisutne nastavke skinite i očistite
nastavak za mljevenje mesa
t
.
Napomena:
Za Kubbe-nastavak
f
križni nož
i
sa federom
u
nije potreban! Oba elementa po potrebi izvadite iz
nastavka usitnjivača mesa
t
.
• Trljanjem na sve metalne dijelove nanesite jestivo
ulje.
• Dva plastična dijela Kubbe-nastavka
f
umetnite
na taj način, da utor na Kubbe-nastavku
f
bude
pozicioniran uz učvrščivač u nastavku za mlje-
venje mesa
t
.
• Kada je sve ispravno umetnuto, ponovo zavrnite
prsten za zatvaranje
a
čvrsto rukom.
• Montirajte nastavak za mljevenje
t
na način
opisan pod točkom a).
d) Montiranje nastavka za brizgano
pecivo
Isklopite stranicu za rasklapanje - tamo ćete redoslijed
za sastavljanje pronaći u obliku slikovnog prikaza.
• Skinite nastavak za mljevenje
t
na način opisan
pod točkom a).
• Eventualno prisutne nastavke skinite i očistite
nastavak za mljevenje mesa
t
.
Napomena:
Za nastavak za brizgano pecivo
q
križni nož
i
sa federom
u
nije potreban! Oba elementa po po-
trebi izvadite iz nastavka usitnjivača mesa
t
.
IB_62025_SFW250A1_LB7 05.11.2010 14:00 Uhr Seite 14

- 15 -
• Trljanjem na sve metalne dijelove nanesite jestivo
ulje.
• Povlačenjem skinite traku za oblikovanje sa
prednje
q
strane nastavka za brizgano pecivo
q
.
• Umetnite prvo plastičnu ploču, zatim metalnu
ploču nastavka za brizgano pecivo
q
u nasta-
vak za mljevenje
t
(vidi rasklopnu stranu).
Umetnite nastavak za brizgano pecivo
q
na taj
način, da utor na nastavku za brizgano pecivo
q
leži na učvrščivaču u nastavku za mljevenje
t
.
• Kada ste sve ispravno postavili, zavrnite prsten
za zatvaranje
a
rukom.
• Traku za oblikovanje ponovo umetnite na pred-
njoj strani
q
nastavka za brizgano pecivo
q
.
Obratite pažnju na to, da rukohvat na oglednoj
traci
q
bude usmjeren od uređaja. U protivnom
uzorak, koji se nalazi neposredno na rukohvatu,
ne možete podesiti.
• Montirajte nastavak za mljevenje
t
na način
opisan pod točkom a).
• Za skidanje prvo morate ponovo povlačenjem
q
skinuti traku za oblikovanje, prije nego što
prsten za zatvaranje
a
odvrnete i nastavak za
brizgano pecivo
q
ponovo možete izvaditi.
6. Rukovanje
Pažnja:
Uređajem ne radite duže od 15 minuta u stalnom
pogonu. Nakon toga uređaj ostavite da miruje oko
30 minuta, kako biste izbjegli pregrijavanje.
Pažnja:
Nikada ne pritisnite tipke ON ili REV prilikom prom-
jene smjera kretanja, dok motor uređaja nije u stan-
ju mirovanja. Motor može pretrpjeti oštećenje.
Upozorenje:
Nikada ne otvorite kućište bloka motora
r
– u njemu
se ne nalaze nikakvi elementi za posluživanje. Ukoliko
otvorite kućište, jamstvo prestaje važiti. Pri otvorenom
kućištu postoji opasnost po život uslijed strujnog
udara.
a) Rukovanje sa uređajem
Nakon što ste željene nastavke montirali:
• Uređaj postavite tako, da ima potpuno stabilan
oslonac i nikako (npr. uslijed vibracija ili zaplit-
anja u mrežnom kabelu) ne može pasti sa stola
ili dospjeti u blizinu otvorene vode. Potresi se
prilikom pogona uređaja ne mogu izbjeći.
Upozorenje:
Nikada ne hvatajte priključeni uređaj ili uređaj u po-
gonu, ukoliko on pada ili dospije u vodu - ili u dru-
gim slučajevima opasnosti! U slučaju opasnosti od-
mah izvucite mrežni utikač! U protivnom može doći
do akutne opasnosti od ozljeđivanja, čak i do opas-
nosti po život!
• Namirnice za prerađivanje umetnite u zdjelu za
umetanje
e
i postavite prihvatnu posudu na
prednjoj strani ispod izlaznog otvora.
• Pritisnite prvo tipku OFF, kako biste bili sigurni da
je uređaj još isključen. U protivnom postoji opas-
nost, da se uređaj nehotično uključi kada mrežni
utikač utaknete u mrežnu utičnicu.
• Zatim mrežni utikač utaknite u utičnicu.
• Pritisnite tipku ON, da biste uključili uređaj.
Pažnja:
Namirnice gurajte isključivo pomoću okruglog čepa
w
u otvor za umetanje – nikada sa prstima, vilicama,
žlicama i sličnim predmetima. Postoji velika opasnost
od ozljeđivanja, a i uređaj bi mogao biti oštećen.
Pažnja:
Nikada ne pritisnite toliko čvrsto, da motor čujno
usporava svoj rad. U protivnom uređaj može pretrp-
jeti preopterećenje i biti oštećen.
IB_62025_SFW250A1_LB7 05.11.2010 14:00 Uhr Seite 15

- 16 -
b) Prerađivanje mesa
• Koristite komade mesa, koji bez problema mogu
biti umetane u otvor za umetanje. Ako je potrebno,
prethodno izrežite komade mesa. Obratite pažnju
na to, da se u komadima mesa ne nalaze kosti ili
tetive.
Oprez:
Mljeveno meso vrlo je osjetljivo na klice. Stoga stro-
go pazite na higijenu, kada prerađujete meso.
• Nakon što ste pročitali sve napomene o temi
"Meso", možete početi raditi sa uređajem na na-
čin opisan pod točkom 6.a).
c) Izrada kobasica
• Meso dva puta usitnite pomoću stroja, prije
nego što ga preradite u kobasice.
• Za izradu mesne mase za kobasice mljevenom
mesu dodajte sitno isjeckan luk, začine i ostale
dodatke prema receptu, te dobivenu masu do-
bro promiješajte. Stavite je u hladnjak na 30 mi-
nuta, prije nego što nastavite sa preradom.
• Navucite crijevo za kobasice (prirodno ili umjet-
no) preko nastavka za umetanje kobasica
s
i
čvorom zatvorite drugi kraj. Za svaki kilogram
mase možete kalkulirati približno 1,6 metara
crijeva.
Savjet:
Prirodno crijevo prethodno umetnite u mlaku vodu
na tri sata, te ga prije navlačenja ižmičite. Prirodno
crijevo na taj način ponovo postaje elastično. Pri-
rodno crijevo možete nabaviti u specijaliziranim
trgovinama za mesarstvo u blizini klaonica ili kod
Vašeg mesara.
• Masa za punjenje se kroz nastavak za umetanje
s
utiskuje u crijevo za kobasice. Kada dostigne-
te željenu dužinu, isključite uređaj, pritisnite kraj
kobasice i nekoliko puta ga zavrnite oko
uzdužne osovine.
Savjet:
Kobasica se širi prilikom kuhanja i zamrzavanja.
Prema tome ne prepunite crijevo, jer kobasica u pro-
tivnom može pući.
• Nakon što ste pročitali sve napomene o temi
"Kobasice", možete započeti koristiti uređaj na
način opisan pod točkom 6.a).
d) Rad sa Kubbe-nastavkom
Pomoću Kubbe-nastavka
f
možete od umetnutih
namirnica oblikovati šuplje valjke od mesa ili pov-
rća, koje kasnije po želji možete napuniti.
• Meso prvo dva puta propustite kroz stroj, prije
nego što ga protiskujete kroz Kubbe-nastavak
f
.
• Nakon što ste pročitali sve upute o temi "Kubbe-
nastavak", možete započeti koristiti uređaj na
način opisan pod točkom 6.a).
e) Izrada brizganog peciva
Kada ste pripremili tijesto za brizgano pecivo
u skladu sa receptom, te montirali nastavak za
brizgano pecivo
q
:
• Nakon što ste pročitali sve naputke o temi "Briz-
gano pecivo", možete početi koristiti uređaj na
način opisan pod točkom 6.a).
• Mali lim za pečenje obložite sa papirom za
pečenje i postavite ga ispod izlaznog otvora
na prednjoj strani uređaja.
• Vršite ravnomjerno utiskivanje tijesta u nastavak
za mljevenje
t
– transportni puž
y
će tijesto
zatim protisnuti kroz odabrani motiv na motivnoj
traci nastavka za brizgano pecivo
q
.
• Nakon što je pecivo dostiglo željenu dužinu,
zaustavite uređaj i odlomite tijesto na izlaznom
otvoru. Postavite pecivo na lim za pečenje.
IB_62025_SFW250A1_LB7 05.11.2010 14:00 Uhr Seite 16

- 17 -
7. U slučaju greške
Kada je pogon blokiran uslijed nagomilanih namirnica:
• Pritisnite tipku OFF, da biste zaustavili usitnjivač
mesa.
• Držite tipku REV pritisnutu. Pogon se sada okreće
unazad. Na taj način možete namirnice pomak-
nuti malo unatrag, kako biste ponovo oslobodili
pogon.
• Kada je pogon oslobođen, otpustite tipku REV.
• Pritisnite tipku ON, da biste pokrenuli usitnjivač
za meso.
• Ukoliko ne uspijete osloboditi pogon, očistite
uređaj na način opisan pod točkom „8. Čišćenje“.
Ako se motor odjednom isključi, moguće je da je
iskočio interni osigurač od preopterećenja. Ovaj
osigurač ima zadatak da zaštiti motor.
• Isključite uređaj i ostavite ga da se ohladi približno
30 minuta, prije nego što ga nastavite koristiti.
• Ukoliko na taj način ne postignete rezultat,
pričekajte još dodatnih 15 minuta.
• Ako i ovaj dodatni rok protekne bez rezultata,
onda je vjerojatno u pitanju defekt. U tom slučaju se
obratite servisnoj ispostavi.
Ako je mrežni kabel oštećen, ili su vidljiva oštećenja
dijelova uređaja:
• Uređaj odmah isključite tako, što ćete pritisnuti
tipku OFF!
• Ukoliko to ne možete učiniti bez opasnosti,
izvucite mrežni utikač.
• Oštećenja moraju biti popravljena od strane
servisa, prije nego što nastavite upotrebljavati
uređaj.
8. Čišćenje
Upozorenje:
Prije čišćenja uređaja izvucite mrežni utikač iz utičnice.
Na taj način ćete spriječiti opasnost od nezgode us-
lijed neočekivanog nehotičnog pokretanja uređaja i
strujnog udara.
a) Čišćenje bloka motora
• Očistite sve vanjske površine i mrežni kabel sa
blago navlaženom krpom za suđe. Uređaj dobro
osušite, prije nego što ga ponovo koristite.
Upozorenje:
Blok motora nikada ne uronite u vodu ili druge
tekućine! U protivnom postoji opasnost po život
uslijed strujnog udara, ukoliko tekućina dospije
do električnih provodnika.
• Ne koristite sredstva za čišćenje, ribanje ili sredstva
za otapanje. Ova sredstva mogu oštetiti uređaj
i ostaviti tragove na namirnicama.
b) Čišćenje dijelova opreme
Napomena:
Dijelove opreme ne perite u stroju za posuđe! To
dovodi do oštećenja dijelova opreme!
• Čistite dijelove opreme, koji dolaze u dodir
sa namirnicama, ...
- isključivo rukom, jer dijelovi opreme nisu
prikladni za strojno pranje.
- sa vrućom vodom za pranje i sredstvom za
pranje prikladnim za namirnice.
Oprez:
Križni nož je vrlo oštar! Opasnost od ozljeđivanja!
• Sve dobro osušite, prije nego što nastavite
koristiti uređaj.
IB_62025_SFW250A1_LB7 05.11.2010 14:00 Uhr Seite 17

- 18 -
Napomena:
Nakon svakog čišćenja na metalne dijelove nanesite
jestivo ulje.
9. Čuvanje
• Gurnite mrežni kabel (bez mrežnog utikača)
u kabelski pretinac ispod dna uređaja. Tako
će biti zaštićen od oštećenja.
• Dvije ploče sa otvorima
o
, ukoliko nisu instalirane
u uređaju, čuvajte u malom pretincu (slika
) na
uređaju.
• Uređaj čuvajte na suhom mjestu.
• Na metalne nastavke nakon sušenja nanesite ne-
što jestivog ulja – ukoliko uređaj ne nastavite od-
mah koristitii. Na taj način postići ćete dobru za-
štitu od korozije.
• Uređaj čuvajte tako, da ne bude dostupan djeci
i osobama sa posebnim potrebama. Ove osobe
moguće opasnosti u rukovanju sa električnim
uređajima ne mogu uvijek procijeniti na pravi na-
čin.
10. Zbrinjavanje
Uređaj nikako ne bacajte u obično kućno
smeće. Ovaj proizvod podliježe europ-
skoj smjernici 2002/96/EC.
Uređaj otklonite preko ovlaštenog poduzeća za
otklanjanje otpada ili preko vašeg komunalnog
poduzeća za otklanjanje otpada.
Obratite pažnju na aktualne važeće propise. U
slučaju dvojbe se povežite sa svojim poduzećem za
uklanjanje otpada.
Sve materijale ambalaže zbrinite na način
neškodljiv za okoliš.
11. Jamstvo i servis
Na ovaj uređaj vrijedi jamstvo u trajanju od 3 godi-
ne od datuma kupovine. Uređaj je pažljivo proizve-
den i prije isporuke brižljivo kontroliran. Molimo sa-
čuvajte blagajnički račun kao dokaz o kupnji.
Molimo da se u slučaju ostvarivanja prava na jamst-
vo telefonski povežete sa Vašom servisnom isposta-
vom. Samo na taj način vaša roba može biti be-
splatno uručena.
Jamstvo vrijedi samo za greške materijala i izrade,
a ne za transportne štete, potrošne dijelove ili ošte-
ćenja lomljivih dijelova, na primjer prekidača ili ba-
terija.
Proizvod je namijenjen isključivo za privatnu, a ne
za gospodarstvenu uporabu.
U slučaju nestručnog rukovanja, rukovanja protiv-
nog namjeni uređaja, primjene sile i zahvata, koji
nisu izvršeni od strane našeg ovlaštenog servisnog
predstavništva, važenje jamstva prestaje. Vaša za-
konska prava ovim jamstvom ostaju netaknuta.
Jamstveni rok se ne produžava uslijed ostvarivanja
prava na jamstvo. To vrijedi i za zamijenjene i po-
pravljene dijelove. Eventualno već prilikom kupovi-
ne prisutna oštećenja i nedostaci moraju biti javlje-
na neposredno nakon raspakiranja, ali najkasnije
dva dana nakon datuma kupovine. Popravke vršene
nakon isteka jamstvenog roka podliježu obavezi
plaćanja.
Ovlašteni servis: Microtec sistemi d.o.o.
Tel.: 01/3692-008
email: support.hr@kompernass.com
IB_62025_SFW250A1_LB7 05.11.2010 14:00 Uhr Seite 18
Seite laden ...
Seite laden ...
Seite laden ...
Seite laden ...
Seite laden ...
Seite laden ...
Seite laden ...
Seite laden ...
Seite laden ...
Seite laden ...
Seite laden ...
Seite laden ...
Seite laden ...
Seite laden ...
Seite laden ...
Seite laden ...
Seite laden ...
Seite laden ...
Seite laden ...
Seite laden ...
Seite laden ...
Seite laden ...
Seite laden ...
Seite laden ...
Seite laden ...
Seite laden ...
Seite laden ...
Seite laden ...
Seite laden ...
Seite laden ...
Seite laden ...
Seite laden ...
-
 1
1
-
 2
2
-
 3
3
-
 4
4
-
 5
5
-
 6
6
-
 7
7
-
 8
8
-
 9
9
-
 10
10
-
 11
11
-
 12
12
-
 13
13
-
 14
14
-
 15
15
-
 16
16
-
 17
17
-
 18
18
-
 19
19
-
 20
20
-
 21
21
-
 22
22
-
 23
23
-
 24
24
-
 25
25
-
 26
26
-
 27
27
-
 28
28
-
 29
29
-
 30
30
-
 31
31
-
 32
32
-
 33
33
-
 34
34
-
 35
35
-
 36
36
-
 37
37
-
 38
38
-
 39
39
-
 40
40
-
 41
41
-
 42
42
-
 43
43
-
 44
44
-
 45
45
-
 46
46
-
 47
47
-
 48
48
-
 49
49
-
 50
50
-
 51
51
-
 52
52


Silvercrest SFW 250 A1 Operating Instructions Manual
- Kategorie
- Fleischwolf
- Typ
- Operating Instructions Manual
Verwandte Papiere
-
Silvercrest 86827 Operating Instructions Manual
-
-
-
-
-
-
-
-
Silvercrest SFW 350 D3 Bedienungsanleitung
-
