
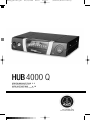
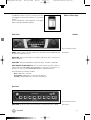
HUB 4000 Q
BEDIENUNGSANLEITUNG . .S. 2
Bitte vor Inbetriebnahme des Gerätes lesen!
USER INSTRUCT I O N S . . . . . . . .p. 10
Please read the manual before using the equipment!
HUB4kQ_F031013_Bil 05/12/2010 08:54 Seite 1 (Schwarz/Black Auszug)

Inhaltsverzeichnis
Seite
1 Sicherheit und Umwelt . . . . . . . . . . . . . . . . . . . . . . . . . . . . . . . . . . . . . . . . . . . .3
Sicherheit . . . . . . . . . . . . . . . . . . . . . . . . . . . . . . . . . . . . . . . . . . . . . . . . . . . . . . .3
Umwelt . . . . . . . . . . . . . . . . . . . . . . . . . . . . . . . . . . . . . . . . . . . . . . . . . . . . . . . .3
2 Beschreibung . . . . . . . . . . . . . . . . . . . . . . . . . . . . . . . . . . . . . . . . . . . . . . . . . . .4
Einleitung . . . . . . . . . . . . . . . . . . . . . . . . . . . . . . . . . . . . . . . . . . . . . . . . . . . . . . .4
Lieferumfang . . . . . . . . . . . . . . . . . . . . . . . . . . . . . . . . . . . . . . . . . . . . . . . . . . . .4
Zubehör . . . . . . . . . . . . . . . . . . . . . . . . . . . . . . . . . . . . . . . . . . . . . . . . . . . . . . . .4
HUB 4000 Q . . . . . . . . . . . . . . . . . . . . . . . . . . . . . . . . . . . . . . . . . . . . . . . . . . . . .4
System Architect™ Software . . . . . . . . . . . . . . . . . . . . . . . . . . . . . . . . . . . . . . . . .4
Wireless iPhone
®
App . . . . . . . . . . . . . . . . . . . . . . . . . . . . . . . . . . . . . . . . . . . . . .5
Bedienelemente . . . . . . . . . . . . . . . . . . . . . . . . . . . . . . . . . . . . . . . . . . . . . . . . . .5
3 Installation . . . . . . . . . . . . . . . . . . . . . . . . . . . . . . . . . . . . . . . . . . . . . . . . . . . . .7
Direkte Verbindung zum PC . . . . . . . . . . . . . . . . . . . . . . . . . . . . . . . . . . . . . . . . . .7
Verbindung zum PC via Switch . . . . . . . . . . . . . . . . . . . . . . . . . . . . . . . . . . . . . . . .7
AKG-Geräte anschließen . . . . . . . . . . . . . . . . . . . . . . . . . . . . . . . . . . . . . . . . . . . .7
Netzanschluss . . . . . . . . . . . . . . . . . . . . . . . . . . . . . . . . . . . . . . . . . . . . . . . . . . .7
Ein- und Ausschalten . . . . . . . . . . . . . . . . . . . . . . . . . . . . . . . . . . . . . . . . . . . . . .7
PC konfigurieren . . . . . . . . . . . . . . . . . . . . . . . . . . . . . . . . . . . . . . . . . . . . . . . . . .8
4 Reinigung . . . . . . . . . . . . . . . . . . . . . . . . . . . . . . . . . . . . . . . . . . . . . . . . . . . . . .8
5 Technische Daten . . . . . . . . . . . . . . . . . . . . . . . . . . . . . . . . . . . . . . . . . . . . . . . .9
2 HUB 4000 Q
HUB4kQ_F031013_Bil 05/12/2010 08:54 Seite 2 (Schwarz/Black Auszug)

1 Sicherheit und Umwelt
1. Schütten Sie keine Flüssigkeiten auf das Gerät und lassen Sie keine sonstigen Gegen-
stände durch die Lüftungsschlitze in das Gerät fallen.
2. Das Gerät darf nur in trockenen Räumen eingesetzt werden.
3. Das Gerät darf nur von autorisiertem Fachpersonal geöffnet, gewartet und repariert
werden. Im Inneren des Gehäuses befinden sich keinerlei Teile, die vom Laien gewartet,
repariert oder ausgetauscht werden können.
4. Prüfen Sie vor Inbetriebnahme des Gerätes, ob die auf dem mitgelieferten Netzgerät
angegebene Betriebsspannung der Netzspannung am Einsatzort entspricht.
5. Betreiben Sie das Gerät ausschließlich mit dem mitgelieferten Netzgerät mit einer Aus-
gangsspannung von 12 V DC.Andere Stromarten und Spannungen könnten das Gerät
ernsthaft beschädigen!
6. Brechen Sie den Betrieb der Anlage sofort ab, wenn ein fester Gegenstand oder Flüs-
sigkeit in das Geräteinnere gelangen sollte. Ziehen Sie in diesem Fall sofort das Net-
zkabel des Netzgeräts aus der Steckdose und lassen Sie das Gerät von unserem
Kundendienst überprüfen.
7. Ziehen Sie das Netzkabel des Netzgeräts bei längerer Nichtverwendung aus der Steck-
dose. Bitte beachten Sie, dass bei angestecktem Netzgerät das Gerät nicht vollständig
vom Netz getrennt wird, wenn Sie es ausschalten.
8. Stellen Sie das Gerät nicht in der Nähe von Wärmequellen wie z. B. Radiatoren,
Heizungsrohren, Verstärkern, usw. auf und setzen Sie es nicht direkter Sonnenein-
strahlung, starker Staub- und Feuchtigkeitseinwirkung, Regen,Vibrationen oder Schlä-
gen aus.
9. Verlegen Sie zur Vermeidung von Störungen bzw. Einstreuungen sämtliche Leitungen,
speziell die der Mikrofoneingänge, getrennt von Starkstromleitungen und Netzleitun-
gen. Bei Verlegung in Schächten oder Kabelkanälen achten Sie darauf, die Übertra-
gungsleitungen in einem separaten Kanal unterzubringen.
10. Reinigen Sie das Gerät nur mit einem feuchten, aber nicht nassen Tuch. Ziehen Sie
unbedingt das Netzkabel des Netzgeräts vorher aus der Steckdose! Verwenden Sie
keinesfalls scharfe oder scheuernde Reinigungsmittel sowie keine, die Alkohol oder Lö-
sungsmittel enthalten, da diese den Lack sowie die Kunststoffteile beschädigen kön-
nten.
11. Verwenden Sie das Gerät nur für die in dieser Bedienungsanleitung beschriebenen
Anwendungen. Für Schäden infolge unsachgemäßer Handhabung oder missbräuch-
licher Verwendung kann AKG keine Haftung übernehmen.
1. Das Netzgerät nimmt auch bei ausgeschaltetem Gerät einen geringen Strom auf. Um
Energie zu sparen, ziehen Sie daher das Netzkabel des Netzgeräts von der Net-
zsteckdose ab, wenn Sie das Gerät längere Zeit nicht benützen.
2. Wenn Sie das Gerät verschrotten, trennen Sie Gehäuse, Elektronik und Kabel und
entsorgen Sie alle Komponenten gemäß den dafür geltenden Entsorgungsvorschriften.
3. Die Verpackung ist recyclierbar. Entsorgen Sie die Verpackung in einem dafür vorge-
sehenen Sammelsystem.
Sicherheit
Umwelt
3HUB 4000 Q
HUB4kQ_F031013_Bil 05/12/2010 08:54 Seite 3 (Schwarz/Black Auszug)

2 Beschreibung
Vielen Dank, dass Sie sich für ein Produkt aus dem Hause AKG entschieden haben. Bitte
lesen Sie die Bedienungsanleitung aufmerksam durch, bevor Sie das Gerät benützen,
und bewahren Sie die Bedienungsanleitung sorgfältig auf, damit Sie jederzeit nachschlagen
können.
Der HUB 4000 Q erlaubt den Anschluss von bis zu acht AKG Geräten wie z.B. DSR 700,
SR 4500/400, SST 4 etc. an ein HiQnet
®
System.
Der HUB 4000 Q wird über Ethernet (10 MBit half duplex) an ein HiQnet
®
Netzwerk ange-
schlossen und ermöglicht dadurch die Kontrolle und Überwachung des AKG Drahtlossys-
tems über die System Architect™ Software oder AKG Wireless iPhone
®
Applikation.
Bei großen Drahtlosanlagen können Sie auch mehrere HUB 4000 Q mittels normaler Ether-
net Switches (oder Router, Wireless HUB, ...) zusammenschalten. Somit können Sie das ge-
samte System von einem PC aus konfigurieren und überwachen.
Der HUB 4000 Q erlaubt Ihnen, das professionelle Funkmikrofon DMS 700 und WMS
4000/4500 sowie das professionelle In Ear Monitoring System IVM 4 in jedes HiQnet
®
Sys-
tem zu integrieren.
Sie können das Gerät entweder freistehend aufstellen oder mit dem mitgelieferten 19"-Mon-
tageset in ein 19"-Rack einbauen*.
Im Zentrum eines HiQnet
®
Netzwerkes steht die Steuersoftware System Architect™ von
Harman Pro. Mit diesem Tool können alle im HiQnet
®
Netzwerk vorhandenen Geräte mittels
eines einzigen, grafischen User-Interfaces konfiguriert und gesteuert werden.
Das von AKG entwickelte User Interface in System Architect™ ermöglicht eine intuitive
Steuerung anhand der kanalzugorientierten Darstellung, sowie eine einfache und komforta-
ble Konfiguration der gesamten Anlage mittels 1 Click Setup, Device Manager, Environment
Scan, RF Monitor, Programmer Guide, Offline Konfiguration u.v.m.
4 HUB 4000 Q
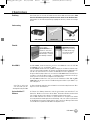
1 HUB 4000 Q 8 Datenkabel 1 Rackmontageset
Einleitung
Lieferumfang
Zubehör
Hub 4000 Q
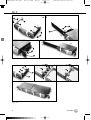
*Siehe Fig. 3.1 und 3.2 auf
Seite 18. Details siehe Be-
dienungsanleitung SR 4500.
System Architect™
Software
AKG Wireless iPhone
App zur Fernsteuerung
von AKG Drahtlossyste-
men mit dem iPhone
®
oder iPod
®
touch.
Steuersoftware
System Architect™ von
Harman Pro, als kostenlo-
ses Download erhältlich auf
www.harmanpro.com/hiqnet
oder www.akg.com/hiqnet.
HUB4kQ_F031013_Bil 05/12/2010 08:54 Seite 4 (Schwarz/Black Auszug)

2 Beschreibung
Mit dem AKG Wireless iPhone
®
App können Sie Ihr AKG
Drahtlossystem mit dem iPhone
®
oder iPod
®
touch mittels
Wi-Fi
®
überprüfen und fernsteuern.
Die Steuerapplikation für das Apple iPhone
®
können Sie
unter http://www.akg.com/hiqnet downloaden.
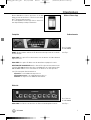
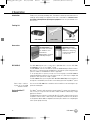
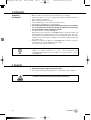
Frontplatte
ON/OFF: Ein/Ausschalttaste mit Kontroll-LED.Wenn das Gerät eingeschaltet ist, leuchtet die
Kontroll-LED grün.
HiQnet LINK: Diese grüne LED leuchtet konstant, wenn das Gerät an ein HiQnet-Netzwerk
angeschlossen ist.
HiQnet DATA: Diese grüne LED blinkt, wenn das Gerät Daten empfängt oder sendet.
DATA TRANSFER TO AKG DEVICE 1-8: Diese blauen LEDs zeigen den Datenaustausch zwi-
schen dem HUB 4000 Q und den angeschlossenen AKG-Geräten an. Jedem Datenanschluss
AKG NETWORK DEVICES 1 bis 8 an der Rückseite des Geräts ist eine LED zugeordnet.
Jede LED zeigt folgende Betriebszustände an:
LED dunkel: es ist kein AKG Gerät angeschlossen.
LED leuchtet konstant: es ist ein AKG Gerät angeschlossen.
LED blinkt: Das angeschlossene AKG Gerät wird lokalisiert.
Rückseite
HiQnet LINK: RJ 45-Buchse zum Anschluss des Ethernet-Verbindungskabels zum PC.
Wireless iPhone
®
App
Bedienelemente
Fig. 1: Frontplatte
des HUB 4000 Q
Siehe Fig. 1.
Fig. 2: Rückseite
des HUB 4000 Q
Siehe Fig. 2.
5
HUB 4000 Q
HUB4kQ_F031013_Bil 05/12/2010 08:54 Seite 5 (Schwarz/Black Auszug)

2 Beschreibung
Siehe Fig. 2 auf Seite 5.
6 HUB 4000 Q
Hinweis
Hinweis
• Das Verbindungskabel ist nicht im Lieferumfang enthalten.
Wenn Sie das Gerät direkt an einen PC anschließen, benötigen Sie ein ausgekreuztes
Netzwerkkabel.
Wenn Sie das Gerät an ein Standard-Ethernet-Hub oder Switch etc. anschließen, be-
nötigen Sie ein nicht ausgekreuztes Netzwerkkabel.
AKG NETWORK DEVICES 1-8: RJ 11-Buchsen zum Anschluss von bis zu 8 AKG-Geräten
(z.B. DSR 700, SR 4500, SST 4 etc.).
12 V/500 mA: Verschraubbare DC-Eingangsbuchse zum Anschluss des optionalen Netzge-
räts (12 V DC, 500 mA).
• Betreiben Sie das Gerät ausschließlich mit einem Netzgerät mit einer Aus-
gangsspannung von 12 V DC, 500 mA. Andere Stromarten und Spannungen
könnten das Gerät ernsthaft beschädigen!
• Weitere Informationen und alle Downloadhinweise für System Architect™, das AKG
Wireless iPhone App sowie Bedienungsanleitungen und FAQs finden Sie unter
http://www.akg.com/hiqnet.
AACCHHTTUUNNGG
HUB4kQ_F031013_Bil 05/12/2010 08:54 Seite 6 (Schwarz/Black Auszug)

3 Installation
• Bevor Sie das Gerät in Betrieb nehmen, kontrollieren Sie, ob die an Ihrem Netzge-
rät angegebene Netzspannung mit der Netzspannung am Einsatzort überein-
stimmt. Der Betrieb des Netzgeräts an einer anderen Netzspannung kann zu
Schäden am Gerät führen.
• Das Gerät funktioniert nur mit 10 MBit Netzwerkanschlüssen. Bitte überprüfen Sie, ob
der angeschlossene Computer oder Netzwerk-Switch bzw. Router 10 MBit halfduplex
unterstützt.
1. Wenn Sie das Gerät direkt mit einem PC verbinden wollen, benötigen Sie ein ausge-
kreuztes Netz werkkabel.
2. Verbinden Sie die HiQnet LINK-Buchse am HUB 4000 Q mit dem Netzwerkeingang am
PC oder an der Netzwerkkarte. (Näheres dazu entnehmen Sie bitte dem Handbuch des
PCs.)
Ein HUB 4000 Q erlaubt Ihnen, bis zu 8 AKG-Geräte von einem PC aus zu steuern. Mittels
eines oder mehrerer handelsüblicher Switches/Router können Sie mehrere HUB 4000 Q
kaskadieren und ebenfalls vom PC aus steuern.
• Der HUB 4000 Q versucht beim ersten Start eine IP Adresse mittels DHCP (Dynamic
Host Configuration Protocol) zu erhalten. Wir empfehlen, in Ihrem HiQnet
®
System
einen Netzwerkrouter mit DHCP Server zu installieren. Dies Erleichtert die Installation,
da alle IP Adressen im Netzwerk automatisch vom DHCP Server vergeben werden.
1. Verbinden Sie den Switch/Router entsprechend den Anweisungen im Handbuch des
Switches/Routers und/oder PCs mit dem PC.
2. Stecken Sie an die HiQnet LINK-Buchse jedes HUB 4000 Q ein nicht ausgekreuztes
Netzwerkkabel an.
3. Stecken Sie das andere Ende jedes Netzwerkkabels an einen Ausgang des Swit-
ches/Routers an.
1. Verwenden Sie ausschließlich die mitgelieferten Datenkabel mit RJ 11-Steckern.
2. Verbinden Sie die Datenbuchse an jedem AKG-Gerät mit einer der AKG NETWORK DE-
VICES-Buchsen 1 bis 8 am HUB 4000 Q.
1. Kontrollieren Sie, ob die an Ihrem Netzgerät angegebene Netzspannung mit der
Netzspannung am Einsatzort übereinstimmt. Der Betrieb des Netzgeräts an einer
anderen Netzspannung kann zu irreparablen Schäden am Gerät führen.
2. Stecken Sie das Versorgungskabel Ihres Netzgeräts an die 12 V 500 mA-Buchse an der
Rückseite des HUB 4000 Q an und schrauben sie den Stecker fest.
3. Stecken Sie das Netzkabel des Netzgeräts an eine geeignete Netzsteckdose an.
1. Drücken Sie die ON/OFF-Taste, um das Gerät einzuschalten.
Die Kontroll-LED neben der ON/OFF-Taste leuchtet auf, die blauen DATA TRANSFER TO
AKG DEVICE-LEDs leuchten von innen nach außen auf und erlöschen. Damit ist das
Gerät initialisiert und betriebsbereit.
2. Zum Ausschalten drücken Sie nochmals die ON/OFF-Taste.
Direkte Verbindung
zum PC
Verbindung zum PC
via Switch
AKG-Geräte anschließen
Netzanschluss
Ein- und Ausschalten
7HUB 4000 Q
AACCHHTTUUNNGG
Hinweis
Hinweis
HUB4kQ_F031013_Bil 05/12/2010 08:54 Seite 7 (Schwarz/Black Auszug)

3 Installation
1. Stellen Sie sicher, dass Ihr PC mit einer funktionierenden Netzwerkkarte ausgerüstet ist.
2. Installieren Sie System Architect™ auf Ihrem PC. Eine Installationsanleitung ist im
Download enthalten.
3. Stellen Sie sämtliche Daten- und Netzwerkverbindungen her.
4. Verbinden Sie sämtliche an Ihr Netz angeschlossenen AKG-Geräte mit dem Stromnetz.
5. Schalten Sie sämtliche an Ihr Netz angeschlossenen AKG-Geräte ein.
6. Schalten Sie sämtliche auf Ihrem PC installierten Firewalls und/oder Proxies aus.
Dies ist ungedingt notwendig, da diese Programme den Datenaustausch inner-
halb des HiQnet-Neztwerks behindern können.
7. Starten Sie System Architect™ und den HUB 4000 Q.
Der HUB 4000 Q versucht beim ersten Start, eine IP Adresse mittels DHCP (Dynamic Host
Configuration Protocol) zu erhalten. Dies kann einige Minuten dauern. Wir empfehlen, in
Ihrem HiQnet
®
System einen Netzwerkrouter mit DHCP Server zu installieren. Dies Er-
leichtert die Installation, da alle IP Adressen im Netzwerk automatisch vom DHCP Ser-
ver vergeben werden.
8. Nach der Zuweisung einer IP Adresse ist der HUB 4000 Q als Symbol im System Archi-
tect™ oder im AKG WIreless iPhone
®
App sichtbar.
Nun können Sie das AKG Drahtlossystem fernsteuern.
• Weiterführende Hilfe von AKG: Bitte lesen Sie auch den beigelegten Quick Start Guide
und das Manual in System Architect™ durch. Weitere Informationen finden Sie online
unter "Frequently Asked Questions" auf http://www.akg.com/hiqnet. Für persönliche
Unterstützung können Sie sich auch an [email protected] wenden.
1. Ziehen Sie den Netzstecker aus der Steckdose.
2. Reinigen Sie die Oberflächen des Gerätes mit einem mit Wasser befeuchteten, aber
nicht nassen Tuch.
• Verwenden Sie keinesfalls scharfe oder scheuernde Reinigungsmittel sowie
keine, die Al kohol oder Lösungsmittel enthalten, da diese den Lack sowie die
Kunststoffteile beschädigen könnten.
PC konfigurieren
8 HUB 4000 Q
AACCHHTTUUNNGG
4 Reinigung
Hinweis
HUB4kQ_F031013_Bil 05/12/2010 08:54 Seite 8 (Schwarz/Black Auszug)

5 Technische Daten
Stromversorgung 12 V DC ±2 V
Stromverbrauch max. 200 mA
Umgebungstemperatur -10°C bis 60°C
Anschlussbuchsen für AKG-Geräte RJ11
Anschlussbuchse für Netzwerkkarte RJ45
Abmessungen 200 x 190 x 44 mm
Gewicht ca. 970g
Dieses Produkt entspricht den in der Konformitätserklärung angegebenen Normen. Sie können die Konformitätserklärung
auf http://www.akg.com oder per E-Mail an [email protected] anfordern.
9
HUB 4000 Q
HUB4kQ_F031013_Bil 05/12/2010 08:54 Seite 9 (Schwarz/Black Auszug)

Table of Contents
Page
1 Safety and Environment.....................................................................................11
Safety .................................................................................................................11
Environment ........................................................................................................11
2 Description ........................................................................................................12
Introduction .........................................................................................................12
Packing List.........................................................................................................12
Accessories.........................................................................................................12
HUB 4000 Q ........................................................................................................12
System Arrchitect Software ...................................................................................12
Wireless iPhone
®
App...........................................................................................13
Controls ..............................................................................................................13
3 Installation.........................................................................................................15
Connecting Directly to the Computer......................................................................15
Connecting to the Computer via a Switch................................................................15
Connecting AKG Devices.......................................................................................15
Connecting to Power ............................................................................................15
Powering Up/Down...............................................................................................15
Configuring the Computer.....................................................................................16
4 Cleaning.............................................................................................................16
5 Specifications....................................................................................................17
10 HUB 4000 Q
HUB4kQ_F031013_Bil 05/12/2010 08:54 Seite 10 (Schwarz/Black Auszug)

1. Do not spill any liquids on the equipment and do not drop any objects through the ven-
tilation slots in the equipment.
2. The equipment may be used in dry rooms only.
3. The equipment may be opened, serviced, and repaired by authorized personnel only.
The equipment contains no user-serviceable parts.
4. Before connecting the equipment to power, check that the AC mains voltage stated on
the supplied power supply is identical to the AC mains voltage available where you will
use the equipment.
5. Operate the equipment with the included power supply with an output voltage of 12 VDC
only. Using adapters with an AC output and/or a different output voltage may cause se-
rious damage to the unit.
6. If any solid object or liquid penetrates into the equipment, shut down the sound system
immediately. Disconnect the power supply from the power outlet immediately and have
the equipment checked by AKG service personnel.
7. If you will not use the equipment for a long period of time, disconnect the power supply
from the power outlet. Please note that the equipment will not be fully isolated from
power when you set the power switch to OFF.
8. Do not place the equipment near heat sources such as radiators, heating ducts, or am-
plifiers, etc. and do not expose it to direct sunlight, excessive dust, moisture, rain, me-
chanical vibrations, or shock.
9. To avoid hum or interference, route all audio lines, particularly those connected to the
microphone inputs, away from power lines of any type. If you use cable ducts, be sure
to use separate ducts for the audio lines.
10. Clean the equipment with a moistened (not wet) cloth only. Be sure to disconnect the
power supply from the power outlet before cleaning the equipment! Never use caustic
or scouring cleaners or cleaning agents containing alcohol or solvents since these may
damage the enamel and plastic parts.
11. Use the equipment for the applications described in this manual only. AKG cannot ac-
cept any liability for damages resulting from improper handling or misuse.
1. The power supply will draw a small amount of current even when the equipment is
switched off. To save energy, disconnect the power supply from the power outlet if you
will leave the equipment unused for a long period of time.
2. When scrapping the equipment, separate the case, circuit boards, and cables, and dis-
pose of all components in accordance with local waste disposal rules.
3. The packaging of the equipment is recyclabe. To dispose of the packaging, make sure
to use a collection/recycling system provided for that purpose and observe local legis-
lation relating to waste disposal and recycling.
Safety
Environment
11HUB 4000 Q
HUB4kQ_F031013_Bil 05/12/2010 08:54 Seite 11 (Schwarz/Black Auszug)

2 Description
Thank you for purchasing an AKG product. This Manual contains important instructions for
setting up and operating your equipment. Please take a few minutes to read the instruc-
tions below carefully before operating the equipment. Please keep the Manual for fu-
ture reference.
The HUB 4000 Q allows you to connect up to eight AKG devices such as DSR 700s,
SR 4500/400s, SST 4s, etc. to a HiQnet
®
system.
The HUB 4000 Q connects to the HiQnet
®
system via 10-MBit half duplex Ethernet and en-
ables you to to control and monitor an AKG wireless microphone system using System Ar-
chitect™ software or the AKG Wireless iPhone
®
application.
To set up large wireless systems, you may even connect together several HUB 4000 Qs
using standard Ethernet switches (or routes, wireless hubs, etc.). This lets you configure and
monitor the entire system from a single computer.
The HUB 4000 Q allows you to integrate DMS 700, WMS 4000/4500 professional wireless
microphones, and an IVM 4 professional in-ear monitoring system into any HiQnet
®
system.
You can use the HUB 4000 Q as a standalone unit or install it in a 19" rack using the sup-
plied rack mounting kit.*
The HiQnet
®
network is built around the System Architect™ software from Harman Pro.
This tool lets you set up and control all devices within a HiQnet
®
network using a single
graphic user interface.
The AKG designed user interface in System Architect™ provides channel-oriented screens
for intuitive control as well as 1 Click Setup, Device Manager, Environment Scan, RF Moni-
tor, Programmer Guide, Offline Configuration, and many other functions for configuring the
entire system quickly and easily.
1 HUB 4000 Q 8 data cables 1 rack mounting kit
Introduction
Packing List
Accessories
HUB 4000 Q
*Refer to figs. 3.1 and 3.2
on page 18. See SR 4500
manual for details.
System Architect™
Software
12 HUB 4000 Q
AKG Wireless iPhone
App for remote controlling
AKG wireless microphone
systems from an iPhone
®
or iPod
®
touch.
System Architect™ con-
trol software from Harman
Pro, available as a free
download from
www.harmanpro.com/hiqnet
or www.akg.com/hiqnet.
HUB4kQ_F031013_Bil 05/12/2010 08:54 Seite 12 (Schwarz/Black Auszug)

The AKG Wireless iPhone
®
app lets you monitor and control
your AKG wireless system from an iPhone
®
or iPod
®
touch
via Wi-Fi
®
.
You can download the control application for the Apple
iPhone
®
from http://www.akg.com/hiqnet.
Front Panel
ON/OFF: Switches power to the unit on and off. The status LED next to the ON/OFF key will
be lit green to indicate power is on.
HiQnet LINK: This green LED will be lit constantly to indicate the unit is connected to a
HiQnet™ network.
HiQnet DATA: This green LED will flash to indicate the unit is receiving or sending data.
DATA TRANSFER TO AKG DEVICE 1-8: These blue LEDs indicate the status of data ex-
change between the HUB 4000 Q and the AKG devices connected to it. Each LED is as-
signed to one of the rear panel AKG NETWORK DEVICES 1 through 8 data ports.
Each LED indicates the following conditions:
Dark: no AKG device connected.
Lit constantly: an AKG device is connected to the data port.
Flashing: locating the AKG device connected to the data port.
Rear Panel
HiQnet LINK: This RJ 45 socket accepts the Ethernet connecting cable to the computer.
Wireless iPhone
®
App
Controls
Fig. 1: Front panel controls.
Refer to fig. 1.
Fig. 2: Rear panel controls.
Refer to fig. 2.
13
HUB 4000 Q
HUB4kQ_F031013_Bil 05/12/2010 08:54 Seite 13 (Schwarz/Black Auszug)

2 Description
Refer to fig. 2 on page 13.
14 HUB 4000 Q
• The connecting cable is not supplied with the equipment.
To connect the equipment directly to a computer, use a crossover Ethernet cable.
To connect the equipment to a standard Ethernet hub, use a standard Ethernet cable.
AKG NETWORK DEVICES 1-8: RJ 11 sockets for connecting up to eight AKG devices (e.g.,
DSR 700s, SR 4500s, SSTS 4, etc.).
12 V/500 mA: Locking DC input for connecting a 12 VDC, 500 mA power supply.
• Operate the equipment with a power supply with an output voltage of 12 VDC,
500 mA only. Using a power supply with an AC output and/or a different output
voltage may cause serious damage to the unit.
• For more information, download instructions for System Architect™ and the AKG Wire-
less iPhone
®
app, as well as manuals and FAQs visit http://www.akg.com/hiqnet.
Note
Note
CCAAUUTTIIOONN
HUB4kQ_F031013_Bil 05/12/2010 08:54 Seite 14 (Schwarz/Black Auszug)

3 Installation
• Prior to setting up the unit, check that the AC mains voltage stated on your
power supply is identical to the AC mains voltage available where you will use
your system. Using the power supply with a different AC voltage may cause
damage to the unit.
• The HUB 4000 Q will operate with 10 MBit network ports only. Please check that the
computer or network switch or router supports 10 MBit half duplex operation.
1. Use a crossover Ethernet cable to connect the HUB 4000 Q to a computer.
2. Connect the HiQnet LINK socket on the HUB 4000 Q to a network input on the computer
or network card. (For details refer to the manual of your computer.)
A single HUB 4000 Q allows you to control up to eight AKG devices from a computer. You can
use one or more commercial switches/routers to daisy-chain several HUB 4000 Qs and con-
trol the entire setup from the computer.
• On powering up for the first time, the HUB 4000 Q will try to obtain an IP address
using DHCP (Dynamic Host Configuration Protocol). We recommend installing a net-
work router with DHCP server in your HiQnet® system. This makes installation easier
as all IP addresses within the network will be assigned automatically by the DHCP
server.
1. Connect the switch/router to the computer referring to the manual(s) of the switch/router
and/or computer.
2. Plug a standard Ethernet cable into the HiQnet LINK socket of each HUB 4000 Q.
3. Plug the other end of each network cable to an unused output on (one of) your
switch/router.
1. Be sure not to use any cables other than the supplied data cables with RJ 11 connec-
tors.
2. Connect the data port on each AKG device to one of the AKG NETWORK DEVICES sock-
ets nos. 1 to 8 on the HUB 4000 Q rear panel.
1. Check that the AC mains voltage stated on the included power supply is identi-
cal to the AC mains voltage available where you will use your system. Using the
power supply with a different AC voltage may cause damage to the unit.
2. Plug the DC cable on the included power supply into the 12 V/500 mA socket on the HUB
4000 Q rear panel and screw down the DC connector.
3. Plug the power cable on the power supply into a convenient power outlet.
1. To switch power to the unit on, press the ON/OFF key.
The status LED next to the ON/OFF key will be lit, the blue DATA TRANSFER TO AKG
DEVICE LEDs will illuminate starting from the center and extinguish to indicate the unit
is initialized and ready to operate.
2. To switch power to the unit off, press the ON/OFF key again.
Connecting Directly
to the Computer
Connecting to the
Computer via a Switch
Connecting AKG Devices
Connecting to Power
Powering Up/Down
15HUB 4000 Q
CCAAUUTTIIOONN
Note
Note
HUB4kQ_F031013_Bil 05/12/2010 08:54 Seite 15 (Schwarz/Black Auszug)

3 Installation
Configuring
the Computer
16 HUB 4000 Q
1. Make sure that a functioning network card is installed in your computer.
2. Install System Architect™ on your computer by following the installation instructions
that come with in the download.
3. Make all data and network connections.
4. Connect all AKG devices connected to your network to power.
5. Switch power to all AKG devices on your network on.
6. Turn off all firewall and/or proxy software that may be running on your computer.
This is absolutely necessary because this type of software may interfere with
data communications within the HiQnet™ network.
7. Start System Architect™ and the HUB 4000 Q.
On powering up for the first time, the HUB 4000 Q will try to obtain an IP address via
DHCP (Dynamic Host Configuration Protocol). This may take a few minutes. We recom-
mend installing a network router with DHCP server in your HiQnet® system. This makes
installation easier as all IP addresses within the network will be assigned automatically
by the DHCP server.
8. Having been assigned an IP address, the HUB 4000 Q will be shown as a symbol in
System Architect™ or in the AKG Wireless iPhone® app.
The system is now ready for remote control.
• Additional support from AKG: Please read also the included Quick Start Guide and the
Manual in System Architect™. For more online information visit
http://www.akg.com/hiqnet and click "FAQs". For personal advice, contact
1. Disconnect the power supply from the power outlet.
2. Use a cloth moistened (not wet!) with water to clean the surfaces of the equipment.
• Never use caustic or scouring cleaners or cleaning agents containing alcohol
or solvents since these may damage the enamel or plastic parts.
Note
4 Cleaning
CCAAUUTTIIOONN
HUB4kQ_F031013_Bil 05/12/2010 08:54 Seite 16 (Schwarz/Black Auszug)

5 Specifications
Power supply 12 VDC ±2 V
Current consumption 200 mA max.
Ambient temperature -10°C to +60°C
Connectors for AKG devices RJ11
Connector for network card RJ45
Size 200 x 190 x 44 mm (7.8 x 7.5 x 1.7 in.)
Weight approx. 970g (2.2 lbs.)
This product conforms to the standards listed in the Declaration of Conformity.
To order a free copy of the Declaration of Conformity, visit http://www.akg.com or contact
17
HUB 4000 Q
HUB4kQ_F031013_Bil 05/12/2010 08:54 Seite 17 (Schwarz/Black Auszug)

Fig. 3
18 HUB 4000 Q
A
BC
Fig. 3.1
AC
B
D
Fig. 3.2
D
HUB4kQ_F031013_Bil 05/12/2010 08:54 Seite 18 (Schwarz/Black Auszug)

Notizen | Notes
19HUB 4000 Q
HUB4kQ_F031013_Bil 05/12/2010 08:54 Seite 19 (Schwarz/Black Auszug)

Microphones · Headphones · Wireless Microphones · Wireless Headphones · Headsets · Electroacoustical Components
Mikrofone · Kopfhörer · Drahtlosmikrofone · Drahtloskopfhörer · Kopfsprechgarnituren · Akustische Komponenten
M
icrophones · Casques HiFi · Microphones sans fil · Casques sans fil · Micros-casques · Composants acoustiques
Micrófonos · Auriculares · Micrófonos inalámbricos · Auriculares inalámbricos · Auriculares con micrófono · Componentes acústicos
Technische Änderungen vorbehalten. Specifications subject to change without notice. Ces caractéristiques sont susceptibles de modifications.
Ci riserviamo il diritto di effettuare modifiche tecniche. Nos reservamos el derecho de introducir modificaciones técnicas.
Especificações sujeitas a mudanças sem aviso prévio.
AKG Acoustics GmbH
Lemböckgasse 21–25, A-1230 Vienna/AUSTRIA, phone: (+43-1) 86654-0*
e-mail: [email protected]
For other products and distributors worldwide visit www.akg.com
Printed in Hungary. 05/10/9100U11850
HUB4kQ_F031013_Bil 05/12/2010 08:54 Seite 20 (Schwarz/Black Auszug)
-
 1
1
-
 2
2
-
 3
3
-
 4
4
-
 5
5
-
 6
6
-
 7
7
-
 8
8
-
 9
9
-
 10
10
-
 11
11
-
 12
12
-
 13
13
-
 14
14
-
 15
15
-
 16
16
-
 17
17
-
 18
18
-
 19
19
-
 20
20


AKG HUB4000 Q Benutzerhandbuch
- Typ
- Benutzerhandbuch
- Dieses Handbuch eignet sich auch für
in anderen Sprachen
- English: AKG HUB4000 Q User manual