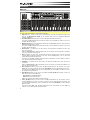
M-Audio Code 49 Benutzerhandbuch
- Kategorie
- Musikinstrumente
- Typ
- Benutzerhandbuch


3
Quickstart Guide (English)
Introduction
Box Contents
Code 49 Quickstart Guide
USB Cable Safety & Warranty Manual
Software Download Cards
Important: Visit m-audio.com to download the complete User Guide and Code Preset Editor.
The Preset Editor gives you a visual and intuitive way to edit the various messages that Code's
controls send to your computer without having to use the hardware interface.
Support
For the latest information about this product (system requirements, compatibility information,
etc.) and product registration, visit m-audio.com.
For additional product support, visit m-audio.com/support.
Quick Start
Software: We've included Pro Tools | First M-Audio Edition and Ableton Live Lite with your
Code 49 so you can get started making music with professional software right out of the box.
For Pro Tools | First M-Audio Edition, register your Code 49 on m-audio.com, and follow the
install instructions in your User Account. For installing Ableton Live Lite, follow the instructions
on the included Ableton Live Lite software download card. Also, visit ableton.com to check
for any available software updates.
Virtual Instruments: Follow the instructions on the software download card for installing the
included virtual instrument plugins. After installation, most DAWs will not load virtual
instrument plugins automatically. In order to access the virtual instrument plugins with Pro
Tools | First M-Audio Edition and Ableton Live Lite, you will need to choose the plugin folder
for the software to scan:
Pro Tools | First M-Audio Edition (AAX) plugin folders:
Windows (32-bit): C:\Program Files (x86)\Common Files\Avid\Audio\Plug-Ins
Windows (64-bit): C:\Program Files\Common Files\Avid\Audio\Plug-Ins
macOS: Macintosh HD/Library/Application Support/Avid/Audio/Plug-Ins
Ableton (VST) Plugins:
Windows (32-bit): C:\Program Files (x86)\VSTplugins
Windows (64-bit): C:\Program Files\VSTplugins
macOS: Macintosh HD\Library\Audio\Plugins\VST
To set your plugin folder in Ableton Live Lite:
1. Go to the Preferences menu.
2. Select the File Folder tab. Under Plug-In Sources click Browse and select the
appropriate plugin folder.
3. After making your selection, the Use VST Custom Plug-In Folder button should
be ON. If it is not, click the button to turn it on.
4. Exit the Preferences menu.

4
Pro Tools | First M-Audio Edition Setup
1. Connect Code 49 to an available USB port on your computer using the supplied USB
cable, and launch Pro Tools | First M-Audio Edition.
2. Open or Create a Project.
3. Select the Setup pulldown menu and open MIDI Input Devices. Enable MIDI Input from
the Code 49 by clicking the box next to Code 49.
4. Select the Setup pulldown menu and open Playback Engine. Choose your audio device
from the Playback Engine pulldown menu.
5. To create a new Instrument track, select the Track pulldown menu and select New.
6. In the New pulldown menu, select Stereo, and then Instrument Track.
7. In the newly created track, add an Insert to your track by clicking in your track's Inserts
A-E and selecting Multichannel Plugin > Instrument and select the instrument you
would like to use, such as Xpand!2 (Stereo). The plugin can now be triggered with your
Code 49.
Note: Windows users will need either an external soundcard (such as the M-Track 2X2) or a
low-latency ASIO driver.
Ableton Live Lite Setup
1. Connect Code 49 to an available USB port on your computer using the supplied USB
cable, and launch Ableton Live Lite.
2. Next, open the Ableton Live Lite Preferences window. Choose your Audio Device in
the Audio tab. This will be dependent upon the audio interface that you are using.
Windows: Select Options > Preferences
macOS: Select Live > Preferences
3. Select the MIDI / Sync tab. Within the MIDI Ports section, adjust the settings as seen
below:
Next to Input: Code 49, toggle the On button in the Track and Remote columns.
Next to Output: Code 49, toggle the On button in the Track and Remote columns.
4. Close the Preferences window.
5. To add an instrument or plugin to Ableton Live Lite in order to generate sound, in the
Categories column, choose Instruments or Plug-Ins.
6. In the Name column, just to the right of the Categories column, locate the Instrument or
Plug-in of your choice. Click-and-drag the instrument to a MIDI track in Ableton Live Lite
to load the instrument. The Instrument can now be triggered with your Code 49.

5
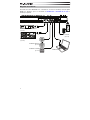
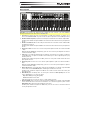
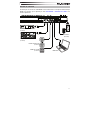
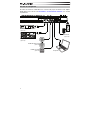
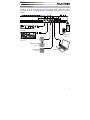
Connection Diagram
Remember to select Code 49 as the controller in the Preferences, Device Setup, or Options
of your digital audio workstation (DAW).
Items not listed in Introduction > Box Contents are sold separately.
MIDI
PIANO
ORGAN
GUITAR/BASS
BRASS/ORCH
SYNTH/PAD
RHYTHM
SPECIAL FX
PATCH
PERFORM
RHYTHM
GM
External MIDI Sound Module
(optional)
Sustain Pedal
(optional)
Computer
Power
(optional)
Expression Pedal
(optional)
External MIDI Sequencer
(optional)

6
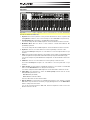
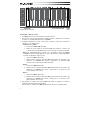
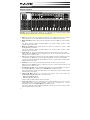
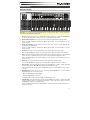
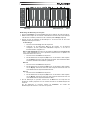
Features
Top Panel
2224
23
24
23
1
23
4
7
9
7
9
7
9
7
9
7
9
7
9
7
9
7
9
7
8
910
11
12
12
12
12
13
12
12
12
12
6
15
16 17 18 19
20
14
21
5
Important: For a more complete explanation of these controls and how to use them, download the
Code 49 User Guide at m-audio.com.
1. Keyboard: This 49-note keyboard is velocity-sensitive with aftertouch and, in conjunction with
the Key Octave –/+ buttons, can access the full range of 127 available MIDI notes (10 octaves).
2. Pitch-Bend Wheel: Move this wheel to send MIDI pitch bend information.
You can also change this wheel’s MIDI assignment. See the User Guide to learn how to do this.
3. Modulation Wheel: Move this wheel to send continuous controller data—MIDI CC #01
(modulation), by default.
You can also change this wheel’s MIDI assignment. See the User Guide to learn how to do this.
4. Key Octave –/+: Press one of these buttons to move the keyboard up or down an octave.
Press and hold Transpose and press one of the buttons to move the keyboard down or up a
semitone.
5. Pads: Use these pads to trigger drum hits or other samples in your software or external MIDI sound
module. The pads are velocity-sensitive, which makes them very responsive and intuitive to play.
You can also change these pads’ MIDI and Color assignments. See the User Guide to learn how to
do this.
6. Pad Octave –/+: Press one of these buttons to move the pads up or down an octave.
Press and hold Transpose and press one of the buttons to move the pads down or up a
semitone.
7. Faders (F1–F9): Use these faders to send MIDI CC messages to your software or external MIDI
device. Use the Fader Mode button to change their current mode.
You can also change these faders’ MIDI assignments. See the User Guide to learn how to do this.
8. Fader Mode: Press this button to switch the Faders (F1–F9) between their two modes,
distinguishable by this button’s color:
Red: MIDI Mode (the default)
Green: Mackie Control
®
/HUI
®
Mode.
Learn more about these modes in the User Guide.
9. Buttons (B1–B9): Use these buttons to send MIDI CC messages to your software or external
MIDI device. They can function as momentary or toggle (latching) buttons. Use the Button Mode
button to change their current mode.
You can also change these buttons’ MIDI, HID, and Color assignments. Please see the User
Guide to learn how to do this.

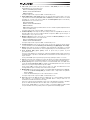
7
10. Button Mode: Press this button to cycle the Buttons (B1–B9) through their three modes,
distinguishable by this button’s color:
Red: MIDI Mode (the default)
Green: Mackie Control/HUI Mode
Yellow: HID Mode
Learn more about these modes in the User Guide.
11. Bank Right/Left: Press one of these buttons to move to the next or previous bank of assignable
controls (Faders, Buttons, and Encoders). This will affect only the assignable controls that are
in the same mode as the Bank Right/Left buttons, distinguishable by this button’s color:
Red: MIDI Mode
Green: Mackie Control/HUI Mode
Yellow: HID Mode
White: Global (the default; this affects all assignable controls regardless of their current modes)
Learn more about these modes in the User Guide.
12. Encoders (E1–E8): Use these 360º knobs to send MIDI CC messages to your software or
external MIDI device. You can also change these encoders’ MIDI assignments. Please see the
User Guide to learn how to do this.
13. Encoder Mode: Press this button to switch the Encoders (E1–E8) between their two modes,
distinguishable by this button’s color:
Red: MIDI Mode (the default)
Green: Mackie Control/HUI Mode
Learn more about these modes in the User Guide.
14. Transport Controls: These six buttons are dedicated buttons for sending conventional Mackie
Control/HUI transport control commands: Rewind (), Fast-Forward (), Stop (), Play (),
and Record ().
15. Display: Use this screen to view parameter values, settings, and messages relevant to Code 49’s
current operation. The various messages shown here are described throughout the User Guide.
16. Preset Down/Up (): Use these buttons to move to the previous or next preset.
You can also use these buttons to cycle through the editable parameters shown in the display,
set the global MIDI channel, or set the MIDI channel of a zone of the keyboard. See the User
Guide to learn how to do this.
Press and hold Shift and press these buttons to move to the previous or next program.
17. Shift: Press and hold this button to access the secondary functions of certain buttons and keys.
Press this button in Zone Edit Mode to access additional zone editing functions.
18. Channel: Press this button to enter or exit Channel Mode. In Channel Mode, use the Preset
Down/Up () buttons to change Code 49’s global MIDI channel. See the User Guide to learn
more about this mode.
Press and hold Shift and press this button to send a MIDI Snap Shot. This sends the assigned
MIDI message and current position/value of all controls.
19. Edit: Press this button to enter or exit Edit Mode. In Edit Mode:
• Use the Preset Down/Up () buttons to change the value or setting of the parameter
shown in the display.
• Use the keyboard’s keys to access additional functions or commands.
Learn more about this mode in the User Guide.
20. Zone, 1–4: Press the Zone button to enter Zone Mode, which lets you use 4 different
overlapping or non-overlapping ranges of keys on different MIDI channels. This is useful for
sending notes to 4 external synthesizers from the same keyboard, for example.
Press any of the 1–4 buttons (when the Zone Button is active/lit) to activate or deactivate those
zones of the keyboard. When a zone is active, its corresponding button will be lit.
Press and hold the Zone Button for 1 second to enter or exit Zone Edit Mode. You can press
any of the flashing 1–4 buttons to edit that zone.

8
21. Transpose: Press and hold this button and press one of the Pad Octave –/+ or Key Octave –/+
buttons to move the pads or keys (respectively) down or up a semitone.
Press and hold Shift and press this button to send a “MIDI Panic” message. This means all MIDI
notes will stop and all controls will stop sending their messages.
22. X/Y Pad: This touch-sensitive pad lets you control two parameters simultaneously in a two-
dimensional way (rather than a traditional one-dimensional modulation wheel). You can assign
the parameter and range of each axis, X (horizontal) and Y (vertical). This pad can be in one of
three modes as determined by the X-Mode and Y-Mode buttons.
23. X/Y Buttons: Press one of these buttons to send the minimum value for the parameter assigned
to that axis.
Press and hold Shift and press one of these buttons to send the middle value for the parameter
assigned to that axis (e.g., a MIDI value of 64—halfway between 0 and 127).
In Edit Mode, press one of these buttons when assigning a parameter to assign it to that axis: X
(horizontal) or Y (vertical).
In HID Mode, use the X or Y button as a left-click or right-click mouse command (respectively).
24. X-Mode / Y-Mode: Press one of these buttons to cycle through the available modes for that
axis of the X/Y Pad, distinguishable by the button’s color:
Red: MIDI CC Mode (the axis is assigned to a MIDI CC number)
Pink: In MIDI Note Mode (the axis is assigned a range, scale, or group of MIDI notes)
Yellow: HID Mode (the axis lets you use the X/Y Pad as a mouse/track pad)
Learn more about these modes in the User Guide.
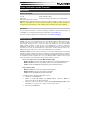
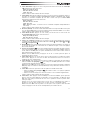
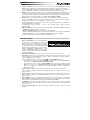
Rear Panel
1. Power Input: If you do not want to use a
computer in your setup (i.e., if you are using
Code 49 to control an external MIDI module),
connect Code 49’s power input to a power
outlet using an optional power adapter (9
VDC, 1 A, center-positive, sold separately).
Alternatively, you can connect Code 49’s
USB Port to a power outlet using a standard
USB charger (sold separately).
2. Power Switch: Press this button to power the Code 49 on or off.
3. USB Port: Use a standard USB cable to connect this USB port to your computer. The
computer’s USB port provides ample power to Code 49. This connection is also used to send
and receive MIDI data to and from your computer.
This connection is also relevant to Code 49’s MIDI Out and MIDI In:
• If an external device is connected to the MIDI Out, your computer can send MIDI messages
out along this path: computer Code 49 external device.
• If an external device is connected to the MIDI In, the external device sends MIDI messages
in along this path: external device Code 49 computer. MIDI messages can then be
sent to an external device via the MIDI Out, but it must pass through the computer first.
4. Sustain In: Connect an optional 1/4” (6.35 mm) TS sustain pedal to this input.
You can also change this input’s MIDI assignment. See the User Guide to learn how to do this.
5. Volume In: Connect an optional 1/4” (6.35 mm) TRS expression pedal to this input.
You can also change this input’s MIDI assignment. See the User Guide to learn how to do this.
6. MIDI In: Use a standard five-pin MIDI cable to connect this MIDI In to the MIDI Out of an
external MIDI device (e.g., another MIDI controller). The MIDI messages sent to this MIDI In will
be sent to your computer via the USB port.
7. MIDI Out: Use a standard five-pin MIDI cable to connect this MIDI Out to the MIDI In of an
external MIDI device (e.g., a synthesizer, sequencer, drum machine, etc.).
8. Kensington
®
Lock Slot: You can use this slot to secure your Code 49 to a table or other surface.
1
2
34
5
678

9
Basic Operations
This chapter covers just some basic features of your Code 49. To get the most out of your
Code 49, remember to download the full User Guide at m-audio.com for more in-depth
explanations of the available controls and features.
Presets
A preset is a saved collection of MIDI assignments for Code 49’s controls, channel settings,
keyboard zone settings, etc. You can store up to 12 presets in Code 49’s internal memory,
enabling you to use a dedicated preset for each digital audio workstation (DAW), virtual
instrument, or project/session, for example.
We recommend visiting m-audio.com and downloading the Code Preset Editor, which gives
you a visual and intuitive way to edit the various messages that Code's controls send to your
computer without having to use the hardware interface.
To select a preset, use the Preset Down/Up () buttons. The current preset number will
appear in the display.
To store a preset:
1. Press Edit to enter Edit Mode. The button will light up.
2. Press the keyboard’s Store key.
3. Press the keyboard’s Enter key. The current settings will be stored as a preset.
Control Modes
Fader Modes: The Faders (F1–F9) are always in one of two modes. Press Fader Mode to
switch between them, distinguishable by the Fader Mode button’s color:
MIDI Mode (red): Moving the faders will send MIDI CC messages.
Mackie Control/HUI Mode (green): Moving the faders will send messages using the
Mackie Control/HUI protocol.
Button Modes: The Buttons (B1–B9) are always in one of three modes. Press Button Mode
button to cycle through them, distinguishable by the Button Mode button’s color:
MIDI Mode (red): Pressing the buttons will send MIDI CC messages.
Mackie Control/HUI Mode (green): Pressing the buttons will send messages using the
Mackie Control/HUI protocol.
HID Mode (yellow): Pressing the buttons will send ASCII character messages.
Encoder Modes: The Encoders (E1–E8) are always in one of two modes. Press Encoder
Mode to switch between them, distinguishable by the Encoder Mode button’s color:
MIDI Mode (red): Moving the encoders will send MIDI CC messages.
Mackie Control/HUI Mode (green): Moving the encoders will send messages using the
Mackie Control/HUI protocol.
X-Modes / Y-Modes: The X/Y Pad is always in one of three modes. Press X-Mode or Y-Mode
to cycle through them, distinguishable by the X-Mode or Y-Mode button’s color (respectively):
MIDI Mode (red): The axis is assigned to a MIDI CC number.
MIDI Note Mode (pink): The axis is assigned to a range, scale, or group of MIDI notes.
HID Mode (yellow): The axis lets you use the X/Y Pad as a mouse/track pad.

10
Edit Mode
Edit Mode lets you set various functions on Code 49. For instance, you can assign MIDI
parameters, set MIDI value ranges, change the colors of buttons, or assign MIDI channels.
To enter or exit Edit Mode, press Edit. The button will light up while in Edit Mode.
Basic Control Assignments
When you select a control to edit, you can set any of the following:
• MIDI assignment (Ctrl Assign): This number determines what type of MIDI message the
control sends (a MIDI CC number, for example).
• Data 1 (if applicable): This number determines how the control functions (whether a
button acts as a momentary or toggle button, for example). This applies only to a button,
a pad, or the sustain pedal when its MIDI message (described above) is a non-registered
parameter number (NRPN, a parameter number higher than 127).
• Data 2: This number determines the control’s minimum value, its “released” message, etc.
• Data 3: This number determines the control’s maximum value, its “pressed” message, etc.
All of these numbers and their corresponding parameters are listed in the User Guide. Some
numbers correspond to their conventional MIDI parameters, but others may be less familiar to
you, particularly NRPNs.
Editing Controls
This section is a brief overview of how to edit the basic control assignments described above.
Please note, though, that different controls have different available parameters, settings, values,
etc., so refer to the User Guide for a more in-depth explanation of how you can edit each control.
You can use Edit Mode for a lot more than changing just the settings described here, as well.
Important:
• In Edit Mode, moving or pressing any control will cause it to send its MIDI message. In
other words, Edit Mode does not prevent/disable controls from sending their normal data.
Keep this in mind while selecting controls to edit them. The exceptions are the keyboard’s
lowest 25 keys, which you can use to access additional functions or commands (see the
diagram on the next page).
• After making your changes in Edit Mode, you must press the keyboard’s Enter key to save
them. To cancel your changes at any time, press Edit to exit Edit Mode.

11
To assign or edit a control:
1. Press Edit to enter Edit Mode. The button will light up.
2. Select the control you want to assign or edit by moving or pressing it. Its name (and
number, if available) will appear in the display.
3. Set any of the four control settings below. You can do more than one and in any order:
Control Assign:
i. Press the keyboard’s Ctrl Assign key.
ii. Use the keyboard’s numeric keys (0–9) to enter the number that corresponds to
the desired MIDI message as specified in the User Guide.
Data 1 (if applicable): This applies only to a button, a pad, or the sustain pedal when
its MIDI message is a non-registered parameter number (NRPN, a parameter number
higher than 127).
i. Press the keyboard’s Data 1 key.
ii. Use the keyboard’s numeric keys (0–9) to enter the Data 1 value, which will
appear in the display. This number corresponds to a specific MIDI parameter
specified in the User Guide.
Data 2:
i. Press the keyboard’s Data 2 key.
ii. Use the keyboard’s numeric keys (0–9) to enter the Data 2 value, which will
appear in the display. This number corresponds to, usually, the minimum value
set on a control.
Data 3:
i. Press the keyboard’s Data 3 key.
ii. Use the keyboard’s numeric keys (0–9) to enter the Data 3 value, which will
appear in the display. This number corresponds to, usually, the maximum value
set on a control.
4. T
o save your changes, press the keyboard’s Enter key. Your changes will be saved and
you will automatically exit Edit Mode.
To cancel your changes, press Edit. You will exit Edit Mode without saving anything.
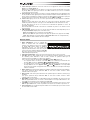
Ctrl Assign Numeric Keys 0
–
9 Enter

12
Guía de inicio rápido (Español)
Introducción
Contenido de la caja
Code 49 Guía de inicio rápido
Cable USB Manual sobre la seguridad y garantía
Tarjeta de descarga de software
Importante: Visite m-audio.com para descargar la Guía del usuario completa el editor de presets
Code. El editor de voces le brinda una forma visual e intuitiva de editar los diversos mensajes que
los controles del Code envían su ordenador sin tener que utilizar la interfaz de hardware.
Soporte
Para obtener la información más completa acerca de este product (los requisitos del sistema,
compatibilidad, etc) y registro del producto, visite m-audio.com.
Para soporte adicional del producto, visite m-audio.com/support.
Conexión rápida
Software: Hemos incluido Pro Tools | First M-Audio Edition y Ableton Live Lite con su Code 49 de
modo que puede comenzar a hacer música con software profesional en cuanto lo saca de la caja.
Para Pro Tools | First M-Audio Edition, registre su Code 49 en m-audio.com y siga las instrucciones
de instalación en su Cuenta de usuario. Para la instalación del Ableton Live Lite, siga las
instrucciones incluidas en la tarjeta de descarga de software del Ableton Live Lite. Visite también
ableton.com para comprobar si hay actualizaciones de software disponibles.
Instrumentos virtuales: Siga las instrucciones de la tarjeta de descarga de software para instalar
los plugins de instrumentos virtuales incluidos. Tras la instalación, muchos DAW no cargarán plugins
de instrumentos virtuales de forma automática. A fin de acceder a los plugins de instrumentos
virtuales con Pro Tools | First M-Audio Edition y Ableton Live Lite, deberá seleccionar la carpeta con
plugins para que el software explore:
Carpetas de plugins de Pro Tools | First M-Audio Edition (AAX):
Windows (32-bit): C:\Program Files (x86)\Common Files\Avid\Audio\Plug-Ins
Windows (64-bit): C:\Program Files\Common Files\Avid\Audio\Plug-Ins
macOS: Macintosh HD/Library/Application Support/Avid/Audio/Plug-Ins
Plugins de Ableton (VST):
Windows (32-bit): C:\Program Files (x86)\VSTplugins
Windows (64-bit): C:\Program Files\VSTplugins
macOS: Macintosh HD\Library\Audio\Plugins\VST
Para establecer su carpeta de plugins en Ableton Live Lite:
1. Vaya al menú Preferences (Preferencias).
2. Seleccione la pestaña File Folder (Carpeta de archivos). Bajo Plug-In Sources (Fuentes
de plugin) haga clic en Browse (Explorar) y seleccione la carpeta de plugins apropiada.
3. Después de hacer su selección, el botón Use VST Custom Plug-In Folder (Usar carpeta
de plugins personalizada) debe estar en ON (encendido). Si no lo está, haga clic en el
botón para encenderlo.
4. Salga del menú Preferences (Preferencias).

13
Configuración del Pro Tools | First M-Audio Edition
1. Conecte el Code 49 a un puerto USB disponible en su ordenador utilizando el cable USB
suministrado y abra Pro Tools | First M-Audio Edition.
2. Abra o cree un proyecto.
3. Seleccione el menú desplegable Setup y abra MIDI Input Devices. Active MIDI Input
desde el Code 49 haciendo clic en la casilla junto al Code 49.
4. Seleccione el menú desplegable Setup y abra Playback Engine. Seleccione su
dispositivo de audio en el menú desplegable Playback Engine.
5. Para crear una pista de un instrumento nuevo, seleccione el menú desplegable Track y
seleccione New.
6. En el menú desplegable New, seleccione Stereo y luego Instrument Track.
7. En la pista recientemente creada, añada un inserto en su pista haciendo clic en los
insertos A-E de su pista y seleccionando Multichannel Plugin > Instrument y seleccione
el instrumento que desea utilizar, como por ejemplo Xpand!2 (Stereo). El plugin ahora
puede dispararse desde del Code 49.
Nota: Los usuarios de Windows necesitarán una tarjeta de sonido externa (como por ejemplo
la M-Track 2X2) o un controlador ASIO de baja latencia.
Configuración de Ableton Live Lite
1. Primero, conecte el Code 49 a un puerto USB disponible en su ordenador utilizando el
cable USB suministrado y ejecute Ableton Live Lite.
2. A continuación, abra la ventana Preferences (Preferencias) de su Ableton Live Lite.
Seleccione su dispositivo de audio en la pestaña Audio. Esto dependerá de la interfaz
de audio que esté utilizando.
Windows: Seleccione Options > Preferences
macOS: Seleccione Live > Preferences
3. Seleccione la pestaña MIDI / Sync (MIDI / Sincronización). Dentro de la sección MIDI
Ports (puertos MIDI), ajuste la configuración como se muestra a continuación:
Junto a Input: (Entrada) Code 49, conmute el botón On en las columnas Track y
Remote (pista y remoto).
Junto a Output: (Salida) Code 49, conmute el botón On en las columnas Track y
Remote (pista y remoto).
4. Cierre la ventana Preferences (Preferencias).
5. Para agregar un instrumento o plugin a Ableton Live Lite a fin de generar sonido, en la
columna Categories (Categorías), seleccione Instruments (Instrumentos) Plug-ins.
6. En la columna Name (Nombre) justo a la derecha de la columna Categorías, localice el
Instrumento o Plugin de su elección. Haga clic y arrastre el instrumento sobre una pista
MIDI en Ableton Live Lite para cargarlo. El instrumento ahora puede dispararse desde
Code 49.

14
Diagrama de instalación
Recuerde seleccionar Code 49 como controlador en su estación de trabajo de audio digital
(DAW). Los elementos que no se enumeran en Introducción > Contenido de la caja se
venden por separado.
MIDI
PIANO
ORGAN
GUITAR/BASS
BRASS/ORCH
SYNTH/PAD
RHYTHM
SPECIAL FX
PATCH
PERFORM
RHYTHM
GM
Módulo de sonido MIDI externo
(opcional)
Pedal de sostenido
(opcional)
Ordenador
Toma de corriente
(opcional)
Pedal de expresión
(opcional)
Secuenciador MIDI externo
(opcional)

15
Características
Panel superior
2224
23
24
23
1
23
4
7
9
7
9
7
9
7
9
7
9
7
9
7
9
7
9
7
8
910
11
12
12
12
12
13
12
12
12
12
6
15
16 17 18 19
20
14
21
5
Importante: Para obtener una explicación más completa de estos controles y de cómo utilizarlos,
descargue la Guía del usuario de Code 49 en m-audio.com.
1. Teclado: Este teclado de 49 notas con post-pulsación es sensible a la velocidad y, en conjunto con los
botones de octava de teclado –/+, puede acceder a la gama completa de 127 notas MIDI (10 octavas).
2. Rueda de inflexión de pitch (tono): Mueva esta rueda para enviar información de inflexión de pitch MIDI.
También puede cambiar la asignación MIDI de esta rueda. Consulte la Guía del usuario para aprender a
hacerlo.
3. Rueda de modulación: Mueva esta rueda para enviar datos del controlador continuo –MIDI CC #01
(modulación), por defecto.
También puede cambiar la asignación MIDI de esta rueda. Consulte la Guía del usuario para aprender a
hacerlo.
4. Octava de teclado –/+: Pulse uno de estos botones para desplazar el teclado una octava hacia arriba
o abajo.
Mantenga pulsado Transpose (Transponder) y pulse uno de los botones para desplazar el teclado un
semitono hacia arriba o abajo.
5. Pads: Utilice estos pads para disparar golpes de batería u otras muestras en su software o módulo de
sonido MIDI externo. Los pads son sensibles a la velocidad, lo que los hace de rápida respuesta y muy
intuitivos para tocar.
También puede cambiar las asignaciones MIDI y de Color de estos pads. Consulte la Guía del usuario
para aprender a hacerlo.
6. Octava de pads –/+: Pulse uno de estos botones para desplazar los pads una octava hacia arriba o
abajo.
Mantenga pulsado Transpose (Transponder) y pulse uno de los botones para desplazar los pads un
semitono hacia arriba o abajo.
7. Fáders (F1–F9): Utilice estos fáders para enviar mensajes de MIDI CC a su software o dispositivo MIDI
externo. Utilice el botón Fader Mode (Modo de fáders) para cambiar su modo actual.
También puede cambiar las asignaciones MIDI de estos fáders. Consulte la Guía del usuario para
aprender a hacerlo.
8. Fader Mode (Modo de fáders): Pulse este botón para conmutar los fáders (F1–F9) entre sus dos
modos, distinguibles por el color de este botón:
Rojo: Modo MIDI (opción predeterminada)
Verde: Modo Mackie Control
®
/HUI
®
.
Para más información acerca de estos modos, consulte la Guía del usuario.
9. Botones (B1–B9): Utilice estos botones para enviar mensajes MIDI CC a su software o dispositivo MIDI
externo. Pueden funcionar como botones momentáneos o de conmutación (enganche). Utilice el botón
Button Mode (Modo de botones) para cambiar su modo actual.
También puede cambiar las asignaciones MIDI, HID, y Color de estos botones. Consulte la Guía del
usuario para aprender a hacerlo.

16
10. Button Mode (Modo de botones): Pulse este botón para realizar un ciclo de los botones (B1–B9) entre
sus tres modos, distinguibles por el color de este botón:
Rojo: Modo MIDI (opción predeterminada)
Verde: Modo Mackie Control/HUI
Amarillo: Modo HID
Para más información acerca de estos modos, consulte la Guía del usuario.
11. Banco izquierdo/derecho Pulse uno de estos botones para pasar al banco de controles asignables
siguiente o anterior (fáders, botones y codificadores). Esto afecta solo a los controles asignables que
están en el mismo modo, como los botones de banco izquierdo/derecho, distinguibles por el color de
este botón:
Rojo: Modo MIDI
Verde: Modo Mackie Control/HUI
Amarillo: Modo HID
Blanco: Global (opción predeterminada, afecta a todos los controles asignables, independientemente
de sus modos actuales)
Para más información acerca de estos modos, consulte la Guía del usuario.
12. Codificadores (E1–E8): Utilice estas perillas de 360º para enviar mensajes MIDI CC a su software o
dispositivo MIDI externo. También puede cambiar las asignaciones MIDI de estos codificadores.
Consulte la Guía del usuario para aprender a hacerlo.
13. Encode Mode (Modo de codificadores): Pulse este botón para conmutar los codificadores (E1–E8)
entre sus dos modos, distinguibles por el color de este botón:
Rojo: Modo MIDI (opción predeterminada)
Verde: Modo Mackie Control/HUI
Para más información acerca de estos modos, consulte la Guía del usuario.
14. Controles de transporte: Estos seis botones son botones dedicados al envío de comandos de control
de transporte Mackie Control/HUI convencionales: Rebobinar (), Avance rápido (), Parar (),
Reproducir () y Grabar ().
15. Pantalla: Utilice esta pantalla para ver valores de parámetros, ajustes y mensajes correspondientes a la
operación d
e Code 49 en ese momento. Los diversos mensajes que se muestran aquí se describen en
la Guía del usuario.
16. Subir/bajar presets (): Utilice estos botones para pasar al preset anterior o siguiente.
También puede utilizar estos botones para recorrer los parámetros editables mostrados en la pantalla,
configurar el canal MIDI global o configurar el canal MIDI de una zona del teclado. Consulte la Guía del
usuario para aprender a hacerlo.
Mantenga pulsado Shift (función secundaria) y pulse estos botones para pasar al programa anterior o
siguiente.
17. Shift (Función secundaria): Mantenga pulsado este botón para acceder a las funciones secundarias de
ciertos botones y teclas. Pulse este botón en modo Zone Edit (Edición de zona) para acceder a las
funciones de edición de zona adicionales.
18. Channel (Canal): Pulse este botón para entrar al modo Channel (Canal). En modo Channel (Canal),
utilice los botones Subir/bajar presets () para cambiar el canal MIDI global del Code 49. Para más
información acerca de este modo, consulte la Guía del usuario.
Mantenga pulsado Shift y pulse este botón para enviar un mensaje de instantánea MIDI. Esto envía el
mensaje MIDI asignado y la posición/valor actual de todos los controles.
19. Edit (Editar): Pulse este botón para entrar o salir del modo Edit (Edición). En modo de edición:
• Utilice los botones Subir/bajar presets () para cambiar el valor o ajuste del parámetro que se
muestra en la pantalla.
• Utilice las teclas del teclado para acceder a funciones o comandos adicionales.
Conozca más información acerca de este modo en la Guía del usuario.
20. Zona, 1–4: Pulse el botón Zone (Zona) para entrar al modo Zone (Zona), que le permite utilizar 4 gamas
de teclas distintas superpuestas o no en diferentes canales MIDI. Esto resulta útil para enviar notas a 4
sintetizadores externos desde el mismo teclado, por ejemplo.
Pulse cualquiera de los botones 1–4 (cuando el botón Zone está activo/encendido) para activar o
desactivar esas zonas del teclado. Cuando una zona está activa, el botón correspondiente se ilumina.
Mantenga pulsado el botón Zone durante un segundo para entrar o salir del modo Zone Edit (Edición
de zona). Puede pulsar cualquiera de los botones 1–4 destellantes para editar esa zona.

17
21. Transpose (Transponder): Mantenga pulsado este botón y pulse uno de los botones Octava de pads
–/+ u Octava de teclado –/+ para desplazar los pads o las teclas (respectivamente) un semitono hacia
arriba o abajo.
Mantenga pulsado Shift y pulse este botón para enviar un mensaje "MIDI Panic" (Todas las notas
desactivadas). Esto hará que todas las notas MIDI se detengan y que todos los controles dejen de
enviar sus mensajes.
22. Pad X/Y: Este pad sensible al tacto le permite controlar dos parámetros simultáneamente de manera
bidimensional (en lugar de la rueda de modulación unidimensional tradicional). Es posible asignar el
parámetro y el rango de cada eje, X (horizontal) e Y (vertical). Este pad puede estar en uno de tres
modos determinados por los botones X-Mode (Modo X) y Y-Mode (Modo Y).
23. Botones X/Y: Pulse uno de estos botones para enviar el valor mínimo del parámetro asignado a ese eje.
Mantenga pulsado Shift y pulse uno de estos botones para enviar el valor medio del parámetro
asignado a ese eje (por ej, un valor MIDI de 64—entremedio de 0 y 127).
En modo de edición, pulse uno de estos botones cuando asigna un parámetro para asignarlo a ese eje:
X (horizontal) o Y (vertical).
En modo HID, utilice el botón X o Y como comando de clic izquierdo o clic derecho de un mouse,
(respectivamente).
24. X-Mode / Y Mode (Modo X / Modo Y): Pulse uno de estos botones para recorrer los modos
disponibles para ese eje del pad X/Y, distinguibles por el color del botón:
Rojo: Modo MIDI CC (el eje se asigna a un número MIDI CC)
Rosado: Modo MIDI Note (Nota MIDI) (el eje se asigna a un rango, escala o grupo de notas MIDI)
Amarillo: Modo HID (el eje le permite utilizar el pad X/Y como pad de mouse/pista)
Para más información acerca de estos modos, consulte la Guía del usuario.
Panel trasero
1. Entrada de corriente: Si no desea utilizar un
ordenador en su instalación (por ejemplo, si está
utilizando el Code 49 para controlar un módulo MIDI
externo), conecte la entrada de corriente del Code 49
a una toma de corriente mediante un adaptador de
corriente opcional (9 VCC, 1 A, centro positivo, que
se vende por separado). Como alternativa, es posible
conectar el puerto USB del Code 49 a una toma de
corriente mediante un cargador USB estándar (que
se vende por separado).
2. On/Off (Interruptor de encendido): Pulse este botón para encender o apagar el Code 49.
3. Puerto USB: Utilice un cable USB estándar para conectar este puerto USB a su ordenador. El puerto
USB del ordenador suministra suficiente corriente al Code 49. Esta conexión también se utiliza para
enviar y recibir datos MIDI desde y hacia su ordenador.
Esta conexión es también relevante para la salida MIDI y la entrada MIDI del Code 49:
• Si se conecta un dispositivo externo a la salida MIDI, su ordenador puede enviar mensajes MIDI
por este camino: ordenador Code 49 dispositivo externo.
• Si se conecta un dispositivo externo a la entrada MIDI, dicho dispositivo envía mensajes MIDI por este
camino: dispositivo externo Code 49 ordenador. Los mensajes MIDI pueden entonces enviarse
hacia un dispositivo externo a través de la salida MIDI, pero deben pasar primero por el ordenador.
4. Entrada de sostenido: Conecte a esta entrada un pedal de sostenido TS de 6,35 mm (1/4 pulg.) opcional.
También es posible cambiar la asignación MIDI de esta entrada. Consulte la Guía del usuario para
aprender a hacerlo.
5. Entrada de volumen: Conecte a esta entrada un pedal de expresión TRS de 6,35 mm (1/4 pulg.) opcional.
También es posible cambiar la asignación MIDI de esta entrada. Consulte la Guía del usuario para
aprender a hacerlo.
6. Entrada MIDI: Utilice un cable MIDI estándar de cinco patillas para conectar esta entrada MIDI a la
salida MIDI de un dispositivo MIDI externo (por ejemplo, otro controlador MIDI). Los mensajes MIDI que
se envíen a esa entrada MIDI serán enviados a su ordenador a través del puerto USB.
7. Salida MIDI: Utilice un cable MIDI estándar de cinco patillas para conectar esta salida MIDI a la
entrada MIDI de un dispositivo MIDI externo (por ejemplo, un sintetizador, secuenciador, caja de
ritmos, etc.).
8. Ranura de bloqueo Kensington
®
: Puede utilizar esta ranura a fin de sujetar el Code 49 a una mesa u
otra superficie.
1
2
34
5
678

18
Operaciones básicas
Este capítulo cubre algunas de las características básicas del Code 49. Para obtener el mejor
resultado del Code 49, recuerde descargar la Guía del usuario completa en m-audio.com a fin de
conocer explicaciones más profundas de los controles y características disponibles.
Presets (Valores predeterminados)
Un preset es una colección memorizada de asignaciones MIDI de los controles, ajustes de canales,
ajustes de zona de teclado, etc. del Code 49. Es posible memorizar hasta 12 presets en la memoria
interna del Code 49, lo que le permite utilizar un preset dedicado para cada estación de audio digital
(DAW), instrumento virtual o proyecto/sesión, por ejemplo.
Recomendamos visitar m-audio.com y descargar el editor de presets Code, el cual le brinda una
forma visual e intuitiva de editar los diversos mensajes que los controles del Code envían su
ordenador sin tener que utilizar la interfaz de hardware.
Para seleccionar un preset, utilice los botones subir/bajar presets (). El número del preset
actual aparece en la pantalla.
Para memorizar un preset:
1. Pulse Edit para entrar al modo de edición. Se ilumina el botón.
2. Pulse la tecla Store (Memorizar) del teclado.
3. Pulse la tecla Enter (Intro) del teclado. Los ajustes actuales se memorizan como preset.
Modos de control
Modos de fáders: Los fáders (F1–F9) están siempre en uno de dos modos. Pulse Fader Mode
(Modo de fáders) para conmutar entre ellos, distinguibles por el color del botón Fader Mode:
Modo MIDI (rojo): Al mover los fáders se envían mensajes MIDI CC.
Modo Mackie Control/HUI (verde): Al mover los fáders se envían mensajes mediante el
protocolo Mackie Control/HUI.
Modo de botones: Los botones (B1–B9) están siempre en uno de tres modos. Pulse Button Mode
(Modo de botones) para conmutar entre ellos, distinguibles por el color del botón Button Mode:
Modo MIDI (rojo): Al pulsar los botones se envían mensajes MIDI CC.
Modo Mackie Control/HUI (verde): Al pulsar los botones se envían mensajes mediante el
protocolo Mackie Control/HUI.
Modo HID (amarillo): Al pulsar los botones se envían mensajes de caracteres ASCII.
Modos de codificadores: Los codificadores (E1–E8) están siempre en uno de dos modos. Pulse
Encoder Mode (Modo de codificadores) para conmutar entre ellos, distinguibles por el color del
botón Encoder Mode:
Modo MIDI (rojo): Al mover los codificadores se envían mensajes MIDI CC.
Modo Mackie Control/HUI (verde): Al mover los codificadores se envían mensajes mediante el
protocolo Mackie Control/HUI.
Modos X / Modos Y: El pad X/Y está siempre en uno de tres modos. Pulse X-Mode (Modo X) o Y-
Mode (Modo Y) para recorrer los modos, distinguibles por el color de los botones X-Mode o Y-
Mode (respectivamente):
Modo MIDI (rojo): El eje se asigna a un número MIDI CC.
Modo de nota MIDI (rosado): El eje se asigna a un rango, escala o grupo de notas MIDI.
Modo HID (amarillo): El eje le permite utilizar el pad X/Y como pad de mouse/pista.

19
Modo de edición
El modo de edición le permite configurar diversas funciones del Code 49. Por ejemplo, es
posible asignar parámetros MIDI, configurar rangos de los valores MIDI, cambiar el color de
los botones o asignar canales MIDI.
Para entrar o salir del modo de edición, pulse Edit. Cuando está en modo de edición, el
botón se ilumina.
Asignaciones de controles básicos
Cuando selecciona un control para editar, usted puede configurar cualquiera de los siguientes:
• MIDI assignment (Asignación MIDI) (Ctrl Assign): Este número determina qué tipo de
mensaje MIDI envía el control (un número MIDI CC, por ejemplo).
• Data 1 (Datos 1) (si corresponde): Este número determina cómo funciona el control (si
un botón actúa como momentáneo o de conmutación, por ejemplo). Esto se aplica solo a
un botón, un pad o el pedal de sostenido cuando su mensaje MIDI (arriba descrito) es
un número de parámetro no registrado (NRPN, un número de parámetro superior a 127).
• Data 2: Este número determina el valor mínimo del control, su mensaje de “liberado”, etc.
• Data 3: Este número determina el valor máximo del control, su mensaje “pulsado”, etc.
Todos estos números y sus parámetros correspondientes se enumeran en la Guía del usuario.
Algunos números corresponden a sus parámetros MIDI convencionales, pero otros pueden
resultarle menos familiares, particularmente los NRPN.
Cómo editar los controles
Esta sección es una breve explicación de cómo se editan las asignaciones de controles
básicos arriba descritas. Tenga en cuenta, sin embargo, que los distintos controles tienen
diferentes parámetros, ajustes, valores, etc. disponibles, de modo que debe consultar la Guía
del usuario para obtener una explicación más profunda acerca de la manera en que puede
editar cada control. Asimismo, es posible utilizar el modo de edición para muchas
operaciones más que para cambiar meramente los ajustes aquí descritos.
Importante:
• En modo de edición, al mover o pulsar cada control se produce el envío de su mensaje
MIDI. En otras palabras, el modo de edición no desactiva los controles ni impide que
envíen sus datos normales. Tenga esto en cuenta cuando selecciona los controles para
editarlos. Las excepciones son las 25 teclas más bajas del teclado, que usted puede
utilizar para acceder a funciones o comandos adicionales (consulte el diagrama de la
página siguiente).
• Después de realizar sus cambios en modo de edición, debe pulsar la tecla Enter para
guardarlos. Para cancelar sus cambios en cualquier momento, pulse Edit a fin de salir del
modo de edición.

20
Para asignar o editar un control:
1. Pulse Edit para entrar al modo de edición. Se ilumina el botón.
2. Seleccione el control que desea asignar o editar moviéndolo o pulsándolo. Su nombre (y
su número, si está disponible) aparecen en la pantalla.
3. Configure cualquiera de los cuatro controles que se indican a continuación. Puede hacer
más de uno y en cualquier orden:
Asignación de controles:
i. Pulse la tecla Ctrl Assign del teclado.
ii. Utilice las teclas numéricas del teclado (0–9) para introducir el número que
corresponde al mensaje MIDI deseado como se especifica en la Guía del usuario.
Data 1 (si corresponde): Esto se aplica solo a un botón, un pad o el pedal de
sostenido cuando su mensaje MIDI es un número de parámetro no registrado (NRPN,
un número de parámetro superior a 127).
i. Pulse la tecla Data 1 del teclado.
ii. Utilice las teclas numéricas del teclado (0–9) para introducir el valor Data 1, que
aparecerá en la pantalla. Este número corresponde a un parámetro MIDI
específico, que se especifica en la Guía del usuario.
Data 2:
i. Pulse la tecla Data 2 del teclado.
ii. Utilice las teclas numéricas del teclado (0–9) para introducir el valor Data 2, que
aparecerá en la pantalla. Este número corresponde, por lo general, al valor
mínimo definido en un control.
Data 3:
i. Pulse la tecla Data 3 del teclado.
ii. Utilice las teclas numéricas del teclado (0–9) para introducir el valor Data 3, que
aparecerá en la pantalla. Este número corresponde, por lo general, al valor
máximo definido en un control.
4. Par
a guardar sus cambios pulse la tecla Enter del teclado. Se guardan sus cambios y
saldrá automáticamente del modo de edición.
Para cancelar sus cambios, pulse Edit. Saldrá del modo de edición sin guardar nada.
Ctrl Assign
(Asi
g
nación de controles)
Teclas numéricas 0-9 Enter
(Intro)
Seite wird geladen ...
Seite wird geladen ...
Seite wird geladen ...
Seite wird geladen ...
Seite wird geladen ...
Seite wird geladen ...
Seite wird geladen ...
Seite wird geladen ...
Seite wird geladen ...
Seite wird geladen ...
Seite wird geladen ...
Seite wird geladen ...
Seite wird geladen ...
Seite wird geladen ...
Seite wird geladen ...
Seite wird geladen ...
Seite wird geladen ...
Seite wird geladen ...
Seite wird geladen ...
Seite wird geladen ...
Seite wird geladen ...
Seite wird geladen ...
Seite wird geladen ...
Seite wird geladen ...
Seite wird geladen ...
Seite wird geladen ...
Seite wird geladen ...
Seite wird geladen ...
Seite wird geladen ...
Seite wird geladen ...
Seite wird geladen ...
Seite wird geladen ...
-
 1
1
-
 2
2
-
 3
3
-
 4
4
-
 5
5
-
 6
6
-
 7
7
-
 8
8
-
 9
9
-
 10
10
-
 11
11
-
 12
12
-
 13
13
-
 14
14
-
 15
15
-
 16
16
-
 17
17
-
 18
18
-
 19
19
-
 20
20
-
 21
21
-
 22
22
-
 23
23
-
 24
24
-
 25
25
-
 26
26
-
 27
27
-
 28
28
-
 29
29
-
 30
30
-
 31
31
-
 32
32
-
 33
33
-
 34
34
-
 35
35
-
 36
36
-
 37
37
-
 38
38
-
 39
39
-
 40
40
-
 41
41
-
 42
42
-
 43
43
-
 44
44
-
 45
45
-
 46
46
-
 47
47
-
 48
48
-
 49
49
-
 50
50
-
 51
51
-
 52
52


M-Audio Code 49 Benutzerhandbuch
- Kategorie
- Musikinstrumente
- Typ
- Benutzerhandbuch
in anderen Sprachen
- français: M-Audio Code 49 Mode d'emploi
- español: M-Audio Code 49 Guía del usuario
- italiano: M-Audio Code 49 Guida utente
Verwandte Artikel
-
M-Audio CTRL49 Bedienungsanleitung
-
-
-
-
-
-
-
-
-
Andere Dokumente
-
Akai MIDIMIX Benutzerhandbuch
-
Akai MAX25 Benutzerhandbuch
-
Akai MAX49 Datenblatt
-
Akai Advance 49 Benutzerhandbuch
-
Akai Advance 61 Schnellstartanleitung
-
Akai Advance 25 Benutzerhandbuch
-
Alesis V25 Bedienungsanleitung
-
Alesis V61 Bedienungsanleitung
-
Alesis V49 Benutzerhandbuch
-
Akai APC MINI Bedienungsanleitung