2
INDEX
ENGLISH ................................................................................................................................................................................. 4
UNPACKING INSTRUCTION .................................................................................................................................................................................... 5
POWERSUPPLY ........................................................................................................................................................................................................ 5
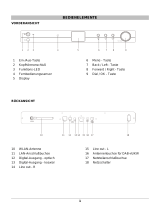
CONTROL .................................................................................................................................................................................................................. 5
REMOTE CONTROL .................................................................................................................................................................................................. 6
USING THE REMOTE CONTROL ............................................................................................................................................................................. 6
GETTING STARTED................................................................................................................................................................................................... 7
NETWORK SETUP ..................................................................................................................................................................................................... 7
INTERNET RADIO ..................................................................................................................................................................................................... 7
MEDIA CENTRE ......................................................................................................................................................................................................... 8
DAB(+) RADIO .......................................................................................................................................................................................................... 9
FM RADIO .................................................................................................................................................................................................................. 9
BT PLAYBACK ........................................................................................................................................................................................................ 10
ALARM SETTING .................................................................................................................................................................................................... 10
SLEEP TIMER SETTING ......................................................................................................................................................................................... 10
MICRO SD/TF CARD SLOT ................................................................................................................................................................................... 10
CD PLAYER ............................................................................................................................................................................................................. 11
CONFIGURATION .................................................................................................................................................................................................. 11
HELPFUL TIPS ........................................................................................................................................................................................................ 15
TROUBLESHOOTING ............................................................................................................................................................................................ 15
NEDERLANDS ........................................................................................................................................................................ 17
UITPAKKEN ............................................................................................................................................................................................................ 18
AANSLUITSPANNING ........................................................................................................................................................................................... 18
BEDIENING ............................................................................................................................................................................................................. 18
AFSTANDSBEDIENING ......................................................................................................................................................................................... 19
GEBRUIK VAN DE AFSTANDSBEDIENING ......................................................................................................................................................... 19
AAN DE SLAG ......................................................................................................................................................................................................... 20
NETWERK INSTELLEN .......................................................................................................................................................................................... 20
INTERNET RADIO .................................................................................................................................................................................................. 20
MEDIA CENTRUM .................................................................................................................................................................................................. 21
DAB(+) RADIO ....................................................................................................................................................................................................... 22
FM RADIO ............................................................................................................................................................................................................... 22
BT PLAYBACK ........................................................................................................................................................................................................ 23
ALARM SETTING .................................................................................................................................................................................................... 23
SLEEP TIMER INSTELLINGEN .............................................................................................................................................................................. 23
MICRO SD/TF KAARTSLEUF ................................................................................................................................................................................ 23
CD-SPELER ............................................................................................................................................................................................................. 24
CONFIGURATION .................................................................................................................................................................................................. 24
BEDIENING VIA PC/SMARTPHONE .................................................................................................................................................................... 27
TIPS .......................................................................................................................................................................................................................... 28
PROBLEEMOPLOSSING ....................................................................................................................................................................................... 29
DEUTSCH .............................................................................................................................................................................. 30
AUSPACKEN ........................................................................................................................................................................................................... 31
NETZANSCHLUSS ................................................................................................................................................................................................. 31
BEDIENUNG ........................................................................................................................................................................................................... 31
FERNSTEUERUNG ................................................................................................................................................................................................. 32
VERWENDEN DER FERNBEDIENUNG ................................................................................................................................................................ 32
ERSTE SCHRITTE ................................................................................................................................................................................................... 33
DAS NETZWERK EINRICHTEN ............................................................................................................................................................................. 33
INTERNET-RADIO .................................................................................................................................................................................................. 33
MEDIENZENTRUM................................................................................................................................................................................................. 34
DAB(+) RADIO ....................................................................................................................................................................................................... 35
FM RADIO ............................................................................................................................................................................................................... 35
BT-WIEDERGABE .................................................................................................................................................................................................. 36
ALARM-EINSTELLUNG.......................................................................................................................................................................................... 36
SLEEP TIMER INSTELLINGEN .............................................................................................................................................................................. 36
MICRO SD/TF-KARTENSCHLITZ ......................................................................................................................................................................... 36
CD-WIEDERGABEGERÄT ..................................................................................................................................................................................... 37
CONFIGURATION .................................................................................................................................................................................................. 37
FERNBEDIENUNG ÜBER PC / SMART PHONE .................................................................................................................................................. 40
HILFENDE TIPPS .................................................................................................................................................................................................... 41
FEHLERSUCHE ....................................................................................................................................................................................................... 42
ESPAÑOL .............................................................................................................................................................................. 43
INSTRUCCIONES DE DESEMBALAJE ................................................................................................................................................................. 44
FUENTE DE ALIMENTACIÓN................................................................................................................................................................................ 44
CONTROL ............................................................................................................................................................................................................... 44
CONTROL REMOTO .............................................................................................................................................................................................. 45