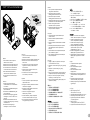
Thermaltake V9 BlacX Edition Benutzerhandbuch
- Kategorie
- Computergehäuse
- Typ
- Benutzerhandbuch
Seite laden ...
Seite laden ...

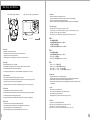
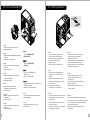
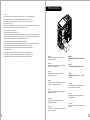
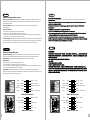
<165 mm
<315 mm
CPU Cooler Height Limitation VGA ( Add- on card) Length Limitation
Warning!!
- Height limit for the CPU heatsink:
The height limit for the CPU heatsink is 165 mm (6.5 inches).
- Length limit for the VGA (graphics card):
The length limit for the VGA (graphics card) is 315 mm (12.4 inches).
Warnung!!
- Höhenbeschränkung für CPU-Kühler:
Die Höhenbeschränkung für den CPU-Kühler liegt bei 165 mm (6,5 Zoll).
- Längenbeschränkung für die VGA (Grafikkarte):
Die Längenbeschränkung für die VGA (Grafikkarte) beträgt 315 mm (12,4 Zoll).
Avertissement !
- Hauteur limite du dissipateur thermique du processeur :
La hauteur limite du dissipateur thermique du processeur est de 165 mm (6,5 pouces).
- Longueur limite de la carte VGA (carte graphique) :
La longueur limite de la carte VGA (carte graphique) est de 315 mm (12,4 pouces).
Precaución
- Límite de altura para el disipador de calor de la CPU:
El límite de altura para el disipador de calor de la CPU es de 165 mm (6,5 pulgadas).
- Límite de longitud para la tarjeta gráfica (VGA):
El límite de longitud para la tarjeta gráfica (VGA) en de 315 mm (12,4 pulgadas).
Attenzione!
- Limite di altezza per il dissipatore di calore della CPU:
Il limite di altezza per il dissipatore di calore della CPU è 165 mm (6,5").
- Limite di lunghezza per la VGA (schede grafiche):
Il limite di lunghezza per la VGA (scheda grafica) è 315 mm (12,4").
Atenção!!
- Limite de altura para o dissipador do CPU:
O limite de altura para o dissipador do CPU é 165 mm (6,5 polegadas).
- Limite de comprimento para VGA (placa gráfica):
O limite de comprimento para VGA (placa gráfica) é 315 mm (12,4 polegadas).
Προειδοποίηση!!
- Όριο ύψους για τον αποδέκτη θερμότητας της CPU:
Το όριο ύψους για τον αποδέκτη θερμότητας της CPU είναι 165 mm (6,5 ίντσες).
- Όριο μήκους για την VGA (κάρτα γραφικών):
Το όριο μήκους για τη VGA (κάρτα γραφικών) είναι 315 mm (12,4 ίντσες).
警告!!
- CPU散熱器的高度限制:
CPU散熱器的高度限制為165mm ( 6.5英吋 )。
- VGA(顯示卡)的長度限制:
VGA(顯示卡)的長度限制為315mm (12.4英吋 )。
警告!!
- CPU散热器的高度限制:
CPU散热器的高度限制为165mm(6.5英寸)。
- VGA(显卡)的长度限制:
VGA(显卡)的长度限制为315mm(12.4英寸)。
警告
- CPUヒートシンクの高さ制限:
CPUヒートシンクの高さ制限は165 mmです。
- VGA(グラフィックスカード)の長さ制限:
VGA(グラフィックスカード)の長さ制限は315 mmです。
Внимание!
- Ограничение по высоте для радиатора ЦП.
Ограничение по высоте для радиатора ЦП составляет 165 мм (6,5 дюйма).
- Ограничение по длине для платы VGA (графическая плата).
Ограничение по длине для платы VGA (графическая плата) составляет 315 мм
(12,4 дюйма).
Uyarı!!
- CPU ısı alıcısı için yükseklik sınırı:
CPU ısı alıcısı için yükseklik sınırı 165 mm’dir (6,6 inç).
- VGA (grafik kartı) için uzunluk sınırı:
VGA (grafik kartı) için uzunluk sınırı 315 mm’dir (12,4 inç).
คำเตือน!!
- ขีดจำกัดความสูงสำหรับฮีตซิงก์ของ CPU:
ขีดจำกัดความสูงสำหรับฮีตซิงก์ของ CPU คือ 165 มม. (6.5 นิ้ว)
- ขีดจำกัดความยาวสำหรับ VGA (การ์ดแสดงผล):
ขีดจำกัดความยาวสำหรับ VGA (การ์ดแสดงผล) คือ 315 มม. (12.4 นิ้ว)
Warning and Notice
3 4
Seite laden ...

7
8
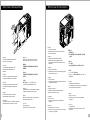
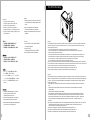
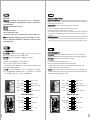
5.25" Drives Installation
1
2
3
4
5
6
English /
1. Pull the bottom of the front panel to
detach it from the chassis.
2. Remove the 5.25" drive bay plastic cover.
3. Remove the 5.25" drive bay metal cover.
4. Turn the lock device counterclockwise
to unlock and remove the lock device.
5. Insert the hardware and attach the
lock device to the hardware in place.
6. Turn the lock device clockwise to lock
the device.
Deutsch /
1. Ziehen Sie am unteren Rand der
Vorderseitentafel, um sie vom Gehäuse
zu entfernen.
2. Entfernen Sie die Plastikabdeckung des
5,25 Zoll Schachts.
3. Entfernen Sie die Metallabdeckung des
5,25 Zoll Schachts.
4. Drehen Sie die Verriegelung gegen den
Uhrzeigersinn, um sie zu öffnen und zu
entfernen.
5. Schieben Sie die Hardware hinein und
bringen Sie die Verriegelung zur Fixierung
der Hardware an.
6. Drehen Sie die Verriegelung im
Uhrzeigersinn, um sie zu schließen.
Français /
1. Tirez sur le bas du panneau avant pour le
démonter du châssis.
2. Retirez le couvercle en plastique de la baie 5.25"
3. Retirez le couvercle en métal de la baie pour
lecteur 5.25"
4. Tournez le verrou dans le sens contraire des
aiguilles d'une montre pour déverrouiller et
retirez le verrou.
5. Insérez le lecteur et mettez le verrou sur le
lecteur qui est en place.
6. Tournez le verrou dans le sens des aiguilles
d'une montre pour verrouiller
Español /
1. Tire de la parte inferior del panel frontal para
separarlo del chasis.
2. Extraiga la cubierta de plástico de la bahía de
unidad de 5,25 pulgadas.
3. Extraiga la cubierta metálica de la bahía de
unidad de 5,25 pulgadas.
4. contrario a las agujas del reloj para
desbloquearlo y extraerlo.
5. Inserte el hardware y acople el dispositivo
de cierre al hardware ubicado en su lugar.
6. Gire el dispositivo de cierre en el sentido de
las agujas del reloj para cerrarlo.
Italiano /
1. Tirare il pulsante del pannello anteriore
per sganciarlo dallo chassis.
2. Rimuovere il coperchio in plastica
dell’alloggiamento dell’unità da 5,25”.
3. Rimuovere il coperchio in metallo
dell’alloggiamento dell’unità da 5,25”.
4. Ruotare il dispositivo di blocco in seno antiorario
per sbloccare e rimuovere tale dispositivo.
5. Inserire il disco rigido e fissare il
dispositivo di blocco in posizione.
6. Ruotare il dispositivo di blocco in senso
orario per chiudere il dispositivo.
Português/
1. Puxe a parte inferior do painel dianteiro para
remover da caixa.
2. Remova a cobertura de plástico da baía da
unidade de 5,25”.
3. Remova a cobertura de metal da baía da unidade
de 5,25”.
4. Rode o dispositivo de bloqueio para a esquerda,
para desbloquear e remova o dispositivo de
bloqueio.
5. Insira o hardware e fixe o dispositivo de bloqueio
para o hardware na posição.
6. Gire o dispositivo de bloqueio para a direita para
bloquear o dispositivo.
Ελληνικά/
1. Τραβήξτε τη βάση του εμπρόσθιου πίνακα για να
τον αποσυνδέσετε από τη θήκη.
2. Αφαιρέστε το πλαστικό κάλυμμα της θέσης μονάδας
5,25”.
3. Αφαιρέστε το μεταλλικό κάλυμμα της θέσης
μονάδας 5,25”.
4. Στρέψτε τη διάταξη ασφάλισης αριστερόστροφα για
απασφάλιση και αφαιρέστε τη διάταξη ασφάλισης.
5. Εισάγετε το υλικό και προσαρμόστε τη διάταξη
ασφάλισης στο τοποθετημένο υλικό.
6. Στρέψτε τη διάταξη ασφάλισης δεξιόστροφα για να
ασφαλίσετε τη διάταξη.
繁體中文 /
1. 拉面板底部,將面板從底盤拆下。
2. 拆下 5.25" 磁碟機槽的塑膠蓋。
3. 拆下 5.25" 磁碟機槽的金屬蓋。
4. 依逆時鐘方向轉動將 5.25" 無螺絲扣具取下
5. 插入硬體裝置並裝上扣具
6. 依照順時針方向將無螺絲扣具裝上並固定
简体中文 /简体中文 /
1. 拉面板底部,将其从底板卸下。
2. 卸下 5.25” 驱动器槽的塑料盖。
3. 卸下 5.25” 驱动器槽的金属盖。
4. 依逆时钟方向转动将5.25”无螺丝扣具取下
5. 插入硬件装置并装上扣具
6. 依照顺时针方向将无螺丝扣具装上并固定
日本語 /日本語 /
1. フロントパネルの下部を引っ張って、
シャーシから取り外します。
2. 5.25”ドライブベイのプラスチックカバー
を取り外します。
3. 5.25”ドライブベイの金属カバーを取り外します。
4. ロックデバイスを反時計方向に回して
ロック解除し、取り外します。
5. ハードウェアを挿入し、ロックデバイスを
ハードウェアの所定の位置にロックします。
6. ロックデバイスを時計方向に回して
デバイスをロックします。
Русский /Русский /
1. Потяните за нижнюю часть передней
панели, чтобы отсоединить ее от корпуса.
2. Снимите пластмассовую заглушку
отсека 5,25-дюймового дисковода.
3. Снимите металлическую заглушку
отсека 5,25-дюймового дисковода.
4. Поверните фиксирующее устройство
против часовой стрелки, чтобы
разблокировать и снять его.
5. Вставьте оборудование и установите
фиксирующее устройство на место.
6. Для блокировки устройства поверните
фиксирующее устройство по часовой
стрелке.
Türkçe /
1. Ön paneli alt kısmından çekerek
kasadan ayırın.
2. 5.25” sürücü bölmesinin plastik
kapağını çıkarın.
3. 5.25” sürücü bölmesinin metal
kapağını çıkarın.
4. Kilidini açmak için, kilit parçasını saatin ters
yönünde döndürün ve kilidi açıldıktan sonra
çıkarın.
5. Donanımı yerleştirin ve kilit parçasını,
donanım üzerindeki yerine yerleştirin.
6. Kilitleme parçasını saat yönünde döndürerek
aygıtı kilitleyin.
ภาษาไทย /
1. ดึงที่ด้านล่างของแผงด้านหน้า
เพื่อแกะแผงด้านหน้าออกจากเคส
2. ถอดฝาปิดพลาสติกของช่องไดรฟ์ขนาด 5.25” ออก
3. ถอดฝาปิดโลหะของช่องไดรฟ์ขนาด 5.25” ออก
4. หมุนอุปกรณ์ล็อคทวนเข็มนาฬิกาเพื่อปลดล็อค
แล้วถอดอุปกรณ์ล็อคออก
5. ใส่ฮาร์ดแวร์เข้าไป
แล้วติดอุปกรณ์ล็อคเข้ากับฮาร์ดแวร์ให้เข้าที่
6. หมุนอุปกรณ์ล็อคตามเข็มนาฬิกาเพื่อล็อคอุปกรณ์

9
English /
1. Remove the 3.5” drive bay metal cover.
2. Secure it with screws.
Deutsch /
1. Entfernen Sie die Metallabdeckung des 3,5 Zoll
Schachts.
2. Sichern Sie sie mit Schrauben.
Français /
1. Retirez le couvercle en métal de la baie pour
lecteur 3.5"
2. Sécurisez avec des vis.
Español /
1. Extraiga la cubierta metálica de la bahía de
unidad de 3,5 pulgadas.
2. Asegúrela con tornillos.
Italiano /
1. Rimuovere il coperchio in metallo
dell’alloggiamento dell’unità da 3,5”.
2. Fissarlo con le viti.
繁體中文 /
1. 拆下 3.5" 磁碟機槽的金屬蓋。
2. 使用螺絲將其固定。
日本語 /日本語 /
1. 3.5”ドライブベイの金属カバーを
取り外します。
2. ネジでしっかり固定します。
Русский /Русский /
1. Снимите металлическую заглушку отсека 3,5-д
юймового дисковода.
2. Закрепите ее с помощью винтов.
简体中文 /简体中文 /
1. 卸下 3.5” 驱动器槽的金属盖。
2. 用螺丝固定。
Türkçe /
1. 3.5” sürücü bölmesinin metal kapağını çıkarın.
2. Vidalarla sabitleyin.
3.5" Drives Installation
1
2
Português/
1. Remova a cobertura de metal da baía da
unidade de 3,5”.
2. Fixe com parafusos.
Ελληνικά/
1. Αφαιρέστε το μεταλλικό κάλυμμα της θέσης
μονάδας 3,5”.
2. Στερεώστε τη με βίδες.
ภาษาไทย /
1. ถอดฝาปิดโลหะของช่องไดรฟ์ขนาด 3.5” ออก
2. ขันสกรูยึดให้แน่น
English /
1. Turn the lock device counterclockwise
to unlock and remove the lock device.
2. Insert the hardware and attach the lock
device to the hardware in place.
hardware in place.
3. Turn the lock device clockwise to lock.
Deutsch /
1. Drehen Sie die Verriegelung gegen den
Uhrzeigersinn, um sie zu öffnen und zu
entfernen.
2. Schieben Sie die Hardware hinein und
bringen Sie die Verriegelung zur Fixierung
der Hardware an.
3. Drehen Sie die Verriegelung im
Uhrzeigersinn, um sie zu schließen.
Français /
1. Tournez le verrou dans le sens contraire des
aiguilles d'une montre pour déverrouiller et
retirez le verrou.
2. Insérez le lecteur et mettez le verrou sur le
lecteur qui est en place.
3. Tournez le verrou dans le sens des aiguilles
d'une montre pour verrouiller.
Español /
1. Gire el dispositivo de cierre en el sentido
contrario a las agujas del reloj para
desbloquearlo y extraerlo.
2. Inserte el hardware y acople el dispositivo de
cierre al hardware ubicado en su lugar.
3. Gire el dispositivo de cierre en el sentido de
las agujas del reloj para cerrar.
Italiano /
1. Ruotare il dispositivo di blocco in seno
antiorario per sbloccare e rimuovere
tale dispositivo.
2. Inserire il disco rigido e fissare il dispositivo
di blocco in posizione.
3. Ruotare il dispositivo di blocco in senso
orario per chiudere.
3.5" HDD Installation
2
Português/
1. Rode o dispositivo de bloqueio para a esquerda,
para desbloquear e remova o dispositivo de bloqueio.
2. Insira o hardware e fixe o dispositivo de bloqueio
para o hardware na posição.
3. Gire o dispositivo de bloqueio para a direita
para bloquear.
1
3
10

繁體中文
1. 依逆時鐘方向轉動將無螺絲扣具取下
2. 插入硬體裝置並裝上無螺絲扣具
3. 依照順時針方向將無螺絲扣具裝上並固定
/
日本語 /日本語 /
1. ロックデバイスを反時計方向に回して
ロック解除し、取り外します。
2. ハードウェアを挿入し、ロックデバイスを
ハードウェアの所定の位置にロックします。
3. ロックデバイスを時計方向に回してロック
します。
Русский /Русский /
1. Поверните фиксирующее устройство
против часовой стрелки, чтобы
разблокировать и снять его.
2. Вставьте оборудование и установите
фиксирующее устройство на место.
3. Для блокировки поверните фиксирующее
устройство по часовой стрелке.
简体中文 /简体中文 /
1. 依逆时钟方向转动将无螺丝扣具取下
2. 插入硬件装置并装上无螺丝扣具
3. 依照顺时针方向将无螺丝扣具装上并固定
Türkçe /
1. Kilidini açmak için, kilit parçasını saatin ters
yönünde döndürün ve kilidi açıldıktan sonra
çıkarın.
2. Donanımı yerleştirin ve kilit parçasını,
donanım üzerindeki yerine yerleştirin.
3. Kilit parçasını, kilitlemek için saat yönünde
döndürün.
12
Ελληνικά/
1. Στρέψτε τη διάταξη ασφάλισης
αριστερόστροφα για απασφάλιση και
αφαιρέστε τη διάταξη ασφάλισης.
2. Εισάγετε το υλικό και προσαρμόστε τη
διάταξη ασφάλισης στο τοποθετημένο υλικό.
3. Στρέψτε τη διάταξη ασφάλισης δεξιόστροφα
για να ασφαλίσει.
ภาษาไทย /
1. หมุนอุปกรณ์ล็อคทวนเข็มนาฬิกาเพื่อปลดล็อค
แล้วถอดอุปกรณ์ล็อคออก
2. ใส่ฮาร์ดแวร์เข้าไป
แล้วติดอุปกรณ์ล็อคเข้ากับฮาร์ดแวร์ให้เข้าที่
3. หมุนอุปกรณ์ล็อคตามเข็มนาฬิกาเพื่อล็อค
Top HDD Docking
English /
The top HDD Docking slot is embedded to enable ultra fast transfer (up to 3.0Gbps) of large data to a SATA hard
disk without having to use an external storage enclosure. To ensure proper operation, please make sure the
following settings are correct:
- Ensure all required drivers are installed for your motherboard or SATA controller card.
- Connect the SATA cable to an available SATA connector on the motherboard or SATA controller card.
- Connect the power cable to power supply.
- Ensure AHCI (Advanced Host Controller Interface) is enabled on your motherboard or SATA controller card.
The AHCI enables for “hotswap” capability of the SATA hard drives without having to turn off the computer
prior to connecting or disconnecting of the hard drive. Please follow instruction provided
by your motherboard or SATA controller card to enable the AHCI function.
If you are using a brand new hard drive, the hard drive will need to be initialized (formatted) before it is accessible.
For more information on how to initialize (format) a new hard drive, please refer to the hard drive user manual or visit
System running on Windows 7: http://www.thermaltakeusa.com/Faq.aspx?ID=1143
System running on Windows Vista: http://www.thermaltakeusa.com/Faq.aspx?ID=1079
System running on Windows XP: http://www.thermaltakeusa.com/Faq.aspx?ID=1073
Deutsch /
Der obere Einführungsschlitz der HDD-Dockingstation ist eingelassen, um einen ultraschnellen Transfer (bis zu 3,0
GB/s) von umfangreichen Daten zur SATA-Festplatte zu ermögichen, ohne dafür ein externes Gehäuse verwenden
zu müssen. Um einen ordnungsgemäßen Betrieb zu gewährleisten, stellen Sie bitte sicher, dass die folgenden
Einstellungen richtig sind:
- Stellen Sie sicher, dass alle erforderlichen Treiber für Ihr Mainboard oder SATA Controller-Karte installiert
sind.
- Verbinden Sie das SATA-Kabel mit einen freien SATA-Anschluss auf dem Mainboard oder der SATA
Controller-Karte.
- Verbinden Sie das Stromkabel mit dem Netzteil.
- Stellen Sie sicher, dass AHCI (Advanced Host Controller Interface) auf dem Motherboard oder der SATA-
Controller-Karte aktiviert ist. AHCI ermöglicht die "HotSwap"-Funktion der SATA-Festplatten, ohne dass
Sie den Computer ausschalten müssen, bevor Sie die Festplatte anschließen oder entfernen. Bitte folgen
Sie den Anweisungen Ihres Motherboards oder der SATA-Controller-Karte, um die AHCI-Funktion zu
aktivieren.
Wenn Sie eine neue Festplatte benutzen, muss die Festplatte initialisiert werden (formatiert), bevor sie nutzbar ist.
Weitere Informationen darüber, wie man eine neue Festplatte formatiert, entnehmen Sie bitte dem
Benutzerhandbuch zur Festplatte oder besuchen Sie
System läuft unter Windows 7: http://www.thermaltakeusa.com/Faq.aspx?ID=1143
System läuft unter Windows Vista:http://www.thermaltakeusa.com/Faq.aspx?ID=1079
System läuft unter Windows XP: http://www.thermaltakeusa.com/Faq.aspx?ID=1073
11
Seite laden ...
Seite laden ...
Seite laden ...
Seite laden ...

22
21
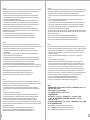
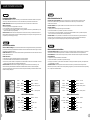
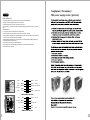
AUDIO AC'97 Function
GROUND
L-RET
R-RET
NC
BROWN
RED
MIC IN
MIC POWER
KEY
BLUE
NC
BLUE
L-OUT
YELLOW
R-OUT
BLACK
YELLOW
AUDIO AC'97 Function
GROUND
L-RET
R-RET
NC
BROWN
RED
MIC IN
MIC POWER
KEY
BLUE
NC
BLUE
L-OUT
YELLOW
R-OUT
BLACK
YELLOW
PRESENCE#
BLACK
SENSE1_RETURN
AUD GND
SENSE2_RETURN
YELLOW
BROWN
RED
PORT1 R
PORT2 R
PORT1 L
BLUE
PORT2 L
SENSE_SEND
KEY
PURPLE
GREEN
ORANGE
BLACK
AUDIO AZALIA Function
PRESENCE#
BLACK
SENSE1_RETURN
AUD GND
SENSE2_RETURN
YELLOW
BROWN
RED
PORT1 R
PORT2 R
PORT1 L
BLUE
PORT2 L
SENSE_SEND
KEY
PURPLE
GREEN
ORANGE
BLACK
AUDIO AZALIA Function
Leads Installation Guide
Leads Installation Guide
Case LED Connection / On the front of the case, you can find some LEDs and switch leads. Please consult your user
manual of your motherboard manufacturer, then connect these leads to the panel header on the motherboard.
USB 2.0 Connection / Please consult your motherboard manual to find out the section of “USB connection”.
USB 3.0 connection /
1. Make sure your motherboard supports USB 3.0 connection.
2. Connect the USB 3.0 cable to the available USB 3.0 port on your computer.
3. If your computer does not have USB 3.0 capability, you can plug the USB 3.0 cable into any available USB 2.0 port, but
operates at the USB 2.0 full speed (480 Mb/s).
Audio Connection / Please refer to the following illustration of Audio connector and your motherboard user manual.
Please select the motherboard which used AC’97 or HD Audio(Azalia),(be aware of that your audio supports AC’97 or HD
Audio (Azalia)) or it will damage your device(s).
Anschlüsse herstellen
Gehäuse-LED-Verbindungen / Auf der Gehäusevorderseite finden Sie einige LEDs und Verbindungen. Bitte nehmen
Sie die Gebrauchsanweisung Ihres Motherboard Herstellers zur Hilfe und schließen Sie diese Verbindungen an die Panel
Header Belegung des Motherboards an.
USB 2.0 Anschluss / Bitte nehmen Sie die Gebrauchsanweisung Ihres Motherboards zur Hilfe und lesen Sie unter dem
Kapitel „USB Anschlüsse“ nach.
USB 3.0 Anschluss /
1. Stellen Sie sicher, dass Ihre Hauptplatine den USB 3.0 Anschluss unterstützt.
2. Verbinden Sie das USB 3.0 Kabel mit dem USB 3.0 Port auf Ihrem Computer.
3. Wenn Ihr Computer nicht mit USB 3.0 kompatibel ist, können Sie das USB-3.0-Kabel in einen freien USB 2.0-Anschluss
stecken und so die volle USB 2.0-Geschwindigkeit (480 MB/s) nutzen.
Audio Anschlüsse / Bitte beachten Sie die folgende Abbildung der Audio Anschlüsse und die Anweisung in der
Gebrauchsanweisung Ihres Motherboards. Bitte wählen Sie das Motherboard, das AC’97 oder HD Audio(Azalia)
verwendet, (achten Sie darauf, dass Ihr Audio AC’97 bzw. HD Audio (Azalia unterstützt)). Andernfalls entstehen schwere
Schäden an Ihrem(n) Gerät(en)!!!
Guide d'installation des fils
Connexion des voyants du boîtier / Sur la face avant du boîtier, vous trouverez plusieurs voyants et les fils des
boutons. S'il vous plaît consultez le guide d'utilisateur du fabricant de votre carte mère, puis connectez ces fils aux
onnecteurs sur la carte mère.
Connexion USB 2.0 / S'il vous plaît consultez le manuel de votre carte mère à la section "Connexion USB".
Connexion USB 3.0 /
1. Vérifiez que votre carte mère prend en charge la connexion USB 3.0.
2. Connectez le câble USB 3.0 au port USB 3.0 disponible sur votre ordinateur.
3. Si votre ordinateur n’a pas de capacité USB 3.0, vous pouvez brancher le câble USB 3.0 dans un port USB 2.0 disponible,
mais il ne fonctionnera qu’à la vitesse USB 2.0 maximale (480 Mbit/s).
Connexion Audio / S'il vous plaît référez vous à l'illustration suivante du connecteur audio et au guide de l'utilisateur de
votre carte mère. S'il vous plaît sélectionnez une carte mère supportant AC'97 ou HD Audi (Azalia), (faites attention que
votre audio supporte l'AC'97 ou HD Audio (Azalia)) sinon cela pourrait endommager votre matériel.
Guía de Instalación de Cables
Conexión del LED de la caja / En la parte frontal de la caja, encontrará algunos LED y cables de interruptores. Consulte el
manual del usuario del fabricante de la placa madre, a continuación conecte estos cables al conector de la placa madre.
Conexión USB 2.0 / Consulte el manual de la placa madre para obtener más información sobre el apartado “Conexión USB".
Conexión USB 3.0 /
1. Asegúrese de que la placa base admite conexión USB 3.0.
2. Conecte el cable USB 3.0 al puerto USB 3.0 disponible en el equipo.
3. Si el equipo no tiene USB 3.0, puede conectar el cable USB 3.0 en cualquier puerto USB 2.0 disponible, pero trabajará a toda
la velocidad USB 2.0 (480 Mb/s).
Conexión de Audio / Consulte la siguiente ilustración del conector de Audio y el manual del usuario de la placa madre.
Seleccione la placa madre que utiliza AC’97 o HD Audio (Azalia), (asegúrese de que su audio admite AC’97 o HD Audio (Azalia))
si no, sus dispositivos resultarán dañados.
Seite laden ...
Seite laden ...
Seite laden ...
Seite laden ...
-
 1
1
-
 2
2
-
 3
3
-
 4
4
-
 5
5
-
 6
6
-
 7
7
-
 8
8
-
 9
9
-
 10
10
-
 11
11
-
 12
12
-
 13
13
-
 14
14
-
 15
15
-
 16
16


Thermaltake V9 BlacX Edition Benutzerhandbuch
- Kategorie
- Computergehäuse
- Typ
- Benutzerhandbuch
in anderen Sprachen
- English: Thermaltake V9 BlacX Edition User manual
- français: Thermaltake V9 BlacX Edition Manuel utilisateur
- español: Thermaltake V9 BlacX Edition Manual de usuario
- italiano: Thermaltake V9 BlacX Edition Manuale utente
- русский: Thermaltake V9 BlacX Edition Руководство пользователя
- português: Thermaltake V9 BlacX Edition Manual do usuário
- 日本語: Thermaltake V9 BlacX Edition ユーザーマニュアル
- Türkçe: Thermaltake V9 BlacX Edition Kullanım kılavuzu
Verwandte Papiere
-
Thermaltake M5 Benutzerhandbuch
-
-
Thermaltake Level 10 GTS Snow Edition Benutzerhandbuch
-
-
-
-
-
-
-