Bresser 7007320 Bedienungsanleitung
- Kategorie
- Wecker
- Typ
- Bedienungsanleitung
Dieses Handbuch eignet sich auch für

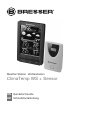
Weather Station · Wetterstation
ClimaTemp WS + Sensor
Quickstart Guide
EN
Schnellstartanleitung
DE

DE
Besuchen Sie unsere Website über den folgenden QR Code oder Weblink um weitere
Informationen zu diesem Produkt oder die verfügbaren Übersetzungen dieser Anleitung zu
finden.
EN
Visit our website via the following QR Code or web link to find further information on this
product or the available translations of these instructions.
FR
Si vous souhaitez obtenir plus d’informations concernant ce produit ou rechercher ce mode
d’emploi en d’autres langues, rendez-vous sur notre site Internet en utilisant le code QR ou le
lien correspondant.
NL
Bezoek onze internetpagina via de volgende QR-code of weblink, voor meer informatie over dit
product of de beschikbare vertalingen van deze gebruiksaanwijzing.
IT
Desidera ricevere informazioni esaustive su questo prodotto in una lingua specifica? Venga
a visitare il nostro sito Web al seguente link (codice QR Code) per conoscere le versioni
disponibili.
ES
¿Desearía recibir unas instrucciones de uso completas sobre este producto en un idioma
determinado? Entonces visite nuestra página web utilizando el siguiente enlace (código QR)
para ver las versiones disponibles.
CA
Voleu una guia detallada d'aquest producte en un idioma específic? Visiteu el nostre lloc web
a través del següent enllaç (codi QR) per accedir a les versions disponibles.
PT
Deseja um manual detalhado deste produto numa determinada língua? Visite a nossa Website
através da seguinte ligação (QR Code) das versões disponíveis.
www.bresser.de/P7007320
www.bresser.de/warranty_terms
GARANTIE · WARRANTY · GARANTÍA · GARANZIA

English......................
4
Deutsch ....................
16

4 / 32
1 Imprint
Bresser GmbH
Gutenbergstr. 2
46414 Rhede
Germany
http://www.bresser.de
If you wish to submit a warranty claim or service request,
please refer to the “Warranty” and “Service” information in
this document. Please be aware that any requests or sub-
missions sent directly to the manufacturer cannot be pro-
cessed.
Errors excepted. Subject to technical modifications.
© 2019 Bresser GmbH
All rights reserved.
Reproduction of this document, including extracts, in any
form (photocopied, printed etc.) or the use and distribution
of this document by electronic means (image file, website
etc.) is not permitted without the prior written consent of the
manufacturer.
The terms and brand names of the respective companies
used in this document are protected by brand, patent or
product law in Germany, the European Union and/or other
countries.
2 Validity information
This documentation is valid for the products with the article
numbers listed below:
7007320
Manual version: v0919

5 / 32
Manual description:
Quickstart_7007320_ClimaTemp-WS_en-
de_BRESSER_v092019a
With any service inquiries, please state these information.
3 About this Instruction Manual
NOTICE
This Quick Start guide is not intended to replace the
more detailed user manual.
Please read the safety instructions and the operating in-
structions carefully before use.
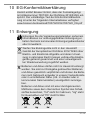
4 General safety instructions
DANGER
Risk of electric shock
This device has electronic parts operated via a power
source (power supply and/or batteries). Improper use of this
product can cause an electric shock. An electric shock can
cause serious or potentially fatal injuries. The following
safety information must be observed at all times.
• Children must only use the device under adult supervi-
sion! Only use the device as described in the manual;
otherwise, you run the risk of an electric shock.
• Disconnect the device from the power supply by pulling
the power plug when it is not used or in case of longer
interruption of operation and before starting any work
on maintenance and cleaning.

6 / 32
• Position your device so that it can be disconnected
from the power supply at any time. The power socket
should be installed near the device and should be eas-
ily accessible as the mains cable plug is used to dis-
connect the device from the power supply.
• To disconnect the device from the power supply, al-
ways pull on the plug. Never pull on the cable.
• Before starting up the device, check the device, the
cables and the connections for signs of damage.
• Never use a damaged device or a device with dam-
aged live parts. Damaged parts must be immediately
replaced by an authorised service company.
• Only use the device in complete dry environment and
do not touch it with wet or moist parts of your body.
DANGER
Risk of suffocation
Improper use of this product can result in suffocation. This
is particularly dangerous for children. The following safety
information must be observed at all times.
• Keep packaging materials (plastic bags, rubber bands
etc.) away from children. They can cause suffocation.
• This product contains small parts that could be swal-
lowed by children. There is a risk of choking!
DANGER
Risk of explosion
Improper use of this product can cause an explosion. The
following safety information must be observed at all times to
prevent an explosion.

7 / 32
• Do not expose the device to high temperatures. Use
only the supplied power supply or the recommended
batteries. Do not short-circuit the device or batteries or
throw them into a fire! Excessive heat or improper
handling could trigger a short circuit, a fire, or an explo-
sion.
NOTICE
Risk of damage to property
Improper handling can result in damage to the device and/
or to the accessories. Always observe the following safety
information when using the device.
• Never disassemble the device. In the event of a fault,
please contact your specialist retailer. The specialist re-
tailer will contact the service centre and send the
device for repair if necessary.
• Do not expose this device to higher temperatures and
protect it from water and high humidity.
• Do not immerse the unit in water!
• Protect the device from severe shocks!
• For this device only use accessories and spare parts
that comply with the technical information.
• Use only the recommended batteries. Always replace
weak or empty batteries with a new, complete set of
batteries at full capacity. Do not use batteries from dif-
ferent brands or with different capacities. Remove the
batteries from the unit if it has not been used for a long
time.
• Never use rechargeable batteries.

8 / 32
NOTICE
Risk of voltage damage!
The manufacturer is not liable for voltage damage due to
improperly inserted batteries or through the use of an im-
proper power adapter!
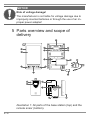
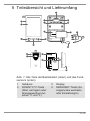
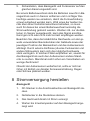
5 Parts overview and scope of
delivery
1
2
3
8
9
4
5
12
14
13
11
6
7
10
15
16
17
18
20
19
22
A
B
C
21
Illustration1: All parts of the base station (top) and the
remote snsor (bottom).

9 / 32
1 Housing 2 Display
3 DOWN/°C/°F button
(decrease value or dis-
play change between
°C and °F)
4 MODE/SET button
(change display mode
or settings)
5 UP/ALARM button (in-
crease value or enable
alarm)
6 SNOOZE/DIMMER but-
ton (snooze function or
display brightness set-
ting)
7 RF SEARCH button
(initiate sensor search)
8 MEMORY button (show
stored highest and low-
est values or delete
storage)
9 Battery compartment 10 WEATHER button (set
weather)
11 OUT-TEMP ALERT but-
ton (set and enable out-
door temperature alert)
12 Battery compartment
cover
13 DC connection socket
for coaxial/barrel con-
nector
14 DC power adapter with
coaxial/barrel plug
15 Housing (Remote
sensor)
16 Display (Remote
sensor)
17 Wall mount fixture 18 Battery compartment
(Remote sensor)
19 RESET button (reset all
settings)
20 °C/°F button (display
change between °C or
°F)
21 Battery compartment
cover
22 Stand (fold-out)
Scope of delivery

10 / 32
Base station (A), power adapter (B), remote Sensor (C)
Recommended batteries (not included)
2 pcs. Micro batteries (1.5V AAA type), 2 pcs. Mignon bat-
teries (1.5V AA type) optionally
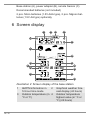
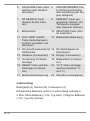
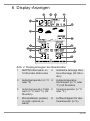
6 Screen display
17
14
15
13
1
2
12
11
10
9
4
8
6
5
3
16
7
Illustration2: Screen display of the base station
1 AM/PM information in
12-hour time mode
2 Graphical weather fore-
cast display (24 hours)
3 Outdoor temperature (in
°C or °F)
4 Outdoor temperature
highest value (in °C or
°F) (24 hours)

11 / 32
5 Outdoor temperature
lowest value (in °C or °F)
(24 hours)
6 Indoor temperature (in
°C or °F)
7 Climate indicator (out-
door) (too cold, optimal,
too warm)
8 Humidity indoors (in %)
9 Humidity highest value
for outdoors (in %) (24
hours)
10 Humidity lowest value
for outdoors (in %) (24
hours)
11 Humidity (in %) 12 Weather trend (48
hours)
13 Date 14 Symbol for radio signal
15 Current time (seconds)
or weekday or alarm
time (display depends
on the selected display
mode)
16 Symbol for active alarm
17 Current time
(hours:minutes:seconds)
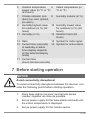
7 Before starting operation
NOTICE
Avoid connectivity disruptions!
To avoid connectivity disruptions between the devices, con-
sider the following points before starting operation.
1. Place base station (receiver) and remote sensor
(sender) together as close as possible.
2. Set up power supply for the base station and wait until
the indoor temperature is displayed.
3. Set up power supply for the remote sensor.

12 / 32
4. Position the base station and the remote sensor within
the effective transmission range.
5. Ensure that the base station and remote sensor are as-
signed to the same channel.
When changing batteries always change batteries in the
main unit as well as all remote units and replace them in the
correct order, so the remote connection can be re-estab-
lished. If either of the devices is mains-powered, the power
supply must be disconnected for a short moment also for
this device when exchanging the batteries. If batteries are
exchanged in only one of the devices (i.e. the remote
sensor) the signal can’t be received or can’t be received
correctly.
Note, that the effective range is vastly affected by building
materials and position of the main and remote units. Due to
external influences (various RC devices and other sources
of interference), the maximum distance can be greatly re-
duced. In such cases we suggest to position the main unit
and the remote sensor at other places. Sometimes all it
takes is a relocation of one of these components of a few
inches!
Though the remote unit is weather proof, it should be placed
away from direct sunlight, rain or snow.
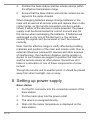
8 Setting up power supply
Base station
1. Put the DC connector into the connection socket of the
base station.
2. Put the mains plug into the power outlet.
3. The device is energized directly.
4. Wait until the indoor temperature is displayed on the
base station.

13 / 32
Remote sensor
5. Remove the battery compartment cover.
6. Insert the batteries into the battery compartment. En-
sure that the battery polarity (+/-) is correct.
7. Replace the battery compartment cover.
9 Automatic time setting
After the power supply was established, the clock will auto-
matically search for the radio signal. The clock will automat-
ically search for the radio signal.
If the radio signal is received correctly, the date and time
will be set automatically and the radio control signal icon
turns on.
If the clock fails to receive the time signal, go ahead with the
following steps:
1. Press DOWN/°C/°F button and UP/ALARM button for
approx. 2 seconds to initiate radio sinal reception.
2. If the device is still not receiving the signal, the time
must be set manually.
Read the detailed manual for more information about
manual time setting and other user defined settings (see
download information on page 2).
10 EC Declaration of Conformity
Hereby, Bresser GmbH declares that the equipment type
with item number 7007320 : is in compliance with Directive:
2014/30/EU. The full text of the EU declaration of conform-
ity is available at the following internet address:
www.bresser.de/download/7007320/CE/7007320_CE.pdf

14 / 32
11 Disposal
Dispose of the packaging materials properly, accord-
ing to their type, such as paper or cardboard. Contact
your local waste-disposal service or environmental au-
thority for information on the proper disposal.
Do not dispose of electronic devices in the household
garbage!
As per Directive 2012/19/EC of the European Parlia-
ment on waste electrical and electronic equipment and
its adaptation into German law, used electronic
devices must be collected separately and recycled in
an environmentally friendly manner.
Do not dispose of batteries and rechargeable batteries
with the household waste. You are legally required to
return used batteries and rechargeable batteries. After
they are used, the batteries can be returned free of
charge to our point of sale or to a nearby location (for
example, retailers or municipal collecting points).
Batteries and rechargeable batteries are marked with a
symbol of a crossed-out dustbin and the chemical sym-
bol of the pollutant. “Cd” stands for Cadmium, “Hg”
stands for mercury and “Pb” stands for lead.
12 Warranty
The regular guarantee period is 2 years and begins on the
day of purchase. To benefit from an extended voluntary
guarantee period as stated on the gift box, registration on
our website is required.

15 / 32
You can consult the full guarantee terms as well as informa-
tion on extending the guarantee period and details of our
services at www.bresser.de/warranty_terms.

16 / 32
1 Impressum
Bresser GmbH
Gutenbergstr. 2
46414 Rhede
Germany
http://www.bresser.de
Für etwaige Gewährleistungsansprüche oder Serviceanfra-
gen verweisen wir auf die Informationen zu „Garantie“ und
„Service“ in dieser Dokumentation. Wir bitten um Verständ-
nis, dass direkt an die Hersteller-Anschrift gerichtete Anfra-
gen oder Einsendungen nicht bearbeitet werden können.
Irrtümer und technische Änderungen vorbehalten.
© 2019 Bresser GmbH
Alle Rechte vorbehalten.
Die Reproduktion dieser Dokumentation – auch auszugs-
weise – in irgendeiner Form (z.B. Fotokopie, Druck, etc.) so-
wie die Verwendung und Verbreitung mittels elektronischer
Systeme (z.B. Bilddatei, Website, etc.) ohne eine vorherige
schriftliche Genehmigung des Herstellers ist nicht gestattet.
Die in dieser Dokumentation verwendeten Bezeichnungen
und Markennamen der jeweiligen Firmen sind im Allgemei-
nen in Deutschland, der Europäischen Union und/oder wei-
teren Ländern waren-, marken- und/oder patentrechtlich ge-
schützt.
2 Gültigkeitshinweis
Diese Dokumentation ist gültig für die Produkte mit den
nachfolgend aufgeführten Artikelnummern:
7007320

17 / 32
Anleitungsversion: v0919
Bezeichnung dieser Anleitung:
Quickstart_7007320_ClimaTemp-WS_en-de_BRES-
SER_v092019a
Informationen bei Serviceanfragen stets angeben.
3 Zu dieser Anleitung
HINWEIS
Diese Schnellstart-Anleitung ersetzt nicht die ausführli-
che Bedienungsanleitung!
Lesen Sie vor Benutzung des Geräts aufmerksam die Si-
cherheitshinweise und die ausführliche Bedienungsanlei-
tung.
4 Allgemeine Sicherheitshinweise
GEFAHR
Gefahr eines Stromschlags!
Dieses Gerät beinhaltet Elektronikteile, die über eine Strom-
quelle (Netzteil und/oder Batterien) betrieben werden. Bei
unsachgemäßer Verwendung dieses Produkts besteht die
Gefahr eines Stromschlags. Ein Stromschlag kann zu
schweren bis tödlichen Verletzungen führen. Beachten Sie
daher unbedingt die nachfolgenden Sicherheitsinformatio-
nen.

18 / 32
• Lassen Sie Kinder beim Umgang mit dem Gerät nie un-
beaufsichtigt! Die Nutzung darf nur, wie in der Anlei-
tung beschrieben, erfolgen, andernfalls besteht die Ge-
fahr eines Stromschlags!
• Unterbrechen Sie die Stromzufuhr, wenn Sie das Gerät
nicht benutzen, im Falle einer längeren Betriebsunter-
brechung sowie vor allen Wartungs- und Reinigungsar-
beiten, indem Sie den Netzstecker ziehen.
• Platzieren Sie Ihr Gerät so, dass es jederzeit vom
Stromnetz getrennt werden kann. Die Netzsteckdose
sollte sich immer in der Nähe Ihres Geräts befinden
und gut zugänglich sein, da der Stecker des Netzka-
bels als Trennvorrichtung zum Stromnetz dient.
• Um das Gerät vom Stromnetz zu trennen, ziehen Sie
immer am Netzstecker und niemals am Kabel!
• Überprüfen Sie das Gerät, die Kabel und Anschlüsse
vor Inbetriebnahme auf Beschädigungen.
• Beschädigtes Gerät oder ein Gerät mit beschädigten
stromführenden Teilen niemals in Betrieb nehmen! Be-
schädigte Teile müssen umgehend von einem autori-
sierten Service-Betrieb ausgetauscht werden.
• Betreiben Sie das Gerät nur in vollkommen trockener
Umgebung und berühren Sie das Gerät nicht mit nas-
sen oder feuchten Körperteilen.
GEFAHR
Erstickungsgefahr!
Bei unsachgemäßer Verwendung dieses Produkts besteht
Erstickungsgefahr, insbesondere für Kinder. Beachten Sie
deshalb unbedingt die nachfolgenden Sicherheitsinformatio-
nen.

19 / 32
• Verpackungsmaterialien (Plastiktüten, Gummibänder,
etc.) von Kindern fernhalten! Es besteht Erstickungsge-
fahr!
• Dieses Produkt beinhaltet Kleinteile, die von Kindern
verschluckt werden können! Es besteht Erstickungsge-
fahr!
GEFAHR
Explosionsgefahr!
Bei unsachgemäßer Verwendung dieses Produkts besteht
Explosionsgefahr. Beachten Sie unbedingt die nachfolgen-
den Sicherheitsinformationen, um eine Explosion zu vermei-
den.
• Setzen Sie das Gerät keinen hohen Temperaturen aus.
Benutzen Sie nur das mitgelieferte Netzteil oder die
empfohlenen Batterien. Gerät und Batterien nicht kurz-
schließen oder ins Feuer werfen! Durch übermäßige
Hitze und unsachgemäße Handhabung können Kurz-
schlüsse, Brände und sogar Explosionen ausgelöst
werden!
HINWEIS
Gefahr von Sachschäden!
Bei unsachgemäßer Handhabung können das Gerät und/
oder die Zubehörteile beschädigt werden. Verwenden Sie
das Gerät deshalb nur entsprechend den nachfolgenden Si-
cherheitsinformationen.
• Bauen Sie das Gerät nicht auseinander! Wenden Sie
sich im Falle eines Defekts an Ihren Fachhändler. Er
nimmt mit dem Service-Center Kontakt auf und kann
das Gerät ggf. zwecks Reparatur einschicken.

20 / 32
• Setzen Sie das Gerät keinen hohen Temperaturen aus
und schützen Sie es vor Wasser und hoher Luftfeuch-
tigkeit.
• Gerät nicht in Wasser tauchen!
• Setzen Sie das Gerät keinen Erschütterungen aus.
• Verwenden Sie für dieses Gerät nur Zubehör- und Er-
satzteile die den technischen Angaben entsprechen.
• Nur die empfohlenen Batterien verwenden. Schwache
oder verbrauchte Batterien immer durch komplett neu-
en Satz Batterien mit voller Kapazität ersetzen. Keine
Batterien unterschiedlicher Marken, Typen oder mit un-
terschiedlich hoher Kapazität verwenden. Batterien aus
dem Gerät entfernen wenn es längere Zeit nicht be-
nutzt wird.
• Verwenden Sie keine wieder aufladbaren Batterien (Ak-
kus).
HINWEIS
Gefahr von Spannungsschäden!
Für Spannungsschäden in Folge falsch eingelegter Batteri-
en oder durch die Nutzung eines nicht geeigneten Netzteils
übernimmt der Hersteller keine Haftung!
Seite wird geladen ...
Seite wird geladen ...
Seite wird geladen ...
Seite wird geladen ...
Seite wird geladen ...
Seite wird geladen ...
Seite wird geladen ...
Seite wird geladen ...
Seite wird geladen ...
Seite wird geladen ...
Seite wird geladen ...
Seite wird geladen ...
-
 1
1
-
 2
2
-
 3
3
-
 4
4
-
 5
5
-
 6
6
-
 7
7
-
 8
8
-
 9
9
-
 10
10
-
 11
11
-
 12
12
-
 13
13
-
 14
14
-
 15
15
-
 16
16
-
 17
17
-
 18
18
-
 19
19
-
 20
20
-
 21
21
-
 22
22
-
 23
23
-
 24
24
-
 25
25
-
 26
26
-
 27
27
-
 28
28
-
 29
29
-
 30
30
-
 31
31
-
 32
32


Bresser 7007320 Bedienungsanleitung
- Kategorie
- Wecker
- Typ
- Bedienungsanleitung
- Dieses Handbuch eignet sich auch für
in anderen Sprachen
- English: Bresser 7007320 Owner's manual
Verwandte Artikel
-
Bresser 7004502000000 Bedienungsanleitung
-
-
-
-
-
Bresser WTW Professional Rain Gauge Bedienungsanleitung
-
Bresser 7004200 Bedienungsanleitung
-
-
Bresser Meteo NBF Colour DCF radio controlled Weather Station Bedienungsanleitung
-