
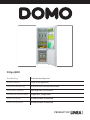
PRODUCT OF
DO927BFK
Handleiding Koelkast en diepvries
Mode d’emploi Frigo et congélateur
Gebrauchsanleitung Kühlschrank und Gefrierschrank
Instruction booklet Refridgerator and freezer
Manual de instrucciones congelador

Lees aandachtig alle instructies - bewaar deze handleiding voor latere raadpleging.
Lisez attentivement les instructions - gardez le mode d’emploi pour utilisation ultérieur.
Lesen Sie genau die Anweisungen - bewahren Sie die Gebrauchsanleitung für spätere
heranziehung.
Read all instructions carefully - save this instruction manual for future reference.
Lea detenidamente todas las instrucciones - Conserve este manual para futura referencia.
budoucího nahlédnutí.
budúceho nahliadnutie.
NL Nederlands 3
FR Français 14
DE Deutsch 25
EN English 36
ES Espagnol 46
CZ 56
SK 66
Seite laden ...
Seite laden ...
Seite laden ...
Seite laden ...
Seite laden ...
Seite laden ...
Seite laden ...
Seite laden ...
Seite laden ...
Seite laden ...
Seite laden ...
Seite laden ...
Seite laden ...
Seite laden ...
Seite laden ...
Seite laden ...
Seite laden ...
Seite laden ...
Seite laden ...
Seite laden ...
Seite laden ...
Seite laden ...

25
DO927BFK
www.domo-elektro.be
DE
GARANTIE
bevor Sie Ihnen angeboten werden. Sollten dennoch
Unsere Mitarbeiter helfen Ihnen gern weiter!
+32 14 21 71 91 [email protected]
Montag – Donnerstag: 8:30 Uhr – 12:00 Uhr und von 13:00 Uhr – 17:00 Uhr
Freitag: 8:30 Uhr – 12:00 Uhr und von 13:00 Uhr – 16:30 Uhr
Garantie wird auf der Grundlage des Kassenbons gewährt.
Die Garantie auf Accessoires und Verschleißteile beträgt 6 Monate.
automatisch in den folgenden Fällen:
· Bei Nichtbeachtung der Anweisungen in dieser Bedienungsanleitung.
·
·
·
· Bei vom Verbraucher oder von nicht ermächtigten Dritten vorgenommenen Reparaturen
oder Änderungen am Gerät.
·
Hersteller empfohlen oder geliefert werden.

26
DO927BFK
DE
SICHERHEITSVORKEHRUNGEN
· Das Verpackungsmaterial sowohl innen als auch außen entfernen. Die Außenseite des
·
· Küchenzeile für Personal in Geschäften
· Büros oder anderen professionellen Umgebungen
·
·
· Dieses Gerät darf von Kindern ab 16 Jahren oder älter gebraucht werden. Ebenso dürfen
hiermit verbundenen Gefahren erhalten haben.
· Kinder dürfen nicht mit dem Gerät spielen.
·
·
Herausziehen des Steckers vom Stromnetz getrennt werden.
·
werden.
· Achtung: das Gerät darf nicht mit einer externen Zeitschaltuhr oder Fernbedienung
gebraucht werden.
·
wenn das Gerät selbst beschädigt ist. Bringen Sie das Gerät zu Überprüfung und Reparatur
oder deren Servicepartner.
·
· Zum Anschluss des Geräts keine Verlängerungsschnur verwenden. Den Kühlschrank auch
Das
Kabel auch nicht mit einem anderen Kabel verbinden. Den Kühlschrank ausschließlich an
· Dieses Gerät muss an eine geerdete Steckdose angeschlossen werden. Bei Kurzschluss
Stromschlag.

27
DO927BFK
www.domo-elektro.be
DE
·
Verwendungszweck entsprechen.
· Der Aufstellungsort des Geräts darf während des Gebrauchs nicht verändert werden.
·
· Eine leerer Kühlschrank kann für Kinder sehr gefährlich sein. Die Türe des Kühlschranks
wodurch das Gerät ungefährlich wird.
beschädigt wird.
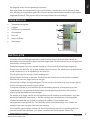
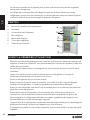
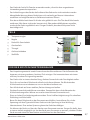
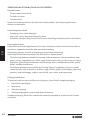
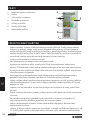
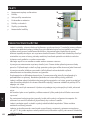
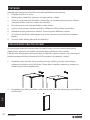
TEILE
1. Temperaturregler
2. Regale
3. Deckel für Gemüsefach
4. Gemüsefach
5. Türregal
6. Gefrierschubladen
7. Stellfüße
VOR DER ERSTEN INBETRIEBNAHME
· Das Verpackungsmaterial sowohl innen als auch außen entfernen. Die Außenseite des
·
·
·
·
· Einen zu hohen Feuchtigkeitsgrad vermeiden. Zuviel Luftfeuchtigkeit sorgt für schnellere
Eisbildung im Kühlschrank.
·
übereinstimmt. Eine andere Spannung kann das Gerät beschädigen.
·
Gerät aus und ziehen Sie den Stecker anschließend aus der Steckdose.
6
1
2
3
4
5
7

28
DO927BFK
DE
·
dem Fehlen einer Erdung resultieren.
·
werden.
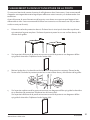
· Das Gerät nach dem Aufstellen vor dem Einschalten 12 Stunden stehen lassen. So kann das
Kühlmittel sich verteilen.
·
eine angemessene Temperatur abkühlt.
·
funktioniert das Gerät nicht ordnungsgemäß.
· Dieses Gerät darf nur in Innenräumen verwendet werden.
·
normal.
GEBRAUCH
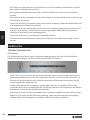
TEMPERATURREGELUNG
Kühlschrank
Stellen Sie diesen Regler auf die von Ihnen gewünschte Position ein.
·
vorab eingestellte Temperatur um.
·
·
werden. Stellen Sie den Regler anschließend auf die Einstellung „Medium“.

29
DO927BFK
www.domo-elektro.be
DE
Tieühlfach
LEBENSMITTEL IM KÜHLSCHRANK AUFBEWAHREN
Ergebnissen:
· Verwenden Sie nur sehr frische Lebensmittel einer sehr guten Qualität.
·
ihren Geschmack verlieren. Dadurch bleiben sie länger frisch. Es vermeidet außerdem die
Übertragung von Gerüchen.
·
·
LEBENSMITTEL IM GEFRIERSCHRANK EINFRIEREN UND AUFBEWAHREN
Verwendung des Gefrierschranks
·
· Zur Herstellung von Eiswürfeln.
· Zum Einfrieren von Lebensmitteln.
Tieühlwaren kaufen
· Die Verpackung darf nicht beschädigt sein.
· Innerhalb des Mindesthaltbarkeitsdatums verbrauchen.
·
schnell in den Gefrierschrank.

30
DO927BFK
DE
Einfrieren von frischen Lebensmitteln
eingefroren sind.
·
Desserts.
·
Auewahrung von Tieühlware
Zur Vermeidung des Geschmacksverlusts und von Austrocknung geben Sie die Lebensmittel
in eine luftdichte Verpackung.
1. Geben Sie die Lebensmittel in die Verpackung.
2. Entfernen Sie sämtliche Luft.
3. Dichten Sie die Verpackung ab.
4. Etikettieren Sie die Verpackung mit dem Datum des Einfrierens.
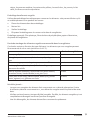
Empfohlene Auewahrungszeiten für Tieühlware im Gefrierschrank
Lebensmittel
Aue-
wahrungszeit
1 Monat
2 Monate
3 Monate
4 Monate
6 Monate
12 Monate

31
DO927BFK
www.domo-elektro.be
DE
Niemals vergessen:
·
diese vor Ablauf des Mindesthaltbarkeitsdatums einfrieren.
·
werden.
· Verzehren Sie einmal aufgetaute Lebensmittel schnell.
STROMAUSFALL
· Die meisten Stromausfälle werden innerhalb von 1 bis 2 Stunden behoben und ändern die
·
·
dauert.
·
VERSETZEN DES GERÄTS
Sie das Gerät erneut einschalten.
· Schalten Sie das Gerät aus und ziehen Sie den Netzstecker aus der Steckdose. Sämtliche
vermeiden.
·
Ihr Gerät verwendet das Kühlmittel Isobutan (R600a). Obwohl R600a ein umweltfreundliches
Im Falle eines Lecks durch eine Beschädigung der Kühlelemente halten Sie den Kühlschrank

32
DO927BFK
DE
REINIGUNG
1. Ziehen Sie den Stecker aus der Steckdose.
2. Entnehmen Sie die Lebensmittel und bewahren Sie diese an einem kühlen Ort auf.
3.
4.
5.
Reinigungsmittel.
6.
gründlich ab.
7. Stecken Sie den Stecker nach der Reinigung in die Steckdose und stellen Sie den
Temperaturregler erneut in der gewünschten Temperatur ein.
8. Legen Sie die Lebensmittel wieder in das Gerät.
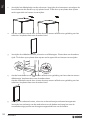
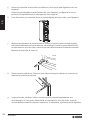
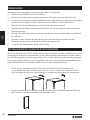
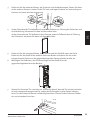
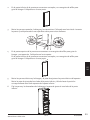
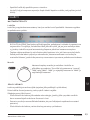
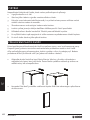
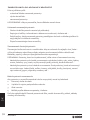
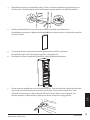
ÖFFNUNGSRICHTUNG DER TÜR ÄNDERN
anerkannten Fachmann zu kontaktieren und ihn diese Arbeiten durchführen zu lassen. Bevor
einen Maulschlüssel zu verwenden (beide nicht im Lieferumfang enthalten).
1. Entfernen Sie die Abdeckung der Schrauben. Entfernen Sie die Schrauben und
hoch und legen Sie diese zur Vermeidung von Kratzern auf einen weichen Untergrund.
3. Take off the middle hinge by removing
the screws. Lift the lower door and place
it on a padded surface to prevent it from
scratching.
Remove the screws’ covers and place
them to the opposite side.
Swap the position of the plastic tube and
hole cover on top of the lower door.
Remove the door block, screw and plastic
tube under the lower door and move
them to the opposite side. You may
need to replace the door block to fit the
opposite side.
unscrew
Reversing the Door Swing
Tools required: Philips style screwdriver / Flat bladed screwdriver / Hexagonal spanner
1. Take off the hinge cover.
2. Remove the the upper hinge. Lift the
upper door and place it on a padded
surface to prevent it from scratching.
Remove the door block, screw and plastic
tube under the upper door and move
them to the opposite side. You may
need to replace the door block to fit the
opposite side.
• Ensure the unit is unplugged and empty.
• All parts removed must be saved to do the reinstallation of the door.
• Do not lay the unit flat as this may damage the coolant system.
• We recommend that 2 people handle the unit during assembly.
• If you want to have the door swing reversed, we recommend that you contact a
qualified technician. You should only try to reverse the door yourself if you believe
that you are qualified to do so.
8
INSTALLATION
LFC60W16_IB_160201_grace.indd 8 1/2/16 10:43 am
2.
des Scharniers. Versetzen Sie diese auf die andere Seite.
3. Take off the middle hinge by removing
the screws. Lift the lower door and place
it on a padded surface to prevent it from
scratching.
Remove the screws’ covers and place
them to the opposite side.
Swap the position of the plastic tube and
hole cover on top of the lower door.
Remove the door block, screw and plastic
tube under the lower door and move
them to the opposite side. You may
need to replace the door block to fit the
opposite side.
unscrew
Reversing the Door Swing
Tools required: Philips style screwdriver / Flat bladed screwdriver / Hexagonal spanner
1. Take off the hinge cover.
2. Remove the the upper hinge. Lift the
upper door and place it on a padded
surface to prevent it from scratching.
Remove the door block, screw and plastic
tube under the upper door and move
them to the opposite side. You may
need to replace the door block to fit the
opposite side.
• Ensure the unit is unplugged and empty.
• All parts removed must be saved to do the reinstallation of the door.
• Do not lay the unit flat as this may damage the coolant system.
• We recommend that 2 people handle the unit during assembly.
• If you want to have the door swing reversed, we recommend that you contact a
qualified technician. You should only try to reverse the door yourself if you believe
that you are qualified to do so.
8
INSTALLATION
LFC60W16_IB_160201_grace.indd 8 1/2/16 10:43 am

33
DO927BFK
www.domo-elektro.be
DE
3.
an der anderen Seite ein. Heben Sie die Tür hoch und legen Sie diese zur Vermeidung von
Kratzern auf einen weichen Untergrund.
3. Take off the middle hinge by removing
the screws. Lift the lower door and place
it on a padded surface to prevent it from
scratching.
Remove the screws’ covers and place
them to the opposite side.
Swap the position of the plastic tube and
hole cover on top of the lower door.
Remove the door block, screw and plastic
tube under the lower door and move
them to the opposite side. You may
need to replace the door block to fit the
opposite side.
unscrew
Reversing the Door Swing
Tools required: Philips style screwdriver / Flat bladed screwdriver / Hexagonal spanner
1. Take off the hinge cover.
2. Remove the the upper hinge. Lift the
upper door and place it on a padded
surface to prevent it from scratching.
Remove the door block, screw and plastic
tube under the upper door and move
them to the opposite side. You may
need to replace the door block to fit the
opposite side.
• Ensure the unit is unplugged and empty.
• All parts removed must be saved to do the reinstallation of the door.
• Do not lay the unit flat as this may damage the coolant system.
• We recommend that 2 people handle the unit during assembly.
• If you want to have the door swing reversed, we recommend that you contact a
qualified technician. You should only try to reverse the door yourself if you believe
that you are qualified to do so.
8
INSTALLATION
LFC60W16_IB_160201_grace.indd 8 1/2/16 10:43 am
4.
eine Abdeckung. Versetzen Sie diese auf die andere Seite.
des Scharniers. Versetzen Sie diese auf die andere Seite.
3. Take off the middle hinge by removing
the screws. Lift the lower door and place
it on a padded surface to prevent it from
scratching.
Remove the screws’ covers and place
them to the opposite side.
Swap the position of the plastic tube and
hole cover on top of the lower door.
Remove the door block, screw and plastic
tube under the lower door and move
them to the opposite side. You may
need to replace the door block to fit the
opposite side.
unscrew
Reversing the Door Swing
Tools required: Philips style screwdriver / Flat bladed screwdriver / Hexagonal spanner
1. Take off the hinge cover.
2. Remove the the upper hinge. Lift the
upper door and place it on a padded
surface to prevent it from scratching.
Remove the door block, screw and plastic
tube under the upper door and move
them to the opposite side. You may
need to replace the door block to fit the
opposite side.
• Ensure the unit is unplugged and empty.
• All parts removed must be saved to do the reinstallation of the door.
• Do not lay the unit flat as this may damage the coolant system.
• We recommend that 2 people handle the unit during assembly.
• If you want to have the door swing reversed, we recommend that you contact a
qualified technician. You should only try to reverse the door yourself if you believe
that you are qualified to do so.
8
INSTALLATION
LFC60W16_IB_160201_grace.indd 8 1/2/16 10:43 am
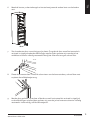
5.
Entfernen Sie den Stellfuß der anderen Seite vom Boden und setzen Sie ihn an der
entsprechenden Position an der gegenüberliegenden Seite am Boden wieder ein.
6.
gegenüberliegenden Seite des Bodens.
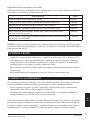
5. Reverse the middle hinge. Screw the
middle hinge onto the opposite side of
the unit.
6. Carefully set the upper door back into
place, inserting in onto the middle hinge.
7. Insert the upper hinge and screw it
tightly to the top of the unit.
Middle hinge
Ensure the lower door is aligned
horizontally and vertically, so that
the seals are closed on all sides
before finally tightening the hinge.
Ensure the upper door is aligned
horizontally and vertically, so that
the seals are closed on all sides
before finally tightening the hinge.
4. Remove the lower screws and lower
hinge from the unit bottom. Reverse the
lower hinge, move and secure it with
the lower screws to the opposite side of
the unit bottom. Carefully set the lower
door back into place, inserting it onto the
lower hinge.
8. Put the hinge cover back.
9
INSTALLATION
LFC60W16_IB_160201_grace.indd 9 1/2/16 10:43 am
7.
bevor Sie das mittlere Scharnier vollständig festziehen. Setzen Sie das Scharnier wieder
ein und schrauben Sie es fest.
5. Reverse the middle hinge. Screw the
middle hinge onto the opposite side of
the unit.
6. Carefully set the upper door back into
place, inserting in onto the middle hinge.
7. Insert the upper hinge and screw it
tightly to the top of the unit.
Middle hinge
Ensure the lower door is aligned
horizontally and vertically, so that
the seals are closed on all sides
before finally tightening the hinge.
Ensure the upper door is aligned
horizontally and vertically, so that
the seals are closed on all sides
before finally tightening the hinge.
4. Remove the lower screws and lower
hinge from the unit bottom. Reverse the
lower hinge, move and secure it with
the lower screws to the opposite side of
the unit bottom. Carefully set the lower
door back into place, inserting it onto the
lower hinge.
8. Put the hinge cover back.
9
INSTALLATION
LFC60W16_IB_160201_grace.indd 9 1/2/16 10:43 am

34
DO927BFK
DE
8.
Sie diese fest und befestigen Sie die Abdeckung erneut.
5. Reverse the middle hinge. Screw the
middle hinge onto the opposite side of
the unit.
6. Carefully set the upper door back into
place, inserting in onto the middle hinge.
7. Insert the upper hinge and screw it
tightly to the top of the unit.
Middle hinge
Ensure the lower door is aligned
horizontally and vertically, so that
the seals are closed on all sides
before finally tightening the hinge.
Ensure the upper door is aligned
horizontally and vertically, so that
the seals are closed on all sides
before finally tightening the hinge.
4. Remove the lower screws and lower
hinge from the unit bottom. Reverse the
lower hinge, move and secure it with
the lower screws to the opposite side of
the unit bottom. Carefully set the lower
door back into place, inserting it onto the
lower hinge.
8. Put the hinge cover back.
9
INSTALLATION
LFC60W16_IB_160201_grace.indd 9 1/2/16 10:43 am
9.
PROBLEME UND DEREN LÖSUNG
Gerät funktioniert nicht.
Der Kühlschrank springt zu oft an.
Ist die Türe gut geschlossen?
Das Gerät bekommt die falsche Spannung
Die Innentemperatur ist zu warm.
Die Temperatureinstellung ist zu niedrig.
Die Luftzufuhr ist blockiert.

35
DO927BFK
www.domo-elektro.be
DE
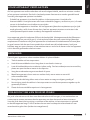
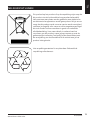
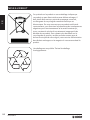
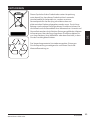
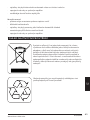
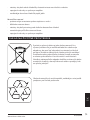
ENTSORGEN
Dieses Symbol auf dem Produkt oder seiner Verpackung
Sammelpunkt für das Recyling von elektrischen und
elektronischen Geräten abgegeben werden muss. Durch Ihren
Beitrag zum korrekten Entsorgen dieses Produkts schützen Sie
die Umwelt und die Gesundheit Ihrer Mitmenschen. Umwelt und
Informationen über das Recycling dieses Produkts erhalten Sie
Sie das Produkt gekauft haben.
Das Verpackungsmaterial ist wiederverwertbar. Entsorgen
Sie die Verpackung umweltgerecht und führen Sie sie der
Seite laden ...
Seite laden ...
Seite laden ...
Seite laden ...
Seite laden ...
Seite laden ...
Seite laden ...
Seite laden ...
Seite laden ...
Seite laden ...
Seite laden ...
Seite laden ...
Seite laden ...
Seite laden ...
Seite laden ...
Seite laden ...
Seite laden ...
Seite laden ...
Seite laden ...
Seite laden ...
Seite laden ...
Seite laden ...
Seite laden ...
Seite laden ...
Seite laden ...
Seite laden ...
Seite laden ...
Seite laden ...
Seite laden ...
Seite laden ...
Seite laden ...
Seite laden ...
Seite laden ...
Seite laden ...
Seite laden ...
Seite laden ...
Seite laden ...
Seite laden ...
Seite laden ...
Seite laden ...

LINEA 2000 bvba - Dompel 9 - 2200 Herentals - Belgium - Tel: +32 14 21 71 91 - Fax: +32 14 21 54 63
BESTEL
de originele
Domo-accessoires
en -onderdelen
online via:
of scan hier:
COMMANDEZ
d’authentiques
accessoires et
pièces Domo en
ligne sur:
ou scannez ici:
BESTELLEN SIE
die Domo
Original-Zubehör
und -Ersatzteile
online über:
oder hier scannen:
ORDER
the original
Domo
accessories and
parts online at:
or scan here:
webshop.domo-elektro.be
Webshop
-
 1
1
-
 2
2
-
 3
3
-
 4
4
-
 5
5
-
 6
6
-
 7
7
-
 8
8
-
 9
9
-
 10
10
-
 11
11
-
 12
12
-
 13
13
-
 14
14
-
 15
15
-
 16
16
-
 17
17
-
 18
18
-
 19
19
-
 20
20
-
 21
21
-
 22
22
-
 23
23
-
 24
24
-
 25
25
-
 26
26
-
 27
27
-
 28
28
-
 29
29
-
 30
30
-
 31
31
-
 32
32
-
 33
33
-
 34
34
-
 35
35
-
 36
36
-
 37
37
-
 38
38
-
 39
39
-
 40
40
-
 41
41
-
 42
42
-
 43
43
-
 44
44
-
 45
45
-
 46
46
-
 47
47
-
 48
48
-
 49
49
-
 50
50
-
 51
51
-
 52
52
-
 53
53
-
 54
54
-
 55
55
-
 56
56
-
 57
57
-
 58
58
-
 59
59
-
 60
60
-
 61
61
-
 62
62
-
 63
63
-
 64
64
-
 65
65
-
 66
66
-
 67
67
-
 68
68
-
 69
69
-
 70
70
-
 71
71
-
 72
72
-
 73
73
-
 74
74
-
 75
75
-
 76
76


in anderen Sprachen
- English: Domo DO927BFK Owner's manual
- français: Domo DO927BFK Le manuel du propriétaire
- español: Domo DO927BFK El manual del propietario
- Nederlands: Domo DO927BFK de handleiding
- slovenčina: Domo DO927BFK Návod na obsluhu
- čeština: Domo DO927BFK Návod k obsluze
Verwandte Papiere
-
Domo DO935DVK Bedienungsanleitung
-
Domo DO912K DO913DV Bedienungsanleitung
-
Linea DO926BFK Bedienungsanleitung
-
-
-
-
Domo DO937DV Bedienungsanleitung
-
-
Domo DO990TDK Bedienungsanleitung
-