


Animo
FC GL HW07/99
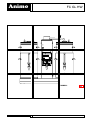
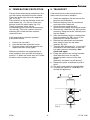
Animo FAVORIET COMBI GL 2x10
STOP
boiler
Kocher
bouiller
C
A
Fig. 3
~
Volt
~
Volt
boiler
Kocher
bouiller
Animo FAVORIET COMBI GL 2x5
STOP
MAX 400W
MAX 400W
B
H
I
J
G
F
E
C
D
A
B
H
I
J
G
F
E
C
D
~
Volt
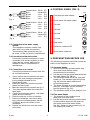
Afmetingen/Dimensions/Maße (Fig. 3 /Abb. 3)
FC GL 2x5 HW FC GL 2x10 HW FC GL 2X20 HW
A = 720 832 976
B = 950 922 1056
C = 365 365 383
D = 505 505 523
E = 795 795 900
F = 180 200 215
G = 205 205 305
H = 298 376 448
I = 352.5 422 494
J = 400 476 548
K = 292,5 292,5 310
L = 172,5 172,5 192,5
M= 136 136 151
N = 335,5 335,5 353,5
K
L
M
N
~
Volt
K
L
M
N
FC GL 2x5 HW FC GL 2x10 HW en FC GL 2x20 HW

Animo
07/99FC GL HW
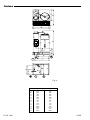
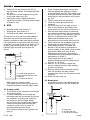
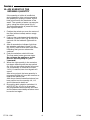
Afmetingen/Dimensions/Maße (Fig. 4 /Abb. 4)
FC GL 1x10 HW FC GL 1X20 HW
A = 550 623
B = 595 663
C = 365 383
D = 505 523
E = 795 900
F = 200 215
G = 205 305
H = 95 95
I = 140 140
J = 195 195
K = 292,5 310
L = 172,5 192,5
M= 136 151
N = 335,5 353,5
Animo FAVORIET COMBI GL 2x10
STOP
boiler
Kocher
bouiller
A
Fig. 4
~
Volt
~
Volt
B
H
I
J
G
F
E
C
D
K
L
M
N

Deutsch .............................................................. 9
Français ............................................................. 133
Animo behoudt zich het recht voor om onderdelen op elk gewenst moment te wijzigen, zonder voorafgaande of directe kennisgeving aan de afnemer.
De inhoud van deze handleiding kan eveneens gewijzigd worden zonder voorafgaande waarschuwing. Deze handleiding is geldig voor de machine in
standaarduitvoering. Animo kan derhalve niet aansprakelijk worden gesteld voor eventuele schade voortvloeiende uit van de standaarduitvoering
afwijkende specificaties van de aan u geleverde machine. Voor informatie betreffende afstelling, onderhoudswerkzaamheden of reparaties waarin
deze handleiding niet voorziet, wordt u verzocht contact op te nemen met de technische dienst van uw leverancier. Deze handleiding is met alle
mogelijke zorg samengesteld, maar Animo kan geen verantwoording op zich nemen voor eventuele fouten in dit boek of de gevolgen daarvan.
Animo has the right to change parts of the machine at any time without advice or direct announcements to the client. The contents of this manual can
also be changed without any announcements. This manual is to be used for the standard model/type of the machine. Thus Animo cannot be held
responsible for any damage resulting from the application of this manual to the version delivered to you. For extra information on adjustments
maintenance and repair, contact the technical department of your supplier. This manual has been written very carefully. However, Animo cannot be
held responsible neither for mistakes in the book nor for their consequences.
Animo behält sich das Recht vor, Einzelteile ohne vorherige Bekanntgabe an den Kunden zu ändern. Der Inhalt dieser Anleitung kann ebenfalls ohne
vorherige Bekanntgabe geändert werden. Diese Anleitung gilt für die Standardausführung der Maschine. Animo haftet daher nicht für Informationen
über Einstellungen, Wartungsarbeiten oder Reparaturen, die nicht in dieser Anleitung enthalten sind. Wenden Sie sich bitte gegebenenfalls an den
Kundendienst Ihres Händlers. Diese Anleitung wurde mit größtmöglicher Sorgfalt zusammengestellt. Animo haftet jedoch nicht für etwaige Fehler in
dieser Anleitung oder für die Folgen solcher Fehler.
Animo se réserve le droit de modifier les pièces à n’importe quel instant, sans avis préalable et sans obligation de notification au client. Le contenu de
ce manuel est également sujet à modification sans avis préalable. Ce manuel s’applique au modèle standard de la machine. Par conséquent, Animo
n’est past responsable pour les dommages éventuels découlant de l’application de ce manuel aux modèles non standard. Pour les renseignements
sur certains réglages, les travaux d’entretien ou réparations qui ne seraient pas traités dans ce manuel, Animo ne peut pas ètre tenu responsable des
erreurs éventuelles ni des dommages qui en découleraient.
Animo
FC GL HW07/99

Animo
1
07/99FC GL HW
GB
TABLE OF CONTENTS
1. GENERAL DESCRIPTION ............................................................... 2
2. TECHNICAL DETAILS ..................................................................... 2
3. INSTALLATION ................................................................................ 3
3.1 Preparation to install ............................................................... 3
3.2 Connection to the electricity supply system ........................... 3
3.3 Connection to the water supply system .................................. 4
3.4 Connection to the drain outlet ................................................ 4
3.5 Connection on a counter ........................................................ 4
4. CONTROL PANEL (FIG.2) ............................................................. 4
5. PREPARATION BEFORE USE ...................................................... 4
5.1 Hot water heater ................................................................... 4
5.2 Flow water heater ................................................................. 4
6. USE .......... .................................................................................... 5
6.1 Brewing coffee ...................................................................... 5
6.2 Brewing tea .......................................................................... 5
6.3 Drawing off hot water ........................................................... 6
7. MAINTENANCE ............................................................................. 6
7.1 Cleaning (daily) .................................................................... 6
7.2 Removal of coffee deposits .................................................. 6
7.3 Descaling .............................................................................. 7
8. TEMPERATURE PROTECTION .................................................... 8
9. TRANSPORT ................................................................................. 8
10. ADJUSTMENT OF THE BREWING QUANTITY ............................. 9

Animo
FC GL HW07/99
2
This manual has been written for users of the Animo FC GL HW. Read this manual carefully for
good and safe use of this appliance.
1. GENERAL DESCRIPTION
The FC GL HW is an automatic coffeebrew installation. It has a flow water heater and 2 removable
electrical heated urns with a capacity of 5,10 or 20 litres each. Minimum brewing capacity is
1,25/2,5/5 litres and maximum capacity 5/10/20 litres per brew. The flow water heater brews the
water fast and doses automatic the selected quantities to assure a correct and efficient filtration.
This installation is provided with a separate hotwaterboiler and hotwatertap to draw of smaller
capacities (uptill a full jug of 1,8 litres) of hot water for tea, instant products etc..
In figure 1 the main parts are indicated.
In figure 2 the controls are indicated.
figure 1:
A - Hot waterreservoir F - Control panel column
B - Swivel arm G- Filter
C - Dry-boil safety guard Flow water heater H - Container DE
D - Dry-boil safety guard hot water reservoir I - Drain hose tape hot water heater
E - Drip tray with grid J - Hotwater tap
K - Switch hot waterreservoir
The machine is supplied with the following parts:
- 2x Container DE - Descaling funnel
- 2x Filter + basket filter insert - 2 sachets coffee fur remover
- 2x Blender - 2 sachets descaling solvent
- Basket filterpaper (50 sheets) - Operation manual
- 2x Level gauge brush - Water supply hoses of 1.5 m
- 2x Cable with plug (short) - Drip tray with grid
- Cable with plug (long)
2. TECHNICAL DATA
Type : FC GL 2x5 HW FC GL 2x10 HW FC GL 2x20 HW FC GL 1x10 HW FC GL 1x20 HW
Approx hourly capacity coffee : ± 20 L/h ± 40 L/h ± 80 L/h ± 40 L/h ± 80 L/h
Buffer quantity : 10 Litres 20 Litres 40 Litres 10 Litres 20 Litres
Minimum amount of coffee : 1,25 Litres 2,5 Litres 5 Litres 2,5 Litres 5 Litres
Hourly capacity hot water (ca) : approx. 15L/h approx. 15L/h approx. 15L/h approx. 15L/h approx. 15L/h
Heating up period of hot water unit (15-98˚C) : 14 min. 14 min. 14 min. 14 min. 14 min.
Maximal water drain : approx. 1,8 L approx. 1,8 L approx. 1,8 L approx. 1,8 L approx. 1,8 L
Recover time after max. drain :
approx.6,5 min approx.6,5 min approx.6,5 min approx.6,5 min approx.6,5min
Drawing speed : 1,8L / 20 sec. 1,8L / 20 sec. 1,8L / 20 sec. 1,8L / 20 sec. 1,8L / 20 sec.
Basket filter paper : Ø101/317 Ø152/457 Ø203/533 Ø152/457 Ø203/533
Electrical connection : 3N~ 400V 50Hz 3N~ 400V 50Hz 3N~ 400V 50Hz 3N~ 400V 50Hz 3N~ 400V 50Hz
Power : 5000W 8275W 11275W 8275W 11275W
Cold water supply : swivel 3/4” swivel 3/4” swivel 3/4” swivel 3/4” swivel 3/4”
Min. - Max. water pressure : 1.5 - 8 bar 1.5 - 8 bar 1.5 - 8 bar 1.5 - 8 bar 1.5 - 8 bar
Temperature and level detection : electronic electronic electronic electronic electronic
Overflow hose : hose 12 mm hose 12 mm hose 12 mm hose 12 mm hose 12 mm
Empty weight : approx. 38 kg approx. 45 kg approx. 60 kg approx. 30 kg approx. 56 kg
Dimensions : see fig. 3 see fig. 3 see fig. 3 see fig. 4 see fig. 4
Technical alterations are reserved

Animo
3
07/99FC GL HW
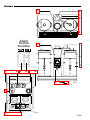
3.2 Connection to the electricity
supply system
The FC GL HW must be connect to
rotatory current 3N~ 400V.
(FC GL 2x5 HW 1N~ 230V).
The wallsocket and the main switch
secured group are part of the electricity
installation. It is not allowed to connected
other users to that group.
Depending on the model, the appliance
should be connected according to the
instructions in the figures below.
• (fig.4) In case of 3N~ 400V (5-core cable).
• (fig.5) In case of 3~ 230V (4-core cable).
• (fig.6) In case of 1N~ 230V (3-core cable).
The following points should be observed
when wiring a new plug:
1. The green/yellow-coloured wire
(“EARTH”) should be connected to the
terminal which is either marked with the
letter “E”, the “earth” symbol ( ) or
coloured green or green/yellow.
2. The blue-coloured wire (“NEUTRAL”)
should be connected to the terminal
which is either marked with the letter "N"
or coloured black.
3. The brown and black-coloured wires
(“LIVE”) should be connected to the
terminals which is either marked with the
letter "L1, L2 and L3" or coloured red.
3. INSTALLATION
Have all repairs carried out by a specially
trained technician.
Follow the instructions to place and connect
the unit, specified below.
√ Preparation to install See 3.1
√ Connection to the electricity
supply system See 3.2
√ Connection to the cold water
supply system See 3.3
√ Connection to the drain outlet See 3.4
√ Connection on a counter See 3.5
3.1 Preparation to install
• The preparation to install must be done
by a specially trained technician.
Always observe local rules while installing
the unit and use approved materials and
parts.
• The technician may only make the
connection from machine to the wall
• The electricity supply, the cold water
supply (G3/4” tube 15mm) and the drain
outlet (hose ø12 mm) must be within half
a metre of the location where the
appliance is installed.
WARNING
* Always remove the plug from the socket if the machine has to be opened for repair or
maintenance.
* Always observe local rules while installing the unit and use approved materials and parts.
* Always plug the machine into an earthed wall socket.
* Connect the machine to the cold watertap
* Connect overflow tap to drainage tube.
* Do not position the machine in areas where the temperature drops below freezing point
because there is always water left in the system.
* Do not submerge or spray the machine.
* During use some parts will become very hot.
* Do not position the container on open fire, or hotplate.
* Never touch the softkeys with sharp objects.
* If the machine is not used it is advisable to remove the plug from the socket and turn off
the water tap.
* Have all repairs carried out by a specially trained technician.
* First disconnect the electric cable before transporting the container.
!

Animo
FC GL HW07/99
4
4. CONTROL PANEL (FIG. 2)
A - Pilot lamp hot water heater
B - On/off switch hot water heater
C - 1/4 brew
D - 1/2 brew
E - 3/4 brew
F - 1/1 brew
G - Stop switch
H - Socket for container DE
I - On/off switch container
5. PREPARATIONS BEFORE USE
The following procedure should be carried out
before a new appliance is used.
5.1 Hot water heater
1. Open the manually operated water stop
valve and check that the swivel
connections are not leaking.
2. Put the plug into the socket and switch the
hot water heater (fig. 2B) on.
3. The hot water heater will fill up, and start
heaten up. The indicator light will light up
(fig. 2A) until the water reached the
correct temperature.
4. The water reached its correct temperature
after just 14 minutes and the indicator
light will goes off (fig. 2A).
5. The hot water heater is now ready for use.
5.2 Flow water heater
1. The innerpot of the container must
always be fresh and clean.
2. Put the cables with inlet plug into the back
of the container and insert the plug into
the socket on the flow water heater
(fig. 2H). Switch on the container (fig. 2I).
The heating will come on.
3.3 Connection to the water supply
system
The installation requires a water stop
valve (3/4”) to be near the machine.
The minimum water pressure may not
be under 1,5 Bar (at 4L/min. flowpressure)
3.4 Connection to the drain outlet
Connect the overflow connection in open
connection with a drain (syphon) in such
a way that the excess water can be
drained in case of a malfunction or
maintenance.
3.5 Connection on a counter
Connect the machine at counter level and
on a solid flat surface.
1. Check, before the connections are made,
whether the main voltage corresponds
to the voltage indicated on the
identification plate.
2. Determine where the machine must be
placed on the counter.
3. Make the transit at the counter see fig. 3.
4. Turn the supplied rubber feet under the
base plate.
5. Connect the electricity supply, cold water
supply and the overflow.
6. Place the drip tray in front of machine.
7. Place the containers over the locating
lugs, place the coffee blenders into the
containers and put the filters on the
containers.
8. Position the swivel arm over the centre
of the filter.
Green/Yellow - Earth (E)
Blue - Neutral(N)
Brown - Live (L1)
Black - Live (L2)
Black - Live (L3)
Green/Yellow - Earth (E)
Brown - Live (L1)
Black - Live (L2)
Black - Live (L3)
Fig. 4
Fig. 5
Green/Yellow - Earth (E)
Blue - Neutral(N)
Brown - Live (L1)
Fig. 6
STOP
boiler
Kocher
bouilleur

Animo
5
07/99FC GL HW
3. Place a basket filter paper into the filter
with the appropriate amount of coffee
(normal/medium ground). The coffee must
be evenly spread over the filter. Generally
speaking you will need about 45-50 gram
per litre.
4. Tap the water from the container.
5. Place the coffee blender into the
container.
6. Place the filter lid on the filter, put the
filter on the container and position the
swivel arm over the centre of the filter lid.
7. Start the flow water heater by selecting
the required quantity on the control panel
(fig. 2C, D, E or F). The indicator light will
goes on. If the light starts to blink, this
means that the swivel arm is not
positioned over the centre of the filter lid.
8. The process can be stopped at any time
by pushing the stop switch (fig. 2G).
9. The brewing process is starting, the
blender in the container guarantees a
uniform quality of the coffee, which makes
stirring the coffee (with loss of time,
temperature and aroma) unnecessary.
The temperature of the coffee is kept at a
temperature of 80-85˚C.
The storage time of the coffee is
determined by the blend of coffee and is
usually 1 à 1,5 hours.
10. After ca. 10-14 minutes a signal will
sound, meaning the flow water heating
process has ended.
11. After the coffee has been made and the
filter has drained, the latter can be
removed and the lid can be placed on the
container.
12. Rinse the filter after use.
6.2 Brewing tea
A tea filter with disc and a filling pipe are
needed to brew tea in the DE (Optional).
3. Select the 1/4 brew switch (fig. 2C) on
the flow water heater. the heating process
will start.
4. The process can be stopped at any time
by the stop switch (fig. 2G).
5. After the process is stopped and the
signal has sounded. The flow water heater
is ready for use.
6. USE
√ Brewing coffee, see section 6.1
√ Brewing tea, see section 6.2
√ Drawing off hot water, see section 6.3
The swivel arm from the flow water heater is
executed with a security device which only
makes it possible to start the brewing process
if the swivel arm is positioned over the centre
of the filter lid. If the swivel arm is taken out of
position, the brewing process will stop, the
indicator light will blink and a signal will
sound.
Basic rules for brewing coffee
• Use regular grind coffee (±50 gram/litre)
• Keep the containers and the filters clean.
6.1 Brewing coffee
1. The innerpot of the container must always
be fresh and clean.
2. To avoid temperature loss during the
brewing proess we recommed to pre heat
the container, by putting the cable into
the socket on the flow water heater
(fig. 2H) filling the container with approx.
2 litres of hot water and switching the
container on (fig. 2I) for at least 10
minutes before the brew starts.
The indication lamp on the container will
light up.
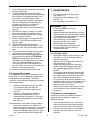
A - Lid with water distributor
B - Filter with basket filter insert
C- Blender
D- Container DE with lid
D
A
C
B
A - Filling pipe
B - Tea filter with disc
C- Container DE with lid
A
B
C

Animo
FC GL HW07/99
6
1. The innerpot of the container must always
be fresh and clean.
2. To avoid temperature loss during the
brewing proess we recommed to pre heat
the container, by putting the cable into
the socket on the flow water heater
(fig. 2H) filling the container with approx.
2 litres of hot water and switching the
container on (fig. 2I) for at least 10
minutes before the brew starts.
The indication lamp on the container will
light up.
3. Put the tea, loose or in bags, in the tea
filter, approximately 6 grams per litre.
4. Insert the tea filter into the disc already
placed on the container.
5. Place the filling pipe in the tea filter and
the disc. Then position the swivel arm
over the pipe.
6. Tap the water from the container.
7. Select the required quantity (fig. 2C 2D,
2E or 2F) and let the flow water heater
start.
8. The process can be stopped at any time
by pushing the stop switch (fig. 2G).
9. Remove the pipe and the tea filter after
the tea has been made. ATTENTION:
HOT! After brewing put the lid on the
container to avoid temperature and taste
loss. The optimum extraction time is
minimally 4 minutes and maximally 15
minutes. After more than 15 minutes the
flavour of the tea decreases.
10. Rinse the tea-filter directly after use.
6.3 Drawing off hot water
The appliance has a tap for drawing off hot
water (Fig. 1I). It is suitable for drawing off
small amounts of hot water. The water
reservoir is automatically topped up and kept
up to temperature.
1. Switch the hot water unit on (fig. 2B).
The indication lamp will light up.
The water in the water reservoir will
heat up.
2. After ca. 14 minutes the water has
reached its temperature and the
indication light will goes off. Hot water
can now be tapped from the hot water
tap. (fig. 1I)
Achievements of this water storage heater?
• Draw off a maximum of, 1,8 litre hot
water each time. It takes ca. 6,5 minutes
before temperature has been restored
• When the indication light (fig. 2A) goes
out, more hot water can be drawn off.
7. MAINTENANCE
√ For the cleaning of various parts,
see section 7.1
√ Removal of coffee deposits, see
section 7.2
√ For descaling, see section 7.3
7.1 Cleaning (daily)
• Rinse the innerpot of the container with
hot water, or use if necessary Animo
coffee fur remover.
• Attention! Do not place the container in
the dishwasher or sink.
• Clean the gauge glass with a gauge
brush, remove the gauge glass cap or
the complete gauge glass protector
vertical.
• The machine and container outside can
be cleaned with a wet cloth, than wiped
dry. Never use any abrasives, as these
can cause scratches and mat spots
• Do not put the filter and the blender on a
container witch is not in use. Place the lid
obllique on the container, otherwise a
stale taste my be the result.
• Always leave some clean water (2 cups)
in the container, this stops the washer
drying out.
7.2 Removal of coffee deposits
A sachet of coffee fur remover solvent is
supplied with the machine. Usage is
extremely simple.
1. Take a bowl filled with ca. 5 litre warm
water and dissolve the coffee deposits
remover solvent from the sachet into it.
2. Put the parts that need to be cleaned in
the bowl and soak them for 15 to 30
minutes.
WARNING
* Do not leave the unit during
maintenance.
* Always follow the prescriptions, that are
delivered with the used descaling solvent.
* It is advisable to wear protecting glasses
and gloves during descaling.
* After descaling, run the appliance
throught at least three cycles.
* Wash hands after descaling.
* Do not submerge or spray the unit.
* Have all repairs carried out by a
qualified technican.
!

Animo
7
07/99FC GL HW
5. Insert the descaling funnel (fig. 7A) into
the hole next to the swivel arm (fig. 7B).
Push the funnel downward as far as
possible.
6. Pour the liquid at a temperature of 60 -
70˚C into the descaling funnel.
The descaling agent will enter the boiler
element by the supply pipe and will come
out of the swivel arm as foam.
The descaling solution can be poured into
the funnel a second time after it has been
collected in the plastic container. As long
as the descaling agent comes out of the
swivel arm foamingly, there are scales
deposits in the appliance. Repeat the
procedure described above with a new
solution until no more foam comes out of
the swivelarm.
7. Then pour approximately 4 Litres of cold
water into the descaling funnel.
8. Remove the descaling funnel, switch on
the flow water heater by selecting the
1/1 brew switch (fig. 2F) to rinse out the
column.
Descaling the hot water heater
1. Carefully read the caution notice and the
directions on the sachet Animo descaling
solvent.
2. Switch off the hot water heater (fig. 2B).
3. Remove the round black and stainless
steel safety lid from the hot water
reservoir (fig. 1A).
4. Dissolve 2 sachets of 50 gram Animo
descaling solvent into 2 litre of warm
water. Draw of the warm water from the
hot water heater.
5. Fill the hot water reservoir with the
solution. This will now undergo a
reaction with the scale deposits.
6. Allow the solution to soak in for 10
minutes until the frothing has stopped.
7 Draw of all the hot water by the tap
(fig. 1l).
8. Switch On the hot water heater (fig. 2B).
Repeat the descaling procedure if there is still
scale visible.
9. Draw off at least 3 jugs (6 litres) hot water
heater.
10. Now the hot water heater is ready for
use.
3. Rinse several times with warm water.
Repeat treatment if the result is
insufficient.
4. Scatter coffee deposits remover solvent
on very filthy spots and clean with a wet
brush.
7.3 Descaling
During operation scale will form in the
machine. Therefore the machine needs to
be descaled regular to guarantee the
lowest energy consumption and proper
functioning.
When to descale?
• If more steam escapes from of the
swivelarm outlet during the brewing
process as normal, the flow water heater
needs descaling.
• Dependent on the frequency of usage and
the hardness of the water, we advise to
inspect the appliance visually regular for
scale formation.
• Remove the swivelarm regular and check
the inner boiling pipe. If the wall of the
boiling pipe showing severe scale
formation, then the flow water heater
needs descaling.
• Remove the covers of the reservoir
regular; It there is loose scale grit on the
bottom, or if there is servere scale
formation on the walls, then the hot water
heater needs descaling.
Descaling the flow water heater
1. Operate the appliance once, selecting the
1/4 brew switch (fig. 2C) and push the
stop switch after 3 minutes (fig. 2G).
The advantage of this is that the element
is well preheated, so that descaling is
better and takes less time.
2. Carefully read the caution notice and the
directions on the sachet ANIMO descaling
solvent.
3. Dissolve 2 sachets of 50
gram ANIMO descaling
solvent into 2 litre of warm
water.
4. Remove the filter and place
a plastic container under
the outlet of the swivel arm
to collect the descaling
agent.
B
A
Fig. 7

Animo
FC GL HW07/99
8
8. TEMPERATURE PROTECTION
There are two temperature protections in the
unit that can be accessed from the outside.
These are at the right side of the appliance
(fig. 1C & 1D).
The protection in the rear belongs to the flow
water heater (fig. 1C), the one in the front
belongs to the hot water heater (fig. 1D).
These protections switch off the
corresponding parts when the temperatures
rise too high. The most common cause for
switching off is scale that has not been
removed in time.
If the temperature protection operates
proceed as follows:
1. Let the unit cool down.
2. Unscrew the black protection cover.
3. Push the button, that now appears and
replace the black cover tightly.
When the protection was triggered due to
scale formation, then proceed according to
section 7.3. When the cause was not in scale
formation, then contact your dealer.
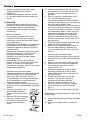
9. TRANSPORT
If the machine has to be transported, the
water reservoirs must be emptied.
1. Switch the appliance off and remove the
plug from the wallsocket.
2. Remove the plugs from the containers
and remove the containers.
3. Close the water outlet tap and
disconnect the supply and overflow hoses.
4. Remove the swivel arm (fig. 8A) from the
column by lifting the former vertically from
the flow heater.
5. After the threaded ring thus revealed has
been unscrewed (fig. 8B), the lid of the
waterreservoir can be removed.
6. Remove the round black and stainless
steel safety lid from the hot water
reservoir (fig. 8C).
7. Take the drain hose tap (fig. 1I) out of the
underside of the base plate, to drain the
hot water reservoir completely, then
close it off again.
8. Empty the machine, by turning it upside
down above the sink, so that the
remaining water runs out of the flow
heater.
(Attention: the water can still be hot!).
9. Replace the parts, mentioned in point 4
and 5.
10. The unit is now ready for transportation.
11. Proceed with section 3 “Installation” to
reinstall the appliance.
Fig. 8
A
B
C

Animo
9
07/99FC GL HW
10. ADJUSMENT OF THE
BREWING QUANTITY
If the quantity of coffee is insufficient
during operation, this can be caused by
the quantity an quality of coffee, by the
kind grind used or the hardness of the
water. The quantity of water can easy be
set by using the control panel (fig. 2).
The adjusted quantity is preserved even
after a power failure.
1. Position the swivel arm over the centre of
the filter (without coffee) and an empty
container.
2. Push on the control panel both selection
switches 1/4 and STOP (fig. 2C+G) for 6
seconds. All the indicator lights start to
flash.
3. After 6 seconds the indicator light from
the selection switches 1/2 and 1/1 will
(fig. 2D+F) start to blink after each other,
indicating that you can release the
switches.
4. Push the selection switch full brew.
The flow water heater process starts.
Do not leave the appliance, as the
process will only stop on your
command!
5. When the right quantity in the container
has been reached push the stop switch
(fig. 2G) and two short signals will sound.
(i.e. the quantity of coffee to be made
+10%) is reached, two short signals will
sound.
After a long signal, the brew quantity is
programmed and will from this moment on
stop at the quantity set.
After the procedure described above has
been carried out, the quantity 1/4, 1/2
and 3/4 have also been set.
6. By pushing both selection switches 1/4
and STOP (fig. 2C+G) for 6 seconds,
the programmed brew quantity will reset
and the above described procedure must
be carried out again.

Animo B.V. Headoffice
Dr. A.F. Philipsweg 47
P.O. Box 71
9400 AB Assen
The Netherlands
Tel. no. +31 (0)592 376376
Fax no. +31 (0)592 341751
E-mail: [email protected]
Internet: http://www.animo.nl
Accredited by
the Dutch Council
for Certification
1197 Rev.2 181202 Animo 09982
-
 1
1
-
 2
2
-
 3
3
-
 4
4
-
 5
5
-
 6
6
-
 7
7
-
 8
8
-
 9
9
-
 10
10
-
 11
11
-
 12
12
-
 13
13
-
 14
14
-
 15
15


in anderen Sprachen
- English: Animo FC GL HW Owner's manual
Verwandte Artikel
-
Animo FC GL Timer Bedienungsanleitung
-
-
-
-
-
-
-
-
-