

1
Welcome
Dear user, thanks for purchasing this product.
Much investment in time and effort has gone into its development,
and it is our hope that it will give you many years of trouble-free service.
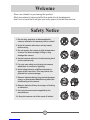
Safety Notice
1. Do not drop, puncture or disassemble the
camera; otherwise the warranty will be voided.
2. Avoid all contact with water, and dry hands
before using.
3. Do not expose the camera to high temperature
or leave it in direct sunlight. Doing so may
damage the camera.
4. Use the camera with care. Avoid pressing hard
on the camera body.
5. For your own safety, avoid using the camera
when there is a storm or lightning.
6. Avoid using batteries of different brands or
types at the same time. This may lead to the
potential for serious damage.
7. Remove batteries during long periods between
usage, as deteriorated batteries may affect the
functionality of the camera.
8. Remove batteries if they show signs of leaking
or distortion.
9. Use only the accessories supplied by the
manufacturer.
10. Keep the camera out of the reach of infants.

2
Table of Contents
Welcome .......................................................................... 1
Safety Notice ................................................................... 1
Table of Contents ........................................................... 2
Getting Started ................................................................ 4
Knowing your camera parts .................................................................. 4
Loading batteries .................................................................................. 5
Inserting a SD/MMC card (optional) ..................................................... 6
Attaching the wrist strap (optional) ....................................................... 7
Basic Operations ............................................................ 8
Turning on your camera ........................................................................ 8
Turning off your camera ........................................................................ 8
Using the LCD monitor ......................................................................... 9
Reading the LCD indicators .................................................................. 10
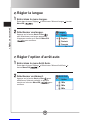
Setting language ................................................................................... 11
Recording a video clip .......................................................................... 12
Taking a still picture .............................................................................. 14
Recording a voice clip .......................................................................... 17
Playing back your recordings ............................................................... 18
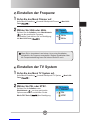
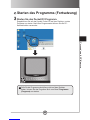
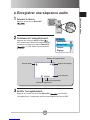
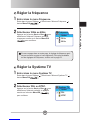
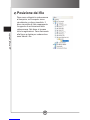
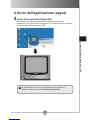
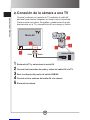
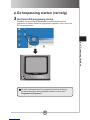
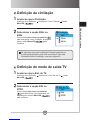
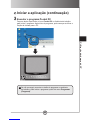
Connecting the camera to a TV ............................................................ 20
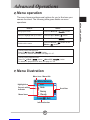
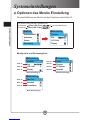
Advanced Operations .................................................... 21
Menu operation ..................................................................................... 21
Menu illustration ................................................................................... 21
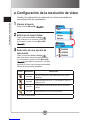
Setting video resolution ........................................................................ 22
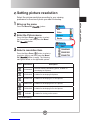
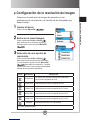
Setting picture resolution ...................................................................... 23
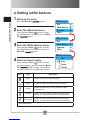
Setting white balance ........................................................................... 24
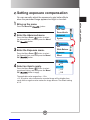
Setting exposure compensation ........................................................... 25
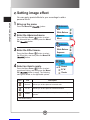
Setting image effect .............................................................................. 26
Setting date stamp ................................................................................ 27
Deleting files ......................................................................................... 28
Viewing file information ......................................................................... 29
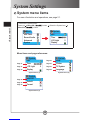
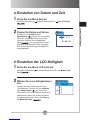
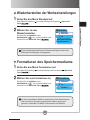
System Settings ............................................................. 30
System menu items .............................................................................. 30
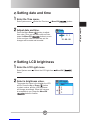
Setting date and time ............................................................................ 31
Setting LCD brightness ......................................................................... 31
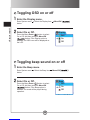
Toggling OSD on or off ......................................................................... 32
Toggling beep sound on or off .............................................................. 32

3
Table of Contents
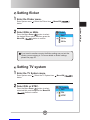
Setting flicker ........................................................................................ 33
Setting TV system ................................................................................. 33
Setting language ................................................................................... 34
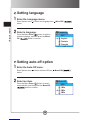
Setting auto-off option ........................................................................... 34
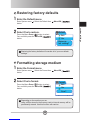
Restoring factory defaults ..................................................................... 35
Formatting storage medium .................................................................. 35
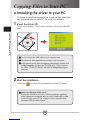
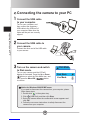
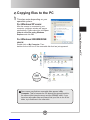
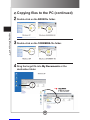
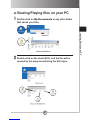
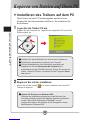
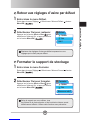
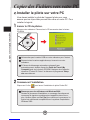
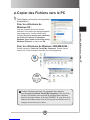
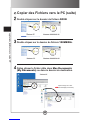
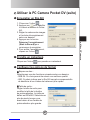
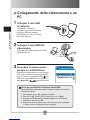
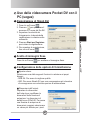
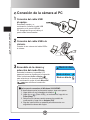
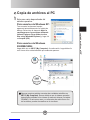
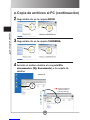
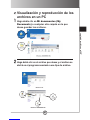
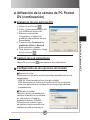
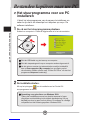
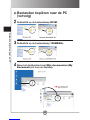
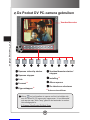
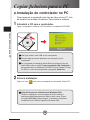
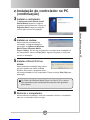
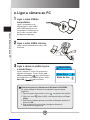
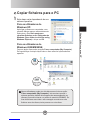
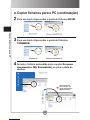
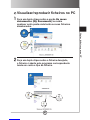
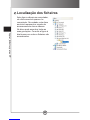
Copying Files to Your PC ............................................... 36
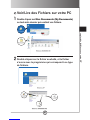
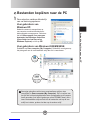
Installing the driver to your PC ............................................................. 36
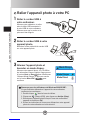
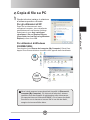
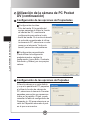
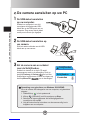
Connecting the camera to your PC ...................................................... 38
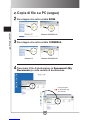
Copying files to the PC ......................................................................... 39
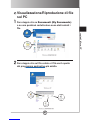
Viewing/Playing files on your PC .......................................................... 41
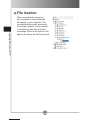
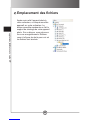
File location .......................................................................................... 42
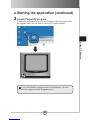
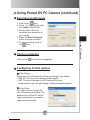
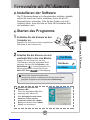
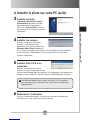
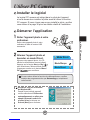
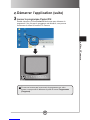
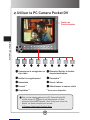
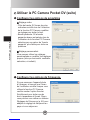
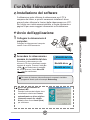
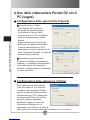
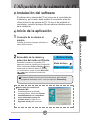
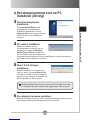
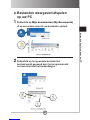
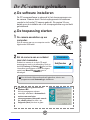
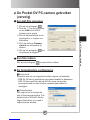
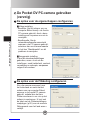
Using PC Camera ........................................................... 43
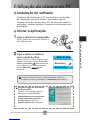
Installing the software ........................................................................... 43
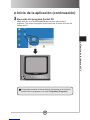
Starting the application ......................................................................... 43
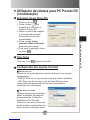
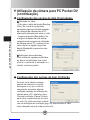
Using Pocket DV PC Camera ............................................................... 46
Addenda .......................................................................... 49
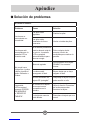
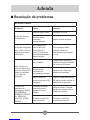
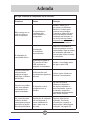
Troubleshooting .................................................................................... 49
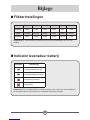
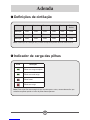
Flicker Settings ..................................................................................... 52
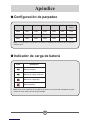
Battery Life Indicator ............................................................................. 52
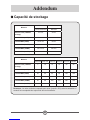
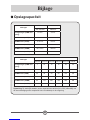
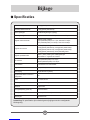
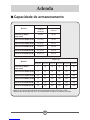
Storage Capacity .................................................................................. 53
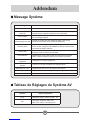
System Message .................................................................................. 54
TV System Settings .............................................................................. 54
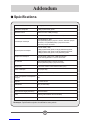
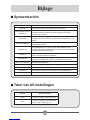
Specifications ....................................................................................... 55

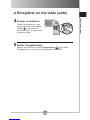
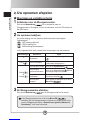
getting started
4
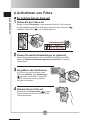
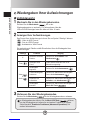
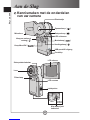
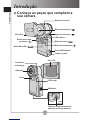
Getting Started
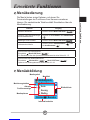
Knowing your camera parts
Record button ( )
Microphone
Up/Down buttons ( )
Menu/OK button ( )
Strap hook
Shutter button ( )
Back LED
Mode button ( )
Power button ( )
USB/AV-out port
Port cover
LCD panel
Lens
Focus switch
Flash strobe
Front LED
Speaker
Battery/Card
compartment cover
Bottom
View

5
getting started
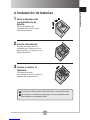
Loading batteries
1 Open the battery
compartment cover.
Slide the battery compartment
cover open in the direction of
indication.
2 Install batteries.
Place two AAA batteries into
the compartment. Note that the
positive(+) and negative(-) ends
cannot be reversed.
3 Replace the cover.
After the batteries are properly
installed, replace the battery
compartment cover.
Do not use different types or brands of batteries at the same time.
Alkaline batteries or rechargeable NiMH batteries are
recommended for high performance.

getting started
6
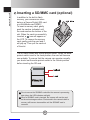
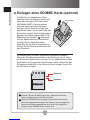
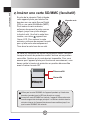
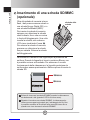
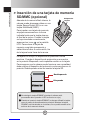
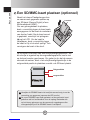
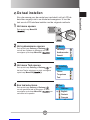
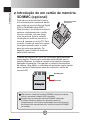
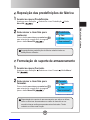
Inserting a SD/MMC card (optional)
In addition to the built-in flash
memory, your camera can store
data on a Secure Digital (SD) card
or a MultiMedia card (MMC).
To insert a memory card, gently
push the card as indicated until
the card reaches the bottom of the
slot. When the card is successfully
inserted, a icon will appear on
the LCD. To remove the memory
card, gently push the card and it
will pop up. Then pull the card out
of the slot.
The SD card comes with a write-protect switch. When the write-
protect switch is set to the Lock position, the card will become
non-writable. To ensure that the camera can operate normally,
you should set the write-protect switch to the Unlock position
before inserting the SD card.
Do not remove the SD/MMC card while the camera is processing
data (when the LED indicates red light).
When a SD/MMC card is inserted, the camera will use the card
as the main storage medium. Files stored in the camera’s built-in
memory will become inaccessible until the SD/MMC card is
removed.

7
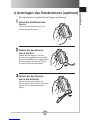
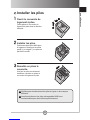
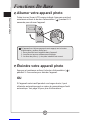
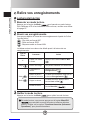
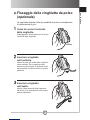
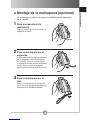
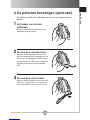
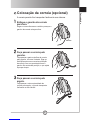
getting started
The wrist strap provides a convenient way for you to carry your
camera around.
1 Stretch out the strap hook.
Hold your camera upside down, and the
strap hook will stretch out.
2 Thread the strap through the
hook.
Thread the thinner part of the strap through
the strap hook as illustrated. Threading in
the indicated direction will save you much
time as the hook will remain stretched in
this way.
3 Thread the strap through the
loop.
Thread the other end of the strap through
the loop, and you are ready to carry your
camera with ease.
Attaching the wrist strap (optional)
hook

basic operations
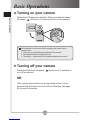
8
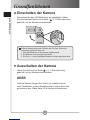
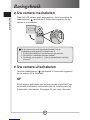
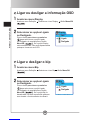
Basic Operations
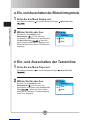
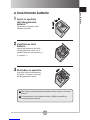
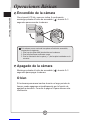
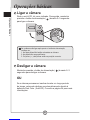
Turning on your camera
Rotate the LCD panel as indicated. Then press and hold down
the power ( ) button for 2~3 seconds to turn on the camera.
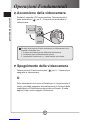
Turning off your camera
Press and hold down the power ( ) button for 2~3 seconds to
turn off the camera.
OR
If the camera stays inactive for a long period of time, it may
automatically shut down due to the Auto-Off setting. See page
34 for more information.
If the camera is not turned on after pressing the power button,
please check:
1. There are two AAA batteries installed in the camera.
2. The batteries have enough power left.
3. The polar(+ -) directions of the installed batteries are correct.

basic operations
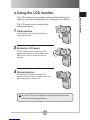
9
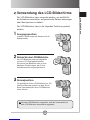
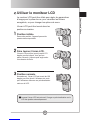
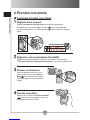
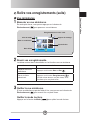
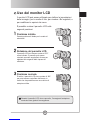
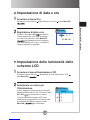
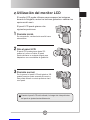
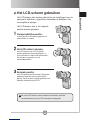
Using the LCD monitor
The LCD monitor can be used to compose image settings for
shooting, to review recorded files, or to change menu options.
The LCD panel can be rotated to the
following positions:
1 Initial position.
In this position, the camera is suitable for
taking self-portraits.
2 Rotate the LCD panel.
The LCD panel can be rotated up to 270
degrees as indicated. You can position the
panel at any angle to serve your filming
purpose.
3 Normal position.
Normally, the LCD panel is rotated 180
degrees to face the user, so that the user can
get a clear preview on the LCD.
270
When the LCD panel is flipped over, the previewed image on the
LCD will be automatically adjusted.

basic operations
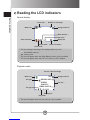
10
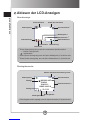
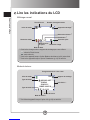
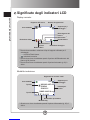
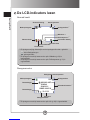
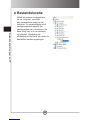
Reading the LCD indicators
Normal display:
881.0X
Zoom ratio Number of recordings
Storage medium *1
White balance *2
Self timer *3
Battery life
Picture resolutionFocus mode
Flash mode
Mode icon
Video resolution
*1 This icon changes according to the storage medium you use:
: internal flash memory.
: memory card.
*2 This icon will appear when the White Balance option (p.24) is enabled.
*3 This icon will appear when the Self Timer option (p.16) is enabled.
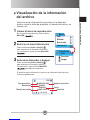
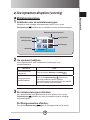
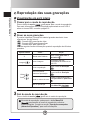
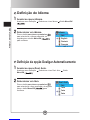
Playback mode:
*1 This item will appear when the Info option (p. 29) is enabled.
IMG-0001.ASF
320X240
2004/01/01
888KB 00:05:30
1/88
00:00:00
Current / Total recordings
File info *1
Storage medium
Playing time
Play mode
Mode icon
File type
File type

basic operations
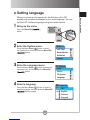
11
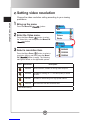
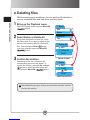
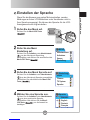
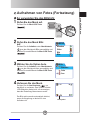
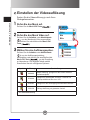
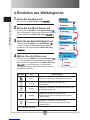
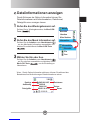
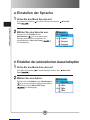
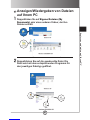
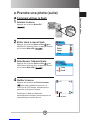
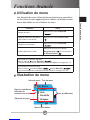
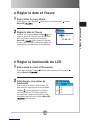
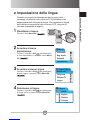
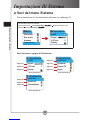
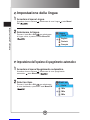
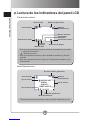
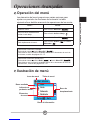
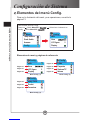
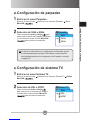
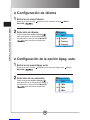
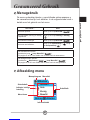
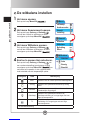
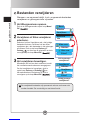
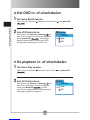
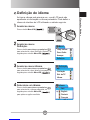
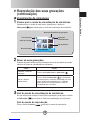
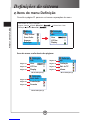
Setting language
When you power on the camera for the first time, the LCD
display may not show messages in your local language. You can
set the LCD interface language using the method below.
1 Bring up the menu.
Press the Menu/OK
button.
2 Enter the System menu.
Press the Up or Down button to select
the System item, and then press the Menu/OK
button.
3 Enter the Language menu.
Press the Up or Down button to select the
Language item, and then press the Menu/OK
button.
4 Select a language.
Press the Up or Down button to select a
suitable language, and then press the Menu/OK
button to apply.
Deutsch
Français
English
Exit
Language
Press : Exit
System
Advanced
Record Audio
Self Timer
Menu
Language
TV System
Flicker
Beep
System

basic operations
12
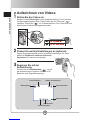
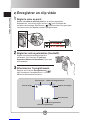
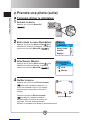
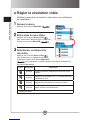
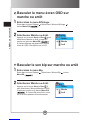
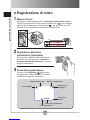
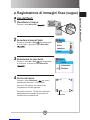
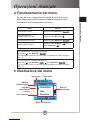
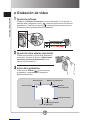
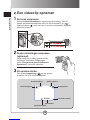
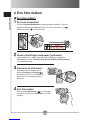
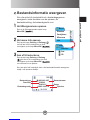
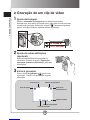
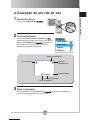
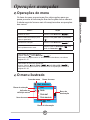
Recording a video clip
1 Adjust the focus.
Set the Focus Switch to an appropriate setting. Normally, you should set
the focus to ( ) for most filming conditions. Select ( ) only for close-
ups. The focus is adjustable during recording.
2 Adjust other settings (optional).
Adjust other advanced settings if necessary. See
the section “Advanced Operations” for more
information.
3 Start recording.
Press the Record button to start
recording. The LCD will display as the following.
881.0X
00:00:01
Number of recordings
Storage medium
Recording time
Record icon
Mode icon
Zoom ratio
Battery life

basic operations
13
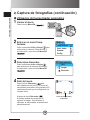
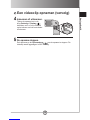
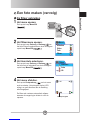
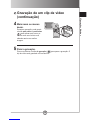
Recording a video clip (continued)
4 Zoom in or zoom out.
During recording, you can press
the Up or Down button to
zoom in or zoom out the screen,
thus retaining the best image.
5 Stop recording.
Press the Record button again to stop recording. The video clip will
be saved in ASF format.

basic operations
14
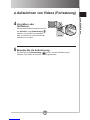
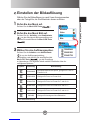
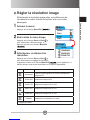
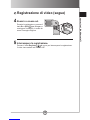
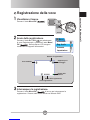
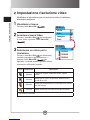
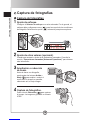
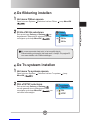
Taking a still picture
How to take a still picture
1 Adjust the focus.
Set the Focus Switch to an appropriate setting. Normally, you should
set the focus to ( ) for most shooting conditions. Select ( ) only for
close-ups.
2 Adjust other settings (optional).
Adjust other advanced settings if necessary. See the section “Advanced
Operations” for more information.
3 Zoom in or zoom out.
Before taking a picture, you can
press the Up or Down button to
zoom in or zoom out the screen, thus
retaining the best image.
4 Take a still picture.
Press the Shutter button to take a still
picture. The picture will be saved in JPEG
format.

basic operations
15
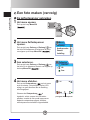
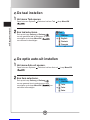
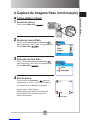
Taking a still picture (continued)
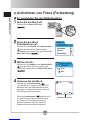
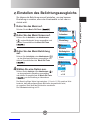
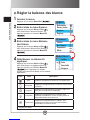
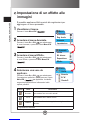
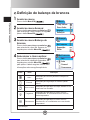
How to use flash strobe
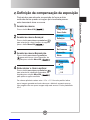
1 Bring up the menu.
Press the Menu/OK
button.
2 Enter the Strobe menu.
Press the Up or Down button to select
the Strobe item, and then press the Menu/OK
button.
3 Select the Auto item.
Press the Up or Down button to select
the Auto item, and then press the Menu/OK
button.
4 Exit the menu.
Press the Shutter button to quick-exit
the menu, and the icon on the LCD will
change, indicating the setting has taken
effect.
From now on, the flash strobe will
automatically fire when the environment is too
dim for shooting.
Strobe
Picture
Video
Exit
Menu
Off
Auto
Exit
Strobe
881.0X
strobe icon

basic operations
16
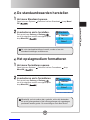
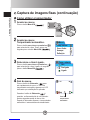
Taking a still picture (continued)
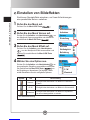
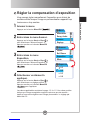
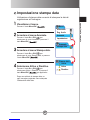
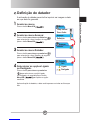
How to use self timer
1 Bring up the menu.
Press the Menu/OK
button.
2 Enter the Self Timer menu.
Press the Up or Down button to select the
Self Timer item, and then press the Menu/OK
button.
3 Select On.
Press the Up or Down button to select
the On item, and then press the Menu/OK
button.
4 Exit the menu.
Press the Shutter button to quick-exit
the menu, and the self timer icon will appear
on the LCD, indicating the setting has taken
effect.
When the Shutter button is pressed,
the camera will have ten seconds delay
before taking a picture. After the shutter fires,
the self timer will be automatically disabled.
System
Advanced
Record Audio
Self Timer
Menu
On
Off
Exit
Self Timer
881.0X
self timer icon

basic operations
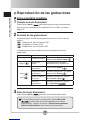
17
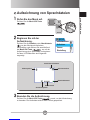
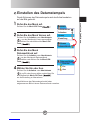
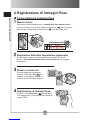
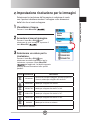
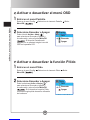
Recording a voice clip
1 Bring up the menu.
Press the Menu/OK
button.
2 Start recording.
Press the Up or Down button to select the
Record Audio item, and then press the Menu/
OK button to start recording a voice
clip. The LCD will display as the following.
88
00:00:01
Number of recordings
Storage medium
Recording time
Record icon
Mode icon
Battery life
3 Stop recording.
Press the Menu/OK button again to stop recording. The voice
clip will be saved in WAV format.
System
Advanced
Record Audio
Self Timer
Menu

basic operations
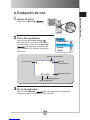
18
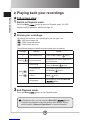
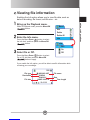
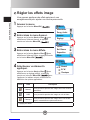
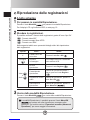
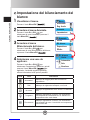
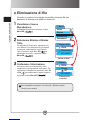
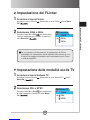
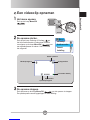
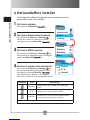
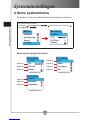
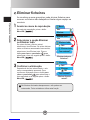
Playing back your recordings
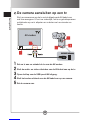
Full-screen view
1 Switch to Playback mode.
Press the Mode button to switch to Playback mode. For LCD
display and OSD indicators, please see page 10.
2 Review your recordings.
You can tell the format of your recordings by the “file type” icon:
: ASF format video clip
: JPEG format still picture
: WAV format voice clip
The following table gives details on playing back your recordings.
File type How to... Action
X Shift between files. Press the Up or Down button.
Picture Review a picture. Still pictures are directly displayed on
the LCD screen.
Video
&
Audio
Start playing. Press the Record button.
Pause/Resume
playing.
During playing/While paused, press
the Record button.
Adjust sound
volume.
During playing, press the Up or
Down button.
Stop playing. During playing, press the Menu/OK
button.
3 Exit Playback mode.
Press the Mode button to exit Playback mode.
In Playback mode, you can press the Menu/OK button
to access the playback menu and perform other actions. Please
see the section “Advanced Operations” for more information.

basic operations
19
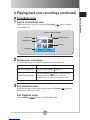
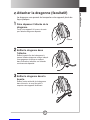
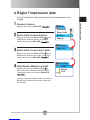
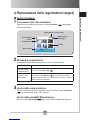
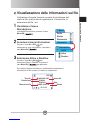
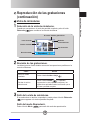
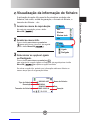
Playing back your recordings (continued)
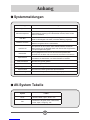
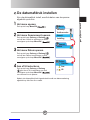
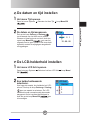
Thumbnail view
1 Switch to thumbnail view.
While in full-screen view, you can press the Shutter button to switch
to thumbnail view.
1/88
Press : Play
Current / Total recordings
File type
Storage medium
Mode icon
Highlight box
Status bar
2 Review your recordings.
The following table gives details on operations in thumbnail view.
How to... Action
Move the highlight box. Press the Up or Down button.
Review the selected file. Press the Record button. Then the screen
will switch back to full-screen view, and the
operations are the same as in full-screen view.
3 Exit thumbnail view.
If you do not select a file to play, you can press the Shutter button to
switch back to full-screen view.
Exit Playback mode.
Press the Mode button to exit Playback mode.
Seite wird geladen ...
Seite wird geladen ...
Seite wird geladen ...
Seite wird geladen ...
Seite wird geladen ...
Seite wird geladen ...
Seite wird geladen ...
Seite wird geladen ...
Seite wird geladen ...
Seite wird geladen ...
Seite wird geladen ...
Seite wird geladen ...
Seite wird geladen ...
Seite wird geladen ...
Seite wird geladen ...
Seite wird geladen ...
Seite wird geladen ...
Seite wird geladen ...
Seite wird geladen ...
Seite wird geladen ...
Seite wird geladen ...
Seite wird geladen ...
Seite wird geladen ...
Seite wird geladen ...
Seite wird geladen ...
Seite wird geladen ...
Seite wird geladen ...
Seite wird geladen ...
Seite wird geladen ...
Seite wird geladen ...
Seite wird geladen ...
Seite wird geladen ...
Seite wird geladen ...
Seite wird geladen ...
Seite wird geladen ...
Seite wird geladen ...
Seite wird geladen ...
Seite wird geladen ...
Seite wird geladen ...
Seite wird geladen ...
Seite wird geladen ...
Seite wird geladen ...
Seite wird geladen ...
Seite wird geladen ...
Seite wird geladen ...
Seite wird geladen ...
Seite wird geladen ...
Seite wird geladen ...
Seite wird geladen ...
Seite wird geladen ...
Seite wird geladen ...
Seite wird geladen ...
Seite wird geladen ...
Seite wird geladen ...
Seite wird geladen ...
Seite wird geladen ...
Seite wird geladen ...
Seite wird geladen ...
Seite wird geladen ...
Seite wird geladen ...
Seite wird geladen ...
Seite wird geladen ...
Seite wird geladen ...
Seite wird geladen ...
Seite wird geladen ...
Seite wird geladen ...
Seite wird geladen ...
Seite wird geladen ...
Seite wird geladen ...
Seite wird geladen ...
Seite wird geladen ...
Seite wird geladen ...
Seite wird geladen ...
Seite wird geladen ...
Seite wird geladen ...
Seite wird geladen ...
Seite wird geladen ...
Seite wird geladen ...
Seite wird geladen ...
Seite wird geladen ...
Seite wird geladen ...
Seite wird geladen ...
Seite wird geladen ...
Seite wird geladen ...
Seite wird geladen ...
Seite wird geladen ...
Seite wird geladen ...
Seite wird geladen ...
Seite wird geladen ...
Seite wird geladen ...
Seite wird geladen ...
Seite wird geladen ...
Seite wird geladen ...
Seite wird geladen ...
Seite wird geladen ...
Seite wird geladen ...
Seite wird geladen ...
Seite wird geladen ...
Seite wird geladen ...
Seite wird geladen ...
Seite wird geladen ...
Seite wird geladen ...
Seite wird geladen ...
Seite wird geladen ...
Seite wird geladen ...
Seite wird geladen ...
Seite wird geladen ...
Seite wird geladen ...
Seite wird geladen ...
Seite wird geladen ...
Seite wird geladen ...
Seite wird geladen ...
Seite wird geladen ...
Seite wird geladen ...
Seite wird geladen ...
Seite wird geladen ...
Seite wird geladen ...
Seite wird geladen ...
Seite wird geladen ...
Seite wird geladen ...
Seite wird geladen ...
Seite wird geladen ...
Seite wird geladen ...
Seite wird geladen ...
Seite wird geladen ...
Seite wird geladen ...
Seite wird geladen ...
Seite wird geladen ...
Seite wird geladen ...
Seite wird geladen ...
Seite wird geladen ...
Seite wird geladen ...
Seite wird geladen ...
Seite wird geladen ...
Seite wird geladen ...
Seite wird geladen ...
Seite wird geladen ...
Seite wird geladen ...
Seite wird geladen ...
Seite wird geladen ...
Seite wird geladen ...
Seite wird geladen ...
Seite wird geladen ...
Seite wird geladen ...
Seite wird geladen ...
Seite wird geladen ...
Seite wird geladen ...
Seite wird geladen ...
Seite wird geladen ...
Seite wird geladen ...
Seite wird geladen ...
Seite wird geladen ...
Seite wird geladen ...
Seite wird geladen ...
Seite wird geladen ...
Seite wird geladen ...
Seite wird geladen ...
Seite wird geladen ...
Seite wird geladen ...
Seite wird geladen ...
Seite wird geladen ...
Seite wird geladen ...
Seite wird geladen ...
Seite wird geladen ...
Seite wird geladen ...
Seite wird geladen ...
Seite wird geladen ...
Seite wird geladen ...
Seite wird geladen ...
Seite wird geladen ...
Seite wird geladen ...
Seite wird geladen ...
Seite wird geladen ...
Seite wird geladen ...
Seite wird geladen ...
Seite wird geladen ...
Seite wird geladen ...
Seite wird geladen ...
Seite wird geladen ...
Seite wird geladen ...
Seite wird geladen ...
Seite wird geladen ...
Seite wird geladen ...
Seite wird geladen ...
Seite wird geladen ...
Seite wird geladen ...
Seite wird geladen ...
Seite wird geladen ...
Seite wird geladen ...
Seite wird geladen ...
Seite wird geladen ...
Seite wird geladen ...
Seite wird geladen ...
Seite wird geladen ...
Seite wird geladen ...
Seite wird geladen ...
Seite wird geladen ...
Seite wird geladen ...
Seite wird geladen ...
Seite wird geladen ...
Seite wird geladen ...
Seite wird geladen ...
Seite wird geladen ...
Seite wird geladen ...
Seite wird geladen ...
Seite wird geladen ...
Seite wird geladen ...
Seite wird geladen ...
Seite wird geladen ...
Seite wird geladen ...
Seite wird geladen ...
Seite wird geladen ...
Seite wird geladen ...
Seite wird geladen ...
Seite wird geladen ...
Seite wird geladen ...
Seite wird geladen ...
Seite wird geladen ...
Seite wird geladen ...
Seite wird geladen ...
Seite wird geladen ...
Seite wird geladen ...
Seite wird geladen ...
Seite wird geladen ...
Seite wird geladen ...
Seite wird geladen ...
Seite wird geladen ...
Seite wird geladen ...
Seite wird geladen ...
Seite wird geladen ...
Seite wird geladen ...
Seite wird geladen ...
Seite wird geladen ...
Seite wird geladen ...
Seite wird geladen ...
Seite wird geladen ...
Seite wird geladen ...
Seite wird geladen ...
Seite wird geladen ...
Seite wird geladen ...
Seite wird geladen ...
Seite wird geladen ...
Seite wird geladen ...
Seite wird geladen ...
Seite wird geladen ...
Seite wird geladen ...
Seite wird geladen ...
Seite wird geladen ...
Seite wird geladen ...
Seite wird geladen ...
Seite wird geladen ...
Seite wird geladen ...
Seite wird geladen ...
Seite wird geladen ...
Seite wird geladen ...
Seite wird geladen ...
Seite wird geladen ...
Seite wird geladen ...
Seite wird geladen ...
Seite wird geladen ...
Seite wird geladen ...
Seite wird geladen ...
Seite wird geladen ...
Seite wird geladen ...
Seite wird geladen ...
Seite wird geladen ...
Seite wird geladen ...
Seite wird geladen ...
Seite wird geladen ...
Seite wird geladen ...
Seite wird geladen ...
Seite wird geladen ...
Seite wird geladen ...
Seite wird geladen ...
Seite wird geladen ...
Seite wird geladen ...
Seite wird geladen ...
Seite wird geladen ...
Seite wird geladen ...
Seite wird geladen ...
Seite wird geladen ...
Seite wird geladen ...
Seite wird geladen ...
Seite wird geladen ...
Seite wird geladen ...
Seite wird geladen ...
Seite wird geladen ...
Seite wird geladen ...
Seite wird geladen ...
Seite wird geladen ...
Seite wird geladen ...
Seite wird geladen ...
Seite wird geladen ...
Seite wird geladen ...
Seite wird geladen ...
Seite wird geladen ...
Seite wird geladen ...
Seite wird geladen ...
Seite wird geladen ...
Seite wird geladen ...
Seite wird geladen ...
Seite wird geladen ...
Seite wird geladen ...
Seite wird geladen ...
Seite wird geladen ...
Seite wird geladen ...
Seite wird geladen ...
Seite wird geladen ...
Seite wird geladen ...
Seite wird geladen ...
Seite wird geladen ...
Seite wird geladen ...
Seite wird geladen ...
Seite wird geladen ...
Seite wird geladen ...
Seite wird geladen ...
Seite wird geladen ...
Seite wird geladen ...
Seite wird geladen ...
Seite wird geladen ...
Seite wird geladen ...
Seite wird geladen ...
Seite wird geladen ...
Seite wird geladen ...
Seite wird geladen ...
Seite wird geladen ...
Seite wird geladen ...
Seite wird geladen ...
Seite wird geladen ...
Seite wird geladen ...
Seite wird geladen ...
Seite wird geladen ...
Seite wird geladen ...
Seite wird geladen ...
Seite wird geladen ...
Seite wird geladen ...
Seite wird geladen ...
Seite wird geladen ...
Seite wird geladen ...
Seite wird geladen ...
Seite wird geladen ...
Seite wird geladen ...
Seite wird geladen ...
Seite wird geladen ...
Seite wird geladen ...
Seite wird geladen ...
Seite wird geladen ...
Seite wird geladen ...
Seite wird geladen ...
Seite wird geladen ...
Seite wird geladen ...
Seite wird geladen ...
Seite wird geladen ...
Seite wird geladen ...
Seite wird geladen ...
Seite wird geladen ...
Seite wird geladen ...
Seite wird geladen ...
Seite wird geladen ...
Seite wird geladen ...
Seite wird geladen ...
Seite wird geladen ...
Seite wird geladen ...
Seite wird geladen ...
Seite wird geladen ...
Seite wird geladen ...
Seite wird geladen ...
Seite wird geladen ...
Seite wird geladen ...
Seite wird geladen ...
Seite wird geladen ...
Seite wird geladen ...
Seite wird geladen ...
-
 1
1
-
 2
2
-
 3
3
-
 4
4
-
 5
5
-
 6
6
-
 7
7
-
 8
8
-
 9
9
-
 10
10
-
 11
11
-
 12
12
-
 13
13
-
 14
14
-
 15
15
-
 16
16
-
 17
17
-
 18
18
-
 19
19
-
 20
20
-
 21
21
-
 22
22
-
 23
23
-
 24
24
-
 25
25
-
 26
26
-
 27
27
-
 28
28
-
 29
29
-
 30
30
-
 31
31
-
 32
32
-
 33
33
-
 34
34
-
 35
35
-
 36
36
-
 37
37
-
 38
38
-
 39
39
-
 40
40
-
 41
41
-
 42
42
-
 43
43
-
 44
44
-
 45
45
-
 46
46
-
 47
47
-
 48
48
-
 49
49
-
 50
50
-
 51
51
-
 52
52
-
 53
53
-
 54
54
-
 55
55
-
 56
56
-
 57
57
-
 58
58
-
 59
59
-
 60
60
-
 61
61
-
 62
62
-
 63
63
-
 64
64
-
 65
65
-
 66
66
-
 67
67
-
 68
68
-
 69
69
-
 70
70
-
 71
71
-
 72
72
-
 73
73
-
 74
74
-
 75
75
-
 76
76
-
 77
77
-
 78
78
-
 79
79
-
 80
80
-
 81
81
-
 82
82
-
 83
83
-
 84
84
-
 85
85
-
 86
86
-
 87
87
-
 88
88
-
 89
89
-
 90
90
-
 91
91
-
 92
92
-
 93
93
-
 94
94
-
 95
95
-
 96
96
-
 97
97
-
 98
98
-
 99
99
-
 100
100
-
 101
101
-
 102
102
-
 103
103
-
 104
104
-
 105
105
-
 106
106
-
 107
107
-
 108
108
-
 109
109
-
 110
110
-
 111
111
-
 112
112
-
 113
113
-
 114
114
-
 115
115
-
 116
116
-
 117
117
-
 118
118
-
 119
119
-
 120
120
-
 121
121
-
 122
122
-
 123
123
-
 124
124
-
 125
125
-
 126
126
-
 127
127
-
 128
128
-
 129
129
-
 130
130
-
 131
131
-
 132
132
-
 133
133
-
 134
134
-
 135
135
-
 136
136
-
 137
137
-
 138
138
-
 139
139
-
 140
140
-
 141
141
-
 142
142
-
 143
143
-
 144
144
-
 145
145
-
 146
146
-
 147
147
-
 148
148
-
 149
149
-
 150
150
-
 151
151
-
 152
152
-
 153
153
-
 154
154
-
 155
155
-
 156
156
-
 157
157
-
 158
158
-
 159
159
-
 160
160
-
 161
161
-
 162
162
-
 163
163
-
 164
164
-
 165
165
-
 166
166
-
 167
167
-
 168
168
-
 169
169
-
 170
170
-
 171
171
-
 172
172
-
 173
173
-
 174
174
-
 175
175
-
 176
176
-
 177
177
-
 178
178
-
 179
179
-
 180
180
-
 181
181
-
 182
182
-
 183
183
-
 184
184
-
 185
185
-
 186
186
-
 187
187
-
 188
188
-
 189
189
-
 190
190
-
 191
191
-
 192
192
-
 193
193
-
 194
194
-
 195
195
-
 196
196
-
 197
197
-
 198
198
-
 199
199
-
 200
200
-
 201
201
-
 202
202
-
 203
203
-
 204
204
-
 205
205
-
 206
206
-
 207
207
-
 208
208
-
 209
209
-
 210
210
-
 211
211
-
 212
212
-
 213
213
-
 214
214
-
 215
215
-
 216
216
-
 217
217
-
 218
218
-
 219
219
-
 220
220
-
 221
221
-
 222
222
-
 223
223
-
 224
224
-
 225
225
-
 226
226
-
 227
227
-
 228
228
-
 229
229
-
 230
230
-
 231
231
-
 232
232
-
 233
233
-
 234
234
-
 235
235
-
 236
236
-
 237
237
-
 238
238
-
 239
239
-
 240
240
-
 241
241
-
 242
242
-
 243
243
-
 244
244
-
 245
245
-
 246
246
-
 247
247
-
 248
248
-
 249
249
-
 250
250
-
 251
251
-
 252
252
-
 253
253
-
 254
254
-
 255
255
-
 256
256
-
 257
257
-
 258
258
-
 259
259
-
 260
260
-
 261
261
-
 262
262
-
 263
263
-
 264
264
-
 265
265
-
 266
266
-
 267
267
-
 268
268
-
 269
269
-
 270
270
-
 271
271
-
 272
272
-
 273
273
-
 274
274
-
 275
275
-
 276
276
-
 277
277
-
 278
278
-
 279
279
-
 280
280
-
 281
281
-
 282
282
-
 283
283
-
 284
284
-
 285
285
-
 286
286
-
 287
287
-
 288
288
-
 289
289
-
 290
290
-
 291
291
-
 292
292
-
 293
293
-
 294
294
-
 295
295
-
 296
296
-
 297
297
-
 298
298
-
 299
299
-
 300
300
-
 301
301
-
 302
302
-
 303
303
-
 304
304
-
 305
305
-
 306
306
-
 307
307
-
 308
308
-
 309
309
-
 310
310
-
 311
311
-
 312
312
-
 313
313
-
 314
314
-
 315
315
-
 316
316
-
 317
317
-
 318
318
-
 319
319
-
 320
320
-
 321
321
-
 322
322
-
 323
323
-
 324
324
-
 325
325
-
 326
326
-
 327
327
-
 328
328
-
 329
329
-
 330
330
-
 331
331
-
 332
332
-
 333
333
-
 334
334
-
 335
335
-
 336
336
-
 337
337
-
 338
338
-
 339
339
-
 340
340
-
 341
341
-
 342
342
-
 343
343
-
 344
344
-
 345
345
-
 346
346
-
 347
347
-
 348
348
-
 349
349
-
 350
350
-
 351
351
-
 352
352
-
 353
353
-
 354
354
-
 355
355
-
 356
356
-
 357
357
-
 358
358
-
 359
359
-
 360
360
-
 361
361
-
 362
362
-
 363
363
-
 364
364
-
 365
365
-
 366
366
-
 367
367
-
 368
368
-
 369
369
-
 370
370
-
 371
371
-
 372
372
-
 373
373
-
 374
374
-
 375
375
-
 376
376
-
 377
377
-
 378
378
-
 379
379
-
 380
380
-
 381
381
-
 382
382
-
 383
383
-
 384
384
-
 385
385
-
 386
386
-
 387
387
-
 388
388
-
 389
389
-
 390
390
-
 391
391
-
 392
392
-
 393
393


in anderen Sprachen
- français: SVP DV-8530 Manuel utilisateur
- español: SVP DV-8530 Manual de usuario
- italiano: SVP DV-8530 Manuale utente
- Nederlands: SVP DV-8530 Handleiding
- português: SVP DV-8530 Manual do usuário
Andere Dokumente
-
Samsung VP-DC173 Benutzerhandbuch
-
Samsung VP-DC165WI Benutzerhandbuch
-
AIPTEK POCKET DV 8800 NEO Bedienungsanleitung
-
Samsung VP-MX10AU Benutzerhandbuch
-
-
Samsung VP-HMX10 Benutzerhandbuch
-
LG KU990I.AVNZDS Benutzerhandbuch
-
-
-
AgfaPhoto DC8200 Benutzerhandbuch