Batavia Paint Spray System Benutzerhandbuch
- Kategorie
- Spritzpistole
- Typ
- Benutzerhandbuch

Model: BT-PSS001
Item-No.: 7064515
www.bataviapower.com
Farbsprühsystem
Système de pulvérisation de peinture
Verfspuitsysteem
Sistema di spruzzatura della vernice
Sistema de pulverización de pintura
Sistema de pulverização de tinta
System rozpylania farby
Operating instructions
Bedienungsanleitung
Mode d'emploi
Gebruiksaanwijzing
Istruzioni di funzionamento
Manual de usuario
Instruções de funcionamento
Instrukcja
Paint spray system
SPRAY

11
18
17
12
13
14
15 4
16
65
1 2 3
7
8
10
9
A
BC
19

D1
2
E
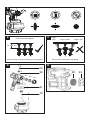
Even coat throughout
50 - 300 mm
Keep stroke smooth and at an even speed
F
Do not flex wrist while spraying
Heavy coat
Light
coat Light coat
13
20
21
19
GH
22 23

2
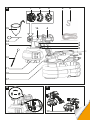
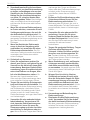
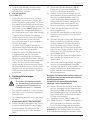
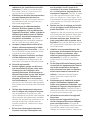
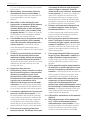
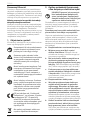
Overview
1. Nut
2. Air cap
3. Nozzle (Φ1.5mm/Φ2.0mm/Φ2.5mm/
Φ3.0mm)
4. Sprayer handle body
5. Shoulder straps
6. Hose clip
7. Trigger
8. Material adjustment knob
9. Quick release lock
10. On / Off switch
11. Container
12. Cleaning brush
13. Check valve sleeve
14. Cleaning needle
15. Viscosity cup
16. Spray gun
17. Air hose
18. Shoulder strap hook
19. Suction tube
20. Check valve
21. Sealing liner
22. Filter
23. Filter cover
Übersicht
1. Mutter
2. Luftkappe
3. Düse (Ø 1,5 mm/Ø 2,0 mm/Ø 2,5 mm/
Ø 3,0 mm)
4. Gehäuse des Sprühgriffs
5. Schultergurt
6. Schlauchschelle
7. Triggerschalter
8. Materialeinstellknopf
9. Schnellverschluß
10. Ein/Aus-Schalter
11. Behälter
12. Reinigungsbürste
13. Absperrventilhülse
14. Reinigungsnadel
15. Viskositätsprüfbecher
16. Spritzpistole
17. Luftschlauch
18. Haken für den Schultergurt
19. Ansaugrohr
20. Rückschlagventil
21. Dichtungsmanschette
22. Filter
23. Filterabdeckung
Aperçu
1. Écrou
2. Capuchon d’entrée d’air
3. Buse (Φ1,5mm/Φ2,0mm/Φ2,5mm/
Φ3,0mm)
4. Corps de la poignée du pulvérisateur
5. Bandoulière
6. Collier de serrage
7. Gâchette
8. Molette de réglage du produit
9. Verrou de déblocage rapide
10. Interrupteur marche/arrêt
11. Réservoir
12. Brosse de nettoyage
13. Contrôle du manchon de vanne
14. Aiguille de nettoyage
15. Coupe de viscosité
16. Pistolet de pulvérisation
17. Tuyau d’air
18. Crochet de bandoulière
19. Tube d’aspiration
20. Clapet antiretour
21. Revêtement d’étanchéité
22. Filtre
23. Couvercle de filtre

3
Overzicht
1. Moer
2. Luchtklep
3. Mondstuk (Φ1,5 mm/Φ2 mm/Φ2,5 mm/
Φ3 mm)
4. Verfspuithandgreep
5. Schouderriem
6. Slangklem
7. Trekker
8. Knop materiaalaanpassing
9. Snelkoppelingsvergrendeling
10. Aan-/uitschakelaar
11. Container
12. Reinigingsborstel
13. Controle ventielhuls
14. Reinigingsnaald
15. Viscositeitsbeker
16. Spuitpistool
17. Luchtslang
18. Schouderriemhaak
19. Zuigbuis
20. Regelafsluiter
21. Afdichtingsvoering
22. Filter
23. Filterdeksel
Panoramica
1. Dado
2. Tappo di regolazione dell’aria
3. Beccuccio (Φ 1,5 mm / Φ 2,0 mm /
Φ 2,5 mm / Φ 3,0 mm)
4. Corpo dell’impugnatura dello
spruzzato-re
5. Tracolle
6. Fascetta stringitubo
7. Grilletto
8. Manopola di regolazione del materiale
9. Blocco a sgancio rapido
10. Interruttore di accensio-ne/
spegnimento
11. Contenitore
12. Scovolino
13. Manicotto della valvola di ritegno
14. Ago per la pulizia
15. Coppa di misurazione della viscosità
16. Pistola a spruzzo
17. Tubo dell’aria
18. Gancio per tracolla
19. Tubo di aspirazione
20. Valvola di ritegno
21. Guarnizione di tenuta
22. Filtro
23. Coperchio del ltro
Resumen
1. Tuerca
2. Soporte de boquilla de aire
3. Boquilla (de 1,5mm, 2,0mm, 2,5mm y
3,0mm de diámetro)
4. Mango del pulverizador
5. Correas para el hombro
6. Abrazadera
7. Gatillo
8. Botón de ajuste del material
9. Cierre de apertura rápida
10. Interruptor de encendido/apagado
11. Depósito
12. Cepillo de limpieza
13. Casquillo de la válvula de control
14. Aguja de limpieza
15. Vaso medidor de la viscosidad
16. Pistola pulverizadora
17. Manguitos de aire
18. Gancho de correa para el hombro
19. Tubo de succión
20. válvula de control
21. Sellado
22. Filtro
23. Cubierta del ltro

4
Visão geral
1. Porca
2. Suporte para bico de ar
3. Bico (Φ1,5 mm/Φ2,0 mm/Φ2,5 mm/
Φ3,0 mm)
4. Corpo do punho do pulverizador
5. Alças para tiracolo
6. Abraçadeira de mangueira
7. Gatilho
8. Botão de ajuste de produto
9. Bloqueio de libertação rápida
10. Interruptor de ligar/desligar
11. Recipiente
12. Escova de limpeza
13. Manga da válvula de retenção
14. Agulha de limpeza
15. Copo de viscosidade
16. Pistola pulverizadora
17. Mangueira de ar
18. Gancho da alça para tiracolo
19. Tubo de sucção
20. Válvula de retenção
21. Revestimento de vedação
22. Filtro
23. Cobertura do ltro
Przegląd
1. Nakrętka
2. Pokrywka dyszy
3. Dysza (Φ1,5mm/Φ2,0mm/Φ2,5mm/
Φ3,0mm)
4. Korpus rękojeści pistoletu
5. Paski na ramię
6. Zaczep węża
7. Spust
8. Pokrętło regulacji przepływu
9. Blokada
10. Włącznik zasilania
11. Pojemnik
12. Szczoteczka czyszcząca
13. Kołnierz zaworu kontrolnego
14. Igła czyszcząca
15. Pojemnik do sprawdzania lepkości
16. Pistolet natryskowy
17. Wąż
18. Zaczep paska na ramię
19. Rurka zasysająca
20. Zawór zwrotny
21. Wkładka uszczelniająca
22. Filtr
23. Pokrywa ltra

5
Contents
1. Explanation of the symbols . . . . 7
2. General power tool safety warnings . 7
3. Additional safety warnings for
electric spray guns . . . . . . 9
4. Important electrical information . 10
5. Before the rst use . . . . . 10
6. Contents of packing . . . . . 10
7. Intended use . . . . . . . 10
8. Assembly . . . . . . . . 10
9. Cleaning the spray gun . . . . .12
10. Maintenance . . . . . . . .12
11. Troubleshooting . . . . . . 13
12. Technical data. . . . . . . 14
13. Disposal . . . . . . . . 14
14. EC-Declaration of conformity . . 14
Inhaltsverzeichnis
1. Erläuterung der Symbole . . . .15
2. Allgemeine Sicherheitshinweise für
Elektrowerkzeuge. . . . . . .15
3. Zusätzliche Sicherheitshinweise für
elektrische Spritzpistolen . . . 17
4. Wichtige elektrische Hinweise . . 18
5. Vor dem ersten Gebrauch . . . 19
6. Lieferumfang . . . . . . . 19
7. Bestimmungsgemäße Verwendung 19
8. Montage . . . . . . . . 19
9. Spritzpistole reinigen. . . . . 21
10. Wartung . . . . . . . . 22
11. Fehlerbehebung . . . . . . 22
12. Technische daten . . . . . . 23
13. Entsorgung . . . . . . . 23
14. EG-Konformitätserklärung . . . 23
Table des matières
1. Explication des symboles . . . 24
2. Consignes générales de sécurité
pour appareils électriques . . . 24
3. Autres avertissements de sécurité
relatifs aux pistolets de pulvérisation
électriques . . . . . . . . 26
4. Informations importantes relatives à
l’électricité . . . . . . . . 28
5. Avant la première utilisation. . . 28
6. Contenu de l’emballage . . . . 28
7. Utilisation prévue . . . . . . 28
8. Assemblage . . . . . . . 28
9. Nettoyage du pistolet de
pulvérisation . . . . . . . 30
10. Entretien . . . . . . . . 31
11. Dépannage. . . . . . . . 32
12. Données techniques . . . . . 33
13. Élimination et recyclage . . . . 33
14. CE-Déclaration de conformité . . 33
Inhoudsopgave
1. Uitleg van de symbolen . . . . 34
2. Algemene veiligheidsvoorschriften
voor elektrisch gereedschap . . 34
3. Aanvullende
veiligheidswaarschuwingen voor
elektrische spraypistolen . . . 36
4. Belangrijke elektrische informatie . 37
5. Voor het eerste gebruik . . . . 38
6. Inhoud van de verpakking . . . 38
7. Beoogd gebruik . . . . . . 38
8. Assemblage . . . . . . . 38
9. Het spraypistool reinigen . . . 40
10. Onderhoud. . . . . . . . 40
11. Probleemoplossing . . . . . 41
12. Technische gegevens . . . . 42
13. Afvalverwerking en hergebruik . . 42
14. EG-Conformiteitsverklaring . . . 42
Contenuto
1. Spiegazione dei simboli . . . . 43
2. Avvertenze di sicurezza generali per
gli elettroutensili . . . . . . 43
3. Ulteriori avvertenze di sicurezza per
l’uso delle pistole a spruzzo elettriche 45
4. Informazioni importanti sulle
caratteristiche elettriche. . . . 46
5. Operazioni preliminari al primo uso
del prodotto . . . . . . . 47
6. Contenuto della confezione . . . 47
7. Destinazione d’uso . . . . . 47
8. Montaggio . . . . . . . . 47
9. Pulizia della pistola a spruzzo . . 49
10. Manutenzione . . . . . . . 50
11. Risoluzione dei problemi. . . . 50
12. Dati tecnici . . . . . . . . 51
13. Smaltimento . . . . . . . 51
14. Dichiarazione di conformità CE . . 52

6
Índice
1. Explicación de los símbolos. . . 53
2. Indicaciones generales de seguridad
para herramientas eléctricas . . 53
3. Advertencias de seguridad
adicionales en materia de pistolas
pulverizadoras eléctricas . . . 55
4. Información importante relacionada
con la electricidad . . . . . 56
5. Antes de usar por primera vez . . 57
6. Contenido del paquete . . . . 57
7. Uso previsto . . . . . . . 57
8. Montaje . . . . . . . . 57
9. Limpieza de la pistola pulverizadora 59
10. Mantenimiento . . . . . . 60
11. Resolución de problemas . . . 60
12. Datos técnicos . . . . . . 61
13. Eliminación . . . . . . . 61
14. Declaración CE de conformidad . 62
Índice
1. Explicação dos símbolos . . . 63
2. Instruções de segurança gerais para
ferramentas elétricas . . . . 63
3. Instruções de segurança adicionais
para pistolas pulverizadoras . . 65
4. Informação elétrica importante. . 66
5. Antes da primeira utilização. . . 67
6. Conteúdo da embalagem . . . 67
7. Utilização prevista . . . . . 67
8. Montagem . . . . . . . . 67
9. Limpeza da pistola pulverizadora . 69
10. Manutenção . . . . . . . 70
11. Resolução de problemas . . . 70
12. Dados técnicos . . . . . . 71
13. Eliminação . . . . . . . . 71
14. Declaração de conformidade CE . 71
Spis treści
1. Objaśnienie symboli . . . . . 72
2. Ogólne wskazówki bezpieczeństwa
dotyczące elektronarzędzi . . . 72
3. Dodatkowe ostrzeżenia dotyczące
pracy z elektrycznymi pistoletami
natryskowymi . . . . . . . .74
4. Ważne informacje dotyczące części
elektrycznych . . . . . . . 75
5. Przed pierwszym użyciem . . . 76
6. Zawartość opakowania . . . . 76
7. Przeznaczenie. . . . . . . 76
8. Montaż . . . . . . . . . 76
9. Czyszczenie pistoletu natryskowego 78
10. Konserwacja . . . . . . . 79
11. Rozwiązywanie problemów . . . 79
12. Dane techniczne . . . . . . 80
13. Utylizacja . . . . . . . . 80
14. Deklaracja zgodności z wymogami
UE . . . . . . . . . . 81

7
English
Dear customer
Please familiarize yourself with the proper
usage of the device by reading and following
each chapter of this manual, in the order
presented. Keep these operating instruc-
tions for further reference.
Please read all safety instructions!
This manual contains important information
on operating and handling the device. Keep
these operating instructions for further
reference. Please pass it on along with the
unit if it is handed over to a third party.
1. Explanation of the symbols
The following symbols are used in the user
manual or on the product:
Warning! To reduce the risk of
injury, the user must read the
instruction manual.
Denotes risk of personal injury, loss
of life or damage to the tool in case
of non-observance of the instruc-
tions in this manual.
Wear a dust mask. When working
with wood and other materials,
harmful dust may be generated.
Work with asbestos containing
materials is not permitted!
Wear safety glasses. When working
with electric power tools, sparks,
splinters, chips and dust particles
may be generated and these can
cause loss of sight.
CE stands for “Conformité
Européenne”, which means “In
accordance with EU Regulations”.
With the CE marking, the manufac-
turer conrms that this Electric
tool complies with the applicable
European directives.
Do not dispose of electric power
tools with domestic refuse.
2. General power tool safety
warnings
WARNING! Read all safety warn-
ings, instructions, illustrations and
specications provided with this
power tool. Failure to follow all instructions
listed below may result in electric shock, re
and/or serious injury.
Save all warnings and instructions for
future reference.
The term “power tool” in the warnings refers
to your mains-operated (corded) power tool
or battery-operated (cordless) power tool.
2.1 Work area safety
a. Keep work area clean and well lit.
Cluttered or dark areas invite accidents.
b. Do not operate power tools in explo-
sive atmospheres, such as in the pres-
ence of ammable liquids, gases or
dust. Power tools create sparks which
may ignite the dust or fumes.
c. Keep children and bystanders away
while operating a power tool. Distrac-
tions can cause you to lose control.
2.2 Electrical safety
a. Power tool plugs must match the out-
let. Never modify the plug in any way.
Do not use any adapter plugs with
earthed (grounded) power tools.
Unmodied plugs and matching outlets
will reduce risk of electric shock.
b. Avoid body contact with earthed or
grounded surfaces, such as pipes,
radiators, ranges and refrigerators.
There is an increased risk of electric
shock if your body is earthed or
grounded.
c. Do not expose power tools to rain or
wet conditions. Water entering a power
tool will increase the risk of electric
shock.
d. Do not abuse the cord. Never use the
cord for carrying, pulling or unplug-
ging the power tool. Keep cord away
from heat, oil, sharp edges or moving
parts. Damaged or entangled cords
increase the risk of electric shock.
e. When operating a power tool out-
doors, use an extension cord suitable
for outdoor use. Use of a cord suitable
for outdoor use reduces the risk of
electric shock.
f. If operating a power tool in a damp
location is unavoidable, use a residual
current device (RCD) protected supply.

English
8
Use of an RCD reduces the risk of elec-
tric shock.
2.3 Personal safety
a. Stay alert, watch what you are doing
and use common sense when operat-
ing a power tool. Do not use a power
tool while you are tired or under the
inuence of drugs, alcohol or medica-
tion. A moment of inattention while
operating power tools may result in
serious personal injury.
b. Use personal protective equipment.
Always wear eye protection. Protective
equipment such as a dust mask, non-
skid safety shoes, hard hat or hearing
protection used for appropriate condi-
tions will reduce personal injuries.
c. Prevent unintentional starting. Ensure
the switch is in the off-position before
connecting to power source and/or
battery pack, picking up or carrying
the tool. Carrying power tools with your
nger on the switch or energising power
tools that have the switch on invites
accidents.
d. Remove any adjusting key or wrench
before turning the power tool on. A
wrench or a key left attached to a rotat-
ing part of the power tool may result in
personal injury.
e. Do not overreach. Keep proper footing
and balance at all times. This enables
better control of the power tool in unex-
pected situations
f. Dress properly. Do not wear loose
clothing or jewellery. Keep your hair
and clothing away from moving parts.
Loose clothes, jewellery or long hair can
be caught in moving parts.
g. If devices are provided for the connec-
tion of dust extraction and collection
facilities, ensure these are connected
and properly used. Use of dust collec-
tion can reduce dust-related hazards.
h. Do not let familiarity gained from fre-
quent use of tools allow you to
become complacent and ignore tool
safety principles. A careless action can
cause severe injury within a fraction of
a second.
2.4 Power tool use and care
a. Do not force the power tool. Use the
correct power tool for your applica-
tion. The correct power tool will do the
job better and safer at the rate for which
it was designed.
b. Do not use the power tool if the switch
does not turn it on and off. Any power
tool that cannot be controlled with the
switch is dangerous and must be
repaired.
c. Disconnect the plug from the power
source and/or remove the battery
pack, if detachable, from the power
tool before making any adjustments,
changing accessories, or storing
power tools. Such preventive safety
measures reduce the risk of starting the
power tool accidentally.
d. Store idle power tools out of the reach
of children and do not allow persons
unfamiliar with the power tool or these
instructions to operate the power tool.
Power tools are dangerous in the hands
of untrained users.
e. Maintain power tools and accessories.
Check for misalignment or binding of
moving parts, breakage of parts and
any other condition that may affect
the power tool’s operation. If dam-
aged, have the power tool repaired
before use. Many accidents are caused
by poorly maintained power tools.
f. Keep cutting tools sharp and clean.
Properly maintained cutting tools with
sharp cutting edges are less likely to
bind and are easier to control.
g. Use the power tool, accessories and
tool bits etc. in accordance with these
instructions, taking into account the
working conditions and the work to be
performed. Use of the power tool for
operations different from those
intended could result in a hazardous
situation.
h. Keep handles and grasping surfaces
dry, clean and free from oil and
grease. Slippery handles and grasping
surfaces do not allow for safe handling

9
English
and control of the tool in unexpected
situations.
2.5 Service
a. Have your power tool serviced by a
qualied repair person using only
identical replacement parts. This will
ensure that the safety of the power tool
is maintained.
3. Additional safety warnings for
electric spray guns
To reduce the risks of re or explosion, elec-
trical shock and the injury to persons, read
and understand all instructions included in
this manual Be familiar with the controls
and proper usage of the equipment.
Indicates a hazardous situation
which, if not avoided, could result
in death or serious injury.
a. HAZARD: EXPLOSION OR FIRE
Solvent and paint fumes can explode or
ignite. Severe injury or property damage can
occur.
PREVENTION:
• Ensure adequate ventilation in the spray
zone and sufcient fresh air in the entire
room. Evaporation of ammable sol-
vents will cause an explosive
environment.
• Avoid all ignition sources such as static
electric sparks, open ames, pilot lights,
electrical appliances, and hot objects.
Connecting or disconnecting power
cords or working light switches can
make sparks.
• Do not smoke in spray area.
• Fire extinguisher must be present and in
good working order.
• Use only outdoors in a well-ventilated
area. Flammable vapours are often heav-
ier than air. The turbine contains arcing
parts that emit sparks and can ignite
vapours.
• Follow the material and solvent manu-
facturer’s warnings and instructions.
• Do not use materials with a ash point
below 21°C Flash point is the tempera-
ture that a uid can produce enough
vapours to ignite (see coating supplier).
• Plastic can cause static sparks. Never
hang plastic to enclose the spray area.
• Do not use plastic drop cloths when
spraying ammable materials.
b. HAZARD: EXPLOSION HAZARD DUE
TO INCOMPATIBLE MATERIALS.
Will cause property damage or severe injury.
PREVENTION:
• Do not use materials containing bleach
or chlorine.
• Do not use halogenated hydrocarbon
solvents such as bleach, mildewcide,
methylene chloride and 1,1,1--trichlo-
roethane. They are not compatible with
aluminium.
• Contact your coating supplier about the
compatibility of material with aluminium.
c. HAZARD: HAZARDOUS VAPOURS
Paints, solvents, insecticides, and other
materials can be harmful if inhaled or come
in contact with the body. Vapours can cause
severe nausea, fainting, or poisoning.
PREVENTION:
• Use a respirator or mask if vapours can
be inhaled. Read all instructions supplied
with the mask to be sure it will provide
the necessary protection.
• Wear protective eye-wear.
• Wear protective clothing as required by
coating manufacturer.
d. HAZARD: GENERAL
Can cause severe injury or property
damage.
PREVENTION:
• Follow all appropriate local, state, and
national codes governing ventilation, re
prevention, and operation.
• Use only manufacturer authorized parts.
User assumes all risks and liabilities
when using parts that do not meet the
minimum specications and safety
devices of the manufacturer.
• Do not spray outdoors on windy days.
• Wear protective clothing to keep paint off
skin and hair.
• Never aim spray gun at any part of the
body.
• Never aim the spray gun at people or
animals.

English
10
4. Important electrical information
4.1 The tool plug must t into the socket.
The plug may not be modied in any
form. Do not use adapter plugs
together with protective-earthed
tools.
Unmodied plugs and suitable sockets
reduce the risk of an electric shock.
4.2 Avoid physical contact with earthed
surfaces such as pipes, heating ele-
ments, stoves and refrigerators. The
risk through electric shock increases if
your body is earthed.
4.3 Keep the equipment away from rain
and moisture. The risk of an electric
shock increases if water penetrates
electrical equipment.
4.4 Do not misuse the mains lead by car-
rying the tool by the lead, hanging it
from the lead or by pulling on the lead
to remove the plug. Keep the lead
away from heat, oil, sharp edges or
moving tool parts. Damaged or twisted
leads increase the risk of an electric
shock.
4.5 If you work outdoors, use only exten-
sion leads that are approved for out-
door use. The use of an extension lead
that is suitable for outdoors reduces the
risk of an electric shock.
5. Before the rst use
Remove the machine and all accessories
from the package. Keep the packaging
materials out of the reach of small children.
There is a danger of suffocation!
6. Contents of packing
1× Electrical spray gun
4× nozzles: 2.5 mm (assembled on
machine), 1.5 mm/2.0 mm/3.0 mm
1× Cleaning needle
1× Viscosity measuring cup
1× Cleaning brush
3× Check valve for air hose
1× Air hose
1× Shoulder strap
1× Seal ring for paint
10× Paper lter with Batavia logo
1× Instruction manual
7. Intended use
The Maxxspray paint spray gun is suitable
for applying paint, lacquers, primer, sealer,
stain and interior wall paint.
• Any other usage of or modication to the
appliance is deemed to be improper and
carries a signicant risk of accidents.
• The use of easily ammable, combus-
tible paints, lacquers or thinners is
strictly prohibited.
• The intended use also includes an opera-
tion following the operating instructions.
• Any use beyond these parameters can
lead to serious risks and is regarded as
use that is contrary to the intended
purpose.
• The machine is not intended for
commer cial use.
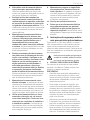
8. Assembly
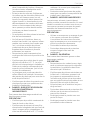
8.1 Aligning the suction tube
(See Fig. C, G).
• If you are going to be spraying in a down-
ward direction, the angled end of the
suction tube (19) should be pointing
toward the front of the gun.
• If you are going to be spraying in an
upward direction, the angled end of the
suction tube (19) should be pointing
toward the rear of the gun.
• By pointing the suction tube in the proper
direction, you will not have to rell the
container as often.
8.2 Attaching spray unit to spray gun
handle
(See Fig. A, B).
• Align the marking line on the spray unit
with the icon of unlock, then rotate the
spray gun handle clockwise until stop.
• Rotate the quick release lock (9) and
snap onto the hook on the edge of canis-
ter lid.
8.3 Attaching the air hose
• Insert one end of the air hose into the
hose connector of the back of the
sprayer. A slight twisting action when
inserting the hose will help insure a snug
t.

11
English
• Insert the other end of the air hose into
the hose connector of the front of the
power unit. A slight twisting action when
inserting the hose will help insure a snug
t.
8.4 Material preparation
Viscosity
• The appliance can process spray materi-
als up to a maximum 150 DIN-s. (viscos-
ity). You can determine the viscosity
(thickness) of the substance with the
supplied measuring cup using a simpli-
ed measuring procedure.
• Before spraying, the material being used
may need to be thinned with the proper
solvent as specied by the material man-
ufacturer. Never exceed the thinning
advice given by the coating
manufacturer.
• Do not use materials with a ash point
below 21°C. Follow the instructions
below.
8.5 Paint thinning
a. Stir the spraying material thoroughly
before measuring viscosity.
b. Dip the viscosity test cup (15) completely
into the spraying material.
c. Hold the test cup (15) up and measure
the time (in seconds) until the stream of
liquid stops. The resulting value is
referred to as DIN seconds (DIN-s).
d. If the value is too high, gradually thin the
spray material by adding small amounts
of a suitable thinning agent in and mixing
the liquid.
e. Measure the DIN seconds again. Repeat
the process until you measure a viscos-
ity of less than 150 DIN seconds.
• Do not exceed the maximal viscosity of
the appliance. The spray material must
not be too thick. Otherwise, the appli-
ance might clog.
• Ensure that the spray material and thin-
ning agent are compatible. Using an
unsuitable thinning agent may cause
clots that clog the appliance. Never mix
synthetic resin varnishes with cellulose
thinners.
• Granular products and products contain-
ing solids must not be sprayed. Their
abrasive effect will shorten the service
life of the pump and valve.
• Material to be sprayed should always be
strained to remove any impurities in the
paint which may enter and clog the sys-
tem. Impurities in the paint will give poor
performance and a poor nish.
Material ash point must be 21°C
or higher.
8.6 Fill container
(See Fig. G).
a. Unscrew the container (11) from the
spray gun.
b. After the material has been properly
thinned and strained, ll the container.
c. Carefully screw the container back onto
the spray gun.
8.7 ON / OFF SWITCH
The on/off switch is located below the han-
dle of the power unit.
• Press the switch button to turn on or turn
off the power unit.
8.8 Adjusting spray pattern shape
(See Fig. D).
The spray pattern shape is adjusted by
turning the air cap (2) to either a vertical,
horizontal, or diagonal position. The posi-
tions of the air cap and the corresponding
spray pattern shapes are illustrated (See
Fig. D). Test each pattern and use which-
ever pattern is suitable for your application.
8.9 Material ow adjustment
Set the material volume by turning the
material adjustment knob (8).
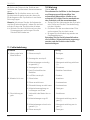
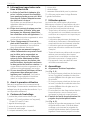
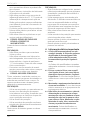
8.10 Proper spraying technique
• If spraying with an HVLP spray system is
new or unfamiliar to you, it is advisable to
practice on a piece of scrap wood or
cardboard before beginning on your
intended work piece.
a. Preparing the surface
• Carefully cover a large area around the
spray surface. Any surface that is not
masked could become contaminated.
• Ensure that the surface is clean, dry and
free of grease.
• Polished surfaces should be lightly
sanded and the sanding dust removed.

English
12
b. How to spray properly
(See Fig. E, F).
• Hold the spray gun at a constant dis-
tance from the object. The ideal spraying
distance is approx. 15 cm.
• Spray evenly up and down with smooth
passes at a consistent speed as illus-
trated in g. E. Doing this will help avoid
irregularities in the nish (i. e. runs and
sags).
• Always apply a thin coat of material on
the rst pass and allow to dry before
applying a second, slightly heavier coat.
• The closer your sprayer is to the object
being sprayed the more the over-spray.
• When spraying, always press and hold
the trigger of the spray gun after spray
pass has begun and release trigger
before stopping the pass. Always keep
the gun pointed squarely at the spray
surface and overlap passes slightly to
obtain the most consistent and profes-
sional nish possible.
9. Cleaning the spray gun
(See Fig. G).
Special clean-up instructions for
use with ammable solvents (must
have a ash point above 21 °C):
• Always ush spray gun outside.
• Area must be free of ammable vapours.
• Cleaning area must be well-ventilated.
• DO NOT SUBMERGE air compressor!
9.1 Unplug the spray gun, and trigger the
spray gun so that the material inside the
spray gun ows back into the container.
9.2 Unscrew the container (11). Empty any
remaining material back into the mate-
rial container.
9.3 Pour a small amount of the appropriate
cleaning solution into the container
(warm, soapy water for latex materials;
mineral spirits for oil-based materials).
Clean container and properly dispose of
cleaning solution.
9.4 Rell the container with NEW cleaning
solution.
9.5 Attach the container to the gun and
plug in the sprayer.
9.6 Spray the solution through the gun for
two seconds in a safe area. Spray again
for two seconds. Unplug the spray gun,
and trigger the spray gun so that the
material inside the spray gun ows
back into the container.
9.7 Wipe the exterior of the container and
gun until clean.
9.8 Unscrew the nut (1) and remove the air
cap (2) and nozzle (3).
9.9 Clean the container, suction tube, air
cap and nozzle with a cleaning brush
and the appropriate cleaning solution.
Never clean nozzle or air holes in the spray
gun with sharp metal objects.
Do not use solvents or lubricants contain-
ing silicone.
9.10 Twist and separate the spray gun from
the handle. Clean the rear of the spray
gun (16) with the appropriate cleaning
solution. Use a thin layer of petroleum
jelly to lubricate the O-ring.
9.11 Dry all parts thoroughly.
9.12 Place a drop of household oil into the
inside of the sprayer from the hole for
assembling the spray tip.
9.13 Reassemble spray gun
Note: Spray nozzle can only be assembled
in one direction that the notch of the nozzle
must align with the skirt on spray unit
housing.
Note: The spray tip must be assembled in
the sprayer with the bumps on the spray tip
in vertical direction.
Note: Assemble the pickup tube and check
valve by rmly pushing them onto the inlet
in the spray.
9.14 Wrap the air hose around the power unit
and put all accessories back into place.
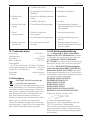
10. Maintenance
(See Fig. H).
You should inspect the air lter in the Air
Compressor Assembly to see if it is exces-
sively dirty. If it is dirty, follow the steps
below to replace it.
a. Unplug the spray gun. Remove the lter
cover with your hands directly.
b. Remove the dirty lters and replace with
new ones.

13
English
c. Secure the cover back onto the main
housing.
Never operate your unit without the air
lters. Dirt could be sucked in and inter-
fere with the function of the unit.
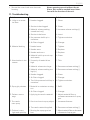
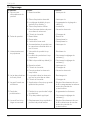
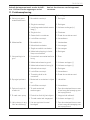
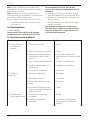
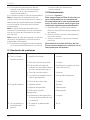
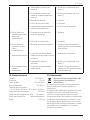
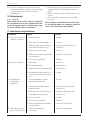
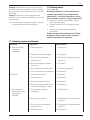
11. Troubleshooting
Problem Cause Solution
A. Little or no mate-
rial ow
1. Nozzle clogged. 1. Clean.
2. Suction tube clogged. 2. Clean.
3. Material volume setting
turned too low(-).
3. Increase volume setting (+).
4. Suction tube loose. 4. Insert.
5. No pressure build up in
container.
5. Tighten container.
6. Air lter clogged. 6. Change.
B. Material leaking 1. Nozzle loose. 1. Tighten.
2. Nozzle worn. 2. Replace.
3. Nozzle seal worn. 3. Replace.
4. Material build-up on air cap
and nozzle
4. Clean.
C. Atomization is too
coarse
1. Viscosity of material too
high.
1. Thin.
2. Material volume too large. 2. Decrease volume setting (-).
3. Material volume setting too
high (+).
3. Decrease volume setting (-).
4. Nozzle clogged. 4. Clean.
5. Air lter clogged. 5. Change.
6. Too little pressure build-up in
container.
6. Tighten container.
D. Spray jet pulsates 1. Material in container running
out.
1. Rell.
2. Air lter clogged. 2. Change.
E. Pattern runs or
sags
1. Applying too much material. 1. Adjust material ow or
increase movement of spray
gun.
F. Too much
over-spray
1. Gun too close to spray object. 1. Increase distance.
2. Too much material applied. 2. Decrease volume setting (-).
G. Pattern is very
light and splotchy.
1. Moving the spray gun too
fast
1. Adjust material ow or decrease
movement of spray gun.

English
14
12. Technical data
Voltage: . . . . . . . . . . . . . . 220-240 V~
Power:. . . . . . . . . . . . . . . . . . .700 W
Flow rate: . . . . . . . . . . . . . 1100 ml/min
Max. viscosity: . . . . . . . . . . . . 150 DIN-s
. . . . . . . . . . . . . (runout time: 150 sec.)
Nozzle size:
. Φ 1.5mm / Φ2.0mm / Φ2.5mm / Φ3.0mm
Canister Capacity . . . . . . . . . . .1200 ml
Air Hose Length . . . . . . . . . . 1.8 metres
Protection class: . . . . . . .double insulated
Weight: . . . . . . . . . . . . . . . . . 2.57 kg
13. Disposal
Do not dispose of electric power
tools with domestic refuse.
The electric power tool is shipped
in packaging to reduce transport damage.
This packaging is a raw material and as
such can either be reused or can be fed
back into the raw material cycle. The elec-
tric power tool and its accessories are
made from various materials such as met-
als and plastics. Take defective compo-
nents to a special refuse collection point.
Ask about these at your specialist shop or
local council.
14. EC-Declaration of conformity
We, the Batavia B.V., Weth. Wassebali-
estraat 6d, NL-7951 SN Staphorst, declare
by our own responsibility that the product
Maxxspray spray gun, Model BT–PSS001,
Item-No 7064515 is according to the basic
requirements, which are dened in the Euro-
pean Directives 2006/42/EC (MD),
2014/30/EU (EMC), 2011/65/EU (RoHS)
and their amendments. For the evaluation
of conformity, the following harmonized
standards were consulted:
EN 60745-1:2009+A11:2010
EN 50580:2012+A1:2013
Afps GS 2019:01 PAK
EN IEC 55014-1:2021
EN IEC 55014-2:2021
EN IEC 61000-3-2:2019+A1;2021
EN61000-3-3:2013+A1:2019+A2:2021
Staphorst, 23 January 2023
Jin Min, QA Representative
Batavia B.V., Weth. Wassebaliestraat 6d,
7951 SN Staphorst, Netherlands
The product and the user manual may be
subject to changes. Technical data may be
changed without prior notice.

15
Deutsch
Sehr geehrte Damen und Herren
Bitte machen Sie sich in der Reihenfolge der
Kapitel mit dem Gerät vertraut und bewah-
ren Sie diese Bedienungsanleitung für spä-
tere Zwecke gut auf.
Bitte beachten Sie die Sicherheitshinweise!
Diese Bedienungsanleitung enthält wichtige
Hinweise zur Inbetriebnahme und Handha-
bung. Legen Sie die Anleitung dem Produkt
bei, wenn Sie es an Dritte weitergeben.
1. Erläuterung der Symbole
Folgende Symbole werden im Benutzer-
handbuch oder auf dem Produkt verwendet:
WARNUNG - Zur Verringerung des
Verletzungsrisikos Bedienungsan-
leitung lesen.
Allgemeines Warnzeichen – Seien
Sie aufmerksam und beachten Sie
allgemeine Gefahren.
Tragen Sie eine Staubschutz-
maske. Beim Bearbeiten von Holz
und anderen Materialien kann
gesundheitsschädlicher Staub
entstehen. Asbesthaltiges Mate-
rial darf nicht bearbeitet werden!
Tragen Sie eine Schutzbrille. Wäh-
rend der Arbeit entstehende Fun-
ken oder aus dem Elektrowerkzeug
heraustretende Splitter, Späne und
Stäube können Sichtverlust
bewirken.
CE steht für ,,Conformité
Européenne“, dies bedeutet,,Über-
einstimmung mit EU Richtlinien“.
Mit der CE Kennzeichnung bestä-
tigt der Hersteller, dass dieses
Elektrowerkzeug den geltenden
europäischen Richtlinien
entspricht.
Nicht in den Hausmüll entsorgen!
2. Allgemeine Sicherheitshinweise
für Elektrowerkzeuge
WARNUNG! Lesen Sie alle Sicher-
heitshinweise, Anweisungen,
Bebilderungen und technischen
Daten, mit denen dieses Elektrowerkzeug
versehen ist. Versäumnisse bei der Einhal-
tung der nachfolgenden Anweisungen kön-
nen elektrischen Schlag, Brand und/oder
schwere Verletzungen verursachen.
Bewahren Sie alle Sicherheitshinweise
und Anweisungen für die Zukunft auf.
Der in den Sicherheitshinweisen verwendete
Begriff „Elektrowerkzeug“ bezieht sich auf
netzbetriebene Elektrowerkzeuge (mit Netz-
leitung) oder auf akkubetriebene Elektro-
werkzeuge (ohne Netzleitung).
2.1 Arbeitsplatzsicherheit
a. Halten Sie Ihren Arbeitsbereich sauber
und gut beleuchtet. Unordnung oder
unbeleuchtete Arbeitsbereiche können
zu Unfällen führen.
b. Arbeiten Sie mit dem Elektrowerkzeug
nicht in explosionsgefährdeter Umge-
bung, in der sich brennbare Flüssig-
keiten, Gase oder Stäube benden.
Elektrowerkzeuge erzeugen Funken, die
den Staub oder die Dämpfe entzünden
können.
c. Halten Sie Kinder und andere Perso-
nen während der Benutzung des Elek-
trowerkzeugs fern. Bei Ablenkung
können Sie die Kontrolle über das Elekt-
rowerkzeug verlieren.
2.2 Elektrische Sicherheit
a. Der Anschlussstecker des Elektro-
werkzeugs muss in die Steckdose
passen. Der Stecker darf in keiner
Weise verändert werden. Verwenden
Sie keine Adapterstecker gemeinsam
mit schutzgeerdeten Elektrowerkzeu-
gen. Unveränderte Stecker und pas-
sende Steckdosen verringern das Risiko
eines elektrischen Schlages.
b. Vermeiden Sie Körperkontakt mit
geerdeten Oberächen wie von Roh-
ren, Heizungen, Herden und Kühl-
schränken. Es besteht ein erhöhtes
Risiko durch elektrischen Schlag, wenn
Ihr Körper geerdet ist.
c. Halten Sie Elektrowerkzeuge von
Regen oder Nässe fern. Das Eindringen
von Wasser in ein Elektrowerkzeug
erhöht das Risiko eines elektrischen
Schlages.

Deutsch
16
d. Zweckentfremden Sie die Anschluss-
leitung nicht, um das Elektrowerkzeug
zu tragen, aufzuhängen oder um den
Stecker aus der Steckdose zu ziehen.
Halten Sie die Anschlussleitung fern
von Hitze, Öl, scharfen Kanten oder
sich bewegenden Teilen. Beschädigte
oder verwickelte Anschlussleitungen
erhöhen das Risiko eines elektrischen
Schlages.
e. Wenn Sie mit einem Elektrowerkzeug
im Freien arbeiten, verwenden Sie nur
Verlängerungsleitungen, die auch für
den Außenbereich geeignet sind. Die
Anwendung einer für den Außenbereich
geeigneten Verlängerungsleitung verrin-
gert das Risiko eines elektrischen
Schlages.
f. Wenn der Betrieb des Elektrowerk-
zeugs in feuchter Umgebung nicht
vermeidbar ist, verwenden Sie einen
Fehlerstromschutzschalter. Der Ein-
satz eines Fehlerstromschutzschalters
vermindert das Risiko eines elektri-
schen Schlages.
2.3 Sicherheit von Personen
a. Seien Sie aufmerksam, achten Sie
darauf, was Sie tun, und gehen Sie mit
Vernunft an die Arbeit mit einem Elek-
trowerkzeug. Benutzen Sie kein Elekt-
rowerkzeug, wenn Sie müde sind oder
unter dem Einuss von Drogen, Alko-
hol oder Medikamenten stehen. Ein
Moment der Unachtsamkeit beim
Gebrauch des Elektrowerkzeugs kann
zu ernsthaften Verletzungen führen.
b. Tragen Sie persönliche Schutzausrüs-
tung und immer eine Schutzbrille. Das
Tragen persönlicher Schutzausrüstung,
wie Staubmaske, rutschfeste Sicher-
heitsschuhe, Schutzhelm oder Gehör-
schutz, je nach Art und Einsatz des
Elektrowerkzeugs, verringert das Risiko
von Verletzungen.
c. Vermeiden Sie eine unbeabsichtigte
Inbetriebnahme. Vergewissern Sie
sich, dass das Elektrowerkzeug aus-
geschaltet ist, bevor Sie es an die
Stromversorgung und/oder den Akku
anschließen, es aufnehmen oder tra-
gen. Wenn Sie beim Tragen des Elektro-
werkzeugs den Finger am Schalter
haben oder das Elektrowerkzeug einge-
schaltet an die Stromversorgung
anschließen, kann dies zu Unfällen
führen.
d. Entfernen Sie Einstellwerkzeuge oder
Schraubenschlüssel, bevor Sie das
Elektrowerkzeug einschalten. Ein
Werkzeug oder Schlüssel, der sich in
einem drehenden Teil des Elektrowerk-
zeugs bendet, kann zu Verletzungen
führen.
e. Vermeiden Sie eine abnormale Kör-
perhaltung. Sorgen Sie für einen
sicheren Stand und halten Sie jeder-
zeit das Gleichgewicht. Dadurch kön-
nen Sie das Elektrowerkzeug in uner-
warteten Situationen besser
kontrollieren.
f. Tragen Sie geeignete Kleidung. Tragen
Sie keine weite Kleidung oder
Schmuck. Halten Sie Haare und Klei-
dung fern von sich bewegenden Tei-
len. Lockere Kleidung, Schmuck oder
lange Haare können von sich bewegen-
den Teilen erfasst werden.
g. Wenn Staubabsaug- und -auffangein-
richtungen montiert werden können,
sind diese anzuschließen und richtig
zu verwenden. Verwendung einer Stau-
babsaugung kann Gefährdungen durch
Staub verringern.
h. Wiegen Sie sich nicht in falscher
Sicherheit und setzen Sie sich nicht
über die Sicherheits-Regeln für Elekt-
rowerkzeuge hinweg, auch wenn Sie
nach vielfachem Gebrauch mit dem
Elektrowerkzeug vertraut sind. Achtlo-
ses Handeln kann binnen Sekunden-
bruchteilen zu schweren Verletzungen
führen.
2.4 Verwendung und Behandlung des
Elektrowerkzeugs
a. Überlasten Sie das Elektrowerkzeug
nicht. Verwenden Sie für Ihre Arbeit
das dafür bestimmte Elektrowerkzeug.
Mit dem passenden Elektrowerkzeug
arbeiten Sie besser und sicherer im
angegebenen Leistungsbereich.

17
Deutsch
b. Benutzen Sie kein Elektrowerkzeug,
dessen Schalter defekt ist. Ein Elektro-
werkzeug, das sich nicht mehr ein- oder
ausschalten lässt, ist gefährlich und
muss repariert werden.
c. Ziehen Sie den Stecker aus der Steck-
dose und/oder entfernen Sie einen
abnehmbaren Akku, bevor Sie Geräte-
einstellungen vornehmen, Einsatz-
werkzeugteile wechseln oder das
Elektrowerkzeug weglegen. Diese
Vorsichtsmaßnahme verhindert den
unbeabsichtigten Start des
Elektrowerkzeugs.
d. Bewahren Sie unbenutzte Elektro-
werkzeuge außerhalb der Reichweite
von Kindern auf. Lassen Sie keine
Personen das Elektrowerkzeug benut-
zen, die mit diesem nicht vertraut sind
oder diese Anweisungen nicht gelesen
haben. Elektrowerkzeuge sind gefähr-
lich, wenn Sie von unerfahrenen Perso-
nen benutzt werden.
e. Pegen Sie Elektrowerkzeuge und
Einsatzwerkzeug mit Sorgfalt. Kont-
rollieren Sie, ob bewegliche Teile ein-
wandfrei funktionieren und nicht
klemmen, ob Teile gebrochen oder so
beschädigt sind, dass die Funktion
des Elektrowerkzeugs beeinträchtigt
ist. Lassen Sie beschädigte Teile vor
dem Einsatz des Elektrowerkzeuges
reparieren. Viele Unfälle haben ihre
Ursache in schlecht gewarteten
Elektrowerkzeugen.
f. Halten Sie Schneidwerkzeuge scharf
und sauber. Sorgfältig gepegte
Schneidwerkzeuge mit scharfen
Schneidkanten verklemmen sich weni-
ger und sind leichter zu führen.
g. Verwenden Sie Elektrowerkzeug, Ein-
satzwerkzeug, Einsatzwerkzeuge usw.
entsprechend diesen Anweisungen.
Berücksichtigen Sie dabei die Arbeits-
bedingungen und die auszuführende
Tätigkeit. Der Gebrauch von Elektro-
werkzeugen für andere als die vorgese-
henen Anwendungen kann zu gefährli-
chen Situationen führen.
h. Halten Sie Griffe und Griffächen
trocken, sauber und frei von Öl und
Fett. Rutschige Griffe und Griffächen
erlauben keine sichere Bedienung und
Kontrolle des Elektrowerkzeugs in
unvorhergesehenen Situationen.
2.5 Service
a. Lassen Sie Ihr Elektrowerkzeug nur
von qualiziertem Fachpersonal und
nur mit Original-Ersatzteilen reparie-
ren. Damit wird sichergestellt, dass die
Sicherheit des Elektrowerkzeugs erhal-
ten bleibt.
3. Zusätzliche Sicherheitshinweise
für elektrische Spritzpistolen
Um Feuer und Explosionen, Stromschlag
und Verletzungen zu vermeiden, lesen und
verstehen Sie alle Anleitungen in diesem
Handbuch. Machen Sie sich mit den Bedie-
nelementen und der ordnungsgemäßen
Verwendung des Geräts vertraut.
Hinweis auf eine gefährliche Situa-
tion, die, wenn sie nicht vermieden
wird, zum Tod oder zu schweren
Verletzungen führen kann.
a. GEFAHR: EXPLOSION ODER FEUER
Lösungsmittel- und Lackdämpfe können
explodieren oder sich entzünden. Schwere
Verletzungen oder Sachschäden können die
Folge sein.
VERMEIDUNG:
• Sorgen Sie für eine ausreichende Belüf-
tung im Sprühbereich und für ausrei-
chend Frischluft im gesamten Raum.
Die Verdunstung von brennbaren
Lösungsmitteln führt zu einer explosi-
ven Umgebung.
• Vermeiden Sie alle Zündquellen wie
statische und elektrische Funken,
offene Flammen, Zündammen, elektri-
sche Geräte und heiße Gegenstände.
Das Anschließen oder Abziehen von
Stromkabeln oder das Betätigen von
Lichtschaltern kann Funken erzeugen.
• Rauchen Sie nicht im Sprühbereich.
• Ein Feuerlöscher muss vorhanden und
funktionstüchtig sein.
• Nur im Freien oder in einem gut belüfte-
ten Bereich verwenden. Entammbare
Dämpfe sind oft schwerer als Luft. Das
Gerät enthält funkenbildende Teile, die

Deutsch
18
Funken erzeugen und Dämpfe entzün-
den können.
• Beachten Sie die Warnhinweise und
Anweisungen des Material- und
Lösungsmittelherstellers.
• Verwenden Sie keine Materialien mit
einem Flammpunkt unter 21 °C. Der
Flammpunkt ist die Temperatur, bei der
eine Flüssigkeit ausreichend Dämpfe
erzeugen kann, um sich zu entzünden
(siehe Lackhersteller).
• Kunststoff kann statische Funkenbil-
dung verursachen. Verwenden Sie kei-
nesfalls Kunststoff, um den Spritzbe-
reich abzuschirmen.
• Verwenden Sie beim Spritzen von
brennbaren Materialien keine Abdeck-
planen aus Kunststoff.
b. GEFAHR: EXPLOSIONSGEFAHR AUF-
GRUND VON UNVERTRÄGLICHEN
MATERIALIEN.
Kann zu Sachschäden oder schweren Ver-
letzungen führen.
VERMEIDUNG:
• Verwenden Sie keine Materialien, die
Bleichmittel oder Chlor enthalten.
• Verwenden Sie keine Lösungsmittel mit
halogenhaltigen Kohlenwasserstoffen
wie Bleichmittel, Schimmelbekämp-
fungsmittel, Methylenchlorid und
1,1,1-Trichlorethan. Sie sind nicht mit
Aluminium verträglich.
• Erkundigen Sie sich bei Ihrem Lackliefe-
ranten nach der Verträglichkeit des
Materials mit Aluminium.
c. GEFAHR: GEFÄHRLICHE DÄMPFE
Lacke, Lösungsmittel, Insektizide und
andere Materialien können schädlich sein,
wenn sie eingeatmet werden oder mit dem
Körper in Kontakt kommen. Dämpfe können
starke Übelkeit, Ohnmacht oder Vergiftun-
gen verursachen.
VERMEIDUNG:
• Verwenden Sie ein Atemschutzgerät
oder eine Maske, wenn Dämpfe eingeat-
met werden können. Lesen Sie alle
Anleitungen, die mit der Maske geliefert
werden, um sicher zu sein, dass sie den
notwendigen Schutz bietet.
• Tragen Sie eine Schutzbrille.
• Tragen Sie Schutzkleidung, wie vom
Lackhersteller vorgeschrieben.
d. GEFAHR: ALLGEMEIN
Kann schwere Verletzungen oder Sachschä-
den verursachen.
VERMEIDUNG:
• Befolgen Sie alle einschlägigen örtli-
chen, staatlichen und nationalen Vor-
schriften zur Belüftung, Brandverhütung
und zum Betrieb.
• Verwenden Sie nur vom Hersteller zuge-
lassene Teile. Der Benutzer übernimmt
alle Risiken und die Haftung bei Verwen-
dung von Teilen, die nicht den Mindest-
spezikationen und Sicherheitsvor-
schriften des Herstellers entsprechen.
• Spritzen Sie an windigen Tagen nicht im
Freien.
• Tragen Sie Schutzkleidung, um Farbe
von Haut und Haaren fernzuhalten.
• Richten Sie die Spritzpistole niemals auf
einen Körperteil.
• Richten Sie die Spritzpistole niemals auf
Personen oder Tiere.
4. Wichtige elektrische Hinweise
4.1 Der Stecker des Geräts muss in die
Steckdose passen. Der Stecker darf in
keiner Form verändert werden. Ver-
wenden Sie keine Adapterstecker
zusammen mit schutzgeerdeten
Werkzeugen.
Unveränderte Stecker und passende
Steckdosen verringern die
Stromschlaggefahr.
4.2 Vermeiden Sie Körperkontakt mit
geerdeten Oberächen wie Rohren,
Heizkörpern, Herden und Kühlschrän-
ken. Die Stromschlaggefahr erhöht
sich, wenn Ihr Körper geerdet ist.
4.3 Schützen Sie das Gerät vor Regen und
Feuchtigkeit. Die Stromschlaggefahr
erhöht sich, wenn Wasser in elektrische
Geräte eindringt.
4.4 Verwenden Sie das Netzkabel nicht
missbräuchlich, indem Sie das Gerät
am Kabel tragen, es am Kabel aufhän-
gen oder am Kabel ziehen, um den
Netzstecker zu ziehen. Schützen Sie
das Kabel vor Hitze, Öl, scharfen Kan-
Seite laden ...
Seite laden ...
Seite laden ...
Seite laden ...
Seite laden ...
Seite laden ...
Seite laden ...
Seite laden ...
Seite laden ...
Seite laden ...
Seite laden ...
Seite laden ...
Seite laden ...
Seite laden ...
Seite laden ...
Seite laden ...
Seite laden ...
Seite laden ...
Seite laden ...
Seite laden ...
Seite laden ...
Seite laden ...
Seite laden ...
Seite laden ...
Seite laden ...
Seite laden ...
Seite laden ...
Seite laden ...
Seite laden ...
Seite laden ...
Seite laden ...
Seite laden ...
Seite laden ...
Seite laden ...
Seite laden ...
Seite laden ...
Seite laden ...
Seite laden ...
Seite laden ...
Seite laden ...
Seite laden ...
Seite laden ...
Seite laden ...
Seite laden ...
Seite laden ...
Seite laden ...
Seite laden ...
Seite laden ...
Seite laden ...
Seite laden ...
Seite laden ...
Seite laden ...
Seite laden ...
Seite laden ...
Seite laden ...
Seite laden ...
Seite laden ...
Seite laden ...
Seite laden ...
Seite laden ...
Seite laden ...
Seite laden ...
Seite laden ...
Seite laden ...
Seite laden ...
Seite laden ...
-
 1
1
-
 2
2
-
 3
3
-
 4
4
-
 5
5
-
 6
6
-
 7
7
-
 8
8
-
 9
9
-
 10
10
-
 11
11
-
 12
12
-
 13
13
-
 14
14
-
 15
15
-
 16
16
-
 17
17
-
 18
18
-
 19
19
-
 20
20
-
 21
21
-
 22
22
-
 23
23
-
 24
24
-
 25
25
-
 26
26
-
 27
27
-
 28
28
-
 29
29
-
 30
30
-
 31
31
-
 32
32
-
 33
33
-
 34
34
-
 35
35
-
 36
36
-
 37
37
-
 38
38
-
 39
39
-
 40
40
-
 41
41
-
 42
42
-
 43
43
-
 44
44
-
 45
45
-
 46
46
-
 47
47
-
 48
48
-
 49
49
-
 50
50
-
 51
51
-
 52
52
-
 53
53
-
 54
54
-
 55
55
-
 56
56
-
 57
57
-
 58
58
-
 59
59
-
 60
60
-
 61
61
-
 62
62
-
 63
63
-
 64
64
-
 65
65
-
 66
66
-
 67
67
-
 68
68
-
 69
69
-
 70
70
-
 71
71
-
 72
72
-
 73
73
-
 74
74
-
 75
75
-
 76
76
-
 77
77
-
 78
78
-
 79
79
-
 80
80
-
 81
81
-
 82
82
-
 83
83
-
 84
84
-
 85
85
-
 86
86


Batavia Paint Spray System Benutzerhandbuch
- Kategorie
- Spritzpistole
- Typ
- Benutzerhandbuch
in anderen Sprachen
- English: Batavia Paint Spray System User manual
- français: Batavia Paint Spray System Manuel utilisateur
- español: Batavia Paint Spray System Manual de usuario
- italiano: Batavia Paint Spray System Manuale utente
- Nederlands: Batavia Paint Spray System Handleiding
- português: Batavia Paint Spray System Manual do usuário
- polski: Batavia Paint Spray System Instrukcja obsługi
Verwandte Papiere
Sonstige Unterlagen
-
Parkside KH 3031 PAINT SPRAY GUN Operation and Safety Notes
-
Parkside PFS 100 B2 Operation and Safety Notes
-
-
-
-
-
-
Parkside PFS 100 C3 Operation and Safety Notes
-
-
WAGNER WallPerfect W665 Bedienungsanleitung