Bresser 5806300 Bedienungsanleitung
- Kategorie
- Mikroskope
- Typ
- Bedienungsanleitung

Microscope · Mikroskop ·
Science ETD-301
EN Instruction manual
DE Bedienungsanleitung

DE
Besuchen Sie unsere Website über den folgenden QR Code oder Weblink um weitere
Informationen zu diesem Produkt oder die verfügbaren Übersetzungen dieser Anleitung
zu nden.
EN
Visit our website via the following QR Code or web link to nd further information on this
product or the available translations of these instructions.
FR
Si vous souhaitez obtenir plus d’informations concernant ce produit ou rechercher ce
mode d’emploi en d’autres langues, rendez-vous sur notre site Internet en utilisant le
code QR ou le lien correspondant.
NL
Bezoek onze internetpagina via de volgende QR-code of weblink, voor meer informatie
over dit product of de beschikbare vertalingen van deze gebruiksaanwijzing.
ES
¿Desearía recibir unas instrucciones de uso completas sobre este producto en un idioma
determinado? Entonces visite nuestra página web utilizando el siguiente enlace (código
QR) para ver las versiones disponibles.
IT
Desidera ricevere informazioni esaustive su questo prodotto in una lingua specica?
Venga a visitare il nostro sito Web al seguente link (codice QR Code) per conoscere le
versioni disponibili.
www.bresser.de/download/P5806300
www.bresser.de/warranty_terms
GARANTIE · WARRANTY · GARANTÍA · GARANZIA
RECYCLAGE (TRIMAN/FRANCE)


4
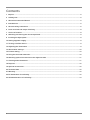
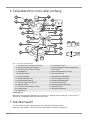
Contents
1 Imprint ............................................................................................................................................................. 5
2 Validity note .................................................................................................................................................... 5
3 About this Instruction Manual....................................................................................................................... 5
4 Intended use ................................................................................................................................................... 5
5 General safety instructions ........................................................................................................................... 6
6 Parts overview and scope of delivery .......................................................................................................... 8
7 Choice of location .......................................................................................................................................... 8
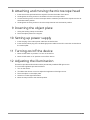
8 Attaching and moving the microscope head............................................................................................... 9
9 Inserting the object plate............................................................................................................................... 9
10 Setting up power supply................................................................................................................................ 9
11 Turning on/off the device .............................................................................................................................. 9
12 Adjusting the illumination ............................................................................................................................. 9
13 Observation settings.................................................................................................................................... 10
14 Friction setting ............................................................................................................................................. 10
15 Using the trinocular extension.................................................................................................................... 10
16 Attaching optional accessories to the objective tube .............................................................................. 11
17 Cleaning and maintenance.......................................................................................................................... 11
18 Disposal ........................................................................................................................................................ 12
19 Optional accessories ................................................................................................................................... 12
20 Technical data .............................................................................................................................................. 12
21 Warranty........................................................................................................................................................ 12
22 EC declaration of conformity ...................................................................................................................... 12
23 UKCA declaration of conformity................................................................................................................. 13

5 / 28
1 Imprint
Bresser GmbH
Gutenbergstr. 2
46414 Rhede
Germany
www.bresser.de
For any warranty claims or service inquiries, please refer to the information on "Warranty" and "Ser-
vice" in this documentation. We ask for your understanding that unsolicited returns cannot be pro-
cessed.
Errors and technical changes excepted.
© 2023 Bresser GmbH
All rights reserved.
The reproduction of this documentation - even in extracts - in any form (e.g. photocopy, print, etc.) as
well as the use and distribution by means of electronic systems (e.g. image file, website, etc.) without
the prior written permission of the manufacturer is prohibited.
The designations and brand names of the respective companies used in this documentation are gen-
erally protected by trade, trademark and/or patent law in Germany, the European Union and/or other
countries.
2 Validity note
This documentation is valid for the products with the following article numbers:
5806300
Manual version: 0523
Manual designation:
Manual_5806300_Science-ETD-301_en-de_BRESSER_v052023a
Always provide information when requesting service.
3 About this Instruction Manual
NOTICE
These operating instructions are to be considered a component of the device.
Read the safety instructions and the instruction manual carefully before using this device.
Keep these instruction manual in a safe place for future reference. If the device is sold or passed on,
the instruction manual must be passed on to any subsequent owner/user of the product.
4 Intended use
• This device is not intended for use by persons (including children) with impaired physical, sensory
or mental abilities, or for lack of experience and/or knowledge, unless they are supervised by or
have received instructions from a person responsible for their safety on how to use this device.
• This device is for personal use only.
• It was developed for an magnified representation of nature observations.
• The device is intended only for indoor use.

6 / 28
5 General safety instructions
DANGER
Risk of an electric shock!
This device contains electronic parts that are powered by a power source (AC adapter and/or batter-
ies). Improper use of this product may result in electric shock. Electric shock can cause serious or fatal
injuries. It is therefore imperative that you observe the following safety information.
• Disconnect the power supply by pulling the mains plug when the appliance is not in use, in case of
a longer interruption of operation and before any maintenance and cleaning work.
• Place your device so that it can be disconnected from the power supply at any time. The power
outlet should always be near your appliance and should be easily accessible, as the plug of the
power cord serves as a disconnect device from the mains supply.
• To disconnect the unit from the mains, always pull the mains plug and never pull the cable!
• Check this device, cables and connections for damage before use.
• Never attempt to operate a damaged device, or a device with damaged electrical parts! Damaged
parts must be replaced immediately by an authorized service agent.
• Operate the device only in a completely dry environment and do not touch the device with wet or
damp body parts.
DANGER
Danger of suffocation!
Improper use of this product may result in suffocation, especially for children. It is therefore imperative
that you observe the following safety information.
• Keep packaging materials (plastic bags, rubber bands, etc.) away from children! There is a danger
of choking!
• This product contains small parts that can be swallowed by children! Choking hazard!
• If small parts are swallowed, consult a doctor immediately!
DANGER
Explosion hazard!
Improper use of this product may result in fire. It is essential that you observe the following safety in-
formation in order to avoid fires.
• Do not expose the device to high temperatures. Use only the supplied AC adapter. Do not short-
circuit the device or batteries or dispose of in fire! Excessive heat and improper handling can
cause short circuits, fires and even explosions!
CAUTION
Risk of body injury!
This device contains components and/or accessories that can cause minor or serious body injury if
used improperly. It is therefore essential that you observe the following safety information in order to
prevent body injuries.
• Sharp-edged and pointed tools are often used for working with this device. Therefore, keep this
device and all accessories and tools in a place inaccessible to children. Danger of body injury!

7 / 28
• Chemicals and liquids do not belong in children's hands! Don't drink! Clean hands thoroughly un-
der running water after use. In case of accidental contact with eyes or mouth, rinse with water. In
case of complaints, consult a doctor immediately and show the substances.
CAUTION
Fire hazard!
Improper use of this product may result in fire. It is essential that you observe the following safety in-
formation in order to avoid fires.
• Never cover the ventilation slots or cooling fins of the device during operation or until it has cooled
down completely!
NOTICE
Danger of material damage!
Improper handling may result in damage to the unit and/or accessories. Therefore, use the device only
in accordance with the following safety information.
• Do not disassemble the device! In the event of a defect, please contact your dealer. They will con-
tact the Service Center and can arrange the return of this device for repair if necessary.
• Do not expose the device to high temperatures and protect it from water and high humidity.
• Do not subject the device to excessive vibrations.
• Only use accessories and spare parts for this device that comply with the technical specifications.

8 / 28
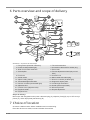
6 Parts overview and scope of delivery
2
7
8
9
10
12
11
14
13
3
15
18
19
21
20
17
22
16
1
4
25
24
23
6
5
A
C
D
B
Illustration1: All parts of the microscope
1 Fixing screw (trinocular extension) 2 Trinocular extension
3 Power socket (incident light) 4 Connection cable with DC hollow plug
5 Slider for trinocular extension 6 Zoom knob
7 Vertical pillar 8 Friction adjustment wheel (only on left
side)
9 Fine focus 10 Coarse focus
11 On/Off switch 12 Mains cable with mains plug
13 Object holding clamps 14 Dimmer controller (incident light)
15 Transmitted light illumination 16 Support for object plate
17 Dimmer controller (transmitted light) 18 Incident light ilumination
19 Objective tube 20 Holder (microscope head)
21 Fixation screw (objective tube) 22 Microscope head
23 Eyepiece holder 24 Diopter adjustment
25 Eyepiece lens
Scope of delivery:
Microscope with integrated mains power cable and plug (A), objective (fixed) (B), 2 pcs. WF 10x eye-
pieces (C), white object plate (translucent) (D)
7 Choice of location
Choose a suitable location before installation and commissioning.
Place the device on a stable, level and vibration-free surface.

9 / 28
8 Attaching and moving the microscope head
1. Insert the microscope head with the objective first into the holder from above.
2. Hand-tighten the fixing screw on the holder to fix the microscope head.
3. Loosen the fixing screw on the microscope head to rotate the part above the objective to the de-
sired observation position.
4. Hand-tighten the fixing screw on the microscope head to lock the head in position.
9 Inserting the object plate
1. Swing the holding clamps to the sides.
2. Place the object plate on the support.
10 Setting up power supply
1. Insert the plug of the mains power cable into the wall socket.
2. Insert the DC hollow plug of the incident light power cable into the DC connection socket above
the vertical pillar.
11 Turning on/off the device
1. Move On/Off switch to position 'I' to turn on the device.
2. Move On/Off switch to 'O' position to turn off the device.
12 Adjusting the illumination
This device provides an illumination with a permanently installed LED light source.
To control the brightness proceed as follows:
1. Turn on the device.
2. Turn/Move the dimmer control to adjust the brightness of the light source.
3. Place the object on the object plate.
4. Switch on incident light illumination.
5. Move the lamp holder to the desired position.

10 / 28
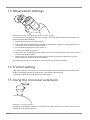
13 Observation settings
Illustration2: Binocular head with diopter adjustment at the eyepiece
This microscope is equipped with an binocular head. The interpupillary distance and the diopter set-
tings can be adjusted individually.
1. With the eyes look through both eyepieces.
2. Change the distance between the eyepieces by pushing them together or pulling apart until a cir-
cular image of the obeserved object is visible.
3. Turn the diopter adjustment ring to position '0'.
4. Turn the zoom button to position '5'.
5. With the left eye, look through the left eyepiece and turn the focusing wheel until a sharp image of
the observed object is visible.
6. With the right eye, look through the right eyepiece and turn the diopter adjustment ring until a
sharp image of the observed object is visible too.
The diopter adjustment can also be done in the opposite way on the left eyepiece.
14 Friction setting
If the friction setting is too smooth, the microscope head will move downwards by itself because the
weight is completely pushing on the guide rail. This creates a blurred image.
To avoid this, tighten the friction adjustment wheel slightly.
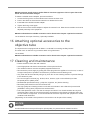
15 Using the trinocular extension
Illustration3: Trinocular extension
Depending on the adapter* attached, a SLR camera, a system camera or a C-mount camera can be
attached to the trinocular extension.

11 / 28
NOTICE!Cameras usually show a smaller field of view than eyepieces. This is in part due to the
sensor size and cannot be changed.
To attach a suitable camera adapter, proceed as follows:
1. Loosen the fixing screw on the extension and remove the dust cover.
2. Push in the slider for the trinocular extension to release the function.
3. Insert/attach the desired camera adapter.
4. Tighten the fixing screw again.
5. Use the focus of the camera adapter to adjust the camera focus. Most camera models can thus be
adjusted parfocally to the eyepieces.
NOTICE!Information on suitable accessories can be found in the chapter "Optional accessories".
*not included in the scope of delivery / optionally available
16 Attaching optional accessories to the
objective tube
The objective tube is equipped with an M48 x 0.75 thread for mounting ancillary lenses*.
The outer notch on the lens ring is used to attach a ring illuminator*.
*not included
NOTICE!Information on suitable accessories can be found in the chapter "Optional accessories".
17 Cleaning and maintenance
• Protect the device from dust and moisture!
• Avoid fingerprints and similar contamination of the optical surfaces.
• The residual moisture must be completely degraded before use.
• Disconnect the power supply by pulling the mains plug when the appliance is not in use, in case of
a longer interruption of operation and before any maintenance and cleaning work.
• Only clean the device externally using a dry cloth. Do not use cleaning solution to prevent damage
to the electronic parts.
• Do not use organic solvents (e.g. alcohol, ether, acetone, xylol or other dilutions) to clean
lacquered parts or plastic parts!
• Disassemble optical elements (e.g. objective, eyepiece, etc) before cleaning.
• Blow away loose dust from the lens surfaces first.
• Use high quality lens cleaning towels or soft cloth and moisten it with a little bit of pure alcohol
(available in a drug store). Wipe the lens surface with it.
• Pull a dust protection cover* over the microscope and store it in a closed container at a dry and
mould-free place. Store the microscope and the accessories in the relevant containers when they
are not used for a longer time. It is recommended to store also objectives and eyepieces in closed
containers with desiccant.
(*depending on the model a dust protection cover and box can be part of the content)
NOTICE
Remember:
A well maintained microscope will keep its optical quality for years and thus maintain its value.

12 / 28
18 Disposal
Dispose of the packaging materials according to its type. Information on proper disposal can
be obtained from the municipal waste disposal service provider or environmental agency.
Do not dispose of electronic devices in the household garbage!
According to the European Directive 2012/19/EU on Waste Electrical and Electronic Equip-
ment and its transposition into national law, used electrical equipment must be collected sep-
arately and recycled in an environmentally sound manner.
19 Optional accessories
Interchangeable eyepieces
BRESSER Wide-field eyepiece 15x/16 (30mm) with diopter adjustment
Art. no. 5943116
Adapter for trinocular extension
BRESSER Adapter for SLR and system cameras
Art. no. 5942100 (camera-specific T2 ring additionally required)
BRESSER Adapter for C-mount cameras
Art. no. 5942101
Ancillary lens for objective
BRESSER Additional objective 2.0x
Art. no. 5941496
20 Technical data
Article number: 5806300
Microscope head: trinocular
Object stage: yes, with translucent object plate (diam. 90 mm; thickness 5 mm)
Eyepiece(s): 2x WF 10x (30 mm)
Eyepiece field of view: 22
Objective(s): 0.7x to 6.3x
Magnification(s): 7x to 63x
Power supply: 230V mains power
Illumination: LED, dual (incident light/transmitted light), independently adjustable
21 Warranty
The regular guarantee period is 10 years and begins on the day of purchase. You can consult the full
guarantee terms and details of our services at www.bresser.de/warranty_terms.
22 EC declaration of conformity
A "Declaration of conformity" in accordance with the applicable directives and correspond-
ing standards has been prepared by Bresser GmbH. The full text of the EC declaration of
conformity is available at the following Internet address: www.bresser.de/down-
load/5806300/CE/5806300_CE.pdf

13 / 28
23 UKCA declaration of conformity
A "Declaration of Conformity" in accordance with the applicable directives and relevant
standards has been issued by Bresser GmbH The full text of the UKCA Declaration of
Conformity is available at the following web address: www.bresser.de/download/5806300/
UKCA/5806300_UKCA.pdf
Bresser UK Ltd. • Suite 3G, Eden House, Enterprise Way, Edenbridge, Kent TN8 6HF,
Great Britain

14
Inhaltsverzeichnis
1 Impressum .................................................................................................................................................... 15
2 Gültigkeitshinweis........................................................................................................................................ 15
3 Zu dieser Anleitung...................................................................................................................................... 15
4 Verwendungszweck ..................................................................................................................................... 15
5 Allgemeine Sicherheitshinweise................................................................................................................. 16
6 Teileübersicht und Lieferumfang................................................................................................................ 18
7 Standortwahl................................................................................................................................................. 18
8 Mikroskop-Kopf anbringen und bewegen.................................................................................................. 19
9 Objektplatte einsetzen ................................................................................................................................. 19
10 Stromversorgung herstellen ....................................................................................................................... 19
11 Gerät ein-/ausschalten................................................................................................................................. 19
12 Beleuchtung einstellen ................................................................................................................................ 19
13 Beobachtungseinstellungen vornehmen................................................................................................... 20
14 Friktionseinstellung ..................................................................................................................................... 20
15 Verwendung des trinokularen Auszugs..................................................................................................... 20
16 Optionales Zubehör an Objektivtubus anbringen..................................................................................... 21
17 Reinigung und Wartung............................................................................................................................... 21
18 Entsorgung ................................................................................................................................................... 22
19 Optionales Zubehör ..................................................................................................................................... 22
20 Technische Daten......................................................................................................................................... 22
21 Garantie......................................................................................................................................................... 22
22 EG-Konformitätserklärung .......................................................................................................................... 23

15 / 28
1 Impressum
Bresser GmbH
Gutenbergstr. 2
46414 Rhede
Germany
www.bresser.de
Für etwaige Gewährleistungsansprüche oder Serviceanfragen verweisen wir auf die Informationen zu
„Garantie“ und „Service“ in dieser Dokumentation. Wir bitten um Verständnis, dass unaufgeforderte
Rücksendungen nicht bearbeitet werden können.
Irrtümer und technische Änderungen vorbehalten.
© 2023 Bresser GmbH
Alle Rechte vorbehalten.
Die Reproduktion dieser Dokumentation – auch auszugsweise – in irgendeiner Form (z.B. Fotokopie,
Druck, etc.) sowie die Verwendung und Verbreitung mittels elektronischer Systeme (z.B. Bilddatei,
Website, etc.) ohne eine vorherige schriftliche Genehmigung des Herstellers ist nicht gestattet.
Die in dieser Dokumentation verwendeten Bezeichnungen und Markennamen der jeweiligen Firmen
sind im Allgemeinen in Deutschland, der Europäischen Union und/oder weiteren Ländern waren-, mar-
ken- und/oder patentrechtlich geschützt.
2 Gültigkeitshinweis
Diese Dokumentation ist gültig für die Produkte mit den nachfolgend aufgeführten Artikelnummern:
5806300
Anleitungsversion: 0523
Bezeichnung dieser Anleitung:
Manual_5806300_Science-ETD-301_en-de_BRESSER_v052023a
Informationen bei Serviceanfragen stets angeben.
3 Zu dieser Anleitung
HINWEIS
Diese Bedienungsanleitung ist als Teil des Gerätes zu betrachten!
Lesen Sie vor der Benutzung des Geräts aufmerksam die Sicherheitshinweise und die Bedienungsan-
leitung.
Bewahren Sie diese Bedienungsanleitung für die erneute Verwendung zu einem späteren Zeitpunkt
auf. Bei Verkauf oder Weitergabe des Gerätes ist die Bedienungsanleitung an jeden nachfolgenden
Besitzer/Benutzer des Produkts weiterzugeben.
4 Verwendungszweck
• Dieses Gerät ist nicht dafür bestimmt, durch Personen (einschließlich Kinder) mit eingeschränkten
physischen, sensorischen oder geistigen Fähigkeiten oder mangels Erfahrung und/oder mangels
Wissen benutzt zu werden, es sei denn, sie werden durch eine für ihre Sicherheit zuständige Per-
son beaufsichtigt oder erhielten von ihr Anweisungen, wie das Gerät zu benutzen ist.
• Dieses Gerät dient ausschließlich der privaten Nutzung.
• Es wurde entwickelt zur vergrößerten Darstellung von Naturbeobachtungen.
• Das Gerät ist nur für den Betrieb in Innenräumen bestimmt!

16 / 28
5 Allgemeine Sicherheitshinweise
GEFAHR
Gefahr eines Stromschlags!
Dieses Gerät beinhaltet Elektronikteile, die über eine Stromquelle (Netzteil und/oder Batterien) betrie-
ben werden. Bei unsachgemäßer Verwendung dieses Produkts besteht die Gefahr eines Strom-
schlags. Ein Stromschlag kann zu schweren bis tödlichen Verletzungen führen. Beachten Sie daher
unbedingt die nachfolgenden Sicherheitsinformationen.
• Unterbrechen Sie die Stromzufuhr, wenn Sie das Gerät nicht benutzen, im Falle einer längeren
Betriebsunterbrechung sowie vor allen Wartungs- und Reinigungsarbeiten, indem Sie den Netz-
stecker ziehen.
• Platzieren Sie Ihr Gerät so, dass es jederzeit vom Stromnetz getrennt werden kann. Die Netz-
steckdose sollte sich immer in der Nähe Ihres Geräts befinden und gut zugänglich sein, da der
Stecker des Netzkabels als Trennvorrichtung zum Stromnetz dient.
• Um das Gerät vom Stromnetz zu trennen, ziehen Sie immer am Netzstecker und niemals am Ka-
bel!
• Überprüfen Sie das Gerät, die Kabel und Anschlüsse vor Inbetriebnahme auf Beschädigungen.
• Beschädigtes Gerät oder ein Gerät mit beschädigten stromführenden Teilen niemals in Betrieb
nehmen! Beschädigte Teile müssen umgehend von einem autorisierten Service-Betrieb ausge-
tauscht werden.
• Betreiben Sie das Gerät nur in vollkommen trockener Umgebung und berühren Sie das Gerät
nicht mit nassen oder feuchten Körperteilen.
GEFAHR
Erstickungsgefahr!
Bei unsachgemäßer Verwendung dieses Produkts besteht Erstickungsgefahr, insbesondere für Kin-
der. Beachten Sie deshalb unbedingt die nachfolgenden Sicherheitsinformationen.
• Verpackungsmaterialien (Plastiktüten, Gummibänder, etc.) von Kindern fernhalten! Es besteht Er-
stickungsgefahr!
• Dieses Produkt beinhaltet Kleinteile, die von Kindern verschluckt werden können! Es besteht Ersti-
ckungsgefahr!
• Wenn Kleinteile verschluckt wurden, unverzüglich einen Arzt aufsuchen!
GEFAHR
Explosionsgefahr!
Bei unsachgemäßer Verwendung dieses Produkts besteht Explosionsgefahr. Beachten Sie unbedingt
die nachfolgenden Sicherheitsinformationen, um eine Explosion zu vermeiden.
• Setzen Sie das Gerät keinen hohen Temperaturen aus. Benutzen Sie nur das mitgelieferte Netz-
teil. Gerät nicht kurzschließen oder ins Feuer werfen! Durch übermäßige Hitze und unsachgemä-
ße Handhabung können Kurzschlüsse, Brände und sogar Explosionen ausgelöst werden!

17 / 28
VORSICHT
Verletzungsgefahr!
Dieses Gerät beinhaltet Bau- und/oder Zubehörteile, durch die bei unsachgemäßer Verwendung leich-
te bis schwere Verletzungen hervorgerufen werden können. Beachten Sie deshalb unbedingt die
nachfolgenden Sicherheitsinformationen, um entsprechenden Verletzungen vorzubeugen.
• Für die Arbeit mit diesem Gerät werden häufig scharfkantige und spitze Hilfsmittel eingesetzt. Be-
wahren Sie deshalb dieses Gerät sowie alle Zubehörteile und Hilfsmittel an einem für Kinder unzu-
gänglichen Ort auf. Es besteht Verletzungsgefahr!
• Chemikalien und Flüssigkeiten gehören nicht in Kinderhände! Nicht trinken! Hände nach Gebrauch
unter fließendem Wasser gründlich säubern. Bei versehentlichem Kontakt mit Augen oder Mund
mit Wasser spülen. Bei Beschwerden unverzüglich einen Arzt aufsuchen und die Substanzen vor-
zeigen.
VORSICHT
Brandgefahr!
Bei unsachgemäßer Verwendung dieses Produkts besteht Brandgefahr. Beachten Sie unbedingt die
nachfolgenden Sicherheitsinformationen, um die Entstehung von Bränden zu vermeiden.
• Decken Sie die Lüftungsschlitze oder Kühlrippen des Geräts während des Betriebs oder solange
es noch nicht vollständig abgekühlt ist niemals ab!
HINWEIS
Gefahr von Sachschäden!
Bei unsachgemäßer Handhabung können das Gerät und/oder die Zubehörteile beschädigt werden.
Verwenden Sie das Gerät deshalb nur entsprechend den nachfolgenden Sicherheitsinformationen.
• Bauen Sie das Gerät nicht auseinander! Wenden Sie sich im Falle eines Defekts an Ihren Fach-
händler. Er nimmt mit dem Service-Center Kontakt auf und kann das Gerät ggf. zwecks Reparatur
einschicken.
• Setzen Sie das Gerät keinen hohen Temperaturen aus und schützen Sie es vor Wasser und hoher
Luftfeuchtigkeit.
• Setzen Sie das Gerät keinen Erschütterungen aus.
• Verwenden Sie für dieses Gerät nur Zubehör- und Ersatzteile die den technischen Angaben ent-
sprechen.

18 / 28
6 Teileübersicht und Lieferumfang
2
7
8
9
10
12
11
14
13
3
15
18
19
21
20
17
22
16
1
4
25
24
23
6
5
A
C
D
B
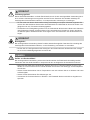
Abb.1: Alle Teile des Mikroskops
1 Fixierschraube (Trinokularer Ansatz) 2 Trinokularer Ansatz
3 Stromanschlussbuchs (Auflicht) 4 Verbindungskabel mit DC-Hohlstecker
5 Schieber für trinokularen Auszug 6 Zoomknopf
7 Vertikalsäule 8 Friktionseinstellrad (nur links)
9 Feinfokussierung 10 Grobfokussierung
11 Ein/Aus-Schalter 12 Netzkabel mit Netzstecker
13 Objekt-Halteklammern 14 Dimmer-Regler (Auflicht)
15 Durchlichtbeleuchtung 16 Auflage für Objektplatte
17 Dimmer-Regler (Durchlicht) 18 Auflicht-Beleuchtung
19 Objektiv-Tubus 20 Halterung (Mikroskop-Kopf)
21 Fixierschraube (Objektiv-Tubus) 22 Mikroskop-Kopf
23 Okularstutzen 24 Dioptrien-Einstellung
25 Okularlinse
Lieferumfang:
Mikroskop mit integriertem Netzkabel und –stecker (A), Objektiv (fest montiert) (B), 2 Stck. WF 10x
Okulare (C), Objektplatte weiß (durchscheinend) (D)
7 Standortwahl
Vor dem Aufbau und der Inbetriebnahme einen geeigneten Standort wählen.
Gerät auf einem stabilen, ebenen und erschütterungsfreien Untergrund platzieren.

19 / 28
8 Mikroskop-Kopf anbringen und bewegen
1. Mikroskop-Kopf mit dem Objektiv voran von oben in die Kopf-Halterung einsetzen.
2. Die Fixierschraube an der Halterung handfest anziehen, um den Mikroskop-Kopf zu fixieren.
3. Die Fixierschraube am Mikroskop-Kopf lösen, um den Teil oberhalb des Objektivs in die ge-
wünschte Beobachtungsposition zu drehen.
4. Die Fixierschraube am Mikroskop-Kopf handfest anziehen, um den Kopf in der Position zu fixieren.
9 Objektplatte einsetzen
1. Die Objekt-Halteklammern zur Seite schwenken.
2. Die Objektplatte auf die Auflagefläche auflegen.
10 Stromversorgung herstellen
1. Den Netzstecker des Netzkabels in die Steckdose stecken.
2. Den DC-Hohlstecker des Auflicht-Spannungskabels in die DC-Anschlussbuchse oberhalb der Ver-
tikalsäule stecken.
11 Gerät ein-/ausschalten
1. Ein/Aus-Schalter in die Position ‚I’ bewegen, um das Gerät einzuschalten.
2. Ein/Aus-Schalter in die Position ‚O’ bewegen, um das Gerät auszuschalten.
12 Beleuchtung einstellen
Dieses Gerät verfügt über eine Beleuchtungseinheit mit fest eingebauter LED-Lichtquelle.
Zur Regelung der Beleuchtung folgendermaßen vorgehen:
1. Gerät einschalten.
2. Dimmerregler drehen/bewegen, um die Helligkeit der Lichtquelle zu regulieren.
3. Objekt auf der Objektplatte platzieren.
4. Auflicht-Beleuchtung einschalten.
5. Lampenfassung in die gewünschte Position bewegen.

20 / 28
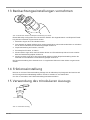
13 Beobachtungseinstellungen vornehmen
Abb.2: Binokularer Einblick mit Dioptrien-Einstellung am Okular
Dieses Mikroskop verfügt über einen binokularen Einblick. Die Augenabstands- und Dioptrien-Einstel-
lung können individuell vorgenommen werden.
1. Mit beiden Augen durch die Okulare blicken.
2. Den Abstand der beiden Okulare durch zusammenschieben oder auseinanderziehen so verändern
bis ein kreisrundes Bild vom Beobachtungsobjekt sichtbar ist.
3. Dioptrieneinstellring auf Position ‚0‘ drehen.
4. Zoomknopf auf Position ‚5‘ drehen.
5. Mit dem linken Auge durch das linke Okular blicken und Fokussierknopf drehen bis ein scharfes
Bild vom Beobachtungsobjekt sichtbar ist.
6. Mit dem rechten Auge durch das rechte Okular blicken und den Dioptrieneinstellring drehen bis
ebenfalls ein scharfes Bild vom Beobachtungsobjekt sichtbar ist.
Die Dioptrieneinstellung kann alternativ auch in umgekehrter Weise am linken Okular vorgenommen
werden.
14 Friktionseinstellung
Bei einer zu leichten Friktionseinstellung bewegt sich der Mikroskop-Kopf aufgrund des Gewichts auf
der Führungsschiene selbstständig abwärts. Hierdurch entsteht ein unscharfes Bild.
Um dies zu vermeiden, das Friktionseinstellungsrad etwas anziehen.
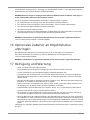
15 Verwendung des trinokularen Auszugs
Abb.3: Trinokularer Auszug
Seite laden ...
Seite laden ...
Seite laden ...
Seite laden ...
Seite laden ...
Seite laden ...
Seite laden ...
Seite laden ...
-
 1
1
-
 2
2
-
 3
3
-
 4
4
-
 5
5
-
 6
6
-
 7
7
-
 8
8
-
 9
9
-
 10
10
-
 11
11
-
 12
12
-
 13
13
-
 14
14
-
 15
15
-
 16
16
-
 17
17
-
 18
18
-
 19
19
-
 20
20
-
 21
21
-
 22
22
-
 23
23
-
 24
24
-
 25
25
-
 26
26
-
 27
27
-
 28
28


Bresser 5806300 Bedienungsanleitung
- Kategorie
- Mikroskope
- Typ
- Bedienungsanleitung
Verwandte Papiere
-
Bresser 5806300 Bedienungsanleitung
-
-
Bresser Science ETD 101 7-45x Zoom Stereo-Microscope Bedienungsanleitung
-
Bresser 5750800 Bedienungsanleitung
-
-
-
-
-
-