
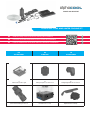
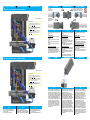
ACCESSORIES ZUBEHÖR ACCESSOIRES
ALPHACOOL CORE WIND WATER COOLING SET
Lisez les instructions de sécurité avant de commencer l‘installation.
FR
!
DE Lesen Sie die Sicherheitshinweise, bevor Sie mit der Installation
!
EN Read the safety instructions before starting the installation.
!
1x
Eisblock Aurora XP³ Light
6x
Fitting Eiszapfen 13/10mm G1/4 2x
Fitting Angled 90° HF 13/10 G1/4
EN DE FR
ACCESSORIES ZUBEHÖR ACCESSOIRES
1x
Quick Release tting HF kit G1/4
1x
Eisstation DC-LT - Solo 1x
Alphacool DC-LT 2 Pump
EN DE FR

COMPONENT STRUCTURE KOMPONENTEN AUFBAU STRUCTURE DES COMPOSANTS1.
DC-LT 2 PUMP DC-LT 2 PUMPE POMPE DC-LT 22.
1x
aRGB Controller: Aurora Eiscontrol
1x
Digital RGB LED Y-splitter 3-times cable
1x
PWM to 3x PWM connector cable
Only: Core Wind 360mm ST30 water cooling Set
1x
PWM to 2x PWM connector cable
Only: Core Wind 240mm ST30 water cooling Set
1x
NexXxoS ST30 Full Copper 240mm Radiator
V.2
Only: Core Wind 240mm ST30 water cooling Set
1x
NexXxoS ST30 Full Copper 360mm Radiator
V.2
Only: Core Wind 360mm ST30 water cooling Set
2x
Eiszyklon Aurora LUX PRO Digital RGB
(120x120x25mm)
Only: Core Wind 240mm ST30 water cooling Set
3x
Eiszyklon Aurora LUX PRO Digital RGB
(120x120x25mm)
Only: Core Wind 360mm ST30 water cooling Set
1x
ATX 24-pin PSU jumper
1x
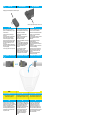
Hose cutter 1x
Filling funnel
1x
Liquid Clear 1000ml
1x
AlphaTube HF 13/10 (3/8 "ID) - 3m
EN DE FR
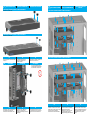
Mount the DC-LT 2 pump in your Eisstation.
The exact installation is described in the
manual enclosed with the Eisstation.
Befestigen Sie die DC-LT 2 Pumpe in ihrer
Eisstation.
Die genaue Montage entnehmen Sie der
Anleitung, die der Eisstation beiliegt.
Montez la pompe DC-LT 2 dans votre
Eisstation.
L'installation exacte est décrite dans les
manuels joints à la Eisstation.

EN DE FR
Mount the XP³ cooler on your mainboard. The
exact installation can be found in the
instructions enclosed with the XP³ cooler.
Montieren Sie den XP³ Kühler auf ihr
Mainboard. Die genaue Montage
entnehmen Sie der Anleitung, die dem XP³
Kühler beiliegt.
Montez le refroidisseur XP³ sur votre carte
mère. L'installation exacte se trouve dans les
instructions fournies avec le refroidisseur
XP³.
EN DE FR
Usually the radiator is mounted in the top or
in the front. The airflow in an ATX enclosure
normally comes in from the front and out the
top and back. The exact installation
instructions are enclosed with the radiator.
Üblicherweise wird der Radiator im Deckel
oder in der Front montiert. Der Luftstrom
erfolgt bei einem ATX Gehäuse
normalerweise von vorne rein und nach
oben und hinten raus. Die genaue
Montageanleitung liegt dem Radiator bei.
En général, le radiateur est monté dans le
couvercle ou à l'avant. Le flux d'air dans un
boîtier ATX entre normalement par l'avant et
sort par le haut et l'arrière. Les instructions
d'installation exactes sont jointes au
radiateur.
EN DE FR
Close all unused ports of the radiator with the
screw plugs. Verschließen Sie alle ungenutzten
Öffnungen des Radiators mit den
Verschlussschrauben.
Fermez toutes les ouvertures non utilisées du
radiateur avec les bouchons à vis.
XP³ ASSEMBLY XP³ MONTAGE XP³ MONTAGE4.
FAN - RADIATOR ASSEMBLY LÜFTER - RADIATOR MONTAGE VENTILATEUR - RADIATEUR
MONTAGE
5.
RADIATOR PREPARATION RADIATOR VORBEREITUNG PRÉPARATION DES RADIATEURS3.
Do not use tools, only tighten up hand-tight!
Kein Werkzeug benutzen, nur handfest anziehen!
Ne pas utiliser d’outils, ne serrez que la main!
ALPHACOOL CORE WIND 360MM ST30 WATER COOLING SET
ALPHACOOL CORE WIND 360MM ST30 WATER COOLING SET
ALPHACOOL CORE WIND 240MM ST30 WATER COOLING SET ALPHACOOL CORE WIND 240MM ST30 WATER COOLING SET
NexXxoS ST30 Full Copper 240mm Radiator
NexXxoS ST30 Full Copper 360mm Radiator

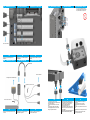
INSTALLATION THE HOSE VERSCHLAUCHUNG INSTALLATION DES TUYAUX8.CONNECTING THE FANS LÜFTER ANSCHLIESSEN CONNECTER LE VENTILATEUR6.
CONNECTING THE LEDS LEDS ANSCHLIESSEN CONNECTER LES LEDS7.
EN DE FR
1. Roughly cut your hose to size.
2. Screw the tting into the component and
unscrew the union nut.
3. Make sure that the union nut is on the
hose.
4. Now push the tubing over the tting.
5. Finally, tighten the union nut over the
tting to complete installation.
1. Schneiden Sie ihren Schlauch grob zu.
2. Schrauben Sie die Anschraubtüllen an
ihre Komponenten und drehen Sie als
nächstes die Überwurfmutter ab.
3. Achten Sie darauf, dass die
Überwurfmutter auf dem Schlauch steckt.
4. Nun stecken Sie Ihren Schlauch auf die
Anschraubtülle.
5. Anschließend wird die Überwurfmutter an
der Anschraubtülle wieder festgedreht.
1. Coupez grossièrement votre tuyau à la
bonne taille.
2. Vissez les passe-ls à vis sur leurs
composants et dévissez ensuite l'écrou-
raccord.
3. Assurez-vous que l'écrou-raccord est sur le
tuyau.
4. Maintenant, mettez votre tuyau sur la buse
à vis.
5. Ensuite, l'écrou-raccord est à nouveau
serré sur le passe-l à visser.
Do not use tools, only tighten up hand-tight!
Kein Werkzeug benutzen, nur handfest anziehen!
Ne pas utiliser d’outils, ne serrez que la main!
EN DE FR
Connect the 4 pin PWM adapter to the
mainboard. Verbinden Sie den 4 Pin PWM-Adapter mit
dem Mainboard. Connectez l'adaptateur PWM 4 broches à la
carte mère.
EN DE FR
Connect the 3 pin adapters to the Eiscontrol
as shown. Verbinden Sie die 3 Pin Adapter mit dem
Eiscontrol wie dargestellt. Connectez les adaptateurs à 3 broches à
l'Eiscontrol comme indiqué.
Fans / Lüfter / Ventilateurs
Fans / Lüfter / Ventilateurs
Power supply / Netzteil / alimentation électrique
aRGB Controller: Aurora Eiscontrol
Digital-RGB adapter
Digital RGB LED Y-splitter 3-times cable

EN DE FR
The quick-release fastener is not necessarily
required.
Connect the hose:
1. screw the tting into the quick-release
fastener.
2. Make sure that the union nut is on the
hose.
3. put your hose onto the quick-release
fastener.
4. then screw the union nut back on the
fastener.
Open the quick-release lock:
1. you can open or close the quick-release
coupling with the lock, yellow arrow.
2The quick-release fastener enables an
uncomplicated extension of the system.
3. you can optionally purchase further quick-
release fasteners: item no.: 17396.
Der Schnellverschluss wird nicht zwangsläug
benötigt.
Schlauch anschliessen:
1. Schrauben Sie die Anschraubtüllen an
den Schnellverschluss.
2. Achten Sie darauf, dass die
Überwurfmutter auf dem Schlauch steckt.
3. Stecken Sie Ihren Schlauch auf den
Schnellverschluss.
4. Anschließend wird die Überwurfmutter
am Verschluss wieder festgedreht.
Schnellverschluss öffnen:
1. Mit der Verriegelung, gelber Pfeil, können
Sie die Schnellverschlusskupplung öffnen
oder schließen.
2. Durch den Schnellverschluss wird eine
unkomplizierte Erweiterung des Systems
ermöglicht.
3. Optional können Sie unter Art.Nr.: 17396
weitere Schnellverschlüsse erwerben.
L'attache rapide n'est pas nécessairement
nécessaire.
Raccordez le tuyau:
1. Vissez les œillets à visser sur l'attache
rapide.
2. Assurez-vous que l'écrou-raccord est sur le
tuyau.
3. Placez votre tuyau sur l'attache rapide.
4. puis revissez l'écrou-raccord sur l'attache.
Ouvrez le verrou à libération rapide:
1. vous pouvez ouvrir ou fermer le raccord
rapide à l'aide du verrou, flèche jaune.
2La xation rapide permet une extension
simple du système.
3. vous pouvez acheter en option d'autres
xations rapides sous la référence: 17396.
Do not use tools, only tighten up hand-tight!
Kein Werkzeug benutzen, nur handfest anziehen!
Ne pas utiliser d’outils, ne serrez que la main!
Connect hose!
Schlauch anschliessen!
Connecter le tuyau!
OUT
OUT
IN
IN
ALPHACOOL CORE WIND 240MM ST30 WATER COOLING SET
WATER FLOW DIRECTION WASSERFLUSSRICHTUNG DIRECTION DU FLUX D'EAU9. QUICK RELEASE SCHNELLVERSCHLUSS FERMETURE RAPIDE10.
COOLANT KÜHLFLÜSSIGKEIT LE CALOPORTEUR11.
EN DE FR
The two examples show the water flow
direction and the temperatures (dark blue
"cold" > red "warm").
You can freely select the tubing.
In den beiden Beispielen wird die
Wasserflussrichtung und die Temperatur
(Dunkelblau „Kalt“ >Rot „Warm“ dargestellt.
Sie können die Verschlauchung frei wählen.
Les deux exemples montrent la direction du
flux d'eau et les températures (bleu foncé
"froid" > rouge "chaud").
Vous pouvez choisir librement la tubulure.
EN DE FR
Connect the pump to your power supply. Set
your power supply unit to OFF at the switch
and plug the ATX jumper plug into the 24-pin
power cable of the power supply unit. Now ll
the reservoir. When you set the power supply
unit to ON at the toggle switch, the pump will
start and the water will be pumped into the
cooling circuit. Meanwhile, keep lling the
reservoir with liquid so that the pump cannot
run dry. When the system is lled and no
more air collects in the reservoir, close the
reservoir and carefully tilt the system back
and forth in all directions while the pump
continues to run. Now check the reservoir
again. If air has collected in it again, add
some more liquid.
Schließen Sie die Pumpe an ihr Netzteil an.
Stellen Sie ihr Netzteil am Kipschalter auf
AUS und stecken sie den ATX-
Überbrückungsstecker auf das 24-Pin
Stromkabel des Netzteiles. Befüllen Sie nun
den Ausgleichsbehälter. Wenn Sie das
Netzteil am Kippschalter auf EIN stellen,
wird die Pumpe starten und das Wasser wir
in den Kühlkreislauf gepumpt. Füllen Sie
währenddessen den Ausgleichsbehälter
immer wieder mit Flüssigkeit, damit die
Pumpe nicht trocken laufen kann. Wenn das
System befüllt ist und sich auch keine Luft
mehr im Ausgleichsbehälter sammelt,
verschließen Sie den Ausgleichsbehälter
und kippen das System vorsichtig in alle
Richtungen hin und her während die Pumpe
weiter läuft. Prüfen Sie nun nochmal den
Ausgleichsbehälter. Falls sich wieder Luft
darin gesammelt hat, füllen sie noch etwas
Flüssigkeit nach.
Connectez la pompe à votre alimentation
électrique. Mettez votre bloc d'alimentation
sur OFF au niveau de l'interrupteur kip et
branchez la che du cavalier ATX dans le
câble d'alimentation à 24 broches du bloc
d'alimentation. Remplissez maintenant le
réservoir d'expansion. Lorsque vous réglez
l'alimentation sur ON au niveau de
l'interrupteur à bascule, la pompe démarre et
l'eau est pompée dans le circuit de
refroidissement. Pendant ce temps,
continuez à remplir le réservoir d'expansion
de liquide an que la pompe ne puisse pas
fonctionner à sec. Lorsque le système est
rempli et qu'il n'y a plus d'air dans le vase
d'expansion, fermez le vase d'expansion et
inclinez soigneusement le système d'avant
en arrière dans toutes les directions pendant
que la pompe continue de fonctionner.
Vériez à nouveau le vase d'expansion. Si de
l'air s'y est à nouveau accumulé, ajoutez un
peu plus de liquide.
ALPHACOOL CORE WIND 360MM ST30 WATER COOLING SET
Example / Beispiel / Exemple
Note / Hinweis / Avis:
When integrating a GPU cooler, at least two additional
connections are required and can be purchased separately
under item no.: 17230 or 17228.
Bei der Einbindung eines GPU Kühlers werden mindestens
zwei weitere Anschlüsse benötigt und können separat unter
Art.Nr.: 17230 oder 17228 erworben werden.
En cas d'intégration d'un refroidisseur de GPU, au moins
deux connexions supplémentaires sont nécessaires et
peuvent être achetées séparément sous les références
17230 ou 17228.
Open quick release!
Schnellverschluss öffnen!
Ouverture rapide!

CHANGING THE COOLANT KÜHLFLÜSSIGKEIT WECHSELN CHANGER DE CALOPORTEUR13.
LEAK TEST DICHTIGKEITSTEST TEST D'ÉTANCHÉITÉ12.
NOTE: HINWEIS: AVIS:
EN DE FR
We recommend the use of translucent
Alphacool fluids only, without UV.
Wir empfehlen ausschließlich die Verwendung
von klaren Alphacool Flüssigkeiten, ohne UV.
Nous recommandons l'utilisation de fluides
Alphacool translucide uniquement, sans UV.
EN DE FR
Switch off your PC. Have a bowl ready to
collect the coolant. Undo the quick-release
fastener and remove the hose connector from
the direction of the pump. Remove the
second tting and pull off the hose. Remove
the remaining liquid by tilting the housing.
Re-attach all the hoses again, then ll the
loop with new coolant.
Schalten Sie ihren PC aus. Stellen Sie eine
Schüssel zum auffangen der Kühlflüssigkeit
bereit. Den Schnellverschluss lösen und
Schlauchanschluss aus Richtung der
Pumpe entfernen. Entfernen Sie die zweite
Anschraubtülle und ziehen Sie den
Schlauch ab. Die Restflüssigkeit durch
kippen des Gehäuses entfernen. Die
Komponenten wieder verschlauchen.
Anschließend neue Kühlflüssigkeit
einfüllen.
Éteignez votre PC. Préparez un bol pour
recueillir le liquide de refroidissement.
Desserrez l'attache rapide et retirez le
connecteur du tuyau en direction de la
pompe. Retirez la deuxième bague à vis et
retirez le tuyau. Retirez le liquide restant en
inclinant le boîtier. Remettez les composants
en place. Puis remplissez de nouveau le
liquide de refroidissement.
EN DE FR
Before you nally put your system into
operation, we recommend that you carry out
a 24-hour leak test:
1. Make sure that your power supply is
switched off.
2. Connect the supplied ATX jumper plug to
the power plug of your power supply.
3. Connect only the pump to the power
supply. 4. Before starting the power supply,
ensure the reservoir is lled with coolant.
5. Do not let the pump run dry to avoid
damaging it.
6. If no water has leaked out after 24 hours,
remove the ATX jumper and connect all other
components properly.
7. Your cooling system is now ready for use.
Bevor Sie ihr System endgültig in Betrieb
nehmen, empfehlen wir einen 24 stündigen
Dichtigkeitstest durchzuführen:
1. Stellen Sie sicher dass Ihr Netzteil
ausgeschaltet ist.
2. Verbinden Sie den mitgelieferten ATX-
Überbrückungsstecker mit dem
Stromstecker Ihres Netzteils.
3. Schließen Sie auschließlich die Pumpe an
das Netzteil an.
4. Bevor Sie das Netzteil starten, füllen Sie
den Ausgleichsbehälter mit Kühlflüssigkeit.
5. Lassen Sie die Pumpe auf keinen Fall
trocken laufen, um diese nicht zu
beschädigen.
6. Ist nach 24 Stunden kein Wasser
ausgetreten, entfernen Sie den
Überbrückungsstecker und schliessen Sie
alle übrigen Komponenten sachgemäß an.
7. Ihr Kühlsystem ist nun einsatzbereit.
Avant de mettre dénitivement votre système
en service, nous vous recommandons
d'effectuer un test d'étanchéité sur 24 heures:
1. Assurez-vous que votre alimentation
électrique est coupée.
2. Connectez la che du cavalier ATX fourni à
la che d'alimentation de votre bloc
d'alimentation.
3. Connectez uniquement la pompe à
l'alimentation électrique.
4. Avant de démarrer l'alimentation,
remplissez le vase d'expansion de liquide de
refroidissement.
5. Ne laissez pas la pompe fonctionner à sec
pour éviter de l'endommager.
6. Si aucune eau ne s'est écoulée après 24
heures, retirez le bouchon de dérivation et
connectez correctement tous les autres
composants.
7. Votre système de refroidissement est
maintenant prêt à être utilisé.
ATX connector (PSU) / ATX-Stecker (Netzteil) / Connecteur ATX (AE)
ATX bridging plug / ATX-Überbrückungsstecker / Connecteur de Pontage ATX

Alphacool International GmbH
Marienberger Str. 1
D-38122 Braunschweig
Germany
Support: +49 (0) 531 28874 - 0
Fax: +49 (0) 531 28874 - 22
E-Mail: [email protected]
https://www.alphacool.com
General Managers: Andreas Rudnicki, Fabian Noelte
WEEE-Reg.-Nr.: DE 54464644
Trade Register: Amtsgericht Braunschweig HRB 202390
VAT.ID.Nr.: DE270458421
Tax number: 13/207/02047
V.1.00-4.2022
-
 1
1
-
 2
2
-
 3
3
-
 4
4
-
 5
5
-
 6
6
-
 7
7


in anderen Sprachen
- English: Alphacool ST30 User manual
- français: Alphacool ST30 Manuel utilisateur
Verwandte Artikel
-
Alphacool Eiswolf 2 AIO – 360mm RTX 4090 Aorus Master Benutzerhandbuch
-
Alphacool Core Hurrican Benutzerhandbuch
-
Alphacool Eisbaer AiO Benutzerhandbuch
-
Alphacool Eiswolf 2 Benutzerhandbuch
-
Alphacool Eisbaer Aurora AIO CPU Water Cooler Benutzerhandbuch
-
Alphacool Core M.2 Benutzerhandbuch
-
Alphacool Aurora SLI Connector Dual Benutzerhandbuch
-
-
-