
Assembly manual for LED luminaire / 2-7
Instrukcja montażu oprawy LED / 8-13
Montageanleitung für LED-Leuchte / 14-19

2
assembly manual
Use
Integrated luminaires LUMINES are ideal for arranging in any interior. Reliable SAMSUNG LEDs in combination with perfectly matched
LUMINES LED proles create timeless linear lighting that can be used both for main and decorative lighting inside the building.
Warning
Installation should be performed by a person with appropriate qualications. Stay careful during the installation process.
All actions related to repair, maintenance or adjustment should be carried out with the disconnected power (the power supply should be discon-
nected at least 10 minutes before the planned works).
The light source of this luminaire is not replaceable; when the light source is worn out, the entire lighting tting must be replaced.
Caution! This product is not a toy! To avoid the danger of suocation keep the bag and the product away from the babies and children!
The assembly of this product should be carried out in accordance with the presented diagram - drawing.
The lighting xture should not be installed in the nearness of flammable materials.
It is forbidden to interfere with the lighting xture and to make any technical modications to the xture. Any changes involve the risk of trans-
ferring full responsibility to the person making the changes.
Failure to follow the instructions may result in burns, re, electric shock, personal injury, or material and non-material damage.
The power cord of the lighting xture cannot be replaced.
The lighting xture must not be used or stored in a corrosive environment.
The device made in "Class I" protection must be connected to the grounding installation (3-wire installation).
The following wires are used in LUMINES lighting xtures:
- OMY cable 3x0.75
- H05V-U cable
The warranty does not cover
Defects caused by installing the device contrary to the instructions.
Defects and damage resulting from natural wear and contrary to the intended use.
As a result of mechanical damage and as a result of overvoltages from the mains.
Maintenance
The lighting tting should be cleaned with a clean, dry and soft cloth. Do not use caustic agents or solvents.
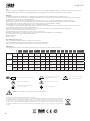
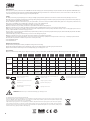
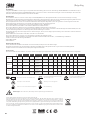
Useful
luminous
flux*
Color
temperature Beam angle Type of power
supply Lifespan Power CRI UGR
4h 8h
On/O
time PF IP
rating Weight Dimensions
CLARO 60
WHITE 2680 lm 4000 K 100° 220-240 V AC
50-60 Hz 54000 h 27 W >80 CRI 28,8 25000 >0,9 IP20 1,4 kg 613×43×73 mm
SILVER 2430 lm 3900 K 100° 220-240 V AC
50-60 Hz 54000 h 27 W >80 CRI 28,7 25000 >0,9 IP20 1,4 kg 613×43×73 mm
CLARO 120
WHITE 5400 lm 4000 K 100° 220-240 V AC
50-60 Hz 54000 h 54 W >80 CRI 28,9 25000 >0,9 IP20 2,1 kg 1213×43×73 mm
SILVER 4920 lm 3900 K 100° 220-240 V AC
50-60 Hz 54000 h 54 W >80 CRI 28,8 25000 >0,9 IP20 2,1 kg 1213×43×73 mm
CLARO 180
WHITE 8100 lm 4000 K 100° 220-240 V AC
50-60 Hz 54000 h 80 W >80 CRI 28,9 25000 >0,9 IP20 2,9 kg 1813×43×73 mm
SILVER 7980 lm 3900 K 100° 220-240 V AC
50-60 Hz 54000 h 80 W >80 CRI 28,8 25000 >0,9 IP20 2,9 kg 1813×43×73 mm
* in a cone (120°)
The product meets the requirements of Regulation 2012/19/UE.
The symbol of the crossed out trash can on the device means that the product marked with it may not be thrown out with other
household waste. After use, the product should be taken to a collection point for waste electrical and electronic equipment
or returned to the retailer. Appropriate segregation of the material for later treatment, recovery or destruction helps to avoid
negative eects on the environment and health, and enables the recovery of raw materials from which the product was made.
For details on available collection points, please contact your local sanitation service or the store where you purchased the
product.
Note! It is forbidden to assembly the lamp under voltage.
Replace any broken protective screen.
The lamp is not dimmable. Warning: risk of electric shock.
The minimum distance from the
illuminated object is 0.5 m.
Do not look at the working light
source for a long time. Requires grounding.
Do not cover luminaire with
thermal insulation materials.

3
assembly manual
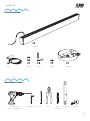
×3
×2 ×1×7
×1
×1
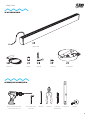
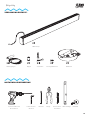
LED lamp
IN THE PACKAGE:
NECESSARY TOOLS:
Lifts
Allen key size 4 Pencil Cross
screwdriver
Spirit level Measure
Nipple Headliner Holders Screws
Screwgun or drill
with a concrete drill bit
Pliers

4
assembly manual
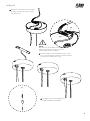
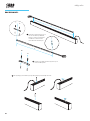
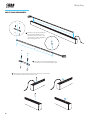
Screw the assembly bracket in place
of the holes with screws.
2
On the ceiling, mark the
place to assemble the head-
liner, drill the holes and then
assemble the flanges for the
mounting pins in them.
X
X
1
LET’S START:
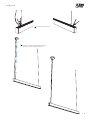
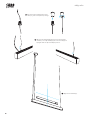
Attach rope locks to the protruding screws on the back of the prole.
3

5
assembly manual
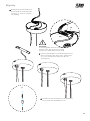
Put the headliner on the assembly element so that
the screws with washers protrude outside and gently
turn them, then tighten the screws.
5
Screw the ceiling mount at a distance X
from the middle of the headliner.
6
Attach the cube to the wires protruding
from the ceiling (L - phase, N - neutral,
PE - protective).
4
NOTE!
Risk of electric shock! Before assembly,
make sure that the power is disconnected
and the cables are de-energized!
L
L
N
N
PE
PE

6
assembly manual
Insert the cables into the locks located on the back of
the prole and set them to the appropriate width and
then adjust them to the appropriate height.
Level the lamp.
8
9
Put the rope with the ball through the
nipple and screw it into the ceiling
holder.
7

7
assembly manual
Cut o any excess lines.
Fasten the cable together with the rope
using the clamps included in the set.
11
10

instrukcja montażu
8
Przeznaczenie
Zintegrowane oprawy oświetleniowe LUMINES doskonale nadają się do aranżacji każdego wnętrza. Niezawodne diody marki SAMSUNG wpo-
łączeniu z idealnie dopasowanymi prolami LED LUMINES tworzą ponadczasowe oświetlenie liniowe, które można zastosować zarówno do
oświetlenia głównego jak i dekoracyjnego wewnątrz budynku.
Uwagi
Montaż powinien być wykonywany przez osobą posiadającą odpowiednie uprawnienia. Podczas montażu zachowaj należytą ostrożność.
Wszelkie czynności związane z naprawą, konserwacją lub regulacją powinny być prowadzone przy wyłączonym napięciu (zasilanie należy odłączyć
min. 10 minut przed planowanymi pracami).
Źródło światła tej oprawy oświetleniowej nie jest wymienialne; w momencie zużycia źródła światła należy wymienić całą oprawę oświetleniową.
Wyrób nie jest zabawką, nie pozwalaj dzieciom bawić się nim oraz opakowaniem!
Instalacja wyrobu powinna być prowadzona według schematu– rysunek.
Oprawy oświetleniowej nie należy instalować w sąsiedztwie materiałów łatwopalnych.
Oprawy oświetleniowej nie należy wystawiać na bezpośrednie oddziaływanie promieni słonecznych oraz termiczne.
Wzbroniona jest ingerencja w oprawę oświetleniową oraz modykacja techniczna oprawy. Wszelkie zmiany niosą za sobą ryzyko przeniesienia
pełnej odpowiedzialności na dokonującego zmian.
Niestosowanie się do instrukcji może skutkować poparzeniami, pożarem, porażeniem prądem elektrycznym, obrażeniami zycznymi lub szkodami
materialnymi i niematerialnymi.
Przewód zasilający oprawy oświetleniowej nie może zostać zastąpiony innym.
Oprawy oświetleniowej nie wolno używać ani przechowywać wśrodowisku korozyjnym.
Urządzenie wykonane w pierwszej klasie ochronności koniecznie musi być podłączone do przewodu ochronnego - instalacja 3 przewodowa.
We wszystkich oprawach oświetleniowych zastosowano przewody:
- Przewód OMY 3x0,75
- Przewód H05V-U
Gwarancja nie obejmuje
Wad powstałych w wyniku instalacji urządzenia niezgodnie z instrukcją.
Wad oraz uszkodzeń wynikających z naturalnego zużycia oraz użytkowania niezgodnego z przeznaczeniem.
Wyniku uszkodzeń mechaniczych oraz na skutek przepięć pochodzących z sieci.
Konserwacja
Oprawę oświetleniową należy czyścić za pomocą czystej, suchej oraz miękkiej szmatki. Nie używaj środków żrących oraz rozpuszczalników.
Użyteczny
strumień
świetlny*
Temp.
barwowa
Kąt
promieniowania
Rodzaj
zasilania
Okres
trwałości Moc
Wskaźnik
oddawania
barw
UGR
4h 8h
Cykl
włącz/wyłącz
Współczynnik
mocy
Stopień
IP
Waga
Wymiary
CLARO 60
BIAŁA 2680 lm 4000 K 100° 220-240 V AC
50-60 Hz 54000 h 27 W >80 CRI 28,8 25000 >0,9 IP20 1,4 kg 613×43×73 mm
SREBRNA 2430 lm 3900 K 100° 220-240 V AC
50-60 Hz 54000 h 27 W >80 CRI 28,7 25000 >0,9 IP20 1,4 kg 613×43×73 mm
CLARO 120
BIAŁA 5400 lm 4000 K 100° 220-240 V AC
50-60 Hz 54000 h 54 W >80 CRI 28,9 25000 >0,9 IP20 2,1 kg 1213×43×73 mm
SREBRNA 4920 lm 3900 K 100° 220-240 V AC
50-60 Hz 54000 h 54 W >80 CRI 28,8 25000 >0,9 IP20 2,1 kg 1213×43×73 mm
CLARO 180
BIAŁA 8100 lm 4000 K 100° 220-240 V AC
50-60 Hz 54000 h 80 W >80 CRI 28,9 25000 >0,9 IP20 2,9 kg 1813×43×73 mm
SREBRNA 7980 lm 3900 K 100° 220-240 V AC
50-60 Hz 54000 h 80 W >80 CRI 28,8 25000 >0,9 IP20 2,9 kg 1813×43×73 mm
* w stożku (120°)
Produkt spełnia wymogi dyrektywy 2012/19/UE.
Symbol przekreślonego kosza znajdujący się na urządzeniu oznacza, że wyrobu nim oznaczonego nie wolno wyrzucać wraz
z innymi odpadami gospodarstwa domowego. Po zużyciu produkt należy oddać do punktu zbiórki odpadów urządzeñ elek-
trycznych i elektronicznych lub zwrócić go sprzedawcy.
Odpowiednia segregacja śmieci w celu późniejszej obróbki, odzysku lub zniszczenia przyczynia się do uniknięcia negatyw-
nych efektów na środowisko i na zdrowie oraz umożliwia odzysk surowców, z których wykonano produkt. W celu uzyskania
szczegółowych informacji dotyczących dostępnych punktów zbiórki odpadów należy zwrócić się do lokalnej służby oczysz-
czania lub do sklepu, gdzie produkt został zakupiony.
UWAGA! Zabrania się instalowania lampy pod napięciem
Wymienić każdy pęknięty
ekran ochronny.
Lampa nie jest przeznaczona do
ściemniania.
Uwaga: ryzyko porażenia
prądem elektrycznym.
Minimalna odległość od oświetlanego
obiektu ‒ 0,5 m.
Nie wpatrywać się wpracujące
źródło światła. Wymaga uziemienia.
Oprawa oświetleniowa nieodpowiednia do
okrywania materiałami termoizolacyjnymi.

instrukcja montażu
9
×3
×2 ×1×7
×1
×1
Lampa LED
W OPAKOWANIU:
NIEZBĘDNE NARZĘDZIA:
Zawiesia
Klucz imbusowy
rozmiar 4
Ołówek Śrubokręt
krzyżakowy
Poziomica Miarka
Nypel PodsutkaUchwytyWkręty
Wkrętarka lub wiertarka
zwiertłem do betonu
Szczypce

instrukcja montażu
10
Przykręcić pałąk montażowy na miejscu
otworów wkrętami.
2
Na sucie wyznaczyć miejsce
do montowania podsutki,
wywierć otwory a następnie
osadzić w nich kołnierze
do kołków montażowych.
X
X
1
ZACZYNAJMY:
Do wystających śrubek z tyłu prolu przykręcić blokady do linek.
3

instrukcja montażu
11
Założyć podsutkę na pałąk montażowy tak,
żeby łby wkrętów wystawały na zewnątrz
i delikatnie obrócić a następnie dokręcić wkręty.
5
Przykręcić uchwyt stropowy w odległości X
od środka podsutki.
6
Wpiąć kostkę do przewodów
wystających z sutu (L – fazowy,
N – neutralny, PE – ochronny).
4
UWAGA!
Niebezpieczeństwo porażenia prądem.
Przed montażem upewnij się, że zasilanie
jest odłączone, a przewody nie są pod napięciem!
L
L
N
N
PE
PE

instrukcja montażu
12
Włożyć linki w blokady umieszczone ztyłu prolu
iustawić je na odpowiadającą szerokość a następnie
wyregulować na odpowiednią wysokość.
Wypoziomować lampę.
8
9
Przełożyć linkę z kulką przez nypel
iwkręcić go do uchwytu stropowego.
7

instrukcja montażu
13
Przyciąć naddatek wystających linek.
Spiąć przewód razem z linką za pomocą
uchwytów dołączonych do zestawu.
11
10

14
Montageanleitung
Das Produkt erfüllt die Anforderungen der Verordnung 2012/19/UE
Das Symbol des durchgestrichenen Mülleimers auf dem Gerät bedeutet, dass das damit gekennzeichnete Produkt nicht mit
anderem Hausmüll entsorgt werden kann. Nach dem Gebrauch soll das Produkt zu einer Sammelstelle für Elektro- und Elek-
tronikaltgeräte gebracht oder an den Einzelhändler zurückgegeben werden. Eine angemessene Trennung des Materials für
eine spätere Behandlung, Rückgewinnung oder Zerstörung trägt dazu bei, negative Auswirkungen auf Umwelt und Gesund-
heit zu vermeiden, und ermöglicht die Rückgewinnung von Rohstoen, aus denen das Produkt hergestellt wurde. Einzelhei-
ten zu den verfügbaren Sammelstellen erhalten Sie von Ihrem örtlichen Abfallentsorgungsdienst oder dem Geschäft, in dem
Sie das Produkt gekauft haben.
Ersetzen Sie defekte Schutzabdeckung.
Die Lampe ist nicht dimmbar. Warnung: Stromschlaggefahr.
Der Mindestabstand zum beleuchteten
Objekt beträgt 0,5 m.
Leuchte nicht zur Abdeckung mit
Wärmedämmsto geeignet.
Starren Sie nicht auf die Arbeitslichtquelle. Erfordert Erdung.
Achtung! Es ist verboten, die Lampe unter Spannung zu installieren.
Bestimmung
Integrierte LUMINES-Leuchten eignen sich perfekt für die Gestaltung jedes Interieurs. Zuverlässige SAMSUNG LEDs in Kombination mit per-
fekt aufeinander abgestimmten LUMINES LED Prolen sorgen für eine zeitlose lineare Beleuchtung, die sowohl für die Haupt- als auch für die
dekorative Beleuchtung im Gebäude verwendet werden kann.
Bemerkungen
Die Installation sollte von einer Person mit entsprechenden Qualikationen durchgeführt werden. Seien Sie bei der Montage vorsichtig.
Alle Aktivitäten im Zusammenhang mit Reparaturen, Wartungen oder Einstellungen sollten bei ausgeschaltet Spannung durchgeführt werden
(die Stromversorgung sollte mindestens 10 Minuten vor den geplanten Arbeiten unterbrochen werden).
Die Lichtquelle dieser Leuchte ist nicht austauschbar. Wenn die Lichtquelle abgenutzt ist, muss die gesamte Leuchte ausgetauscht werden.
Das Produkt ist kein Spielzeug!, lassen Sie Kinder nicht damit und mit der Verpackung spielen!
Die Produktinstallation sollte nach dem Schema durchgeführt werden - Abbildung.
Die Leuchte darf nicht in der Nähe von brennbaren Materialien installiert werden.
Die Leuchte darf keiner direkten Sonneneinstrahlung und Wärmestrahlung ausgesetzt werden.
Es ist verboten, die Leuchte zu stören und technische Änderungen an der Leuchte vorzunehmen. Bei Änderungen besteht die Gefahr, dass die
volle Verantwortung auf die Person übertragen wird, die die Änderungen vornimmt.
Die Nichtbeachtung der Anweisungen kann zu Verbrennungen, Feuer, Stromschlag, Körperverletzung oder materiellen und immateriellen
Schäden führen.
Das Netzkabel der Leuchte kann nicht durch ein anderes ersetzt werden.
Die Leuchte darf nicht in einer korrosiven Umgebung verwendet oder gelagert werden.
Das Gerät in der ersten Schutzklasse hergestellt ist mit dem Schutzleiter verbunden werden, - 3 -Kabelführung -Installations.
In allen Leuchten benutzt die folgenden Kabel:
- Kabel OMY 3x0,75
- Kabel H05V-U
Garantie gilt nicht, wenn
Fehler, die durch die Installation des Geräts verursacht wurden, widersprechen den Anweisungen.
Nachteilen und Schäden, die durch natürliche Abnutzung und Gebrauch im Gegensatz zu den vorgesehenen Verwendungszweck.
Folglich mechanischer Schäden und von Überspannungen aus dem Netz.
Koservierung
Die Leuchte sollte mit einem sauberen, trockenen und weichen Lappen gereinigt werden. Verwenden Sie keine ätzenden Mittel oder Lösungsmittel.
Nützlicher
Lichtstrahl* Farbtemperatur Abstrahl-
winkel
Art der
Stromversorgung
Lebensdauer
bis
Nenn-
leistung
CRI UGR
4h 8h Startzeit PF IP-
Klasse Gewicht Größe
CLARO 60
WEISS 2680 lm 4000 K 100° 220-240 V AC
50-60 Hz 54000 h 27 W >80 CRI 28,8 25000 >0,9 IP20 1,4 kg 613×43×73 mm
SILBER 2430 lm 3900 K 100° 220-240 V AC
50-60 Hz 54000 h 27 W >80 CRI 28,7 25000 >0,9 IP20 1,4 kg 613×43×73 mm
CLARO 120
WEISS 5400 lm 4000 K 100° 220-240 V AC
50-60 Hz 54000 h 54 W >80 CRI 28,9 25000 >0,9 IP20 2,1 kg 1213×43×73 mm
SILBER 4920 lm 3900 K 100° 220-240 V AC
50-60 Hz 54000 h 54 W >80 CRI 28,8 25000 >0,9 IP20 2,1 kg 1213×43×73 mm
CLARO 180
WEISS 8100 lm 4000 K 100° 220-240 V AC
50-60 Hz 54000 h 80 W >80 CRI 28,9 25000 >0,9 IP20 2,9 kg 1813×43×73 mm
SILBER 7980 lm 3900 K 100° 220-240 V AC
50-60 Hz 54000 h 80 W >80 CRI 28,8 25000 >0,9 IP20 2,9 kg 1813×43×73 mm
* im Kegel (120°)

15
Montageanleitung
×3
×2 ×1×7
×1
×1
LED-Lampe
VERPACKUNG ENTHÄLT:
NOTWENDIGE WERKZEUGE:
Aufhängungen
Inbusschlüssel
Größe 4
Bleistift Kreuzschrau-
bendreher
Wasserwaage Maßstab
Nippel BaldachinMontageklammernSchrauben
Bohrschrauber mit
Betonbohrer
Zange
Leuchte nicht zur Abdeckung mit
Wärmedämmsto geeignet.

16
Montageanleitung
Schrauben Sie die Montagehalterung
anstelle der Löcher mit Schrauben fest.
2
Markieren Sie die Stelle für die
Montage des Baldachins an
der Decke, bohren Sie Löcher
und setzen Sie dann die Dübel
für Montagestifte ein.
X
X
1
LASST UNS BEGINNEN:
Befestigen Sie die Seilarretierungen an den hervorstehenden
Schrauben auf der Rückseite des Prols.
3

17
Montageanleitung
Setzen Sie den Baldachin so auf das Montageelement,
dass die Schrauben nach außen ragen, und bewegen
Sie sie vorsichtig zur Kante. Ziehen Sie dann die
Schrauben fest.
5
Schrauben Sie den Deckenhalter in einem Abstand
von X von der Mitte des Baldachins fest.
6
Befestigen Sie den Klemmblock an
die aus der Decke herausragenden
Leitungen (L – Phase, N – Neutral,
PE – Erdung).
4
ACHTUNG!
Stromschlaggefahr.Stellen Sie vor der
Montage sicher, dass die Stromversorgung
unterbrochen und die Kabel stromlos sind!
L
L
N
N
PE
PE

18
Montageanleitung
Führen Sie die Seile in die Schlösser auf der Rückseite
des Prols ein, stellen Sie sie auf die entsprechende
Breite und dann auf die entsprechende Höhe ein.
Richten Sie die Lampe aus.
8
9
Führen Sie das Seil mit der Kugel
durch den Nippel und schrauben
Sie ihn in den Deckenhalter.
7

19
Montageanleitung
Überschüssige Seile abschneiden.
Verbinden Sie das Kabel und das Seil mit
den im Set enthaltenen Klammern.
11
10

Made in Poland:
LED Labs Sp. z o.o.
Zakopiańska 2C
30-418 Kraków, Poland
www.lumines.pl
The costs of waste management can be found:
Koszty zagospodarowania odpadów znajdziesz:
Sie nden die Kosten der Abfallbewirtschaftung hier:
www.led-labs.pl
Thank you for choosing the CLARO LED luminaire
Dziękujemy za wybór oprawy LED CLARO
Vielen Dank, dass Sie sich für die CLARO LED-Leuchte entschieden haben
-
 1
1
-
 2
2
-
 3
3
-
 4
4
-
 5
5
-
 6
6
-
 7
7
-
 8
8
-
 9
9
-
 10
10
-
 11
11
-
 12
12
-
 13
13
-
 14
14
-
 15
15
-
 16
16
-
 17
17
-
 18
18
-
 19
19
-
 20
20


in anderen Sprachen
- English: LUMINES CLARO Series User manual
- polski: LUMINES CLARO Series Instrukcja obsługi
Andere Dokumente
-
 LEDOLUX HERMES ECO Benutzerhandbuch
-
 LEDOLUX ORBIT Benutzerhandbuch
-
 LEDOLUX 40W Benutzerhandbuch
-
Ansult 019938 Benutzerhandbuch
-
Anslut 019939 Benutzerhandbuch
-
Anslut Counter Lighting LED Benutzerhandbuch
-
Anslut 019936 Benutzerhandbuch
-
Perel LEDA7001NW-B Benutzerhandbuch
-
Perel LEDA7003NW-BM Benutzerhandbuch
-
Perel LEDA7001NW-BP Benutzerhandbuch


