Lincoln 1862 Bedienungsanleitung
- Kategorie
- Elektrowerkzeuge
- Typ
- Bedienungsanleitung

Page
Section - D7 - 83A
Form 404386
DEC - 2011
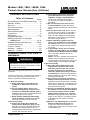
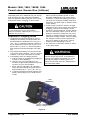
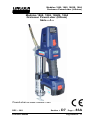
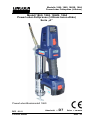
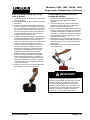
Models 1860, 1862, 1862E, 1864
PowerLuber Grease Gun (Lithium Ion)
Series “A”
Basic PowerLuber Model 1860

Page Number - 2
Models 1860, 1862, 1862E, 1864
PowerLuber Grease Gun (Lithium)
Form 404386
GENERAL POWER TOOL SAFETY
WARNINGS
Table of Contents
Page
General Power Tool Safety Warnings.......2
Specic Safety........................................3
Service..........................................4
Tool Use and Care...................................4
Specications........................................4
General Description.................................5
Inspection...........................................6
Operation.........................................6-7
Charger Operation...................................8
Safety Instruction for Charger
and Batteries.................................10-11
Exploded View and Parts List...........12-14
Troubleshooting...........................15
French Version.....................................16
German Version.................................33
Spanish Version.................................49
Read all safety warnings and
instructions. Failure to follow the warnings
and instructions may result in electric shock,
re and/or serious injury.
Save all warnings and instructions for future
reference.
The term “power tool” in the warnings refers to
your mains-operated (corded) power tool or
battery-operated (cordless) power tool.
1) Work area safety
a) Keep work area clean and well lit.
Cluttered or dark areas invite acci-
dents.
b) Do not operate power tools in ex-
plosive atmospheres, such as in the
presence of ammable liquids, gases
or dust. Power tools create sparks which
may ignite the dust or fumes.
c) Keep children and bystanders away
while operating a power tool. Distrac-
tions can cause you to lose control.
2) Electrical safety
a) Power tool plugs must match the
outlet. Never modify the plug in any
way. Do not use any adapter plugs with
earthed (grounded) power tools. Un-
modied plugs and matching outlets will
reduce risk of electric shock.
b) Avoid body contact with earthed or
grounded surfaces such as pipes,
radiators, ranges and refrigerators.
There is an increased risk of elec-
tric shock if your body is earthed or
grounded.
c) Do not expose power tools to rain
or wet conditions. Water entering a
power tool will increase the risk of electric
shock.
d) Do not abuse the cord. Never use the
cord for carrying, pulling or unplugging
the power tool. Keep cord away from
heat, oil, sharp edges or moving parts.
Damaged or entangled cords increase
the risk of electric shock.
e) When operating a power tool out-
doors, use an extension cord suitable
for outdoor use. Use of a cord suitable
for outdoor use reduces the risk of elec-
tric shock.
f) If operating a power tool in a damp
location is unavoidable, use a residual
current device (RCD) protected supply.
Use of an RCD reduces the risk of
electric shock.
NOTE: The term “residual current device
(RCD)” may be replaced by the term
“ground fault circuit interrupter (GFCI)” or
“earth leakage circuit breaker (ELCB)”.
3) Personal safety
a) Stay alert, watch what you are do-
ing and use common sense when
operating a power tool. Do not use
a power tool while you are tired or
under the inuence of drugs, alcohol
or medication. A moment of inattention
while operating power tools may result in
serious personal injury.
b) Use personal protective equipment.
Always wear eye protection. Protective
equipment such as dust mask, non-skid
safety shoes, hard hat, or hearing protec-
tion used for appropriate conditions will
reduce personal injuries.
c) Prevent unintentional starting. Ensure
the switch is in the off-position before
connecting to power source and/or
battery pack, picking up or carrying
the tool. Carrying power tools with your
nger on the switch or energizing power
tools that have the switch on invites
accidents.
d) Remove any adjusting key or wrench
before turning the power tool on.
A wrench or a key left attached to a
rotating part of the power tool may result
in personal injury.
ORIGINAL INSTRUCTIONS

Page Number - 3
Models 1860, 1862, 1862E, 1864
PowerLuber Grease Gun (Lithium)
Form 404386
e) Do not overreach. Keep proper footing
and balance at all times. This enables
better control of the power tool in
unexpected situations.
f) Dress properly. Do not wear loose
clothing or jewelery. Keep your hair,
clothing and gloves away from moving
parts. Loose clothes, jewelery or long
hair can be caught in moving parts.
g) If devices are provided for the connec-
tion of dust extraction and collection
facilities, ensure these are connected
and properly used. Use of dust collec-
tion can reduce dust-related hazards.
4) Power tool use and care
a) Do not force the power tool. Use the
correct power tool for your applica-
tion. The correct power tool will do the
job better and safer at the rate for which it
was designed.
b) Do not use the power tool if the
switch does not turn it on and off. Any
power tool that cannot be controlled with
the switch is dangerous and must be
repaired.
c) Disconnect the plug from the power
source and/or the battery pack from
the power tool before making any
adjustments, changing accessories,
or storing power tools. Such preventive
safety measures reduce the risk of start-
ing the power tool accidentally.
d) Store idle power tools out of the reach
of children and do not allow persons
unfamiliar with the power tool or these
instructions to operate the power tool.
Power tools are dangerous in the hands
of untrained users.
e) Maintain power tools. Check for mis-
alignment or binding of moving parts,
breakage of parts and any other condi-
tion that may affect the power tool’s
operation. If damaged, have the power
tool repaired before use. Many ac-
cidents are caused by poorly maintained
power tools.
f) Keep cutting tools sharp and clean.
Properly maintained cutting tools with
sharp cutting edges are less likely to
bind and are easier to control.
g) Use the power tool, accessories and
tool bits etc. in accordance with these
instructions, taking into account the
working conditions and the work to
be performed. Use of the power tool for
operations different from those intended
could result in a hazardous situation.
5) Battery Tool Use and Care
a) Recharge only with the battery charger
specied by the manufacturer. A char-
ger that is suitable for one type of battery
pack may create a risk of re when used
with another battery pack.
b) Use power tools only with specically
designated battery packs. Use of any
other battery packs may create risk of
injury and re.
c) When battery pack is not in use, keep
it away from other metal objects, like
paper clips, coins, keys, nails screws
or other small metal objects, that can
make a connection from one terminal
to another. Shorting the battery terminals
together may cause burns or a re.
d) Under abusive conditions, liquid may
be ejected from the battery; avoid
contact. If contact accidentally occurs,
ush with water. If liquid contacts eyes
additionally, seek medical help. Liquid
ejected from battery may cause irritation or
burns.
6) Service
a) Have your power tool serviced by a
qualied repair person using only
identical replacement parts. This will
ensure that the safety of the power tool is
maintained.
Specic Safety
1. Always wear eye protection. The Power-
Luber can generate up to 7,500 psi (517
bar).
2. Use only Lincoln 1218, 1224, 1230 or
1236 outlet whip hoses. Grease injection
injuries are a very serious injury. Hold the
hose only in the area of the spring guard.
3. Avoid accidental starting. Be sure switch
is not depressed when inserting battery
pack.
4. Do not bend the hose so that it becomes
kinked.
5. Replace the hose at the rst sign of wear,
kink or damage to the outside jacket.
Do not overreach. Keep proper footing and
balance at all times. Proper footing and
balance enable better control of the tool in
unexpected situations.
Use safety equipment. Always wear eye
protection.
Dust mask, non-skid safety shoes,
hard hat, or hearing protection must be used
for appropriate conditions.

Page Number - 4
Models 1860, 1862, 1862E, 1864
PowerLuber Grease Gun (Lithium)
Form 404386
Any other use not in accordance with instruc-
tions will result in loss of claim for warranty or
liability.
SERVICE
Tool service must be performed only by quali-
ed repair personnel. Service or maintenance
performed by unqualied personnel may void
warranty and result in a risk of injury.
When servicing a tool, use only identical
replacement parts.
Extreme pressure may cause nozzle
extension or whip hose to burst. Use only
Lincoln APPROVED hoses and follow whip
hose instructions and warnings.
TOOL USE AND CARE
Do not use tool if switch does not turn it on or
off. A tool that cannot be controlled with the
switch is dangerous and must be repaired.
Do not continue to hold down trigger if grease
gun is stalled. This could damage the motor or
cause re.
Disconnect battery pack from tool before mak-
ing any adjustments, changing accessories,
or storing the tool. Such preventive safety
measures reduce the risk of starting the tool
accidentally.
Store the tools out of reach of children and
other untrained persons. Tools are dangerous
in the hands of untrained users.
When battery pack is not in use, keep it away
from other metal objects like: paper clips,
coins, keys, nails, screws, or other small metal
objects that can make a connection from
one terminal to another. Shorting the battery
terminals together may cause sparks, burns,
or a re.
Maintain tools with care. Check for misalign-
ment or binding of moving parts, breakage of
parts, and any other condition that may affect
the tool’s operation. If damaged, have the tool
serviced before using. Many accidents are
caused by poorly maintained tools.
Use only accessories that are recommended
by Lincoln.
Only accessories that are capable of handling
7500 psi (517 bar) should be used. Accesso-
ries that may be suitable for one tool may cre-
ate a risk of injury when used on another tool.
Appropriate use
The PowerLuber was exclusively designed to
pump and dispense lubricant using 18 volt bat-
tery power. The maximum specication ratings
should not be exceeded.
Grease gun can develop high pressure - up
to 7,500 psi (517 Bar). Use safety glasses
and gloves for protection during operation.
Keep hands clear of the exposed rubber
portion of hose.
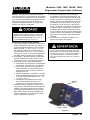
Warning! To reduce the risk of
injury, the user must read the
instruction manual.
Separate collection. This product
must not be disposed of with
normal household waste.
The gun uses lubricants, that may be am-
mable and poisonous if ingested. Do not use
gun near open ame or other re hazards.
Greases are often marketed as high tempera-
ture because it must maintain their lubricating
properties in hot areas, but the lubricants may
be ammable if the temperature is too high.
Please read all warnings on lubricants before
using this gun. It is best if the lubricants can
not be ammable.

Page Number - 5
Models 1860, 1862, 1862E, 1864
PowerLuber Grease Gun (Lithium)
Form 404386
SPECIFICATIONS
Basic PowerLuber Model 1860
Operating Power, Volt 18
Maximum Operating Pressure, psi (bar)
- Low Output - 7,500 (517)
- High Output - 3,000 (206)
Grease Reservoir Capacity, oz. (g) 14.5 (411)
Operating Temperature Range, °F (°C) 0 to 122
(-18 to +50)
Operating Current, Amp 4.0
Rated Current, Amp 5.0
Lubricant (Grease) Up to NLGI #2
Grease output oz./min. (gram/min)
- Low Output (L) 3.5 (99)
- High Output (H) 8.9 (252)
Weight, Lbs. (Kg) 8.8 (4.0)
Accessories:
Battery Li-Ion Model 1861
Output, VDC 18
Capacity, mAh 3000
Battery Charger Model 1850
Charge time 1 Hour
Input, VAC (3.0 A) 120 V, 50-60 Hz
Battery Charger Model 1850E
Charge time 1 Hour
Input, VAC (3.0 A) 230 V, 50 Hz
Outlet Hose Model 1236
Pressure Rating, psi (Bar) 7,500 (510)
Length of the Hose, In (mm) 36 (914)
Sound pressure (Lp) 70.0 dB(A), uncertainty (K) 3 dB(A)
Acoustic power (Lw) 81 dB(A), uncertainty (K) 3 dB(A)
Vibration emission value (ah) 1.1 m/s2, uncertainty (K)
1.5 m/s2
NOTE 1: Operating current and grease output data at
1,000 Psi (69 bar).
Models
Sales Model Components Included
1860 Grease Gun (W/ Battery)
1862 Grease Gun (W/ Battery)
Charger
Carrying Case
1862E Grease Gun (W/ Battery)
Charger (220v European)
Carrying Case
1864 Grease Gun (W/ Battery)
Extra Battery
Charger
Carrying Case
1850 Charger
1850E Charger (220v European)
1861 Battery Pack
1236 Hose (36”)
1230E Hose (RoHS European- 30”)
5852 Coupler, Midget Hyd.
251-10124-7 Coupler (European)
NOTE 2: The declared vibration total value has been
measured in accordance with a standard test method
and may be used for comparing one tool with another;
that the declared vibration total value may also be used
in a preliminary assessment of exposure.
Note 3: The vibration emission during actual use of
the power tool can differ from the declared total value
depending on the ways in which the tool is used; and
of the need to identify safety measures to protect the
operator that are based on an estimation of exposure in
the actual conditions of use (taking account of all parts
of the operating cycle such as the limes when the tool
is switched off and when it is running idle in addition to
the trigger time).

Page Number - 6
Models 1860, 1862, 1862E, 1864
PowerLuber Grease Gun (Lithium)
Form 404386
GENERAL DESCRIPTION
The Lincoln PowerLuber is a Lithium-Ion
battery operated grease gun. The gun was
developed for manual lubrication of grease
points and includes a pressure relief valve,
LED and electronic control center.
The PowerLuber is driven by a small, low
voltage electric motor connected to a three-
stage planetary gear transmission. The rotary
motion of the motor is converted into a recip-
rocating motion of the plunger using a yoke
mechanism. The PowerLuber is a positive
displacement single acting pump.
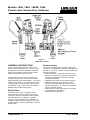
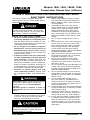
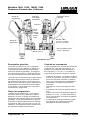
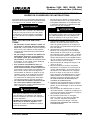
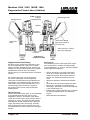
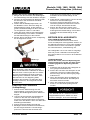
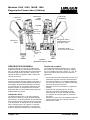
Relief Valve
The safety valve (g. 1) is factory set to
relieve pressure above 7500 psi (517 bar).
The valve also is an indicator of the bearing
and lubrication line conditions. If grease
comes out of the relief valve, it indicates a
clogged or tight bearing or tting or line. Cor-
rect this before continuing lubrication with the
PowerLuber.
Figure 1
(1860 Grease Gun)
Control center
The tool is equipped with a control center that
consists of: PC Board with Display, LED light and
Set keys “A” and “B”. Control center provides the
following functions:
• Motor protection. It will stop the motor if the
gun runs continuously at maximum pressure.
The display will ash red until the thermal
protector self resets;
• Displays the current level of battery charge;
• Monitors the level of the grease in tube;
• Calculates and displays the amount of the
grease delivered in, oz. PCB converts stroke
count to grease delivery.
• Allows control of an exact amount of grease
to lubricate critical bearings;
• Illuminates the LED light.

Page Number - 7
Models 1860, 1862, 1862E, 1864
PowerLuber Grease Gun (Lithium)
Form 404386
To prevent damage to the gears in the
transmission, the motor must be com-
pletely stopped before changing the lever
to the “L” or “H” (low or high) mode of
operation.
INSPECTION
Visually inspect for damaged, loose or miss-
ing parts. If equipment is worn or damaged,
remove from service. Contact an authorized
service center for damage assessment or
repair.
OPERATION
Changing “L” or “H” Mode
To change the mode of operation:
“L” (low output/high pressure)
“H” (high output/low pressure)
When motor is not running, push the lever
(Fig. 1) until letter “L” or “H” will be completely
visible in the window.
In case the lever is not completely shifted/
engaged, hold this lever and bump the switch
to engage gears.
High output is recommended if the tool is
used to lubricate large bearings not requiring
high pressure, beyond 3,000 psi (206 bar).
Also, high output is recommended if tool is
used to rell small reservoirs.
Low output is recommended if the tool is
used in construction, mining applications and
general lubrication. Low output will provide
the maximum pressure of up to 7,500 psi
(517 bar) the tool is capable of producing.
It is normal for batteries to lose their power
retention capacity over hundreds of charge
cycles. Replace the battery when this hap-
pens.
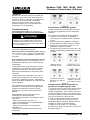
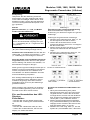
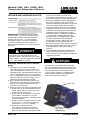
Turning Display and LED light
“ON”/”OFF”
To turn display and LED light “ON”:
-push either key or
-gently squeeze the trigger/switch;
To turn it “OFF”:
-push key “B” 3 sec. or
-wait 30seconds for self shutoff.
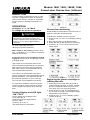
Display “ON” Display “OFF”
Grease ow monitoring.
Some OEM’s recommends the exact amount of
grease to lubricate critical bearings.
To deliver the desired amount of grease:
1. Press set key “A” 3sec. to set display reading
to zero.
2. Run and stop the gun at desired output.
3. Reset with Key A and lubricate next bearing.
4. Press key “B” 1 sec to view total (accumu-
lated) output.
Figure 2
Figure 3
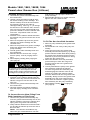
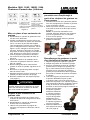
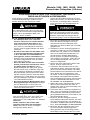
Replacing the grease cartridge or
relling the tube.
1. Prime the Power Luber after each rell or
grease cartridge change. To prime, operate
the gun until grease ows from hose. Use
vent valve (Fig.1) to expel air pockets.
2. Press set key “A” and “B” simultaneously 3
sec to reset all. (output, accumulated output
and grease level indicator.)
3. Press set key “A” 1 sec to display symbol
“grease level full”.
Figure 4

Page Number - 8
Models 1860, 1862, 1862E, 1864
PowerLuber Grease Gun (Lithium)
Form 404386
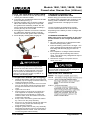
Installing Grease Cartridge
1. Unscrew the grease tube assembly from
the PowerLuber.
2. Visually check the follower seal lip direc-
tion before loading a new cartridge. The
follower seal lip must be directed toward
the follower handle or rear side for
cartridge loading. See Fig. 5. (To change
the direction of the follower seal, unscrew
tube cap from grease tube assembly and
pull on the handle to remove follower seal
from tube. Flip follower seal over and
reassemble.)
3. Pull back on the follower handle and latch
the follower rod groove into the slot on the
tube cap.
4. Remove the plastic cap from the grease
cartridge and insert cartridge into the
container tube.
5. Remove the pull tab from grease cartridge
and screw grease tube assembly into
pump assembly.
6. Thread grease tube assembly back onto
the Powerhead.
7. Release follower rod from slot. Purge
air from pump. See air purging instruc-
tions.
8. Reset display reading after purging air.
(See page 8).
Air pockets in the cartridge lubricant will
cause the gun to lose its prime and will
cause grease output measurements and
cartridge level readings to be inaccurate.
Removing Empty Grease Cartridge
1. Pull back on the follower handle until the
follower rod is fully extended and latch the
follower rod groove into the slot on the
tube cap.
2. Unscrew the grease tube assembly from
the PowerLuber.
3. Carefully release the follower handle to
eject the empty cartridge from container
tube.
To Convert Gun to Allow Filling From
Bulk Containter or Filler Pump
1. Unscrew the grease tube assembly cap
from the grease tube assembly. Pull on the
follower handle to extract the follower and
spring from the grease tube assembly.
2. Grasp follower between thumb and foren-
ger and ip the follower lip from the rear to
the front side.
NOTE. The follower resembles a cup.
When the gun is assembled for use with
bulk lubricant, the cup opens toward the
pump assembly.
3. Reassemble follower into grease tube and
tighten onto the container tube.
To Fill The Gun from Bulk Container
1. Remove pump assembly from grease tube
assembly.
2. Pack lubricant into cavity of the pump as-
sembly.
3. Insert the open end of the grease tube
assembly into lubricant (see Fig. 6). Slowly
pull the follower handle back while pushing
the grease tube assembly deeper into the
lubricant to prevent air pockets from being
pulled into the grease tube.
4. When the follower rod is fully extended,
pull it sideways to latch the rod groove
into the keyhole slot in the grease tube
assembly cap.
5. Loosely assemble the pump to the grease
tube assembly. Release the follower
rod from the grease tube assembly cap
and disengage the follower rod from the
follower by rotating the follower handle.
Push the follower rod into the grease tube
assembly. Slowly unscrew the grease tube
assembly from the pump until lubricant
oozes from the interface. Tighten grease
tube assembly into the pump assembly.
6. Reset display reading after purging air
(see page 8).
Figure 5
Rear Side Front Side
Figure 6

Page Number - 9
Models 1860, 1862, 1862E, 1864
PowerLuber Grease Gun (Lithium)
Form 404386
CHARGER OPERATION
CHARGING THE BATTERY PACK
Before using your PowerLuber for the rst time,
the battery pack should be fully charged. If the
battery pack is installed in the PowerLuber,
remove it and follow “Charging Procedure”
below.
Lincoln chargers are designed to charge
Lincoln Lithium batteries in 30-60 minutes
depending on the battery’s state of charge and
temperature.
CHARGING PROCEDURE
Make sure power circuit voltage is the same
as that shown on the charger specication
plate.
1. Plug the charger into an appropriate outlet
before inserting battery pack.
2. Insert the battery pack into the charger. The
green (charging) light will blink continuously
indicating that the charging process has
started.
3. The completion of charge will be indicated
by the green light remaining ON continu-
ously. The pack is fully charged and may be
used at this time.
4. Disconnect charger from power source
when not in use.
120/230 volts present at charging terminals. Do
not probe with conductive objects. Danger of
electric shock or electrocution.
INDICATOR LIGHT OPERATION
To Fill The Gun with a Filler Pump
1. Engage the follower rod with the follower by
rotating the follower handle.
2. Insert the gun vent/bulk ll valve into the ller
pump socket (see Fig. 7).
3. Operate the ller pump to ll the container.
When the follower rod groove is exposed,
the grease tube assembly is lled. The fol-
lower rod will be extended approximately 8
inches (20 cm). Do not overll!
4. Disengage the follower rod from the follower
by rotating the follower handle. Push the
follower rod into the grease tube assembly.
5. Reset display reading after purging air.
To Expel Air Pockets (Air Purging)
1. Withdraw the follower rod from the grease tube
assembly cap and engage it with the follower by
rotating the follower handle.
2. Unscrew the plug of vent valve 3-4 turns. Exert
force on the follower handle until grease ows
through the small hole in the side of the vent
valve.
3. Tighten the vent valve.
4. Pull the trigger in short bursts to operate gun
until trapped air is expelled. Disengage the
follower rod from the follower by rotating the
follower handle. Push the follower rod into the
grease tube assembly.
5. If step 2 fails, unscrew the grease tube assem-
bly 3 turns from the pump assembly.
6. Exert force on the follower handle until lubricant
oozes from the grease tube assembly and
pump assembly interface.
7. Retighten grease tube into the pump assembly.
Disengage the follower rod from the follower by
rotating the follower handle. Push the follower
rod into the grease tube assembly.
Remove Air Pocket! Air pocket at grease
inlet will prevent grease from being pumped.
Unscrew the vent valve three to four turns to
remove small air pockets trapped in this area.
If the air pocket is substantial and no grease
ows from coupler after trigger is pulled for 15
seconds, see following steps.
Figure 7

Page Number - 10
Models 1860, 1862, 1862E, 1864
PowerLuber Grease Gun (Lithium)
Form 404386
NOTE: Battery temperature will increase during
and shortly after use. Batteries may not accept
a full charge if they are charged immediately
after use. Allow the battery pack to cool to room
temperature before charging for best results.
Important Charging Notes
1. Longest life and best performance can be
obtained if the battery is charged when the
air temperature is between 65° F and 75° F
(18° - 24° C). DO NOT charge the battery in
an air temperature below +40° F (4.5° C) or
above 105° F (+40.5° C). This is important
and will prevent serious damage to the bat-
tery.
2. The charger and battery may become warm
to the touch while charging. This is a normal
condition, and does not indicate a problem.
3. If the battery does not charge properly:
a. Check current at receptacle by plugging in
a lamp or other appliance.
b. Check to see if the receptacle is con-
nected to a light switch which turns power
off when you turn out the lights.
c. Move charger and battery to a location
where the surrounding air temperature is
approximately 65° F - 75° F (18 - 24° C).
d. If charging problems persist, take the tool,
battery and charger to your local service
center.
Vent slots in top and bottom of charger must
not be obstructed. Do not charge battery
when temperature is BELOW 40° F (4.5° C) or
ABOVE 104° F (40° C).
Figure 8
Don’t allow any liquid to get inside charger.
Electric shock may result. To facilitate the
cooling of the battery pack after use, avoid
placing the charger or battery pack in a
warm environment such as a metal shed or
an uninsulated trailer.
1861
Battery
1850 or 1850E
Battery Charger
4. The battery should be recharged when it
fails to produce sufcient power on jobs.
DO NOT CONTINUE to use under these
conditions. Follow the charging procedure.
You may also charge a partially used pack
whenever you desire with no adverse affect
on the battery.
5. Under certain conditions, with the charger
plugged into the power supply, the exposed
charging contacts of the charger can be
shorted by foreign material. Foreign materi-
als of a conductive nature such as, but not
limited to, steel wool, aluminum foil, or any
buildup of metallic particles should be kept
away from charger cavities. Always unplug
the charger from the power supply when
there is no battery in the cavity. Unplug
charger before attempting to clean.
6. Do not freeze or immerse charger in water
or any other liquid.

Page Number - 11
Models 1860, 1862, 1862E, 1864
PowerLuber Grease Gun (Lithium)
Form 404386
This manual contains important safety and
operating instruction for Lincoln Model 1850 or
1850E Battery Charger.
SAFETY INSTRUCTIONS FOR CHARGER AND BATTERIES
SAVE THESE INSTRUCTIONS
1. Before using a battery charger, read all
instructions and cautionary markings on
Battery Charger, Battery Pack, and prod-
uct using battery.
2. CAUTION: To reduce the risk of injury,
Lincoln Model 1850 and 1850E Chargers
should only be used to charge Lincoln
battery pack Model 1861. Other types
of batteries may burst causing personal
injury and damage. Do not charge Lincoln
Model 1861 Battery Packs with any other
charger.
3. Do not expose charger to rain, snow or
frost.
4. Do not abuse cord. Never carry charger by
cord or yank it to disconnect from recep-
tacle. Pull by plug rather than cord when
disconnecting charger. Have damaged
or worn power cord and strain reliever
replaced immediately. DO NOT ATTEMPT
TO REPAIR POWER CORD.
5. Make sure cord is located so that it will not
be stepped on, tripped over, or otherwise
subjected to damage or stress.
6. Do not use an extension cord unless
absolutely necessary. Use of improper
extension cord could result in a risk of re
and electric shock.
7. Do not operate charger with damaged cord
or plug. Have them replaced immediately,
to avoid a hazard DO NOT ATTEMPT TO
REPAIR POWER CORD.
8. Do not operate charger if it has received
a sharp blow, been dropped, or otherwise
damaged in any way, take it to a qualied
service center.
9. Do not disassemble charger or bat-
tery pack. Take it to a qualied service
center when service or repair is required.
Incorrect reassembly may result in risk of
electrical shock or re.
10. Unplug charger from outlet before attempt-
ing any maintenance or cleaning to reduce
risk of electric shock.
11. Charge the battery pack in a well venti-
lated place; do not cover the charger and
battery with a cloth, etc., while charging.
12. Do not store the charger or battery packs
in locations where the temperature may
reach or exceed 122° F (50° C) such as
a metal tool shed, or a car in the summer
which can lead to deterioration of the stor-
age battery.
Risk of Electric Shock 120 VAC or 230 VAC
present at charger terminals. Do not probe
with conductive objects. Do not charge dam-
aged battery. Replace immediately.
READ ALL INSTRUCTIONS
• Do not incinerate the battery pack even if it
is severely damaged or is completely worn
out. The battery pack can explode in a re.
Toxic fumes and materials are created when
Ll-ION battery packs are burned.
• Do not charge or use battery in explosive
atmospheres, such as in the presence of
ammable liquids, gases or dust. Inserting
or removing the battery from the charger may
ignite the dust or fumes.
• If battery contents come into contact with
the skin, immediately wash area with mild
soap and water. If battery liquid gets into
the eye, rinse water over the open eye for 15
minutes or until irritation ceases. If medical at-
tention is needed, the battery electrolyte for
LI-ION batteries is composed of a mixture of
liquid organic carbonates and lithium salts.
• Contents of opened battery cells may
cause respiratory irritation. Provide fresh
air. If symptoms persists, seek medical atten-
tion.
Burn hazard. Battery liquid may be ammable
if exposed to spark or ame. Charge the
battery packs only in Lincoln Industrial
chargers.
DO NOT splash or immerse in water or
other liquids. This may cause premature cell
failure.
Never attempt to open the battery pack for
any reason. If the plastic housing of the
battery pack breaks or cracks, return to a
service center for recycling.
• Do not store or use the tool and battery in
locations where the temperature may reach
or exceen 105°F (40°C) such as outside
sheds or metal buildings in summer.

Page Number - 12
Models 1860, 1862, 1862E, 1864
PowerLuber Grease Gun (Lithium)
Form 404386
13. Do not charge battery pack when the
temperature is BELOW 40° F (4.5° C) or
ABOVE 104° F (40° C). This is very impor-
tant for proper operation.
14. Do not incinerate battery pack. It can
explode in a re.
15. Do not charge battery in damp or wet loca-
tions.
16. Do not attempt to charge any other cord-
less tool or battery pack with the Lincoln
Model 1850 or 1850E charger.
17. Do not short across the terminals of the
battery pack. EXTREMELY HIGH TEM-
PERATURES COULD CAUSE PERSON-
AL INJURY OR FIRE.
18. This appliance is not intended for use by
persons (including children) with reduced
physical, sensory or mental capabilities,
or lack of experience and knowledge, un-
less they have been given supervision or
instruction concerning use of the appliance
by a person responsible for their safety.
19. Children should be supervised to ensure
that they do not play with the appliance.
20. Dispose of expended batteries properly.
The Lincoln Model 1861 Battery Pack
contains rechargeable, lithium-ion batter-
ies. These batteries must be recycled or
disposed of properly. Drop off expended
battery packs at your local replacement
battery retailer, or your recycling center.
Users in the United States NOTE:
Applicable fees for the collection and recy-
cling of these batteries have been paid to
the RBRCTM. For further information, call
1-800-8BATTERY.

Page Number - 13
Models 1860, 1862, 1862E, 1864
PowerLuber Grease Gun (Lithium)
Form 404386
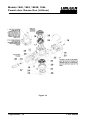
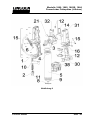
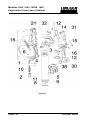
Figure 9

Page Number - 14
Models 1860, 1862, 1862E, 1864
PowerLuber Grease Gun (Lithium)
Form 404386
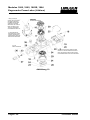
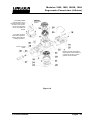
Figure 10

Page Number - 15
Models 1860, 1862, 1862E, 1864
PowerLuber Grease Gun (Lithium)
Form 404386
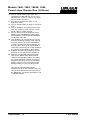
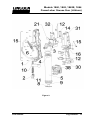
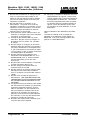
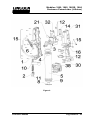
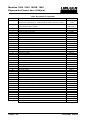
Service Parts List
Item Description Part Number
1FLEXIBLE HOSE 36” W/GASKET(MODEL 1860) 1236
FLEXIBLE HOSE 36” W/GASKET(MODEL 1860E) 1236E
2 COUPLER (MODEL 1860) 5852
COUPLER (MODEL 1860E) 251-10124-7
3PACKING 34793
4FOLLOWER ASSEMBLY KIT 93485
5GREASE TUBE ASSEMBLY 271882
6 GASKET KIT (HOSE) 271884
7 SEAL 271889
8 HANDLE KIT (GREASE TUBE) 286090
9 ROD, FOLLOWER KIT 286091
10 HOSE CLIP KIT 286376
11 COUPLER CAP KIT 286093
12 ELECTRICAL COMPONENTS KIT 286377
13 RESERVED
14 GEAR SELECTOR KIT 286097
15 HANDLE HARDWARE 286393
16 DECAL KIT 286378
17 MOTOR WITH ADAPTER KIT 286399
18 PUMP HARDWARE KIT 286391
19 COVER PUMP KIT 286379
20 YOKE KIT 286380
21 LED COVER KIT 286381
22 PLUNGER KIT 286109
23 STUD KIT 286110
24 ROLLER 286111
25 SPRING SELECTOR 286113
26 VENT/BULK VALVE KIT 286134
27 RESERVED
28 DRIVER ASSEMBLY 286285
29 GEAR SET KIT 286286
30 HANDLE WITH ELECTRICAL COMPONENT KIT 286382
31 HANDLE WITH SCREW KIT 286383
32 PUMP ASSEMBLY KIT 286384
33 CHECK VALVE KIT 286306
34 HOUSING PUMP WITH BEARING 286394
35 VENT VALVE KIT 286315
36 GASKET KIT (RELIEF VALVE) 286316
37 RELIEF VALVE KIT 286317
38 BATTERY 18V (LITHIUM) 1861
(NOT PICTURED) CHARGER (LITHIUM) 1850
(NOT PICTURED) STRAP 1414
CASE KIT 286392

Page Number - 16
Models 1860, 1862, 1862E, 1864
PowerLuber Grease Gun (Lithium)
Form 404386
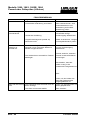
TROUBLESHOOTING
Condition Possible Cause Corrective Action
Motor fails to run. - Battery needs charging. Recharge battery.
- Faulty wiring to motor. Remove battery, disassemble
handle and check wiring
for loose connection.
PowerLuber fails to - Grease tube assembly is out of grease. Check that grease tube
dispense grease. assembly has grease.
- Loss of prime. Repeat priming operation.
- Ball check item 33 is not functioning. Remove Item 33, clean and
inspect ball seat area.
PowerLuber continues - Air may be trapped in several locations Empty grease tube
to lose prime. in container after bulk lling. assembly, rell and repeat
priming instructions.
- Follower may be binding in grease Replace grease tube assembly
tube assembly. Item 5.
Disassemble grease tube
assembly and clean.
Be sure that follower has properly
entered the grease cartridge.
Or
Verify that the follower is not
caught on the rim of the grease
cartridge.
Battery fails to take - Charger may not have power. Check that receptacle has power.
a charge. - Battery may be bad. Replace battery.

Page Numéro - 17
Formulaire 404386
Modèles 1860, 1862, 1862E, 1864
Graisseur PowerLuber (Lithium)
Page
Section - D7 - 83A
DEC – 2011
Modèles 1860, 1862, 1862E, 1864
Graisseur PowerLuber (lithium)
Série « A »
PowerLuber de base modèle 1860

Page Numéro - 18
Modèles 1860, 1862, 1862E, 1864
Graisseur PowerLuber (Lithium)
Formulaire 404386
Table des Matières
Page
Consignes de sécurité générales
relatives à l’outillage électrique ................18
Consignes spéciques de sécurité.................18
Entretien ........................................................20
Utilisation et soin de l’outil .................................20
Caractéristiques .............................................21
Description générale .....................................22
Contrôle...................................................23
Fonctionnement.........................................23
Fonctionnement du chargeur .........................25
Instructions de sécurité pour chargeur et bat-
teries ..........................................27
Vue éclatée liste des pièces détachées .........29
Dépannage ....................................................32
Anglise.........................................................2
Allemand ................................. (à déterminer)
Espagnol ................................. (à déterminer)
Prière de lire toutes les instructions et
consignes de sécurité. Le non-respect des
instructions et consignes de sécurité risque
d’entraîner un risque d’électrocution, d’incendie
et (ou) de blessures graves.
Avertissements généraux de
sûreté de machine-outil
Conserver toutes les instructions et consignes
de sécurité pour référence ultérieure.
Le terme « outil électrique » dans les con-
signes de sécurité fait référence à votre outil,
qu’il fonctionne sur secteur (avec cordon) ou
sur batterie (sans cordon).
1) Sécurité de la zone de travail
a) Maintenir la zone de travail propre et
bien éclairée.
Les zones encombrées ou mal éclai-
rées sont propices aux accidents.
b) Ne pas faire fonctionner d’outils
électriques en atmosphère explosive,
en présence de liquides ou de gaz
inammables, ou de poussière. Les
outils électrique causent des étincelles
susceptibles d’enammer la poussière ou
les vapeurs.
c) Tenir les enfants et autres personnes
à l’écart d’un outil électrique en fonc-
tionnement. Une distraction risque de
vous faire perdre le contrôle de l’outil.
2) Sécurité électrique
a) La che d’un outil électrique doit
obligatoirement correspondre à la
prise. Il est interdit de modier la che
de quelque manière que ce soit. Il est
interdit d’utiliser un adaptateur de che
avec un outil électrique nécessitant une
mise à la terre. Les ches non modiées
et les prises appropriées réduisent le
risque d’électrocution.
b) Éviter tout contact du corps avec des
surfaces reliées à la terre (tuyaux, ra-
diateurs, cuisinières et réfrigérateurs,
entre autres). Le risque d’électrocution
est plus grand si votre corps est relié à
la terre.
c) Ne pas exposer un outil électrique à
la pluie ou à l’humidité. La pénétration
d’eau dans un outil électrique augmente
le risque d’électrocution.
d) Ne pas malmener le cordon. Il est in-
terdit d’utiliser le cordon pour porter, tirer
ou débrancher l’outil électrique. Tenir le
cordon à l’écart de la chaleur, de l’huile,
des arêtes vives et des pièces mobiles.
Un cordon endommagé ou emmêlé aug-
mente le risque d’électrocution.
e) Lors de l’emploi d’un outil électrique
à l’extérieur, utiliser une rallonge ap-
propriée à une utilisation en extérieur.
L’emploi d’une rallonge appropriée à
un usage en extérieur réduit le risque
d’électrocution.
f) Si l’utilisation d’un outil électrique
dans un endroit humide est inévitable,
alimenter celui-ci à l’aide d’une protec-
tion différentielle. Une protection dif-
férentielle réduit le risque d’électrocution.
NOTA : Le terme « protection différen-
tielle » est synonyme de « disjoncteur
différentiel ».
3) Sécurité des personnes
a) Restez vigilant, faites attention à ce
que vous faites et utilisez votre bon
sens en utilisant un outil électrique.
Ne pas utiliser un outil électrique sous
l’effet de la fatigue, ou sous l’inuence
de médicaments, d’alcool ou de
drogue. Un simple moment d’inattention
pendant l’utilisation d’un outil électrique
risque d’entraîner une blessure grave.
b) Utiliser un équipement de protection.
Toujours porter une protection ocu-
laire. Le port d’équipements de sécurité
(masque anti-poussière, chaussures
de sécurité antidérapantes, casque ou
protection auditive, en fonction des condi-
tions) réduit le risque de blessures.
c) Éviter le démarrage intempestif de
l’outil. S’assurer que l’interrupteur est
en position arrêt avant de brancher
l’appareil et (ou) sa batterie, de le sou-
lever ou de le transporter. Le transport
d’un outil électrique avec le doigt sur

Page Numéro - 19
Formulaire 404386
Modèles 1860, 1862, 1862E, 1864
Graisseur PowerLuber (Lithium)
l’interrupteur, ou le branchement d’un
outil dont l’interrupteur est en position «
March », ouvre la porte aux accidents.
d) Retirer les éventuelles clefs de réglage
avant la mise en marche de l’outil.
Une clef restée xée à une pièce rotative
d’un outil électrique risque de causer une
blessure.
e) Ne pas se pencher en porte à faux.
Conserver son équilibre en perma-
nence. Ceci permet de mieux contrôler
l’outil en cas de situation imprévue.
f) Porter des vêtements appropriés. Ne
pas porter de vêtements amples ni
de bijoux. Tenir les cheveux, les vête-
ments et les gants à l’écart des pièces
mobiles. Les vêtements amples, les bi-
joux et les cheveux longs risquent d’être
happés par les pièces en mouvement.
g) Si les outils sont équipés de disposi-
tifs de dépoussiérage, s’assurer que
ceux-ci sont raccordés et correcte-
ment utilisés. L’emploi d’un dispositif
de dépoussiérage pourra réduire les
dangers liés aux poussières.
4) Utilisation et soin d’un outil électrique
a) Ne pas forcer un outil électrique.
Utiliser un outil électrique convenant
au travail à effectuer. Un outil électrique
approprié effectuera le travail mieux et
avec davantage de sécurité à la vitesse
pour laquelle il a été étudié.
b) Ne pas utiliser un outil électrique si
son interrupteur ne fonctionne pas.
Un outil qui ne peut pas être contrôlé
au moyen de son interrupteur est
dangereux, et doit obligatoirement être
réparé.
c) Débrancher la che de la prise
d’alimentation et (ou) débrancher la
batterie de l’outil avant d’effectuer un
réglage, un changement d’accessoire,
ou de ranger l’outil. Ces mesures de
sécurité préventives réduisent le risque
de démarrage par inadvertance.
d) Ranger les outils électriques hors de
portée des enfants, et ne pas laisser
des personnes connaissant mal l’outil
ou ces instructions le faire fonction-
ner. Un outil électrique entre les
mains d’une personne non formée est
dangereux.
e) Entretien des outils électriques. Véri-
er le bon alignement et l’absence de
grippage des pièces en mouvement,
vérier le bon état des pièces ainsi
que toute autre condition susceptible
d’affecter le fonctionnement de l’outil.
Si un outil électrique est endommagé,
le faire réparer avant de l’utiliser. De
nombreux accidents sont causés par des
outils électriques mal entretenus.
f) Maintenir les outils de coupe bien ai-
guisés et propres. Des outils de coupe
entretenus correctement et ayant
des arêtes bien aiguisées sont moins
susceptibles au grippage et sont plus
faciles à contrôler.
g) Utiliser les outils, accessoires, em-
bouts, etc., conformément aux présen-
tes instructions, en tenant compte des
conditions de travail et de la tâche à
effectuer. L’emploi d’un outil électrique
pour un usage différent de celui pour
lequel il est prévu risque de causer une
situation dangereuse.
5) Utilisation et soin d’un outil à batterie
a) Ne recharger la batterie qu’avec le
chargeur spécié par le fabricant. Un
chargeur adapté à un type de bloc-bat-
terie risque de créer un risque d’incendie
avec un bloc-batterie d’un type différent.
b) N’utiliser des outils électriques
qu’avec des blocs-batteries prévus
pour ceux-ci. L’emploi d’autres blocs-
batteries pourra créer des risques de
blessures et d’incendie.
c) Hors utilisation, tenir un bloc-batte-
rie à l’écart des objets métalliques
(trombones, pièces de monnaie, clefs,
clous, vis et autres petits objets en
métal) qui risquent de mettre ses
bornes en court-circuit. Un court-circuit
entre les bornes d’une batteries risque
d’entraîner des brûlures ou un incendie.
d) En cas d’utilisation abusive, du liquide
risque d’être éjecté de la batterie ;
éviter le contact. En cas de contact
accidentel, rincer à l’eau. Si le liquide
touche les yeux, consulter un méde-
cin. Le liquide éjecté de la batterie peut
provoquer de l’irritation ou des brûlures.
6) Réparations
a) Faire réparer votre outil par un
technicien qualié, et ne remplacer
des pièces que par des pièces de
rechange identiques. Ceci permettra
de maintenir la sécurité de votre outil
électrique.
Consignes spéciques de sécurité
1. Toujours porter une protection oculaire. Le
Power-Luber peut produire une pression de
517 bars.
2. N’utiliser que des exibles de sortie courts
Lincoln 1218, 1224, 1230 ou 1236. Les
blessures par injection de graisse sont très
graves. Ne tenir le exible que par le ressort
de protection.
3. Éviter les démarrages accidentels. S’assurer

Page Numéro - 20
Modèles 1860, 1862, 1862E, 1864
Graisseur PowerLuber (Lithium)
Formulaire 404386
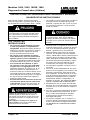
Attention danger ! Pour réduire
le risque de blessure, l’utilisateur
doit impérativement lire le manuel
d’instruction.
Rebutage séparé. Ce produit ne doit
pas être rebuté avec les ordures
ménagères.
Le graisseur peut produire une pression très
élevée, pouvant atteindre 517 bars. Porter des
lunettes de sécurité et des gants pendant son
fonctionnement. Tenir les mains à l’écart de la
partie du exible en caoutchouc visible.
Toute autre utilisation non conforme aux instruc-
tions risque d’entraîner la perte de la garantie ou
un refus de responsabilité.
ENTRETIEN
La réparation de l’outil ne peut être effectué que
par un technicien compétent. Une réparation ou
un entretien effectué par une personne non com-
pétente pourra annuler la garantie et entraîner un
risque de blessure.
Lors d’une réparation de l’outil, n’utiliser que des
pièces de rechange identiques.
Une pression extrême peut entraîner
l’éclatement d’une rallonge de buse ou d’un
exible court. N’utiliser que des exibles
AGRÉÉS par Lincoln et respecter les instruc-
tions et consignes de sécurité du exible court.
Utilisation et soin de l’outil
Ne pas utiliser l’outil si son interrupteur ne fonc-
tionne pas. Un outil ne pouvant pas être contrôlé
au moyen de son interrupteur est dangereux, et
doit obligatoirement être réparé.
Ne pas maintenir l’appui sur la gâchette si le
graisseur est bloqué. Ceci risque d’endommager le
moteur ou de provoquer un incendie.
Débrancher la batterie de l’outil avant d’effectuer
un réglage, un changement d’accessoire, ou de
ranger l’outil. Ces mesures de sécurité préven-
tives réduisent le risque d’un démarrage par
inadvertance.
Ranger les outils hors de portée des enfants et des
personnes inexpérimentées. Des outils entre les
mains de personnes non formées sont dangereux.
Tenir les blocs-batteries inutilisés à l’écart d’objets
en métal tels que : trombones, pièces de monnaie,
clefs, clous, vis et autres petits objets en métal
qui risquent de mettre ses bornes en court-circuit.
Un court-circuit entre les bornes d’une batteries
risque de causer des étincelles, des brûlures ou
un incendie.
Entretenir les outils avec soin. Vérier le bon
alignement et l’absence de grippage des pièces
en mouvement, vérier le bon état des pièces ainsi
que toute autre condition susceptible d’affecter le
fonctionnement de l’outil. Si un outil est en mau-
vais état, le faire réparer avant toute utilisation. De
nombreux accidents sont causés par des outils
mal entretenus.
N’utiliser que les accessoires recommandés par
Lincoln.
Seuls les accessoires prévus pour une pression
de 517 bars peuvent être utilisés. Des accessoires
pouvant convenir à un outil peuvent créer un
risque de blessure sur un autre outil.
Utilisation appropriée
Le PowerLuber a été étudié exclusivement pour
pomper et distribuer des produits de graissage
avec une batterie de 18 V. Le dépassement des
caractéristiques maximales est interdit.
que l’interrupteur n’est pas enfoncée lors de
l’insertion du bloc-batterie.
4. Ne pas courber le exible au point qu’il soit
plié.
5. Remplacer le exible au premier signe d’usure,
de torsion ou de dommage à sa gaine externe.
Ne pas se pencher en porte à faux. Conserver
son équilibre en permanence. Une position stable
et bien équilibrée permet un meilleur contrôle de
l’outil dans une situation inattendue.
Utiliser des équipements de sécurité. Toujours
porter une protection oculaire.
Un masque anti-poussière, des chaussures de
sécurité antidérapantes, un casque ou une protec-
tion auditive doivent impérativement être portés,
en fonction des conditions.
Le graisseur contient des produits lubriants, qui
sont susceptibles d’être inammables et toxiques
en cas d’ingestion. Ne pas utiliser le graisseur à
proximité d’une amme nue ou d’autres dangers
d’incendie.
Bien que de nombreuses graisses mentionnent «
haute température », car elles doivent conserver
leurs propriétés lubriantes à chaud, elles peuvent
malgré tout être inammables si la température
est trop élevée. Bien lire toutes les consignes de
sécurité des produits lubriants avant d’utiliser ce
graisseur. Il est préférable que les produits lubri-
ants ne soient pas inammables.
Seite wird geladen ...
Seite wird geladen ...
Seite wird geladen ...
Seite wird geladen ...
Seite wird geladen ...
Seite wird geladen ...
Seite wird geladen ...
Seite wird geladen ...
Seite wird geladen ...
Seite wird geladen ...
Seite wird geladen ...
Seite wird geladen ...
Seite wird geladen ...
Seite wird geladen ...
Seite wird geladen ...
Seite wird geladen ...
Seite wird geladen ...
Seite wird geladen ...
Seite wird geladen ...
Seite wird geladen ...
Seite wird geladen ...
Seite wird geladen ...
Seite wird geladen ...
Seite wird geladen ...
Seite wird geladen ...
Seite wird geladen ...
Seite wird geladen ...
Seite wird geladen ...
Seite wird geladen ...
Seite wird geladen ...
Seite wird geladen ...
Seite wird geladen ...
Seite wird geladen ...
Seite wird geladen ...
Seite wird geladen ...
Seite wird geladen ...
Seite wird geladen ...
Seite wird geladen ...
Seite wird geladen ...
Seite wird geladen ...
Seite wird geladen ...
Seite wird geladen ...
Seite wird geladen ...
Seite wird geladen ...
Seite wird geladen ...
Seite wird geladen ...
Seite wird geladen ...
Seite wird geladen ...
Seite wird geladen ...
Seite wird geladen ...
-
 1
1
-
 2
2
-
 3
3
-
 4
4
-
 5
5
-
 6
6
-
 7
7
-
 8
8
-
 9
9
-
 10
10
-
 11
11
-
 12
12
-
 13
13
-
 14
14
-
 15
15
-
 16
16
-
 17
17
-
 18
18
-
 19
19
-
 20
20
-
 21
21
-
 22
22
-
 23
23
-
 24
24
-
 25
25
-
 26
26
-
 27
27
-
 28
28
-
 29
29
-
 30
30
-
 31
31
-
 32
32
-
 33
33
-
 34
34
-
 35
35
-
 36
36
-
 37
37
-
 38
38
-
 39
39
-
 40
40
-
 41
41
-
 42
42
-
 43
43
-
 44
44
-
 45
45
-
 46
46
-
 47
47
-
 48
48
-
 49
49
-
 50
50
-
 51
51
-
 52
52
-
 53
53
-
 54
54
-
 55
55
-
 56
56
-
 57
57
-
 58
58
-
 59
59
-
 60
60
-
 61
61
-
 62
62
-
 63
63
-
 64
64
-
 65
65
-
 66
66
-
 67
67
-
 68
68
-
 69
69
-
 70
70


Lincoln 1862 Bedienungsanleitung
- Kategorie
- Elektrowerkzeuge
- Typ
- Bedienungsanleitung
in anderen Sprachen
- English: Lincoln 1862 Owner's manual
- français: Lincoln 1862 Le manuel du propriétaire
- español: Lincoln 1862 El manual del propietario
Andere Dokumente
-
 JBM 60042 Benutzerhandbuch
-
 JBM 60032 Benutzerhandbuch
-
 ororo Mini 5K Benutzerhandbuch
-
Loctite 97504 Benutzerhandbuch
-
TOOLCRAFT 2582931 Benutzerhandbuch
-
Cornwell Tools NE7201 Bedienungsanleitung
-
DeWalt DCGG571 Benutzerhandbuch
-
Avdel 0753 MKII 07530 MKII Bedienungsanleitung
-
-
ITT Goulds Pumps IC i-FRAME Bedienungsanleitung


