Yamaha QY-300 Bedienungsanleitung
- Kategorie
- Sequenzer
- Typ
- Bedienungsanleitung
Dieses Handbuch eignet sich auch für


FCC INFORMATION (U.S.A)
1. IMPORTANT NOTICE : DO NOT MODIFY THIS UNIT!
This product, when installed as indicated in the instructions contained in this manual, meets FCC requirements. Modifications not expressly approved
by Yamaha may void your authority, granted by the FCC, to use the product.
2. IMPORTANT: When connecting this product to accessories and/or another product use only high quality shielded cables. Cable/s supplied with this
product MUST be used. Follow all installation instructions. Failure to follow instructions could void your FCC authorization to use this product in the
USA.
3. NOTE: This product has been tested and found to comply with the requirements listed in FCC Regulations, Part 15 for Class “B” digital devices.
Compliance with these requirements provides a reasonable level of assurance that your use of this product in a residential environment will not result
in harmful interference with other electronic devices. This equipment generates/uses radio frequencies and, if not installed and used according to the
instructions found in the user’s manual, may cause interference harmful to the operation of other electronic devices. Compliance with FCC regulations
does not guarantee that interference will not occur in all installations. If this product is found to be the source of interference, which can be determined
by turning the unit “OFF” and “ON”, please try to eliminate the problem by using one of the following measures:
Relocate either this product or the device that is being affected by the interference.
Utilize power outlets that are on different branch (circuit breaker or fuse) circuits or install AC line filter/s.
In the case of radio or TV interference, relocate/reorient the antenna. If the antenna lead-in is 300 ohm ribbon lead, change the lead-in to co-axial type
cable.
If these corrective measures do not produce satisfactory results, please contact the your local retailer authorized to distribute this type of product. If
you can not locate the appropriate retailer, please contact Yamaha Corporation of America, Electronic Service Division, 6600 Orangethorpe Ave,
Buena Park, CA 90620
*
The above statements apply ONLY to those products distributed by Yamaha Corporation of America or its subsidiaries.
CANADA
THIS DIGITAL APPARATUS DOES NOT EXCEED THE “CLASS B”
LIMITS FOR RADIO NOISE EMISSIONS FROM DIGITAL APPARA-
TUS SET OUT IN THE RADIO INTERFERENCE REGULATION OF
THE CANADIAN DEPARTMENT OF COMMUNICATIONS.
LE PRESENT APPAREIL NUMERIQUE N’EMET PAS DE BRUITS
RADIOELECTRIQUES DEPASSANT LES LIMITES APPLICABLES
AUX APPAREILS NUMERIQUES DE LA “CLASSE B”
PRESCRITES DANS LE REGLEMENT SUR LE BROUILLAGE
RADIOELECTRIQUE EDICTE PAR LE MINISTERE DES COMMU-
NICATIONS DU CANADA.
*
This applies only to products distributed by Yamaha Canada Music
LTD.
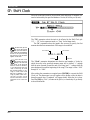
Bescheinigung des Importeurs
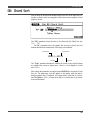
Hiermit wird bescheinigt, daß der/die/das
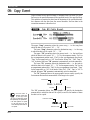
Music Sequencer Typ: QY300
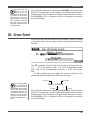
- - - - - - - - - - - - - - - - - - - - - - - - - - - - - - - - - - - - - - - - - - - - - - - - - - - - - - - - - - - - - - - -
(Gerät, typ, Bezeichnung)
in Übereinstimmung mit den Bestimmungen der
VERFÜGUNG 1046/84
- - - - - - - - - - - - - - - - - - - - - - - - - - - - - - - - - - - - - - - - - - - - - - -
(Amtsblattverfügung)
funkentstört ist.
Der Deutschen Bundespost wurde das Inverkehrbringen dieses
Gerätes angezeigt und die Berechtigung zur Überprüfung der Serie
auf Einhaltung der Bestimmungen eingeräumt.
Yamaha Europa GmbH
- - - - - - - - - - - - - - - - - - - - - - - - - - - - - - - - - - - - - - - - - - - - -
Name des lmporteurs.
*
Dies bezieht sich nur auf die von der YAMAHA EUROPA GmbH
vertriebenen Produkte.
ADVARSEL!
Lithiumbatteri—Eksplosionsfare ved fejlagtig håndtering. Udskiftning
må kun ske med batteri af samme fabrikat og type. Levér det brugte
batteri tilbage til leverandoren.
VARNING
Explosionsfara vid felaktigt batteribyte. Använd samma batterityp eller
en ekvivalent typ som rekommenderas av apparattillverkaren.
Kassera använt batteri enligt fabrikantens instruktion.
VAROITUS
Paristo voi räjähtää, jos se on virheellisesti asennettu. Vaihda paristo
ainoastaan laitevalmistajan suosittelemaan tyyppiin. Hävitä käytetty
paristo valmistajan ohjeiden mukaisesti.
Dette apparat overholder det gaeldende EF-direktiv vedrørende
radiostøj.
Cet appareil est conforme aux prescriptions de la directive
communautaire 87/308/CEE.
Diese Geräte entsprechen der EG-Richtlinie 82/499/EWG und/
oder 87/308/EWG.
This product complies with the radio frequency interference re-
quirements of the Council Directive 82/499/EEC and/or 87/308/
EEC.
Questo apparecchio è conforme al D.M.13 aprile 1989 (Direttiva
CEE/87/308) sulla soppressione dei radiodisturbi.
Este producto está de acuerdo con los requisitos sobre
interferencias de radio frequencia fijados por el Consejo Directivo
87/308/CEE.
YAMAHA CORPORATION

This product utilizes batteries or an external power supply
(adapter). DO NOT connect this product to any power supply or
adapter other than one described in the manual, on the name
plate, or specifically recommended by Yamaha.
WARNING: Do not place this product in a position where any-
one could walk on, trip over, or roll anything over power or
connecting cords of any kind. The use of an extension cord is not
recommended! If you must use an extension cord, the minimum
wire size for a 25' cord (or less ) is 18 AWG. NOTE: The smaller
the AWG number, the larger the current handling capacity. For
longer extension cords, consult a local electrician.
This Product should be used only with the components supplied
or; a cart, rack, or stand that is recommended by Yamaha. If a
cart, etc., is used, please observe all safety markings and instruc-
tions that accompany the accessory product.
SPECIFICATIONS SUBJECT TO CHANGE: The informa-
tion contained in this manual is believed to be correct at the time
of printing. However, Yamaha reserves the right to change or
modify any of the specifications without notice or obligation to
update existing units.
This product, either alone or in combination with an amplifier and
headphones or speaker/s, may be capable of producing sound lev-
els that could cause permanent hearing loss. DO NOT operate for
long periods of time at a high volume level or at a level that is
uncomfortable. If you experience any hearing loss or ringing in the
ears, you should consult an audiologist. IMPORTANT: The
louder the sound, the shorter the time period before damage occurs.
Some Yamaha products may have benches and/or accessory
mounting fixtures that are either supplied with the product or as
optional accessories. Some of these items are designed to be
dealer assembled or installed. Please make sure that benches are
stable and any optional fixtures (where applicable) are well se-
cured BEFORE using. Benches supplied by Yamaha are designed
for seating only. No other uses are recommended.
NOTICE: Service charges incurred due to lack of knowledge
relating to how a function or effect works (when the unit is
operating as designed) are not covered by the manufacturer’s
warranty, and are therefore the owners responsibility. Please
study this manual carefully and consult your dealer before re-
questing service.
ENVIRONMENTAL ISSUES: Yamaha strives to produce
products that are both user safe and environmentally friendly.
We sincerely believe that our products and the production meth-
ods used to produce them, meet these goals. In keeping with both
the letter and the spirit of the law, we want you to be aware of
the following:
Battery Notice: This product MAY contain a small non-re-
chargeable battery which (if applicable) is soldered in place. The
average life span of this type of battery is approximately five
years. When replacement becomes necessary, contact a qualified
service representative to perform the replacement.
This Product may also use “household” type batteries. Some of
these may be rechargeable. Make sure that the battery being
charged is a rechargeable type and that the charger is intended
for the battery being charged.
When installing batteries, do not mix old batteries with new, or
with batteries of a different type. Batteries MUST be installed
correctly. Mismatches or incorrect installation may result in over-
heating and battery case rupture.
Warning: Do not attempt to disassemble, or incinerate any bat-
tery. Keep all batteries away from children. Dispose of used
batteries promptly and as regulated by the laws in your area.
Note: Check with any retailer of household type batteries in your
area for battery disposal information.
Disposal Notice: Should this Product become damaged beyond
repair, or for some reason its useful life is considered to be at an
end, please observe all local, state, and federal regulations that
relate to the disposal of products that contain lead, batteries,
plastics, etc. If your dealer is unable to assist you, Please contact
Yamaha directly.
NAME PLATE LOCATION: The name Plate is located on the
bottom of the product. The model number, serial number, power
requirements, etc., are located on this plate. You should record
the model number, serial number, and the date of purchase in the
spaces provided below and retain this manual as a permanent
record of your purchase.
Model
Serial No.
Purchase Date
SPECIAL MESSAGE SECTION
92-BP
PLEASE KEEP THIS MANUAL

ii
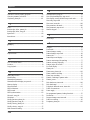
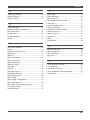
Contents
Channel Assignments .......................................................18
Playback Effects ................................................................18
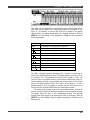
■ Quantization ..............................................................18
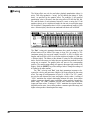
■ Swing ........................................................................20
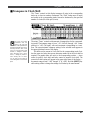
■ Transpose & Clock Shift...........................................21
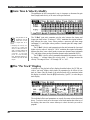
■ Gate Time & Velocity Modify..................................22
■ The “Per Track” Display...........................................22
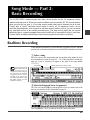
Song Mode —
Part 2: Basic Recording ........................... 23
Realtime Recording ..........................................................23
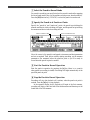
■ Punch-in Recording ..................................................26
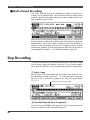
■ Multi-channel Recording ..........................................28
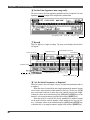
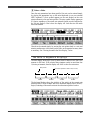
Step Recording ..................................................................28
■ Drum Assignment & Used Memory Displays ..........33
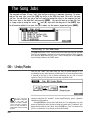
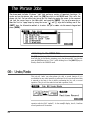
The Song Jobs............................................. 34
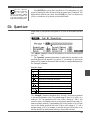
00: Undo/Redo ..................................................................34
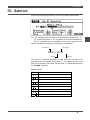
01: Quantize ......................................................................35
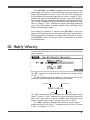
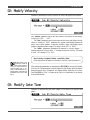
02: Modify Velocity ..........................................................37
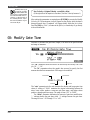
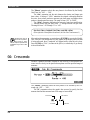
03: Modify Gate Time ......................................................38
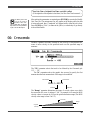
04: Crescendo ....................................................................39
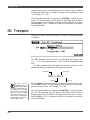
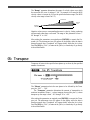
05: Transpose ....................................................................40
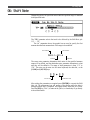
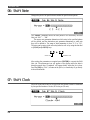
06: Shift Note.....................................................................41
07: Shift Clock ...................................................................42
08: Chord Sort ..................................................................43
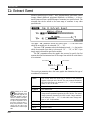
09: Copy Event ..................................................................44
10: Erase Event .................................................................45
11: Extract Event ..............................................................46
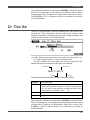
12: Thin Out ......................................................................47
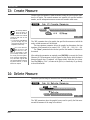
13: Create Measure ..........................................................48
14: Delete Measure ...........................................................48
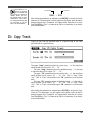
15: Copy Track .................................................................49
16: Mix Track ...................................................................50
17: Clear Track .................................................................50
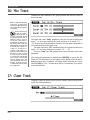
18: Expand Backing .........................................................51
19: Init Play Effect ............................................................52
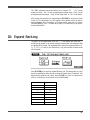
20: Normalize Effect .........................................................52
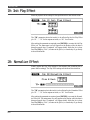
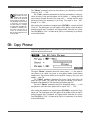
21: Copy Song ...................................................................53
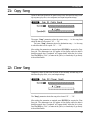
22: Clear Song ...................................................................53
23: Song Name ..................................................................54
Precautions ................................................. iv
About This Manual...................................... vi
The QY300: An Overview.......................... vii
■ Sequencer Functions ................................................ vii
■ Accompaniment Sequencing ................................... vii
■ Voice & Effects ...................................................... viii
Power & Connections................................... 1
Power Supply ......................................................................1
Setting Up Your System .....................................................2
■ The Connectors ...........................................................2
■ Audio Connections .....................................................3
■ MIDI Connections ......................................................3
The Controls................................................. 5
Song Mode —
Part 1: Playback & Control........................ 8
Play the Demo Song ............................................................8
■ Loop Playback ..........................................................10
Location .............................................................................10
■ The Measure/Beat Parameter ....................................10
■ The Shuttle Dial ........................................................10
■ The Mark/Jump Function..........................................11
Tempo Control ..................................................................12
Transposition ....................................................................12
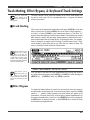
Track Muting, Effect Bypass, &
Keyboard Track Setting...................................................13
■ Track Muting ............................................................13
■ Effect Bypass ............................................................13
■ Keyboard Track ........................................................14
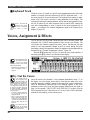
Voices, Assignment & Effects ..........................................14
■ Try Out the Voices....................................................14
■ The Pan Pots .............................................................15
■ The Faders.................................................................15
■ Reverb .......................................................................15
■ Coarse & Fine Tuning...............................................16
■ Pitch Bend Range......................................................17
Contents

iii
Contents
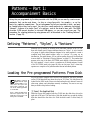
Patterns —
Part 1: Accompaniment Basics................ 55
Defining “Patterns”, “Styles”, & “Sections” ..................55
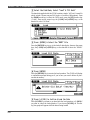
Loading the Pre-programmed Patterns From Disk ......55
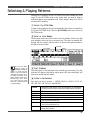
Selecting & Playing Patterns ...........................................57
■ Changing Chords ......................................................59
■ Track Muting & Effect Bypass .................................62
■ Voices, Assignment & Effects ..................................62
Patterns —
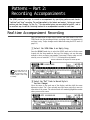
Part 2: Recording Accompaniments ........ 65
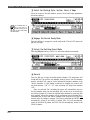
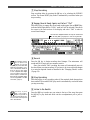
Realtime Accompaniment Recording .............................65
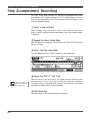
Step Accompaniment Recording .....................................68
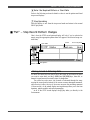
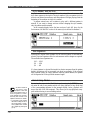
■ “Pat” — Step Record Pattern Changes .....................69
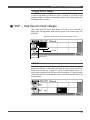
■ “Chd” — Step Record Chord Changes .....................71
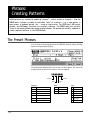
Phrases: Creating Patterns........................... 74
The Preset Phrases ...........................................................74
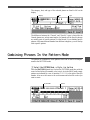
Combining Phrases In the Pattern Mode .......................75
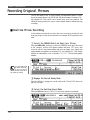
Recording Original Phrases.............................................78
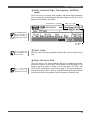
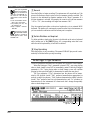
■ Realtime Phrase Recording.......................................78
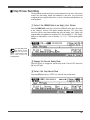
■ Step Phrase Recording ..............................................81
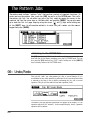
The Pattern Jobs ......................................... 86
00: Undo/Redo ..................................................................86
01: Copy Pattern ...............................................................87
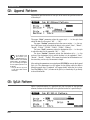
02: Append Pattern ..........................................................88
03: Split Pattern ................................................................88
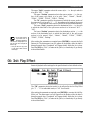
04: Init Play Effect ............................................................89
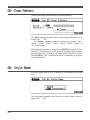
05: Clear Pattern ..............................................................90
06: Style Name ..................................................................90
The Phrase Jobs.......................................... 92
00: Undo/Redo ..................................................................92
01: Quantize ......................................................................93
02: Modify Velocity ..........................................................95
03: Modify Gate Time ......................................................95
04: Crescendo ....................................................................96
05: Transpose ....................................................................97
06: Shift Note.....................................................................98
07: Shift Clock ...................................................................98
08: Copy Phrase ................................................................99
09: Append Phrase .........................................................100
10: Split Phrase ...............................................................100
11: Get Phrase .................................................................101
12: Put Phrase .................................................................102
13: Clear Phrase ............................................................. 102
14: Phrase Name .............................................................103
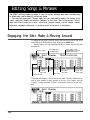
Editing Songs & Phrases............................ 104
Engaging the Edit Mode & Moving Around ................ 104
■ Moving Around.......................................................105
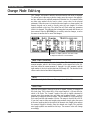
Change Mode Editing.....................................................106
■ Deleting Events .......................................................107
■ Changing Tracks .....................................................107
■ Assigning a Track Name.........................................107
Insert Mode Editing .......................................................107
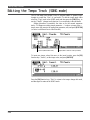
Editing the Tempo Track (SONG mode) .....................112
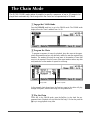
The Chain Mode ...................................... 113
■ Deleting Songs From the Chain ..............................114
■ Inserting New Songs In the Chain ..........................114
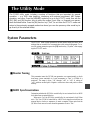
The Utility Mode...................................... 115
System Parameters .........................................................115
■ Master Tuning.........................................................115
■ MIDI Synchronization ............................................115
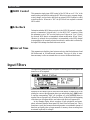
■ MIDI Control ..........................................................116
■ Echo Back ...............................................................116
■ Interval Time...........................................................116
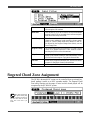
Input Filters ....................................................................116
Fingered Chord Zone Assignment ................................117
Disk Operations ....................................... 119
Direct Save & Load From the Song, Pattern,
Phrase, & Chain Modes .................................................119
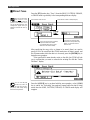
■ Direct Save..............................................................120
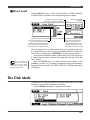
■ Direct Load .............................................................121
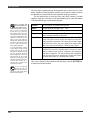
The Disk Mode ................................................................121
■ Save & Load ...........................................................123
■ Delete ......................................................................124
■ Rename ...................................................................124
■ Format .....................................................................125
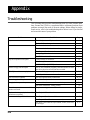
Appendix ................................................. 126
Troubleshooting ..............................................................126
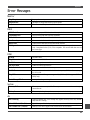
Error Messages ...............................................................127
Specifications...................................................................128
Index ................................................................................129

iv
Precautions
Precautions
!! PLEASE READ THIS BEFORE PROCEEDING !!
■Location
Do not expose the QY300 to the following condi-
tions to avoid deformation, discoloration, or
more serious damage.
• Direct sunlight (e.g. near a window).
• High temperatures (e.g. near a heat source, out-
side, or in a car during the daytime).
• Excessive humidity.
• Excessive dust.
• Strong vibration.
■Power Supply
• Turn the power switch OFF when the instrument
is not in use.
• The power supply cord should be unplugged
from the AC outlet if the instrument is not to be
used for an extended period of time.
• Unplug the instrument during electric storms.
• Avoid plugging the instrument into the same AC
outlet as appliances with high power consump-
tion, such as electric heaters or ovens. Also avoid
using multi-plug adaptors since these can result
in reduced sound quality and possibly damage.
■Turn Power OFF When
Making Connections
• To avoid damage to the instrument and other de-
vices to which it is connected (a sound system,
for example), turn the power switches of all re-
lated devices OFF prior to connecting or discon-
necting audio and MIDI cables.
■MIDI Connections
• When connecting the QY300 to MIDI equip-
ment, be sure to use high-quality cables made
especially for MIDI data transmission.
• Avoid MIDI cables longer than about 15 meters.
Longer cables can pick up electrical noise that
can causes data errors.
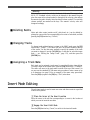
■Handling and Transport
• Never apply excessive force to the controls, con-
nectors or other parts of the instrument.
• Always unplug cables by gripping the plug
firmly, not by pulling on the cable.
• Disconnect all cables before moving the instru-
ment.
• Physical shocks caused by dropping, bumping, or
placing heavy objects on the instrument can re-
sult in scratches and more serious damage.
■Cleaning
• Clean the cabinet and panel with a dry soft cloth.
• A slightly damp cloth may be used to remove
stubborn grime and dirt.
• Never use cleaners such as alcohol or thinner.
• Avoid placing vinyl objects on top of the instru-
ment (vinyl can stick to and discolor the surface).
■Electrical Interference
• This instrument contains digital circuitry and
may cause interference if placed too close to ra-
dio or television receivers. If this occurs, move
the instrument further away from the affected
equipment.

v
Precautions
■Data Backup
• The QY300 contains a special long-life battery
that retains the contents of its internal memory
even when the power is turned OFF. The backup
battery should last for several years. When the
backup battery needs to be replaced “Battery
Low” will appear on the display when the power
is turned on. When this happens, have the backup
battery replaced by qualified Yamaha service
personnel. DO NOT ATTEMPT TO REPLACE
THE BACKUP BATTERY YOURSELF!
• Internal memory data can be corrupted due to
incorrect operation. Be sure to save important
data to floppy disk frequently so you have a
backup to revert to if something happens to dam-
age the data in memory. Also note that magnetic
fields can damage data on the disk, so it is advis-
able to make a second back-up copy of disks that
contain very important data, and keep backup
disks in a safe place away from stray magnetic
fields (i.e. away from speakers, appliances con-
taining motors, etc.).
■Handle Floppy Disks and the
Disk Drive With Care
• Use only 3.5" 2DD type floppy disks.
• Do not bend or apply pressure to the floppy disk.
Do not open the shutter and touch the surface of
the floppy disk inside.
• Do not expose the disk to high temperatures. (e.g.
direct sunlight, a car interior, etc.)
• Do not expose the disk to magnetic fields. Mag-
netic fields can partially or totally erase data on
the disk, rendering the disk unreadable.
• To eject a floppy disk, press the eject button
slowly as far as it will go then, when the disk is
fully ejected, remove it by hand.
The disk may not be ejected properly if the eject
button is pressed too quickly, or it is not pressed
in as far as it will go (the eject button may be-
come stuck in a half-pressed position and the disk
extends from the drive slot by only a few
millimeters). If this happens, do not attempt to
pull out the partially ejected disk. Using force in
this situation can damage the disk-drive mecha-
nism or the floppy disk. To remove a partially
ejected disk, try pressing the eject button once
again, or push the disk back into the slot and then
repeat the eject procedure carefully.
• Do not insert anything but floppy disks into the
disk drive. Other objects may cause damage to
the disk drive or the floppy disk.
■Service and Modification
• The QY300 contains no user serviceable parts.
Opening it or tampering with it in any way can
lead to irreparable damage and possibly electric
shock. Refer all servicing to qualified YAMAHA
personnel.
■Third-party Software
• Yamaha can not take any responsibility for soft-
ware produced for this product by third-party
manufacturers. Please direct any questions or
comments about such software to the manufac-
turer or their agents.
YAMAHA is not responsible for damage caused
by improper handling or operation.

vi
About This Manual
About This Manual
The following simple icons are used throughout this manual to draw attention to important
points and information where necessary. The icons also make it easier to differentiate be-
tween information that you should read immediately and information that can be skipped
until later, hopefully helping you to become familiar with the QY300 in the quickest, most
efficient manner possible.
This icon warns of possible hardware damage, software malfunction, or
any other serious problem that may occur due to improper operation or
set up.
This icon marks information that you
must read — i.e. important steps or
procedures that are essential for proper, efficient, or easy operation.
The magnifying-glass icon indicates information that may not be essential for
general operation, but is a more detailed explanation of a feature, a description
of the principle involved, etc. You can skip this information if full details are
not required immediately.
Suggestions as to how a feature or function can be applied musically are
identified by this icon.
Hints or ideas that are not specifically musical but may make operation easier
or more interesting are marked by the light-bulb icon.

1
Power & Connections
Power & Connections
Power Supply
Your QY300 comes supplied with a Yamaha PA-1207 optional AC adaptor.
Plug the DC output cable from the AC adaptor into the DC IN jack on the rear
panel, then plug the adaptor into a convenient wall AC power socket. It is also
a good idea to clip the adaptor’s DC cable into the cable clip on the QY300
rear panel to minimize the possibility of accidentally unplugging the cable
during operation.
• Do not attempt to
use an AC adaptor
other than the sup-
plied unit or an appropriate re-
placement provided by your
Yamaha dealer to power the
QY300. The use of an incom-
patible adaptor may cause ir-
reparable damage to the
QY300, and might pose a seri-
ous shock hazard!
• Be sure to unplug the AC
adaptor from the AC mains
socket when the QY300 is not
in use.
Cable Clip

2
Power & Connections
Setting Up Your System
What you will connect the QY300 to, and what you will connect to the QY300,
will depend entirely on your individual requirements. A few examples are
provided below to help you get started.
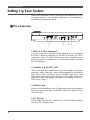
■ The Connectors
1 MIDI IN & OUT Connectors
If you plan to use a MIDI keyboard or other instrument to play and program
the QY300, it should be connected to QY300 MIDI IN connector (see “MIDI
Connections,” below). The MIDI OUT connector can be connected to an ex-
ternal tone generator or synthesizer if you want to drive external voices from
the QY300 sequencer.
2 L/MONO & R OUTPUT Jacks
These are the main stereo outputs from the QY300’s internal tone generator
system (see “Audio Connections,” below). Both are standard 1/4" mono phone
plugs. When a plug is inserted into only the L/MONO output, the left- and
right-channels signals are mixed and delivered via that output to allow direct
connection to mono sound systems. The output level is adjusted via the VOL-
UME control (Z page 7).
3 PHONES Jack
Any pair of stereo headphones with a 1/4" stereo phone plug can be plugged in
here for convenient monitoring. The PHONES output level is adjusted via the
VOLUME control.
4 DC IN Jack
The DC output cable from the Yamaha PA-1207 AC Power Adaptor supplied
with the QY300 is plugged in here.
1
2
3
4

3
Power & Connections
■ Audio Connections
The simplest way to monitor the QY300 sound is via a pair of stereo head-
phones (1/4" stereo phone plug type) plugged into the PHONES jack. If want
to use an external stereo sound system, however, use the L/MONO and R
OUTPUT jacks. Since the QY300 output jacks are 1/4" phone types, you
might have to use adaptors to connect to a sound system with different input
connectors — e.g. RCA type pin jacks. You can connect the QY300 directly to
most mixing consoles and instrument amplifiers via standard phone-plug ca-
bles (use the L/MONO output when connecting to a mono sound system).
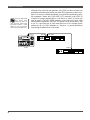
■ MIDI Connections
Although the QY300 can be played and programmed from the built-in micro-
keyboard, an external MIDI keyboard connected to the MIDI IN connector
provides the added advantages of standard keyboard size
and key velocity
sensitivity (if your keyboard has a velocity-sensitive keyboard). Connect the
MIDI OUT connector of the keyboard to the MIDI IN connector of the QY300,
and make sure that your keyboard is set to transmit on the appropriate MIDI
channel. The QY300 MIDI channel-to-track assignments are described on page
18.
Make sure that both the
QY300 and your sound
system are turned OFF
when making connections.
MIDI Keyboard
MIDI INMIDI OUT
QY300

4
Power & Connections
Although it has a built-in tone generator, the QY300 can drive external tone
generators and synthesizers just like any other MIDI sequencer or music com-
puter. You can even combine the internal voices with those produced by exter-
nal equipment. Connect the QY300 MIDI OUT connector to the MIDI IN
connector of a single external device, or the first in a “chain” of devices you
want to control. The MIDI THRU connector of the first device in the chain
should then be connected to the MIDI IN connector of the second device, and
so on. It’s a good idea not to chain more than four or five external devices
without the use of a MIDI distributor or “thru box”, to prevent data delays
from having an audible effect on the sound.
Always use high-quality
MIDI cables when
connecting MIDI de-
vices, and avoid cables longer
than about 15 meters — longer
cables can pick up electrical
noise that can cause data errors.
Tone Generator
MIDI OUT
MIDI IN
QY300
MIDI THRU
Tone Generator
MIDI IN

5
The Controls
The Controls
The QY300 has fairly simple, consistent control interface that, once understood, makes
operation fast and easy, no matter what operation you are performing. If you read through
this section carefully, and try out the procedures in the Try this: sections, you should have
no problem accessing and operating the QY300Õs many advanced features.
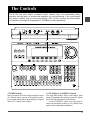
1 POWER Switch
Press in to turn the QY300 on, and press again to turn it
off. When the power is on one of the mode key indica-
tors will light and the SONG mode display will appear
on the LCD (Liquid Crystal Display).
2 LCD Display & CONTRAST Control
This large multi-function liquid crystal display panel
shows all parameters and prompts you need to operate
the QY300 with optimum ease and efficiency.
Use the CONTRAST control on the rear panel to
achieve the best display visibility (LCD visibility varies
greatly with viewing angle and lighting).
3 3 3
1 2

6
The Controls
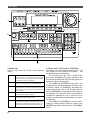
4 Cursor and [–1/NO] and [+1/YES] Keys
This block of six keys includes four cursor keys — the
ones labeled with the triangular arrow-heads — and
two data decrement/increment keys.
The cursor keys move the “cursor” around the dis-
play screen, highlighting the various parameters that
are available for editing (the QY300 cursor appears as a
dark block with inverse characters).
The [–1/NO] and [+1/YES] keys are used to edit
(change the value of) the parameter at which the cursor
is currently located. The [–1/NO] key decrements (de-
creases stepwise) the value of the selected parameter,
while the [+1/YES] key increments (increases stepwise)
the parameter. Press either key briefly to decrement or
increment the parameter by one, or hold the key for
continuous decrementing of incrementing in the speci-
fied direction.
The [–1/NO] and [+1/YES] keys are also used to
respond to certain prompts when they appear. Press
[+1/YES] to go ahead with the operation, or [–1/NO] to
cancel.
3 Mode Keys
These six keys select the QY300’s main operating
modes:
SONG The main “sequencer” mode in which the QY300’s 16
sequencer tracks can be recorded, edited, and played
back. Pattern, chord, and tempo changes are also recorded
in this mode to create accompaniments.
PATTERN The PATTERN mode is used to create patterns by com-
bining or “patching” phrases from the PHRASE mode.
PHRASE The individual phrases that are used to create accompani-
ment patterns can be selected, played, and created in this
mode. There are 2,000 preset patterns, and memory for
100 user phrases.
CHAIN The CHAIN mode is used to specify a “chain” of songs
to be automatically played in sequence.
UTILITY The QY300’s MIDI, data filter, and ABC utility functions
are all accessed via the UTILITY mode.
DISK Although you can directly save and load data to and from
floppy disk from the SONG, PATTERN, PHRASE, and
CHAIN modes, the DISK mode provides access to a full
range of important disk and data management functions.
3 3 3
7
4
5
6
3
89
12
10
11

7
The Controls
5 Numeric Keypad & Enter Key
These keys allow direct entry of numeric values where
applicable. Enter the required value via the numeric
keys — the entered number will flash on the display —
then press the [ENTER] key to actually enter the speci-
fied value. The [ENTER] key is also used to enter
notes and other events when editing sequence data, and
to execute a specified job or disk function. The numeric
keys are also used to specify note lengths and dynamics
when step recording.
6 Data and Shuttle Dials
These concentric dials have different functions: The in-
ner “data dial” can be used for data entry in the same
situations as the [–1/NO] and [+1/YES] keys or nu-
meric keypad. Rotate the dial clockwise to increment
the select value or counter-clockwise to decrement. The
data dial is handy for quickly covering a large range of
values or searching for a specific item or value.
The outer “shuttle dial” is used to move forward or
backward in the SONG, PATTERN, or PHRASE mode
at varying speed, both during playback and when play-
back is stopped. The more you rotate the shuttle dial in
the clockwise direction the faster you will shuttle for-
ward through the song, pattern, or phrase. The same
applies to reverse shuttling in the counter-clockwise di-
rection. If you use the shuttle dial during playback you
will be able to monitor the sound while shuttling for-
ward or backward.
7 Function & [SHIFT] Keys
The function keys — [F1] through [F6] — select the
corresponding items from the menu that appears on the
display immediately above the keys. The available
functions are different in each mode.
The [SHIFT] keys are used to access several sec-
ondary or “background” functions that you might only
need in special situations. For example, the [SHIFT]
key can be used when you want to mute all tracks si-
multaneously instead of muting the tracks one at a time.
8 [EDIT] and [JOB] Keys
The [EDIT] key accesses the QY300 edit mode from
the SONG or PHRASE modes, allowing detailed event-
by-event editing of the recorded data.
The [JOB] key accesses the various “jobs” avail-
able in the SONG, PATTERN, and PHRASE modes.
The jobs include functions such as quantization, data
copying, track mixing, data modification, name entry,
and much more.
9 Sequencer Keys
The sequencer keys control recording and playback in
the SONG, PATTERN, and PHRASE modes.
REC Activates the record-ready mode in the QY300 SONG and PHRASE
modes. The red REC key indicator will light, then recording will begin as
soon as the [PLAY] key is pressed. The [REC] key can be pressed again
to cancel the record-ready mode before recording is actually started by
pressing the [PLAY] key.
PLAY Starts playback from the current point in the song or phrase if the record-
ready mode is not active, or recording from the same point if the record-
ready mode is active.
STOP Stops playback or recording.
TOP Instantly returns to the first beginning of the current song or phrase (i.e.
the first beat of the first measure).
10 Micro Keyboard
This tiny 2-octave keyboard makes it possible to program
the QY300 without having to connect an external MIDI
keyboard. It’s even polyphonic, so you can directly enter
chords as well as single notes. The only thing it lacks is
velocity sensitivity. The QY300 does, however, accept
velocity information from an external MIDI keyboard.
When programming an accompaniment the micro-
keyboard is also used to specify the chord roots and types
to be entered.
11 Octave Keys
Since the 2-octave range of the micro-keyboard is not
enough for serious music programming, the [OCT
DOWN] and [OCT UP] keys allow the pitch of the key-
board to be shifted up or down in octave steps, over a range
of 8 octaves. Each time the [OCT DOWN] key is pressed
the pitch of the keyboard is shifted down by one octave,
until the lower limit is reached. The [OCT UP] key shifts
the pitch of the keyboard up in the same way.
When recording the accompaniment chord tracks in
the step mode the octave keys perform several second-
ary functions, such as specifying “on-bass” or synco-
pated chords.
The keyboard octave is reset to the ÒnormalÓ range (E2 É F4)
when the power is turned off.
12 VOLUME Control
The VOLUME control adjusts the volume of the sound
delivered via the OUTPUT and PHONES jacks. Rotate
the control toward “MAX.” to increase the volume.
Set the VOLUME control to its minimum setting when
connecting the QY300 to a sound system for the first time,
then gradually increase the volume level until the required
listening level is reached. This simple precaution can prevent unex-
pectedly high volume levels from damaging your speaker system (and
maybe even your ears!).

8
Song Mode — Part 1: Playback & Control
Song Mode — Part 1:
Playback & Control
Playback in the QY300 SONG mode involves much more than simply starting and stopping
playback. You have extensive control over a number of important parameters that dramati-
cally affect the final sound. Use the demo song provided on the QY300 data disk to try out
the various features and functions described in this section.
Before you begin, be sure to select the SONG mode by pressing the [SONG] mode
button.
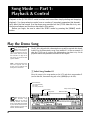
Play the Demo Song
The QY300 is shipped with a demonstration song and the required data already
loaded. Play the demonstration song (Song number 01) to hear an example of
what the QY300 can do, and use the demonstration song data to try out the
playback features and parameters described in this chapter.
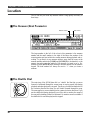
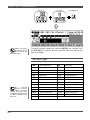
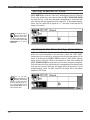
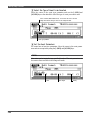
1 Select Song Number 01
Move the cursor to the song number on the LCD and select song number 01
(use the data dial, the numeric keypad, or the [–1/NO] key to do this).
Mode indicators:
[v] = Record Ready
[m] = Stop
[©] = Play or Record
Song number
Song name
Measure number
Tempo & time signature
If for some reason the
demo song has been
erased or overwritten, it
can be re-loaded from the sup-
plied QY300 data disk. Follow
the instructions on page 56 of
this manual to load the all-data
type file “DEMO”.
NOTE Actual file names on the
data disk supplied with the
QY300 may be different from
those given in the manual.
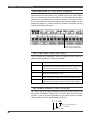
Note that the name of
the selected song
appears to the right of
the song number, and tracks
which contain data are indicated
by solid blocks below the track
numbers (these are actually mute
buttons, described below).

9
Song Mode — Part 1: Playback & Control
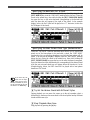
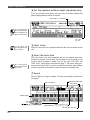
2 Play the Demo Song
Press the [©] key to start playback. The demo will automatically stop when it
finishes, or you can press the [
m] key to stop playback at any time.
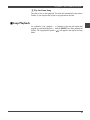
■ Loop Playback
For continuous “loop” playback — i.e. playback of the song will repeat until
stopped by pressing the [
m] key — hold the [SHIFT] key while pressing the
[
©] key. The loop playback symbol ( ) will appear to the right of the song
name.

10
Song Mode — Part 1: Playback & Control
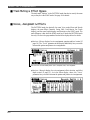
Location
The QY300 lets you locate any measure within a song quickly and easily in
three ways:
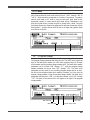
■ The Measure/Beat Parameter
The large number to the left of the colon in this parameter is the measure
number and the small number to the right of the shows the number of the
current quarter-note beat within the current measure during playback and re-
cording. To go directly to any measure within a song, place the cursor at the
measure number and use the [–1/NO] and [+1/YES] keys, the data dial, or the
numeric keypad to enter the number of the measure you want to go to. Re-
member to press [ENTER] after entering a measure number via the numeric
keypad. The beat number will always be reset to “1” when you locate a
measure.
■ The Shuttle Dial
The outer ring of the QY300 data dial is a “shuttle” dial that lets you move
forward or backward through the current song at varying speed, both during
playback and when playback is stopped. The more you rotate the shuttle dial in
the clockwise direction the faster you will shuttle forward through the song.
The same applies to reverse shuttling in the counter-clockwise direction. If you
use the shuttle dial during playback you will be able to monitor the sound of
the song while shuttling forward or backward. No monitor sound is available if
the shuttle dial is used when playback is stopped.
Measure number
Beat number

11
Song Mode — Part 1: Playback & Control
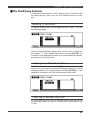
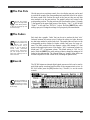
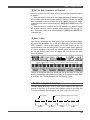
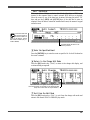
■ The Mark/Jump Function
The mark/jump function lets you “mark” (memorize) up to 10 locations within
the current song and “jump” to any one of the marked locations in one easy
step.
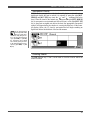
Marking a Location
To mark the current location, press the [F4] function key (“Mark”). This calls
the Mark/Jump display.
When the Mark/Jump display appears, make sure the cursor is located at a
clear number (“2” in the example display above) and press [ENTER]. This
records the current measure/beat location in the specified Mark/Jump number,
and returns you to the SONG mode.
Jumping to a Marked Location
To jump to a marked location, press the [F6] key (“Mark”) from any other
location, move the cursor to the appropriate Mark/Jump number (or enter the
Mark/Jump number via the numeric keypad), and press [ENTER]. You will
immediately be returned to the SONG mode at the specified location.
Clearing a Marked Location
To clear a marked location go to the Mark/Jump display, move the cursor to
the Mark/Jump number you want to clear,and press the [F1] function key
(“Clear”).

12
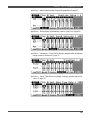
Song Mode — Part 1: Playback & Control
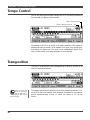
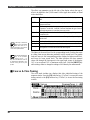
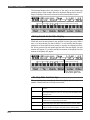
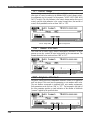
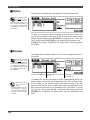
Tempo Control
The QY300 allows precise tempo settings from 25 to 300 beats per minute in
fine one-tenth of a quarter-note increments.
The number to the left of the period in the tempo parameter is the number of
quarter-note beats per minute, an the number to the right of the period repre-
sents tenths of a quarter note. The cursor can be independently placed at the
ones or tenths section of the tempo parameter to set as required.
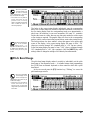
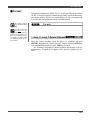
Transposition
The pitch of song playback can be transposed up or down by as much as an
octave in semitone increments.
To transpose playback pitch place the cursor at the transpose parameter (“Trs”
on the LCD) and set as required. Each increment corresponds to one semitone,
and the maximum range is from –12 (down one octave) to +12 (up one
octave).
Tenths of a beat per minute
Tempo in beats per minute (25 … 300)
Please note that the
transpose parameter
does not affect the re-
corded sequence data, only the
pitch of playback.
Seite wird geladen ...
Seite wird geladen ...
Seite wird geladen ...
Seite wird geladen ...
Seite wird geladen ...
Seite wird geladen ...
Seite wird geladen ...
Seite wird geladen ...
Seite wird geladen ...
Seite wird geladen ...
Seite wird geladen ...
Seite wird geladen ...
Seite wird geladen ...
Seite wird geladen ...
Seite wird geladen ...
Seite wird geladen ...
Seite wird geladen ...
Seite wird geladen ...
Seite wird geladen ...
Seite wird geladen ...
Seite wird geladen ...
Seite wird geladen ...
Seite wird geladen ...
Seite wird geladen ...
Seite wird geladen ...
Seite wird geladen ...
Seite wird geladen ...
Seite wird geladen ...
Seite wird geladen ...
Seite wird geladen ...
Seite wird geladen ...
Seite wird geladen ...
Seite wird geladen ...
Seite wird geladen ...
Seite wird geladen ...
Seite wird geladen ...
Seite wird geladen ...
Seite wird geladen ...
Seite wird geladen ...
Seite wird geladen ...
Seite wird geladen ...
Seite wird geladen ...
Seite wird geladen ...
Seite wird geladen ...
Seite wird geladen ...
Seite wird geladen ...
Seite wird geladen ...
Seite wird geladen ...
Seite wird geladen ...
Seite wird geladen ...
Seite wird geladen ...
Seite wird geladen ...
Seite wird geladen ...
Seite wird geladen ...
Seite wird geladen ...
Seite wird geladen ...
Seite wird geladen ...
Seite wird geladen ...
Seite wird geladen ...
Seite wird geladen ...
Seite wird geladen ...
Seite wird geladen ...
Seite wird geladen ...
Seite wird geladen ...
Seite wird geladen ...
Seite wird geladen ...
Seite wird geladen ...
Seite wird geladen ...
Seite wird geladen ...
Seite wird geladen ...
Seite wird geladen ...
Seite wird geladen ...
Seite wird geladen ...
Seite wird geladen ...
Seite wird geladen ...
Seite wird geladen ...
Seite wird geladen ...
Seite wird geladen ...
Seite wird geladen ...
Seite wird geladen ...
Seite wird geladen ...
Seite wird geladen ...
Seite wird geladen ...
Seite wird geladen ...
Seite wird geladen ...
Seite wird geladen ...
Seite wird geladen ...
Seite wird geladen ...
Seite wird geladen ...
Seite wird geladen ...
Seite wird geladen ...
Seite wird geladen ...
Seite wird geladen ...
Seite wird geladen ...
Seite wird geladen ...
Seite wird geladen ...
Seite wird geladen ...
Seite wird geladen ...
Seite wird geladen ...
Seite wird geladen ...
Seite wird geladen ...
Seite wird geladen ...
Seite wird geladen ...
Seite wird geladen ...
Seite wird geladen ...
Seite wird geladen ...
Seite wird geladen ...
Seite wird geladen ...
Seite wird geladen ...
Seite wird geladen ...
Seite wird geladen ...
Seite wird geladen ...
Seite wird geladen ...
Seite wird geladen ...
Seite wird geladen ...
Seite wird geladen ...
Seite wird geladen ...
Seite wird geladen ...
Seite wird geladen ...
Seite wird geladen ...
Seite wird geladen ...
-
 1
1
-
 2
2
-
 3
3
-
 4
4
-
 5
5
-
 6
6
-
 7
7
-
 8
8
-
 9
9
-
 10
10
-
 11
11
-
 12
12
-
 13
13
-
 14
14
-
 15
15
-
 16
16
-
 17
17
-
 18
18
-
 19
19
-
 20
20
-
 21
21
-
 22
22
-
 23
23
-
 24
24
-
 25
25
-
 26
26
-
 27
27
-
 28
28
-
 29
29
-
 30
30
-
 31
31
-
 32
32
-
 33
33
-
 34
34
-
 35
35
-
 36
36
-
 37
37
-
 38
38
-
 39
39
-
 40
40
-
 41
41
-
 42
42
-
 43
43
-
 44
44
-
 45
45
-
 46
46
-
 47
47
-
 48
48
-
 49
49
-
 50
50
-
 51
51
-
 52
52
-
 53
53
-
 54
54
-
 55
55
-
 56
56
-
 57
57
-
 58
58
-
 59
59
-
 60
60
-
 61
61
-
 62
62
-
 63
63
-
 64
64
-
 65
65
-
 66
66
-
 67
67
-
 68
68
-
 69
69
-
 70
70
-
 71
71
-
 72
72
-
 73
73
-
 74
74
-
 75
75
-
 76
76
-
 77
77
-
 78
78
-
 79
79
-
 80
80
-
 81
81
-
 82
82
-
 83
83
-
 84
84
-
 85
85
-
 86
86
-
 87
87
-
 88
88
-
 89
89
-
 90
90
-
 91
91
-
 92
92
-
 93
93
-
 94
94
-
 95
95
-
 96
96
-
 97
97
-
 98
98
-
 99
99
-
 100
100
-
 101
101
-
 102
102
-
 103
103
-
 104
104
-
 105
105
-
 106
106
-
 107
107
-
 108
108
-
 109
109
-
 110
110
-
 111
111
-
 112
112
-
 113
113
-
 114
114
-
 115
115
-
 116
116
-
 117
117
-
 118
118
-
 119
119
-
 120
120
-
 121
121
-
 122
122
-
 123
123
-
 124
124
-
 125
125
-
 126
126
-
 127
127
-
 128
128
-
 129
129
-
 130
130
-
 131
131
-
 132
132
-
 133
133
-
 134
134
-
 135
135
-
 136
136
-
 137
137
-
 138
138
-
 139
139
-
 140
140
-
 141
141


Yamaha QY-300 Bedienungsanleitung
- Kategorie
- Sequenzer
- Typ
- Bedienungsanleitung
- Dieses Handbuch eignet sich auch für
in anderen Sprachen
- English: Yamaha QY-300 Owner's manual
- français: Yamaha QY-300 Le manuel du propriétaire
- español: Yamaha QY-300 El manual del propietario
- italiano: Yamaha QY-300 Manuale del proprietario
- русский: Yamaha QY-300 Инструкция по применению
- Nederlands: Yamaha QY-300 de handleiding
- português: Yamaha QY-300 Manual do proprietário
- dansk: Yamaha QY-300 Brugervejledning
- polski: Yamaha QY-300 Instrukcja obsługi
- čeština: Yamaha QY-300 Návod k obsluze
- svenska: Yamaha QY-300 Bruksanvisning
- Türkçe: Yamaha QY-300 El kitabı
- suomi: Yamaha QY-300 Omistajan opas
- română: Yamaha QY-300 Manualul proprietarului
Verwandte Artikel
-
Yamaha QY22 Benutzerhandbuch
-
-
-
-
-
-
-
-
-