Parkside PNTS 1500 C4 Translation Of The Original Instructions
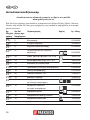
- Kategorie
- Staubsauger
- Typ
- Translation Of The Original Instructions
Dieses Handbuch eignet sich auch für

WET & DRY VACUUM CLEANER PNTS 1500 D5
NASS- UND TROCKENSAUGER
Originalbetriebsanleitung
WET & DRY VACUUM CLEANER
Translation of the original instructions
ΗΛΕΚΤΡΙΚΗ ΣΚΟΥΠΑ ΥΓΡΩΝ /
ΣΤΕΡΕΩΝ
Μετάφραση των αυθεντικών οδηγιών λειτουργίας
IAN 304887

Before reading, unfold the page containing the illustrations and familiarise yourself with all functions
of the device.
Πριν ξεκινήσετε την ανάγνωση, ανοίξτε τη σελίδα με τις εικόνες και εξοικειωθείτε με όλες τις λειτουργίες
της συσκευής.
Klappen Sie vor dem Lesen die Seite mit den Abbildungen aus und machen Sie sich anschließend mit
allen Funktionen des Gerätes vertraut.
GB / IE /CY Translation of the original instructions Page
5
GR / CY Μετάφραση των αυθεντικών οδηγιών λειτουργίας Σελίδα 18
DE / AT / CH Originalbetriebsanleitung Seite 33

14
16
15
19
20
21
21a
18
22
23
27
17
26
28
24
25
29
29
1
2
3
3a
4
5
6
7
8
9
10
11
12
13
8a
14a

14
15 10
20
19
19
29
3
3b
3a3
8
8a
8b
3
21
10
21a
19
6
5
29
18
14a

5
GB IE CY
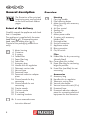
Contents
Introduction .................................5
Intended purpose .........................5
General description ......................6
Extent of the delivery ........................6
Overview ........................................6
Description of operation ....................7
Technical data .............................. 7
Symbols and icons .......................7
Symbols used in the instructions .........7
Symbols on the appliance .................8
Pictograms regarding the use
of nozzles and lters ........................8
Safety information ....................... 8
Assembly .....................................9
Operation ..................................10
Switching on/off ............................ 10
Airow Control ..............................10
Work breaks .................................10
Dry vacuuming ..............................11
Wet vacuuming .............................12
Blowing ........................................12
Powertool vacuuming .....................12
Cleaning/Maintenance ...............12
General Cleaning Work .................12
Filter Cleaning System ....................13
Maintenance .................................13
Storage ......................................13
Disposal/Environmental
protection ..................................13
Guarantee .................................14
Repair Service ............................15
Service-Center ............................15
Importer .................................... 15
Replacement parts/Accessories .. 16
Trouble shooting ........................17
Introduction
Congratulations on the purchase of your
new device. With it, you have chosen a
high quality appliance.
During production, this equipment has
been checked for quality and subjected
to a nal inspection. The functionality of
your equipment is therefore guaranteed. It
cannot be ruled out that residual quantities
of water or lubricants will remain on or in
the equipment/hose lines in isolated cases.
This is not a fault or defect and it repre-
sents no cause for concern.
The operating instructions constitute
part of this appliance. They contain
important information on safety, use
and disposal.
Before using the appliance, famil-
iarise yourself with all of the operat-
ing and safety instructions. Use the
appliance only as described and
for the applications specied.
Keep this manual safely and in the
event that the appliance is passed
on, hand over all documents to the
third party.
Intended purpose
The appliance is intended for domestic wet
and dry vacuuming in, for example, the
house, work room, car or garage. The ap-
pliance can also be used as a blower or to
suction up water. This equipment is not suit-
able for commercial use. Commercial use
will invalidate the guarantee.
Vacuuming of ammable or explosive
materials or those which endanger health
is prohibited. The manufacturer will not be
held responsible for injuries resulting from
use which does not comply with the direc-
tions, or from incorrect use.
Translation of the original
EC declaration of conformity ......46
Exploded Drawing .....................49

6
GB IE CY
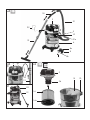
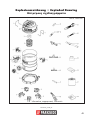
General description
The illustration of the principal
functioning parts can be found
on the front and back foldout
pages.
Extent of the delivery
Carefully unpack the appliance and check
that it is complete.
The appliance is supplied with the motor
head tted ( 3). To remove the motor
head, open the sealing clips ( 5).
Dispose of the packaging material cor-
rectly.
3 Motor housing
6 Container
8 5 castors
14 Folded lter
15 Paper lter bag
16 Foam lter
17 Accessory bag
18 Handle with air regulation
19 Telescopic suction tube
21 Vacuum hose
22 Powertool hose
23 Powertool reduction adaptor
piece
24 Ground nozzle for dry
vacuuming
25 Ground nozzle for wet
vacuuming
26 Crevice nozzle
27 Cushion nozzle
28 Car nozzle
29 2 retaining brackets
8b 5 cross recessed screws
- Instruction Manual
Overview
Housing
1 Carrying handle
2 Filter cleaning button
3 Motor housing with accessory
tting (3a)
4 Air ow control
5 Sealing clip
6 Container
7 Mains power cable
8 5 castors with accessory
holders (8a)
9 Drainage outlet
10 Suction connection
11 Appliance socket
12 Blow connection
13 On/off switch
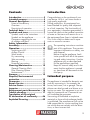
Filter
14 Folded lter for dry vacuuming
(already tted)
14a Cover plate (not visible)
15 Paper lter bag for vacuuming
large dirt particles
16 Foam lter (wet lter) for wet
vacuuming
Accessories
17 Accessory bag
18 Handle with air regulation
19 Telescopic suction tube
20 Vacuum tube holder
21 Vacuum hose with catch (21a)
22 Powertool hose
23 Powertool reduction adaptor
piece for connecting electrical
equipment for dust extraction.

7
GB IE CY
Nozzles
24 Floor nozzle for dry suction
25 Floor nozzle for wet suction
26 Crevice nozzle
27 Cushion nozzle
28 Car nozzle
29 2 retaining brackets
8b 5 cross recessed screws
3b Filter basket
14a Cover plate
30a Top cable holder
30b Bottom cable holder
Description of operation
The wet and dry vacuum cleaner is
equipped with a robust stainless steel
container for waste collection. The castors
provide good manoeuvrability of the appli-
ance. The suction ow is switched off by a
oat during wet vacuuming once the waste
tank is full. In addition, the machine has a
blower function and a socket for the con-
nection of a further electrical appliance.
The following describes the function of the
operating parts.
Technical data
Wet and dry
vacuum cleaner .................. PNTS 1500 D5
Mains voltage (U) .........220-240 V~, 50 Hz
Power consumption of motor (P) ...1500 W
Max. load on appliance socket
(Pmax.) ..................................1400 W
Power consumption of motor
+ max. load on appliance socket
(Psum.) ..................................... 2900 W
Safety class .......................................... I
Protection category...........................IPX4
Cable length.....................................6 m
Waste tank capacity (gross)............... 30 l
Weight (incl. all accessories) .. approx. 8.8 kg
Sound pressure level
(L
pA
) ........................77 dB(A); K
pA
= 3 dB
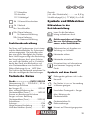
Symbols and icons
Symbols used in the
instructions
Read the operating instructions
carefully.
Hazard symbols with in-
formation on prevention of
personal injury and property
damage.
Precaution symbol with information
on prevention of harm / damage.
Pull out the mains plug.
Connect the machine
to the power supply.
Notice symbol with information on
how to handle the device properly.

8
GB IE CY
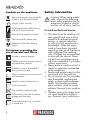
Symbols on the appliance
Electrical machines must not be dis-
posed of with household refuse.
Plug for indoor use only.
Switching between additional ap-
pliance + vacuum cleaner
Max. load on appliance socket
Device socket for power tools
Reference to the lter cleaning
system
Pictograms regarding the
use of nozzles and lters
Nozzle to vacuum carpets.
Nozzle to vacuum smooth surfaces
and hard oor surfaces.
Nozzle to vacuum dust and dirt
from joints and cracks.
Specic nozzle to vacuum cushions
and mattresses.
Specic nozzle to clean the car.
To absorb liquids.
Not suitable to absorb liquids.
To absorb dry dirt from the house,
garage and workshop.
To absorb ne dust e.g. stone dust
or wood dust.
Safety information
Caution! When using power
tools, observe the following
basic safety measures for the
prevention of electric shocks
and the risk of injury and re:
To avoid accidents and injuries:
• This device can be used by chil-
dren aged 8 and over and by
people with reduced physical,
sensory or mental capacities
or with a lack of experience or
knowledge, if they are super-
vised or have been instructed
regarding safe use of the device
and understand the resulting
risks. Children are not permitted
to play with the device. Clean-
ing and user maintenance are
not to be undertaken by children
without supervision.
• Never leave a machine which is
ready for operation unattended
at the workplace.
• People and animals must not be
vacuumed with the machine.
• Do not vacuum any hot, incandes-
cent, ammable, explosive ma-
terials, or those which endanger
health. This includes hot ashes,
petrol, solvents, acids or caustic
solutions. Personal injury could oc-
cur.
• Nozzles and suction tubes must
not reach head level whilst in
use. Personal injury could occur.

9
GB IE CY
To avoid accidents and injuries from
electric shocks:
• Ensure that the mains cable is
not damaged by being pulled
over sharp edges, by jamming,
or by pulling on the cable.
• Before each use, check the pow-
er supply lead and the extension
cable for damage and ageing.
Do not use the equipment if the
cable is damaged or worn. Dan-
ger of electric shock hazard.
• If the power cable for this equip-
ment is damaged, it must be
replaced by the manufacturer,
a customer service agent of the
same or a similarly qualied per-
son in order to prevent hazards.
• Switch the machine off and dis-
connect the mains plug:
- when the machine is not in use,
- before the machine is opened
up,
- for all maintenance and clean-
ing work,
- if the connecting cable is dam-
aged or tangled up.
• Never use the mains lead to pull
the plug out of the socket or to pull
the appliance. Protect the cable
from heat, oil, and sharp edges.
• Make sure that the mains volt-
age corresponds with the infor-
mation on the rating plate.
• Only plug the appliance into a
socket which is safeguarded.
• The device must only be con-
nected to a mains socket via a
residual-current circuit breaker
(RCD) with a rated leakage cur-
rent of not more than 30mA.
• Do not expose the unit to rain
CAUTION! The following
states how damage to the ap-
pliance and possible injury to
people can be avoided:
• Ensure that the machine is cor-
rectly assembled and the lters
are in the correct position.
• Do not use without the lter. This
could damage the machine.
• Only use replacement parts
and accessories delivered and
recommended by our Service
Centre. The use of parts by other
manufacturers immediately ren-
ders the guarantee void.
• Only have repairs carried out
at our authorised customer ser-
vice points.
• Observe the instructions for
cleaning and maintenance of
the machine.
• Store the appliance in a dry
place and out of reach of chil-
dren.
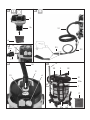
Assembly
Pull out the mains plug.
Danger of electric shock.
1. Attach the castors (8) with ac-
cessory holders (8a) to the
underside of the container (6).
Fasten them with the enclosed
Phillips screws (8b).
2. Place the motor housing (3) on
top of the container (6) and
close it with the clips (5).
3. Lightly squeeze together the
ends of the retaining bracket
(29) and click it into the motor
housing (3).

10
GB IE CY
4. Installing the accessories:
- Push the vacuum hose (21)
into the suction connection
(10) until it locks in place.
To remove it, press the catch
(21a) and pull the vacuum
- Fit the handle with air control
(18).
- Install the telescopic suction
tube (19). (Press the button on
the telescopic suction pipe to-
wards
and pull out to the
desired length).
- Install the nozzle desired (
24-28).
Nevervacuumwithoutalter!
Accessories such as the crevice noz-
zle ( 26), upholstery nozzle (
27) or car nozzle ( 28) can be
attached directly onto the handle
with air regulation ( 18).
Operation
Fully unwind the suction hose
( 21) before commencing work.
Switching on/off
Connect the mains plug.
To vacuum dust, plug the electrical
tool onto the mains socket on the
vacuum ( 11).
Only connect electrical appliances with a
maximum power rating of 1400 W.
Switching on the vacuum cleaner
(Permanent operation):
Move the On/Off switch ( 13) to the “I”
position.
Switch on electrical appliance +
vacuum cleaner:
1. Move the On/Off switch
(13) to the position
2. Switch on electrical appliance.
Switching on the electrical appli-
ance automatically switches on the
vacuum cleaner. Once the electrical
appliance has been switched off,
the vacuum cleaner switches off fol-
lowing a time lapse.
Switching off the vacuum cleaner:
Move the On/Off switch ( 13) to the
“0” position.
Airow Control
The airow can be continuously adjusted
by turning the airow controller ( 4).
MIN: minimum airow
MAX: maximum airow
When vacuuming with low-
powered electrical tools (such as
grinders or jigsaws), open the air
regulator on the handle (18). This
increases the suction power. To do
this, push the ring of the air regula-
tor upwards to three possible levels.
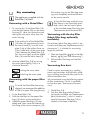
Work breaks
If you want to store away the assembled
suction equipment when you take a break,
you can
push the telescopic suction tube (19)
together and insert the suction tube
holder (20) into the accessory holder
(3a) on the motor head (3);
the telescopic suction tube (19) can be
placed in the retaining bracket (29).

11
GB IE CY
Dry vacuuming
The appliance is supplied with the
uted lter (14) tted.
Vacuuming with a uted lter:
1. To vacuum dry, t the uted lter (14)
onto the lter basket (3b) on the motor
housing (3). Here, the upward curved
sealing lip must point away from the
motor housing.
If the sealing lip of the folded lter
(14) does not spontaneously touch
the motor head (3), turn the cover
plate (14a) a little without force un-
til the inside latch of the cover plate
(14a) releases the folded lter (14).
You can now lightly push the folded
lter (14) onto the motor head (3).
2. Lock the folded lter (14) by turning
the cover plate slightly (14a) in a
clockwise direction:
Locking the cover plate
Unlocking the cover plate
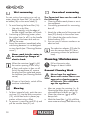
Vacuuming with the paper lter
bag:
To avoid the uted lter becoming
clogged, we recommend the addition-
al use of a paper lter bag (brown).
1. Fit the uted lter (14).
2. Fold the side aps on the paper lter
bag (15) down on the perforation.
3. Unfold the paper lter bag (15) com-
pletely and invert it over the internal suc-
tion tting of the suction connection (10).
The sealing ring on the lter bag open-
ing must completely enclosed the arm
on the suction nozzle.
A ne dirt lter bag made of micro
lter eece is also optionally avail-
able, which can be used in place
of the included paper lter bag (see
“Replacement parts/Accessories”).
Vacuuming with the dry lter
(fabric lter bag, optionally
available):
The anti-tear fabric lter bag, which is op-
tionally available (see “Replacement parts/
Accessories”), is suitable for vacuuming
large dirt particles.
1. Place the foam lter ( 16) on the lter
basket ( 3b) (see “Wet Vacuuming”).
2. Pull the fabric lter bag over the lter
basket.
Vacuuming ne dust:
Certain suction processes (e.g. sanding
paints and varnishes, drilling walls, grind-
ing or drilling hard wood) can pose a risk
due to hazardous dust.
We recommend using the following option-
al lter combination, which is available,
for ne dust (see “Spare parts/Accesso-
ries”):
1. Fluted lter (14).
2. Fine dust lter bag made of eece
(optionally available see “Replacement
parts/Accessories”), which is used in
stead of the paper lter bag (15) in-
cluded in the scope of delivery.

12
GB IE CY
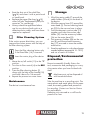
Wet vacuuming
For wet suction/vacuuming or to suck up
water, place the foam lter (16) on the l-
ter basket (3b) on the motor head (3).
1. To avoid tearing the foam lter (16):
- Use only a dry lter;
- Before inserting, twist the edge of
the lter slightly and then roll it back.
2. Suctioning up (draining) water: place
the suction hose ( 21) on the handle
( 18) into the water tank and suc-
tion up the water.
3. Empty the container immediately after
vacuuming because it is not designed
to store liquids (see “Cleaning/Mainte-
nance”).
Never reach into the water to
be suctioned up. Danger of
electric shock.
When the container ( 6) is full,
the suction opening is shut off by
a oat, and suction is then cut off.
Switch the appliance off, remove
the plug from the socket and empty
the container (see Cleaning/Mainte-
nance).
If foam or liquid exits, switch off the
machine immediately.
Blowing
1. To blow instead of suck, push the vacu-
um hose (21) into the blow connection
(12), which then locks in places (op-
eration without using a lter).
2. To remove it, press the catch (21a) and
pull the vacuum hose (21) out.
Powertool vacuuming
The Powertool hose can be used for
the following:
• Cleaning hard-to-reach places or sensi-
tive equipment.
• Connecting powertools for vacuuming
dust off.
1. Attach the wider end of the power tool
hose (22) directly to the suction hose
(21). Attach the other end to the en-
closed reducer (23).
2. You can now t vacuum nozzles or an
electrical tool.
The reduction adaptor (23) also ts
onto the vacuum hose (21) (dust
vacuuming without the powertool
hose).
Cleaning/Maintenance
Pull out the mains plug.
Danger of electric shock.
General Cleaning Work
Never hose the appliance
down with water. Never use
aggressive cleaning agents
or solvents. This could dam-
age the appliance.
• After use, empty the container ( 6).
Opening the drain plug to allow the
vacuumed liquid to drain out ( 9).
• Clean the container ( 6) with a
damp cloth.
• Wash the foam lter ( 16) with luke-
warm water and soap, and allow to dry.

13
GB IE CY
• Beat the dust out of the cloth lter
(
14) and clean it with a paint brush
or hand brush.
• Replace the paper lter bag ( 15)
when full (see “Replacement parts/Ac-
cessories” for reordering)
• Always check the appliance before
use for any obvious faults such as a
defective mains cable, and have these
repaired or replaced.
Filter Cleaning System
If the suction power diminishes, you can
improve the suction power with the help of
the lter cleaning system.
Press the lter cleaning button only
if the uted lter (14) is inserted.
Insert the mains plug of the device.
1. Move the on/off switch (13) to the “I”
position.
2. Turn the air ow control (4) to the MAX
position.
3. Press the lter cleaning button (2)
down with the help of the handle (18)
and hold it down for 3-4 seconds.
4. Repeat the process two more times.
Maintenance
The device is maintenance free.
Storage
1. Wind the mains cable (7) around the
cable holders (30a+b) on the back of
the device.
2. Wind the vacuum hose (21) around the
motor head (3). The two retaining brack-
ets (29) x the vacuum hose in place.
3. Push the telescopic suction tube (19)
together and insert the suction tube
holder (20) into the accessory holder
(3a) on the motor head (3).
4. The accessory holders (8a) on the cas-
tors (8) and the enclosed accessory
bag (17) are used to store the smaller
accessories.
5. Store the appliance in a dry place (recom-
mended ambient temperature 15 - 30°C)
and out of reach of children.
Disposal/Environmental
protection
Be environmentally friendly. Return the
tool, accessories and packaging to a recy-
cling centre when you have nished with
them.
Machines must not be disposed of
with household refuse.
Take the machine to a recycling point. The
waste plastic and metal parts can be sepa-
rated, accurately graded and passed on
for recycling. Contact our Service Centre
for more details.
Defective units returned to us will be dis-
posed of for free.

14
GB IE CY
Guarantee
Dear Customer,
This equipment is provided with a 3-year
guarantee from the date of purchase.
In case of defects, you have statutory rights
against the seller of the product. These
statutory rights are not restricted by our
guarantee presented below.
Terms of Guarantee
The term of the guarantee begins on the
date of purchase. Please retain the original
receipt. This document is required as proof
of purchase.
If a material or manufacturing defect occurs
within three years of the date of purchase
of this product, we will repair or replace –
at our choice – the product for you free of
charge. This guarantee requires the defec-
tive equipment and proof of purchase to be
presented within the three-year period with
a brief written description of what consti-
tutes the defect and when it occurred.
If the defect is covered by our guarantee,
you will receive either the repaired product
or a new product. No new guarantee pe-
riod begins on repair or replacement of the
product.
Guarantee Period and Statutory
Claims for Defects
The guarantee period is not extended by
the guarantee service. This also applies for
replaced or repaired parts. Any damages
and defects already present at the time of
purchase must be reported immediately af-
ter unpacking. Repairs arising after expiry
of the guarantee period are chargeable.
Guarantee Cover
The equipment has been carefully pro-
duced in accordance with strict quality
guidelines and conscientiously checked
prior to delivery.
The guarantee applies for all material and
manufacturing defects. This guarantee
does not extend to cover product parts that
are subject to normal wear and may there-
fore be considered as wearing parts (e.g.
lters or attachments) or to cover damage
to breakable parts (e.g. switches).
This guarantee shall be invalid if the prod-
uct has been damaged, used incorrectly or
not maintained. Precise adherence to all of
the instructions specied in the operating
manual is required for proper use of the
product. Intended uses and actions against
which the operating manual advises or
warns must be categorically avoided.
The product is designed only for private
and not commercial use. The guarantee
will be invalidated in case of misuse or
improper handling, use of force, or inter-
ventions not undertaken by our authorised
service branch.
Processing in Case of Guarantee
To ensure efcient handling of your query,
please follow the directions below:
• Please have the receipt and identication
number (IAN 304887) ready as proof of
purchase for all enquiries.
• Please nd the item number on the rating
plate.
• Should functional errors or other defects
occur, please initially contact the service
department specied below by tele-
phone or by e-mail. You will then receive
further information on the processing of
your complaint.

15
GB IE CY
• After consultation with our customer
service, a product recorded as defective
can be sent postage paid to the service
address communicated to you, with the
proof of purchase (receipt) and specica-
tion of what constitutes the defect and
when it occurred. In order to avoid ac-
ceptance problems and additional costs,
please be sure to use only the address
communicated to you. Ensure that the
consignment is not sent carriage forward
or by bulky goods, express or other spe-
cial freight. Please send the equipment
inc. all accessories supplied at the time
of purchase and ensure adequate, safe
transport packaging.
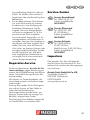
Repair Service
For a charge, repairs not covered by
the guarantee can be carried out by
our service branch, which will be happy to
issue a cost estimate for you. We can han-
dle only equipment that has been sent with
adequate packaging and postage.
Attention: Please send your equipment to
our service branch in clean condition and
with an indication of the defect.
Equipment sent carriage forward or by
bulky goods, express or other special
freight will not be accepted.
We will dispose of your defective devices
free of charge when you send them to us.
Service-Center
GB
Service Great Britain
Tel.: 0800 4047 657
E-Mail: [email protected]
IAN 304887
IE
Service Ireland
Tel.: 1890 930 034
(0,08 EUR/Min., (peak))
(0,06 EUR/Min., (off peak))
E-Mail: [email protected]
IAN 304887
CY
Service Cyprus
Tel.: 8009 4409
E-Mail: [email protected]
IAN 304887
Importer
Please note that the following address is
not a service address. Please initially con-
tact the service centre specied above.
Grizzly Tools GmbH & Co. KG
Stockstädter Straße 20
DE-63762 Großostheim
GERMANY
www.grizzly-service.eu

16
GB IE CY
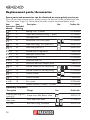
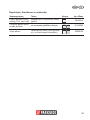
Replacement parts/Accessories
Spare parts and accessories can be obtained at www.grizzly-service.eu
If you do not have internet access, please contact the Service Centre via telephone (see
“Service-Center” Page 15). Please have the order number mentioned below ready.
Item Item Description Use Product No.
Instruction Exploded
Manual Drawing
5 5 Sealing clips, 2 pieces 91104545
8 11 Castor and accessory tting, 1 piece 91104547
9 9 Drainage outlet 91104546
14 27 Folded lter with cover plate 91104553
15 25 Paper lter bags, 30 l, pack of 5 30250133
16 23 Foam lter, pack of 3 30250100
18 13 Handle with air regulation 72800038
19 21 Telescopic suction tube 91098090
21 19 Vacuum hose 91104550
22 20 Powertool hose 1m 72800211
23 12 Powertool reduction adaptor piece 72800212
24 14 Ground nozzle for dry vacuuming 91104548
25 15 Ground nozzle for wet vacuuming 91104549
26 17 Crevice nozzle 91099005
27 16 Cushion nozzle 72800040
28 18 Car nozzle 91096445
Carbon brushes + holders, 2 pieces 91104554
Optionally available:
Description Design Use Product No.
Fine dirt lter bag 30l,
pack of 5
2-layer micro lter eece, white
30250110
Fluted lter without
lter cover
With steel inner mesh 91104553
Dry lter Blue fabric bag, washable 30250135

17
GB IE CY
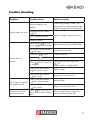
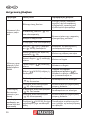
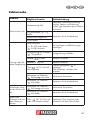
Trouble shooting
Problem Possible cause Fault correction
Device does not start
Mains voltage is not
present
Check plug socket, cable, line,
plug and fuse, where appropriate,
repair through electrical specialist
Defective on/off switch
(
13)
Repair through customer service
Worn carbon brushes
Defective motor
Low or lack of
suction
Hose system (
21/22)
or jets ( 24-28) blocked
Remove obstructions and blockages
Air control on the handle
(
18) open
Close the air control
Container ( 6) open
Close container
Container (
6) full
Empty container
Filter (
14/15/16) full
or clogged
Press the lter cleaning button
(
2);
Empty, clean or replace lter
Float in the lter basket
(
3b) cannot move
Release oat
Float in the lter basket
(
3b) faulty
Repair by Customer Care
Float does not switch
the appliance off
Float in the lter basket
(
3b) cannot move
Release oat
Float in the lter basket
(
3b) faulty
Repair by Customer Care
Dust or dirt is blow
out of the device
Filter (
14/15/16) is
not or not correctly assem-
bled
Use missing lters or check the
correct position of the lter

18
GR CY
Περιεχόμενα
Εισαγωγή ............................................ 18
Χρήση .................................................. 18
Γενική περιγραφή ...............................19
Παραδοτέα υλικά .............................. 19
Επισκόπηση ..................................... 19
Περιγραφή λειτουργίας ..................... 20
Τεχνικά στοιχεία .................................. 20
Σύμβολα και εικονοσύμβολα ............. 20
Εικονοσύμβολα στις οδηγίες ............ 20
Σύμβολα πάνω στη συσκευή ........... 21
Εικονοσύμβολα για τη χρήση
ακροφυσίων και φίλτρων ................. 21
Υποδείξεις ασφάλειας ........................ 21
Οδηγίες συναρμολόγησης ................23
Η εγκατάσταση .................................... 23
Ενεργοποίηση και απενεργοποίηση .. 23
Ρύθμιση ροής αέρα .......................... 24
Διαλείμματα ...................................... 24
Στεγνή αvαρρόφηση ......................... 24
Υγρή αναρρόφηση ........................... 25
Φύσημα ............................................ 26
Avαρρόφηση Powertool ................... 26
Καθαρισμός και συντήρηση .............. 26
Γενικές εργασίες καθαρισμός ........... 26
Σύστημα καθαρισμού φίλτρου .......... 26
Συντήρηση ....................................... 27
Αποθήκευση ....................................... 27
Απόσυρση/προστασία του
περιβάλλοντος .................................... 27
Ανταλλακτικά/Αξεσουάρ ....................28
Ανίχνευση βλαβών ............................. 30
Εγγύηση .............................................. 31
Σέρβις επισκευής ................................ 32
Service-Center .................................... 32
Εισαγωγέας ......................................... 32
Εισαγωγή
Συγχαρητήρια για την αγορά της νέας συ-
σκευής σας. Προτιμήσατε να αγοράσετε
ένα προϊόν ανώτερης ποιότητας. Η ποιό-
τητα αυτής της συσκευής ελέγχθηκε κατά
τη διάρκεια της παραγωγής, αλλά και σε
τελικό έλεγχο. Με τον τρόπο αυτό εξασφα-
λίστηκε η λειτουργικότητα της συσκευής
σας. Δεν αποκλείεται σε μεμονωμένες
περιπτώσεις να βρίσκονται στη συσκευή
ή στους σωλήνες κατάλοιπα νερού ή λι-
παντικών. Το γεγονός αυτό δεν αποτελεί
ελάττωμα ή βλάβη της συσκευής και δεν
είναι καθόλου ανησυχητικό.
Οι οδηγίες χρήσης αποτελούν ανα-
πόσπαστο τμήμα αυτού του προϊό-
ντος. Περιέχουν σημαντικές υποδείξεις για
την ασφάλεια, τη χρήση και διάθεση της
συσκευής. Πριν τη χρήση του προϊόντος
να εξοικειωθείτε με όλες τις οδηγίες χειρι-
σμούς και τις υποδείξεις ασφαλείας. Να
χρησιμοποιείτε το προϊόν μόνο όπως πε-
ριγράφεται και μόνο για τον αναφερόμενο
σκοπό. Να φυλάξετε καλά τις οδηγίες και
να τις παραδώσετε σε τρίτους μαζί με το
προϊόν.
Χρήση
Η συσκευή προορίζεται για καθαρισμό
υγρών και σκόνης στον ιδιωτικό τομέα
όπως π.χ. στο σπίτι, στο χώρο για χόμπυ,
στο αυτοκίνητο ή στο γκαράζ. Αυτή η συ-
σκευή δεν είναι κατάλληλη για επαγγελμα-
τική χρήση. Σε περίπτωση επαγγελματικής
χρήσης παύει να ισχύει η εγγύηση. Η
συσκευή μπορεί να χρησιμοποιηθεί και ως
φυσητήρας ή για αναρρόφηση νερού.
,
.
Μετάφραση της πρωτότυπης
Δήλωσης συμμόρφωσης CE ............. 47
Επί μέρoυς σχεδιαγράμματα ............. 49

19
CYGR
,
.
Γενική περιγραφή
Οι απεικονίσεις βρίσκονται
στην μπροστινή και πισινή σε-
λίδα-φάκελλο.
Παραδοτέα υλικά
Βγάλτε τη συσκευή από τη συσκευασία
και ελέγξτε, αν είναι πλήρης.
Η συσκευή παραδίδεται με τοποθετημένη
κεφαλή κινητήρα ( 3). Για την αφαίρεση
της κεφαλής του κινητήρα ανοίξτε τα κλιπ
( 5).
Διαθέστε τα υλικά συσκευασίας σύμφωνα
με τους κανονισμούς.
3
6
8 5 τροχοί οδήγησης
14 Πτυχωτό φίλτρο
15
16
17
18
19 Τηλεσκοπικός σωλήνας αναρ-
ρόφησης
21
22 Powertool
23 Powertool
24 Ακροφύσιο δαπέδου για στεγνή
αναρρόφηση
25 Ακροφύσιο δαπέδου για υγρή
αναρρόφηση
26
27
28
29 Βραχίονας συγκράτησης
8b 5 σταυρόβιδες
- Οδηγιών χρήσης
Επισκόπηση
1
2 Πλήκτρο καθαρισμού φίλτρου
3 με υποδο-
χές αξεσουάρ (3a)
4 Ρυθμιστής ροής αέρα
5
6
7
8 5 τροχοί οδήγησης με υποδο-
χές αξεσουάρ (8a)
9
10
11 Πρίζα συσκευής
12 Σύνδεση συστήματος για
φύσημα
13
14 Πτυχωτό φίλτρο για στεγνή
αναρρόφηση (ήδη συναρμολο-
γημένο)
14a Ρυθμιστής ασφάλειας (δεν
απεικονίζεται)
15 για την
αναρρόφηση ακαθάριστο βρω-
μιάς
16
17
18
19 Τηλεσκοπικός σωλήνας αναρ-
ρόφησης
20
21 με άγκι-
στρο (21a)
22 Powertool

20
GR CY
23 Powertool
24 Ακροφύσιο δαπέδου για στεγνή
αναρρόφηση
25 Ακροφύσιο δαπέδου για υγρή
αναρρόφηση
26
27
28
29 2 Βραχίονας συγκράτησης για
σωλήνα αναρρόφησης
8b 5 σταυρόβιδες
3b Υποδοχή φίλτρου
14a Ρυθμιστής ασφάλειας
30a Επάνω τμήμα στηρίγματος κα-
λωδίου
30b Κάτω τμήμα στηρίγματος κα-
λωδίου
Περιγραφή λειτουργίας
Η ηλεκτρική σκούπα υγρών και σκόνης
είναι εξοπλισμένη με ένα σταθερό δοχείο
από ανοξείδωτο χάλυβα. Οι τροχοί οδή-
γησης προσφέρουν μεγάλη ευκινησία στη
συσκευή.
,
.
.
Τη λειτουργία των εξαρτημάτων χειρισμού
θα την βρείτε στις ακόλουθες περιγραφές.
Τεχνικά στοιχεία
κούπα υγρών
και σκόνης ........................PNTS 1500 D5
Τάση δικτύου (U) .........220-240 V~, 50 Hz
(P) .................................. 1500 W
Μεγ. ισχύς της πρίζας συσκευής
(Pmax.) ...................................... 1400 W
+
mεγ. ισχύς της πρίζας συσκευής
(Psum.) ...................................... 2900 W
.............................I
Είδος προστασίας ..............................IPX4
..................................6 m
(μικτή) .............................30 l
( ) .........περίπ. 8,8 kg
Στάθμη ηχητικής πίεσης
(L
pA
) .........................77 dB(A); K
pA
=3 dB
Σύμβολα και
εικονοσύμβολα
Εικονοσύμβολα στις οδηγίες
Διαβάστε τις οδηγίες λειτουργίας
προσεκτικά.
Σύμβολα κινδύνου με στοιχεία για
την πρόληψη προσωπικών και υλι-
κών ζημιών.
Σύμβολο υποχρέωσης με στοιχεία
για την πρόληψη ζημιών.
Αποσυνδέστε το βύσμα δικτύου.
Συνδέστε τη συσκευή στην τάση
δικτύου.
Seite wird geladen ...
Seite wird geladen ...
Seite wird geladen ...
Seite wird geladen ...
Seite wird geladen ...
Seite wird geladen ...
Seite wird geladen ...
Seite wird geladen ...
Seite wird geladen ...
Seite wird geladen ...
Seite wird geladen ...
Seite wird geladen ...
Seite wird geladen ...
Seite wird geladen ...
Seite wird geladen ...
Seite wird geladen ...
Seite wird geladen ...
Seite wird geladen ...
Seite wird geladen ...
Seite wird geladen ...
Seite wird geladen ...
Seite wird geladen ...
Seite wird geladen ...
Seite wird geladen ...
Seite wird geladen ...
Seite wird geladen ...
Seite wird geladen ...
Seite wird geladen ...
Seite wird geladen ...
Seite wird geladen ...
Seite wird geladen ...
Seite wird geladen ...
-
 1
1
-
 2
2
-
 3
3
-
 4
4
-
 5
5
-
 6
6
-
 7
7
-
 8
8
-
 9
9
-
 10
10
-
 11
11
-
 12
12
-
 13
13
-
 14
14
-
 15
15
-
 16
16
-
 17
17
-
 18
18
-
 19
19
-
 20
20
-
 21
21
-
 22
22
-
 23
23
-
 24
24
-
 25
25
-
 26
26
-
 27
27
-
 28
28
-
 29
29
-
 30
30
-
 31
31
-
 32
32
-
 33
33
-
 34
34
-
 35
35
-
 36
36
-
 37
37
-
 38
38
-
 39
39
-
 40
40
-
 41
41
-
 42
42
-
 43
43
-
 44
44
-
 45
45
-
 46
46
-
 47
47
-
 48
48
-
 49
49
-
 50
50
-
 51
51
-
 52
52


Parkside PNTS 1500 C4 Translation Of The Original Instructions
- Kategorie
- Staubsauger
- Typ
- Translation Of The Original Instructions
- Dieses Handbuch eignet sich auch für
in anderen Sprachen
- English: Parkside PNTS 1500 C4
Verwandte Artikel
-
Parkside PNTS 1500 B3 Translation Of The Original Instructions
-
Parkside 284950 Translation Of The Original Instructions
-
-
-
-
-
-
Parkside PNTS 1500 A1 Translation Of Original Operation Manual
-
Parkside PNTS 1400 E2 Original Instructions Manual
-
Andere Dokumente
-
Flex VC 6 L MC Benutzerhandbuch
-
Vonroc VC504AC Benutzerhandbuch
-
Kärcher WD 7.700 P Spezifikation
-
Scheppach HD2P Bedienungsanleitung
-
Bosch GAS 50 Professional Bedienungsanleitung
-
monzana 103232 Assembly Instructions
-
-
Scheppach HD2p 5906301901 Original Instructions Manual
-
Bosch GAS 25 L SFC Bedienungsanleitung
-