Kindermann 5915000006 Datenblatt
- Kategorie
- Projektionswände
- Typ
- Datenblatt
Dieses Handbuch ist auch geeignet für
Seite laden ...

C
B
A
3.1.2
Mounting instruction
Specifications are subject to change without prior notice.Version 11/2000
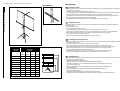
Mounting
Screen size
(in cm)
Dimensions
(in mm)
A
min.
C
max.
1:1 format
152x152cm 510 2170 2820 1670
178x178cm 510 2430 3250 1920
213x213cm 510 2780 3250 2390
244x244cm 510 3070 3250 2670
4:3 format
114x152cm 510 1730 2540 1670
137x178cm 510 1850 3000 1920
163x213cm 510 2130 3250 2390
183x244cm 510 2390 3250 2670
B
min.
Montagevoorschrift
N.B.:Zet het scherm tijdig voor projectie op zodat het projectiedoek aan de omgevingstemperatuur kan wennen.
- Ga achter het scherm staan.
- Druk met de voet op de vergrendeling van de driepoot (A).
- Voor overheadprojectie moet de OHP-beugel (B) uit de binnenbuis worden geschoven en naar voren gedraaid.
- Rol het projectiedoek uit en bevestig de bovenbalkring aan de ophanghaak of de OHP-beugel.
- De binnenbuis zover uitschuiven tot de bovenkant van het projectiedoek de gewenste hoogte heeft bereikt.
- Met de handgreep (C) het gewenste projectieformaat instellen.
- Na gebruik het projectiedoek ontspannen door de handgreep (C) omhoog te bewegen.
Assembly instructions
Note:Set up the screen ahead of time,so that the screen material can acclimatise to the ambient temperature
prior to projection.
- Stand behind the screen.
- Press the tripod lock (A) with your foot.
- For overhead projection,pull out the OHP extension bracket (B) out of the inner tube.
- Roll out the screen material and mount the ring on the upper bar to the catch hook or to the OHP bracket.
- Slide out the inner tube until the top of the screen material has reached the required height.
- Set the desired projection size with the grip (C).
- After use,the screen material can be released by moving the grip (C) up.
Assemblage de l’écran de projection
N.B.:Pensez à installer l’écran de projection à l’avance pour que la toile puisse s’acclimater à la température ambiante.
- Placez-vous derrière l’écran.
- Appuyez avec le pied sur le dispositif de verrouillage du trépied (A).
- Pour la rétroprojection,tirez l’équerre OHP (B) hors du tube intérieur et inclinez-la vers l’avant.
- Déroulez l’écran de projection et fixez l’anneau de la barre supérieure au crochet ou à l’équerre OHP.
- Tirez le tube intérieur jusqu’à ce que le haut de la toile de projection soit à la hauteur désirée.
- Avec la poignée (C),réglez le format de projection désiré.
- Tendez la toile de projection avec le bouton de tension (D).Tournez vers la gauche et enfoncez.
- Après emploi,détendez la toile de projection en actionnant la poignée (C) vers le haut.
Montageanleitung
Anm.:Stellen Sie die Projektionswand rechtzeitig zur Projektion auf,damit sich die Temperatur des Projektionstuches
der Umgebungstemperatur angleicht.
- Stellen Sie sich hinter die Projektionswand.
- Drücken Sie mit dem Fuß auf die Verriegelung des dreibeinigen Stativs (A).
- Für Overhead-Projektionen muß der OHP-Bügel (B) aus dem Innenrohr herausgeschoben und
nach vorne gedreht werden.
- Rollen Sie das Projektionstuch aus und befestigen Sie den Oberbalkenring am Aufhänghaken
oder am OHP-Bügel.
- Schieben Sie das Innenrohr soweit aus,bis die Oberkante des Projektionstuches die
gewünschte Höhe erreicht hat.
- Mit dem Handgriff (C) stellen Sie das gewünschte Projektionsformat ein.
- Nach Gebrauch wird das Projektionstuch entspannt,indem der Handgriff (C) nach oben bewegt wird.
NL
E
F
D
D
length
Accessory
C
B
A
D
-
 1
1
-
 2
2


Kindermann 5915000006 Datenblatt
- Kategorie
- Projektionswände
- Typ
- Datenblatt
- Dieses Handbuch ist auch geeignet für
in anderen Sprachen
- English: Kindermann 5915000006 Datasheet
- français: Kindermann 5915000006 Fiche technique
- Nederlands: Kindermann 5915000006 Data papier
Verwandte Papiere
Sonstige Unterlagen
-
Sharp EL-99T Bedienungsanleitung
-
Projecta Slimscreen Spezifikation
-
Rothenberger Schnellspannsäule Benutzerhandbuch
-
NEC DT20 Bedienungsanleitung
-
Canon RE-455X Benutzerhandbuch
-
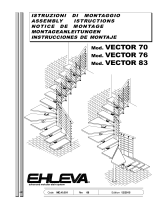 EHLEVA VECTOR 706 Assembly Instructions Manual
-
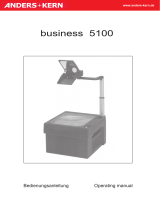 ANDERS+KERN business 5100 Bedienungsanleitung
-
Sony HDMI VPL-FX41L Benutzerhandbuch
-
Reflecta 81245 Datenblatt

