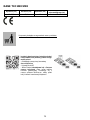
Whirlpool WHSS 62F LT K Benutzerhandbuch
- Kategorie
- Dunstabzugshauben
- Typ
- Benutzerhandbuch

EN Instructions for use
BG
CS
NL Gebruiksaanwijzingen
FR
DE Betriebsanleitung
HU Használati útmutató
IT
PL
PT Instruções de uso
RO i pentru utilizator
RU
SK
ES Instrucciones de uso
NO Brugsanvisning
SV Bruksanvisning
DA Brugsanvisning
FI Käyttöohje

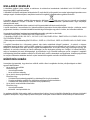
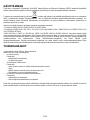
2x
Ø 2,9x6,5
1x
1x
1x
Ø 3,5x9,5
5
x
Ø 8x40
5
x
Ø 5x45
1x
1x
1x
2x
Ø 150 mm
25
1x
1x
2x
4x
Ø 4x8
1x
1x
6x
Ø 3,5x9,5

5
2
1
3 4
H6
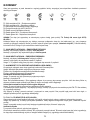
2x
Ø 8 x 40mm
2 x
Ø 5 x 45mm
5mm
= =
2 x Ø 8mm
X cm
X cm
X cm
4x
Ø 4 x 8mm

7
8
> 1cm
Ø 16cm
> 5cm
Ø 16cm
9,5cm
6
2 x
Ø 8 x 40mm
2 x
Ø 5 x 45mm
2 x Ø 8mm

9
X cm
> 1cm
> 3cm
X - 2cm
V
~ Hz
=
=
X
a.
2x Ø 3,5x9,5
4x Ø 3,5x9,5
b.
10
11

12 13
14 15
16 17
x 1
Ø 5x45
x1

1 x
Ø 3,5x9,5mm
18 19
20
22
21
Ø 150 mm

24
23
2x Ø 2,9x6,5

26
25
2 x

10
EN
GENERAL SAFETY
• Before any cleaning or maintenance operation, disconnect hood from the mains by
removing the plug or disconnecting the mains electrical supply.
• Always wear work gloves for all installation and maintenance operations.
• This appliance can be used by children aged from 8 years and above and persons with
reduced physical, sensory or mental capabilities or lack of experience and knowledge if
they have been given supervision or instruction concerning use of the appliance in a
safe way and understand the hazards involved.
• Children shall not be allowed to tamper with the controls or play with the appliance.
• Cleaning and user maintenance shall not be made by children without supervision.
• The premises where the appliance is installed must be sufficiently ventilated, when the
kitchen hood is used together with other gas combustion devices or other fuels.
• The hood must be regularly cleaned on both the inside and outside (AT LEAST ONCE
A MONTH).
• This must be completed in accordance with the maintenance instructions provided.
Failure to follow the instructions provided regarding the cleaning of the hood and filters
will lead to the risk of fires.
• Do not flambé under the range hood.
• Do not remove filters during cooking.
• For lamp replacement use only lamp type indicated in the Maintenance/Replacing
lamps section of this manual.
The use of exposed flames is detrimental to the filters and may cause a fire risk, and
must therefore be avoided in all circumstances.
Any frying must be done with care in order to make sure that the oil does not overheat
and ignite.
CAUTION: Accessible parts of the hood may become hot when used with cooking
appliances.
• Do not connect the appliance to the mains until the installation is fully complete.
• With regards to the technical and safety measures to be adopted for fume discharging it is important to closely follow the
regulations provided by the local authorities.
• The air must not be discharged into a flue that is used for exhausting fumes from appliance burning gas or other fuels.
• Do not use or leave the hood without the lamp correctly mounted due to the possible risk of electric shocks.
• Never use the hood without effectively mounted grids.
• The hood must NEVER be used as a support surface unless specifically indicated.
• Use only the fixing screws supplied with the product for installation or, if not supplied, purchase the correct screws type.
• Use the correct length for the screws which are identified in the Installation Guide.
• In case of doubt, consult an authorized service assistance center or similar qualified person.
WARNING!
• Failure to install the screws or fixing device in accordance with these instructions may result in electrical hazards.
• Do not use with a programmer, timer, separate remote control system or any other device that switches on automatically.
Very young children(0-3years)should be kept away from the appliance.Young children (3-8 years)should be kept away from the
appliance unless continuously supervised.

11
CAUTION:The appliance is not intended to be operated by means of an external switching device, such as a timer,or separate
remote controlled system.
This appliance is not for professional use. Do not use the appliance outdoors.
The appliance must be handled and installed by two or more persons-risk of injury.
Installation, including water supply (if any),electrical connections and repairs must be carried out by a qualified technician.
Once installed,packaging waste (plastic,styrofoam parts etc.) must be stored out of reach of children – risk of suffocation.
Do not use the appliance when you are wet or barefoot.
Never use steam cleaning equipement – risk of electric shock.
The packaging material is 100% recyclable and is marked with the recycle symbol
The hood can look different to that illustrated in the drawings in this booklet. The instructions for use, maintenance and
installation, however, remain the same.
Closely follow the instructions set out in this manual. All responsibility, for any eventual inconveniences, damages or fires
caused by not complying with the instructions in this manual, is declined. This appliance is intended to be used in household and
similar application such as: - staff kitchen areas in shop, offices and other working environments; - farm houses; - by clients in hotels,
motels and other residential type environments; - bed and breakfast type environments.
• It is important to conserve this booklet for consultation at any moment. In the case of sale, cession or move, make sure it is
together with the product.
• Read the instructions carefully: there is important information about installation, use and safety.
• Do not carry out electrical or mechanical variations on the product or on the discharge conduits.
• Before proceeding with the installation of the appliance verify that there are no damaged all components. Otherwise contact
your dealer and do not proceed with the installation.
The minimum distance between the supporting surface for the cooking equipment on the hob and the lowest part of the range hood
must be not less than 50cm from electric cookers and 65cm from gas or mixed cookers.
If the instructions for installation for the gas hob specify a greater distance, this must be adhered to.
ELECTRICAL CONNECTION
The mains power supply must correspond to the rating indicated on the plate situated inside the hood. If provided with a plug
connect the hood to a socket in compliance with current regulations and positioned in an accessible area, after installation. If it not
fitted with a plug (direct mains connection) or if the plug is not located in an accessible area, after installation, apply a double pole
switch in accordance with standards which assures the complete disconnection of the mains under conditions relating to over-current
category III, in accordance with installation instructions.
WARNING!
Before re-connecting the hood circuit to the mains supply and checking the efficient function, always check that the mains cable is
correctly assembled.
If the cable is not fitted with a plug, connect the wires according to the following table:
Mains voltage and frequency
Wire connection
Refer to the rating indicated on the plate inside of the hood
: yellow/green
N : blue
L : brown
Replacing the power cable
The hood is provided with a special power cable ; if the cable is damaged, request a new one from Technical Service.
AIR VENT
(for the suction versions)
Connect the hood and discharge holes on the walls with a diameter equivalent to the air outlet (connection flange).
Using the tubes and discharge holes on walls with smaller dimensions will cause a diminution of the suction performance and a
drastic increase in noise.

12
Any responsibility in the matter is therefore declined.
! Use a duct of the minimum indispensable length.
! Use a duct with as few elbows as possible (maximum elbow angle: 90°).
! Avoid drastic changes in the duct cross-section.
! The company declines any responsibility whenever these regulations are not respected.
FILTERING OR DUCTING ?
! Your cooker hood is ready to be used in suction version.
To use the hood in filtering version the special ACCESSORY KIT must be installed.
Check on the first pages of this manual if the ACCESSORY KIT is furnished or must be bought separately.
Note: If furnished, in certain cases, the additional activated carbon filtering system may be installed on the hood.
Information about the conversion of the hood from suction version to filtering version is present in this manual.
Ducting version
In this case the fumes are conveyed outside of the building by means of a special pipe connected with the connection ring located on
top of the hood.
CAUTION!
The exhausting pipe is not supplied and must be purchased apart.
Diameter of the exhausting pipe must be equal to that of the connection ring.
CAUTION!
If the hood is supplied with active charcoal filter, then it must be removed.
Filter version
The aspirated air will be degreased and deodorised before being fed back into the room.
In order to use the hood in this version, you have to install a system of additional filtering based on activated charcoal.
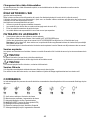
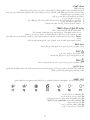
CONTROLS
The hood is fitted with a control panel with aspiration speed selection control and a light switch to control cooking area lights.
T1. Fan motor OFF / Decrease speed
T2. Fan motor ON / Increase speed
T3. Grease/charcoal filter alarm/reset
T4. 6th sense function (AUTO mode) ON/OFF
T5. Night Light (Ambient light)
T6. Main Light OFF / Decrease intensity
T7. Main light ON / Increase intensity
CAUTION! This hood has an automatic operation system (see below “T4. 6th sense function (AUTO mode) ON/OFF”). Calibration
occurs automatically each time the hood is reconnected to the electrical network (e.g.: the first time it is installed after a blackout). It
can also be performed manually (see paragraph “Sensor set up”). During calibration, which lasts for 5 minutes, T4 will flash and
lights can be used.
T1. FAN MOTOR OFF / DECREASE SPEED
Press to decrease speed and switch the extraction motor OFF.
Press and hold to directly switch the extraction motor OFF.
T2. FAN MOTOR ON / INCREASE SPEED
Press to switch the extraction motor ON and increase speed.
Press and hold to set 5th speed directly.

13
Please note: 4th and 5th speed last for 5 mins. Then the hood go back to 3rd speed.
T3. GREASE/CHARCOAL FILTER ALARM/RESET
At regular intervals, the hood signals the need to perform filter maintenance.
Please note: The indicators will only work when the hood is on.
T3 lit: Carry out maintenance on the grease filter.
T3 flashing: carry out maintenance of the charcoal filter.
Resetting the filter saturation indicators:
Please note: This must be done with the hood switched on.
Press and hold T3.
The reset of the Grease Filter and Charcoal Filter is performed using the same key. If both filters alarms are active, the reset
procedure will reset the counter one by one, with priority to the Charcoal.
Activating the carbon filter saturation indicator
Please note: This must be done with the extraction motor switched off.
This indicator is usually deactivated – press and hold T6 and T7 simultaneously to activate the function: both will light up to indicate
activation.
To deactivate the function, press and hold the same buttons again: Both will flash briefly and then switch off to indicate deactivation.
T4. 6TH SENSE FUNCTION (AUTO MODE) ON/OFF
The hood set the extraction speed automatically if the sensor in the hood detects changing on ambient conditions.
Please note: to make sure this function is used correctly first configure sensor (see “Sensor set up” below).
Please note: if you change any other functions that control the speed, the “6th sense” function will switch off.
Sensor set up
This can be done when the hood is OFF.
In normal ambient conditions press T4 for 5secs, T4 flashes for 5 mins to indicate hood is performing sensor calibration, then
switches off to indicate the calibration has ended.
Setting cooktop: Press and hold T1 and T2 simultaneously. Both lit to indicate hood is ready to accept cooktop parameter
calibration.
Press T1 to choose Gas hob (T1 starts to flash for 3 secs to indicate hood parameters are set for gas hob).
Press T2 to choose Induction hob (T2 starts to flash for 3 secs to indicate hood parameters are set for induction hob).
T5. NIGHT LIGHT (AMBIENT LIGHT)
Press to switch the soft background lighting on or off.
T6. MAIN LIGHT OFF / DECREASE INTENSITY
Press to decrease intensity and to switch OFF light.
Press and hold to directly switch OFF.
T7. MAIN LIGHT ON / INCREASE INTENSITY
Press to switch ON and to increase light intensity.
Press and hold to directly switch ON.

14
MAINTENANCE
Cleaning
Clean using ONLY a cloth dampened with neutral liquid
detergent. DO NOT CLEAN WITH TOOLS OR
INSTRUMENTS. Do not use abrasive products. DO NOT USE
ALCOHOL!
Maintenance of the anti-grease filters
Traps cooking grease particles.
This must be cleaned once a month (or when the filter
saturation indication system – if envisaged on the model in
possession – indicates this necessity) using non aggressive
detergents, either by hand or in the dishwasher, which must
be set to a low temperature and a short cycle.
When washed in a dishwasher, the grease filter may discolor
slightly, but this does not affect its filtering capacity.
To remove the grease filter, pull the spring release handle.
Maintenance of the charcoal filter
It absorbs unpleasant odors caused by cooking.
The saturation of the charcoal filter occurs after more or less
prolonged use, depending on the type of cooking and the
regularity of cleaning of the grease filter.
In any case it is necessary to replace the cartridge at least
every four mounths (or when the filter saturation indication
system – if envisaged on the model in possession – indicates
this necessity).The charcoal filter may NOT be washed or
regenerated.
Replacing lamps
The hood is equipped with a lighting system based on LED
technology.
The LEDs guarantee an optimum lighting, a duration up to 10
times longer than the traditional lamps and allow to save 90%
electrical energy.
To replace lights, contact authorised spare part center.

15
DISPOSAL
• This appliance is marked according to the European directive 2012/19/EC on Waste Electrical and Electronic Equipment (WEEE).
• By ensuring this product is disposed of correctly, you will help prevent potential negative consequences for the environment and
human health, which could otherwise be caused by inappropriate waste handling of this product.
• The symbol on the product, or on the documents accompanying the product, indicates that this appliance may not be treated
as household waste. Instead it should be taken to the appropriate collection point for the recycling of electrical and electronic
equipment. Disposal must be carried out in accordance with local environmental regulations for waste disposal.
• For further detailed information regarding the process, collection and recycling of this product, please contact the appropriate
department of your local authorities or the local department for household waste or the shop where you purchased this product.
Appliance designed, tested and manufactured according to:
• Safety: EN/IEC 60335-1; EN/IEC 60335-2-31, EN/IEC 62233.
• Performance: EN/IEC 61591; ISO 5167-1; ISO 5167-3; ISO 5168; EN/IEC 60704-1; EN/IEC 60704-2-13; EN/IEC 60704-3; ISO
3741; EN 50564; IEC 62301.
• EMC: EN 55014-1; CISPR 14-1; EN 55014-2; CISPR 14-2; EN/IEC 61000-3-2; EN/IEC 61000-3-3. Suggestions for a correct use in
order to reduce the environmental impact: Switch ON the hood at minimum speed when you start cooking and kept it running for few
minutes after cooking is finished. Increase the speed only in case of large amount of smoke and vapor and use boost speed(s) only
in extreme situations. Replace the charcoal filter(s) when necessary to maintain a good odor reduction efficiency. Clean the grease
filter(s) when necessary to maintain a good grease filter efficiency. Use the maximum diameter of the ducting system indicated in this
manual to optimize efficiency and minimize noise.
MALFUNCTIONS
If something appears not to be working properly, do the following simple checks before calling Technical Service:
• If the hood is not working:
Check that:
- The power has not been disconnected.
- A speed has been selected.
• If the hood performs inefficiently:
Check that:
- The motor speed selected is sufficient for the amount of smoke and vapours released.
- The kitchen is sufficiently ventilated to allow air intake.
- The charcoal filter is not worn (hood in filtering version).
• If the hood has turned off during normal functioning:
Check that:
- The power has not been disconnected.
- the omnipolar disconnection device has not tripped.
If the hood fails to operate correctly, briefly disconnect it from the mains power supply for almost 5 sec. Then connect it in again and
try once more before contacting the Technical Assistance Service.

16
TECHNICAL DATA
Height (cm)
Width (cm)
Depth (cm)
Ø of the exhaust tube
(cm)
110-129,5
89,8
32
15
Components not provided with the product
You can download the Safety Instructions,
User Manual, Product Fiche and Energy data
by:
• Visiting our website docs.whirlpool.eu
• Using QR Code
• Alternatively, contact our After-sales Service
(See phone number in the warranty booklet).
When contacting our After-sales Service, please
state the codes provided on your product's
identification plate.

17
BG
• Преди каквато и да било операция, свързана с почистването или поддръжката,
изключете аспиратора от ел. мрежата, като извадите щепсела от контакта или
изключите главния прекъсвач в жилището.
• При извършване на всички операции свързани с инсталирането и поддръжката,
използвайте работни ръкавици.
• Уредът може да бъде използван от деца на възраст не по-ниска от 8 години и от
лица с ограничени физически, сетивни или умствени възможности или хора без
опит или необходимите познания, но при условие че са под наблюдение или след
като са получили необходимите инструкции за безопасно използване на уреда и
свързаните с него опасности.
• Не позволявайте на децата да си играят с уреда!
• Почистването и поддръжката не трябва да се извършва от деца без набюдението
на възрастен.
• Помещението трябва да разполага с достатъчна вентилация когато аспираторът
се изпозва едновременно с други уреди на газ или друг вид гориво.
• Аспираторът трябва да се почиства често както отвътре така и отвън (ПОНЕ
ВЕДНЪЖ В МЕСЕЦА).
• Придържайте се към инструкциите посочени в наръчника за поддръжка!
• Неспазването на инструкциите за почистване на аспиратора и за подмяна и
почистване на филтрите води до риск от пожар.
• Строго забранено е приготвянето на ястия фламбе под аспиратора.
• За да подмените лампите, използвайте само тези, които са посочени в раздел
„Поддръжка/подмяна на лампите“, както е посочено в настоящия наръчник за
експлоатация.
Използването на открит пламък е вредно за филтрите и може да предизвика
пожар, затова трябва на всяка цена да се избягва.
Приготвянето на пържени храни трябва да се извършва под наблюдение, тъй като
сгорещеното олио може да се възпламени.
ВНИМАНИЕ: Когато готварският плот работи, достъпните части на аспиратора
могат да се нагорещят.
• Не свързвайте уреда към ел. мрежата докато не сте приключили окончателно с
монтажа.
• Що се отнася до техническите размери и мерките за безопасност, които трябва да предприемете за отвеждането на
димните газове навън, Ви препоръчваме да се придържате стриктно към правилата, предвидени в регламентите на
компетентните местни власти.
• Аспирираният въздух не трябва да се насочва към тръбопроводите, които се използват за отвеждане на димните газове,
отделящи се при използването на уреди работещи с газ или друг вид гориво.
• Не използвайте и не оставяйте аспиратора без правилно монтирани лампички поради евентуален риск от токов удар.
• Никога не използвайте аспиратора без правилно монтирана решетка!
• Аспираторът не трябва НИКОГА да се използва като опорен плот освен ако това не е специално указано.
• При монтажа изполвайте само фиксиращите болтове, които са доставени заедно с уреда или ако няма такива, закупете
подходящи болтове.
• Използвайте болтове с подходяща дължина, както е посочено в наръчника за инсталиране.

18
• При наличие на съмнения, моля свържете се с оторизирания сервиз за техническо обслужване или квалифициран
персонал.
ВНИМАНИЕ!
• Неисталирането на болтовете и механизмите за фиксиране в съотвествие с настоящите инструкции може да доведе
до рискове от електрическо естество.
• Не използвайте с програматор, таймер, отделно дистанционно управление или каквото и да е друго устройство,
което се активира автоматично.
Дръжте децата под 3 годишна възраст далеч от уреда. Без непрекъснато наблюдение на възрастен, съхранявайте уреда
далеч от деца на възраст под 8 години.
ВНИМАНИЕ: уредът не е предназначен да функционира чрез външно устройство или отделна система за дистанционно
управление.
Този уред не е предназначен за професионална употреба. Не използвайте уреда на открито.
За да избегнете риск от нараняване на хора, този уред трябва да бъде преместван и инсталиран от двама или повече
човека.
Инсталирането, включващо евентуални съединения за водно захранване (ако е предвидено), електрически свързвания,
и операциите, свързани с ремонт трябва да се извършват от квалифициран персонал.
Като приключи инсталирането, съхранявайте опаковъчния материал (пластмасови части, полистирол и т.н.) далеч от деца,
за да се избегне риск от задушаване. .
Не използвайте уреда, когато сте мокри или с боси крака.
Никога не използвайте парочистачки за почистване – риск от токов удар.
Опаковъчният материал се рециклира на 100% и е маркиран със символа за рециклиране
Аспираторът може да се различава външно от чертежите поместени в настоящото упътване, но независимо от това
инструкциите за употреба, поддръжката и инсталирането са абсолютно същите.
Придържайте се стриктно към тук посочените инструкции. Фирмата не носи отговорност за евентуални неизправности,
повреди или възпламеняване на уреда, възникнали в резултат на неспазване на инструкциите в настоящото упътване.
Аспираторът е проектиран за аспириране на дима и парата, които се отделят при готвене, и е предназначен само за битова
употреба.
• Съветваме Ви да съхранявате настоящото упътване за да може да го използвате във всеки един момент. При
продажба, отдаване под наем или преместване, упътването за употреба трябва да остане заедно с продукта.
• Прочетете внимателно инструкциите! Те съдържат важна информация относно инсталирането, употребата и мерките
за безопасност.
• Забранено е нанасянето на електрически или механически изменения върху продукта и върху въздуховодните тръби!
• Преди да пристъпите към инсталирането на уреда, уверете се, че няма увредени части. Ако има такива, свържете се с
търговския представител и не пристъпвайте към инсталиране.
Минималното разстояние между повърхността, на която се поставят съдовете за готвене и най-ниската част на кухненския
аспиратор, трябва да бъде не по-малко от 50cm в случай на електрически печки и не по-малко от 65cm, в случай на газови
или комбинирани печки.
Ако в инструкциите на газовия уред за готвене е посочено по-голямо разстояние, то трябва да се има предвид.
Напрежението в ел.мрежата трябва да отговаря на напрежението, което е посочено върху етикета с данните за аспиратора,
поставен от вътрешната му страна. Ако е снабден с щепсел свържете аспиратора към контакт, съответстващ на
действащите норми и намиращ се на лесно достъпно място дори и след приключване на монтажа. Ако не е снабден с
щепсел (директно свързване към мрежата), или щепселът не е на достъпно място след приключване на монтажа,
използвайте двуполюсен прекъсвач според нормите, така че да се осигури пълно изключване на мрежата при
свръхнапрежение ІІІ, в съответствие с правилата за монтиране.
ВНИМАНИЕ!
Преди да свържете отново аспиратора към мрежата и да проверите дали функционира правилно, проверете дали кабелът е
монтиран както трябва.

19
Ако кабелът не е оборудван с щепсел,свържете проводниците съгласно следната таблица:
Напрежение и честота на мрежата
Свързване на кабелите
Направете справка със стойността, посочена на етикета с
характеристики вътре в аспиратора.
: жълт/зелен
N : син
L : кафяв
Аспираторът е снабден със специален кабел за захранване; в случай, че кабелът бъде увреден обърнете се към
гаранционния сервиз за да получите нов.
(за аспирираща версия)
Свържете аспиратора към въздуховодни тръби и отвори в стената. Диаметърът на тръбите трябва да съответства на
диаметъра на съединителния фланец за отвеждане на въздуха.
Свързването към въздуховодни тръби и отвори с по-малък диаметър намалява капацитета на аспириране и увеличава
значително шума по време на работа.
В тези случаи фирмата не поема никаква отговорност.
! Използвайте тръба с необходимата дължина.
! Използвайте тръба с възможно най-малко тръбни колена (с максимален ъгъл на извивка: 90°).
! Не променяайте рязко сечението на тръбите!
! Фирмата не поема никаква отговорност в случай на неспазване на настоящите норми.
! Аспираторът е готов за употреба във вариант на аспирираща версия.
За да използвате аспиратора във вариант на филтрираща версия е необходимо да инсталирате специалния
ДОПЪЛНИТЕЛЕН КОМПЛЕКТ.
В началото на настоящия наръчник е посочено дали ДОПЪЛНИТЕЛНИЯТ КОМПЛЕКТ е доставен или трябва да бъде
закупен отделно.
Бележка: Ако комплектът е вече доставен, имайте предвид, че в някои случаи допълнителната филтрираща система
на базата на филтри с активен въглен може вече да е инсталирана върху аспиратора.
Информацията относно трансформирането на аспиратора от аспирираща във филтрираща версия се съдържа в
настоящото ръководство.
Парата се отвежда навън посредством въздуховодна тръба свързана със съединителния фланец.
ВНИМАНИЕ!
Въздуховодната тръба не е включена към аксесоарите и трябва да бъде закупена отделно.
Диаметърът на въздуховодната тръба трябва да отговаря на диаметъра на съединителния пръстен.
ВНИМАНИЕ!
Ако аспираторът е снабден с филтри с активен въглен, въпросните трябва да бъдат отстранени.
Аспирираният въздух се пречиства и освежава преди да влезе отново в обръщение в помещението. За да използвате
аспиратора в този вариант на работа трябва да инсталирате допълнителна филтрираща система на базата на филтри с
активен въглен.

20
Аспираторът е снабден с командно табло с възможност за регулиране скоростта на аспириране и превключвател на
осветлението на готварския плот.
T1. ИЗКЛ. на мотора на вентилатора / Намаляване на скоростта
T2. ВКЛ. на мотора на вентилатора / Увеличаване на скоростта
T3. Нулиране на алармата за филтъра за мазнини/ филтъра с активен въглен
T4. ВКЛ./ИЗКЛ. на функцията 6th sense (режим AUTO)
T5. Нощно осветление (амбиентно осветление)
T6. ИЗКЛ. на основното осветление / Намаляване на интензитета
T7. ВКЛ. на основното осветление / Увеличаване на интензитета
ВНИМАНИЕ! Този аспиратор разполага със система за автоматична работа (вижте по-долу “T4. ВКЛ./ИЗКЛ. на функцията
6th sense (режим AUTO)”). Калибрирането се извършва автоматично всеки път когато аспираторът бъде свързан отново
към електрическата мрежа (напр.: при първоначалния монтаж или спиране на захранването).
Калибрирането може също така да се извърши автоматично (вижте раздел “Настройване на датчика”). По време на
калибрирането, което трае 5 минути, T4 ще премигва и осветлението може да се използва.
T1. ИЗКЛ. НА МОТОРА НА ВЕНТИЛАТОРА / НАМАЛЯВАНЕ НА СКОРОСТТА
Натиснете, за да намалите скоростта и да изключите мотора за екстракция.
Натиснете и задръжте, за да изключите директно мотора за екстракция.
T2. ВКЛ. НА МОТОРА НА ВЕНТИЛАТОРА / УВЕЛИЧАВАНЕ НА СКОРОСТТА
Натиснете, за да включите мотора за екстракция и за да увеличите скоростта. натиснете и задръжте, за да зададете
директно 5а скорост.
Моля, имайте предвид: 4та и 5а скорост работят за най-много 5 минути, след което аспираторът се връща на 3та скорост.
T3. НУЛИРАНЕ НА АЛАРМАТА ЗА ФИЛТЪРА ЗА МАЗНИНИ/ ФИЛТЪРА С АКТИВЕН ВЪГЛЕН
На равни интервали от време аспираторът сигнализира за нужда от обслужване на филтъра.
Моля, имайте предвид: Индикаторите ще работят само ако аспираторът е включен.
T3 свети: Извършете обслужване на филтъра за мазнини.
T3 премигва: необходимо е обслужване на филтъра с активен въглен.
Нулиране на индикаторите за насищане на филтрите:
Моля, имайте предвид: Този процес се извършва само при работещ аспиратор.
Натиснете и задръжте T3.
Нулирането на филтъра за мазнини и на филтъра с активен въглен се извършва с един и същи бутон. Ако алармите и на
двата филтъра са активни, процедурата по нулиране ще извърши нулиране на броячите един по един, с предимство
зафилтъра с активен въглен.
Активиране на индикатора за насищане на въгленовия филтър
Моля, имайте предвид: Този процес се извършва само при изключен мотор за екстракция.
Обикновено този индикатор е деактивиран – натиснете едновременно и задръжте бутони T6 и T7, за да активирате
функцията: И двата ще светнат, за да потвърдят активирането.
За да деактивирате функцията, отново натиснете и задръжте същите бутони: И двата ще премигнат еднократно и ще
изгаснат, което потвърждава деактивирането.
T4. ВКЛ./ИЗКЛ. НА ФУНКЦИЯТА 6TH SENSE (РЕЖИМ AUTO)
Аспираторът задава автоматично скоростта на екстракция, ако датчикът засече промяна в заобикалящите го условия.
Моля, имайте предвид: за да сте сигурни, че функцията се използва правилно, първо конфигурирайте датчика (вижте
“Настройване на датчика” по-надолу).
Моля, имайте предвид: ако промените някоя от останалите функции, които управляват скоростта, функцията “6th sense” ще
се изключи.
Seite laden ...
Seite laden ...
Seite laden ...
Seite laden ...
Seite laden ...
Seite laden ...
Seite laden ...
Seite laden ...
Seite laden ...
Seite laden ...
Seite laden ...
Seite laden ...
Seite laden ...
Seite laden ...
Seite laden ...
Seite laden ...
Seite laden ...
Seite laden ...
Seite laden ...
Seite laden ...
Seite laden ...
Seite laden ...
Seite laden ...
Seite laden ...
Seite laden ...
Seite laden ...
Seite laden ...
Seite laden ...
Seite laden ...
Seite laden ...
Seite laden ...
Seite laden ...
Seite laden ...
Seite laden ...
Seite laden ...
Seite laden ...
Seite laden ...
Seite laden ...
Seite laden ...
Seite laden ...
Seite laden ...
Seite laden ...
Seite laden ...
Seite laden ...
Seite laden ...
Seite laden ...
Seite laden ...
Seite laden ...
Seite laden ...
Seite laden ...
Seite laden ...
Seite laden ...
Seite laden ...
Seite laden ...
Seite laden ...
Seite laden ...
Seite laden ...
Seite laden ...
Seite laden ...
Seite laden ...
Seite laden ...
Seite laden ...
Seite laden ...
Seite laden ...
Seite laden ...
Seite laden ...
Seite laden ...
Seite laden ...
Seite laden ...
Seite laden ...
Seite laden ...
Seite laden ...
Seite laden ...
Seite laden ...
Seite laden ...
Seite laden ...
Seite laden ...
Seite laden ...
Seite laden ...
Seite laden ...
Seite laden ...
Seite laden ...
Seite laden ...
Seite laden ...
Seite laden ...
Seite laden ...
Seite laden ...
Seite laden ...
Seite laden ...
Seite laden ...
Seite laden ...
Seite laden ...
Seite laden ...
Seite laden ...
Seite laden ...
Seite laden ...
Seite laden ...
Seite laden ...
Seite laden ...
Seite laden ...
Seite laden ...
Seite laden ...
Seite laden ...
Seite laden ...
Seite laden ...
Seite laden ...
Seite laden ...
Seite laden ...
Seite laden ...
Seite laden ...
Seite laden ...
Seite laden ...
Seite laden ...
Seite laden ...
Seite laden ...
Seite laden ...
Seite laden ...
Seite laden ...
Seite laden ...
Seite laden ...
Seite laden ...
Seite laden ...
Seite laden ...
Seite laden ...
Seite laden ...
Seite laden ...
Seite laden ...
Seite laden ...
-
 1
1
-
 2
2
-
 3
3
-
 4
4
-
 5
5
-
 6
6
-
 7
7
-
 8
8
-
 9
9
-
 10
10
-
 11
11
-
 12
12
-
 13
13
-
 14
14
-
 15
15
-
 16
16
-
 17
17
-
 18
18
-
 19
19
-
 20
20
-
 21
21
-
 22
22
-
 23
23
-
 24
24
-
 25
25
-
 26
26
-
 27
27
-
 28
28
-
 29
29
-
 30
30
-
 31
31
-
 32
32
-
 33
33
-
 34
34
-
 35
35
-
 36
36
-
 37
37
-
 38
38
-
 39
39
-
 40
40
-
 41
41
-
 42
42
-
 43
43
-
 44
44
-
 45
45
-
 46
46
-
 47
47
-
 48
48
-
 49
49
-
 50
50
-
 51
51
-
 52
52
-
 53
53
-
 54
54
-
 55
55
-
 56
56
-
 57
57
-
 58
58
-
 59
59
-
 60
60
-
 61
61
-
 62
62
-
 63
63
-
 64
64
-
 65
65
-
 66
66
-
 67
67
-
 68
68
-
 69
69
-
 70
70
-
 71
71
-
 72
72
-
 73
73
-
 74
74
-
 75
75
-
 76
76
-
 77
77
-
 78
78
-
 79
79
-
 80
80
-
 81
81
-
 82
82
-
 83
83
-
 84
84
-
 85
85
-
 86
86
-
 87
87
-
 88
88
-
 89
89
-
 90
90
-
 91
91
-
 92
92
-
 93
93
-
 94
94
-
 95
95
-
 96
96
-
 97
97
-
 98
98
-
 99
99
-
 100
100
-
 101
101
-
 102
102
-
 103
103
-
 104
104
-
 105
105
-
 106
106
-
 107
107
-
 108
108
-
 109
109
-
 110
110
-
 111
111
-
 112
112
-
 113
113
-
 114
114
-
 115
115
-
 116
116
-
 117
117
-
 118
118
-
 119
119
-
 120
120
-
 121
121
-
 122
122
-
 123
123
-
 124
124
-
 125
125
-
 126
126
-
 127
127
-
 128
128
-
 129
129
-
 130
130
-
 131
131
-
 132
132
-
 133
133
-
 134
134
-
 135
135
-
 136
136
-
 137
137
-
 138
138
-
 139
139
-
 140
140
-
 141
141
-
 142
142
-
 143
143
-
 144
144
-
 145
145
-
 146
146
-
 147
147
-
 148
148


Whirlpool WHSS 62F LT K Benutzerhandbuch
- Kategorie
- Dunstabzugshauben
- Typ
- Benutzerhandbuch
Verwandte Papiere
-
Whirlpool WHBS 62F LT K Benutzerhandbuch
-
-
-
Whirlpool WVS 93F LT K Benutzerhandbuch
-
Whirlpool WHSS 92F LT K Bedienungsanleitung
-
Whirlpool WHSS 90F TS K Benutzerhandbuch
-
-
HOTPOINT/ARISTON HAHTT 64 X Benutzerhandbuch
-
Whirlpool WHC 63 F LB X Benutzerhandbuch
-