TEAC ShowMe Benutzerhandbuch
- Kategorie
- Digitale Bilderrahmen
- Typ
- Benutzerhandbuch

– 1 –
ShowMe
Digital Media Player
Digital Media Player
Digital Media Player
Digital Media Player
Digital Media Player
Öèôðîâîé ìåäèà-ïëååð
Pøehrávaè
Digital Media Player
Handbuch
User’s Manual
Manuel
Manuale
Manual
Ðóêîâîäñòâî ê ýêñïëóàòàöèè
Pøíruèka uivatele
®
Windows and Macintosh
Für eine reibungslose Garantieabwicklung notieren Sie sich bitte hier die Seriennummer des Laufwerks. Im Garantiefall
senden Sie sie mit Ihrer Garantiekarte und einer Rechnungskopie an die nächste TEAC Niederlassung.
To ensure the smooth handling of your warranty please write the serial number of your drive into the box. In the case of
warranty you are expected to send it together with a copy of your invoice to your nearest TEAC sales representative.
Afin de nous permettre de régler sans problème les formalités de garantie, nous vous prions de noter ici le numéro de
série du mécanisme d’entraînement. Dans un cas de garantie, nous vous prions d’envoyer la carte de garantie et une
copie de la facture à la prochaine succursale de TEAC.
Per non avere problemi di sorta in caso di ricorso alla garanzia, si annoti per favore il numero di serie del drive. In caso
di ricorso alla garanzia, spedisca la Sua scheda di garanzia ed una copia della fattura alla più vicina filiale TEAC.
Para una tramitación sin problemas de la garantía, anote por favor aquí el número de serie de la unidad de disco. En
caso de garantía, envíelo con la tarjeta de garantía y una copia de la factura a la delegación de TEAC más próxima.
Para que a garantia possa ser aplicada sem problemas, tome nota no manual do número de série da unidade. Caso
seja necessário utilizar a garantia, envie-a para o agente autorizado TEAC mais próximo, juntamente com o respectivo
certificado de garantia e uma cópia do talão de compra.
Äëÿ îáåñïå÷åíèÿ îïòèìàëüíîãî ãàðàíòèéíîãî îáñëóæèâàíèÿ óáåäèòåëüíàÿ ïðîñüáà çàïîìíèòü ñåðèéíûé íîìåð
êóïëåííîãî Âàìè óñòðîéñòâà.  ñëó÷àå íåîáõîäèìîñòè ãàðàíòèéíîãî ðåìîíòà ïðèñûëàéòå åãî âìåñòå ñ
ãàðàíòèéíûì òàëîíîì è êîïèåé êâèòàíöèè îá óïëàòå èëè ñ÷¸òà â áëèæàéøåå àãåíñòâî TEAC.
Aby umo¿liwiæ bezproblemow¹ realizacjê roszczeñ gwarancyjnych, prosimy o zapisanie tutaj numeru seryjnego napêdu.
W przypadku reklamacji gwarancyjnej nale¿y przes³aæ ten numer razem z kart¹ gwarancyjn¹ i kopi¹ rachunku do
najbli¿szego oddzia³u TEAC.
Kvùli bezproblémovému vyøízení záruky si zde prosím poznamenejte sériové èíslo pøístroje. Pøi nárokování záruky jej
zalete se svým záruèním listem a kopií faktury do nejblií poboèky firmy TEAC.

– 2 –
• Alle in diesem Druckwerk mitgeteilten Daten, Merkmale und Beschreibungen können sich jederzeit und ohne besondere Ankündigung ändern.
• Alle enthaltenen Firmennamen und Produktbezeichnungen sind Warenzeichen der jeweiligen Inhaber. Alle Rechte vorbehalten.
• Changes in specifications and features may be made without notice or obligation.
• Company and product names provided herein are trademarks of their respective companies.
Copyright © 2004, TEAC Corporation. All rights reserved. Edition: December 2004
• Toutes les informations données dans ce manuel peuvent être modifiées à tout moment sans avis spécial.
• Toute raison sociale et désignation de produit constitue une marque de fabrique du propriétaire respectif.
• Tutti i marchi ed i nomi commerciali costituiscono i marchi di fabbrica dell’attuale proprietario.
• Tutte le informazioni contenute nel presente manuale istruzioni possono essere modificate in qualsiasi momento senza preavviso.
• Todos los datos de este manual, características y descripciones pueden modificarse en cualquier momento y sin previo aviso.
• Todos los nombres de empresas y denominaciones de productos contenidos aquí son marca registrada del propietario correspondiente.
• Todos os nomes comerciais e designações de produtos aqui incluídos são marcas registadas dos respectivos titulares.
• Todos os dados, características e descrições apresentados no presente impresso podem ser alterados em qualquer momento e sem aviso
prévio.
• Âñÿ èíôîðìàöèÿ ñîäåðæàùàÿñÿ â íàñòîÿùåì äîêóìåíòå, ìîæåò â ëþáîå âðåìÿ ïðèòåðïåòü èçâåñòíûå èçìåíåíèÿ áåç ñïåöèàëüíîãî
ïðåäóïðåæäåíèÿ.
• Âñå ñîäåðæàùèåñÿ â íàñòîÿùåì äîêóìåíòå íàçâàíèÿ ôèðì è èçäåëèé ÿâëÿþòñÿ òîâàðíûì çíàêîì âëàäåëüöåâ.
• Wszystkie dane zawarte w tym podrêczniku, w³aciwoci i opisy mog¹ ulec zmianie w dowolnym momencie i bez stosownego uprzedzenia.
• Wszystkie podane tu nazwy firm i produktów s¹ znakami towarowymi ka¿dego z w³acicieli. Wszelkie prawa zastrze¿one.
• Vechny údaje, znaky a popisy uvedené v této tiskovinì se mohou kdykoli a bez zvlátního oznámení zmìnit.
• Vechny zde uvedené názvy firem a oznaèení výrobkù jsou ochrannými známkami pøísluných majitelù. Vechna práva vyhrazena.

– 3 –
Á
Â
Ã
À
Ä
Ä
Å Æ Ç È É

– 4 –
DEUTSCH
Einführung
Mit dem TEAC ShowMe haben Sie sich für einen Digital Media Player der Extraklasse entschieden. Mit Ihrem Fernsehgerät, einem Beamer oder einem
Monitor betrachten Sie Bilder und Videos und hören Musik im gemütlichen Ambiente Ihrer Wohnräume – völlig ohne PC. Das TEAC ShowMe arbeitet mit
sieben verschiedenen Speicherkarten und einer USB2.0-Festplatte. Mit dem TEAC ShowMe lassen sich alle gängigen Video-, Foto- und Audioformate
wiedergeben.
Lieferumfang
TEAC ShowMe Digital Media Player, Netzteil, VGA-Kabel, SVHS-Kabel, Audiokabel, USB-Kabel, Fernbedienung, Festplatteneinheit, CD, dieses Hand-
buch
Inbetriebnahme
Stecken Sie die Festplatteneinheit in den dafür vorgesehenen Steckplatz (Ä). Schließen Sie mit den entsprechenden Video- und Audiokabeln einen
Fernseher ( und ), Beamer (É) oder Monitor (È) und anschließend das Netzteil (Ç) an. Nach dem Einschalten (Å) und anschließendem Einstellen des
Videomodus ist das Gerät betriebsbereit.
Videomodus einstellen (Video Mode)
Mit dieser Option muß das Video-Ausgangssignal an die Norm des Ausgabegeräts angepaßt werden. Standardmäßig ist AV/S eingestellt. Bei der ersten
Inbetriebnahme müssen Sie deshalb gegebenenfalls die Taste Video Mode so oft betätigen, bis Sie ein stabiles Bild sehen. Folgende Modi werden
nacheinander angewählt:
AV/S Videosignal an AV und SVHS
COMPOSITE TV-konformes Farbvideosignal (Halbbildverfahren, interlaced)
P-SCAN YBPR Farbvideosignal Vollbildverfahren
VGA Videosignal für Monitore an DSUB-Buchse
Die Bedienelemente
Die Fernbedienung ( )
Power Ein-/Ausschalter
Music Slide Während des Betrachtens von Fotos können Musikstü-
cke gespielt werden.
Mute Stummschaltung
Setup erlaubt verschiedene Einstellungen.
Video Mode dient zum Einstellen des Ausgabegeräts (Fernsehgerät/
Beamer/Monitor).
Repeat Wiederholtes Wiedergeben von Videos und/oder
Musikstücken
Volume 56 Lautstärkeeinstellung lauter/leiser
Photo Betrachten von Fotos im direkten Modus
Music Musikstücke abspielen im direkten Modus
Video Videos ansehen im direkten Modus
File Zugriff auf Dateien
Memory Device zeigt die eingesteckten Medien an.
Up v/Down
^
Cursor auf/ab für Menüauswahl
Previous < vorheriges Anwählen
Next > nächstes Anwählen
Play/Enter 4 Wiedergabe starten/Anwahl bestätigen
Display zeigt das aktuelle Arbeitsmedium an, ermöglicht das
Umschalten zwischen Musikbibliothek und Equalizer.
Stop hält die Wiedergabe an.
Zoom ein-/auszoomen für Fotos
Pause vorübergehend anhalten
Rotate Fotos um je 90 Grad drehen
FF/FR 87 schneller Vor-/Rücklauf
Previous 9 vorheriges Video/Musikstück
Next : nächstes Video/Musikstück
EQ/Transition EQ: Einstellen der Klangcharakteristik, Transition:
Bildübergang zwischen Fotos einstellen
Die Bedienelemente
Rückseite:
Å ON/OFF Ein-/Ausschalter
Æ NTSC/PAL Umschalter PAL/NTSC
Ç 5V DC Netzteilanschluß
È VGA Port Anschluß für PC Monitor
É S-Video SVHS-Ausgang
Video Ausgang Videosignal
Stereo out Ausgang Tonsignal
Oberseite:
À Joystick dient zum Navigieren durch Menüs.
Á Home Rücksprung in das Grundmenü.
 Setup erlaubt verschiedene Einstellungen.
à Stop hält die Wiedergabe an.
Ä Steckplatz Hier wird die Festplatte eingesteckt.
Vorderseite:
Links Steckplatz für SD/MMC/MS/MD/SM Karten
Rechts Steckplatz für Compact Flash Karten
Festplatteneinheit
Die Festplatte wird zum Abspielen von Videos und Musik sowie dem Betrachten von Fotos in das TEAC ShowMe eingesteckt. Über die im Festplatten-
gehäuse integrierte USB2.0-Schnittstelle lassen sich die entsprechenden Dateien auf die Festplatte kopieren. Dazu wird die Festplatte am TEAC ShowMe
abgesteckt und mit dem mitgelieferten USB-Kabel mit einem PC verbunden. Die Stromversorgung erfolgt über die USB2.0-Schnittstelle. Auf der Vorderseite
befindet sich eine LED , die Zugriffe anzeigt, während die Festplatte am PC angeschlossen ist. Auf der gleichen Seite befinden sich der USB2.0-
Steckverbinder und der Anschluß an das TEAC ShowMe. Nach dem Kopieren der Dateien wird die Festplatte am TEAC ShowMe wieder eingesteckt. Bitte
schalten Sie dazu das Gerät ab und anschließend wieder ein.
Die Bedienmenüs
Nach dem Einschalten bzw. durch Drücken der Taste Home bzw. Memory Device gelangen Sie ins Grundmenü. Danach bewegen Sie sich mit den Tasten
der Fernbedienung oder dem Joystick durch die Menüs. Mit Enter (Taste 4 an der Fernbedienung/senkrecht betätigter Joystick am Player) wird die
gewählte Menüoption aufgerufen.
Anzeigen von eingesteckten Medien (Memory Device)
Ist mehr als ein Medium eingesteckt, werden die verfügbaren Medien zur Auswahl angeboten. Ist nur ein Speichermedium eingesteckt, wird das nächste
Menü (Photo, Music, Video, File) direkt angezeigt.

– 5 –
Fotomodus (Photo Mode)
Der Fotomodus unterstützt das Format JPEG und bietet folgende Optionen an: Anzeigen von Vorschaubildern, Vollbildschirmanzeige durch Anklicken des
Vorschaubilds, Rotate (Fotos in 90° Schritten drehen), Zoom (Zoombereich einstellen), Music Slide (Musikwiedergabe während des Betrachtens von
Fotos), Display (zeigt Informationen über das aktive Medium an), 13 Transition Modes (Auswahl unter 13 verschiedenen Überblendmodi):
Full Screen Vollbildanzeige
TopàBottom von oben nach unten überblenden
BottomàTop von unten nach oben überblenden
T/BàCenter von oben und unten zur Mitte hin überblenden
CenteràT/B von der Mitte nach oben und unten hin überblenden
Blind:TàB Rolloeffekt von oben nach unten
LeftàRight von links nach rechts überblenden
RightàLeft von rechts nach links überblenden
L/RàCenter von links und rechts zur Mitte hin überblenden
CenteràL/R von der Mitte nach links und rechts hin überblenden
Implode von allen Seiten zur Mitte hin überblenden
Blind: LàR Rolloeffekt von links nach rechts
Random Überblendeffekt wird unter den obigen 12 zufällig ausgewählt
Musikmodus (Music)
Der Digital Media Player unterstützt die Audioformate MP3 und WMA. Der Musikmodus bietet folgende Optionen an:
Music Library Wird Music angewählt, erscheint eine Liste mit den Musiktiteln. Nun beginnt die Wiedergabe.
Music Equalizer Einstellen der Klangcharakteristik mit der Taste EQualizer (Standard, Jazz, Klassik, Pop, Ballade, Rock und Tanz). Mit der Taste Display
läßt sich die Equalizerkennlinie betrachten.
Music Slide Diashow mit Musikbegleitung
Repeat Einstellen des Wiederholmodus (One, All, Off = Eines, Alle, Aus)
Mit den Tasten Previous und Next wählen Sie den vorherigen/nächsten Titel, mit Pause halten Sie die Musik an.
Videowiedergabe (Video)
Der Player unterstützt die Formate VCD, DVD, Motion JPEG und MPEG4. Nach dem Einstellen des gewünschten Speichermediums kann das Video
anhand von Vorschaubildern ausgewählt werden. Die Funktionen (schneller Vor-/Rücklauf FF/FR (max. 8X), Play (Wiedergabe), Pause, Stop) entspre-
chen herkömmlichen Videorecordern. Der Videomodus bietet die folgenden Optionen: Vorschaubilder für die vorhandenen Videos, Vollbildwiedergabe
durch Anklicken des gewünschten Vorschaubilds, Display (zeigt Informationen über das aktive Medium an).
Anzeige von Dateien (File)
Der Player bietet eine ähnliche Dateifunktion wie der Windows Explorer. Dies ermöglicht das Untersuchen und Verwalten des Dateisystems auf den
Medien.
Einstellungen (Setup ()
Der Player läßt sich auf die von Ihnen bevorzugten Einstellungen konfigurieren (Standardeinstellungen in Fettdruck).
Setup-Menü Verfügbare Optionen Einstellungen Beschreibung
Photo Setup Thumbnail Digest On/Off Vorschaubilder ein/aus
Transition Mode Fast/Normal/Slow schnell/normal/langsam überblenden
Orientation Defaults/Ignore Bildlageeinstellung
Music Setup Repeat Mode One/All/Off Wiederholmodus für Musikstücke (eines/alle/aus)
Photo Slideshow Slide Show Mode Manual/Auto bei Diaschau Fotos manuell oder automatisch weiterschalten
Intervall Time 1/3/5/10 seconds Einstellen der Betrachtungsdauer (3 Sekunden)
Movie Setup Intervall Time Fast/Normal Bildwiederholrate (schnell/normal)
Repeat Mode Off/One/All Wiederholmodus für Videos (aus/eines/alle)
Auto-Start Setup Photo/Music/Video/Off beim Einschalten gesetzter Startmodus (aus)
Preferences Video Output AV/S-Video/COMPOSITE/
P-SCAN YBPR/VGA Videomodus
OSD-Messages On/Off OnScreenDisplay Mitteilungen an/aus
Default Reset Standardwerte setzen
Spezifikation
Unterstützte Formate Video: MPEG1, MPEG2, MPEG4, Motion JPEG; Audio: MP3, WMA; Foto: JPEG
Unterstützte CF1/CF2, MD, MMC, MS, SD, SM, USB2.0-Festplatte ab 30 GB, weitere Kapazitäten sind verfügbar, die zutreffende Angabe ist
Speichermedien auf der Verpackung zu finden
Ausgänge Video: TV (PAL/NTSC), Composite Video, S-VHS, YUV (optional); Audio: Stereoausgang
Betriebssystem Windows 98SE/ME/2000/XP, Mac OS 10.2 oder höher
OSD-Sprache Englisch
Netzteil Eingang: AC 110V..240V, 50Hz..60Hz, Ausgang: DC +5V, 1,4A max.
Leistungsaufnahme 7W
Abmessungen 162 x 114 x 29 mm; mit eingesteckter Festplatte: 162 x 114 x 133 mm
Gewicht ca. 250g (mit Festplatte)
Sicherheitstandards CE
Wichtige Hinweise
•
Der Player erkennt nur die erste Ihrer Festplatten. Speichern Sie deshalb die auf die Festplatte zu übertragenden Daten in der ersten Partition (auf dem
ersten Laufwerk, normalerweise C:\).
•
Stellen Sie unbedingt für die optimale Wiedergabe über ein Fernsehgerät die korrekte Norm (PAL/NTSC (Æ)) ein.
•
Die Festplatte unterstützt Hot-Plug nicht. Sie darf deshalb nur bei ausgeschaltetem Player an- und abgesteckt werden.
•
Der Player unterstützt für Speicherkarten Hot-Plug. Zum Ein-/Ausstecken muß der Player nicht ausgeschaltet werden.
DEUTSCH

– 6 –
ENGLISH
Introduction
By choosing the TEAC ShowMe you purchased a superior digital media player. Without a PC you can view pictures and videos and listen to music with your
TV set, projector, or monitor in the comfortable surroundings of your living room. The TEAC ShowMe can handle up to seven different memory cards and
uses an USB2.0 hard disk. The TEAC ShowMe is able to reproduce all commonly used video, photo and audio formats.
Package Contents
TEAC ShowMe Digital Media Player, AC Adapter, AV Cable, S-Video Cable, Audio Cable, USB Cable, Remote Control, Hard Disk Unit, CD, this Manual
Setup
Insert the hard disk unit into the respective slot (Ä). Connect to a TV set ( and ), projector (É), or monitor (È) using the appropriate video and audio
cables and connect the power supply (Ç). After switching on (Å) followed by setting the video mode the unit is ready to use.
Searching for the Appropriate Video Mode
This option must be used to adopt the video output signal to the standard of the output device. AV/S is factory preset. On first use it can be necessary to
press the button Video Mode repeatedly until you can see a steady picture. The following modes are available in the shown order:
AV/S Works on both AV and S-Video output
COMPOSITE Chromatic aberration (Interlaced)
P-SCAN YBPR Chromatic aberration (Continuous scanning)
VGA ViGeneral DSUB output
The Controls
Remote Control ( )
Power Power on and off
Music Slide Playing music and photo slide at the same time
Mute Stop all noises
Setup Various setup configurations
Video Mode Search for the appropriate output for different output
devices (LCD, monitor, TV)
Repeat Repeat songs or movies
Volume 56 Adjust the level of volume, louder/smaller
Photo Direct mode to photo viewing
Music Direct mode to music
Video Direct mode to video
File File directory
Memory Device Shows how many output devices are inserted
Up v/Down
^
Use them to select items during setup
Previous
< To select the previous item
Next > To select the next item
Play/Enter 4 Confirm playing music or video, or confirm setup
Display Allows you to check on the information of playing
media; to switch from Music Library to Equalizer
Stop Stop the music, video or photo sliding
Zoom To have a larger view of photos
Pause Stop for a while
Rotate Rotate photos to various 90 angles
FF/FR 87 Fast Forward and Fast Rewind for music and video
Previous 9 For previous song or previous movie clip
Next : For next song or next movie clip
EQ/Transition EQ: Changing the Music EQ mode Transition: switching
the slideshow mode
Controls on the device
Cover:
À Joystick navigating through the menus
Á Home return to main menu
 Setup used to specify various settings
à Stop stops playback
Ä Slot used to insert the hard disk
Front panel:
Left SD/MMC/MS/MD/SM card slot
Right Compact Flash card slot
Rear panel:
Å ON/OFF on/off switch
Æ NTSC/PAL toggle between PAL/NTSC
Ç 5V DC power supply connector
È VGA Port PC monitor connector
É S-Video SVHS connector
Video video signal output connector
Stereo out audio signal output connector
Hard Disk
The hard disk is inserted into the TEAC ShowMe to view videos and pictures and to listen to music. Respective data files are copied to the hard disk via the
integrated USB2.0 interface. The hard disk is disconnected from the TEAC ShowMe and connected to a PC with the supplied USB cable. Power is supplied
via the USB2.0 interface. The front side LED shows accesses while the hard disk is connected to a PC. The USB2.0 connector and the TEAC ShowMe
connector are located on the same side. After the files have been copied the hard disk is re-connected to the TEAC ShowMe. Please ensure the unit is
switched off while re-connecting.
The Menus
After switching on or pressing the keys Home or Memory Device you will reach the main menu. Then you can navigate through the menus with the buttons
of the remote control or the joystick. Enter (button 4on the remote control or pushing straight down the knob of the joystick on the player) selects the menu
option.
Choosing Displaying Devices (Memory Device)
If more than one medium is inserted the available media are shown and can be selected. If only one medium is inserted the next menu options (Photo,
Music, Video, File) are shown.

– 7 –
ENGLISH
Photo Mode
In the mode Photo the JPEG format is supported. Select one of the following options: pre-view pictures, full screen display by clicking on the preview picture,
Rotate (rotate photos in steps of 90 degrees), Zoom (set the zoom area), Music Slide (listening music while viewing pictures), Display (shows informa-
tions about the active medium), 13 Transition Modes (select one of 13 transition modes):
Full Screen Picture occupy the whole screen
TopàBottom Expand from top to bottom
BottomàTop Expand from bottom to top
T/BàCenter Compress from top and bottom to center
CenteràT/B Decompress from center to top and bottom
Blind:TàB Like a blind, the picture will be showed from top to bottom
LeftàRight Expand from left to right
RightàLeft Expand from right to left
L/RàCenter Compress from left and right to center
CenteràL/R Decompress from center to left and right
Implode The picture will implode to the center
Blind: LàR Like a blind, the picture will be expanded from left to right
Random Pictures will be showed in a random way with 12 transitions provided
Music Mode
The Digital Media Player supports the audio formats MP3 and WMA. The Music mode offers the following options:
Music Library After selecting Music, you will see the music library. The music will start playing now.
Music Equalizer set the sound type with the EQualizer button (Standard, Jazz, Classic, Pop, Ballads, Rock and Dance). Display allows to see the filter
curve of the equalizer.
Music Slide Slide show accompanied with music
Repeat Set the repeat mode (One, All, Off)
With the buttons Previous and Next you go to the previous/next music title, with Pause you stop the playback temporarily.
Video Mode
The player supports several formats: VCD, DVD, Motion JPEG, and MPEG4. After the desired media is selected the video can be choosen aided by the
preview pictures. The functions (Fast Forward/Fast Reverse (FF/FR) (max. 8X), Play (playback), Pause, Stop) are similar to those of the commonly known
video recorders. The video mode offers the following options: video pre-view pictures, full screen display by clicking on a preview picture, Display (shows
informations about the active medium).
File Directory
The player offers a similar file directory function as Windows. You may manage or view the files in your memory device.
Setup (
The player can be pre-set to your preferred settings (factory presets are printed bold).
Setup Menu Setup Item Setup Setting
Photo Setup Thumbnail Digest On/Off
Transition Mode Fast/Normal/Slow
Orientation Defaults/Ignore
Music Setup Repeat Mode One/All/Off
Photo Slideshow Slide Show Mode Manual/Auto
Intervall Time 1/3/5/10 seconds
Movie Setup Intervall Time Fast/Normal
Repeat Mode Off/One/All
Auto-Start Setup Photo/Music/Video/Off
Preferences Video Output AV/S-Video/COMPOSITE/P-SCAN YBPR/VGA
OSD-Messages On/Off
Default Reset
Spezification
Supported Formats Video: MPEG1, MPEG2, MPEG4, Motion JPEG; Audio: MP3, WMA; Photo: JPEG
Supported Devices CF1/CF2, MD, MMC, MS, SD, SM, USB2.0-HDD with 30GB or higher, further capacities are available, please refer to the values
on the packaging
Output Video: TV (PAL/NTSC), Composite Video, S-Video, YUV (optional); Audio: stereo
Operating System Windows 98SE/ME/2000/XP, Mac OS 10.2 or higher
OSD language English
Power Adapter Input: AC 110V..240V, 50Hz..60Hz, Output: DC +5V, 1.4A max.
Power Consumption 7W
Dimensions 162 x 114 x 29 mm; HDD enclosure plug-in: 162 x 114 x 133 mm
Weight app. 250g (HDD enclosure included)
Safety Standards CE
Important Notes
•
The player can only detect first disk. Therefore, it is strongly recommended to save your information in the first partition of your hard disk (on the first drive,
usually C:\).
•
It is a must to set the corresponding standard (PAL/NTSC(Æ)) to ensure optimized reproduction with a TV set.
•
Hot plugging is not supported for HDD enclosure. Re- and dis-connecting is therefore allowed only if power is switched off.
•
Hot plugging is supported for memory cards only. It is not necessary to switch off the player while inserting or removing memory cards.

– 8 –
FRANÇAIS
Introduction
Avec le TEAC ShowMe, vous avez opté pour un Digital Media Player haut de gamme. Avec votre appareil de télévision, un projecteur ou un monitor, vous
contemplez les photographies et les vidéos et vous écoutez de la musique dans l’ambiance détendue de quatre murs – absolument sans PC. Le TEAC ShowMe
fonctionne avec sept cartes mémoire différentes et un disque dur USB2.0. Le TEAC ShowMe permet de reproduire tous les formats usuels vidéo, audio et
photographiques.
Etendue de la livraison
TEAC ShowMe Digital Media Player, alimentation, câble VGA, câble SVHS, câble audio, câble USB, télécommande, unité de disque dur, CD, ce manuel
Mise en service
Branchez l’unité de disque dur dans l’emplacement enfichable prévu à cet effet (Ä). Raccordez avec les câbles vidéo et audio correspondants ( et ), une
télévision, un projecteur (É) ou un monitor (È) et l’alimentation (Ç) pour finir. L’appareil est prêt à fonctionner après l’enclenchement (Å), suivi du réglage du
mode vidéo.
Réglage du mode vidéo
Avec cette option, le signal de sortie vidéo doit être adapté à la norme de l’appareil d’édition. Le mode AV/S est ajusté en standard. C’est pourquoi vous devez,
le cas échéant, appuyer sur la touche Video Mode lors de la première mise en service, jusqu’à ce que vous aperceviez une image stable. Les modes suivants
sont sélectionnés l’un après l’autre :
AV/S signal vidéo à AV et SVHS
COMPOSITE signal vidéo couleur conforme TV (procédé demi-écran, interlaced)
P-SCAN YBPR signal vidéo couleur procédé plein écran
VGA signal vidéo pour les monitors à la prise DSUB
Eléments de commande
Télécommande ( )
Power Bouton de mise sous et hors tension
Music Slide Il est possible d’écouter des airs de musique pendant
la contemplation des photos.
Mute Commutation sur muet
Setup Permet divers réglages.
Video Mode Sert à ajuster l’appareil de sortie (appareil de
télévision / projecteur / monitor).
Repeat Ecoute répétée de vidéos et/ou d’airs de musique
Volume 56 Réglage du volume sonore (plus haut / moins haut)
Photo Contempler des photos dans le mode direct
Music Ecouter des airs de musique dans le mode direct
Video Regarder des vidéos dans le mode direct
File Accéder à des fichiers
Memory Device Affiche les supports branchés.
Up v/Down
^
Curseur vers le haut / le bas pour la sélection des
menus
Previous < Sélectionner le précédent
Next > Sélectionner le suivant
Play/Enter
4 Lancer la reproduction/confirmer la sélection
Display Montre le support de travail actuel, permet de
commuter entre la bibliothèque des titres de musique
et l’égaliseur.
Stop Interrompt l’écoute.
Zoom Zoomer plus grand / plus petit pour les photos
Pause Interrompre temporairement
Rotate Tourner les photos de 90 degrés à chaque fois
FF/FR 87 Défilement rapide vers l’avant/l’arrière
Previous 9 Vidéo / air de musique précédent
Next : Vidéo / air de musique suivant
EQ/Transition EQ : réglage de la caractéristique de tonalité,
transition : ajuster la transition d’image entre les
photos
Eléments de commande
Face supérieure :
À Joystick sert à naviguer dans les menus.
Á Home retour au menu de base.
 Setup permet différents réglages.
à Stop interrompt la reproduction.
Ä Emplacement enfichable c’est ici que le disque dur est raccordé.
Face arrière :
Å ON/OFF Bouton de mise sous et hors tension
Æ NTSC/PAL Commutateur PAL/NTSC
Ç 5V DC Raccordement de l’alimentation
È VGA Port Raccordement du monitor de PC
É S-Video Sortie SVHS
Video Sortie du signal vidéo
Stereo out Sortie du signal de tonalité
Face avant :
à gauche emplacement enfichable pour des cartes SD/MMC/MS/MD/SM
à droite emplacement enfichable pour des cartes Compact Flash
Unité de disque dur
L’unité de disque dur est enfichée dans le TEAC ShowMe pour l’écoute de vidéos et de musique ainsi que pour contempler des photos. L’interface USB2.0
intégrée dans le boîtier du disque dur permet de copier les fichiers correspondants sur le disque dur. Pour cela, le disque dur est débranché du TEAC ShowMe,
puis est relié à un PC au moyen du câble USB contenu dans la livraison. L’alimentation en courant est assurée via l’interface USB2.0. Sur la face avant se trouve
une LED qui indique les accès, tandis que le disque dur est raccordé au PC. Le connecteur USB2.0 et la prise sur le TEAC ShowMe sont agencés du même
côté. Après la copie des fichiers, le disque dur est á nouveau branché au le TEAC ShowMe. Pour cela, vous devez mettre l’appareil hors tension, puis
l’enclencher à nouveau.
Les menus de commande
Vous accédez au menu de base après l’enclenchement ou si vous appuyez sur la touche Home ou sur la touche Memory Device. Ensuite, vous pouvez
naviguer dans les menus avec les touches de la télécommande ou avec le joystick. L’option de menu sélectionnée est activée avec la touche Enter (touche4sur
la télécommande/joystick actionné verticalement sur le lecteur).

– 9 –
FRANÇAIS
Affichage des supports branchés (Memory Device)
Si plus d’un support est branché, les supports disponibles sont proposés pour la sélection. Si seulement un support de mémoire est branché, le prochain menu
(Photo, Music, Video, File) est affiché directement.
Mode photo (Photo Mode)
Le mode photo soutient le format JPEG et offre les options suivantes : affichage d’images de prévisualisation, affichage plein écran par clic sur l’image de
prévisualisation, Rotate (tourner les photos en étapes de 90°), Zoom (ajuster la zone à zoomer), Music Slide (reproduction de musique pendant la contemplation
de photos), Display (affiche des informations sur le support actif), 13 Transition Modes (sélection parmi 13 différents modes de fondu) :
Full Screen affichage plein écran
TopàBottom enchaîner en fondu de haut en bas
BottomàTop enchaîner en fondu de bas en haut
T/BàCenter enchaîner en fondu depuis le haut et le bas vers le milieu
CenteràT/B enchaîner en fondu depuis le milieu vers le haut et le bas
Blind:TàB effet de rideau déroulant de haut en bas
LeftàRight enchaîner en fondu de la gauche vers la droite
RightàLeft enchaîner en fondu de la droite vers la gauche
L/RàCenter enchaîner en fondu de la gauche et de la droite vers le milieu
CenteràL/R enchaîner en fondu depuis le milieu vers la gauche et la droite
Implode enchaîner en fondu depuis tous les côtés vers le milieu
Blind: LàR effet de rideau déroulant de la gauche vers la droite
Random l’effet de fondu est sélectionné parmi les 12 options susmentionnées
Mode de musique (Music)
Le Digital Media Player soutient les formats audio MP3 et WMA. Le mode de musique offre les options suivantes :
Music Library Si l’option Music est sélectionnée, une liste contenant les titres de musique s’affiche. Maintenant, la reproduction commence.
Music Equalizer Ajuster la caractéristique de tonalité avec la touche EQualizer (standard, jazz, classique, pop, ballade, rock et danse). La touche Display
permet de contempler la courbe d’égaliseur.
Music Slide Spectacle de diapositives avec accompagnement musical
Repeat Réglage du mode de répétition (One, All, Off = un seul, tous, OFF)
Avec les touches Previous et Next, vous sélectionnez le prochain titre ou le titre précédent ; avec la touche Pause, vous interrompez la musique.
Reproduction vidéo (Video)
Le lecteur soutient les formats VCD, DVD, Motion JPEG et MPEG4. Après avoir ajusté le support de mémoire souhaité, il est possible de sélectionner la vidéo
à l’aide des images de prévisualisation. Les fonctions (défilement rapide vers l’avant/l’arrière FF/FR (max. 8X), Play (reproduction), Pause, Stop) correspondent
aux magnétoscopes vidéo usuels. Le mode vidéo offre les options suivantes : images de prévisualisation pour les vidéos existants, reproduction plein écran en
cliquant sur l’image de prévisualisation souhaitée, Display (affiche des informations sur le support actif).
Affichage des fichiers (File)
Le lecteur offre une gestion des fichiers semblable à celle du Windows Explorer. Cela permet d’examiner et de gérer de système de fichiers sur le support.
Réglages (Setup ()
Le lecteur peut être configuré sur les réglages que vous préférez (réglages standards en caractères gras).
Menu Setup Options disponibles Réglages Description
Photo Setup Thumbnail Digest On/Off images de prévisualisation ON/OFF
Transition Mode Fast/Normal/Slow enchaîner en fondu rapidement/normalement/lentement
Orientation Defaults/Ignore réglage de la position d’image
Music Setup Repeat Mode One/All/Off
mode de répétition pour les airs de musique (un seul/tous/OFF)
Photo Slideshow Slide Show Mode Manual/Auto faire défiler manuellement ou automatiquement les photos lors du spectacle
de diapositives
Intervall Time 1/3/5/10 seconds réglages de la durée de contemplation (3 secondes)
Movie Setup Intervall Time Fast/Normal vitesse de répétition des images (rapide/normale)
Repeat Mode Off/One/All mode de répétition pour les vidéos (OFF/une seule/toutes)
Auto-Start Setup Photo/Music/Video/Off
mode de démarrage positionné lors de l’enclenchement (OFF)
Preferences Video Output AV/S-Video/COMPOSITE/
P-SCAN YBPR/VGA mode vidéo
OSD-Messages On/Off messages OnScreenDisplay ON/OFF
Default Reset positionner les valeurs standards
Spécification
Formats soutenus vidéo: MPEG1, MPEG2, MPEG4, Motion JPEG; audio: MP3, WMA; photo: JPEG
Supports de CF1/CF2, MD, MMC, MS, SD, SM, disque dur USB2.0 à partir de 30 Go ; d’autres capacités sont disponibles, l’indication
mémoire soutenus correspondante figure sur l’emballage
Sorties vidéo: TV (PAL/NTSC), Composite Video, S-VHS, YUV (option); audio: sortie stéréo
Système d’exploitation Windows 98SE/ME/2000/XP, Mac OS 10.2 ou plus évolué
Langue OSD anglais
Alimentation entrée : AC 110V..240V, 50Hz..60Hz, sortie: DC +5V, 1,4A max.
Puissance consommée 7W
Dimensions 162 x 114 x 29 mm; avec disque dur enfiché : 162 x 114 x 133 mm
Poids env. 250g (avec disque dur)
Normes de sécurité CE
Remarques importantes
•
Le lecteur reconnaît seulement le premier de vos disques durs. C’est pourquoi vous devez mémoriser les données à transmettre sur le disque dur dans la
première partition (sur le premier lecteur, normalement C:\).
•
Ajustez absolument la norme correcte (PAL/NTSC (Æ)) pour la reproduction optimale via un appareil de télévision.
•
Le disque dur ne soutient pas le Hot-Plug. C’est pourquoi il doit être branché et débranché uniquement lorsque le lecteur est hors tension.
•
Le lecteur soutient le mode Hot-Plug pour les cartes mémoire. Le lecteur ne doit pas être mis obligatoirement hors tension pour le branchement et le
débranchement.

– 10 –
ITALIANO
Introduzione
Acquistando il TEAC ShowMe avete scelto un Digital Media Player di classe superiore. Con il vostro televisore, un beamer o un monitor osserverete foto e video
e ascolterete la musica nel piacevole ambiente di casa vostra – assolutamente senza bisogno del PC. Il TEAC ShowMe funziona con sette diversi tipi di schede
di memoria e un disco rigido USB 2.0. Con il TEAC ShowMe si riescono a riprodurre tutti i tipi più diffusi di formati video, foto e audio.
Volume di fornitura
TEAC ShowMe Digital Media Player, alimentatore di rete, cavo VGA, cavo SVHS, cavo audio, cavo USB, telecomando, unità disco rigido, CD, il presente
manuale
Messa in funzione
Inserite l’unità disco rigido nell’apposito slot (Ä). Collegate con i rispettivi cavi video e audio un televisore ( e ), beamer (É) o monitor (È) e successivamente
l’alimentatore (Ç). Dopo l’accensione (Å) e la successiva regolazione della modalità video, l’apparecchio è pronto per il funzionamento.
Impostare la modalità video (Video Mode)
Con questa opzione si deve adattare il segnale di uscita video alla norma dell’unità di uscita. Come standard è impostato AV/S. Nel corso della prima messa
in funzione dovete pertanto azionare eventualmente il tasto Video Mode più volte finché non riuscirete a vedere un’immagine stabile. Le modalità seguenti
vengono selezionate in successione:
AV/S segnale video su AV e SVHS
COMPOSITE segnale video a colori conforme alla TV (processo semi-immagine, interlacciato)
P-SCAN YBPR segnale video a colori processo schermo intero
VGA segnale video per monitor su presa DSUB
Gli elementi di comando
Il telecomando ( )
Power Accensione/spegnimento
Music Slide Durante la visualizzazione delle foto si possono
riprodurre brani musicali.
Mute Commutazione muto
Setup consente diverse impostazioni.
Video Mode serve per regolare l’unità di uscita (televisore/
beamer/monitor).
Repeat Riproduzione ripetuta di video e/o brani musicali
Volume 56 Regolazione del volume aumenta volume/abbassa
volume
Photo Visualizzare foto nella modalità diretta
Music Riprodurre brani musicali nella modalità diretta
Video Visualizzare video nella modalità diretta
File Accesso a file
Memory Device Mostra i supporti inseriti.
Up v/Down
^
Cursore su/giù per la selezione di menu
Previous < Seleziona precedente
Next > Seleziona successivo
Play/Enter 4 Avvia la riproduzione/conferma la selezione
Display Mostra il supporto di lavoro attuale, consente la
commutazione tra libreria musicale ed equalizzatore.
Stop Ferma la riproduzione.
Zoom Zoom in/out per foto
Pause Arresto temporaneo
Rotate Ruotare le foto di 90 gradi alla volta
FF/FR 87 Avanzamento/ritorno veloce
Previous 9 Video/brano musicale precedente
Next : Video/brano musicale successivo
EQ/Transition EQ: regolazione delle caratteristiche del suono,
transition: regolare la transizione tra le foto
Gli elementi di comando
Lato superiore:
À Joystick Serve per navigare tra i menu.
Á Home Ritorno al menu di base.
 Setup Consente diverse impostazioni.
à Stop Trattiene la riproduzione.
Ä Slot Qui si inserisce il disco rigido.
Lato anteriore:
sinistra Slot per schede SD/MMC/MS/MD/SM
destra Slot per schede Compact Flash
Lato posteriore:
Å ON/OFF Accensione/spegnimento
Æ NTSC/PAL Commutatore PAL/NTSC
Ç 5V DC Allacciamento dell’alimentatore di rete
È VGA Port Allacciamento per monitor PC
É S-Video Uscita SVHS
Video Uscita segnale video
Stereo out Uscita segnale audio
Unità disco rigido
Il disco rigido si inserisce nel TEAC ShowMe per riprodurre video e musica, nonché per visualizzare le foto. I relativi file si possono copiare sul disco rigido
attraverso l’interfaccia USB 2.0 integrata nel corpo del disco rigido. Allo scopo il disco rigido sul TEAC ShowMe viene staccato e collegato ad un PC con il cavo
USB fornito. L’alimentazione di corrente avviene attraverso l’interfaccia USB 2.0. Sul lato frontale è inserito un LED che visualizza gli accessi quando il disco
rigido è collegato al PC. Sullo stesso lato si trovano il connettore USB 2.0 e l’allacciamento al TEAC ShowMe. Una volta copiati i file, il disco rigido si innesta
nuovamente sul TEAC ShowMe. Allo scopo spegnete l’apparecchio per poi riaccenderlo successivamente.
I menu di comando
Dopo l’accensione oppure premendo il tasto Home o Memory Device si entra nel menu di base. Successivamente si passa attraverso i vari menu premendo i
tasti del telecomando o il Joystick. Quando si preme Enter (tasto 4 sul telecomando/ Joystick verticale azionato sul Player) si apre l’opzione di menu selezio-
nata.
Visualizzazione dei supporti inseriti (Memory Device)
Se è inserito più di un supporto, viene proposta la scelta dei supporti disponibili. Se è inserito solo un supporto di memoria, viene visualizzato direttamente il
menu successivo (Photo, Music, Video, File).

– 11 –
ITALIANO
Modalità foto (Photo Mode)
La modalità foto supporta il formato JPEG e offre le seguenti opzioni: visualizzazione di immagini di anteprima, visualizzazione a schermo intero tramite clic
sull’immagine di anteprima, Rotate (ruotare le foto di 90° alla volta), Zoom (regolare l’area dello zoom), Music Slide (riproduzione musicale mentre si guardano
foto), Display (visualizza informazioni sul supporto attivo), 13 Transition Modes (selezione tra 13 diverse modalità di dissolvenza):
Full Screen Visualizzazione a schermo intero
TopàBottom Dissolvenza dall’alto verso il basso
BottomàTop Dissolvenza dal basso verso l’alto
T/BàCenter Dissolvenza dall’alto e dal basso verso il centro
CenteràT/B Dissolvenza dal centro verso l’alto e il basso
Blind:TàB Effetto tendina dall’alto in basso
LeftàRight Dissolvenza da sinistra a destra
RightàLeft Dissolvenza da destra a sinistra
L/RàCenter Dissolvenza da sinistra e destra verso il centro
CenteràL/R Dissolvenza dal centro verso sinistra e destra
Implode Dissolvenza da tutti i lati verso il centro
Blind: LàR Effetto tendina da sinistra a destra
Random L’effetto dissolvenza viene scelto a caso tra i 12 riportati sopra
Modalità musica (Music)
Il Digital Media Player supporta i formati audio MP3 e WMA. La modalità musica offre le seguenti opzioni:
Music Library Quando si seleziona Music, compare una lista con i brani musicali. Poi inizia la riproduzione.
Music Equalizer Regolazione delle caratteristiche del suono con il tasto EQualizer (standard, jazz, classica, pop, ballata, rock e danza). Premendo il tasto
Display si può osservare la curva caratteristica dell’equalizzatore.
Music Slide Presentazione diapositive con accompagnamento musicale
Repeat Regolazione della modalità ripetizione (One, All, Off = uno, tutti, off)
Con i tasti Previous e Next si seleziona il brano precedente/successivo, con il tasto Pause si interrompe la musica.
Riproduzione video (Video)
Il Player supporta i formati VCD, DVD, Motion JPEG e MPEG4. Dopo avere impostato il supporto di memoria desiderato, si può selezionare il video con l’aiuto
delle immagini di anteprima. Le funzioni (avanzamento/ritorno veloce FF/FR (max. 8X), Play (riproduzione), Pause, Stop) corrispondono a quelle dei videore-
gistratori tradizionali. La modalità video offre le seguenti opzioni: immagini di anteprima per i video presenti, riproduzione a schermo intero tramite clic sull’im-
magine di anteprima desiderata, Display (visualizza informazioni sul supporto attivo).
Visualizzazione di file (File)
Il Player offre una gestione dei file simile a quella di Windows Explorer. Questo consente sia la ricerca che la gestione del sistema di file sui supporti.
Impostazioni (Setup ()
Il Player si può configurare con le impostazioni preferite (impostazioni standard in grassetto).
Menu di setup Opzioni disponibili Impostazioni Descrizione
Photo Setup Thumbnail Digest On/Off Immagini di anteprima on/off
Transition Mode Fast/Normal/Slow Dissolvenza rapida/normale/lenta
Orientation Defaults/Ignore Regolazione della posizione dell’immagine
Music Setup Repeat Mode One/All/Off Modalità di riproduzione per brani musicali (uno/tutti/off)
Photo Slideshow Slide Show Mode Manual/Auto Durante la presentazione di diapositive commutazione manuale o
automatica delle foto
Intervall Time 1/3/5/10 seconds Regolazione della durata della visualizzazione (3 secondi)
Movie Setup Intervall Time Fast/Normal Velocità di refresh (rapida/normale)
Repeat Mode Off/One/All Modalità di riproduzione per video (off/uno/tutti)
Auto-Start Setup Photo/Music/Video/Off Modalità di avvio impostata all’accensione (off)
Preferences Video Output AV/S-Video/COMPOSITE/
P-SCAN YBPR/VGA Modalità video
OSD-Messages On/Off OnScreenDisplay messaggi on/off
Default Reset Impostare valori standard
Specifica
Formati supportati Video: MPEG1, MPEG2, MPEG4, Motion JPEG; Audio: MP3, WMA; Foto: JPEG
Supporti di memoria CF1/CF2, MD, MMC, MS, SD, SM, disco rigido USB 2.0 a partire da 30 GB, sono disponibili anche altre capacità, l’indicazione
supportati specifica è riportata sulla confezione
Uscite Video: TV (PAL/NTSC), Composite Video, S-VHS, YUV (opzionale); Audio: uscita stereo
Sistema operativo Windows 98SE/ME/2000/XP, Mac OS 10.2 e successivi
Lingua OSD Inglese
Alimentatore di rete Ingresso: AC 110V..240V, 50Hz..60Hz, uscita: DC +5V, 1,4A max.
Potenza assorbita 7W
Dimensioni 162 x 114 x 29 mm; con disco rigido inserito: 162 x 114 x 133 mm
Peso ca. 250g (con disco rigido)
Norme di sicurezza CE
Avvertenze importanti
•
Il Player riconosce solo il primo dei vostri dischi rigidi. Salvate pertanto i dati da trasferire sul disco rigido nella prima partizione (sulla prima unità, di norma
C:\).
•
Impostate assolutamente la norma corretta per la riproduzione ottimale tramite televisore (PAL/NTSC (Æ)).
•
Il disco rigido non supporta l’Hot-Plug. Pertanto esso va collegato e scollegato solo quando il Player è spento.
•
Il Player supporta l’Hot-Plug per le schede di memoria. Quando queste si inseriscono/estraggono il Player non deve necessariamente essere spento.

– 12 –
ESPAÑOL
Introducción
Con el TEAC ShowMe se ha decidido Ud. por un Digital Media Player de clase extra. Con su televisor, un beamer o un monitor podrá Ud. contemplar imágenes
y vídeos y escuchar música en el tranquilo ambiente de su sala de estar – sin necesidad de PC. El TEAC ShowMe funciona con siete tarjetas de memoria
distintas y un disco duro USB2.0. El TEAC ShowMe permite reproducir todos los formatos habituales de vídeo, fotografía y audio.
Material suministrado
TEAC ShowMe Digital Media Player, bloque de alimentación, cable VGA, cable SVHS, cable de audio, cable USB, mando a distancia, unidad de disco duro, CD,
este manual
Puesta en funcionamiento
Inserte la unidad de disco duro en el espacio previsto para ello (Ä). Conecte con los cables correspondientes de vídeo y audio un televisor ( y ), beamer (É)
o monitor (È) y a continuación el bloque de alimentación (Ç). Después de conectado (Å) y ajustado el modo de vídeo, el aparato está listo para funcionar.
Ajustar el modo de vídeo (Video Mode)
Con esta opción, la señal de salida de vídeo debe adecuarse a la norma del aparato de salida. Por defecto está ajustado en AV/S. Por eso, en la primera puesta
en funcionamiento deberá dado el caso pulsar la tecla Video Mode tantas veces como sea necesario hasta poder ver una imagen estable. Posteriormente
pueden seleccionarse los siguientes modos:
AV/S Señal de vídeo para AV y SVHS
COMPOSITE Señal de vídeo en color compatible con televisión (método de semicuadro, interlaced)
P-SCAN YBPR Señal de vídeo en color método de pantalla completa
VGA Señal de vídeo para monitores en jack DSUB
Los elementos de control
El mando a distancia ( )
Power Conectar/desconectar
Music Slide Durante la visualización de fotografías se pueden
reproducir pistas musicales.
Mute Funcionamiento silencioso
Setup Permite distintos ajustes.
Video Mode Sirve para ajustar el aparato de salida (televisor/
beamer/monitor).
Repeat Reproducción repetida de vídeos y/o pistas musicales
Volume 56 Ajuste del volumen de voz más alto/más bajo
Photo Visualización de fotografías en modo directo
Music Reproducir pistas musicales en modo directo
Video Visualización de vídeos en modo directo
File Acceso a archivos
Memory Device Muestra los medios introducidos.
Up v/Down
^
Subir/bajar cursor para seleccionar menú
Previous < Seleccionar punto anterior
Next > Seleccionar punto posterior
Play/Enter 4 Iniciar reproducción/confirmar selección
Display Muestra el medio de trabajo actual, permite cambiar
entre biblioteca musical y ecualizador.
Stop Detiene la reproducción.
Zoom Zoom +/- para fotografías
Pause Pausa provisional
Rotate Girar la fotografía 90 grados
FF/FR 87 Avance/retroceso más rápido
Previous 9 Vídeo/pista musical anterior
Next : Vídeo/pista musical posterior
EQ/Transition EQ: ajuste de la característica del sonido, transición:
paso de una imagen a la siguiente
Los elementos de control
Parte superior:
À Joystick Sirve para moverse por los menús.
Á Home Volver al menú inicial
 Setup Permite distintos ajustes.
à Stop Detiene la reproducción.
Ä Lugar de inserción Aquí se introduce el disco duro.
Parte delantera:
Izquierda Lugar de inserción para tarjetas SD/MMC/MS/MD/SM
Derecha Lugar de inserción para tarjetas Compact Flash
Parte trasera:
Å ON/OFF Conectar/desconectar
Æ NTSC/PAL Conmutador PAL/NTSC
Ç 5V DC Conexión para bloque de alimentación
È VGA Port Conexión para monitor de PC
É S-Video Salida SVHS
Video Salida de la señal de vídeo
Stereo out Salida de la señal de audio
Unidad de disco duro
El disco duro se inserta en el TEAC ShowMe para reproducir vídeos y música, así como para visualizar fotos. Gracias a la interfaz USB2.0 integrada en la caja
del disco duro se pueden copiar los archivos correspondientes en el disco duro. Para ello se extrae el disco duro del TEAC ShowMe y se conecta a un PC
mediante el cable USB suministrado. La alimentación eléctrica se produce a través de la interfaz USB2.0. En la parte delantera se encuentra un diodo luminoso
que indica los accesos mientras el disco duro está conectado a un PC. En esa misma zona se hallan el conectador de enchufe USB2.0 y la conexión al TEAC
ShowMe. Una vez copiados los archivos se vuelve a insertar el disco duro en el TEAC ShowMe. Para ello, desconecte y vuelva a conectar el aparato.
Los menús de control
Una vez conectado el aparato o después de pulsar la tecla Home o Memory Device se accede al menú inicial. A partir de ahí, muévase por los menús con
ayuda de las teclas del mando a distancia o con el joystick. Llame el comando de menú seleccionado con Enter (tecla 4 del mando a distancia/joystick
accionado en vertical en el Player).
Mostrar los medios introducidos (Memory Device)
Si hay más de un medio introducido, los medios disponibles se ofrecen para seleccionar uno de ellos. Si solamente hay un medio de almacenamiento
introducido, se muestra directamente el siguiente menú (Photo, Music, Video, File).

– 13 –
ESPAÑOL
Modo de fotografía (Photo Mode)
El modo de fotografía soporta el formato JPEG y ofrece las siguientes opciones: imágenes de presentación, visualización en pantalla completa haciendo clic en
la imagen de presentación, Rotate (girar las fotos en etapas de 90º), Zoom (ajustar el área de zoom), Music Slide (reproducción de música durante la
visualización de fotografías), Display (muestra informaciones sobre el medio activo), 13 Transition Modes (seleccionar entre 13 distintos modos de transición
entre imágenes):
Full Screen Visualización en pantalla completa
TopàBottom Transición de arriba abajo
BottomàTop Transición de abajo arriba
T/BàCenter Transición de arriba y abajo hacia el centro
CenteràT/B Transición desde el centro hacia arriba y abajo
Blind:TàB Efecto persiana de arriba abajo
LeftàRight Transición de izquierda a derecha
RightàLeft Transición de derecha a izquierda
L/RàCenter Transición de izquierda y derecha hacia el centro
CenteràL/R Transición desde el centro hacia izquierda y derecha
Implode Transición de todos los lados hacia el centro
Blind: LàR Efecto persiana de izquierda a derecha
Random El efecto de transición se selecciona aleatoriamente entre los 12 anteriores
Modo de música (Music)
El Digital Media Player es compatible con los formatos de audio MP3 y WMA. El modo de música ofrece las siguientes opciones:
Music Library Seleccionando Music aparece una lista con los títulos de las pistas. Comienza entonces la reproducción.
Music Equalizer Ajuste de la característica del sonido con la tecla EQualizer (estándar, jazz, clásica, pop, baladas, rock y baile). La tecla Display permite
visualizar la línea característica del ecualizador.
Music Slide Visualización de imágenes tipo diapositivas con acompañamiento musical
Repeat Ajuste del modo de repetición (One, All, Off = una, todas, no)
Las teclas Previous y Next permiten seleccionar el título anterior/posterior, la tecla Pause detiene la música.
Reproducción de vídeo (Video)
El Player es compatible con los formatos VCD, DVD, Motion JPEG y MPEG4. Una vez ajustado el medio de almacenamiento deseado, se puede seleccionar el
vídeo con ayuda de imágenes de presentación. Las funciones (avance/retroceso rápido FF/FR (máx. 8X), Play (reproducción), Pause, Stop) se corresponden
con las de un reproductor de vídeo tradicional. El modo de vídeo ofrece las siguientes opciones: imágenes de presentación de los vídeos existentes, reproducción
en pantalla completa haciendo clic en la imagen de presentación deseada, Display (muestra informaciones sobre el medio activo).
Mostrar archivos (File)
El Player ofrece una función de archivos similar a la del Windows Explorer que permite examinar y administrar el sistema de archivos en los medios.
Ajustes (Setup ()
El Player puede configurarse con los ajustes que Ud. prefiera (ajustes por defecto en negrita).
Menú de configuración Opciones disponibles Ajustes Descripción
Photo Setup Thumbnail Digest On/Off Imágenes de presentación sí/no
Transition Mode Fast/Normal/Slow Transición rápida/normal/lenta
Orientation Defaults/Ignore Ajuste de la posición de la imagen
Music Setup Repeat Mode One/All/Off Modo de repetición de pistas musicales (una/todas/no)
Photo Slideshow Slide Show Mode Manual/Auto Con visualización tipo diapositivas, pasar de imagen manual o
automáticamente
Intervall Time 1/3/5/10 seconds Ajuste de la duración de visualización (3 segundos)
Movie Setup Intervall Time Fast/Normal Tasa de repetición de imágenes (rápida/normal)
Repeat Mode Off/One/All Modo de repetición de vídeos (no/uno/todos)
Auto-Start Setup Photo/Music/Video/Off Al conectar, modo de inicio activado (no)
Preferences Video Output AV/S-Video/COMPOSITE/
P-SCAN YBPR/VGA Modo de vídeo
OSD-Messages On/Off Mensajes OnScreenDisplay sí/no
Default Reset Establecer valores estándar
Especificaciones
Formatos soportados Vídeo: MPEG1, MPEG2, MPEG4, Motion JPEG; Audio: MP3, WMA; Fotografía: JPEG
Medios de almacena- CF1/CF2, MD, MMC, MS, SD, SM, disco duro USB2.0 a partir de 30 GB, otras capacidades disponibles, consulte el embalaje
miento soportados para su correspondiente indicación
Salidas Vídeo: TV (PAL/NTSC), Composite Video, S-VHS, YUV (opcional); Audio: salida estéreo
Sistema operativo Windows 98SE/ME/2000/XP, Mac OS 10.2 o superior
Idioma OSD Inglés
Bloque de alimentación Entrada: CA 110V..240V, 50Hz..60Hz, salida: CC +5V, 1,4A máx.
Consumo de potencia 7 W
Dimensiones 162 x 114 x 29 mm; con disco duro insertado: 162 x 114 x 133 mm
Peso aprox. 250g (con disco duro)
Normas de seguridad CE
Notas importantes
•
El Player sólo reconocerá el primero de sus discos duros. Por esa razón, guarde los datos a transmitir al disco duro en la primera partición (en la primera
unidad, normalmente C:\).
•
Es imprescindible ajustar la norma correcta (PAL/NTSC (Æ)) para obtener una calidad de reproducción óptima en un televisor.
•
El disco duro no soporta la función Hot-Plug. Por eso, sólo se debe insertar y extraer con el Player desconectado.
•
El Player soporta la función Hot-Plug para tarjetas de memoria. No es necesario desconectar el Player para insertarlas/extraerlas.

– 14 –
ÐÓÑÑÊÈÉ
Ââåäåíèå
Îòäàâ ïðåäïî÷òåíèå TEAC ShowMe, Âû âûáðàëè öèôðîâîé ìåäèà-ïëååð ýêñòðà êëàññà. Ïîäêëþ÷èâ åãî ê òåëåâèçîðó, ïðîåêòîðó èëè ìîíèòîðó, Âû
ìîæåòå ïðîñìàòðèâàòü ôîòîãðàôèè, âèäåîçàïèñè, ñëóøàòü ìóçûêó â óþòíîé äîìàøíåé îáñòàíîâêå. Ïðè ýòîì Âàì íå íóæåí êîìïüþòåð. TEAC ShowMe
ñîâìåñòèì ñ 7 òèïàìè êàðò ïàìÿòè è æåñòêèì äèñêîì ñ USB 2.0. TEAC ShowMe âîñïðîèçâîäèò âñå ðàñïðîñòðàíåííûå âèäåî-, ôîòî- è àóäèîôîðìàòû.
Êîìïëåêò ïîñòàâêè
Öèôðîâîé ìåäèà-ïëååð TEAC ShowMe, ñåòåâîé àäàïòåð, êàáåëü VGA, êàáåëü SVHS, àóäèî-êàáåëü, êàáåëü USB, ïóëüò äèñòàíöèîííîãî óïðàâëåíèÿ,
íàêîïèòåëü ñ æåñòêèì äèñêîì, êîìïàêò-äèñê, äàííîå ðóêîâîäñòâî.
Ïîäãîòîâêà ê ýêñïëóàòàöèè
Óñòàíîâèòå íàêîïèòåëü ñ æåñòêèì äèñêîì â ïðåäóñìîòðåííûé ðàçúåì (Ä). Ïîäêëþ÷èòå ñ ïîìîùüþ èìåþùèõñÿ âèäåî- è àóäèî-êàáåëåé òåëåâèçîð (
è ), ïðîåêòîð (É) èëè ìîíèòîð (È). Çàòåì ïîäñîåäèíèòå ê óñòðîéñòâó ñåòåâîé àäàïòåð (Ç). Âêëþ÷èòå (Å) óñòðîéñòâî è íàñòðîéòå âèäåîðåæèì. Ïëååð
ãîòîâ ê ýêñïëóàòàöèè.
Íàñòðîéêà âèäåîðåæèìà (Video Mode)
Ïðè ïîìîùè äàííîé îïöèè íåîáõîäèìî íàñòðîèòü âûõîäíîé âèäåîñèãíàë íà ñòàíäàðò óñòðîéñòâà âûâîäà. Ïî óìîë÷àíèþ íàñòðîåí AV/S. Ïîýòîìó
ïðè ïåðâîì âêëþ÷åíèè íàæèìàéòå ïðè íåîáõîäèìîñòè êëàâèøó Video Mode, ïîêà íå ïîëó÷èòå óñòîé÷èâîå èçîáðàæåíèå. Âîçìîæåí ïîñëåäîâàòåëüíûé
âûáîð ñèãíàëà ñëåäóþùèõ ñòàíäàðòîâ:
AV/S Âèäåîñèãíàë íà AV è SVHS
COMPOSITE Êîìïîçèòíûé öâåòíîé ÒÂ-ñèãíàë (ïîëóêàäð, ÷åðåññòðî÷íàÿ ðàçâåðòêà)
P-SCAN YBPR Öâåòíîé âèäåîñèãíàë (ïîëíûé êàäð)
VGA Âèäåîñèãíàë íà ìîíèòîð ÷åðåç ðàçúåì DSUB
Îðãàíû óïðàâëåíèÿ ïëååðà
Îðãàíû óïðàâëåíèÿ äèñòàíöèîííîãî ïóëüòà ( )
Power Âêëþ÷åíèå/âûêëþ÷åíèå ïèòàíèÿ
Music Slide Ïðîñìîòð ôîòîãðàôèé ñ îäíîâðåìåííûì
ïðîèãðûâàíèåì ìóçûêàëüíûõ òðåêîâ
Mute Îòêëþ÷åíèå çâóêà
Setup Âûáîð íàñòðîåê
Video Mode Íàñòðîéêà óñòðîéñòâà âûâîäà (òåëåâèçîðà/
ïðîåêòîðà/ìîíèòîðà).
Repeat Ïîâòîðíîå âîñïðîèçâåäåíèå âèäåîôàéëîâ è
ìóçûêàëüíûõ òðåêîâ
Volume 56 Ðåãóëèðîâêà çâóêà + /
Photo Ïîêàç ôîòîãðàôèé â ðåæèìå ïðÿìîãî ïðîñìîòðà
Music Ïðîèãðûâàíèå ìóçûêàëüíûõ òðåêîâ â ðåæèìå
ïðÿìîãî âîñïðîèçâåäåíèÿ
Video Ïîêàç âèäåîôàéëîâ â ðåæèìå ïðÿìîãî ïðîñìîòðà
File Îáðàùåíèå ê ôàéëàì
Memory Device Îòîáðàæåíèå óñòàíîâëåííûõ óñòðîéñòâ ïàìÿòè
Up v/Down
^
Ïåðåõîä êóðñîðà ââåðõ/âíèç äëÿ âûáîðà ïóíêòà
ìåíþ
Previous < Ê ïðåäûäóùåìó ïóíêòó
Next > Ê ñëåäóþùåìó ïóíêòó
Play/Enter 4 Âîñïðîèçâåäåíèå/ïîäòâåðæäåíèå âûáîðà
Display Îòîáðàæåíèå àêòèâíîãî óñòðîéñòâà ïàìÿòè,
ïåðåêëþ÷åíèå ìåæäó ìóçûêàëüíîé áèáëèîòåêîé è
ýêâàëàéçåðîì.
Stop Îñòàíîâ âîñïðîèçâåäåíèÿ
Zoom Óâåëè÷åíèå/óìåíüøåíèå ôîòîãðàôèé
Pause Ïàóçà
Rotate
Ïîâîðîò ôîòîãðàôèè ñåêòîðàìè ïî 90 ãðàäóñîâ
FF/FR 87 Áûñòðàÿ ïðîêðóòêà âïåðåä/íàçàä
Previous 9 Ïðåäûäóùèé âèäåî/ìóçûêàëüíûé òðåê
Next : Ñëåäóþùèé âèäåî/ìóçûêàëüíûé òðåê
EQ/Transition EQ: Íàñòðîéêà õàðàêòåðèñòèê çâó÷àíèÿ, Transition:
íàñòðîéêà òèïà ìåæêàäðîâîãî ïåðåõîäà äëÿ
ôîòîãðàôèé
Îðãàíû óïðàâëåíèÿ ïëååðà
Âèä ñâåðõó:
À äæîéñòèê äëÿ íàâèãàöèè ïî ìåíþ
Á Home âîçâðàò â îñíîâíîå ìåíþ
 Setup âûáîð ðàçëè÷íûõ íàñòðîåê
à Stop îñòàíîâ âîñïðîèçâåäåíèÿ
Ä ðàçúåì äëÿ óñòàíîâêè æåñòêîãî äèñêà
Âèä ñïåðåäè:
ñëåâà ñëîò äëÿ êàðò SD/MMC/MS/MD/SM
ñïðàâà ñëîò äëÿ êàðò Compact Flash
Ñçàäè:
Å ON/OFF âêëþ÷åíèå/âûêëþ÷åíèå ïèòàíèÿ
Æ NTSC/PAL ïåðåêëþ÷àòåëü PAL/NTSC
Ç 5V DC ðàçúåì äëÿ ïîäêëþ÷åíèÿ ñåòåâîãî à äàïòåðà
È VGA Port ðàçúåì äëÿ ïîäêëþ÷åíèÿ ìîíèòîðà ÏÊ
É S-Video âûõîä SVHS
Video âèäåîâûõîä
Stereo out àóäèîâûõîä
Íàêîïèòåëü ñ æåñòêèì äèñêîì
Æåñòêèé äèñê óñòàíàâëèâàåòñÿ â óñòðîéñòâî TEAC ShowMe ñ öåëüþ âîñïðîèçâåäåíèÿ âèäåîôàéëîâ, ïðîèãðûâàíèÿ ìóçûêè è ïðîñìîòðà ôîòîãðàôèé.
×åðåç âñòðîåííûé â êîðïóñ æåñòêîãî äèñêà ïîðò USB 2.0 ìîæíî çàïèñûâàòü íåîáõîäèìûå ôàéëû íà æåñòêèé äèñê. Äëÿ ýòîãî îòñîåäèíèòå æåñòêèé
äèñê îò ïëååðà è ïðè ïîìîùè USB-êàáåëÿ èç êîìïëåêòà ïîñòàâêè ïîäñîåäèíèòå ê êîìïüþòåðó. Ýëåêòðîïèòàíèå ïîñòóïàåò ÷åðåç èíòåðôåéñ USB 2.0.
Íà ïåðåäíåé
ïàíåëè èìååòñÿ ñâåòîäèîä, êîòîðûé ïîêàçûâàåò îáðàùåíèÿ ê ïàìÿòè, êîãäà æåñòêèé äèñê ïîäêëþ÷åí ê êîìïüþòåðó. Òàì æå èìååòñÿ ðàçúåì
USB 2.0 è ðàçúåì äëÿ ïîäêëþ÷åíèÿ ê TEAC ShowMe. Ïîñëå çàïèñè ôàéëîâ ñ êîìïüþòåðà íà æåñòêèé äèñê âíîâü óñòàíîâèòå åãî â TEAC ShowMe.
Ïðåäâàðèòåëüíî âûêëþ÷èòå, à ïîñëå óñòàíîâêè äèñêà âêëþ÷èòå ïëååð.
Ìåíþ óïðàâëåíèÿ
Ïðè âêëþ÷åíèè ïëååðà, íàæàòèè êëàâèøè Home èëè Memory Device çàãðóæàåòñÿ ãëàâíîå ìåíþ. Âû ìîæåòå ïåðåìåùàòüñÿ ïî ìåíþ ïðè ïîìîùè
êëàâèø ïóëüòà äèñòàíöèîííîãî óïðàâëåíèÿ èëè äæîéñòèêà. Âûçîâ îïöèé ìåíþ ïðîèçâîäèòñÿ êîìàíäîé Enter (íàæàòü íà êëàâèøó4ïóëüòà
äèñòàíöèîííîãî óïðàâëåíèÿ èëè ïîâåðíóòü ââåðõ ðû÷àæîê äæîéñòèêà íà ïëååðå)
Îòîáðàæåíèå óñòàíîâëåííûõ óñòðîéñòâ ïàìÿòè (Memory Device)
Åñëè óñòàíîâëåíî áîëåå îäíîãî óñòðîéñòâà ïàìÿòè, îíè ïðåäëàãàþòñÿ íà âûáîð. Ïðè íàëè÷èè òîëüêî îäíîãî óñòðîéñòâà ïàìÿòè ñðàçó âûâîäèòñÿ
ñëåäóþùåå ìåíþ (Photo, Music, Video, File).

– 15 –
ÐÓÑÑÊÈÉ
Ôîòîðåæèì (Photo)
Ôîòîðåæèì ïîääåðæèâàåò ôîðìàò JPEG è ïðåäëàãàåò ñëåäóþùèå îïöèè: ïðåäâàðèòåëüíûé ïðîñìîòð ôîòîãðàôèé, ïîëíîýêðàííûé ïðîñìîòð
ôîòîãðàôèè, âûáðàííîé ùåë÷êîì ìûøè, Rotate (ïîâîðîò ôîòîãðàôèè ñåêòîðàìè ïî 90
0
), Zoom (íàñòðîéêà ìàñøòàáà ôîòîãðàôèè), Music Slide
(âîñïðîèçâåäåíèå ìóçûêè ïðè ïðîñìîòðå ôîòîãðàôèé), Display (èíäèêàöèÿ àêòèâíîãî óñòðîéñòâà ïàìÿòè), 13 Transition Modes (13 ðåæèìîâ
ìåæêàäðîâîãî ïåðåõîäà):
Full Screen ïîëíîýêðàííûé ðåæèì
Top àBottom íàïëûâ ñâåðõó âíèç
BottomàTop íàïëûâ ñíèçó ââåðõ
T/BàCenter íàïëûâ ñâåðõó è ñíèçó ê öåíòðó
CenteràT/B íàïëûâ èç öåíòðà ââåðõ è âíèç
Blind:TàB ýôôåêò âîëíû ñâåðõó âíèç
LeftàRight íàïëûâ ñëåâà íàïðàâî
RightàLeft íàïëûâ ñïðàâà íàëåâî
L/RàCenter íàïëûâ ñïðàâà è ñëåâà ê öåíòðó
CenteràL/R íàïëûâ èç öåíòðà íàïðàâî è íàëåâî
Implode íàïëûâ ñî âñåõ ñòîðîí ê öåíòðó
Blind: LàR ýôôåêò âîëíû ñëåâà íàïðàâî
Random âûáîð îäíîãî èç 12 âûøåóêàçàííûõ ýôôåêòîâ íàïëûâà
Ìóçûêàëüíûé ðåæèì (Music)
Öèôðîâîé ìåäèà-ïëååð ïîääåðæèâàåò àóäèîôîðìàòû MP3 è WMA. Ìóçûêàëüíûé ðåæèì ïðåäëàãàåò ñëåäóþùèå îïöèè:
Music Library Ïðè âûáîðå Music ïîÿâëÿåòñÿ ñïèñîê òðåêîâ. Íà÷èíàåòñÿ âîñïðîèçâåäåíèå.
Music Equalizer Íàñòðîéêà ìóçûêàëüíîãî æàíðà ïðè ïîìîùè êëàâèøè EQualizer (ñòàíäàðò, äæàç, êëàññèêà, ïîï, áàëëàäà, ðîê è òàíöåâàëüíàÿ).
Ïðè íàæàòèè íà êëàâèøó Display îòîáðàæàåòñÿ êðèâàÿ ýêâàëàéçåðà.
Music Slide Ïðîñìîòð ñëàéäîâ ñ ìóçûêàëüíûì ñîïðîâîæäåíèåì
Repeat Íàñòðîéêà ðåæèìà ïîâòîðåíèÿ (One, All, Off = îäèí, âñå, âûêë.)
Êëàâèøè Previous è Next ñëóæàò äëÿ âûáîðà ïðåäûäóùåãî/ñëåäóþùåãî òðåêà, Pause - äëÿ âêëþ÷åíèÿ ðåæèìà ïàóçû.
Âîñïðîèçâåäåíèå âèäåôàéëîâ (Video)
Ïëååð ïîääåðæèâàåò ôîðìàòû VCD, DVD, Motion JPEG è MPEG4. Ïîñëå âûáîðà òðåáóåìîãî óñòðîéñòâà ïàìÿòè âûáåðèòå âèäåîçàïèñü ïîñðåäñòâîì
ïðåäâàðèòåëüíîãî ïðîñìîòðà. Ôóíêöèè (áûñòðàÿ ïðîêðóòêà âïåðåä/íàçàä FF/FR (ìàêñ. 8-êðàòíàÿ ñêîðîñòü), Play (âîñïðîèçâåäåíèå), Pause, Stop)
àíàëîãè÷íû ôóíêöèÿì òðàäèöèîííîãî âèäåîìàãíèòîôîíà. Âèäåîðåæèì ñîäåðæèò ñëåäóþùèå îïöèè: ïðåäâàðèòåëüíûé ïðîñìîòð çàïèñàííûõ
âèäåîôàéëîâ, ïîëíîýêðàííûé ïðîñìîòð âèäåîôàéëà, âûäåëåííîãî ùåë÷êîì ìûøè, Display (èíäèêàöèÿ àêòèâíîãî óñòðîéñòâà ïàìÿòè).
Îòîáðàæåíèå ôàéëîâ (File)
Ïëååð ïðåäëàãàåò ôóíêöèþ îòîáðàæåíèÿ ôàéëîâ àíàëîãè÷íî ïðîãðàììå Ïðîâîäíèê â Windows. Îíà ñëóæèò äëÿ ïðîñìîòðà è óïðàâëåíèÿ ôàéëàìè,
çàïèñàííûìè íà óñòðîéñòâàõ ïàìÿòè.
Íàñòðîéêè (Setup ()
Íàñòðîéêè ïëååðà ìîæíî ñêîíôèãóðèðîâàòü â ñîîòâåòñòâèè ñ Âàøèìè ïðåäïî÷òåíèÿìè (íàñòðîéêè ïî óìîë÷àíèþ âûäåëåíû æèðíûì øðèôòîì).
Ìåíþ Setup Äîñòóïíûå îïöèè Íàñòðîéêè Îïèñàíèå
Photo Setup Thumbnail Digest On/Off âêë./âûêë. ïðåäâàðèòåëüíîãî ïðîñìîòðà
Transition Mode Fast/Normal/Slow áûñòðûé/íîðìàëüíûé/ìåäëåííûé íàïëûâ
Orientation Defaults/Ignore ðàçìåùåíèå èçîáðàæåíèÿ íà ýêðàíå
Music Setup Repeat Mode One/All/Off ïîâòîðåíèå ìóçûêàëüíûõ òðåêîâ (îäèí/âñå/âûêë.)
Photo Slideshow Slide Show Mode Manual/Auto ñìåíà ñëàéäîâ â ðó÷íîì èëè àâòîìàòè÷åñêîì ðåæèìå
Intervall Time 1/3/5/10 seconds íàñòðîéêà âðåìåíè ïðîñìîòðà (3 ñåêóíäû)
Movie Setup Intervall Time Fast/Normal ÷àñòîòà îáíîâëåíèÿ ýêðàíà (áûñòðàÿ/íîðìàëüíàÿ)
Repeat Mode Off/One/All ïîâòîðíûé ïîêàç âèäåîôàéëîâ (âûêë./îäèí/âñå)
Auto-Start Setup Photo/Music/Video/Off ðåæèì çàïóñêà, íàñòðîåííûé ïðè âêëþ÷åíèè (âûêë.)
Preferences Video Output AV/S-Video/COMPOSITE/
P-SCAN YBPR/VGA âèäåîðåæèì
OSD-Messages On/Off ñîîáùåíèÿ ýêðàííîãî ìåíþ âêë./âûêë.
Default Reset ïðèìåíèòü íàñòðîéêè ïî óìîë÷àíèþ
Òåõíè÷åñêîå îïèñàíèå
Ïîääåðæèâàåìûå ôîðìàòû âèäåî: MPEG1, MPEG2, MPEG4, Motion JPEG; àóäèî: MP3, WMA; ôîòî: JPEG
Ïîääåðæèâàåìûå CF1/CF2, MD, MMC, MS, SD, SM, æåñòêèé äèñê USB2.0 îò 30 Ãá, âîçìîæíî ïîäêëþ÷åíèå óñòðîéñòâ áîëüøåãî
óñòðîéñòâà ïàìÿòè îáúåìà, ñì. óêàçàíèå íà óïàêîâêå
Âûõîäû âèäåî: TV (PAL/NTSC), Composite Video, S-VHS, YUV (îïöèÿ); àóäèî: ñòåðåîâûõîä
ÎÑ Windows 98SE/ME/2000/XP, Mac OS 10.2 èëè áîëåå ïîçäíÿÿ âåðñèÿ
ßçûê ýêðàííîãî ìåíþ àíãëèéñêèé
Ñåòåâîé àäàïòåð íà âõîäå: ïåðåìåííîå íàïðÿæåíèå 110-240 Â, 50-60 Ãö, íà âûõîäå: ïîñòîÿííîå íàïðÿæåíèå +5Â, ìàêñ.1,4 À;
Ïîòðåáëÿåìàÿ ìîùíîñòü 7 Âò
Ðàçìåðû 162 x 114 x 29 ìì; ñ óñòàíîâëåííûì æåñòêèì äèñêîì: 162 x 114 x 133 ìì
Âåñ ïðèáëèçèòåëüíî 250 ã (ñ óñòàíîâëåííûì æåñòêèì äèñêîì)
Íîðìû áåçîïàñíîñòè CE
Âàæíî!
•
Ïëååð ðàñïîçíàåò òîëüêî ïåðâûé èç Âàøèõ æåñòêèõ äèñêîâ. Ïîýòîìó ñîõðàíÿéòå çàïèñûâàåìûå íà æåñòêèé äèñê äàííûå â ïåðâîì ðàçäåëå (íà
ïåðâîì íàêîïèòåëå, îáû÷íî Ñ:\).
•
Äëÿ îïòèìàëüíîãî âîñïðîèçâåäåíèÿ ÷åðåç òåëåâèçîð îáÿçàòåëüíî íàñòðîèòü òðåáóåìûé ñòàíäàðò (PAL/NTSC (
Æ
)).
•
Æåñòêèé äèñê íå ïîääåðæèâàåò ôóíêöèþ Hot-Plug.  ñâÿçè ñ ýòèì åãî ìîæíî óñòàíàâëèâàòü è îòñîåäèíÿòü òîëüêî ïðè âûêëþ÷åííîì ïëååðå.
•
Ïëååð ïîääåðæèâàåò ôóíêöèþ Hot-Plug äëÿ êàðò ïàìÿòè, ÷òî ïîçâîëÿåò óñòàíàâëèâàòü è èçâëåêàòü èõ, íå âûêëþ÷àÿ ïëååð.

– 16 –
ÈESKY
Úvod
Zakoupením pøístroje TEAC ShowMe jste se rozhodli pro prvotøídní pøehrávaè Digital Media Player. Se svým televizním pøijímaèem, beamerem nebo monitorem
si budete prohlíet snímky a videonahrávky a poslouchat hudbu vútulném prostøedí svého bytu zcela bez PC. Zaøízení TEAC ShowMe pracuje se sedmi
rùznými pamìovými kartami a jedním pevným diskem USB2.0. Pøehrávaèem TEAC ShowMe lze pøehrávat vechny bìné formáty z oblasti video, foto a audio.
Obsah dodávky
Pøehrávaè TEAC ShowMe Digital Media Player, napájecí zdroj, kabel VGA, kabel SVHS, kabel pro audio, kabel USB, dálkové ovládání, jednotka pevného
disku, CD, tato pøíruèka
Uvedení do provozu
Zasuòte jednotku pevného disku do pøísluné achty (Ä). Pomocí pøísluných kabelù pro video a audio pøipojte televizor ( a ), beamer (É) nebo monitor (È)
a pak napájecí zdroj (Ç). Po zapnutí (Å) a následném nastavení reimu videa je pøístroj pøipraven k provozu.
Nastavení reimu videa (Video Mode)
Touto volbou se musí výstupní signál videa pøizpùsobit normì výstupního zaøízení. Standardnì je zde nastaven reim AV/S. Pøi prvním uvedení do provozu
proto musíte pøípadnì stisknout tlaèítko reimu videa Video Mode tolikrát, ne uvidíte stálý obraz. Postupnì se navolí následující reimy:
AV/S Videosignál na AV a SVHS
COMPOSITE Signál pro barevné video shodný s TV (metoda pùlsnímkù, interlaced)
P-SCAN YBPR Signál pro barevné video - metoda celého snímku
VGA Videosignál pro monitory u zdíøky DSUB
Ovládací prvky
Dálkové ovládání ( )
Power vypínaè (vypnutí / zapnutí)
Music Slide bìhem prohlíení fotografií mùete pøehrávat hudební
skladby.
Mute vypnutí zvuku
Setup umoòuje rùzné nastavení.
Video Mode slouí knastavení výstupní jednotky (televizní pøijímaè/
beamer/monitor).
Repeat opakované pøehrávání videonahrávek a/nebo
hudebních skladeb
Volume 56 nastavení hlasitosti zesílit/ztlumit hlasitost
Photo prohlíení fotografií vpøímém reimu
Music pøehrávání hudebních skladeb vpøímém reimu
Video sledování videa vpøímém reimu
File pøístup k souborùm
Memory Device zobrazuje vloená média.
Up v/Down
^
kurzor nahoru/dolù pro výbìr menu
Previous < pøedchozí volba
Next > pøítí volba
Play/Enter 4 spustit pøehrávání/potvrdit volbu
Display zobrazuje aktuální pracovní médium, umoòuje
pøepínání mezi hudební knihovnou a ekvalizérem.
Stop zastaví pøehrávání.
Zoom zoom zvìtení a zmenení fotografií
Pause pøechodné zastavení
Rotate fotografii otoèit o 90 stupòù
FF/FR 87 rychlé pøesunutí dopøedu/dozadu
Previous 9 pøedchozí video/hudební skladba
Next : následující video/hudební skladba
EQ/Transition EQ: nastavení charakteristiky zvuku, Transition:
nastavení pøechodu obrazu mezi fotografiemi
Ovládací prvky
Horní strana:
À Joystick slouí knavigování vjednotlivých menu.
Á Home návrat do základního menu.
 Setup umoòuje rùzná nastavení.
à Stop zastaví pøehrávání.
Ä Zasouvací achta sem se zasune pevný disk.
Pøední strana:
Vlevo Zasouvací achta pro karty SD/MMC/MS/MD/SM
Vpravo Zasouvací achta pro karty Compact Flash
Zadní strana:
Å ON/OFF Vypínaè (zapnutí/vypnutí)
Æ NTSC/PAL Pøepínaè PAL/NTSC
Ç 5V DC Pøípojka napájecího zdroje
È VGA Port Pøípojka pro PC Monitor
É S-Video Výstup SVHS
Video Výstup videosignálu
Stereo out Výstup zvukového signálu
Jednotka pevného disku
Pevný disk se do TEAC ShowMe zasouvá kpøehrávání videonahrávek a hudby a kprohlíení fotografií. Pøes rozhraní USB2.0, integrované vpouzdru pevného
disku se dají pøísluné soubory kopírovat na pevný disk. Pevný disk se pøitom vytáhne z TEAC ShowMe a propojí se dodaným USB-kabelem s poèítaèem.
Pøívod proudu je zajitìn pøes rozhraní USB2.0. Na pøední stranì je umístìna svìtelná dioda , která indikuje provádìný výbìr, zatímco je pevný disk pøipojený
k poèítaèi. Na stejné stranì je umístìný konektor USB2.0 a pøípojka k TEAC ShowMe. Po zkopírování souborù se pevný disk opìt zasune do TEAC ShowMe.
Pøístroj pøitom nejdøíve vypnìte a pak opìt zapnìte.
Ovládací menu
Po zapnutí popø. stisknutím tlaèítka Home popø. Memory Device se dostanete do základního menu. Pak se pomocí tlaèítek dálkového ovládání nebo joysticku
pohybujete v jednotlivých menu. Stisknutím tlaèítka Enter (tlaèítko4na dálkovém ovládání / svislý pohyb joystickem na pøehrávaèi) se otevøe poadovaná volba
menu.
Zobrazení pøipojených médií (Memory Device)
Jestlie je pøipojeno více ne jedno médium, nabídne se výbìr médií, které jsou k dispozici. Je-li zasunuto pouze jedno pamìové médium, zobrazí se pøímo
následující menu (Photo, Music, Video, File).

– 17 –
Reim fotografií (Photo Mode)
Reim fotografií podporuje formát JPEG a nabízí následující volby: Zobrazení malých pøehledných obrázkù, zobrazení celého snímku kliknutím na pøehledný
obrázek, Rotate (otáèení fotografie vkrocích po 90°), Zoom (nastavení rozsahu zoomu), Music Slide (Pøehrávání hudby bìhem prohlíení fotografií), Display
(zobrazuje informace o aktivním médiu), 13 Transition Modes (výbìr mezi 13 rùznými reimy prolínání obrazu):
Full Screen zobrazení celého obrazu
Top àBottom prolínání shora dolù
BottomàTop prolínání zdola nahoru
T/BàCenter prolínání shora dolù do støedu
CenteràT/B prolínání od støedu smìrem nahoru a dolù
Blind:TàB odvíjení obrazu shora dolù
LeftàRight prolínání zleva doprava
RightàLeft prolínání zprava doleva
L/RàCenter prolínání zleva a zprava smìrem do støedu
CenteràL/R prolínání ze støedu vlevo a vpravo
Implode prolínání ze vech stran do støedu
Blind: LàR odvíjení obrazu zleva doprava
Random efekt prolínání se zvolí náhodnì mezi 12 výe uvedenými monostmi
Reim hudby (Music)
Pøehrávaè Digital Media Player podporuje audio-formáty MP3 a WMA. Reim hudby nabízí následující volby:
Music Library Pokud zvolíme Music, zobrazí se seznam s hudebními tituly. Nyní zaèíná pøehrávání.
Music Equalizer Nastavení charakteristiky zvuku tlaèítkem EQualizer (standard, jazz, klasická hudba, pop, balada, rock a taneèní hudba). Pomocí
tlaèítka Display lze sledovat charakteristiku ekvalizéru.
Music Slide Diashow shudebním doprovodem
Repeat Nastavení reimu opakování (One, All, Off = jedna, vechny, vypnuto)
Tlaèítky Previous a Next zvolíte pøedchozí/následující hudební titul, tlaèítkem Pause hudbu zastavíte.
Pøehrávání videa (Video)
Tento pøehrávaè podporuje formáty VCD, DVD, Motion JPEG a MPEG4. Po nastavení poadovaného pamìového média se mùe video zvolit podle pøehledných
obrázkù vnáhledu. Funkce (rychlý chod dopøedu/dozadu FF/FR (max. 8X), Play (pøehrávání), Pause, Stop) odpovídají bìným videorekordérùm. Reim videa
nabízí následující volby: Pøehledné obrázky pro stávající videa, pøehrávání plného obrazu kliknutím na poadovaný pøehledný obrázek v náhledu, Display
(zobrazuje informace o aktivním médiu).
Zobrazení souborù (File)
Tento pøehrávaè nabízí podobnou funkci souborù jako Windows Explorer. To umoòuje prohlíení a uchovávání systému souborù na médiích.
Nastavení (Setup ()
Pøehrávaè lze nakonfigurovat podle nastavení, kterému dáváte pøednost (standardní nastavení jsou tuènì vytitìna).
Menu Setup Moné volby Nastavení Popis
Photo Setup Thumbnail Digest On/Off pøehledné obrázky zapnuto/vypnuto
Transition Mode Fast/Normal/Slow prolínat rychle/normálnì/pomalu
Orientation Defaults/Ignore nastavení polohy obrazu
Music Setup Repeat Mode One/All/Off reim opakování pro hudební skladby (jedna/vechny/vypnuto)
Photo Slideshow Slide Show Mode Manual/Auto pøi prohlíení fotografií se snímky pøepínají ruènì nebo automaticky
Intervall Time 1/3/5/10 seconds nastavení doby prohlíení (3 sekundy)
Movie Setup Intervall Time Fast/Normal rychlost opakování obrazu (rychle/normálnì)
Repeat Mode Off/One/All reim opakování pro video (vypnuto/jedno/vechny)
Auto-Start Setup Photo/Music/Video/Off reim sputìní stanovený pøi zapnutí (vypnuto)
Preferences Video Output AV/S-Video/COMPOSITE/
P-SCAN YBPR/VGA reim videa
OSD-Messages On/Off sdìlení OnScreenDisplay zapnuto/vypnuto
Default Reset nastavení standardních hodnot
Specifikace
Podporované formáty Video: MPEG1, MPEG2, MPEG4, Motion JPEG; Audio: MP3, WMA; Foto: JPEG
Podporovaná CF1/CF2, MD, MMC, MS, SD, SM, USB2.0-pevný disk od 30 GB, dalí kapacity jsou k dispozici, pøísluné údaje jsou uvedeny
pamìová média na obalu
Výstupy Video: TV (PAL/NTSC), Composite Video, S-VHS, YUV (na objednávku); Audio: výstup stereo
Operaèní systém Windows 98SE/ME/2000/XP, Mac OS 10.2 vyí verze
Jazyk OSD Anglicky
Síový zdroj Vstup: AC 110V..240V, 50Hz..60Hz, výstup: DC +5V, 1,4A max.
Pøíkon 7W
Rozmìry 162 x 114 x 29 mm; se zasunutým pevným diskem: 162 x 114 x 133 mm
Hmotnost ca. 250g (se zasunutým pevným diskem)
Bezpeènostní normy CE
Dùleitá upozornìní
•
Pøehrávaè rozeznává pouze první z Vaich pevných diskù. Ulote si proto na pevný disk data, která se mají pøenáet v první sekci pevného disku (na první
diskové jednotce, obvykle C:\).
•
Pro optimální pøehrávání na televizoru bezpodmíneènì nastavte správnou normu (PAL/NTSC (Æ).
•
Pevný disk nepodporuje Hot-Plug. Smí se proto zasouvat a vytahovat pouze pøi vypnutém pøehrávaèi.
•
Tento pøehrávaè podporuje pro pamìové karty Hot-Plug. Pøi jejich zasouvání/vytahování se pøehrávaè nemusí vypínat.
ÈESKY

– 18 –
Im Garantiefall: www.teac.de/rma
In case of warranty: www.teac.de/rma
Lors d’un cas de garantie : www.teac.de/rma
In caso di garanzia: www.teac.de/rma
Para garantías consultar: www.teac.de/rma
Em caso de garantia contacte: www.teac.de/rma
 ñëó÷àå, òðåáóþùåì ïðåäîñòàâëåíèÿ ãàðàíòèè: www.teac.de/rma
W przypadku reklamacji gwarancyjnej: www.teac.de/rma
V pøípadì záruky: www.teac.de/rma
Technical Service Depots (Europe)
TEAC Europe GmbH, DSPD
Technical Support Tel: +49 (0) 180 5 55 83 79
Mo-Fr from 9:00 – 17:00 CET
Technical Support Fax: +49 (0) 611 7158 666
Online RMA: http://www.teac.de/RMA
Internet: http://www.teac.de/support
For Russia:
Technical Support Tel: +380 44 23 92 364
Technical Support Fax: +380 44 23 92 364
E-Mail: [email protected]
All other countries please call: +49 (0) 180 5 55 83 79
GARANTIEKARTE
Name des Eigentümers
Adresse
Name des Händlers Kaufdatum
Adresse des Händlers
Modell Seriennummer
Dauer der Gewährleistung
TEAC Corporation, nachfolgend TEAC genannt, gewährt dem Erstkäufer für dieses Produkt ab dem Datum des Kaufs
zwei (2) Jahre Garantie bezüglich jedes etwaigen Defekts an Material und Herstellung. Gemäß der nachstehenden
Bedingungen wird das betreffende TEAC Produkt von den autorisierten TEAC Servicestellen, den autorisierten Fach-
einzelhändlern oder den autorisierten Servicestellen der Facheinzelhändler ohne Berechnung von Material- und Arbeits-
kosten repariert. Die Servicestelle entscheidet, ob das Gerät als ganzes oder nur die defekten Teile ausgetauscht wer-
den. Die TEAC Tochtergesellschaften, die autorisierten TEAC Servicestellen und die autorisierten Servicestellen der
Facheinzelhändler übernehmen die Garantieleistung in den anderen EG- und EFTA-Mitgliedsstaaten im Rahmen der in
dieser Garantie definierten Bestimmungen.
Gewährleistungsumfang
Soweit dies nachfolgend nicht ausgeschlossen wird, umfaßt die Gewährleistung alle etwaigen Defekte an Material und
Herstellung. Folgendes ist aus dem Gewährleistungsumfang ausdrücklich ausgeschlossen:
1. Schäden am Gehäuse.
2. Geräte, die verändert wurden oder deren Seriennummern verfälscht, verändert oder entfernt wurden.
3. Schäden oder Fehlfunktionen, die auf folgendes zurückzuführen sind:
(a) Höhere Gewalt, fehlerhafter und/oder nicht bestimmungsgemäßer Gebrauch,
(b) Gebrauch, der nicht den im Handbuch angegebenen Verfahrensweisen entspricht,
(c) Transportschäden jedweder Art. Für Transportschäden haftet das Frachtunternehmen. (Alle mit dem Transport
verbundenen expliziten und impliziten Risiken sind nicht Bestandteil der Haftung von TEAC.)
(d) unsachgemäß ausgeführte Reparaturen oder Reparaturversuche durch nicht von TEAC autorisierte Personen
und/oder Unternehmen,
(e) alle Schäden, die nicht unmittelbar als Produktdefekt anzusehen sind, insbesondere Schäden, die durch
un-
sachgemäßen Gebrauch seitens des Anwenders wie beispielsweise unzureichende Kühlluftzufuhr entstanden sind,
(f) Schäden durch unsachgemäßes Anwenden der Software,
(g) regelmäßige Inspektionen,
(h) Wartung bzw. Reparatur von Teilen infolge normalen, betriebsbedingtem Verschleiß,
(i) Anpassung an national unterschiedliche technische oder sicherheitsrelevante Anforderungen, wenn das Pro-
dukt nicht in dem Land eingesetzt wird, für das es ursprünglich konzipiert und hergestellt worden ist.
Wer kann die Gewährleistung in Anspruch nehmen
Gewährleistungsansprüche können ausschließlich vom Ersterwerber des Produkts in Anspruch genommen werden.
Welche Kosten werden übernommen
TEAC übernimmt die Kosten für die im Rahmen einer Garantiereparatur anfallende Arbeitszeit und die Materialien, die
im Rahmen dieser Gewährleistungsbestimmungen definiert sind. Frachtkosten und Versandversicherung werden im
folgenden Abschnitt diskutiert.
Gewährleistungsabwicklung
1. Falls Ihr Gerät innerhalb der Garantiezeit Service benötigt, wenden Sie sich bitte an Ihren für dieses Produkt autori-
sierten Fachhändler. Falls Sie in Ihrer Nähe keinen Fachhändler finden, nehmen Sie bitte mit der TEAC Niederlas-
sung Kontakt auf.
2. Ihr Fachhändler teilt Ihnen Namen und Adresse der nächstgelegenen autorisierten Servicestation mit.
Schicken Sie das Produkt oder die als defekt vermuteten Teile spesenfrei (Fracht- und Versicherungskosten müssen
von Ihnen bezahlt werden) an die Servicestation. Fügen Sie bitte eine Kopie des Kaufbelegs bei und füllen Sie die
Garantiekarte vollständig aus (mit Angabe der Seriennummer des Geräts). TEAC behält sich vor, Garantieleistungen
abzulehnen, falls Garantiekarte und Kaufnachweis nicht im Sinne der vorliegenden Bestimmungen vorgelegt werden.
Falls die erforderlichen Reparaturen von den Gewährleistungsbestimmungen abgedeckt sind und das Produkt zur
nächstgelegenen Servicestation geschickt wurde, werden die Kosten für Rückfracht und Versicherung freigemacht.
Bitte schicken Sie das Gerät nicht ohne unsere ausdrückliche Zustimmung direkt an TEAC (siehe auch
Rücksendeformular).
Einschränkungen der Gewährleistung und Ausschluß implizierter Ansprüche
Soweit dies nicht dem jeweils gültigen national anwendbaren Recht widerspricht, sind folgende Ansprüche ausgeschlossen:
1.
TEAC begrenzt seine Leistungspflicht aus der Gewährleistung ausschließlich auf Reparatur oder Ersatz nach freier Wahl
von TEAC sowie der autorisierten Servicestellen, der autorisierten Facheinzelhändler und deren autorisierten Service-
stellen. Weitergehende Ansprüche sind in vollem Umfang ausgeschlossen. TEAC übernimmt keine Haftung für Schäden
an anderen Gegenständen realer oder virtueller Natur, insbesondere an Software und/oder Datenbeständen, die durch
Defekte in TEAC Produkten verursacht wurden. Weiterhin sind alle Ansprüche aus Mangel an Benutzbarkeit, entgange-
nem Umsatz und/oder Gewinn sowie alle anderen impliziten und expliziten Haftungen ausdrücklich ausgeschlossen.
2.
Alle impliziten Gewährleistungsansprüche und Vorbehalte, einschließlich solcher, aber nicht beschränkt auf diese, wie die
Vermarktbarkeit und/oder die Gebrauchsfähigkeit für einen bestimmten Zweck, werden hiermit explizit ausgeschlossen.
Diese Garantiebestimmungen berühren das national festgelegte Verbraucherrecht nicht.
WARRANTY CARD
Owner’s name
Address
Dealer’s names Date of purchase
Dealer’s address
Model Serial no.
Warranty Period
TEAC Corporation, hereinafter called TEAC, warrants this product against any defect in material and workmanship for
two (2) years from the date of purchase by the original retail purchaser. According to the following terms this TEAC
product will be repaired without charge of labor and materials by the authorized TEAC service stations, by the authorized
TEAC dealers and/or their authorized service stations. TEAC, the authorized TEAC service stations, the authorized
TEAC dealers and/or their authorized service stations may decide wether the defective product will be repaired or
replaced as a whole or partially. The TEAC dependancies, the authorized TEAC service stations, the authorized TEAC
dealers and/or their authorized service stations will also honour this warranty in the other EC and EFTA member states
based on the terms in this warranty conditions.
What is Covered and What is Not Covered.
Except as specified below, this warranty covers any defects in materials and workmanship of this product. The following
are not covered by the warranty:
1. Damage to or deterioration of the external cabinet.
2. Any unit that has been altered or on which the serial number has been defaced, modified, or removed.
3. Damage, deterioration or malfunction resulting from:
(a) accident, misuse, abuse or neglect;
(b) failure to follow instructions supplied with the product;
(c) any shipment of the product. Any damage arising of transportation is the liability of the freigth company. Any
damage arising of transportation and any implicit and explicit risks are the liability of the freigth company.This is
expressivly not a liability of TEAC;
(d) repair or attempted repair by anyone not authorized by TEAC to repair this product;
(e) causes other than product defects, including lack of technical skill, competence or experience of the user. Espe-
cially damages which may arise of incidential use respectively by improper ventilation,
(f) damages caused by improper or incorrect installation of software,
(g) periodic check-ups,
(h) maintenance respectively repair of parts due to normal wear and tear,
(i) adoptions or adjustments to the product in order to conform to different national technical or safety standards of
any country other than the one for which the product was originally designed and manufactured.
Who May Enforce the Warranty
This warranty may be enforced only by the original retail purchaser.
What We Will Pay For
We will pay all labor and material expenses for items covered by the warranty. Payment of shipping and insurance charge
is discussed in the next section of this warranty.
How You Can Get Warranty Service
1. If your unit needs service during the warranty period, please contact the local authorized distributor for this product.
If you are unable to locate such a distributor, please contact your TEAC facility at the address indicated below.
2. After identifying the nearest authorized service station for this product the product or any parts believed to be defec-
tive must be shipped freight and insurance prepaid to such service station, together with a copy of this warranty
certificate and a copy of your sales receipt, showing the date of purchase. Please ensure to fill out the warranty
certificate correctly (do not forget the serial number of the product). TEAC reserves the right to refuse the guarantee
service if the documents are missing or incomplete in the understanding of this terms.
If the necessary repairs are covered by the warranty, and if you have sent the product or parts of it to the nearest
authorized service station, the return freight and insurance charges will be prepaid.
Please do not return your unit to the TEAC factory without our prior authorization (see also RMA form)!
Limitations of Liability and Exclusion of Implied Warranties
Unless considered unenforceable or unlawfull under the applicable national law:
1. TEAC’s liability for any defective product is limited to repair or replacement of the product, at TEAC's option and the
option of authorized service stations, authorized dealers and their authorized service stations. No one is authorized
to assume any greater liability on TEACs behalf. TEAC shall not be liable for any damage to any other properties
independant of their virtual or real nature especially there is no liability for any damage to any kind of software and/
or any kind of databases caused by TEAC products.Furthermore TEAC is not liable for damages arising out of loss
of use, loss of revenue or profits, or any other damages, wether incidential, consequential, or otherwise.
2. All implied warranties or conditions, including but not limited to warranties or conditions of merchantability and
fitness for a particular purpose, hereby are excluded.
These warranty terms do not affect any statutory rights of consumers which were granted by the respective national
laws.
-
 1
1
-
 2
2
-
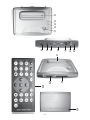 3
3
-
 4
4
-
 5
5
-
 6
6
-
 7
7
-
 8
8
-
 9
9
-
 10
10
-
 11
11
-
 12
12
-
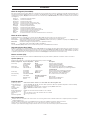 13
13
-
 14
14
-
 15
15
-
 16
16
-
 17
17
-
 18
18


TEAC ShowMe Benutzerhandbuch
- Kategorie
- Digitale Bilderrahmen
- Typ
- Benutzerhandbuch
in anderen Sprachen
- English: TEAC ShowMe User manual
- français: TEAC ShowMe Manuel utilisateur
- español: TEAC ShowMe Manual de usuario
- italiano: TEAC ShowMe Manuale utente
- čeština: TEAC ShowMe Uživatelský manuál
Verwandte Artikel
Andere Dokumente
-
Conceptronic CSM3PL Bedienungsanleitung
-
Fantec MM-FH36US 1000GB Benutzerhandbuch
-
-
Hama 00055102 Bedienungsanleitung
-
-
Conceptronic CM3H Benutzerhandbuch
-
Approx Mini Media Player Benutzerhandbuch
-
Conceptronic CM3S Benutzerhandbuch
-
LG RH367H-P Benutzerhandbuch
-
Samsung LE-40M71B Benutzerhandbuch