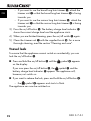
Silvercrest 102881 Bedienungsanleitung
- Kategorie
- Rasierer für Männer
- Typ
- Bedienungsanleitung
Dieses Handbuch ist auch geeignet für

ROTARY SHAVER SRR 3.7 A1
IAN 102881
ROTARY SHAVER
Operating instructions
APARAT DE RAS CU ROTAŢII
Instrucţiuni de utilizare
ROTACIJSKI APARAT ZA BRIJANJE
Upute za upotrebu
ROTATIONSRASIERER
Bedienungsanleitung
ΞΥΡΙΣΤΙΚΗ ΜΗΧΑΝΗ
Οδηүίες χρήσης

GB Operating instructions Page 1
HR Upute za upotrebu Stranica 21
RO Instrucţiuni de utilizare Pagina 41
GR Οδηүίες χρήσης Σελίδα 61
DE / AT / CH Bedienungsanleitung Seite 81
Before reading, unfold the page containing the illustrations and familiarise
yourself with all functions of the device.
Prije nego što pročitate tekst, otvorite stranicu sa slikama i upoznajte se na
osnovu toga sa svim funkcijama uređaja.
Înainte de a citi instrucţiunile, priviţi imaginile şi familiarizaţi-vă cu toate funcţiile
aparatului.
Πριν ξεκινήσετε την ανάγνωση, ανοίξτε τη σελίδα με τις εικόνες και εξοικει-
ωθείτε με όλες τις λειτουργίες της συσκευής.
Klappen Sie vor dem Lesen die Seite mit den Abbildungen aus und machen
Sie sich anschließend mit allen Funktionen des Gerätes vertraut.

A

B

1
SRR 3.7 A1
GB
Contents
Introduction . . . . . . . . . . . . . . . . . . . . . . . . . . . . . . . . . . . 2
Intended use . . . . . . . . . . . . . . . . . . . . . . . . . . . . . . . . . . 2
Package contents . . . . . . . . . . . . . . . . . . . . . . . . . . . . . . 2
Description of the appliance . . . . . . . . . . . . . . . . . . . . . . 3
Technical data . . . . . . . . . . . . . . . . . . . . . . . . . . . . . . . . . 4
Safety guidelines . . . . . . . . . . . . . . . . . . . . . . . . . . . . . . 5
Charging the batteries . . . . . . . . . . . . . . . . . . . . . . . . . . 9
Cordless shaving . . . . . . . . . . . . . . . . . . . . . . . . . . . . . . 10
Shaving using the mains adapter . . . . . . . . . . . . . . . . 11
Trimmer/long hair trimmer . . . . . . . . . . . . . . . . . . . . . 11
Travel lock . . . . . . . . . . . . . . . . . . . . . . . . . . . . . . . . . . . 12
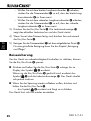
Cleaning and care . . . . . . . . . . . . . . . . . . . . . . . . . . . . . 13
Cleaning with the brush . . . . . . . . . . . . . . . . . . . . . . . . . . . . . . . . .13
Cleaning under running water . . . . . . . . . . . . . . . . . . . . . . . . . . . .14
Thorough cleaning . . . . . . . . . . . . . . . . . . . . . . . . . . . . . . . . . . . . .15
Storage . . . . . . . . . . . . . . . . . . . . . . . . . . . . . . . . . . . . . 16
Warranty and service . . . . . . . . . . . . . . . . . . . . . . . . . . 17
Disposal . . . . . . . . . . . . . . . . . . . . . . . . . . . . . . . . . . . . . 18
Importer . . . . . . . . . . . . . . . . . . . . . . . . . . . . . . . . . . . . .19
IB_102881_SRR3.7A1_HR_RO_GR.indb 1 02.12.14 09:47

GB
2
SRR 3.7 A1
Introduction
Congratulations on the purchase of your new appliance.
You have selected a high-quality product. The operating instructions
are part of this product. They contain important information on safety,
usage and disposal. Before using the product, familiarise yourself
with all handling and safety guidelines. Use the product only as
described and for the range of applications specifi ed. Please also
pass these operating instructions on to any future owner(s).
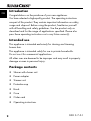
Intended use
This appliance is intended exclusively for shaving and trimming
human hair.
This appliance is intended solely for use in private households.
Do not use it for commercial applications.
All other uses are deemed to be improper and may result in property
damage or even in personal injury.
Package contents
♦ Shaver with shaver unit
♦ Power adapter
♦ Trimmer unit
♦ Protective cap
♦ Brush
♦ Case
♦ Order card
♦ Operating instructions
IB_102881_SRR3.7A1_HR_RO_GR.indb 2 02.12.14 09:47

3
SRR 3.7 A1
GB
NOTE
Check contents for completeness and damage immediately
after unpacking. Contact Customer Services if necessary.
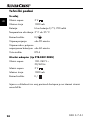
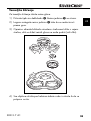
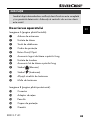
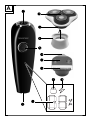
Description of the appliance
Figure A (front fold-out page):
1 Drive shaft
2 Shaver unit
3 Release button
4 Protective collar
5
On/off button
6 Narrow long-hair trimmer
7 Trimmer unit
8 Broad long-hair trimmer
9
symbol (lock)
0
symbol (charge)
q Battery charge level indicator
w Charging socket
Figure B (rear fold-out page):
e Connection plug
r Mains adapter
t Brush
z Protective cap
u Case
IB_102881_SRR3.7A1_HR_RO_GR.indb 3 02.12.14 09:47

GB
4
SRR 3.7 A1
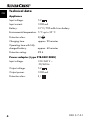
Technical data
Appliance
Input voltage: 5 V
Input current: 1000 mA
Battery: 3.7 V / 700 mAh Li-ion battery
Environmental temperature: 5°C up to 35°C
Protection class: III/
Charging time: approx. 90 minutes
Operating time with fully
charged battery: approx. 60 minutes
Protection rating: IPX 4
Power adapter (type PTB-050100EU)
Input voltage: 100 - 240 V ∼
50/60 Hz
Output voltage: 5 V
Output power: 1000 mA
Protection class: II /
IB_102881_SRR3.7A1_HR_RO_GR.indb 4 02.12.14 09:47

5
SRR 3.7 A1
GB
Safety guidelines
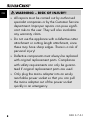
DANGER – RISK OF ELECTRIC SHOCK!
► Prior to use, check the appliance for visible
external damage. Never operate an appliance
that is damaged. There is a risk of electrocution.
► The appliance may no longer be used if there
is any damage to the cable, to the mains power
adapter, the housing or any other components.
► Remove the mains adapter from the power
socket
— if a defect occurs,
— before cleaning the appliance,
— if you do not intend using the appliance
for long periods,
— after every use.
Pull the mains power adapter itself and not the
cable.
► Never submerge the appliance or the cable
with mains adapter in water or other liquids.
IB_102881_SRR3.7A1_HR_RO_GR.indb 5 02.12.14 09:47

GB
6
SRR 3.7 A1
DANGER – RISK OF ELECTRIC SHOCK!
► If the appliance falls into water, it is imperative
that you pull the mains adapter out of the power
socket before you reach into the water.
► Never touch the mains adapter with wet hands,
especially when plugging it in or unplugging it.
Risk of electrocution!
► Check mains adapter and appliance regularly
for possible mechanical damage.
► Ensure that the cable does not get jammed in
cupboard doors or pulled over hot surfaces.
If this occurs, the cable insulation may be
damaged.
► The installation of a residual current circuit breaker
with a rated tripping current of no more than
30 mA off ers further protection from electric
shocks. Have the installation carried out only
by a qualifi ed electrician.
IB_102881_SRR3.7A1_HR_RO_GR.indb 6 02.12.14 09:47

7
SRR 3.7 A1
GB
DANGER – RISK OF ELECTRIC SHOCK!
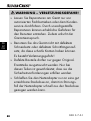
► WARNING! Keep the appliance dry.
► WARNING! Disconnect the mains adapter
from the handset when you clean it with water.
WARNING – RISK OF INJURY!
► This appliance may be used by children aged
8 years and above and by persons with limited
physical, sensory or mental capabilities or lack
of experience and knowledge, provided that
they are under supervision or have been told
how to use the appliance safely and are aware
of the potential risks.
► Children must not use the appliance as a play-
thing.
► Cleaning and user maintenance tasks may not
be carried out by children unless they are super-
vised.
IB_102881_SRR3.7A1_HR_RO_GR.indb 7 02.12.14 09:47

GB
8
SRR 3.7 A1
WARNING – RISK OF INJURY!
► All repairs must be carried out by authorised
specialist companies or by the Customer Service
department. Improper repairs can pose signifi -
cant risks to the user. They will also invalidate
any warranty claim.
► Do not use the appliance with a defective cutter
attachment or cutting length attachment, since
these may have sharp edges. There is a risk of
personal injury!
► Defective components must always be replaced
with original replacement parts. Compliance
with safety requirements can only be guaran-
teed if original replacement parts are used.
► Only plug the mains adapter into an easily
reachable power socket so that you can pull
the mains adapter out of the power socket
quickly in an emergency.
IB_102881_SRR3.7A1_HR_RO_GR.indb 8 02.12.14 09:47

9
SRR 3.7 A1
GB
CAUTION – PROPERTY DAMAGE!
► Never operate the appliance unsupervised,
and only in accordance with the information
on the nameplate.
► Use only the supplied mains adapter (type
PTB-050100EU) to power your appliance.
► To avoid damage caused by overheating, do
not cover the mains power adapter.
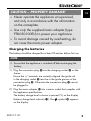
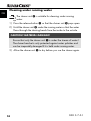
Charging the batteries
The battery should be charged for at least 90 minutes before fi rst use.
NOTE
►
Ensure that the appliance is switched off before charging the
battery.
1) Plug the connection plug e into the charging socket w on the
shaver.
Ensure the +/- terminals are correctly aligned: the guide rod
in the charging socket w must be in the guide groove on the
connection plug e. Otherwise the connection plug e cannot
be plugged in.
2) Plug the mains adapter r into a mains socket that complies with
the appliance specifi cations.
The battery charge level is shown in percent (%) on the display
(battery charge level indicator q). The
symbol 0 appears
on the display.
IB_102881_SRR3.7A1_HR_RO_GR.indb 9 02.12.14 09:47

GB
10
SRR 3.7 A1
♦ As soon as the battery is fully charged, the
symbol
0 appears
permanently on the display and the battery charge level indica-
tor q shows 99%.
♦ Once the battery is fully charged, you can use the appliance for
around 60 minutes without connecting it to the power supply.
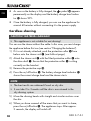
Cordless shaving
CAUTION! MATERIAL DAMAGE!
►
This appliance is not suitable for wet shaving!
You can use the shaver without the cable. In this case, you must charge
the appliance before fi rst use (see section "Charging the batteries").
1) If it is not already attached, push the protective collar 4 from
below onto the shaver unit 2 (see fold-out page).
2) Attach the shaver unit 2 with the fi tted protective collar 4 onto
the drive shaft 1. Ensure that the protective collar 4 is sitting
correctly on the handset.
3) Remove the protective cap z.
4) Press the on/off button 5. The battery charge level indicator q
shows the current charge level and the shaver starts.
NOTE
►
The best results are achieved if used on dry skin.
► It can take 2 to 3 weeks until the skin is accustomed to the
dry shaving system.
5) Move the shaving heads with straight and circular motions over
the skin.
6) When you have covered all the areas that you want to shave,
press the on/off button 5. The appliance stops. After approx.
3 seconds, the display will switch off .
IB_102881_SRR3.7A1_HR_RO_GR.indb 10 02.12.14 09:47

11
SRR 3.7 A1
GB
7) Clean the shaver after every use with the supplied brush t.
For a more thorough cleaning, read the section "Cleaning and
care".
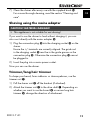
Shaving using the mains adapter
CAUTION! MATERIAL DAMAGE!
►
This appliance is not suitable for wet shaving!
If you want to use the shaver to load without charging it, you can
also use it directly with the mains adapter r:
1) Plug the connection plug e into the charging socket w on the
shaver.
Ensure the +/- terminals are correctly aligned. The guide rod
in the charging socket w must be in the guide groove on the
connection plug e. Otherwise the connection plug e cannot
be plugged in.
2) Insert the plug into a mains power socket.
Now you can use the shaver.
Trimmer/long hair trimmer
To shape your beard, form sideburns or shave eyebrows, use the
trimmer unit 7.
1) Pull the shaver unit 2 off the handset (if attached).
2) Attach the trimmer unit 7 to the drive shaft 1. Depending on
whether you want to use the broad 8 or narrow long hair
trimmer 6, change the direction of attachment.
IB_102881_SRR3.7A1_HR_RO_GR.indb 11 02.12.14 09:47

GB
12
SRR 3.7 A1
– If you want to use the broad long hair trimmer 8, attach the
trimmer unit 7 so that the broad long hair trimmer 8 is facing
towards you.
– If you want to use the narrow long hair trimmer 6, attach the
trimmer unit 7 so that the narrow long hair trimmer 6 is facing
towards you.
3) Press the on/off button 5. The battery charge level indicator q
shows the current charge level and the appliance starts.
4) When you are fi nished trimming, press the on/off switch 5 again.
5) Clean the trimmer unit 7 with the supplied brush t. For a more
thorough cleaning, read the section "Cleaning and care".
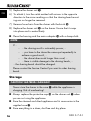
Travel lock
To ensure that the appliance cannot switch on accidentally, you can
lock the on/off button 5.
■ Press and hold the on/off button 5 until the
symbol 9 appears
on the display.
If you now press the on/off button 5, the
symbol 9 and the
battery charge level indicator q appear. The appliance will,
however, not switch on.
■ If you want to release the lock, press and hold the on/off button 5:
– the
symbol 9 appears and starts to fl ash.
The appliance can now be switched on.
IB_102881_SRR3.7A1_HR_RO_GR.indb 12 02.12.14 09:47

13
SRR 3.7 A1
GB
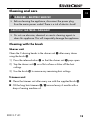
Cleaning and care
DANGER – ELECTRIC SHOCK!
►
Before cleaning the appliance, disconnect the power plug
from the mains power socket! There is a risk of electric shock!
CAUTION! MATERIAL DAMAGE!
►
Do not use abrasive, chemical or caustic cleaning agents to
clean this appliance. This will irreparably damage the appliance.
Cleaning with the brush
Shaver unit
Clean the 3 shaving heads in the shaver unit 2 after every shave
using the brush t.
1) Press the release button 3 so that the shaver unit 2 pops open.
2) Tap the shaver unit 2 on a fl at surface or blow off the hair
cuttings.
3) Use the brush t to remove any remaining hair cuttings.
Trimmer unit
■ Clean the trimmer unit after every use with the supplied brush t.
■ Oil the long hair trimmers 6/8 around every 6 months with a
drop of sewing machine oil.
IB_102881_SRR3.7A1_HR_RO_GR.indb 13 02.12.14 09:47

GB
14
SRR 3.7 A1
Cleaning under running water
The shaver unit 2 is suitable for cleaning under running
water.
1) Press the release button 3 so that the shaver unit 2 pops open.
2) Hold the shaver unit 2 under the running water so that the water
fl ows through the shaving heads from the inside to the outside.
CAUTION! MATERIAL DAMAGE!
Ensure that only the shaver unit 2 is under the stream of water!
The shaver handset is only protected against water splashes and
can be irreparably damaged if it is held under running water.
3) Allow the shaver unit 2 to dry before you use the shaver again.
IB_102881_SRR3.7A1_HR_RO_GR.indb 14 02.12.14 09:47

15
SRR 3.7 A1
GB
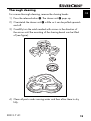
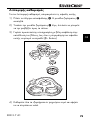
Thorough cleaning
For a more thorough cleaning, remove the shaving heads:
1) Press the release button 3. The shaver unit 2 pops up.
2) Overstretch the shaver unit 2 a little so it can be pulled upwards
and off .
3) Carefully turn the catch marked with arrows in the direction of
the arrows until the mounting of the shaving heads can be lifted
of (see fi gure).
4) Clean all parts under running water and then allow them to dry
fully.
IB_102881_SRR3.7A1_HR_RO_GR.indb 15 02.12.14 09:47

GB
16
SRR 3.7 A1
5) Replace the shaver unit 2.
6) To attach it, turn the catch marked with arrows in the opposite
direction to the arrow markings so that the shaving head mount-
ing can no longer be removed.
7) Remove loose hairs from the shaver with the brush t.
8) Replace the shaver unit 2 on the shaver. Ensure that it snaps
into place and is seated fi rmly.
■ Clean the housing and the mains adapter r with a damp cloth.
NOTE
If ...
– ... the shaving result is noticeably poorer, ...
– ... you have to the shave the same spot repeatedly to
achieve a good result, ...
– ... the shave takes much longer than usual, ...
– ... there is visible damage to the shaving heads, ...
... the shaving heads should be changed.
Please contact the Service Centre if you want to order shaving
heads.
Storage
CAUTION! MATERIAL DAMAGE!
Never store the shaver in the case u while the appliance is
charging. Risk of overheating!
■ Always replace the protective cap z on the shaver unit 2 when
you are not using the appliance.
■ Store the cleaned and dried appliance and its accessories in the
supplied case u.
■ Store everything in a clean, dust-free and dry place.
IB_102881_SRR3.7A1_HR_RO_GR.indb 16 02.12.14 09:47
Seite laden ...
Seite laden ...
Seite laden ...
Seite laden ...
Seite laden ...
Seite laden ...
Seite laden ...
Seite laden ...
Seite laden ...
Seite laden ...
Seite laden ...
Seite laden ...
Seite laden ...
Seite laden ...
Seite laden ...
Seite laden ...
Seite laden ...
Seite laden ...
Seite laden ...
Seite laden ...
Seite laden ...
Seite laden ...
Seite laden ...
Seite laden ...
Seite laden ...
Seite laden ...
Seite laden ...
Seite laden ...
Seite laden ...
Seite laden ...
Seite laden ...
Seite laden ...
Seite laden ...
Seite laden ...
Seite laden ...
Seite laden ...
Seite laden ...
Seite laden ...
Seite laden ...
Seite laden ...
Seite laden ...
Seite laden ...
Seite laden ...
Seite laden ...
Seite laden ...
Seite laden ...
Seite laden ...
Seite laden ...
Seite laden ...
Seite laden ...
Seite laden ...
Seite laden ...
Seite laden ...
Seite laden ...
Seite laden ...
Seite laden ...
Seite laden ...
Seite laden ...
Seite laden ...
Seite laden ...
Seite laden ...
Seite laden ...
Seite laden ...
Seite laden ...
Seite laden ...
Seite laden ...
Seite laden ...
Seite laden ...
Seite laden ...
Seite laden ...
Seite laden ...
Seite laden ...
Seite laden ...
Seite laden ...
Seite laden ...
Seite laden ...
Seite laden ...
Seite laden ...
Seite laden ...
Seite laden ...
Seite laden ...
Seite laden ...
Seite laden ...
Seite laden ...
Seite laden ...
Seite laden ...
Seite laden ...
Seite laden ...
Seite laden ...
-
 1
1
-
 2
2
-
 3
3
-
 4
4
-
 5
5
-
 6
6
-
 7
7
-
 8
8
-
 9
9
-
 10
10
-
 11
11
-
 12
12
-
 13
13
-
 14
14
-
 15
15
-
 16
16
-
 17
17
-
 18
18
-
 19
19
-
 20
20
-
 21
21
-
 22
22
-
 23
23
-
 24
24
-
 25
25
-
 26
26
-
 27
27
-
 28
28
-
 29
29
-
 30
30
-
 31
31
-
 32
32
-
 33
33
-
 34
34
-
 35
35
-
 36
36
-
 37
37
-
 38
38
-
 39
39
-
 40
40
-
 41
41
-
 42
42
-
 43
43
-
 44
44
-
 45
45
-
 46
46
-
 47
47
-
 48
48
-
 49
49
-
 50
50
-
 51
51
-
 52
52
-
 53
53
-
 54
54
-
 55
55
-
 56
56
-
 57
57
-
 58
58
-
 59
59
-
 60
60
-
 61
61
-
 62
62
-
 63
63
-
 64
64
-
 65
65
-
 66
66
-
 67
67
-
 68
68
-
 69
69
-
 70
70
-
 71
71
-
 72
72
-
 73
73
-
 74
74
-
 75
75
-
 76
76
-
 77
77
-
 78
78
-
 79
79
-
 80
80
-
 81
81
-
 82
82
-
 83
83
-
 84
84
-
 85
85
-
 86
86
-
 87
87
-
 88
88
-
 89
89
-
 90
90
-
 91
91
-
 92
92
-
 93
93
-
 94
94
-
 95
95
-
 96
96
-
 97
97
-
 98
98
-
 99
99
-
 100
100
-
 101
101
-
 102
102
-
 103
103
-
 104
104
-
 105
105
-
 106
106
-
 107
107
-
 108
108
-
 109
109


Silvercrest 102881 Bedienungsanleitung
- Kategorie
- Rasierer für Männer
- Typ
- Bedienungsanleitung
- Dieses Handbuch ist auch geeignet für
in anderen Sprachen
Verwandte Papiere
-
Silvercrest SRR 3.7 A1 Operating Instructions Manual
-
-
Silvercrest SLS 3 A1 Operating Instructions Manual
-
-
-
-
Silvercrest SRR 3.7 C4 Operating Instructions Manual
-
-
-