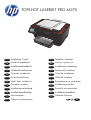
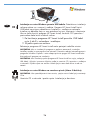
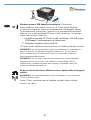
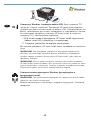
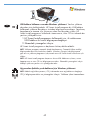
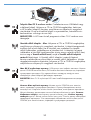
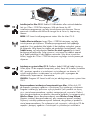
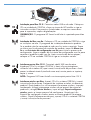
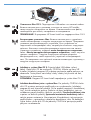
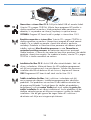
HP M275 Installationsanleitung
- Kategorie
- Lautsprecherhalterungen
- Typ
- Installationsanleitung
Dieses Handbuch eignet sich auch für
Seite wird geladen ...

10% - 80%
10 - 32.5°C
(50 - 91°F)
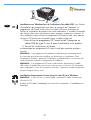
468 mm
(18.4 in)
495 mm
(19.5 in)
399 mm
(15.7 in)
13.5 kg
29.7 lb
1
EL
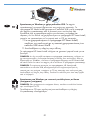
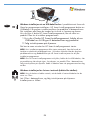
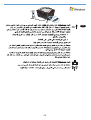
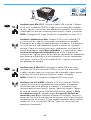
Τοποθετήστε τη συσκευή σε ένα σταθερό σημείο, σε καλά αεριζόμενο χώρο χωρίς
σκόνη και μακριά από το άμεσο ηλιακό φως.
FI
Sijoita laite tukevalle alustalle pölyttömään paikkaan, johon aurinko ei paista
suoraan ja jossa on hyvä ilmanvaihto.
NL
Plaats het apparaat op een stevige, goed geventileerde, stofvrije plek uit direct
zonlicht.
DA
Placer produktet i et stabilt, godt udluftet, støvfrit område uden direkte sollys.
CS
Pro umístění produktu vyberte stabilní, dobře větraný a bezprašný prostor mimo
dosah přímého slunečního světla.
HR
Proizvod postavite na čvrstu površinu do koje ne dopire izravno sunčevo svjetlo u
dobro prozračenom prostoru bez prašine.
CA
Seleccioneu una superfície sòlida, ben ventilada, sense pols i allunyada de la llum
directa del sol per situar el producte.
ES
Busque un lugar sólido, bien ventilado, sin polvo y alejado de la luz solar directa
para colocar el producto.
IT
Posizionare il prodotto in un'area piana, ben ventilata, priva di polvere e lontana dalla
luce diretta dei raggi solari.
DE
Stellen Sie das Gerät an einem stabilen, gut durchlüfteten und staubfreien Ort auf,
der direktem Sonnenlicht nicht ausgesetzt ist.
FR
Choisissez un support solide et un endroit propre, bien aéré et à l'abri du
rayonnement direct du soleil pour placer votre produit.
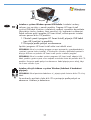
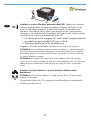
EN
Select a sturdy, well-ventilated, dust-free area, away from direct sunlight to position
the product.
1
Seite wird geladen ...

TR
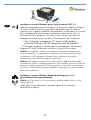
Ürün Gereksinimleri
Güç prizi
•
İki nokta arası USB kablosu•
SV
Produktkrav
Eluttag
•
A-till-B-typ, USB-kabel•
SL
Zahteve za izdelek
Napajalna vtičnica
•
Kabel USB vrste A–B•
SK
Požiadavky produktu
Sieťová zásuvka
•
Kábel USB typu A do B•
RU
Требования
Розетка питания
•
USB-кабель типа A-B•
RO
Cerinţe pentru produs
Priză de alimentare
•
Cablu USB de tip A-B•
PT
Requisitos do produto
Tomada de alimentação
•
Cabo USB do tipo A a B•
PL
Wymagania urządzenia
Gniazdko zasilania
•
Kabel USB typu A-to-B•
NO
Produktkrav
Strømuttak
•
USB-kabel av A-til-B-type•
KK
нім талаптары
Розетка
•
A-B типті USB кабелі•
HU
A készülék működtetéséhez szükséges
feltételek
Hálózati aljzat
•
A–B típusú USB-kábel•
EL
Απαιτήσεις συσκευής
Πρίζα ρεύματος
•
Καλώδιο USB τύπου A-to-B•
FI
Laitteen vaatimukset
Pistorasia
•
A-B-tyypin USB-kaapeli•
NL
Apparaatvereisten
Stopcontact
•
USB-kabel van het type A-naar-B•
DA
Produktkrav
Stikkontakt
•
A-til-B-type USB-kabel•
CS
Požadavky produktu
Elektrická zásuvka
•
USB kabel typu AB•
HR
Zahtjevi proizvoda
Utičnica
•
USB kabel vrste A do B•
CA
Requisits del producte
Presa de corrent
•
Cable USB de tipus A a B•
ES
Requisitos del producto
Toma de alimentación
•
Cable USB de tipo A a B•
IT
Requisiti del prodotto
Presa di alimentazione
•
Cavo USB di tipo A-B•
DE
Produktanforderungen
Netzsteckdose
•
A-to-B USB-Kabel•
FR
Exigences du produit
Prise de courant
•
Câble USB de type A vers B•
AR
EN
Product Requirements
Power outlet
•
A-to-B type USB cable•
3

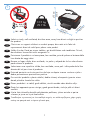
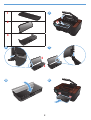
CS
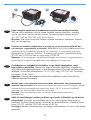
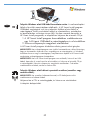
Upozornění: Tento produkt obsahuje rameno fotoaparátu, které se používá pro
fotografování dokumentů. Toto rameno fotoaparátu se nepoužívá jako držák či
nosné zařízení. Chcete-li produkt přenést, použijte držáky umístěné vespod produktu
na pravé a levé straně. Tento produkt obsahuje žárovku LED. Při provozu se
nekoukejte přímo do ní.
HR
Upozorenje: Uređaj uključuje i krak fotoaparata koji se koristi za fotografiranje
dokumenata. Taj krak nije namijenjen korištenju kao ručka ili dio za nošenje. Za
nošenje koristite ručke koje se nalaze na njegovoj donjoj desnoj i lijevoj strani.
Uređaj uključuje i LED svjetiljku. Nemojte gledati izravno u nju dok je u upotrebi.
CA
Advertència: Aquest producte inclou un braç de càmera que s’utilitza per
fotograar documents. Aquest braç de càmera no està pensat per utilitzar-lo com
a nansa o dispositiu de transport. Per transportar el producte, utilitzeu les nanses
situades a la part inferior dreta i esquerra del producte. Aquest producte inclou una
làmpada LED. No mireu directament a la làmpada mentre estigui en funcionament.
ES
Advertencia: Este producto incluye un brazo de cámara que se utiliza para
fotograar documentos. Este brazo de la cámara no se debe utilizar como asa
o dispositivo de transporte. Para transportar el producto, utilice las asas que hay
en la parte inferior derecha e izquierda del producto. Este producto incluye una
lámpara de LED. No la mire directamente cuando esté en funcionamiento.
IT
Avvertenza: questo prodotto viene fornito con un braccio della fotocamera da
utilizzare per acquisire foto di documenti. Il braccio non è concepito per essere
utilizzato come maniglia o per il trasporto della periferica. Per il trasporto del prodotto,
utilizzare le maniglie posizionate nella parte inferiore destra e sinistra della periferica.
Il prodotto include una lampada a LED. Non ssare la lampada durante l'uso.
DE
Achtung: Dieses Gerät verfügt über einen Kameraarm, der zum Fotograeren
von Dokumenten verwendet wird. Dieser Kameraarm sollte nicht als Griff oder
Tragevorrichtung verwendet werden. Verwenden Sie zum Tragen des Geräts die
Griffe rechts und links unten am Gerät. Dieses Gerät verfügt über eine LED-Lampe.
Sehen Sie nicht direkt hinein, wenn sie leuchtet.
FR
Avertissement : Ce produit comprend un bras pour appareil photo utilisé pour
photographier les documents. Ce bras pour appareil photo ne doit pas être
utilisé comme poignée, ni pour le transport. Pour porter le produit, servez-vous
des poignées qui se trouvent en bas à droite et à gauche du produit. Ce produit
comprend une lampe DEL. Evitez de regarder directement la lampe allumée.
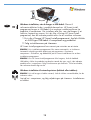
EN
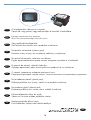
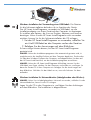
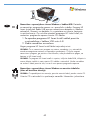
Warning: This product includes a camera arm that is used to photograph
documents. This camera arm is not intended to be used as a handle or carrying
device. To carry the product, use the handles located on the bottom right and left
sides of the product. This product includes an LED lamp. Do not look directly into it
during its operation.
4
Seite wird geladen ...
Seite wird geladen ...
Seite wird geladen ...
Seite wird geladen ...
Seite wird geladen ...

1 2
3
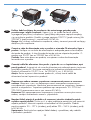
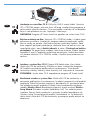
ES
Conecte el cable de alimentación entre el producto y una toma CA con conexión
a tierra y, a continuación, encienda el producto. Asegúrese de que la fuente de
alimentación es adecuada para el voltaje del producto. La especicación del
voltaje se encuentra en la etiqueta del producto. El producto utiliza 110-127 VCA
o 220-240 VCA y 50/60 Hz.
Precaución: Para evitar daños al producto, utilice sólo el cable de alimentación que
se proporciona con el mismo.
IT
Collegare il cavo di alimentazione del prodotto a una presa elettrica con collegamento
a terra, quindi accendere il prodotto. Accertarsi che la fonte di alimentazione sia
adeguata alla tensione del prodotto. L'indicazione della tensione si trova sull'etichetta
del prodotto. Il prodotto utilizza 110-127 V CA o 220-240 V CA e 50/60 Hz.
Attenzione
:
per evitare di danneggiare il prodotto, utilizzare solo il cavo di
alimentazione fornito in dotazione.
DE
Verbinden Sie das Netzkabel mit dem Gerät und einer geerdeten
Wechselstromsteckdose. Schalten Sie dann das Gerät ein. Stellen Sie sicher,
dass Ihre Stromquelle für die Betriebsspannung des Geräts geeignet ist. Die
Betriebsspannung nden Sie auf dem Geräteetikett. Das Gerät verwendet entweder
110 bis 127 Volt Wechselspannung oder 220 bis 240 Volt Wechselspannung und
50/60 Hz.
Vorsicht: Um Schaden am Gerät zu vermeiden, sollten Sie ausschließlich das
Netzkabel verwenden, das im Lieferumfang des Geräts enthalten ist.
FR
Branchez le cordon d’alimentation entre le produit et une prise CA avec mise
à la terre, puis mettez le produit sous tension. Assurez-vous que votre source
d'alimentation est adaptée à la tension nominale du produit. La tension nominale
est indiquée sur l'étiquette du produit. Le produit utilise 110-127 volts c.a. ou 220-
240 volts c.a. et 50/60 Hz.
Attention : An d'éviter d'endommager le produit, utilisez uniquement le cordon
d'alimentation fourni avec le produit.
EN
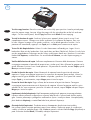
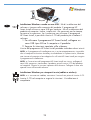
Connect the power cord between the product and a grounded AC outlet, and then
turn on the product. Make sure your power source is adequate for the product
voltage rating. The voltage rating is on the product label. The product uses either
110-127 Vac or 220-240 Vac and 50/60 Hz.
Caution: To prevent damage to the product, use only the power cord that is
provided with the product.
10
Seite wird geladen ...
Seite wird geladen ...
Seite wird geladen ...
Seite wird geladen ...

4
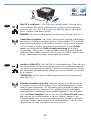
EL
Στον πίνακα ελέγχου, επιλέξτε τη γλώσσα σας.
Περιμένετε τέσσερα λεπτά μέχρι να ολοκληρωθεί η προετοιμασία της συσκευής.
FI
Valitse kieli ohjauspaneelista.
Odota noin neljä minuuttia, kunnes laitteen alustaminen on suoritettu loppuun.
NL
Selecteer op het bedieningspaneel uw taal.
Wacht ongeveer vier minuten tot het product is geïnitialiseerd.
DA
Vælg sprog på kontrolpanelet.
Vent ca. re minutter, mens produktet starter.
CS
Na ovládacím panelu vyberte jazyk.
Vyčkejte přibližně 4 minuty, než proběhne inicializace produktu.
HR
Odaberite svoj jezik na upravljačkoj ploči.
Pričekajte približno četiri minute dok se proizvod pokrene.
CA
Al tauler de control, seleccioneu el vostre idioma.
Espereu aproximadament quatre minuts mentre el producte s’inicialitza.
ES
En el panel de control, seleccione su idioma.
Espere cuatro minutos aproximadamente hasta que el producto se inicialice.
IT
Sul pannello di controllo, selezionare la lingua.
Attendere circa quattro minuti in modo che l'inizializzazione del prodotto venga
eseguita.
DE
Wählen Sie auf dem Bedienfeld Ihre Sprache aus.
Warten Sie ca. vier Minuten, bis das Gerät initialisiert wurde.
FR
Sur le panneau de commande, sélectionnez votre langue.
Patientez environ pendant 4 minutes, le temps que le produit s'initialise.
EN
On the control panel, select your language.
Wait approximately four minutes while the product initializes.
15
Seite wird geladen ...

5
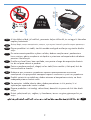
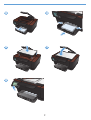
CS
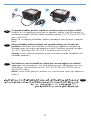
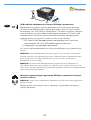
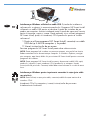
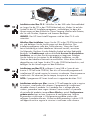
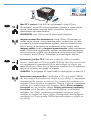
Otestujte funkci kopírování. Zvedněte rameno fotoaparátu do plně otevřené polohy.
Na snímací plochu umístěte potištěný papír lícem nahoru. Zarovnejte papír se zvednutými
vodítky u levého a zadního okraje. Na ovládacím panelu stiskněte tlačítko Copy (Kopírovat) a
poté stisknutím tlačítka Black (Černobíle) zahájíte kopírování.
HR
Isprobavanje funkcije kopiranja. Krak fotoaparata podignite do potpuno otvorenog položaja.
Ispisanu stranicu postavite na postolje za snimanje tako da dio s ispisom bude okrenut prema
gore. Stranicu poravnajte s podignutim vodilicama te lijevim i stražnjim rubom. Na upravljačkoj
ploči dodirnite Kopiranje, a zatim Crno kako biste pokrenuli kopiranje.
CA
Proveu la funció de còpia. Pugeu el braç de la càmera a la posició oberta. Carregueu
una pàgina impresa cara amunt al dispositiu de captura. Alineeu la pàgina amb les guies
alçades de les vores esquerra i posterior. Al tauler de control, toqueu Còpia i després toqueu
Negre per iniciar la còpia.
ES
Pruebe la función de copia. Suba el brazo de la cámara hasta la posición de máxima
apertura. Cargue una página impresa en la supercie de captura (boca arriba). Alinee la
página con las guías alzadas de los bordes izquierdo y posterior. En el panel de control,
toque Copia y, a continuación, toque Negro para iniciar la copia.
IT
Verica della funzione di copia. Sollevare completamente il braccio della fotocamera. Caricare
una pagina stampata sul pannello di acquisizione, rivolta verso l'alto. Allineare la pagina con le
guide sollevate a sinistra e con i bordi posteriori. Sul pannello di controllo, toccare Copia, quindi
Nero per avviare la copia.
DE
Testen Sie die Kopierfunktion. Heben Sie den Kameraarm vollständig an. Legen Sie ein
bedrucktes Blatt mit der bedruckten Seite nach oben auf den Objekttisch. Richten Sie die Seite
an den angehobenen Führungen an der linken und hinteren Kante aus. Berühren Sie auf dem
Bedienfeld Kopieren, und berühren Sie anschließend Schwarz, um den Kopiervorgang zu
starten.
FR
Test de la fonction de copie. Soulevez le bras pour appareil photo jusqu'à ce qu'il soit
complètement ouvert. Chargez une feuille imprimée sur le plateau de capture, face vers
le haut. Alignez la page sur les guides surélevés, sur les bords gauche et arrière. Sur le
panneau de commande, appuyez sur Copie puis sur Noir pour commencer à copier.
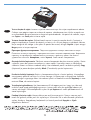
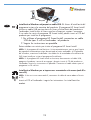
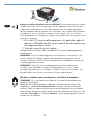
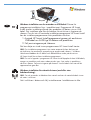
EN
Test the copy function. Raise the camera arm to the fully open position. Load a printed page
onto the capture stage, face-up. Align the page with the raised guides at the left and rear
edges. On the control panel, touch Copy and then touch Black to start copying.
17
Seite wird geladen ...
Seite wird geladen ...
Seite wird geladen ...
Seite wird geladen ...

DE
Windows-Installation bei Verwendung eines USB-Kabels: Die Dateien
für die Softwareinstallation benden sich im Speicher des Geräts.
Das HP Smart Install-Programm verwendet ein USB-Kabel, um die
Installationsdateien von Ihrem Gerät auf den Computer zu übertragen.
Es installiert alle Dateien, die Sie zum Drucken, Kopieren und Scannen
benötigen. Wenn Sie das HP Smart Install-Programm nicht verwenden
möchten, können Sie für die Softwareinstallation die CD einlegen.
1.
Um das HP Smart Install-Programm zu verwenden, schließen Sie
ein A-to-B USB-Kabel an den Computer und an das Gerät an.
2. Befolgen Sie die Anweisungen auf dem Bildschirm.
Es kann einige Minuten dauern, bis das HP Smart Install-Programm
gestartet wird.
HINWEIS: Wenn das Installationsprogramm nicht automatisch gestartet wird, ist
möglicherweise die AutoPlay-Funktion auf dem Computer deaktiviert. Durchsuchen
Sie über den Windows Explorer den Computer, und doppelklicken Sie dann auf
das HP Smart Install-Laufwerk, um das Installationsprogramm auszuführen.
HINWEIS: Wenn das HP Smart Install-Programm fehlschlägt, trennen Sie das
USB-Kabel vom Gerät, schalten Sie das Gerät aus und wieder ein, und legen Sie
dann die Geräte-CD in Ihren Computer ein. Befolgen Sie die Anweisungen auf
dem Bildschirm. Schließen Sie das Kabel nur an, wenn die Software Sie dazu
auffordert.
Windows-Installation für Netzwerkdrucker (kabelgebunden oder Wireless):
HINWEIS: Wenn Sie ein kabelgebundenes Netzwerk verwenden, schließen Sie das
Netzwerkkabel an, bevor Sie die CD einlegen.
Legen Sie die CD in den Computer ein, und folgen Sie den Anleitungen
auf dem Bildschirm. Die Installation ist abgeschlossen.
22
Seite wird geladen ...
Seite wird geladen ...
Seite wird geladen ...
Seite wird geladen ...
Seite wird geladen ...
Seite wird geladen ...
Seite wird geladen ...
Seite wird geladen ...
Seite wird geladen ...
Seite wird geladen ...
Seite wird geladen ...
Seite wird geladen ...
Seite wird geladen ...
Seite wird geladen ...
Seite wird geladen ...
Seite wird geladen ...
Seite wird geladen ...
Seite wird geladen ...
Seite wird geladen ...
Seite wird geladen ...
Seite wird geladen ...
Seite wird geladen ...

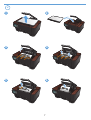
Installazione per Mac OS X: collegare il cavo USB o il cavo di rete.
Inserire il CD nell'unità CD-ROM, fare clic sull'icona del programma di
installazione HP, quindi seguire le istruzioni visualizzate. Questo processo
installa tutti i le necessari per la stampa, la copia e la scansione.
NOTA: il programma HP Smart Install non è supportato da Mac OS X.
Installazione wireless per Mac: inserire il CD nell'apposita unità e seguire
le istruzioni visualizzate sullo schermo. Il programma di installazione
dovrebbe rilevare il prodotto. Se il prodotto non si collega alla rete
wireless, procedere come segue: toccare l'icona wireless sul pannello
di controllo del prodotto, toccare Menu Wireless, quindi Congurazione
guidata wireless per avviare il processo di congurazione. Seguire
la procedura visualizzata in Congurazione guidata wireless per
collegare il prodotto alla rete. Al termine della procedura, inserire il CD
nell'apposita unità e seguire le istruzioni visualizzate sullo schermo.
IT
DE
Installation unter Mac OS X: Schließen Sie das USB- oder Netzwerkkabel
an. Legen Sie die CD in das CD-ROM-Laufwerk ein, klicken Sie auf das
Symbol für das HP Installationsprogramm, und befolgen Sie dann die
Anweisungen auf dem Bildschirm. Dieser Vorgang installiert alle Dateien,
die Sie zum Drucken, Kopieren und Scannen benötigen.
HINWEIS:
Das HP Smart Install-Programm wird bei Mac OS X nicht
unterstützt.
Kabellose Mac-Installation: Legen Sie die CD in das CD-ROM-Laufwerk
ein, und befolgen Sie die Anweisungen auf dem Bildschirm. Das
Installationsprogramm sollte das Gerät erkennen. Wenn das Gerät
keine Verbindung mit dem kabellosen Netzwerk herstellt, versuchen
Sie Folgendes: Berühren Sie das Kabellos-Symbol auf dem Bedienfeld.
Berühren Sie Drahtlosmenü und anschließend Assistent für die drahtlose
Installation, um mit dem Einrichtungsvorgang zu beginnen. Befolgen
Sie die Schritte im Assistenten für die drahtlose Installation, um das
Gerät an das kabellose Netzwerk anzuschließen. Wenn diese Schritte
abgeschlossen sind, legen Sie die CD in das CD-ROM-Laufwerk ein, und
befolgen Sie die Anweisungen auf dem Bildschirm.
45
Seite wird geladen ...
Seite wird geladen ...
Seite wird geladen ...
Seite wird geladen ...
Seite wird geladen ...
Seite wird geladen ...
Seite wird geladen ...
Seite wird geladen ...
Seite wird geladen ...
Seite wird geladen ...

8
DE
Die Installation ist abgeschlossen. Falls Sie Ihr Gerät während der
Softwareinstallation nicht registriert haben, besuchen Sie die Website
www.register.hp.com, um es jetzt zu registrieren. Das HP Help and Learn
Center sowie weitere Dokumentation bendet sich auf der CD, die dem Gerät
beiliegt, oder im HP Programmordner auf Ihrem Computer. Das HP Help and Learn
Center ist eine Produkthilfe für einfachen Zugriff auf Produktinformationen, Web-
Support für HP Produkte, Hinweise zur Fehlerbehebung sowie Zulassungs- und
Sicherheitsinformationen.
Informationen zur Erfüllung behördlicher Bestimmungen nden Sie im Handbuch
zu Garantie und rechtlichen Hinweisen auf der Geräte-CD oder auf der folgenden
Website:
www.hp.com/support/LJColorMFPM275.
FR
L’installation est terminée. Si vous n'avez pas enregistré votre produit lors de
l'installation du logiciel, rendez-vous sur www.register.hp.com pour le faire dès
maintenant. Le centre d'aide et d'apprentissage HP (HP Help and Learn Center)
ainsi que d'autres documents se trouvent sur le CD livré avec le produit ou dans
le dossier dédié aux programmes HP sur votre ordinateur. Le centre d'aide et
d'apprentissage HP est un outil d'aide qui fournit un accès facile aux informations
sur le produit, à une assistance en ligne pour les produits HP, à un guide de
dépannage et à des informations relatives à la réglementation et à la sécurité.
Pour les informations relatives à la conformité, consultez le Guide de garantie et
d'informations légales sur le CD du produit ou sur le site Web suivant :
www.hp.com/support/LJColorMFPM275.
EN
Setup is complete. If you did not register your product during software installation
go to www.register.hp.com to register now. The HP Help and Learn Center
and other documentation are on the CD that came with the product or in the HP
Program folder on your computer. The HP Help and Learn Center is a product help
tool that provides easy access to product information, HP product Web support,
troubleshooting guidance, and regulatory and safety information.
For regulatory compliance information, see the Warranty and Legal Guide on the
product CD or at the following Web site:
www.hp.com/support/LJColorMFPM275.
56
Seite wird geladen ...
Seite wird geladen ...
Seite wird geladen ...
Seite wird geladen ...
Seite wird geladen ...
Seite wird geladen ...
Seite wird geladen ...
Seite wird geladen ...
Seite wird geladen ...
Seite wird geladen ...
Seite wird geladen ...
-
 1
1
-
 2
2
-
 3
3
-
 4
4
-
 5
5
-
 6
6
-
 7
7
-
 8
8
-
 9
9
-
 10
10
-
 11
11
-
 12
12
-
 13
13
-
 14
14
-
 15
15
-
 16
16
-
 17
17
-
 18
18
-
 19
19
-
 20
20
-
 21
21
-
 22
22
-
 23
23
-
 24
24
-
 25
25
-
 26
26
-
 27
27
-
 28
28
-
 29
29
-
 30
30
-
 31
31
-
 32
32
-
 33
33
-
 34
34
-
 35
35
-
 36
36
-
 37
37
-
 38
38
-
 39
39
-
 40
40
-
 41
41
-
 42
42
-
 43
43
-
 44
44
-
 45
45
-
 46
46
-
 47
47
-
 48
48
-
 49
49
-
 50
50
-
 51
51
-
 52
52
-
 53
53
-
 54
54
-
 55
55
-
 56
56
-
 57
57
-
 58
58
-
 59
59
-
 60
60
-
 61
61
-
 62
62
-
 63
63
-
 64
64
-
 65
65
-
 66
66
-
 67
67
-
 68
68


HP M275 Installationsanleitung
- Kategorie
- Lautsprecherhalterungen
- Typ
- Installationsanleitung
- Dieses Handbuch eignet sich auch für
in anderen Sprachen
- English: HP M275 Installation guide
- français: HP M275 Guide d'installation
- español: HP M275 Guía de instalación
- italiano: HP M275 Guida d'installazione
- русский: HP M275 Инструкция по установке
- Nederlands: HP M275 Installatie gids
- slovenčina: HP M275 Návod na inštaláciu
- português: HP M275 Guia de instalação
- dansk: HP M275 Installationsvejledning
- polski: HP M275 Instrukcja instalacji
- čeština: HP M275 instalační příručka
- svenska: HP M275 Installationsguide
- Türkçe: HP M275 Yükleme Rehberi
- suomi: HP M275 Asennusohje
- română: HP M275 Ghid de instalare
Verwandte Artikel
-
HP LaserJet Enterprise 500 MFP M525 Installationsanleitung
-
-
-
-
HP LaserJet Pro CP1525 Bedienungsanleitung
-
-
-
-
-
HP LaserJet Pro M1132 Multifunction Printer series Benutzerhandbuch