
W
ühlmaus Schussfalle - AUBER
Artikel Nr. 10 09 82
Vole Trap Gun - AUBER
Article No. 10 09 82
Bedienungsanleitung
Instruction Manual

II
Instruction manuals provide valuable hints for using your new
device. They enable you to use all functions, and they help you
avoid misunderstandings and prevent damage.
Please take the time to read this manual carefully and keep it
for future reference.
Bedienungsanleitungen enthalten wichtige Hinweise für den
Umgang mit Ihrem neuen Produkt. Sie ermöglichen Ihnen, alle
Funktionen zu nutzen, und sie helfen Ihnen, Missverständnis-
se zu vermeiden und Schäden vorzubeugen.
Bitte nehmen Sie sich die Zeit, diese Bedienungsanleitung in
Ruhe durchzulesen und bewahren Sie diese für späteres
Nachlesen gut auf.
Sehr
g
eehrte Damen und Herren
Dear Customers

III
Übersicht
|
Overvie
w
A
B
D
C
E
F
G
H

IV
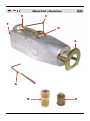
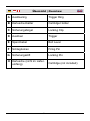
A Auslösering Trigger Ring
B Kartuschenhalter Cartridge Holder
C Sicherungsbügel Locking Clip
D Auslöser Trigger
E Spannhebel Bolt Lever
F Schlagbolzen Firing Pin
G Sicherungsstift Locking Pin
H Kartusche (nicht im Liefer-
umfang)
Cartridge (not included)
Übersicht
|
Overvie
w

1
Sicherheitshinweise
Beachten Sie bitte zur Vermeidung von Fehlfunkti-
onen, Schäden und gesundheitlichen Beeinträchti-
gungen folgende Hinweise:
Diese Bedienungsanleitung gehört zu diesem Produkt. Sie
enthält wichtige Hinweise zur Inbetriebnahme und Handha-
bung. Bitte legen Sie die Bedienungsanleitung dem Produkt
bei, wenn Sie es an Dritte weitergeben!
Lassen Sie Verpackungsmaterial nicht achtlos herumliegen.
Plastiktüten etc. können zu einem gefährlichen Spielzeug für
Kinder werden.
Vorsicht, es handelt sich um einen Schussapparat!
Schießen Sie die Schussfalle nie in der Hand ab.
Halten Sie stets die Finger von der Laufmündung fern.
Halten Sie niemals die Laufmündung gegen den Körper.
Lassen Sie den schussbereiten Apparat niemals unbeaufsich-
tigt liegen!
Vorsicht wenn Kinder in der Nähe sind!
Generell sollten alle Personen eingewiesen bzw. informiert
werden, die sich in der Nähe der Schussfalle befinden.
Jugendlichen unter 18 Jahren ist der Umgang mit diesem
Apparat verboten.
Stellen Sie das Gerät nicht in unmittelbarer Nähe zu öffentli-
chen Wegen und Plätzen auf.
Verwenden Sie das Gerät nur für den vorgesehenen Zweck.
Tragen Sie beim Aufstellen der Schussfalle enganliegende
Montagehandschuhe und ggf. Gehörschutz.
Schussgerät und Munition sind stets getrennt zu lagern.
Zerlegen Sie das Gerät nicht und unternehmen Sie keine
Reparaturversuche. Das Gerät enthält keine durch Sie aus-
wechselbaren oder zu reparierenden Teile. Wenden Sie sich
bei Frage oder Problemen an unseren Kundenservice.

2
Benutzen
Einleitung
Tierschutzgerechte Wühlmausbekämpfung: Mit der Schussfalle
erzielen sie eine zuverlässige, sichere und somit tier-
schutzgerechte Tötung. Der Apparat ist komplett aus Aluminium
hergestellt und dadurch dauerhaft gegen Korrosion geschützt.
Die Schussfalle hat eine unkomplizierte, einfache und sichere
Handhabung.
Laden
Laden und Entladen darf nur am Einsatzort erfolgen!
Die Schussfalle nur im gesicherten Zustand laden!
(Nur mit Kartuschenmunition 9 mm R Knall laden):
1. Schrauben Sie den Kartuschenhalter (B) aus dem Lauf der
Schussfalle.
2. Drücken Sie den Sicherungsbügel (C) nach vorn in Richtung
des Auslöserings (A).
3. Drücken Sie den Spannhebel (E) nieder und legen Sie den
Sicherungsbügel (C) über den Spannhebel.
4. Führen Sie den Sicherungsstift (G) in die vorgesehene Öff-
nung am hinteren Teil des Spannhebels ein. Das Gerät ist nun
doppelt gesichert.
5. Führen Sie die Kartusche (H) in den Kartuschenhalter (B) ein.
6. Schrauben Sie anschließend den Kartuschenhalter wieder ein.
7. Drücken Sie jetzt den Spannhebel (E) ganz nieder und legen
Sie den Auslöser (D) über den Spannhebel.
8. Entfernen Sie den Sicherungsstift (G) bevor Sie die Schussfal-
le in den Mausgang einführen.
9. Erst wenn der Apparat in Schussstellung gebracht ist,
legen Sie den Sicherungsbügel (C) um. Das Gerät befindet
sich nun in Schussstellung!

3
Benutzen
Entladen
Das Entladen und Entfernen eines nicht abgeschossenen
Apparats muss wie folgt durchgeführt werden:
Der Apparat muss zuerst durch 2 Sicherungen gesichert werden.
1. Legen Sie den Sicherungsbügel (C) über den Spannbügel (E).
2. Stecken Sie den Sicherungsstift (G) in die vorgesehene
Öffnung am hinteren Teil des Spannhebels (E).
3. Schrauben Sie dann den Kartuschenhalter (B) heraus.
4. Entfernen Sie die Kartusche (H).
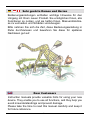
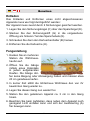
Fanganleitung
1. Hacken Sie an mehreren
Stellen die Wühlmaus-
haufen auf.
2. Öffnen Sie die Gänge
mittels eines Holzstabs
in jedem aufgehackten
Haufen. Die Gänge dür-
fen keine Biegung oder Abzweigung haben und müssen etwa
20 cm geradeaus laufen.
3. In kurzer Zeit stößt die lichtscheue Wühlmaus den von ihr
bewohnten Gang wieder zu.
4. Legen Sie diesen Gang nun wieder frei.
5. Stellen Sie den geladenen Apparat ca. 3 cm in den Gang
hinein.
6. Beachten Sie beim Aufstellen, dass neben dem Apparat noch
genügend Licht einfallen kann und sich der Auslöserring (A)
frei bewegen kann.

4
Benutzen
Beim ersten Versuch der Maus, den Gang wieder mit Erde zu
verstopfen, schiebt sie den Auslöser zurück und bewirkt so den
Selbstschuss. Die Maus ist sofort tot und liegt oft 30 cm im Gang
zurück.
Ein Misserfolg ist bei richtiger Handhabung ausgeschlossen.
Pflege und Reinigung
Verwenden Sie den Sicherungsstift (G), um eine gezündete
Kartusche aus dem Kartuschenhalter (B) zu entfernen.
Reinigen Sie die Schussfalle nach dem Gebrauch. Reinigen
Sie das Gewinde an der Mündung der Schussfalle von Erde
und Sand.
Ölen Sie den Schlagbolzen (F) von Zeit zu Zeit.
Technische Daten
Bezeichnung: Wühlmaus Schussfalle
Typ / Modell: AUBER
Abmessungen: 180 x 45 x 60 mm
Gewicht (ohne Munition): 384 g
Munition: 9 x 17 mm R Knall
(gelb, für Wühlmäuse)

5
Zulassun
g
und Zubehör
Hinweise auf die PTB-Zulassung
Dieses Wühlmaus-Schussgerät wurde gem. § 7 Be-
schussgesetz (Besch-G) von der Physikalisch-
Technischen Bundesanstalt unter der Nr. 2 zugelassen.
Durch diese PTB-Zulassung ist der Betrieb des Wühlmaus-
Schussgeräts in den Ländern Deutschland, Österreich und in
Großbritannien erlaubt.
Hinweise auf Wiederholungsprüfung
Betriebener Schussapparat gem. § 24 der Beschussverordnung
(BeschussV).
Gemäß § 24 Beschussverordnung (BeschussV) ist der Betreiber
von Schussapparaten verpflichtet, diese alle 2 Jahre ab Kaufda-
tum, bei wesentlichen Funktionsmängeln unverzüglich, dem
Hersteller oder dessen Beauftragten zur Wiederholungsprüfung
vorzulegen. Geprüfte Geräte erhalten eine Prüfplakette.
Name und Anschrift des Herstellers:
AUBER Aluminiumguss
Königsfelder Str. 96
D-78739 Hardt
Zubehör
Kartuschen: Artikel Nr. 92 13 53 (gelb, für Wühlmäuse)
Ersatzkartuschenhalter: Artikel Nr. 11 14 35
Die Munition 9 x 17 mm (gelb, für Wühlmäuse) gehört nicht zum
Lieferumfang.
PTB
2

6
Safet
y
Notes
This manual belongs to the product. It contains important
notes on operating the unit. Please pass it on along with
the unit if it is handed over to a third party!
Dispose of the packaging materials carefully; the plastic
bags may become a deadly toy for children.
Caution: This is a shooting device!
Never shoot the trap gun while holding it in your hands.
Always keep fingers away from the muzzle of the gun.
Never point the muzzle of the gun towards your body.
Never leave the loaded trap gun unattended.
Caution if children are near.
Generally, all persons who are near the installed trap gun
should be informed and/or instructed.
Persons under 18 are not allowed to operate the trap gun.
Do not place the unit in close proximity to public places or
pathways.
Use the trap gun only for its intended purpose.
When setting up the trap gun, wear tight fitting work gloves
and, if necessary, hearing protection.
Trap gun and ammunition have to be stored separately.
Do not disassemble the unit or attempt to repair it yourself.
It does not contain parts serviceable by you. In case of
questions or problems, turn to our customer support.
Please note the following safety notes to avoid
malfunctions, damage or physical injury:

7
Usin
g
Introduction
Animal friendly vole fighting: With the vole trap gun, a reliable,
secure, and animal friendly killing is achieved. The unit is
completely made of aluminium and therefore permanently
protected against corrosion. The vole trap gun is characterised
by its simple, easy and safe handling.
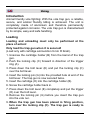
Loading
Loading and unloading must only be performed at the
place of action!
Only load the trap gun when it is secured!
(Load only with cartridge ammunition 9 mm R Knall).
1. Unscrew the cartridge holder (B) from the barrel of the trap
gun.
2. Push the locking clip (C) forward in direction of the trigger
ring (A).
3. Press down the bolt lever (E) and put the locking clip (C)
over the bolt lever.
4. Insert the locking pin (G) into the provided hole at end of the
bolt lever. The trap gun is now secured twice.
5. Insert the cartridge (H) into the cartridge holder (B).
6. Screw the cartridge holder back in.
7. Press down the bolt lever (E) completely and put the trigger
(D) over the bolt lever.
8. Remove the locking pin (G) before you insert the trap gun
into the vole run.
9. When the trap gun has been placed in firing position,
turn over the locking clip (C). The trap gun is ready to
shoot!

8
Usin
g
Unloading
Perform the following steps to unload and to remove a trap gun
that did not shoot:
The unit has to be secured by two safety devices.
1. Put the locking clip (C) over the bolt lever (E).
2. Insert the locking pin (G) into the provided hole at the end of
the bolt lever (E).
3. Unscrew the cartridge holder (B).
4. Remove the cartridge (H).
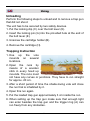
Trapping Instruction
1. Hoe up the vole
mounds on several
locations.
2. Open the runs by
means of a wooden
stick in every hoed up
mounds. The runs must
not have any curves or junctions. They have to run straight
for approx. 20 cm.
3. After a short period of time the shade-loving vole will close
the run that is inhabited by it.
4. Open this run again.
5. Put the loaded trap gun approximately 3 cm inside the run.
6. When setting up the trap gun make sure that enough light
can enter besides the trap gun and the trigger ring (A) can
run freely from any obstacles.

9
Usin
g
The first try the vole wants to block the run with soil again, it
will push back the trigger of the trap gun which fires the gun.
The vole is instantly dead. It may lie 30 cm inside the run.
Failure is impossible at proper handling.
Maintenance and Cleaning
Use the locking pin (G) to remove a fired cartridge from the
cartridge holder (B).
Clean the trap gun after each use. Remove soil and sand
from the thread at the barrel of the gun.
Lubricate the firing pin (F) from time to time.
Technical Data
Name: Vole Trap Gun
Type / Model: AUBER
Dimensions: 180 x 45 x 60 mm
Weight (w/o ammunition): 384 g
Ammunition: 9 x 17 mm R Knall
(yellow, for voles)

10
Authorisation
|
Accessories
PTB Authorisation Notes
This vole trap gun has been authorised under no. 2
according to the § 7 Beschussgesetz (Besch-G) by the
Physikalisch-Technischen Bundesanstalt (Germany).
According to the PTB Authorisation this vole trap gun may only
be operated in Germany, Austria and Great Britain.
Repeated Inspection Notes
Operated shooting device according to § 24, Beschuss-
verordnung (BeschussV).
According to § 24, Beschussverordnung (BeschussV), the
operator of firing devices is obligated to have the device re-
inspected by the manufacturer or by its representative every 2
years from the date of purchase in case there are essential
functional shortcomings. Tested devices receive a test label.
Manufacturer’s Name and Address
AUBER Aluminiumguss
Königsfelder Str. 96
D-78739 Hardt
Accessories
Cartridges: Article No. 92 13 53 (yellow, for voles)
Spare Cartridge Holders: Article No. 11 14 35
Ammunition 9 x 17 mm (yellow, for voles) is not included.
PTB
2

11
Consi
g
nes de sécurité
Ces instructions s'appliquent à ce produit. Ils contiennent des
informations importantes sur le fonctionnement et l'utilisation
du produit. S'il vous plaît inclure les instructions sur l’utilisation
du produit, si vous le donner à d'autres!
Ne laissez jamais sans surveillance les matériaux d'emballage.
Les sacs en plastique, etc. pourrait devenir un jouet dangereux
pour les enfants.
Attention, il s'agit d'une arme!
Ne tournez jamais le coup dans la main.
Gardez toujours vos doigts loin de la bouche de l’arme.
Ne gardez jamais la bouche de l’arme pointé contre le corps.
Ne laissez jamais l’arme chargée sans surveillance!
Portez une attention particulière si des enfants se trouvent en
proximité!
Généralement, toutes les personnes qui sont trouvent en
proximité de l’arme doivent être formés et / ou informé.
Les mineurs de moins de 18 ans ne sont pas autorisés à
utiliser cet équipement.
Ne pas placer le piège en proximité des routes et des lieux
publics.
Utilisez l’équipement seulement pour l’usage prévu.
Pendant le positionnement du piège, mettre des gants étroits
et serrés, et, si nécessaire, une protection auditive.
L'arme et les munitions doivent être stockés séparément.
Ne démontez pas l'appareil et n'essayez pas de le réparer.
L'appareil ne contient aucune pièce qui peut être changé ou
réparé par l'utilisateur. Si vous avez des questions ou des pro-
blèmes, contactez notre service à la clientèle.
S'il vous plaît noter afin d'éviter des dysfonction-
nements, des dommages et des effets néfastes sur
la santé les informations suivantes:

12
Informazioni sulla sicurezza
Queste istruzioni si riferiscono a questo prodotto. Esse con-
tengono informazioni importanti sul funzionamento e l’utilizzo
del prodotto. Si prega di includere le istruzioni d’uso al prodot-
to, se si passa ad altri!
Non lasciare mai il materiale di imballaggio incustodito. Sac-
chetti di plastica, ecc. possono diventare un giocattolo perico-
loso per i bambini.
Attenzione, si tratta di una pistola!
Non sparare mai il colpo nella mano.
Tenere sempre le dita lontane dalla bocca.
Non tenere mai la bocca dell’arma rivolta contro il corpo.
Non lasciare mai l’arma carica incustodita!
Prestare particolare attenzione in vicinanza dei bambini!
Generalmente, tutte le persone che si trovano nella vicinanza
della trappola, devono essere istruiti o/e informati.
Ai minori al di sotto dei 18 anni è vietato l’utilizzo di questo
apparecchio.
Non posizionare la trappola in prossimità di luoghi e strade
pubbliche.
Usare l'apparecchio solo per lo scopo previsto.
Indossare durante il posizionamento della trappola guanti
stretti e aderenti, e se necessario, una protezione acustica.
L’arma e le munizioni devono essere conservate separata-
mente.
Non smontare l'apparecchio e non cercare di ripararlo.
L’apparecchio non contiene parti che possano essere cambiati
o riparati dall’utente. In caso di domande o problemi, contatta-
re il nostro
servizio clienti.
Si prega di notare in modo da evitare malfunziona-
menti, danni e effetti negativi sulla salute seguenti
informazioni:

V
Notizen
|
NotesEntsor
g
un
g
|
Dis
p
osal
Werter Kunde,
bitte helfen Sie mit, Abfall zu vermeiden.
Sollten Sie sich einmal von diesem Artikel trennen wollen,
so bedenken Sie bitte, dass viele seiner Komponenten aus
wertvollen Rohstoffen bestehen und wiederverwertet wer-
den können.
Entsorgen Sie ihn daher nicht in die Mülltonne, sondern
führen Sie ihn bitte Ihrer Sammelstelle für Wertstoffe zu.
Dear Customer,
Please help avoid waste materials.
If you at some point intend to dispose of this article, then
please keep in mind that many of its components consist of
valuable materials, which can be recycled.
Please do not discharge it in the rubbish bin, but check with
your local council for recycling facilities in your area.

Gestaltung urheberrechtlich geschützt VI © Westfalia 08/12
Kundenbetreuun
g
|
Customer Services
Deutschland
Westfalia
D-58093 Hagen
Telefon: (0180) 5 30 31 3
Telefax: (0180) 5 30 31 30
Internet: www.westfalia.de
Österreich
Westfalia
Moosham 31
A-4943 Geinberg OÖ
Telefon: (07723) 4 27 59 54
Telefax: (07723) 4 27 59 23
Internet: www.westfalia-versand.at
UK
Westfalia
Freepost RSBS-HXGG-ZJSC
8 Fairfax Road, N. Abbot TQ12 6UD
Phone: (0844) 5 57 50 70
Fax: (0870) 0 66 41 48
Internet: www.westfalia.net
-
 1
1
-
 2
2
-
 3
3
-
 4
4
-
 5
5
-
 6
6
-
 7
7
-
 8
8
-
 9
9
-
 10
10
-
 11
11
-
 12
12
-
 13
13
-
 14
14
-
 15
15
-
 16
16
-
 17
17
-
 18
18


Westfalia 10 09 82 Benutzerhandbuch
- Typ
- Benutzerhandbuch
- Dieses Handbuch ist auch geeignet für
in anderen Sprachen
- English: Westfalia 10 09 82 User manual
Sonstige Unterlagen
-
Benelli M4 Pistol grip Use and Maintenance Manual
-
Benelli Vinci SuperSport Use and Maintenance Manual
-
-
-
-
-
-
-
-