
LUX SMART ELECTRIC OVEN
USER INSTRUCTIONS
THIS DEVICE IS IN COMPLIANCE WITH THE EEE DIRECTIVE.
Please read the present instructions manual with due care before
installing or using your appliance. Please keep the present instructions
manual in a safe place to also make use of it at a later time.
13007-BLBLB / 13007-GGB
13007-XBLK / 13007-XBLB
13007-WWB / 13007-WWB TPT
13007-WWK / 13007-WWK TPT
MODEL : 13007 MODEL : 13008
13008-BLBLB /
13008-XBLK / 13008-XBLB
13008-WWB / 13008- GGK
13008-WWK

Dear Client;
Please read this user´s manual prior to using your TERMİKEL Lux Electric Oven which was
manufactured in our modern plants under a due quality control system because it will lead you
in your operation. Thanks
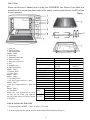
1. Oven case
2. Upper resistance
3. Spit Roasting Bar
(Model: 13008)
4. Signal lamp
5. Enamelled inner body
6. Lower resistance
7. Front glass of the oven
8. Grill
9. Enamelled tray
10. Spit Roasting Bar
(Model: 13008)
11. Display Panel
12. Clock Timer
(Model: 13007)
(Model: 13008)
13. Selecting Switch
* zero, lower, upper and lower + upper
(Model: 13007)
* zero, lower, upper and lower + upper and
grill
(Model: 13008)
14. Thermostat
NOTE: This “User Instructions” are issued
for more than one model. Your appliance
may not include some of the features written
in this guide.
INSTALLATION OF THE OVEN
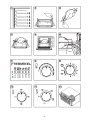
* Spit Roasting Bar (MODEL: 13008) Figure 2,3,4,5 and 6
1. In order to place the bar, put its two feet on the edges of the enamel tray (Figure 2).
-2-
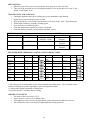
MODEL 13007 13008
COLOUR WHITE – INOX WHITE – INOX
FUEL TYPE ELECTRIC ELECTRIC
TIMER MECHANICAL 90
MINUTES
MECHANICAL 90
MINUTES
COOKING FUNCTIONS 3 FUNCTIONS 4 FUNCTIONS
OVEN VOLUME 35 LITRE 35 LITRE
LOWER RESISTANCE 700 WATT 700 WATT
UPPER RESISTANCE 700 WATT 700 WATT
GRILL RESISTANCE - 500 + 700 = 1200 W
THERMOSTAT YES YES
SPIT ROAST CHICKEN NO YES
MAXIMUM OVEN POWER 1400 WATT 1400 WATT
VOLTAGE 230 V 230 V
FREQUENCY 50-60 HZ 50-60 HZ
PRODUCT
SIZES
WIDTH (MM) 540 540
DEPTH (MM) 470 470
HEIGHT (MM) 325 325
PACKAG
ED SIZES
WIDTH (MM) 590 590
DEPTH (MM) 515 515
HEIGHT (MM) 355 355

2. Fix one of the forks by connecting it to the bar. Then
insert the bar to the chicken or meat and then connect
the second fork to the bar and fix it. (Figure 3).
3. Place the bar firmly to its place (Figure 4)
4. Put the tray on “1” position to inside (Figure 5).
5. Place the bar firmly to its place on the inner wall
(Figure 6).
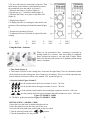
* Display Panel Figure 7
6. It displays the time of cooking for some meals, and
positions of the selecting switch and thermostat (Figure
8).
* Thermostat (8 positions) Figure 8
7. It indicates the level of heat that is required for each
cooking
1… 90 C 3… 150 C 5… 210 C 7… 250 C
2… 120 C 4… 180 C 6… 230 C 8… 280 C
Using the Push – buttons:
Please set the push-button after extracting it outwards by
pushing inside as it is shown. After the cooking is completed,
please position the button to zero and push it inside. Please
make sure that the push buttons be on pushed position during
inactive condition.
* Time Clock (Figure 9)
8. This button is used to set the cooking time. It activates the signal lamp. There is a mechanical alarm
clock which can set the cooking time from 5 minutes to 90 minutes. If the oven will be operated more
than 90 minutes, the button is taken to the manual “ON” position (Figure 9).
* Selecting Switch Figure 10 and 11
9. It is the position where the lower resistance is active . 700 watt
It is the position where the upper resistance is active . 700 watt
It is the position where both the lower and upper resistances are active. 1400 watt.
It is the position where the upper resistance and grill resistance are active. 1200 watt.
Figure 11: (MODEL: 13008)
10. The lid Ist grade open position. Figure 12: (MODEL: 13008)
SPIT ROASTING : (MODEL: 13008)
* Insert the bar to the meat or chicken and place the bar
* Place the enamel tray into the lower part of the oven.
* Keep the lid in Ist grade open position and set the time clock
* Take the selecting button to the position.
* Take the thermostat to the last position.
-3-

-4-

PRECAUTIONS
•When the glass of the oven is on open position, never put pot, etc. onto the glass.
•Take care of the specified sizes in selecting pots and trays to be used in the oven. Load: 22 cm
Width: 34 cm Depth: 34 cm.
MAINTENANCE AND CLEANING
•Unplug the appliance and wait for cooling prior to any maintenance and cleaning.
•Do not drop water onto the glass when it is hot.
•Wipe up and dry the oven lid and external surfaces with warm soapy water / liquid detergents
•Do not make cleaning by using dry cleaning agents
•Never wash the oven under tap water
•Clean the internal parts regularly by using a wet sponge
•Clean the stainless surface by using soapy moisturised canvas.
TECHNICAL DATA MODEL
Supply voltage 230 Volt Timer Clock 0-90 minutes
Oven power 1400 Watt (MODEL: 13007)
(MODEL: 13008)
Depth Internal /
External
36.5 / 47 cm
Grill power 1200 Watt (MODEL: 13008) Width Internal /
External
37.5 / 54.5 cm
Oven volume 35 lt Height Internal /
External
25.5 / 32.5 cm
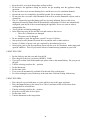
RECOMMENDED THERMOSTAT LEVELS AND COOKING TIMES
MEALS THERMOSTAT MINUTES RACK SWITCH MEALS THERMOSTAT MINUTES RACK SWITCH
Cake 4 25-35 2-3 7-8 Lamb
meat
5-6 50-60 3
Grape Pie 4 25-35 2-3 Mutton 7-8 50-60 3
Fruit
Cake
4 20-30 2-3 Veal 7-8 50-70 3
Cookies 4 20-35 2-3 Chicken 7 50-55 1
Filled
pastry
5-6 35-40 1-2 Fish 6-7 25-30 2-3
Tea cake 5-6 30-45 1 Sticky rib 7-8 30-35 2-3
Pie 4-5 30-40 2 Kebab 7-8 30-35 2-3
Puff
Pastry
7-8 30-40 1 Frozen
Pizza
7-8 30-35 2
* The values given in cooking table are the values obtained in our laboratories. You can obtain various
results to satisfying your tastes depending on your cooking and use habits.
* Cooking times depend on quantity of ingredients.
* Please pre-heat for 5-6 minutes before cooking.
IMPORTANT NOTICES
•The mains of the oven must be 230 V.
•Please use your oven by a 10 A earthed outlet.
•If the appliance will be used in a foreign country, please contact to the authorised services.
•The lid and sides of the oven may have high temperature during operation.
-5-

•Keep the cable away from sharp edges and hot surfaces.
•Do not move the appliance during use and do not put anything onto the appliance during
operation.
•Do not use the oven as an extra heating device and do not cover its ventilation channels.
•Operate the oven in a completely dry and flat ground. Never immerse it into water.
•Do not place the oven onto a shelf mounted to the wall or near the flammable objects such as
curtains etc.
•The oil / fat particles spreading during grill may be easily inflamed. However this is not
dangerous because the flames shall be automatically extinguished. If it does not automatically
extinguish, open the lid of the oven and unplug the appliance. Never use water in order to
extinguish the fire.
• Never pull the cord during unplugging.
•In the following cases do not start the oven and contact to the service:
oThe oven is fallen down or damaged
oThe power cord is damaged
•Do not attempt to repair the appliance yourself in case of a failure
•Always keep a safety distance between the oven and the walls or other surfaces.
•In case of a failure of power cord, get it replaced by the authorised services.
•After buying, prior to the first operation, please start the oven for 30 minutes under empty and
open lid condition. This will prevent the odours of manufacturing remnants to your food.
USING THE OVEN
•Put the food tray into the oven and close the lid.
•Place the grill to the level you desire (MODEL: 13008)
•If you will cook the food inside another pot, please remove the enamelled tray. Put your pot on
the grill.
•Take the selecting switch to the ... position
•Set the thermostat
•Set the timer clock
•Your oven will automatically switched off at the end of the cooking time.
•For ideal cooking do not use both trays at the same time. Perform cooking with one tray.
USING THE GRILL
•Place the grill covered with meat, to a place which is near to the upper resistance
•Place the enamelled tray to the lowest level. The oil and water which will be arisen from
cooking shall be collected here.
•Take the selecting switch to the .. position.
•Keep the oven lid at the Ist level open.
•Set the timer clock
•Take the thermostat to the last position
-6-
-
 1
1
-
 2
2
-
 3
3
-
 4
4
-
 5
5
-
 6
6


in anderen Sprachen
- English: Termikel 13007-WWK
Andere Dokumente
-
Candy CCVM513NB/E Benutzerhandbuch
-
Siemens HA724220 Herd Bedienungsanleitung
-
Nordmende CSE514WH Benutzerhandbuch
-
-
-
Bosch HSA720120 Herd Bedienungsanleitung
-
-
Whirlpool CI 55M A Bedienungsanleitung
-
Rommelsbacher BG 1050 Benutzerhandbuch