Silvercrest SAS 7.4 LI A2 Operating Instructions Manual
- Typ
- Operating Instructions Manual

IAN 109560
LI-ION RECHARGEABLE HANDHELD
VACUUM CLEANER SAS 7.4 LI A2
LI-ION RECHARGEABLE HANDHELD
VACUUM CLEANER
Operating instructions
ASPIRATOR DE MÂNĂ
CU ACUMULATOR LI-ION
Instrucţiuni de utilizare
ΣΚΟΥΠΑΚΙ ΧΕΙΡΟΣ
ΜΠΑΤΑΡΙΑΣ ΛΙΘΙΟΥ
Οδηүίες χρήσης
RUČNI USISAVAČ S LITIJ-IONSKOM
PUNJIVOM BATERIJOM
Upute za upotrebu
LI-IONEN-AKKU-HANDSTAUBSAUGER
Bedienungsanleitung

GB Operating instructions Page 1
HR Upute za upotrebu Stranica 9
RO Instrucţiuni de utilizare Pagina 17
GR Οδηүίες χρήσης Σελίδα 25
DE / AT / CH Bedienungsanleitung Seite 33
Before reading, unfold the page containing the illustrations and familiarise yourself with all functions of
the device.
Prije nego što pročitate tekst, otvorite stranicu sa slikama i upoznajte se na osnovu toga sa svim funkcijama
uređaja.
Înainte de a citi instrucţiunile, priviţi imaginile şi familiarizaţi-vă cu toate funcţiile aparatului.
Πριν ξεκινήσετε την ανάγνωση, ανοίξτε τη σελίδα με τις εικόνες και εξοικειωθείτε με όλες τις λειτουργίες
της συσκευής.
Klappen Sie vor dem Lesen die Seite mit den Abbildungen aus und machen Sie sich anschließend mit allen
Funktionen des Gerätes vertraut.

4
1
2
q
0
8
7
6
3
5
9

- 1 -
Content Page
Intended Usage 2
Items supplied 2
Appliance description 2
Important safety instructions 3
Technical data 5
Before taking into use 5
Information about the batteries 5
Installation of the wall holder 5
Charging 6
Operation 6
Cleaning 7
Disposal 7
Warranty and Service 8
Importer 8
IB_109560_SAS7.4LIA2_HR_RO_GR.qxp 08.12.2014 11:47 Uhr Seite 1

- 2 -
Li-Ion Rechargeable
Handheld Vacuum
Cleaner
Congratulations on the purchase of your new
appliance.
You have clearly decided in favour of a quality pro-
duct. These operating instructions are a part of this
product. They contain important information in regard
to safety, use and disposal. Before using the product,
familiarise yourself with all of these operating and
safety instructions. Use the product only as described
and only for the specified areas of application. In ad-
dition, pass these documents on, together with the
product, to any future owner.
Intended Usage
This cordless hand-held vacuum cleaner may only
be used to vacuum dry or wet surfaces resp. dry or
wet materials and fluids. People or animals may not
be vacuumed with this appliance. Any other usage
of, or modification to, the appliance is deemed to be
improper usage and carries the risk of serious per-
sonal injury. The manufacturer accepts no liability
for damages that result from improper use of the ap-
pliance or are caused by the incorrect operation of
it. The appliance is not intended for commercial use.
Items supplied
Li-Ion Rechargeable Handheld Vacuum Cleaner
Crevice nozzle
Wet suction nozzle
Wall holder
Assembly material
Power transformer
Operating instructions
Check the items supplied directly after unpacking
for completeness.
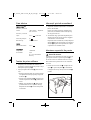
Appliance description
1 Wet suction nozzle
2 Crevice nozzle
3 Wall holder
4 Power adapter
5 Barrel plug
6 On/Off switch
7 Charge indicator lamp
8 Unlocking button
9 Dust filter bag
0 Dust filter
q Dirt container
Note:
This appliance is supplied with non-charged batteries.
The batteries must be charged for 24 hours before
the first use.
IB_109560_SAS7.4LIA2_HR_RO_GR.qxp 08.12.2014 11:47 Uhr Seite 2

- 3 -
Important safety instructions
To avoid potentially fatal electric shocks:
• Do not charge or use the appliance outdoors.
• Never use the hand vacuum cleaner if the cable, plug or casing are damaged.
• To avoid risks, arrange for damaged power cables and/or plugs to be replaced
as soon as possible by a qualified specialist or by our Customer Services.
• Arrange for repairs to be carried out only by specialist workshops. Under no
circumstances should you open the appliance yourself. Interferences that are
not carried out by a specialist workshop could lead to physical injuries.
• Before switching the hand vacuum cleaner on, ensure that the mains voltage
corresponds to the voltage indicated in the technical data for the appliance.
• Never touch the power supply or the appliance with wet or damp hands.
• Do not use the power adapter with an extension cable; connect the power
adapter directly to a power socket.
To avoid the risk of injury:
• Do not change any accessories while the appliance is switched on.
• Do not use the hand vacuum for vacuuming up sharp objects or glass shards.
• Never vacuum up burning matches, glowing ashes or cigarette butts.
• Do not use the hand vacuum for vacuuming up chemical products, stone dust,
gypsum, cement or similar particles.
• This appliance is not suitable for use with inflammable and explosive substances
or chemical and aggressive liquids.
• Always store the appliance indoors. To prevent accidents, keep the appliance
in a dry location when not in use.
• Under extreme conditions, leaks in the battery cells may occur. In the event that
battery fluid comes into contact with skin or eyes, the affected area must be rin-
sed off with water immediately. Contact a physician.
IB_109560_SAS7.4LIA2_HR_RO_GR.qxp 08.12.2014 11:47 Uhr Seite 3

- 4 -
• This appliance may be used by children aged 8 over and by persons with
reduced physical, sensory or mental capabilities or lack of experience and
knowledge, provided that they are under supervision or have been told how
to use the appliance safely and are aware of the potential risks. Children must
not play with the appliance. Cleaning and user maintenance tasks may not
be carried out by children unless they are supervised.
Tips for safety:
• Use only accessory parts recommended by the manufacturer.
• The power adapter may not be used for other purposes. Never carry the wall
holder or the power adapter by the cable. Do not pull on the cable when you
want to move the appliance.
• Always grip the power plug to disconnect the appliance from the power supply.
• Always be sure to keep the hand vacuum away from heating elements, ovens
or other heated appliances and surfaces.
• Always make certain that the ventilation slits are open. A blocked ventilation
circuit can result in overheating and damage to the appliance.
• This product contains rechargeable batteries. Do not thow the batteries into a fire
and do not subject them to high temperatures. There is the risk of an explosion!
• Take special care when using the hand vacuum on stairs.
• Do not use the hand vacuum without the dust filter inserted.
• Do not use the power adapter for a different product and do not attempt to
charge this appliance with a different charging station. Use only the charging
station supplied with this appliance.
• Never try to recharge non-rechargeable batteries.
IB_109560_SAS7.4LIA2_HR_RO_GR.qxp 08.12.2014 11:47 Uhr Seite 4

- 5 -
Technical data
Power adapter 4
Input voltage /
- current: 100 - 240 V
~
, 50/60 Hz
max. 300 mA
Output voltage/
- current: 9,6 V / 300 mA
Protection class: II /
Type designation: SAS 7.4 LI A2-1
AApppplliiaannccee
Input voltage 9,6 V
BBaatttteerriieess
Capacity: 1300 mAh
Batteries: 7,4 V
(2 x 3.7 V Lithium-Ion
Batteries)
Before taking into use
• Remove all packaging materials from the applian-
ce, particularly the protective cap over the On/Off
switch 6.
• Place the dirt container q onto the motor block:
• Slide the plastic tab on the underside of the
handheld vacuum cleaner into the recess in the
dirt container q.
• Press the unlocking button 8 and slide the dirt
container q onto the motor block at the same
time.
• Let go of the unlocking button 8 so that the lok-
king mechanism engages in the recess.
The dirt container q is now sitting securely on
the motor block.
Information about the batteries
1. This hand-held vacuum cleaner is powered by
rechargeable lithium-ion batteries.
Before using the cableless hand vacuum cleaner
for the first time, the batteries must be charged
for at least 24 hours.
2. The batteries reach their full capacity after a
charging period of 24 hours. For care of the
batteries we recommend the following: after the
batteries are charged, remove the power adap-
ter 4 from the mains power socket. Reconnect
the power adapter 4 again with the mains power
socket when the suction power of the appliance is
noticeably weaker.
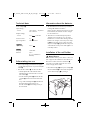
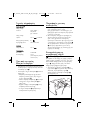
Installation of the wall holder
Mortal danger!
Ensure that there are no power cables or other con-
duits or pipes in the wall at the location where you
intend to bore the holes for the wall holder 3.
It would be a potentially fatal risk to bore into a
current carrying electric cable!
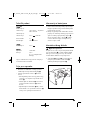
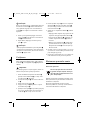
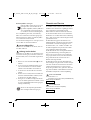
1. Place the barrel plug 5 of the power adapter 4
into the wall holder 3 as shown in the diagramme.
Secure the barrel plug 5 by turning it.
IB_109560_SAS7.4LIA2_HR_RO_GR.qxp 08.12.2014 11:47 Uhr Seite 5

- 6 -
2. Select a suitable installation location for the wall
holder 3: It should present no problem with
taking the hand vacuum cleaner out of it and a
mains power socket for the power adapter 4
must be accessible.
3. Bore two holes with a spacing of approx. 68 mm.
Use the wall holder 3 to mark the boreholes:
this will ensure the spacing is correct. The bore-
holes must be suitable for 5 mm wallplugs.
4. Insert the wallplugs into the boreholes and, using the
screws, firmly screw the wall holder 3 to the wall.
5. You can place the nozzles on the lateral acces-
sories holder.
6. Connect the power adapter 4 to a mains power
socket.
Charging
Note:
Check to ensure that the on/off switch 6 has been
slid back (to the position "0") before starting the
charging process.
• Place the hand vacuum cleaner from above into
the wall holder 3, so that the barrel plug 5
slips into the socket on the hand vacuum cleaner.
The charge indicator lamp 7 flashes red and
the charging process begins.
Important:
• When the hand vacuum again has enough ener-
gy to vacuum, the charge indicator lamp 7
glows green. This does not mean that the batte-
ries are fully charged. When the charge indica-
tor lamp 7 glows green, it means the batteries
are charged to about 80%.
• When charging is complete, which with fully
discharged batteries can take approx. 5 hours,
the appliance automatically switches to a trickle
charge (maintenance function). Nevertheless, in
order to avoid possible damage to the batteries,
do not leave the appliance permanently con-
nected to the power adapter 4.
• First recharge the batteries when the suction
power of the hand vacuum cleaner is noticeably
weaker and the charge indicator lamp 7 green
is blinking.
Note:
The hand vacuum cleaner can also be charged
directly via the power adapter 4. For this, remove
the barrel plug 5 with a slight twist from the wall
holder 3 and insert it into the socket on the hand
vacuum cleaner.
Operation
Warning!
The suction opening must always be open and
unblocked. Blockages lead to overheating and da-
mage to the motor.
Tips:
• Make certain that the dust filter 0 is always
inserted before using the appliance.
• As the maximum, suck up only as much liquid as
will fill the dirt container q to the MAX mark.
1. Take the hand vacuum cleaner from the wall hol-
der 3 or, if you do not use the wall holder 3,
remove the barrel plug 5 from the socket.
2. If required, place the appropriate nozzle into the
suction opening:
• the crevice nozzle 2, to clean narrow and
difficult to reach locations.
• the wet suction nozzle 1 to vacuum liquids up.
IB_109560_SAS7.4LIA2_HR_RO_GR.qxp 08.12.2014 11:47 Uhr Seite 6

- 7 -
Note:
After you have vacuumed up liquids, immediately
clean the dirt container q. Otherwise bacteria and
microbes could form in it! Ensure that the dust filter
bag 9 is completely dry before using the appliance
again.
3. To switch the appliance on, slide the on/off
switch 6 forwards. The charge indicator lamp 7
lights up green.
4. When you have finished using it, slide the on/
off switch 6 to the rear.
Note:
Place the hand vaccum cleaner into the wall
holder 3 and start the charging process when
the suction power is noticeably weaker and the
charge indicator lamps 7 green is blinking.
Cleaning
To achieve the best results, empty the dirt container q
and clean the dust filter 0 after every use.
Important:
Do not use aggressive, chemical or abrasive cleaning
agents. These could damage the surfaces of the ap-
pliance.
1. To open the dirt container q, press the unlocking
button 8 and remove the dirt container q.
2. Remove the dust filter 0 from the dirt container q.
3. Empty the dirt container q.
4. Pull the dust filter bag 9 with its mounting out of
the dust filter 0.
5. Rinse the dust filter bag 9 in cold water and
then wait until it is completely dry again before
you place it back into the dust filter 0. Do not
dry it with hot air.
6. Place the dust filter 0 back into the dirt contai-
ner q. Ensure that the dust filter 0 is seated
squarely and that the rubber lip seals the dirt
container q.
7. Replace the dirt container q back onto the
motor block:
• Push the plastic nose on the underside of the
hand vacuum cleaner into the recess on the
dirt container q.
• Press the unlocking button 8 and, at the same
time, slide the dirt container q onto the motor
block.
• Release the unlocking button 8 so that the
restraint grips into the recess. The dirt contai-
ner q now sits firmly on the motor block.
8. Clean the housing and both nozzles with a lightly
moistened cloth. For stubborn soiling use a mild
detergent on the cloth.
9. Dry all parts thoroughly before reusing the ap-
pliance or putting it into storage.
Disposal
The appliance and the batteries must be disposed
of separately.
Disposal of the device
Do not dispose of this appliance in your
normal domestic waste. This product is
subject to the provisions of European
Directive 2012/19/EU.
Dispose of the appliance through an approved dis-
posal centre or at your community waste facility.
Observe the currently applicable regulations.
In a case of doubt, please contact your waste dispo-
sal centre.
IB_109560_SAS7.4LIA2_HR_RO_GR.qxp 08.12.2014 11:47 Uhr Seite 7

- 8 -
Disposal of batteries/cells
Used batteries/cells may not be disposed
of in house-hold waste. Every consumer is
statutorily obliged to dispose of batteries
at a collection site of his community/city
district or at a retail store.
The purpose of this obligation is to ensure that
batteries are disposed of in a non-polluting manner.
Only dispose of batteries/cells when they are fully
discharged.
To dispose of the appliance in an environmentally
friendly manner you must remove the battery from
the appliance.
Risk of electric shock!
Disconnect the appliance from the mains power
supply when you remove the battery!
Attention! Damage to property!
Remove the battery from the appliance ONLY if you
want to scrap/dispose of the appliance! The appliance
is permanently defective after you have removed
the battery!
1. Remove the dirt container q from the motor unit.
2. Undo the 4 cross-head screws on the side of the
motor unit and the cross-head screw on the
round grill on the motor unit.
3. You can now dismantle the motor unit.
4. Snip the 3 cables connecting the printed circuit
board to the blue battery pack. You can now re-
move the battery.
5. Dispose of the battery in an environmentally
friendly manner. Please observe the currently
applicable regulations. Please contact your
waste disposal centre if you are in any doubt.
Dispose of all packaging materials in an
environmentally friendly manner.
Warranty and Service
The warranty for this appliance is for 3 years from
the date of purchase. The appliance has been ma-
nufactured with care and meticulously examined
before delivery.
Please retain your receipt as proof of purchase. In
the event of a warranty claim, please make contact
by telephone with our Service Department. Only in
this way can a post-free despatch for your goods be
assured.
The warranty covers only claims for material and mau-
facturing defects, but not for transport damage, for
wearing parts or for damage to fragile components,
e.g. buttons or batteries. This product is for private
use only and is not intended for commercial use.
The warranty is void in the case of abusive and impro-
per handling, use of force and internal tampering not
carried out by our authorized service branch. Your
statutory rights are not restricted in any way by this
warranty.
The warranty period will not be extended by repairs
made under warranty. This applies also to replaced
and repaired parts. Any damage and defects extant
on purchase must be reported immediately after un-
packing the appliance, at the latest, two days after
the purchase date. Repairs made after the expiration
of the warranty period are subject to payment.
Service Great Britain
Tel.: 0871 5000 720 (£ 0.10/Min.)
E-Mail: [email protected]
Hotline availability:
Monday to Friday 08:00 - 20:00 (CET)
Importer
KOMPERNASS HANDELS GMBH
BURGSTRASSE 21
44867 BOCHUM
GERMANY
www.kompernass.com
IAN 109560
IB_109560_SAS7.4LIA2_HR_RO_GR.qxp 08.12.2014 11:47 Uhr Seite 8

- 9 -
Sadrˇzaj Strana
Namjenska uporaba 10
Opseg isporuke 10
Opis uređaja 10
Važne sigurnosne napomene 11
Tehnički podaci 13
Prije prve uporabe 13
Informacije o baterijama 13
Montaža zidnog držača 13
Punjenje 14
Rukovanje 14
Čišćenje 15
Zbrinjavanje 15
Jamstvo i servis 16
Uvoznik 16
IB_109560_SAS7.4LIA2_HR_RO_GR.qxp 08.12.2014 11:47 Uhr Seite 9

- 10 -
Ručni usisivač s
litij-ionskom punjivom
baterijom
Srdačno čestitamo na kupnji Vašeg novog uređaja.
Time ste se odlučili za visokovrijedan proizvod.
Upute za rukovanje predstavljaju sastavni dio ovog
proizvoda. One sadrže važne napomene za sigur-
nost, rukovanje i zbrinjavanje. Prije uporabe uređaja
upoznajte se sa svim pripadajućim uputama za
uporabu i svim sigurnosnim napomenama. Proizvod
koristite isključivo na opisani način i u navedenim
područjima uporabe. U slučaju predaje proizvoda
trećim osobama priložite i predajte i svu dokumen-
taciju.
Namjenska uporaba
Ručni usisivač smije se koristiti isključivo za usisavanje
suhih i mokrih površina, odnosno za usisavanje suhe
i mokre nečistoće ili tekućina. Uređajem se ne smije
usisavati ljude ili životinje. Svaki drugi način uporabe
i svaka izmjena uređaja smatra se nenamjenskom i kri-
je znatnu opasnost od nastanka nezgode. Proizvođač
ne odgovara za štete nastale uslijed nenamjenske
uporabe uređaja ili uslijed pogrešnog načina ruko-
vanja.
Uređaj nije namijenjen za komercijalnu uporabu
Opseg isporuke
Ručni usisavač s litij-ionskom punjivom baterijom
baterijom
Sapnica za fuge
Sapnica za mokro usisavanje
Zidni držač
Materijal za montažu
Punjač
Upute za rukovanje
Neposredno nakon raspakiranja provjerite
kompletnost obima isporuke.
Opis uređaja
1 Sapnica za mokro usisavanje
2 Sapnica za fuge
3 Zidni držač
4 Punjač
5 Šuplji utikač
6 Prekidač Uklj/Isklj
7 Lampica za kontrolu punjenja (crvena/zelena)
8 Tipka za deblokadu
9 Vrećice za prašinu s filtrom
0 Filtar za prašinu
q Spremnik za nečistoću
Napomena:
Uređaj se isporučuje s nenapunjenim baterijama.
Prije prve uporabe uređaja baterije treba puniti
24 sata.
IB_109560_SAS7.4LIA2_HR_RO_GR.qxp 08.12.2014 11:47 Uhr Seite 10

- 11 -
Važne sigurnosne napomene
Da biste izbjegli opasnost po život uslijed strujnog udara:
• Ne punite i ne koristite ovaj uređaj na otvorenom.
• Ručni usisivač nikada ne koristite ako su oštećeni kabel, utikač ili kućište.
• Oštećeni mrežni kabel ili mrežni utikač na zamjenu dajte autoriziranom
stručnom osoblju, kako bi se izbjegle moguće opasnosti.
• Popravke smije obavljati isključivo stručna radionica. Ni u kom slučaju samo-
stalno ne otvarajte uređaj. Zahvati, koje nije izvršila autorizirana radionica,
mogu dovesti do ozljeda.
• Prije uključivanja uređaja provjerite da napon naveden u tehničkim podacima
uređaja odgovara mrežnom naponu.
• Punjač ili uređaj nikada ne dirajte mokrim ili vlažnim rukama.
• Punjač ne koristite zajedno s produžnim kabelom, nego ga neposredno priklju-
čite na utičnicu.
Da biste izbjegli opasnost od ozljeda:
• Ne mijenjajte nastavke dok uređaj radi.
• Ručni usisivač ne koristite za usisavanje šiljatih predmeta ili krhotina stakla
• Nikada ne usisavajte goruće šibice, žareći pepeo ili goruće opuške.
• Ručni usisivač nikada ne koristite za usisavanje kemijskih proizvoda, kamene
prašine, gipsa, cementa ili sličnih tvari.
• Uređaj nije prikladan za zapaljive i eksplozivne tvari, niti za kemijske ili agresivne
tekućine.
• Uređaj uvijek skladištite u zatvorenim prostorijama. Da biste spriječili nezgode,
uređaj nakon uporabe uvijek čuvajte na suhom mjestu.
• Pod ekstremnim uvjetima baterije mogu procuriti. U slučaju kontakta tekućine
sa kožom ili očima, mjesto dodira odmah isperite čistom vodom. Potražite
liječničku pomoć.
IB_109560_SAS7.4LIA2_HR_RO_GR.qxp 08.12.2014 11:47 Uhr Seite 11

- 12 -
• Ovaj uređaj smiju koristiti djeca stara 8 godina ili više, kao i osobe sa smanje-
nim fizičkim, senzornim ili mentalnim sposobnostima ili pomanjkanjem iskustva
i znanja, ukoliko su pod nadzorom ili su primile poduku o sigurnom rukovanju
uređajem te su razumjele opasnosti koje proizlaze iz uporabe uređaja. Djeca
se ne smiju igrati uređajem. Čišćenje i servisiranje ne smiju obavljati djeca bez
odgovarajućeg nadzora.
Ovako ćete sigurno postupati:
• Koristite isključivo opremu koju preporučuje proizvođač.
• Punjač se ne smije koristiti u druge svrhe. Zidni držač i punjač nikada ne nosite
tako, da vise na kabelu. Ne povlačite kabel, kada želite premjestiti uređaj.
• Uvijek uhvatite mrežni utikač, kada uređaj želite isključiti iz utičnice.
• Obavezno obratite pažnju na to da ručni usisivač ne odlažete pokraj radijatora,
pećnica ili drugih zagrijanih uređaja ili površina.
• Uvijek obratite pažnju na to da otvori za ventilaciju ostanu slobodni. Blokirana
cirkulacija zraka može dovesti do pregrijavanja i oštećenja uređaja.
• Ovaj proizvod sadrži punjive baterije. Baterije ne bacajte u vatru i ne izlažite
ih visokim temperaturama.
Postoji opasnost od eksplozije!
• Budite posebno pažljivi kada ručni usisivač koristite na stubištima.
• Ručni usisivač ne koristite bez umetnutog filtra za prašinu.
• Punjač ne koristite za druge proizvode i ne pokušavajte uređaj puniti pomoću
druge stanice za punjenje. Koristite isključivo punjač isporučen zajedno s ovim
uređajem.
• Nikada ne pokušavajte puniti baterije koje za to nisu predviđene.
IB_109560_SAS7.4LIA2_HR_RO_GR.qxp 08.12.2014 11:47 Uhr Seite 12

- 13 -
Tehnički podaci
PPuunnjjaačč
4
Ulazni napon/
ulazna struja: 100 - 240 V
~
, 50/60 Hz
maks. 300 mA
Izlazni napon/
izlazna struja: 9,6 V / 300 mA
Razred zaštite: II /
Oznaka tipa: SAS 7.4 LI A2-1
UUrreeđđaajj
Ulazni napon: 9,6 V
BBaatteerriijjee
Kapacitet: 1300 mAh
Baterija: 7,4 V
(2 x 3,7 V Litijski-ionska
baterija)
Izjava o sukladnosti za ovaj proizvod dostupna je
na internet stranici www.lidl.hr.
Prije prve uporabe
• Odstranite svu ambalažu s uređaja, posebno
zaštitnu kapu iznad prekidača Uklj/Isklj 6.
• Postavite spremnik za nečistoću q na blok
motora:
• Gurnite plastični jezičac na donjoj strani ručnog
usisivača u utor smješten na spremniku za ne-
čistoću q.
• Pritisnite tipku za deblokadu 8 i istovremeno
gurnite spremnik za nečistoću q na blok
motora.
• Otpustite tipku za deblokadu 8 tako, da blo-
kada zahvati u utor. Spremnik za nečistoću q
sada je čvrsto postavljen na blok motora.
Informacije o baterijama
1. Ručni usisivač radi na litij-ionske punjive baterije.
Prije prve uporabe ručnog usisivača baterije treba
puniti najmanje 24 sata.
2. Baterije svoj puni kapacitet dostižu nakon 24 sata
punjenja. Za održavanje baterije preporučujemo
sljedeće: Nakon punjenja baterija punjač 4
izvucite iz mrežne utičnice. Punjač 4 utaknite
u utičnicu tek kada snaga usisavanja ručnog
usisivača osjetno oslabi.
Montaža zidnog držača
Opasnost po život
Provjerite da se u zidu, u kojem namjeravate izbušiti
rupe za zidni držač 3 ne nalaze električni kabeli
ili drugi vodovi. Postoji opasnost po život ukoliko
svrdlom izbušite električni vod pod naponom!
1. Šuplji utikač 5 punjača 4 na način prikazan
na sljedećoj slici utaknite u zidni držač 3.
Zakretanjem fiksirajte šuplji utikač 5.
IB_109560_SAS7.4LIA2_HR_RO_GR.qxp 08.12.2014 11:47 Uhr Seite 13

- 14 -
2. Potražite prikladno mjesto za montažu zidnog
držača 3:
Ručni usisivač morate moći bez problema iz
njega izvući, a mrežna utičnica za punjač 4
mora biti nadohvat.
3. Izbušite dvije rupe s međusobnim razmakom od
ca. 68 mm. Koristite zidni držač 3 za obilježa-
vanje rupa; tako će rastojanje biti precizno
odmjereno. Rupe za bušenje moraju odgovarati
tiplama veličine 5 mm.
4. Umetnite tiple u rupe i fiksirajte zidni držač 3
pomoću vijaka.
5. Sapnice možete nataknuti na bočne držače pri-
bora.
6. Utaknite punjač 4 u mrežnu utičnicu.
Punjenje
Napomena:
Provjerite da je prekidač Uklj/Isklj 6 gurnut unazad
(pozicija “0”), prije nego što započnete s punjenjem.
• Umetnite ručni usisavač s gornje strane u zidni
držač 3, tako da šuplji utikač 5 klizne u utikač
na uređaju. Lampica za kontrolu punjenja 7 će
treptati u crvenoj boji i postupak punjenja zapo-
činje.
Važno:
• Kada ručni usisivač opet ima dovoljno snage za
usisavanje, lampica za kontrolu punjenja 7 će
svijetliti zeleno. To ne znači da su baterije sasvim
napunjene. Kada lampica za kontrolu punjenja 7
svijetli zeleno, znači da su baterije napunjene
otprilike 80%.
• Kada je postupak punjenja dovršen, što kod pot-
puno ispražnjenih baterija može trajati 5 sati,
uređaj automatski prelazi u modus održavanja
napona (funkcija održavanja). Uređaj ipak ne
ostavljajte stalno priključeno na punjač 4, tako
da ne dođe do eventualnog oštećenja baterija.
• Baterije napunite tek onda, kada učinak usisa-
vanja ručnog usisavača osjetno oslabi i kada
lampica za kontrolu punjenja 7 treperi zeleno.
Napomena:
Ručni usisivač možete puniti i neposredno pomoću
punjača 4. U tu svrhu izvadite šuplji utikač 5 lag-
anim zakretanjem iz zidnog držača 3 i umetnite
ga u utičnicu na ručnom usisavaču.
Rukovanje
Pozor!
Usisni otvor u svakom trenutku mora biti prohodan
i ne smije biti začepljen. Začepljenja dovode do
pregrijavanja i oštećenja motora.
Napomene:
• Obratite pažnju na to, da filtar za prašinu 0
uvijek bude umetnut prije korištenja uređaja.
• Usisajte maksimalno toliku količinu tekućine/
nečistoće, dok spremnik za nečistoću q ne
bude napunjen do oznake MAX.
1. Skinite ručni usisivač sa zidnog držača 3 ili
ukoliko zidni držač 3 ne koristite, izvucite
šuplji utikač 5 iz utičnice.
2. U usisni otvor umetnite odgovarajuću sapnicu
po želji:
• Sapnicu za fuge 2, da biste očistili uska i
teško dostupna mjesta.
• Sapnicu za mokro usisavanje 1, za usisavanje
tekućina.
IB_109560_SAS7.4LIA2_HR_RO_GR.qxp 08.12.2014 11:47 Uhr Seite 14

- 15 -
Napomena:
Nakon što ste usisali tekućine, odmah očistite spremnik
za nečistoću q. U protivnom dolazi do stvaranja
klica i bakterija! Obratite pažnju na to, da vrećica
za prašinu s filtrom 9 bude potpuno osušena, prije
nego što uređaj ponovo koristite.
3. Za uključivanje uređaja gurnite prekidač Uklj/
Isklj 6 prema naprijed. Lampica za kontrolu
punjenja 7 će zasvijetliti zeleno.
4. Nakon uporabe gurnite prekidač Uklj/Isklj 6
prema nazad.
Napomena:
Umetnite ručni usisivač u zidni držač 3 i započnite
s postupkom punjenja kada snaga usisavanja osjetno
oslabi i svjetiljka za kontrolu punjenja 7 treperi
zeleno.
Čišćenje
Za postizanje najboljih rezultata ispraznite spremnik
za nečistoću q i očistite filtar za prašinu 0 nakon
svake uporabe.
Važno:
Ne koristite agresivna, kemijska ili abrazivna sredstva
za čišćenje. Ova sredstva oštećuju površinu uređaja.
1. Da biste otvorili spremnik za nečistoću q, pritis-
nite tipku za deblokadu 8 i skinite spremnik za
nečistoću q.
2. Izvadite filtar za prašinu 0 iz spremnika za
nečistoću q.
3. Ispraznite spremnik za nečistoću q.
4. Izvucite vrećicu filtra za prašinu 9 s držačem
iz filtra za prašinu 0.
5. Insperite vrećicu filtra za prašinu 9 u hladnoj
vodi i pričekajte da se sasvim osuši, prije nego je
ponovo umetnete u filtar za prašinu 0.
Ne sušite filtar vrućim zrakom.
6. Filtar za prašinu 0 ponovo umetnite u spremnik
za nečistoću q. Obratite pažnju na to, da filtar
za prašinu 0 bude ravno umetnut i da gumena
brtva zatvara spremnik za nečistoću q.
7. Postavite spremnik za nečistoću q ponovo na
blok motora:
• Gurnite plastični jezičac na donjoj strani ručnog
usisavača u utor na spremniku za nečistoću q.
• Pritisnite tipku za deblokadu 8 i istovremeno
gurnite spremnik za nečistoću q na blok
motora.
• Otpustite tipku za deblokadu 8 tako, da blo-
kada zahvati u utor. Spremnik za nečistoću q
sada je čvrsto postavljen na blok motora.
8. Očistite kućište i dvije sapnice lagano navlaže-
nom krpom. U slučaju tvrdokornih onečišćenja
dodajte malo blagog sredstva za čišćenje na
krpu.
9. Sve dijelove dobro osušite prije ponovne uporabe
uređaja ili prije odlaganja uređaja.
Zbrinjavanje
Uređaj i baterija moraju se zbrinuti odvojeno.
Zbrinjavanje uređaja
Uređaj nikako ne smijete bacati s obič-
nim kućnim otpadom. Ovaj proizvod
podliježe europskoj direktivi
2012/19/EU.
Uređaj zbrinite preko ovlaštenog poduzeća za
zbrinjavanje otpada ili preko nadležnog komunalnog
poduzeća za zbrinjavanje otpada.
Poštujte aktualno važeće propise.
U slučaju dvojbe obratite se mjesnom poduzeću
za zbrinjavanje otpada.
IB_109560_SAS7.4LIA2_HR_RO_GR.qxp 08.12.2014 11:47 Uhr Seite 15

- 16 -
Zbrinjavanje baterija/akumulatora
Baterije/akumulatori ne smiju se zbrinjavati
zajedno s kućnim otpadom. Svaki potrošač
je zakonski obavezan baterije/akumulatore
predati na sabirnom mjestu njegove općine/
njegovog dijela grada ili u trgovini.
Svrha ove obveze je da se baterije/akumulatore
zbrinjava na način neškodljiv za okoliš. Baterije/
akumulatore vratite isključivo u ispražnjenom stanju.
Da biste uređaj zbrinuli na ekološki ispravan način,
baterije treba izvaditi iz uređaja.
Opasnost od strujnog udara!
Isključite napajanje prije vađenja baterije!
Pozor! Oštećenje proizvoda!
Izvadite bateriju iz uređaja samo kada uređaj želite
zbrinuti/baciti! Uređaj prestaje biti ispravan kada iz
njega izvadite bateriju!
1. Skinite spremnik za nečistoću q s bloka motora.
2. Otpustite 4 križna vijka na strani bloka motora i
križni vijak na okrugloj rešetci na bloku motora.
3. Sada možete rastaviti blok motora.
4. Kliještima razdvojite 3 kabela, koji povezuju plo-
čicu s plavo omotanom baterijom. Sada možete
ukloniti bateriju.
5. Bateriju zbrinite na ekološki ispravan način.
Poštujte aktualno važeće propise. U slučaju
dvojbe obratite se mjesnom poduzeću za zbrin-
javanje otpada.
Svu ambalažu zbrinite na način neškodljiv
za okoliš.
Jamstvo i servis
Za ovaj uređaj daje se jamstvo u trajanju od 3 godine
od datuma kupnje. Uređaj je pažljivo proizveden i
prije isporuke brižljivo provjeren.
Molimo sačuvajte račun kao dokaz o kupnji. Molimo
vas da u slučaju jamstvenog zahtjeva nazovete tele-
fonski broj nadležnog servisa. Samo na taj način
možemo osigurati besplatno slanje robe.
Pravo na jamstvo vrijedi samo za greške materijala i
greške nastale prilikom proizvodnje, ali ne i za štete
nastale prilikom transporta, potrošne dijelove ili uslijed
oštećenja lomljivih dijelova, npr. prekidača ili baterija.
Proizvod je namijenjen isključivo za privatnu, nekomer-
cijalnu uporabu.
Jamstvo prestaje vrijediti u slučaju zlouporabe, nepra-
vilnog korištenja, primjene sile i zahvata na uređaju
koje nije obavila za to ovlaštena podružnica servisa.
Ovo jamstvo ne ograničava Vaša zakonska prava.
Korištenje prava na jamstvo ne produžuje jamstveni
rok. To vrijedi i za zamijenjene i popravljene dijelove.
Štete i nedostatke koji eventualno postoje već prilikom
kupovine treba odmah javiti neposredno nakon raspa-
kiranja, a najkasnije u roku od dva dana nakon
datuma kupnje. Popravci izvršeni nakon isteka jamst-
venog roka podliježu obavezi plaćanja.
Servis Hrvatska
Tel.: 0800 777 999
E-Mail: [email protected]
Dostupnost deÏurne telefonske linije:
Ponedjeljak do petak od 8:00 - 20:00 sati (SEV)
Uvoznik
Lidl Hrvatska d.o.o. k.d.,
p.p. 61
10020 Novi Zagreb
Proizvođač:
KOMPERNASS HANDELS GMBH
BURGSTRASSE 21
44867 BOCHUM
GERMANY
www.kompernass.com
IAN 109560
IB_109560_SAS7.4LIA2_HR_RO_GR.qxp 08.12.2014 11:47 Uhr Seite 16

- 17 -
R
CUPRINS PAGINA
Utilizarea conform destinaţiei 18
Furnitura 18
Descrierea aparatului 18
Indicaţii de siguranţă importante 19
Date tehnice 21
Înainte de prima utilizare 21
Informaţii privind acumulatorii 21
Montarea suportului de perete 21
Încărcarea 22
Operarea 22
Curăţarea 23
Eliminarea aparatelor uzate 23
Garanţia şi service-ul 24
Importator 24
IB_109560_SAS7.4LIA2_HR_RO_GR.qxp 08.12.2014 11:47 Uhr Seite 17
Seite wird geladen ...
Seite wird geladen ...
Seite wird geladen ...
Seite wird geladen ...
Seite wird geladen ...
Seite wird geladen ...
Seite wird geladen ...
Seite wird geladen ...
Seite wird geladen ...
Seite wird geladen ...
Seite wird geladen ...
Seite wird geladen ...
Seite wird geladen ...
Seite wird geladen ...
Seite wird geladen ...
Seite wird geladen ...
Seite wird geladen ...
Seite wird geladen ...
Seite wird geladen ...
Seite wird geladen ...
Seite wird geladen ...
Seite wird geladen ...
Seite wird geladen ...
Seite wird geladen ...
Seite wird geladen ...
-
 1
1
-
 2
2
-
 3
3
-
 4
4
-
 5
5
-
 6
6
-
 7
7
-
 8
8
-
 9
9
-
 10
10
-
 11
11
-
 12
12
-
 13
13
-
 14
14
-
 15
15
-
 16
16
-
 17
17
-
 18
18
-
 19
19
-
 20
20
-
 21
21
-
 22
22
-
 23
23
-
 24
24
-
 25
25
-
 26
26
-
 27
27
-
 28
28
-
 29
29
-
 30
30
-
 31
31
-
 32
32
-
 33
33
-
 34
34
-
 35
35
-
 36
36
-
 37
37
-
 38
38
-
 39
39
-
 40
40
-
 41
41
-
 42
42
-
 43
43
-
 44
44
-
 45
45


Silvercrest SAS 7.4 LI A2 Operating Instructions Manual
- Typ
- Operating Instructions Manual
in anderen Sprachen
- română: Silvercrest SAS 7.4 LI A2
Verwandte Artikel
-
Silvercrest SAS 7.4 LI B1 Operating Instructions Manual
-
Silvercrest SAS 7.4 LI B3 Benutzerhandbuch
-
Silvercrest SAS 7.4 LI A2 Operating Instructions Manual
-
-
Silvercrest SAS 7.4 LI D3 Bedienungsanleitung
-
Silvercrest SAS 7.4 LI A1 Operating Instructions Manual
-
-
Silvercrest SAS 7.4 LI E4 Bedienungsanleitung
-
-
Andere Dokumente
-
Kompernass KH 1510 CHANGING TABLE HEATER Benutzerhandbuch
-
ECG VT 4120 Benutzerhandbuch
-
-
 DS Produkte Z 02959 Benutzerhandbuch
-
Electrolux ZB4112 Benutzerhandbuch
-
Hoover HF21L18 011 Benutzerhandbuch
-
-
-
-
DeLOCK 83020 Datenblatt
