Silvercrest SDRF 10 A1 Operation and Safety Notes
- Kategorie
- Wecker
- Typ
- Operation and Safety Notes

D
AB+ RADIO WITH COLOUR DISPLAY SDRF 10 A1
DAB+ RADIO WITH
COLOUR DISPLAY
Operation and safety notes
DAB+ -RADIO MIT FARBDISPLAY
Bedienungs- und Sicherheitshinweise
IAN 309610

D
AB+ RADIO WITH COLOUR DISPLAY SDRF 10 A1
GB / IE / NI Operation and safety notes Page 5
DE / AT / CH Bedienungs- und Sicherheitshinweise Seite 43
Before reading, unfold both pages containing illustrations and familiarise yourself with all
functions of the device.
Klappen Sie vor dem Lesen die beiden Seiten mit den Abbildungen aus und machen Sie
sich anschließend mit allen Funktionen des Gerätes vertraut.

1.5 V LR 6 AA
1.5 V LR 6 AA
1.5 V LR 6 AA
1.5 V LR 6 AA
B
3456
30
1
Digital Radio
12:00
A
1
2
1a 1b
1c
1d1e1f1g

C
18 17 16 15 14
8 9 10 11 127
13
19

5 GB/IE/NI
Warning notices and symbols used .............. Page 7
List of pictograms used ............................................ Page 7
Introduction ....................................................................... Page 9
Intended use ............................................................................ Page 9
Parts description ...................................................................... Page 10
Delivery contents ..................................................................... Page 10
Technical data ......................................................................... Page 10
General safety notes ................................................. Page 12
Safety instructions for batteries / rechargeable batteries ..... Page 15
Before use ........................................................................... Page 16
Connecting the power supply to power ................................ Page 16
Inserting / replacing batteries ................................................. Page 17
Initial use ............................................................................. Page 17
Switching the product on and off ........................................... Page 17
Changing radio modes ........................................................... Page 19
Configuring the product .......................................................... Page 19
Menu options via Menu / Info button .................................... Page 19
Setting the language ............................................................... Page 23
Setting the clock ...................................................................... Page 24
Setting the display light ........................................................... Page 25
Operation ........................................................................... Page 26
Adjusting the volume ............................................................... Page 26
DAB+ station scan ................................................................... Page 26
Seek / change FM station ....................................................... Page 27
Saving a DAB+ station / FM station ....................................... Page 28
Selecting a saved DAB+ / UKW station ................................ Page 28

6 GB/IE/NI
Overwriting presets ................................................................. Page 29
Setting the Sleep Timer ........................................................... Page 29
Setting the alarm / Snooze ..................................................... Page 30
Connecting headphones ........................................................ Page 33
Displaying information in the colour LCD .............................. Page 33
Factory reset ..................................................................... Page 34
Cleaning and care ........................................................ Page 35
Storage during non-use .......................................... Page 35
Troubleshooting ............................................................ Page 35
Disposal ................................................................................ Page 36
Warranty ............................................................................. Page 37
Conditions of warranty ........................................................... Page 38
Warranty period and legal claims for defects ...................... Page 38
Scope of warranty .................................................................. Page 38
Processing of warranty claims ................................................ Page 39
Service ................................................................................... Page 39
Supplier / Producer / Importer ................................................ Page 40
EU Declaration of conformity ............................. Page 41

7 GB/IE/NI
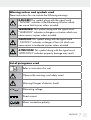
Warning notices and symbols used
These instructions for use contain the following warnings:
DANGER! This symbol along with the signal word
“DANGER” indicates a life-threatening situation which
can cause fatal injuries unless avoided.
WARNING! This symbol along with the signal word
“WARNING” indicates a dangerous situation which can
cause serious injuries unless avoided.
CAUTION! This symbol along with the signal word
“CAUTION” indicates a danger of low risk which can
cause minor to moderate injuries unless avoided.
ATTENTION! This symbol along with the signal word
“ATTENTION” indicates property damage may result.
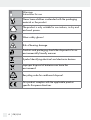
List of pictograms used
Refer to instructions for use!
Observe the warnings and safety notes!
Warning! Danger of electric shock!
Alternating voltage
Direct current
Mains connection polarity

8 GB/IE/NI
Warnings
Instructions for use
Never leave children unattended with the packaging
material or the product.
The product is only suitable for use indoors, in dry and
enclosed spaces.
Wear safety gloves!
Risk of hearing damage
Products and packaging should be disposed of in an
environmentally friendly manner.
Symbol identifying electrical and electronic devices.
Improper disposal of batteries can harm the
environment!
Recycling code for cardboard disposal.
This product complies with the applicable product-
specific European directives.

9 GB/IE/NI
DAB+ Radio with colour display SDRF 10 A1
Introduction
We congratulate you on the purchase of your new product.
You have chosen a high quality product. The instructions for
use are part of the product. They contain important information
concerning safety, use and disposal. Before using the product, please
familiarise yourself with all of the safety information and instructions for
use. Only use the product as described and for the specified applica-
tions. If you pass the product on to anyone else, please ensure that you
also pass on all the documentation with it.
Intended use
This consumer electronic is intended to receive analogue and digital
radio stations (Digital Audio Broadcasting (DAB)). The product can be
powered with the included power supply or with batteries. Only use the
product indoors. This product is only intended for private, non-commer-
cial use. Only use the product for the intended purpose. Any use not
specified above or product modification is prohibited and can result
in injuries and / or damage. The manufacturer assumes no liability for
damage due to improper use.
Please note, different countries may have other national legislation re-
garding which frequency ranges may be received freely. Any information
received outside the allowed frequency ranges must not be used for
gain, nor the contents thereof or the fact they were received disclosed
to third parties.
This product is only suitable for use indoors, in dry and
enclosed spaces.

10 GB/IE/NI
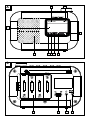
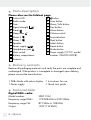
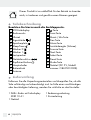
Parts description
Please also see the fold-out page.
1
Colour LCD
1a
Radio mode
1b
Time
1c
Signal strength
1d
Preset
1
1e
Sleep timer
30
1f
Alarm 2
1g
Alarm 1
2
Speaker
3
Power supply
4
Headphones jack
5
Main switch
6
Battery compartment
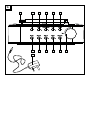
7
Antenna
8
button
9
Scan button
10
Menu / Info button
11
Prev button
12
Alarm button
13
Volume control
14
Snooze button
15
Next button
16
Select button
17
Preset button
18
Mode button
19
Power supply (5 V DC, model
number: OBL-0501000B)
Delivery contents
Remove all packaging materials and verify the parts are complete and
undamaged. If the product is incomplete or damaged upon delivery,
please contact the manufacturer.
1 DAB+ Radio with colour display
1 Power supply
1 Instructions for use
1 Quick start guide
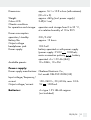
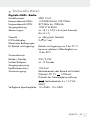
Technical data
Digital DAB+ radio:
Model number: SDRF 10 A1
Frequency range DAB+: 174.928 MHz to 239.2 MHz
Frequency range FM: 87.5 MHz to 108 MHz
Output: 10 W (1 W RMS)

11 GB/IE/NI
Dimensions: approx. 16.1 x 10.9 x 6 cm (with antenna)
(W x H x D)
Weight: approx. 460 g (incl. power supply)
Colour LCD: 2.4
(6.1 cm)
Climatic conditions
for operation and storage: operation and storage from 0 to 35 °C,
at a relative humidity of 10 to 90 %
Power consumption
operation / standby: 5 W / 0.4 W
Battery life: approx. 12 hours
Output voltage
headphones jack: 103.5 mV
Power supply: battery operated or with power supply
(power supply: 5 V DC
, 1000 mA;
mains connection polarity
, battery
operated: 4 x 1.5 V AA (LR6))
Available presets: 10 x DAB+, 10 x FM
Power supply:
Power supply manufacturer: Obelieve Electronic Co.,
Ltd. model OBL-0501000B (UK)
Input voltage / frequency /
current: 100–240 V∼, 50 / 60 Hz, max. 0.3 A
Output voltage / current: 5V
, 1000 mA
Batteries: 4 x type 1.5 V LR6 AA mignon
(not included)

12 GB/IE/NI
General safety notes
BEFORE USING THIS PRODUCT; PLEASE FAMILIARISE YOURSELF
WITH ALL OF THE SAFETY NOTES AND INSTRUCTIONS FOR USE!
PLEASE ALSO INCLUDE ALL DOCUMENTATION WHEN PASSING
THIS PRODUCT ON TO OTHERS!
DANGER! DANGER TO LIFE AND RISK OF
ACCIDENTS FOR INFANTS AND CHILDREN!
Never leave children unsupervised with the packaging
material. The packaging material poses a suffocation hazard. Chil-
dren frequently underestimate the dangers. The packaging material
is not a toy.
This product can be used by aged from 8 years people with reduced
physical, sensory or mental capabilities or lack of experience and
knowledge if they have been given supervision or instruction con-
cerning use of the appliance in a safe way and understand the
hazards involved. Do not allow children to play with the product.
Never allow children to clean or maintain this product unsupervised.
This product is not a toy.
If you notice anything unusual during use (e.g. unusual noise, strange
odour or smoke), switch the product off immediately and unplug
the power supply
19
from the mains socket and, if applicable, re-
move the batteries. Afterwards, do not use the product until it has
been examined by a qualified person.
Product repairs must be performed by an authorised speciality
company or customer service. Improper repairs may place the
user in considerable danger. This will also void the warranty.
Never open the housing of the product or the power supply
19
.
It has no internal parts requiring maintenance.

13 GB/IE/NI
Never cover the product and the power supply
19
. Heat may
otherwise build.
Do not place burning candles or open fire on or next to the product.
Do not throw the product into fire or expose it to high temperatures.
Avoid very high volumes for prolonged periods. Hearing
damage may otherwise occur.
WARNING! AVOID DANGER TO LIFE DUE
TO ELECTRIC SHOCK!
Always connect the product to a properly installed mains socket.
Make sure that the mains voltage corresponds to that of the power
supply
19
(see “Technical data“).
The power supply
19
of the product must be plugged into an easily
accessible mains socket so the product can easily be disconnected
from power in the event of an emergency.
Never touch the power supply
19
or the product with damp or
wet hands.
Before using the product, make sure that both the product and the
cable connection are undamaged! Never use a damaged product!
Always use the included power supply
19
.
Never immerse the product and the power supply
19
in water or
other liquids.
Do not use the product in very humid rooms, e.g. kitchen, bathroom
or sauna.
This product is only intended for use in dry locations and temperate
climate.
Do not use the product near splashing water, baths or swimming
pools.
Do not make unauthorised changes or modifications to the product.

14 GB/IE/NI
Do not place objects filled with water (e.g. vases or beverages) on
or next to the product. If liquids have entered the product, immedi-
ately unplug the power supply
19
from the socket and, if applicable,
remove the batteries. Afterwards, do not use the product until it has
been examined by a qualified person.
When the power supply
19
is plugged into a mains socket it uses
a small amount of electricity, even if the product is not connected
to the power supply
19
or is switched off. To disconnect from the
mains completely, unplug the power supply from the
19
mains
socket.
Always run the cable for the power supply
19
so it will not present
a tripping hazard.
Always unplug the power supply
19
from the mains socket before
cleaning.
Always unplug the power supply
19
by the actual plug. Never
pull on the cable.
ATTENTION! RISK OF PROPERTY DAMAGE!
Always set the product on a sturdy, level surface. It could be
damaged if it falls.
Do not place heavy objects on the product.
Do not place heavy objects, e.g. furniture, on the cable.
Keep the product away from moisture, dripping water and splashing
water!
Do not use the product near heat sources or other appliances
emitting heat!
Unplug the power supply
19
from the mains socket during storms.

15 GB/IE/NI
Unplug the power supply
19
of the product from the mains socket
and, if applicable, remove the batteries from the battery compart-
ment if the product will not be used for a prolonged period.
Safety instructions for batteries /
rechargeable batteries
DANGER TO LIFE! Keep batteries / rechargeable batteries out
of reach of children. If accidentally swallowed seek immediate
medical attention.
DANGER OF EXPLOSION! Never recharge nonrechargeable
batteries. Do not short-circuit batteries / rechargeable batteries
and / or open them. Overheating, fire or bursting can be the result.
Never throw batteries / rechargeable batteries into fire or water.
Do not exert mechanical loads to batteries / rechargeable batteries.
Risk of leakage of batteries / rechargeable batteries
Avoid extreme environmental conditions and temperatures, which
could affect batteries / rechargeable batteries, e.g. radiators / direct
sunlight.
If batteries / rechargeable batteries have leaked, avoid contact
with skin, eyes and mucous membranes with the chemicals! Flush
immediately the affected areas with fresh water and seek medical
attention!
WEAR PROTECTIVE GLOVES! Leaked or damaged
batteries / rechargeable batteries can cause burns on
contact with the skin. Wear suitable protective gloves
at all times if such an event occurs.
In the event of a leakage of batteries / rechargeable batteries,
immediately remove them from the product to prevent damage.

16 GB/IE/NI
Only use the same type of batteries / rechargeable batteries.
Do not mix used and new batteries / rechargeable batteries.
Remove batteries / rechargeable batteries if the product will not
be used for a longer period.
Risk of damage of the product
Only use the specified type of battery / rechargeable battery!
Insert batteries / rechargeable batteries according to polarity marks
(+) and (-) on the battery / rechargeable battery and the product.
Clean the contacts on the battery / rechargeable battery and in
the battery compartment before inserting!
Remove exhausted batteries / rechargeable batteries from the
product immediately.
Before use
Note: Remove all packaging material from the product.
Connecting the power supply to power
Note: Before connecting the power supply
19
to the mains, compare
the connection data on the type plate of the power supply
19
(voltage
and frequency) with the data for your electric circuit. Make sure the
data matches to prevent product damage.
Note: To prevent the clock and alarm settings to be lost in the event of
a power failure, insert four batteries type 1.5 V LR6 AA (not included).
The batteries keep the internal clock running during a power outage.
In this case the colour LCD
1
will be off. Once power has returned,
the colour LCD
1
automatically shows the correct time.
Connect the coaxial connector of the power supply
19
to the
mains connection
3
at the back of the product.

17 GB/IE/NI
Plug the power supply
19
into a properly installed mains socket to
connect the product to the mains.
Inserting / replacing batteries
Remove the battery cover to open the battery compartment
6
at
the back of the product. If applicable, remove the used batteries.
Insert four batteries type 1.5 V LR6 AA (not included). Ensure cor-
rect polarity. Note the markings inside the battery compartment
6
.
Reinstall the battery cover until you hear it lock into place to close
the battery compartment
6
.
Note: To see the battery status, press the Menu / Info button
10
on
the colour LCD
1
several times (see chapter “Displaying informa-
tion in the colour LCD
1
“). The battery level is shown in percent.
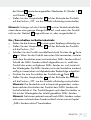
Initial use
Switching the product on and off
The product will only display the clock, date and alarm times in standby
mode when using the product with the power supply
19
. When battery
powered, the colour LCD
1
will be blank until the product is switched
on with the
button
8
.
Switching on / off on mains power:
Fully extend the antenna
7
for good reception.
Set the main switch
5
at the back of the product to position „On“.
The product is now in standby mode. The colour LCD
1
shows
the current date and the time, as well as the alarm settings for
alarm 1 and alarm 2.
Press the button
8
to switch on the product. When using the
product for the first time it will automatically scan for DAB+ stations
after being switched on. The progress bar in the colour LCD
1

18 GB/IE/NI
indicates the progress of the DAB+ station scan. The number
above the progress bar indicates how many DAB+ stations have been
found.
After the DAB+ station scan has completed, the product will select
the first available DAB+ station and start playing it. By default, the
DAB+ stations are listed in numerical and alphabetic order.
Press the button
8
to set the product to standby mode. The
colour LCD
1
shows the current date and time
1b
, as well as
the alarm settings for alarm 1
1g
and alarm 2
1f
.
Set the main switch
5
at the back of the product to position
“Off“ to switch the product all the way off.
Note: When the power supply
19
is plugged into a mains socket it
uses a small amount of electricity, even if the product is not connected
to the power supply
19
or is switched off.
Switching on / off when battery powered:
Fully extend the antenna
7
for good reception.
Set the main switch
5
at the back of the product to position “On“.
Then press the button
8
to switch the product on. When using the
product for the first time it will automatically scan for DAB+ stations
after being switched on. After the DAB+ station scan has completed,
the product will select the first available DAB+ station and start
playing it. By default, the DAB+ stations are listed in numerical
and alphabetic order.
Press the button
8
to switch the product off.
Set the main switch
5
at the back of the product to position “Off“
to switch the product all the way off.
Note: The station list is automatically saved so the product does
not need to scan for DAB+ stations the next time it is switched on.

19 GB/IE/NI
After being switched on, the product will automatically start play-
ing the last DAB+ station selected.
Note: You can manually scan for DAB+ stations at any time or
start an automatic station scan as described in chapter “DAB+
station scan“.
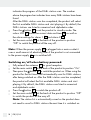
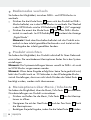
Changing radio modes
You can switch between DAB+ and FM mode.
With the product in DAB+ mode, press the Mode button
18
to
switch to FM mode. The colour LCD
1
will now show “FM“.
Press the Mode button
18
again to return to DAB+ mode. The
colour LCD
1
now shows “Digital Radio“.
Note: After being switched on, the product is automatically in the
last radio mode used and start playing the last station selected.
Configuring the product
You can customise the product to your preferences. The various menu
options can be found under system settings.
Note: The system systems can be changed in both DAB+ as well as
FM mode.
Note: If no entry is made or button pressed, the product automatically
returns to playback mode after approx. 30 seconds. Any settings which
were not saved by pressing the Select button
16
will be lost.
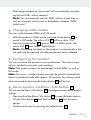
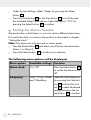
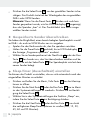
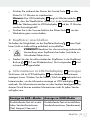
Menu options via Menu / Info button
10
You can use the Menu / Info button
10
to configure various basic product
settings.
Press and hold the Menu / Info button
10
to open the menu options.
Use the Next button
15
and the Prev button
11
from the menu
options.
Confirm each entry by pressing the Select button
16
.

20 GB/IE/NI
Press the Menu / Info button
10
again to return to the menu options
for other settings.
To return to playback mode, press the Menu / Info button
10
until
the product is in playback mode again. If no button is pressed after
the last entry, the product automatically returns to playback mode
after approx. 30 seconds.
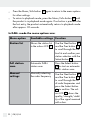
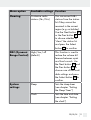
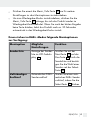
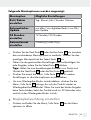
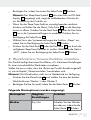
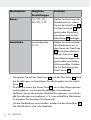
In DAB+ mode the menu options are:
Menu option Available settings Function
Station list
Shows the station list
in the colour LCD
1
Use the Next button
15
and the Prev button
11
to scroll through the sta-
tion list and confirm your
station selection with the
Select button
16
.
Full station
scan
Automatic DAB+
station scan
Press the Select button
16
to start an automatic
DAB+ station scan.
Manual
settings
Manually selecting
the radio frequency
Use the Next button
15
and the Prev button
11
to scroll through the list
of radio frequencies and
press the Select button
16
to confirm. The col-
our LCD
1
shows the
quality / strength / stabil-
ity of the signal received
with a bar.
Seite wird geladen ...
Seite wird geladen ...
Seite wird geladen ...
Seite wird geladen ...
Seite wird geladen ...
Seite wird geladen ...
Seite wird geladen ...
Seite wird geladen ...
Seite wird geladen ...
Seite wird geladen ...
Seite wird geladen ...
Seite wird geladen ...
Seite wird geladen ...
Seite wird geladen ...
Seite wird geladen ...
Seite wird geladen ...
Seite wird geladen ...
Seite wird geladen ...
Seite wird geladen ...
Seite wird geladen ...
Seite wird geladen ...
Seite wird geladen ...
Seite wird geladen ...
Seite wird geladen ...
Seite wird geladen ...
Seite wird geladen ...
Seite wird geladen ...
Seite wird geladen ...
Seite wird geladen ...
Seite wird geladen ...
Seite wird geladen ...
Seite wird geladen ...
Seite wird geladen ...
Seite wird geladen ...
Seite wird geladen ...
Seite wird geladen ...
Seite wird geladen ...
Seite wird geladen ...
Seite wird geladen ...
Seite wird geladen ...
Seite wird geladen ...
Seite wird geladen ...
Seite wird geladen ...
Seite wird geladen ...
Seite wird geladen ...
Seite wird geladen ...
Seite wird geladen ...
Seite wird geladen ...
Seite wird geladen ...
Seite wird geladen ...
Seite wird geladen ...
Seite wird geladen ...
Seite wird geladen ...
Seite wird geladen ...
Seite wird geladen ...
Seite wird geladen ...
Seite wird geladen ...
Seite wird geladen ...
Seite wird geladen ...
Seite wird geladen ...
Seite wird geladen ...
Seite wird geladen ...
Seite wird geladen ...
Seite wird geladen ...
Seite wird geladen ...
-
 1
1
-
 2
2
-
 3
3
-
 4
4
-
 5
5
-
 6
6
-
 7
7
-
 8
8
-
 9
9
-
 10
10
-
 11
11
-
 12
12
-
 13
13
-
 14
14
-
 15
15
-
 16
16
-
 17
17
-
 18
18
-
 19
19
-
 20
20
-
 21
21
-
 22
22
-
 23
23
-
 24
24
-
 25
25
-
 26
26
-
 27
27
-
 28
28
-
 29
29
-
 30
30
-
 31
31
-
 32
32
-
 33
33
-
 34
34
-
 35
35
-
 36
36
-
 37
37
-
 38
38
-
 39
39
-
 40
40
-
 41
41
-
 42
42
-
 43
43
-
 44
44
-
 45
45
-
 46
46
-
 47
47
-
 48
48
-
 49
49
-
 50
50
-
 51
51
-
 52
52
-
 53
53
-
 54
54
-
 55
55
-
 56
56
-
 57
57
-
 58
58
-
 59
59
-
 60
60
-
 61
61
-
 62
62
-
 63
63
-
 64
64
-
 65
65
-
 66
66
-
 67
67
-
 68
68
-
 69
69
-
 70
70
-
 71
71
-
 72
72
-
 73
73
-
 74
74
-
 75
75
-
 76
76
-
 77
77
-
 78
78
-
 79
79
-
 80
80
-
 81
81
-
 82
82
-
 83
83
-
 84
84
-
 85
85


Silvercrest SDRF 10 A1 Operation and Safety Notes
- Kategorie
- Wecker
- Typ
- Operation and Safety Notes
in anderen Sprachen
- English: Silvercrest SDRF 10 A1
Verwandte Artikel
Andere Dokumente
-
Lenco PDR-026 Portable DAB Plus FM Radio Benutzerhandbuch
-
Auna 10033111 Bedienungsanleitung
-
Renkforce RF-DAB-AP Operating Instructions Manual
-
-
-
-
Reflexion Design DAB+/UKW-Radio Bedienungsanleitung
-
AEG MC 174 Benutzerhandbuch
-
Nordmende Transita 320 Bedienungsanleitung
-