Yamaha YSP-2200 Bedienungsanleitung
- Kategorie
- Projektoren
- Typ
- Bedienungsanleitung
Dieses Handbuch eignet sich auch für

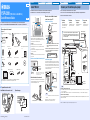
This Quick Reference Guide explains steps to connect TV and Blu-ray disc player to this unit and start playback.
Make sure to read “CAUTION: READ THIS BEFORE OPERATING YOUR UNIT.” on Safety and Accessory Information first.
■ Prepare the remote control
Install batteries in the remote control. Operation range
YSP-2200 (YSP-CU2200 + NS-SWP600)
Quick Reference Guide
English
UCTABGLV
Necessary items for this manual
Supplied items
Optional items
*This guide explains how to connect TV and Blu-ray disc player with HDMI input/output jacks.
Refer to Safety and Accessory Information about other supplied accessories.
TV Blu-ray disc player HDMI cable (×2)
Center unit and Subwoofer
(×1)
Remote
control (×1)
Cardboard microphone stand
(×1)
IntelliBeam microphone (×1)
IR Flasher (×1) Stands for
subwoofer (×4)
Speaker cable (×1) Non-skid pad for the center unit
(×4)
Battery (×2)
(AA, R6, UM-3)
Optical cable (×1) Video pin cable (×1) Demonstration DVD (×1)
Press U.
Battery × 2
(AA, R6, UM-3)
Remove the transparent
sheet before using the
remote control.
Within 6 m (20 ft)
Installation Connection Settings Playback
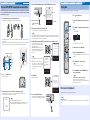
Install YSP-2200
● Install this unit in the exact center of the wall when it is measured from the left and right corners.
● Install this unit as close to the exact front of your normal listening position as possible.
Some of your TV have sensors such as motion sensor, or signal
transmitter for 3D glasses in front. Installing the center unit may
interrupts the sensors or signal transmitter functioning. Set the center
unit away from your TV, or install it in your rack.
Center unit
Install this unit in the center of the left and right walls.
Listening position (such as sofa, etc.) should be located at the
front of the unit.
The distance between listening position and the unit should be
more than 1.8 m (5.9 ft).
Subwoofer
Install the subwoofer as close to the center unit as possible for a better
unit of sounds.
When the center unit straddles the stands of your TV
Attach the stands to the subwoofer
Install the subwoofer with the supplied stands. Horizontal placement is
convenient for installing the center of a rack, and vertical placement is
convenient for installing the side of a rack.
When the center unit hides the remote
control sensor of your TV
Remove the center unit legs
Use IR Flasher (supplied)
The unit receives the signal from the remote control of your TV in front,
and transmits to your TV by IR Flasher (supplied). Remove the backing
paper on the tip of LED part of IR Flasher, and attach it to the remote
control sensor of your TV or the area close to the remote control sensor
of your TV on the rear panel of center unit as shown. Connect the plug
to the IR output jack of the unit.
When using IR Flasher, direct the remote control of your TV to the
center unit.
This function is valid even in the standby mode.
This function may not activate with some TVs.
Center unit
Subwoofer
The graduation
(from 0 to 10)
Adjustable range:
28.5 mm to 38.5 mm
(1-1/8 in to 1-1/2 in)
Turning the stands to left makes the unit higher.
Confirm the graduation of each stand to make
each stand the same height.
Horizontal placement Vertical placement
3 Push the whole leg to the center of the bottom as shown in the
illustration while laying the hook to the same direction and
remove it.
2 Remove the outside part of
the leg.
1 Turn the leg furthermore to
the left.
4 Attach the 4 non-skid pads (supplied) to the corners on the bottom of
the center unit. (The illustration below is one of the examples for
attaching the non-skid pads.)
Non-skid pad
IR Flasher (supplied)
Remote control
sensor of your TV
yHint
Installation Connection Settings Playback
Connect your TV and Blu-ray disc player
● Do not connect the power cable until all connections are completed.
● Do not use excessive force when inserting the cable plug. Doing so may damage the cable plug and/or terminal.
For the cable connection, follow the orders below.
Refer to Owner’s Manual on the page 15 when connecting your game console etc.
Audio return channel (ARC) supported TV
Connect HDMI cable to audio return channel supported terminal (the terminal with “ARC” indicated) on TV. In this case, you do not need
to connect optical cable.
Activate the HDMI control function of this unit so as to activate audio return channel (ARC). (See Owner’s Manual on the page 25.)
What is audio return channel (ARC)?
A function transmits digital audio signal output from TV to this unit through a HDMI cable. By this function, a digital audio pin cable to connect TV
and this unit is not needed.
1.
HDMI cable
(optional)
Input the digital audio/video
signals of the Blu-ray disc
player to this unit.
2.
HDMI cable
(optional)
The digital video of the Blu-
ray disc is reflected on TV.
3.
Optical cable
(supplied)
Play back digital sounds of
TV on this unit. y
4.
Video pin cable
(supplied)
To display the YSP-2200’s
setup menus on the TV.
123
INPUT1
HDMI INPUT
OPTICAL
OUTPUT
VIDEO
AUDIORL
HDMI
OUTPUT
Connect the center unit with the speaker cable (supplied) to the subwoofer.
Match the positive (+) of the subwoofer terminal to the positive (+) of the center
unit terminal, and the negative (-) of the subwoofer terminal to the negative (-) of
the center unit terminal.
Blu-ray disc player
TV
1. Remove the cap
2. Check the
direction of the plug
Video signals
Audio signals
1
2
3
4
Subwoofer (supplied)
5.
y
To AC wall outlet
6.
Insert into the terminal on
the rear panel.
Twist and pull off the
insulation tube on the lead
wire.
(Example)
yHint
Printed in Malaysia WV67660 [En] © 2010 Yamaha Corporation

Installation Connection Settings Playback
Carry out AUTO SETUP for appropriate surround effects
The IntelliBeam technology allows you to achieve sound adjustments that best match your listening environment. It is normal for loud
test tones to be output during the AUTO SETUP procedure. Make sure that there are no children around in the listening room while the
AUTO SETUP procedure is in progress.
1.
Set the IntelliBeam microphone at your normal listening position.
Assemble the stand and place the IntelliBeam microphone on top of it horizontally as shown below.
Use the supplied cardboard microphone stand or a tripod to place the IntelliBeam microphone at the same height as your ears would be
when you are seated.
Make sure that there are no obstacles between the IntelliBeam microphone and the walls in your listening room as these objects obstruct the
path of sound beams. However, any objects that are in contact with the walls will be regarded as a protruding part of the walls.
2.
Press key on the remote control.
The power of this unit turns on.
3.
Turn on the power of your TV and select YSP-2200 as the video input on your TV.
If you connected the video pin cable to TV Video In 1, as shown in the connection diagram, select video input 1 on the TV.
If no menu appears, make sure the video pin cable is connected correctly.
123 45
IntelliBeam microphone Upper limit
Center height of
this unit
Within 1 m (3.3 ft)
Within 1 m (3.3 ft)
Listening
position
Cardboard
microphone stand
1.8 m (6.0 ft)
or more
Lower limit
Center
line
IntelliBeam
microphone
Cardboard
microphone
stand
YSP-
2200
Push [SETUP] to
begin SETUP MENU.
You can select the language described in the menu screen.
Press and hold SETUP key until the “LANGUAGE SETUP” menu appears. → Press U/V key to
select the desired language and then press ENTER key. → Press SETUP key again.
yHint
4.
Connect the supplied IntelliBeam microphone to the INTELLIBEAM jack on the front panel.
5.
Make sure that your listening room is as quiet as possible.
For accurate measurement, turn off air conditioner or other devices that make noises.
Leave the room after the next procedure. The best setting may not be done if you are in the room. When leaving the room, bring this Quick
Reference Guide with you. The AUTO SETUP procedure takes about 3 minutes. Wait outside the room during the AUTO SETUP procedure.
To cancel the AUTO SETUP procedure after it is started, press RETURN key.
6.
Press ENTER key to start the AUTO SETUP procedure and then leave the room within 10 seconds.
The screen changes as each measurement is carried out.
When the process is complete, a bell will sound and the
results will be displayed on the TV.
If “ENVIRONMENT CHECK : Failure” (“Error Code: E-1” etc.
is displayed in the front panel display) is displayed, see page
19 of the Owner’s Manual and run the measurement
process again.
The results displayed depend on the position of the YSP-
2200.
If you hear a buzzer sound and an error message
appears on the TV, look for a solution in “Error messages
for AUTO SETUP” on page 21 of the Owner’s Manual.
Then press RETURN key to run the measurement
process again.
7.
Press ENTER key.
The measurement result is saved.
8.
Disconnect the IntelliBeam microphone.
The initial screen appears. Keep the IntelliBeam microphone in a safe
place. The settings are automatically saved in the system memory.
IntelliBeam microphone (supplied)
Cardboard microphone stand
(supplied)
AUTO SETUPSETUP
(PREPARATION & CHECK)
Please connect the MIC.
Please place the MIC at least
1.8m/6ft away from SoundPro-
jector. The MIC should be set
at ear level when seated.
Measurement takes about 3min.
After [ENTER] is pressed,
please leave the room.
[ENTER]:Start [RETURN]:Cancel
Start Setup?
TV screen
Front panel display
yHint
Will begin in 10 sec.
Please leave the room.
---------
AUTO SETUP START
[RETURN]:Cancel
MEASUREMENT COMPLETE.
BEAM MODE :5Beam/Plus2
SUBWOOFER :Yes
[ENTER]:Save set-up.
[RETURN]:Do
not save
set-up.
XXXXXXXXSHOW RESULTXXXXXXXXXX
Start in 10sec
5Beam /SWF:RDY
About 3
minutes
later
yHint
AUTO SETUP COMPLETE
Please remove the MIC
from Sound Projector
and the listening position.
Setup Finish.
Installation Connection Settings Playback
Playing back
Play back the supplied demonstration DVD, and confirm the exact connection and settings.
Then, have fun for playback!
For detailed operation, refer to the Owner’s Manual on the supplied CD-ROM.
1.
Press key to turn on this unit.
2.
Turn on your TV and Blu-ray disc player connected to this
unit.
3.
Press HDMI1-3 to select the Blu-ray disc player as the input
source.
Press TV key to select the TV as the input source.
4.
Set the input source of TV to HDMI input 1.
5.
Play back the supplied demonstration DVD.
Refer to “Using the supplied demonstration DVD”. (Refer to Safety and Accessory
Information.)
6.
Press VOLUME +/- key to adjust the volume.
Use TV remote control to mute the sound from TV.
7.
Press SURROUND key and then the CINEMA DSP keys to
set your sound preferences.
When this unit does not play back, check the following
The connection between this unit and Blu-ray disc player.
The audio output settings of Blu-ray disc player is set to digital sound output.
The input of TV is selected exactly.
1
7
3
6
HDMI1
Input source name
yHint
yHint
yHint
HDMI control function
You can use the TV remote control to operate this unit if your TV supports the HDMI control function. See the page 25 of Owner’s Manual about
settings.
yHint
-
 1
1
-
 2
2


Yamaha YSP-2200 Bedienungsanleitung
- Kategorie
- Projektoren
- Typ
- Bedienungsanleitung
- Dieses Handbuch eignet sich auch für
in anderen Sprachen
- English: Yamaha YSP-2200 Owner's manual
- français: Yamaha YSP-2200 Le manuel du propriétaire
- español: Yamaha YSP-2200 El manual del propietario
- italiano: Yamaha YSP-2200 Manuale del proprietario
- русский: Yamaha YSP-2200 Инструкция по применению
- Nederlands: Yamaha YSP-2200 de handleiding
- dansk: Yamaha YSP-2200 Brugervejledning
- svenska: Yamaha YSP-2200 Bruksanvisning
- Türkçe: Yamaha YSP-2200 El kitabı
- suomi: Yamaha YSP-2200 Omistajan opas
- română: Yamaha YSP-2200 Manualul proprietarului
Verwandte Artikel
-
Yamaha YSP-CU2200 Benutzerhandbuch
-
Yamaha YSP-4300 Bedienungsanleitung
-
-
-
Yamaha Digital Sound Projector YSP-3000 Bedienungsanleitung
-
Yamaha YSP-4000 Bedienungsanleitung
-
Yamaha YSP5100BT Benutzerhandbuch
-
-
Yamaha YSP-600 Bedienungsanleitung
-