Seite wird geladen ...

1
Notes for Wireless LAN Users
This manual explains how to connect the machine to the network via a wireless LAN interface.
• Ad hoc mode is not supported.
• Ethernet and wireless LAN settings cannot be enabled at the same time.
Checking Your Wireless Network Environment
• Before configuring the wireless LAN settings, configure the machine's IP address.
For details about configuring the machine's IP address, see "2. Preparing for Printing", User
Guide .
• Check that the access point is operating.
CHV600
• Plug the wireless LAN cable into the Ethernet port before configuring the wireless LAN set-
tings.
CHV601

2
• Change the [LAN Type] to [IEEE 802.11b/g/n] before configuring the wireless LAN settings.
the [User Tools] key
[Login] Enter the login password. (default: 000000) [System Settings]
[Interface Settings] [Network] [LAN Type] [IEEE 802.11b/g/n] Turn the machine off.
Turn the machine on.
CHV632

3
Selecting the Configuration Method
The configuration method depends on the access point being used.
"Easy Setup" is a function for automatically configuring the wireless LAN settings. The actual
name of the function may vary depending on the access point being used. See the access point
manual.
Page 4
”Easy Setup Using the
WPS Button”
Page 8
”Manual setting”
Easy Setup
“PBC Method”
Easy Setup
“PIN Method”
Manual setting
Does the access point support "Easy Setup" of the wireless LAN?
Is there a push button
on the access point?
Page 6
”Easy Setup Using a
PIN Code”
Yes
No
Yes No
CHV604
• Manual setting: Page 8 "Configuring Settings Using Web Image Monitor"
• Manual setting: Page 17 "Configuring Settings Using the Control Panel"

4
Easy Setup Using the WPS Button
1. Turn the machine on.
CHV605
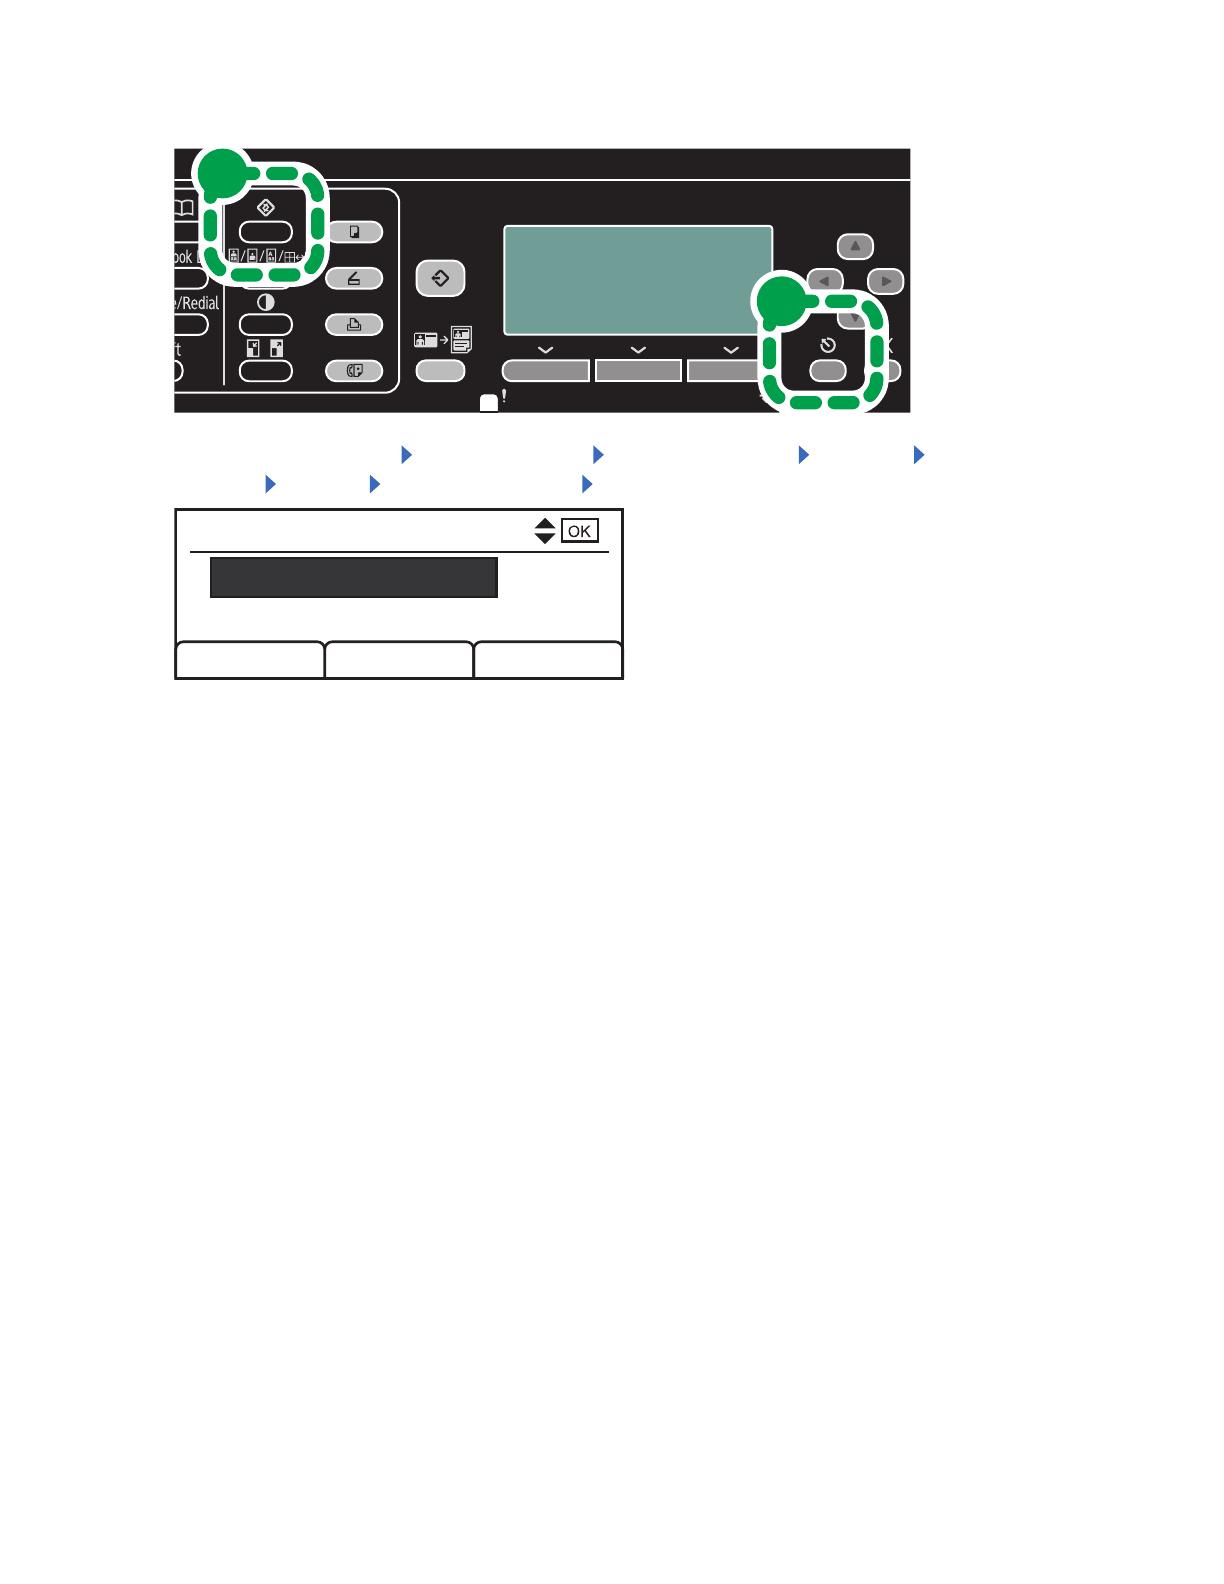
2. Press the [User Tools] key.
CHV051
3. Press [Login].
4. Enter the login password, and then press the [OK] key.
If this is the first time to log in, enter the default password of "000000".
5. Press the [
] or [ ] key to display [System Settings], and then press the [OK] key.
6. Press the [
] or [ ] key to display [Interface Settings], and then press the [OK] key.
7. Press the [
] or [ ] key to display [IEEE 802.11], and then press the [OK] key.
8. Press the [
] or [ ] key to display [Easy Setup], and then press the [OK] key.
1/1
IEEE
802.11 b/g/n
Det. Settings
Easy Setup
Current status

5
9. Press the WPS button on the access point.
WPS
CHV607
10. Press the [ ] or [ ] key to display [PBC Method], and then press the [OK] key.
1/1
Easy Setup:
PIN Method
PBC Method
If the connection is successful, "Connection to AP has succeeded." will be displayed.
If the connection fails, "Connection to AP has failed." is displayed. If this is the case, go back
to Step 8. If the problem persists, check whether the access point is working properly. If the
access point is working properly but the problem still persists, contact your sales or service
representative.
• If the access point cannot be detected within 120 seconds, the search session expires.

6
Easy Setup Using a PIN Code
1. Turn the machine on.
CHV605
2. Press the [User Tools] key.
CHV051
3. Press [Login].
4. Enter the login password, and then press the [OK] key.
If this is the first time to log in, enter the default password of "000000".
5. Press the [
] or [ ] key to display [System Settings], and then press the OK key.
6. Press the [
] or [ ] key to display [Interface Settings], and then press the OK key.
7. Press the [
] or [ ] key to display [IEEE 802.11], and then press the OK key.
8. Press the [
] or [ ] key to display [Easy Setup], and then press the OK key.
1/1
IEEE
802.11 b/g/n
Det. Settings
Easy Setup
Current status

7
9. Press the [ ] or [ ] key to display [PIN Method], and then press the OK key.
1/1
Easy Setup:
PIN Method
PBC Method
10. Check the machine's PIN.
PIN Method:
Connect
11. Enter the machine's PIN on the access point web page.
CHV609
For details, see the manual supplied with the wireless LAN access point.
12. Execute WPS (PIN system) from the access point's web page.
13. Press [Connect].
If the connection is successful, "Connection to AP has succeeded." will be displayed.
If the connection fails, “Connection to AP has failed.” is displayed. If this is the case, go back
to Step 10. If the problem persists, check whether the access point is working properly. If the
access point is working properly but the problem still persists, contact your sales or service
representative.

8
Manual Setting
If you cannot confirm the settings of the access point being used or the access point does not
support WPS, configure the wireless LAN settings manually.
You can configure the settings using Web Image Monitor or the control panel. This manual mainly
explains configuration using Web Image Monitor.
Configuring Settings Using Web Image Monitor
• Connect the machine and computer with an Ethernet cable before configuring the settings.
CHV619
• Check the security method employed by the access point being used.
• Change the [LAN Type] to [Ethernet] before configuring the wireless LAN settings.
CHV632
the [User Tools] key [Login] Enter the login password. (default: 000000) [System Settings]
[Interface Settings] [Network] [LAN Type] [Ethernet] the [OK] key Turn the machine
off. Turn the machine on.
9
• Check the machine's IP address.
1
2
CHV654
the [User Tools] key (1) [System Settings] [Interface Settings] [Network] [Machine IPV4
Address] [IP Add.] the [Escape] key (2) The control panel returns to the initial screen.
1/1
Mach.IPv4 Addr. :
Specify
Auto-Obtain(DHCP)
IP Add. Subnet M MAC Add.

10
1. Launch the Web browser.
2. In the address bar, enter "http://(machine's IP address or host name)/".
3. Enter the administrator password, and then click [Login].
If this is the first time to log in, enter the default password of "000000".
CHV636
4. In the menu area, click [Configuration].
CHV638

11
5. Click [Interface Settings] under "Interface".
CHV640
1
2
CHV644
1. Select [Wireless LAN].
2. Click [OK].

12
6. Click [OK], when "Update complete" appears.
7. Click [Wireless LAN Settings] under "Interface".
CHV640
• If not applying any security method
3
1
2
CHV646
1. Enter the network name of the access point.
2. Select [Inactive].
3. Click [OK].

13
• If the security method is WEP
1
2
3
4
CHV648
1. Enter the network name of the access point.
2. Select [WEP].
3. Enter the password for the access point.
Configure other settings if needed.
4. Click [OK].
14
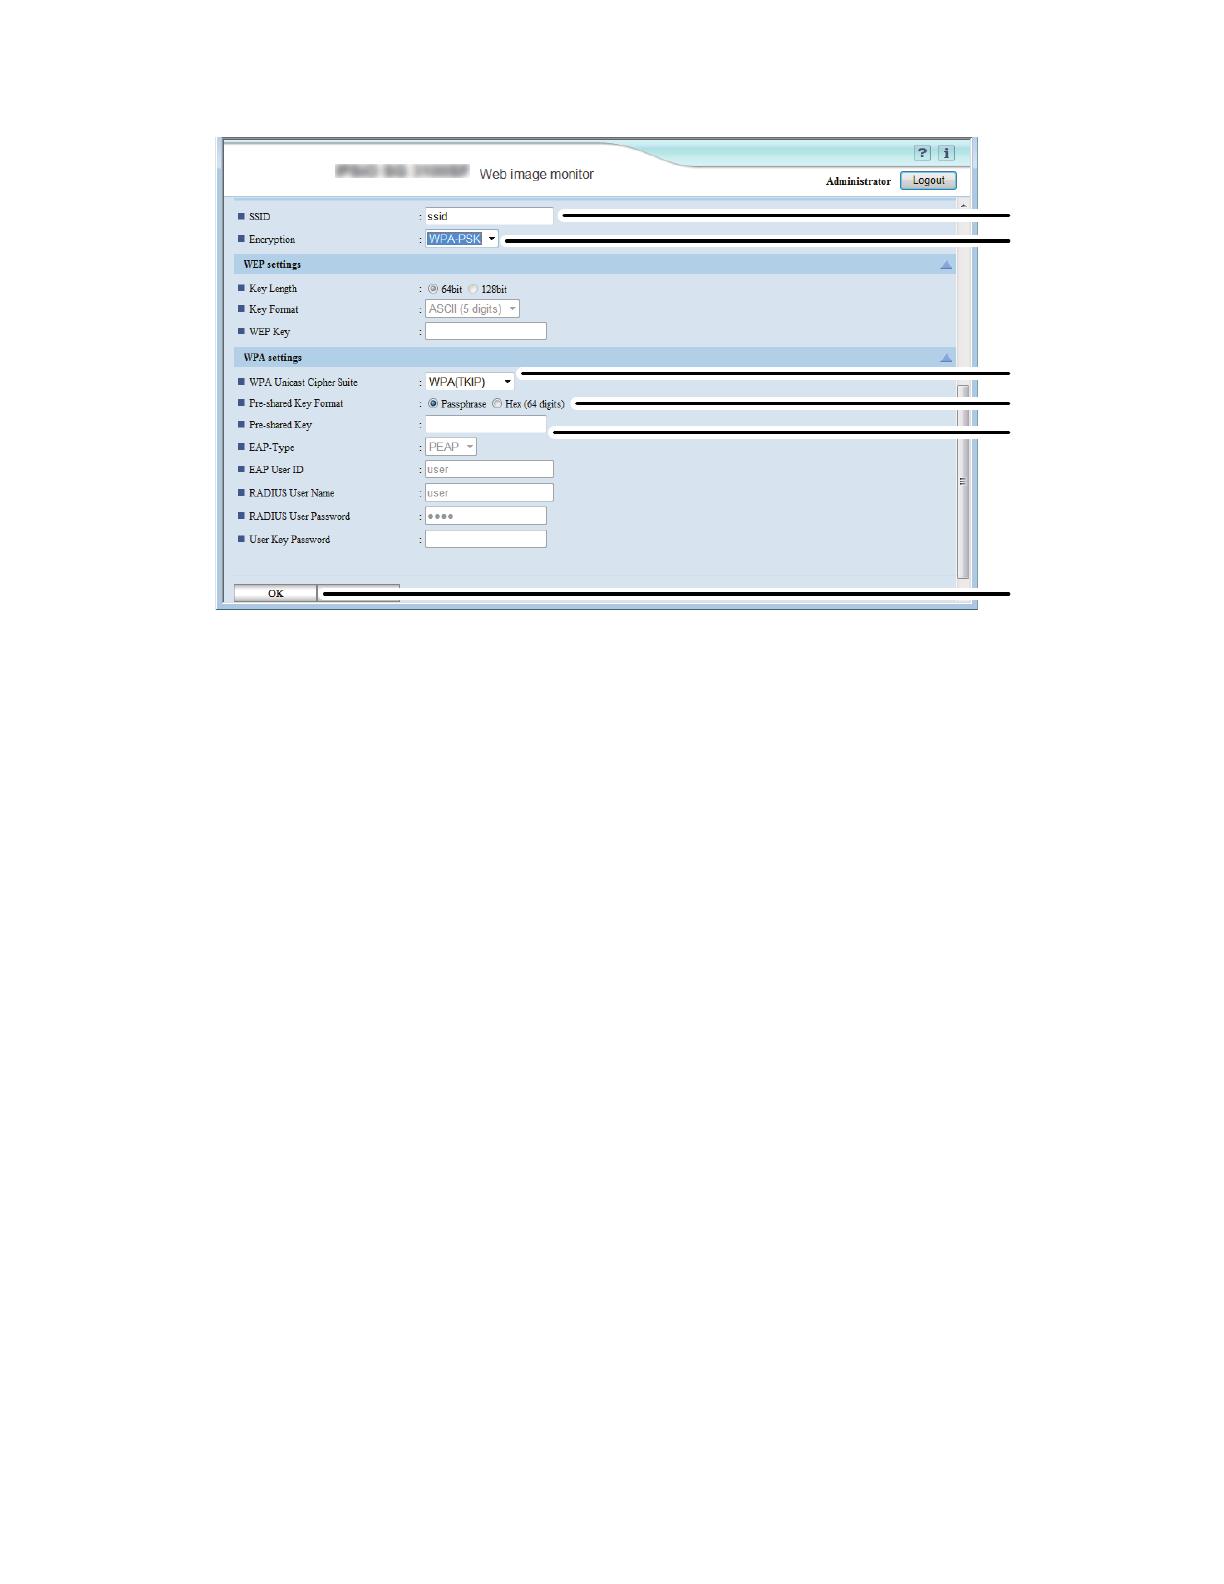
• If the security method is WPA-PSK
1
2
6
3
4
5
CHV650
1. Enter the network name of the access point.
2. Select [WPA-PSK].
3. Select [WPA(TKIP)], [WPA(AES)],or [WPA2(AES)].
4. Select [Passphrase] or [Hex].
5. Enter the password for the access point.
6. Click [OK].

15
• If the security method is WPA-EAP
1
2
4
5
3
CHV652
1. Enter the network name of the access point.
2. Select [WPA-EAP].
3. Select [WPA(TKIP)], [WPA(AES)],or [WPA2(AES)].
4. Select the extensible authentication protocol you want to use.
Enter the user ID for Extensible Authentication Protocol (EAP).
Enter the user name to be used for RADIUS server authentication.
Enter the password to be used for RADIUS server authentication.
Configure other settings if needed.
5. Click [OK].

16
8. Click [OK], when "Update complete" appears.
9. Click [Logout].
CHV642
10. Turn the machine off.
11. Remove the Ethernet cable, and then connect the wireless LAN cable.
CHV601
12. Turn the machine on.
Setting is complete.

17
Configuring Settings Using the Control Panel
• Change the [LAN Type] to [IEEE 802.11b/g/n] before configuring the wireless LAN settings.
• For details, see "2. Preparing for Printing", User Guide .
CHV632
1. Change the network interface settings.
the [User Tools] key [Login] Enter the login password. (default: 000000) [System Set-
tings] [Interface Settings] [Network] [LAN Type] [IEEE 802.11b/g/n] the [OK] key
Turn the machine off. Turn the machine on.
2. Configure the wireless LAN settings.
the [User Tools] key
[Login] Enter the login password. (default: 000000) [System Set-
tings] [Interface Settings] [IEEE 802.11] [Det. Settings] the [OK] key Turn the machine
off. Turn the machine on.

18
Checking the Status
CHV632
the [User Tools] key [System Settings] [Interface Settings] [IEEE 802.11] [Current status]
[Status]

19
Hinweise für Wireless LAN-Anwender
In diesem Handbuch wird beschrieben, wie das Gerät über die WLAN-Schnittstelle an das Netz-
werk angeschlossen werden kann.
• Ad-hoc-Modus wird nicht unterstützt.
• Ethernet- und Wireless-LAN-Einstellungen können nicht gleichzeitig aktiviert sein.
Überprüfen der Wireless-Netzwerkumgebung
• Vor der Konfiguration der Wireless-LAN-Einstellungen müssen Sie die IP-Adresse des Geräts
konfigurieren.
Einzelheiten zur Konfiguration der IP-Adresse des Geräts finden Sie in der Anwenderanleitung
.
• Prüfen Sie, ob der Zugriffspunkt arbeitet.
CHV600
• Vor der Konfiguration der Wireless-LAN-Einstellungen müssen Sie das Wireless-LAN-Kabel
mit dem Ethernet-Anschluss verbinden.
CHV601

20
• Ändern Sie den [LAN-Typ] auf [IEEE 802.11b/g/n], bevor Sie die Wireless-LAN-Einstellungen
konfigurieren.
Taste [Anwenderprogramm] [Login] Login-Passwort eingeben. (Standard: 000000)
[Systemeinstell.] [Schnittstelleneinst.] [Netzwerk] [LAN-Typ] [IEEE 802.11b/g/n]
Gerät ausschalten.
Gerät einschalten.
CHV632
/