Amcor 3600 Benutzerhandbuch
- Kategorie
- Navigatoren
- Typ
- Benutzerhandbuch
Dieses Handbuch eignet sich auch für
Seite wird geladen ...
Seite wird geladen ...

Amcor... wherever you go !
3
Thank you for purchasing this advanced Amcor 3600 GPS
Navigation System.
Vielen Dank für den Kauf dieses modernen Amcor 3600 GPS
Navigations Systems.
Hartelijk dank voor de aanschaf van dit geavanceerde Amcor
3600 GPS Navigatie Systeem.
Nous vous remercions d’avoir choisi ce système de
navigation GPS sophistiqué Amcor 3600.
La ringraziamo per avere acquistato questo sistema di
navigazione GPS avanzato Amcor 3600.
Gracias por adquirir este sistema de navegación GPS
avanzado Amcor 3600.
Seite wird geladen ...

5
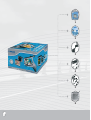
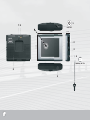
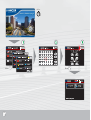
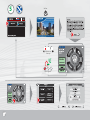
Contents of the box:
1. This manual.
2. DVD with hardware and software manual, and
the back-up files for the navigation software.
3. Holder for mounting on a car window.
4. USB Cable.
5. 5 V (DC) adapter for in the car.
6. Your GPS navigation system, the Amcor 3600.
Inhalt des Kartons:
1. Diese Gebrauchsanweisung.
2. DVD mit Hardware und Software-Handbuch
und Reservedateien der Navigationssoftware.
3. Halterung für Montage an der Windschutzscheibe.
4. USB Kabel.
5. 5 V (DC)-Adapter fürs Auto.
6. Ihr GPS Navigationssystem Amcor 3600.
Inhoud van de doos:
1. Deze handleiding.
2. DVD met hardware handleiding en software
handleiding en de reserve bestanden van de
navigatie software.
3. Houder voor bevestiging aan een autoruit.
4. USB kabel.
5. 5 V (DC) adapter voor in de auto.
6. Uw GPS navigatie systeem, de Amcor 3600.
Contenu de la boîte:
1. Ce mode d’emploi.
2. DVD contenant le mode d’emploi Matériel et
Logiciel ainsi que les fichiers de sauvegarde du
logiciel de navigation.
3. Support pour le montage sur le pare-brise de la
voiture.
4. Câble d’USB.
5. Adaptateur 5 V (CC) pour utiliser dans la voiture.
6. Votre système de navigation GPS Amcor 3600.
Contenuto della confezione:
1. Questa guida.
2. DVD contenente il manuale Hardware, il manuale
Software ed i file di riserva del software per la
navigazione.
3. Sostegno per il fissaggio al cristallo dell’automobile.
4. Cavo del USB.
5. Adattatore a 5 V (CC) per l’alimentazione
dall’automobile.
6. Il suo sistema di navigazione GPS, Amcor 3600.
Contenido de la caja:
1. Esta guía.
2. DVD con el manual del hardware y del software, y
las copias de seguridad del software de navegación.
3. Soporte para montarlo en la ventana del vehículo.
4. Cavo del USB.
5. Adaptador de 5 V (CC) para el vehículo.
6. Su sistema de navegación GPS, Amcor 3600.

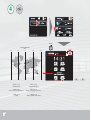
6
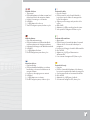
100 mm
75 mm
17 mm
4
7 8
6
5
2
3
1
ON / OFF
50/60 Hz ; DC 5 V

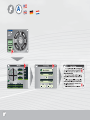
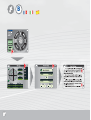
7
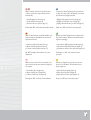
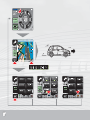
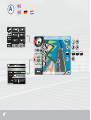
The appliance
1. ON/OFF Switch (see page 10)
2. SD Slot
3. Audio output
4. DC/IN.
5. Mini USB Port
6. Speaker
7. Reset
8. External GPS Antenna Jack
Das Gerät
1. AN/AUS Schalter (siehe Seite 10)
2. SD Slot
3. Audioanschluss
4. DC/IN
5. Mini-USB-Anschluss
6. Lautsprecher
7. Neustart
8. Anschluss für externe GPS Antenne
Het apparaat
1. AAN/UIT schakelaar (zie pagina 10)
2. SD Slot
3. Audio uitgang
4. DC/IN
5. Mini USB poort
6. Luidspreker
7. Herstart
8. Aansluiting voor externe GPS antenne
L’appareil
1. Touche marche/arrêt (voir page 10)
2. SD Slot
3. Sortie audio
4. DC/IN
5. Prise mini-USB
6. Haut-parleur
7. Redémarrage
8. Branchement pour antenne externe GPS
L’apparecchio
1. Bottone ON/OFF (vedi pagina 10)
2. SD Slot
3. Presa cuffie audio
4. CC/IN
5. Presa mini-USB
6. Altoparlante
7. Riavvio
8. Collegamento antenna esterno GPS
El dispositivo
1. Botón encendido/apagado (vea la página 10)
2. SD Slot
3. Salida de audio
4. CC/entrada
5. Entrada mini-USB
6. Altavoz
7. Reanudar
8. Conexión antena exterior GPS
Seite wird geladen ...

1
9
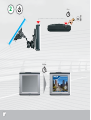
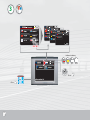
Installing in the vehicle
Slide the mounting cradle onto the end of the mounting
bracket. Place the suction cup onto the desired location
on the windscreen, and push the lever to lock the
suction cup.
Snap your Amcor 3600 into the windscreen mount.
Your Amcor 3600 can be powered from a 5 V DC Car
adapter.
Plaatsing in de auto
Schuif de houder op de zuignap. Plaats de zuignap in de
gewenste positie op het raam en vergrendel. De zuignap
zit nu goed vast.
Plaats nu het apparaat op de houder. U kunt uw apparaat
opladen met de 5 V DC autolader.
Montage im Auto
Die Befestigungsplatte ganz auf den Befestigungsbügel
schieben. Saugnapf an der gewünschten Stelle auf der
Frontscheibe ansetzen und durch Drücken des Hebels
fixieren.
Amcor 3600 an der Scheibenhalterung anbringen und
einrasten lassen. Ihr Amcor 3600 kann über einen 5 V
DC Fahrzeugadapter.
Removing appliance
Before removing the appliance, press the two buttons
on the holder in. Remove the appliance from the front.
Unbolt the suction cup and pull on the lip to loosen it.
Apparaat uitnemen
Druk voor het afnemen van het apparaat de twee
knoppen op de houder in. Neem het apparaat naar voren
af. Ontgrendel de zuignap en trek aan het lipje om de
zuignap los te nemen.
Gerät herausnehmen
Vor der Abnahme des Geräts die zwei Knöpfe auf dem
Halter eindrücken. Das Gerät mit einer Bewegung nach
vorn abnehmen. Den Saugnapf entriegeln und an der
Lasche ziehen, um den Saugnapf lösen zu können.
Installation dans la voiture
Faites glisser le berceau de fixation à l’extrémité du
support de montage. Posez la ventouse à l’endroit
souhaité sur le pare-brise, et actionnez le levier pour
verrouiller la ventouse.
Engagez votre Amcor 3600 dans le support de pare-brise.
Votre Amcor 3600 est alimenté soit par un adaptateur de
voiture 5 V CC.
Posizionamento nell’auto
Inserisca il gancio di montaggio sull’estremità del braccio.
Piazzare la ventosa nella posizione desiderata del
parabrezza, quindi premere la leva per bloccare la ventosa
come mostrato sotto.
Inserire Amcor 3600 sul montante del parabrezza come
mostrato a destra. Il vostro Amcor 3600 può essere
alimentato con un adattatore da automobile 5 V CC.
Instalación en el vehículo
Deslice la bandeja de montaje al final del soporte de
montaje. Coloque la ventosa en el lugar deseado del
parabrisas y mueva la palanca para fijar la ventosa.
Encaje el Amcor 3600 en el soporte para parabrisas. El
Amcor 3600 puede alimentarse con un adaptador de CC
de 5 V.
Retirer l’appareil
Pour retirer l’appareil, appuyer sur les deux boutons
du boîtier. Sortir l’appareil par l’avant. Déverrouiller la
ventouse et tirer la languette pour détacher la ventouse.
Togliere l’apparecchio
Per staccare l’apparecchio premete i due pulsanti sul
sostegno. Togliete l’apparecchio tirandolo in avanti.
Sbloccate la ventosa e tirate la linguetta per staccare la
ventosa stessa.
Desinstalar el dispositivo
Antes de retirar el aparato, pulse los dos botones del
soporte. Retire el aparato desde delante. Desenrosque la
copa de succión y tire del borde para soltarla.
Seite wird geladen ...

2
11
POWER
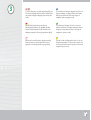
Switching on and off
Press the POWER button on top of the device
shortly (5 sec.).
Ein- und Ausschalten
Kurz (5 Sek.) der mit POWER gekennzeichneten
Taste obenauf das Gerät drücken.
Aan- en uitschakelen
Druk kort (5 sec.) op de POWER knop aan de
bovenrzijde van het apparaat.
Allumer et éteindre
Appuyez brièvement (5 sec.) le bouton POWER sur
la partie supériere de l’appareil.
Accensione e spegnimento
Premere brevemente (5 sec.) il pulsante POWER in
cima all’apparecchio.
Encendido y apagado
Pulsar brevemente (5 sec.) el botón POWER encima
del dispositivo.
POWER
Seite wird geladen ...

Wenn Sie das Gerät zum ersten Mal anstellen oder
nach einem Restart durchlaufen Sie automatisch
folgende drei Schritte:
1. Sprache einstellen (siehe auch Seite 14)
2. Datum einstellen (siehe auch Seite 18)
3. Zeitzone einstellen (siehe auch Seite 16)
Mit “OK” bestätigen, dann kommen Sie in das
Hauptmenü.
When you switch on the device for the first time
or after a re-start, these steps will be pesented
automatically:
1. Select language (see also page 14)
2. Set the date (see also page 18)
3. Select the time zone (see also page 16)
Confirm with “OK” and the main menu will be shown.
Wanneer u het toestel voor het eerst aanzet, of na
een herstart doorloopt u automatisch de volgende
drie stappen:
1. Taal instellen (zie ook pagina 14)
2. Datum instellen (zie ook pagina 18)
3. Tijdzone instellen (zie ook pagina 16)
Bevestig met “OK” en u komt in het hoofdmenu.
Lorsque vous utilisez l’appareil pour la première fois
ou après une remise à zéro de l’appareil, vous devrez
procéder aux trois réglages suivants :
1. Réglage de la langue (voir aussi à la page 14)
2. Réglage de la date (voir aussi à la page 18)
3. Réglage du fuseau horaire (voir aussi à la page 16)
Valider avec “OK” pour aller au menu principal.
Quando accendete l’apparecchio per la prima volta, o
dopo averlo riavviato, effettuerete automaticamente i
seguenti tre passaggi.
1. Impostazione della lingua (vedi anche pagina 14)
2. Impostazione della data (vedi anche pagina 18)
3. Impostazione del fuso orario (vedi anche pagina 16)
Confermate con “OK” ed accederete al menu
principale.
Cuando use el aparato por primera vez o tras una
puesta a cero del aparato, deberá realizar los tres
ajustes siguientes:
1. Ajuste del idioma (vea la página 14)
2. Ajuste de la fecha (vea la página 18)
3. Ajuste del huso horario (vea la página 16)
Acepte con “OK” para ir al menú principal.
13

3
10% 40% 70% 100%
Lithium-ion battery
,ANGUAGES
2OMÊNA
6LAAMS
0YCC+
Go to
16
Go to
18
14

3
15
Zur Wahl der Sprache das entsprechende
Fahnensymbol berühren. Die gewählte Sprache
wird die Standardsprache für das Gerät und die
Navigationssprache (Text und gesprochenes Wort).
To select a language, touch the appropriate flag icon.
The chosen language will become the default for the
unit and the navigation language (text and spoken
word).
Om de taal in te stellen kiest u de gewenste vlag.
Deze taal wordt nu de standaard taal voor het
apparaat en de navigatie (tekst en gesprokene).
Pour sélectionner la langue, appuyez sur l’icône du
drapeau souhaité. La langue sélectionnée devient
la langue par défaut de l’unité et la langue de
navigation (texte et guidage vocal).
Per selezionare la lingua, sfiorare l’icona con la
bandiera desiderata. La lingua selezionata diventa
la lingua pre-impostata per l’unità e la lingua di
navigazione (scritta e orale).
Para seleccionar el idioma pulse sobre el icono de
la bandera apropiado. El idioma seleccionado será
el idioma por defecto para el aparato y el idioma de
navegación (texto y voz).
Seite wird geladen ...

4
17
Set your time zone!
Before first use, you need to set the time zone
yourself.
Select settings / Select time / Use the arrows to
select your time zone.
Press OK to confirm.
Note: GPS signals typically do not work indoors.
If there is a good GPS signal, GMT time and date
will be set automatically.
Ihre Zeitzone einstellen!
Beim Erstgebrauch müssen Sie selbst Ihre
Zeitzone einstellen.
Einstellungen auswählen / Zeit auswählen / Ihre
Zeitzone mit Hilfe der Pfeile auswählen. Eingabe
mit OK bestätigen.
Hinweis: In geschlossenen Räumen funktioniert
der GPS-Signalempfang gewöhnlich nicht.
Wenn das Signal gut ist, werden GMT Zeit und
Datum automatisch eingestellt.
Uw tijdzone instellen!
Bij het eerste gebruik moet u zelf uw tijdzone
instellen.
Selecteer instellingen / Selecteer tijd / Selecteer uw
tijdzone met de pijltjes.
Bevestig met OK.
Belangrijk: GPS signalen werken niet binnen.
Bij een goede ontvangst van het GPS signaal
worden datum en GMT tijd automatisch ingesteld.
Réglez votre fuseau horaire !
Vous devrez régler votre fuseau horaire lors de la
première utilisation.
Sélectionnez Réglages / Sélectionnez Heure /
Sélectionnez votre fuseau horaire à l’aide des flèches.
Validez avec OK.
Note : En général, les signaux GPS ne sont pas
reçus dans des bâtiments.
Si le signal est correct, l’heure GMT et la date se
règlent automatiquement.
Ihre Zeitzone einstellen!
Beim Erstgebrauch müssen Sie selbst Ihre
Zeitzone einstellen.
Einstellungen auswählen / Zeit auswählen / Ihre
Zeitzone mit Hilfe der Pfeile auswählen. Eingabe
mit OK bestätigen.
Nota: i segnali GPS generalmente non funzionano
in ambienti interni.
Se il segnale è adeguato, l’ora GMT e la data si
impostano automaticamente.
¡Ajuste su zona horaria!
Antes del primer uso deberá usted ajustar la zona
horaria.
Seleccione Ajustes / Seleccione Hora / Use las
flechas para seleccionar su zona horaria.
Pulse OK para confirmar.
Nota: Las señales de GPS normalmente no se
captan en interiores.
Si la señal es buena, la hora GMT y la fecha se
ajustarán automáticamente.
Seite wird geladen ...

Datum einstellen
Jahr, Monat und Datum markieren.
Bildschirm ausrichten
Die Anweisungen auf dem Bildschirm befolgen.
Lautstärke / Kontrast
Ziehen, um Lautstärke oder Kontrast einzustellen.
Auto-Abschalten
Zeit einstellen, um das Gerät automatisch
abzuschalten.
Set Date
Select year, month and date.
Align Screen
Follow the instructions on the screen.
Volume / Brightness
Drag to adjust the volume or brightness.
Auto turn off
Set time to turn off the device automatically.
Datum instellen
Selecteer jaar, maand en datum.
Scherm uitlijnen
Volg de aanwijzingen op het scherm.
Volume / Helderheid
Sleep om het volume of de helderheid in te stellen.
Automatisch uitschakelen
Stel de tijd in voor het automatisch uitschakelen van
het apparaat.
Réglage de la date
Sélectionner l’année, le mois et le jour.
Alignement de l’écran
Suivre les instructions indiquées sur l’écran.
Volume / Luminosité
Faire glisser le potentiomètre pour ajuster le volume
ou la luminosité.
Arrêt automatique
Pour régler l’heure à laquelle l’appareil s’éteindra
automatiquement.
Impostazione della data
Selezionate l’anno, il mese e la data.
Allineamento dello schermo
Seguite le istruzioni sullo schermo.
Volume / Luminosità
Trascinate per regolare il volume o la luminosità.
Spegnimento automatico
Impostate l’ora in cui volete che il dispositivo si
spenga automaticamente.
Ajustar fecha
Seleccione año, mes y día.
Alinear pantalla
Siga las instrucciones de la pantalla.
Volumen / Brillo
Arrastre para ajustar el volumen o el brillo.
Apagado automático
Ajuste la hora del apagado automático del
dispositivo.
19
Seite wird geladen ...

5
21
Main Navigation menu
Select ‘Navigation’
You can select from:
“Cockpit”
“Map”
“Find & Go”
“Settings”
“About”
“Exit”
For fast start-up, select “Find and Go”.
Navigation Hauptmenü
Auswahl “Navigation“
Sie können wählen aus:
“Cockpit”
“Karte”
“Suchen & Starten”
“Einstellungen”
“Info über”
“Beenden”
Für einen schnellen Start wählen Sie “Suchen &
Starten“.
Navigatie hoofdmenu
Select ‘Navigatie’
U hebt de keuze uit:
“Cockpit”
“Kaart”
“Vind & Ga”
“Instellen”
“Info”
“Uit”
Voor een snelle start kiest u “Vind & Ga”.
Menu principal pour la de navigation
Sélectionner ‘Navigation’
Les options suivantes se présentent :
“Navigation”
“Carte”
“Chercher & Aller”
“Réglages”
“A propos”
“Sortie”
Pour un départ rapide, sélectionnez “Chercher &
Aller”.
Menu principale di navigazione
Selezioni ‘Navigazione’
Può scegliere tra:
“Cockpit”
“Carta”
“Trovate e Andate”
“Regolazioni”
“Informazioni”
“Uscita”
Per un avviamento veloce scelga “Trovate e
Andate”
Menú de navegación principal
Seleccione ‘Navegación’
Puede seleccionar entre:
“Mandos”
“Mapa”
“Busc e ir”
“Ajustes”
“Acerca de ...”
“Salir”
Para un inicio rápido, seleccione “Busc e ir”.
Seite wird geladen ...

23
Select an address
Select “Find & Go” and press “Address”.
Select Country, City, Street and House Number.
All none common characters like ( , . – ‘ ) should be
replaced with ‘space’.
Press “Done”. Select ‘Route to’, the route will be
calculated.
Een adres kiezen
Selecteer “Vind & Ga” en druk op “Adres”.
Selecteer Land, Stad, Straat en Huisnummer.
Alle speciale tekens, zoals ( , . – ‘ ) moeten worden
vervangen door een spatie.
Druk op ‘Klaar’. Selecteer “Route naar”. De route
wordt uitgerekend.
Eine Adresse wählen
“Suchen und Starten’ wählen und “Adresse”
drücken. Land, Stadt, Straße und Hausnummer
wählen.
Alle nicht üblichen Zeichen wie ( , . – ‘ ) müssen
durch eine „Leerstelle“ ersetzt werden.
“OK” drücken. ‘Route berechnen’ auswählen, die
Strecke wird jetzt berechnet.
If you make a mistake, you can touch the “back
arrow” icon at any time to go back to the previous
screen.
Wenn Sie einen Fehler machen, können Sie
jederzeit durch Berühren des Pfeils “zurück” zum
vorherigen Bildschirm wechseln.
Als u een fout heeft gemaakt, dan kunt u met het
‘pijltje terug’ teruggaan naar het vorige scherm.
Sélectionner une adresse
Sélectionnez “Trouver & Aller” et appuyez sur
“Adresse”. Sélectionnez Pays, Ville, Rue, Numéro
de maison. Tous les caractères non-alphanumériques
tels que ( , . – ‘ ) doivent être remplacés par un
‘espace’. Appuyez sur “Terminé”. Sélectionnez
‘Itinéraire vers’, et l’itinéraire sera calculé.
Scelga un indirizzo
Selezionare ‘Trovate e Andate’ e premere
‘Indirizzo’.
Selezionare Paese, Città, Via, Numero civico.
Tutti i caratteri particolari come ( , . - ‘ ) devono
essere sostituiti da uno “spazio”.
Premere ‘Fine’. Selezionare ‘Perc. verso’, e la rotta
viene calcolata.
Seleccione una dirección
Seleccione “Encontrar e Ir” y pulse “Dirección”.
Seleccione País, Ciudad, Calle y Número de casa.
Todos los caracteres no comunes, como ( , . – ‘ )
deben cambiarse por un “espacio”.
Pulse “Fin”. Seleccione ‘Destino’, para que se
calcule la ruta.
Si se equivoca puede pulsar el icono de “flecha
atrás” en cualquier momento para retroceder a la
pantalla anterior.
In caso di errore, sfiorare l’icona “freccia indietro”
in qualunque momento per ritornare alla schermata
precedente.
En cas d’erreur, appuyez sur l’icône “flèche retour”
à tout moment pour retourner à l’écran précédent.
Seite wird geladen ...

25
Cockpit
The cockpit provides information on the course
of action to be taken, total distance to the
destination, travelling time and time of arrival.
At the bottom left and right you will find the menu
options, you can choose from a large number of
different options (refer to the Software manual on
the website).
Cockpit
Das Cockpit informiert Sie über die von Ihnen
auszuführenden Handlungen, den Gesamtabstand
zum Ziel, die Reise- und Ankunftszeit.
Links und rechts unten befinden sich Menü-
Optionen. Hier können Sie aus zahlreichen
Einstellungen wählen (siehe das Software
Handbuch auf der Website).
Cockpit
De cockpit geeft informatie over de actie die
u moet ondernemen, de totale afstand tot de
bestemming, de reistijd en de aankomsttijd.
Links- en rechtsonder zijn er menu-opties, hier
kunt u uit vele instellingen kiezen (zie de software
manual op de website).
Navigation
La navigation vous fournit des informations
concernant l’action à entreprendre, la distance
totale jusqu’à votre destination, la durée du trajet
et l’heure d’arrivée.
A gauche et à droite en bas de l’écran vous
trouverez les menus comportant de multiples
options (voir le manuel du logiciel sur le website).
Cockpit
Il “Cockpit” fornisce le informazioni sulle azioni
da intraprendere, sulla distanza complessiva che
manca alla destinazione, sul tempo di percorrenza
e l’ora di arrivo.
In basso a sinistra e destra trovate le opzioni
del menu, con le quali potete effettuare molte
impostazioni (vedi manuale del Software sul
website).
Mandos
El cuadro de navegación proporciona información
sobre el rumbo a seguir, la distancia total hasta el
destino, la duración del trayecto y la hora de llegada.
En la parte inferior izquierda y derecha están las
opciones de menú, con un gran número de opciones
distintas (consulte el manual del programa o el
website).
Seite wird geladen ...

27
Using “History” you can directly choose
destinations without having to retype them.
With “POI” (points of interest) thousands of
destinations are at your disposal. They are
conveniently grouped allowing you to quickly find a
particular destination.
Using “Home” you can preprogram your own
home address. This means you will always be able
to quickly choose your route home. The same
applies for your work address when using “Work”.
Aus der „Letzte Ziele”-Datei können Sie direkt
Ziele wählen, ohne die Ziele erneut eingeben zu
müssen.
Mit der „POI“-Datei (points of interest) verfügen
Sie über tausende Ziele. Die Ziele sind in logischen
Gruppen zusammengestellt, sodass Sie schnell
das Ziel finden, zu dem Sie wollen.
Bei „Haus” können Sie Ihre Wohnadresse
programmieren. Damit wählen Sie immer schnell
Ihre Route nach Hause. Gleiches gilt für Ihre
Arbeitsadresse bei „Arbeit”.
Vanuit de “Historie” kunt u rechtstreeks
bestemmingen kiezen, zonder ze opnieuw in te
typen.
Met de “POI” (points of interest) heeft u de
beschikking over duizenden bestemmingen.
Ze zijn handig gegroepeerd, zodat u snel uw
bestemming kunt vinden.
Bij “Huis” kunt u uw woonadres ingeven. Zo kunt
u altijd snel de route naar huis kiezen. Dit geldt
eveneens voor uw werkadres bij “Werk”.
Le menu “Historique” vous permet de sélectionner
directement des destinations sans avoir à les retaper.
Avec l’option “POI” (points d’intérêts) vous
trouverez des milliers de destinations disponibles.
Elles sont classées en ordre pratique afin que vous
puissiez retrouver rapidement la destination où vous
désirez aller.
Sous “Maison” vous pouvez programmer votre
propre adresse. Vous pourrez ainsi retrouver
rapidement l’itinéraire pour vous ramener chez vous.
Vous pouvez d’ailleurs faire la même chose avec
l’adresse de votre travail sous “Travail”.
Lo “Storico” vi permette di scegliere direttamente le
destinazioni, senza digitarle nuovamente.
Grazie ai “POI” (points of interest) disponete di
migliaia di destinazioni, comodamente raggruppate,
in modo da facilitarne la selezione.
In “Casa” potete programmare il vostro indirizzo. In
questo modo potete sempre scegliere rapidamente la
rotta verso casa. Questo vale anche per l’indirizzo del
vostro posto di lavoro, programmabile in “Lavoro”.
Con “Histórico” puede seleccionar directamente los
destinos sin tener que volver a introducirlos.
Con “POI” (puntos de interés) tiene a su disposición
cientos de destinos. Están convenientemente
agrupados para que rápidamente pueda localizar un
destino concreto.
Con “Casa” puede programar la dirección de su
domicilio. De este modo siempre encontrará de
inmediato la ruta a casa. Del mismo modo puede
usar su dirección del trabajo con “Trabajo”.
Seite wird geladen ...

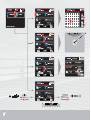
29
Map options
Left-hand side:
These map options are only displayed when
“Zoom & Tilt” has been activated in the Quick
Menu. You can then zoom in and out. You can
also tilt the map. This changes the vertical
viewing angle of the map. The map switches
from a 2D view to a 3D view so that you can
see further ahead.
Right-hand side:
Black arrow – Driving direction
The arrow (front of the car) points upwards
and stays in this position. The map turns
underneath the arrow.
.
White arrow – North at the top
The map is positioned so that North is always
at the top of the screen. The arrow (driving
direction) turns.
Aeroplane – Bird’s-eye view
A bird’s-eye view of the map is displayed.
Satellite signal strength indicator, battery
capacity and sound on or sound off.
Kaartopties
Linkerzijde:
Deze kaartopties worden alleen weergegeven
op voorwaarde dat ‘Zoomen & Kantelen’ in
het Snelmenu is geactiveerd. U kunt dan in- of
uitzoomen en de kaart kantelen. Hiermee
wijzigt u de verticale kijkhoek van de kaart van
een 2D aanzicht tot 3D aanzicht zodat u verder
vooruit kunt kijken.
Rechterzijde:
Zwarte pijl – Rijrichting
De pijl (neus van de auto) wijst naar boven en
blijft naar boven staan. De kaart draait onder
de pijl door.
.
Witte pijl – Noord boven
De kaart staat in het scherm met richting
Noord boven. De pijl (rijrichting) draait.
Vliegtuig – Bovenaanzicht
Van de kaart wordt een bovenaanzicht
getoond.
Aanduiding signaalsterkte van de satellieten,
batterij capaciteit en geluid aan of uit.
Kartenoptionen
Linke Seite:
Diese Kartenoptionen werden nur
wiedergegeben, wenn im Schnellmenü „Zoom
& Kippen“ aktiviert ist. Sie können dann
ein- und auszoomen und die Karte kippen.
Damit verändern Sie den vertikalen Blickwinkel
der Karte von einer 2D-Ansicht zu einer 3D-
Ansicht, sodass Sie weiter voraus schauen
können.
Rechte Seite:
Schwarzer Pfeil – Fahrrichtung
Der Pfeil (Vorderseite des Autos) zeigt nach
oben und bleibt oben stehen. Die Karte dreht
unter dem Pfeil hindurch.
.
Weißer Pfeil – Norden oben
Die Karte steht im Bildschirm mit Richtung
Norden oben. Der Pfeil (Fahrrichtung) dreht
sich.
Flugzeug – Draufsicht
Von der Karte wird eine Draufsicht gezeigt.
Anzeige der Signalstärke der Satteliten, der
Batterieleistung und Ton ein oder Ton aus.
Seite wird geladen ...
Seite wird geladen ...
Seite wird geladen ...

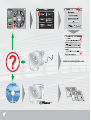
33
You can find more information and detailed
descriptions under “Settings”. If you choose the
question mark at the top right of the screen, an
explanation will appear on the screen.
Check www.amcornavigation.com for more
information.
Mehr Informationen und detaillierte
Beschreibungen finden Sie bei allen Bildschirmen
unter „Einstellungen“. Wenn Sie das Fragezeichen
rechts oben wählen, erscheint die Erklärung.
Für mehr Informationen können Sie auch
nachsehen unter www.amcornavigation.com
Meer informatie en gedetailleerde beschrijvingen
kunt u vinden onder “instellingen”. Als u het
vraagteken rechtsboven kiest verschijnt de uitleg
in beeld.
Voor meer informatie kunt u ook kijken op
www.amcornavigation.com
Vous trouverez de plus amples informations et les
descriptions détaillées sous le menu “paramètres”.
Pour voir l’explication à l’écran appuyez sur le point
d’interrogation situé en haut à droite.
Pour plus de renseignements, vous pouvez consulter
également le site sur www.amcornavigation.com
In tutte le schermate potete richiamare ulteriori
informazioni o descrizioni dettagliate mediante
il menu “impostazioni”. Cliccando sul punto
interrogativo in alto a destra appare la spiegazione.
Per ulteriori informazioni potete visitare anche il sito
www.amcornavigation.com
Más información y descripciones detalladas en
“Ajustes". Si selecciona el interrogante de la parte
superior derecha de la pantalla, aparecerá una
explicación en la pantalla.
Para más información, puede consultar la página
web www.amcornavigation.com
Seite wird geladen ...

35
GPS signal
After switching on, it takes a few minutes
before the satellite signals start being
processed. You can see whether the reception
is good from the satellite symbol.
Select the symbol. You now see the “GPS data”
screen.
Here, you can see the number of satellites and
the strength of the signal.
If the reception is good, the date, time (in
GMT) and position are automatically set.
Select “Time Sync”. Here, you can adjust the
time if necessary.
Select “?” for further information about time
synchronization.
You need to set the time zone once yourself.
The best way of doing this is by using the
“Settings / Set Time / Arrows” (see page 16).
GPS signaal
Na het aanzetten duurt het een aantal minuten
voordat de satellietsignalen worden verwerkt.
U kunt aan het satellietsymbool zien of de
ontvangst goed is.
Selecteer het symbool. U krijgt nu het scherm
“GPS data”.
Hier kunt u het aantal satellieten zien en de
signaalsterkte.
Bij goede ontvangst worden datum en GMT
tijd en positie automatisch ingesteld.
Selecteer “Tijdsync”. Hier kunt u zo nodig een
correctie opgeven voor de GMT tijd.
Selecteer “?” Over de tijdsynchronisatie krijgt
u hier aanvullende informatie.
De tijdzone moet u eenmalig zelf instellen.
U kunt dit het best doen bij “Settings /
Tijdsinstelling / Pijltjes” (zie pagina 16).
GPS-Signal
Nach dem Einschalten dauert es einige
Minuten, bevor die Satellitensignale verarbeitet
werden. Am Satellitensymbol sehen Sie, ob der
Empfang gut ist.
Wählen Sie das Symbol aus. Sie erhalten jetzt
den Bildschirm „GPS-Daten“.
Hier können Sie die Satellitenanzahl und die
Signalstärke sehen.
Bei gutem Empfang werden Datum, GMT-Zeit
und die Position automatisch eingestellt.
Wählen Sie „Zeit synch.“. Hier können Sie
eine eventuelle Korrektur für die GMT-Zeit
angeben.
Wählen Sie „?“. Über die Zeitsynchronisierung
erhalten Sie zusätzliche Informationen.
Die Zeitzone müssen Sie einmalig selbst
einstellen. Das tun Sie am besten bei
„Einstellungen / Zeiteinstellung / Pfeile“
(siehe Seite 16).
Seite wird geladen ...
Seite wird geladen ...

38
Subject to modifications / Änderungen vorbehalten / Wijzigingen voorbehouden
Sous réserve de modifications / Si riserva il diritto di apportare modifiche / Sujeto a modificaciones
Waste electrical products must not be disposed of with
household waste. This product should be taken to your
local recycling centre for safe treatment.
Elektro- und Elektronikaltgeräte sollen nicht als
unsortierten Siedlungsabfall beseitigt werden. Dieses
Produkt muss zur Entsorgung an Ihren Wertstoffhof
abgeliefert werden.
Afgedankte elektrische producten mogen niet bij het
gewone huisvuil worden gezet. Breng dit product naar uw
plaatselijke milieustraat zodat het op de juiste wijze wordt
behandeld.
Déchets d’équipements électriques et électroniques
ne doivent pas être débarrassés avec les déchets
domestiques. Ce produit devrait être pris à votre
déchetterie communale pour un traitement systématique.
I prodotti elettrici residui non devono essere disfatti di con
i rifiuti domestici. Questo prodotto dovrebbe essere preso
al vostro centro di riciclaggio locale per il trattamento
sicuro.
Los desechos eléctricos y electrónicos no se deben
disponer a la basura. Este producto se debe llevar a su
centro de reciclaje local para el tratamiento seguro.
Seite wird geladen ...
Seite wird geladen ...
-
 1
1
-
 2
2
-
 3
3
-
 4
4
-
 5
5
-
 6
6
-
 7
7
-
 8
8
-
 9
9
-
 10
10
-
 11
11
-
 12
12
-
 13
13
-
 14
14
-
 15
15
-
 16
16
-
 17
17
-
 18
18
-
 19
19
-
 20
20
-
 21
21
-
 22
22
-
 23
23
-
 24
24
-
 25
25
-
 26
26
-
 27
27
-
 28
28
-
 29
29
-
 30
30
-
 31
31
-
 32
32
-
 33
33
-
 34
34
-
 35
35
-
 36
36
-
 37
37
-
 38
38
-
 39
39
-
 40
40


Amcor 3600 Benutzerhandbuch
- Kategorie
- Navigatoren
- Typ
- Benutzerhandbuch
- Dieses Handbuch eignet sich auch für
in anderen Sprachen
- English: Amcor 3600 User manual
- français: Amcor 3600 Manuel utilisateur
- español: Amcor 3600 Manual de usuario
- italiano: Amcor 3600 Manuale utente
- Nederlands: Amcor 3600 Handleiding