Zanussi ZWF1025 Benutzerhandbuch
- Kategorie
- Waschmaschinen
- Typ
- Benutzerhandbuch

EN
User manual 2
DE
Benutzerinformation 19
Washing Machine
Waschmaschine
ZWF 1025

Contents
Safety information _ _ _ _ _ _ _ _ _ _ _ _ _ _ _ 2
Safety instructions _ _ _ _ _ _ _ _ _ _ _ _ _ _ 3
Environment concerns _ _ _ _ _ _ _ _ _ _ _ _ 4
Product description _ _ _ _ _ _ _ _ _ _ _ _ _ _ 5
Control panel _ _ _ _ _ _ _ _ _ _ _ _ _ _ _ _ _ 6
Programmes _ _ _ _ _ _ _ _ _ _ _ _ _ _ _ _ _ _ 7
Consumption values _ _ _ _ _ _ _ _ _ _ _ _ _ 9
Before first use _ _ _ _ _ _ _ _ _ _ _ _ _ _ _ 10
Daily use _ _ _ _ _ _ _ _ _ _ _ _ _ _ _ _ _ _ _ 10
Hints and tips _ _ _ _ _ _ _ _ _ _ _ _ _ _ _ _ 13
Care and cleaning _ _ _ _ _ _ _ _ _ _ _ _ _ _ 13
Troubleshooting _ _ _ _ _ _ _ _ _ _ _ _ _ _ _ 16
Technical information _ _ _ _ _ _ _ _ _ _ _ _ 18
Subject to change without notice.
Safety information
Before the installation and use of the appliance, carefully read the
supplied instructions. The manufacturer is not responsible if an incor-
rect installation and use causes injuries and damages. Always keep
the instructions with the appliance for future reference.
Children and vulnerable people safety
Warning! Risk of suffocation, injury or permanent disability.
• This appliance can be used by children aged from 8 years and
above and persons with reduced physical, sensory or mental ca-
pabilities or lack of experience and knowledge if they have been
given supervision or instruction concerning use of the appliance in
a safe way and understand the hazards involved.
• Do not let children play with the appliance.
• Keep all packaging away from children.
• Keep all detergents away from children.
• Keep children and pets away from the appliance door when it is
open.
• If the appliance has a child safety device, we recommend you acti-
vate it.
• Cleaning and user maintenance shall not be made by children
without supervision.
General Safety
• Before maintenance, deactivate the appliance and disconnect the
mains plug from the mains socket.
2
www.zanussi.com

• Do not change the specification of this appliance.
• Obey the maximum load volume of 8 kg (refer to the “Programme
chart” chapter).
• If the supply cord is damaged, it must be replaced by the manu-
facturer, its service agent or similarly qualified persons in order to
avoid a hazard.
•The operating water pressure (minimum and maximum) must be
between 0,5 bar (0,05 MPa) and 8 bar (0,8 MPa)
• The ventilation openings in the base (if applicable) must not be ob-
structed by a carpet.
• The appliance is to be connected to the water mains using the
new supplied hose-sets. Old hose sets must not be reused.
Safety instructions
Installation
• Remove all the packaging and the transit
bolts.
• Keep the transit bolts. When you move the
appliance again you must block the drum.
• Do not install or use a damaged appliance.
• Do not install or use the appliance where the
temperature is less than 0 °C or where it is
exposed to the weather.
• Obey the installation instruction supplied with
the appliance.
• Make sure that the floor where you install the
appliance is flat, stable, heat resistant and
clean.
• Do not install the appliance where the appli-
ance door can not be fully opened.
• Always be careful when you move the appli-
ance because it is heavy. Always wear safety
gloves.
• Make sure that there is air circulation be-
tween the appliance and the floor.
• Adjust the feet to have the necessary space
between the appliance and the carpet.
Electrical connection
Warning! Risk of fire and electrical shock.
• The appliance must be earthed.
• Make sure that the electrical information on
the rating plate agrees with the power supply.
If not, contact an electrician.
• Always use a correctly installed shockproof
socket.
• Do not use multi-plug adapters and extension
cables.
• Make sure not to cause damage to the mains
plug and to the mains cable. Should the ap-
pliance power supply cable need to be re-
placed, this must be carried out by our Serv-
ice Centre.
• Connect the mains plug to the mains socket
only at the end of the installation. Make sure
that there is access to the mains plug after
the installation.
• Do not pull the mains cable to disconnect the
appliance. Always pull the mains plug.
• Do not touch the mains cable or the mains
plug with wet hands.
• This appliance complies with the E.E.C. Di-
rectives.
3
www.zanussi.com

Water connection
• Make sure not to cause damage to the water
hoses.
• The appliance is to be connected to the wa-
ter mains using the new supplied hose-sets.
Old hose sets must not be reused.
• Before you connect the appliance to new
pipes or pipes not used for a long time, let
the water flow until it is clean.
• The first time you use the appliance, make
sure that there is no leakage.
Use
Warning! Risk of injury, electrical shock,
fire, burns or damage to the appliance.
• Use this appliance in a household environ-
ment.
• Do not change the specification of this appli-
ance.
• Obey the safety instructions on the detergent
packaging.
• Do not put flammable products or items that
are wet with flammable products in, near or
on the appliance.
• Do not touch the glass of the door while a
programme operates. The glass can be hot.
• Make sure that you remove all metal objects
from the laundry.
• Do not put a container to collect possible wa-
ter leakage under the appliance. Contact the
Service to ensure which accessories can be
used.
Care and Cleaning
Warning! Risk of injury or damage to the
appliance.
• Before maintenance, deactivate the appliance
and disconnect the mains plug from the
mains socket.
• Do not use water spray and steam to clean
the appliance.
• Clean the appliance with a moist soft cloth.
Only use neutral detergents. Do not use
abrasive products, abrasive cleaning pads,
solvents or metal objects.
Disposal
Warning! Risk of injury or suffocation.
• Disconnect the appliance from the mains
supply.
• Cut off the mains cable and discard it.
• Remove the door catch to prevent children
and pets to get closed in the appliance.
Environment concerns
The symbol on the product or on its
packaging indicates that this product may not
be treated as household waste. Instead it
should be taken to the appropriate collection
point for the recycling of electrical and
electronic equipment. By ensuring this product
is disposed of correctly, you will help prevent
potential negative consequences for the
environment and human health, which could
otherwise be caused by inappropriate waste
handling of this product. For more detailed
information about recycling of this product,
please contact your local council, your
household waste disposal service or the shop
where you purchased the product.
Ecological hints
To help the environment, use less water and en-
ergy, obey these instructions:
• Set a programme without the prewash phase
to wash laundry with normal soil.
• Always start a washing programme with the
maximum load of laundry.
• If necessary, use a stain remover when you
set a programme with a low temperature.
• To use the correct quantity of the detergent,
check the water hardness of your domestic
system
Packaging materials
Recycle the materials with the symbol
.
Put the packaging in applicable containers to
recycle it.
4
www.zanussi.com

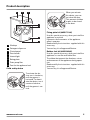
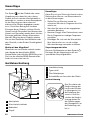
Product description
1 2 3
5
6
7
4
1
Worktop
2
Detergent dispenser
3
Control panel
4
Door handle
5
Internal light
6
Rating plate
7
Drain pump filter
8
Feet for the appliance level
Child safety device
To activate the de-
vice, turn it clockwise,
until the groove is
horizontal. To deacti-
vate the device, turn it
counter-clockwise,
until the groove is ver-
tical.
When you activate
this device, you can-
not close the door.
This prevents children
or pets to be closed
in the drum.
Fixing plate kit (4055171146)
Use this special accessory, when you install the
appliance on a plinth.
It prevents the movements of the appliance
when it operates.
Read carefully the instructions supplied with this
accessory.
You can buy it in all approved Service.
Rubber feet kit (4055126249)
Use this special accessory, when you install the
appliance in a not flat and stable floor.
The rubber feet prevent the vibrations, noises
and movement of the appliance during opera-
tion.
Read carefully the instructions supplied with this
accessory.
You can buy it in all approved Service.
5
www.zanussi.com

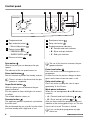
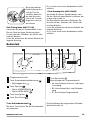
Control panel
90°
30°
60°
60°30°
40°
40°
40°
40°
40°
30°30°
40°
40°
40°
1000
3h
6h
9h
900
700
500
1 2 3 4 5 6
B
C
A
7
1
Programme knob
2
Spin reduction button
:
–
Rinse hold position
3
Options button
:
– PREWASH option
–
SUPER QUICK option
4
Extra rinse button
5
Start/pause button
6
Delay start button
7
Programme phase indicators:
• A - Prewash and wash indicator
• B - Rinse and spin indicator
• C - End cycle indicator
Spin button
With this button you can decrease the spin
speed.
The indicator of the set speed comes on.
Rinse hold button
Set this function to prevent the laundry creases.
There is a water in the drum when the pro-
gramme is completed.
Super Quick button
With this option you can decrease the pro-
gramme duration.
Use this option for items with light soil or items
to refresh.
The related indicator comes on.
Prewash button
The appliance performs a prewash cycle before
the main wash.
We recommend that you use this function when
you have laundry with a high level of soil.
The set of this function increases the pro-
gramme duration.
Extra rinse button
Press this button to add rinsing phases to a
programme.
Use this function for persons allergic to deter-
gents and in areas where the water is soft.
Delay start button
Press this button to delay the start of a pro-
gramme by 9, 6 or 3 hours.
Wash phase indicators
When you set a programme A and B indicators
come on.
•
A – Prewash and wash indicator
+
•
B – Rinse and spin indicator
+
After you have started the programme the only
indicator of the running phase stays on. The ma-
chine starts to work. The door is locked.
If you set the drain programme any light
comes on.
6
www.zanussi.com

•
C – End cycle indicator
This indicator comes on at the end of the cycle.
After a few minutes the door can be opened.
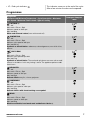
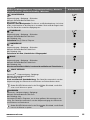
Programmes
Programme
Maximum and Minimum Temperature - Cycle Description - Maximum
Spin Speed - Maximum Fabrics Load - Type of Laundry
Detergent Compart-
ment
COTTONS
1)
90° - 30°
Main wash - Rinses - Spin
Maximum speed at 1000 rpm
Max. load 8 kg
White and coloured cotton (items with normal soil).
2)
SYNTHETICS
60° - 30°
Main wash - Rinses - Spin
Maximum spin speed at 900 rpm
Max. load 3.5 kg
Synthetic or mixed fabrics: underwear, coloured garments, non-shrink shirts,
blouses.
2)
EASY IRON
40°
Main wash - Rinses - Spin
Maximum spin speed at rpm 900
Max. load 1 kg
Synthetic or mixed fabrics. The wash and spin phases are more soft to avoid
creases in the fabrics. In this way ironing is easier. The appliance performs addi-
tional rinses.
2)
DELICATES
40° - 30°
Main wash - Rinses - Spin
Maximum speed at 700 rpm
Max. load kg 4
Delicate fabrics: acrylics, viscose, polyester.
2)
HANDWASH
40° - 30°
Main wash - Rinses - Spin
Maximum spin speed at 1000 rpm
Max. load 2 kg
Delicate fabrics with «hand washing» care symbol.
WOOL
40°
Main wash - Rinses - Spin
Maximum speed at 1000 rpm
Max. load 2 kg
Machine washable, hand wash wool and delicate fabrics.
3)
.
7
www.zanussi.com

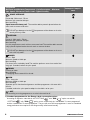
Programme
Maximum and Minimum Temperature - Cycle Description - Maximum
Spin Speed - Maximum Fabrics Load - Type of Laundry
Detergent Compart-
ment
SPORT INTENSIVE
40°
Prewash
2)
- Main wash - Rinses
Maximum spin speed at 900 rpm
Max. load 2.5 kg
Sport items with heavy soil . The machine adds a prewash phase before the
main wash to remove mud stains.
DO NOT put detergent into the
compartment of the drawer to rinse the
laundry with only water.
CURTAINS
40°
Prewash - Main wash - Rinses
Maximum spin speed at 700 rpm
Max. load 2 kg
Use this programme to wash with an extra water load. The machine adds automat-
ically a prewash phase before the main wash to remove the dust.
DO NOT put detergent into the
compartment of the drawer to rinse cur-
tains with only water..
RINSES
Rinses - Spin
Maximum speed at 1000 rpm
Max. load 8 kg
For cotton items washed by hand. The machine performs some rinses and a final
long spin. If needed, reduce the spin speed.
DRAIN
Draining of water
Max. load 8 kg
To emptying out the water left in the tub.
SPIN
Drain - Long spin
Maximum speed at 1000 rpm
Max. load 8 kg
Separate spin for hand washed garments and after programmes with water left in
the tub.
if needed, reduce the spin speed to adapt it to the fabrics to be spun.
= OFF
For cancelling a running programme or to switch the machine off .
1) Standard programmes for the Energy Label consumption values
According to regulation 1061/2010, the “COTTONS
” with "ECO ” option set and the
“COTTONS
” with "ECO ” option set are respectively the “standard 60 °C cotton programme”
and the “standard 40 °C cotton programme”. They are the most efficient programmes in terms of combined
energy and water consumption for washing normally soiled cotton laundry.
8
www.zanussi.com

The water temperature of the washing phase may differ from the temperature declared for the selected
programme.
2) If you use liquid detergents, set a programme without PREWASH.
3) A single or bulky item may cause imbalance. If the appliance doesn’t perform the final spin phase, add more
items, redistribute the load manually and then set the spin programme.
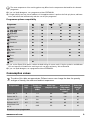
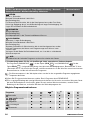
Programme options compatibility
Programme
1)
2)
Cottons
∎ ∎ ∎ ∎ ∎ ∎
Cottons
∎ ∎ ∎ ∎ ∎
Synthetics
∎ ∎ ∎ ∎ ∎ ∎
Easy Iron
∎ ∎ ∎ ∎ ∎
Delicates
∎ ∎ ∎ ∎ ∎ ∎
Handwash
∎ ∎ ∎
Wool
∎ ∎ ∎
Sport intensive
∎ ∎ ∎ ∎
Curtains
∎ ∎ ∎ ∎
Rinse
∎ ∎ ∎ ∎
Drain
Spin
∎
1) If you set the Super Quick option, reduce the load to 2 kg for cotton, and 1.5 kg for synthetics and delicates.
You can keep the full load but the washing results can be nsatisfactory. We recommend
2) If you use liquid detergent, set a programme without PREWASH.
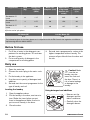
Consumption values
The data of this table are approximate. Different causes can change the data: the quantity
and type of laundry, the water and ambient temperature.
Programmes Load
(Kg)
Energy con-
sumption
(kWh)
Water con-
sumption (litre)
Approximate
programme
duration (mi-
nutes)
Remaining
moisture
(%)
1)
Cottons 60 °C 8 1.4 63 160 60
Cottons 40 °C 8 0.6 63 130 60
Synthetics 40 °C 3.5 0.6 54 80 37
Delicates 40 °C 3.5 0.6 63 65 37
Wool/Hand wash
30 °C
2 0.25 55 60 32
Standard cotton programmes
9
www.zanussi.com

Programmes Load
(Kg)
Energy con-
sumption
(kWh)
Water con-
sumption (litre)
Approximate
programme
duration (mi-
nutes)
Remaining
moisture
(%)
1)
Standard 60 °C
cotton
8 1.17 61 205 60
Standard 60 °C
cotton
4 0.77 48 159 60
Standard 40 °C
cotton
4 0.69 48 147 60
1) At the end of spin phase.
Off Mode (W) Left On Mode (W)
0.10 0.98
The information given in the charts above are in compliance with the EU Commission regulation 1015/2010
implementing directive 2009/125/EC.
Before first use
1. Put 2 litre of water in the detergent com-
partment for washing phase. This activates
the drain system.
2. Put a small quantity of detergent in the
compartment for washing phase.
3. Set and start a programme for cotton at the
highest temperature without laundry. This
removes all possible dirt from the drum and
the tub.
Daily use
1. Open the water tap.
2. Connect the mains plug to the mains sock-
et.
3. Put the laundry in the appliance.
4. Use the correct quantity of detergent and
additives.
5. Set and start the correct programme for the
type of laundry and soil.
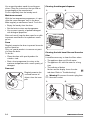
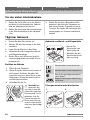
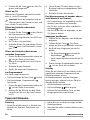
Loading the laundry
1. Open the appliance door.
2. Put the laundry in the drum, one item at a
time. Shake the items before you put
them in the appliance. Make sure not to
put too much laundry in the drum.
3. Close the door.
Caution! Make
sure that no
laundry stays be-
tween the seal and
the door. There is a
risk of water leakage
or damage to the
laundry.
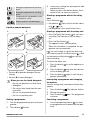
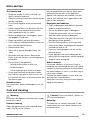
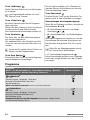
Using detergent and additives
MAX
• Measure out the
detergent and the
fabric conditioner.
• Carefully close the
detergent drawer.
10
www.zanussi.com

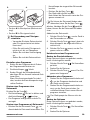
Detergent compartment for prewash
phase.
Detergent compartment for washing
phase.
Compartment for liquid additives (fab-
ric conditioner, starch).
Flap for powder or liquid detergent.
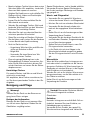
Liquid or powder detergent
1.
MAX
A
2.
MAX
3.
MAX
B
4.
MAX
• Position A for powder detergent (factory
setting).
• Position B for liquid detergent.
When you use the liquid detergent:
– Do not use gelatinous or thick liquid
detergents.
– Do not put more liquid then the maxi-
mum level.
– Do not set the prewash phase.
– Do not set the delay start.
Setting a programme
1. Turn the programme knob and set the pro-
gramme.
2.
The indicator
flashes.
3. If necessary, change the spin speed or add
available functions.
When you press the relevant button, the in-
dicator of the set function comes on.
Starting a programme without the delay
start
Press the button
:
•
the indicator
stops to flash and the indica-
tor
+ is on.
• the programme starts and the door locks.
Starting a programme with the delay start
•
Press the Delay Start button
to set neces-
sary delay. The indicator of the set delay is
on.
•
Press the Start button
:
The appliance starts the countdown.
When the countdown is completed, the pro-
gramme starts automatically.
You can change or cancel the delay start
before you press the Start button
. After
you have pressed the button
you can only
cancel the delay.
To cancel the delay start:
1.
Press the button
to set the appliance to
PAUSE.
2.
Press the button
one time, the indicator
of the set delay goes off.
3.
Press the button
again to start the pro-
gramme immediately.
Interrupting a programme and changing
the options
You can change only some options before they
operate.
1. Press the button
. The indicator flashes.
2. Change the options.
3. Press the button
again. The programme
continues.
Cancelling a programme
1.
Turn the programme knob to
to cancel
the programme and to deactivate the appli-
ance.
11
www.zanussi.com

2. Turn the programme knob again to activate
the appliance. Now, you can set a new
washing programme.
The appliance does not drain the water.
Changing the options
You can change only some options before they
operate.
1.
Press the button
. The indicator flashes.
2. Change the options.
3.
Press the button
again. The programme
continues.
Opening the door
While a programme or the delay start operates,
the appliance door is locked.
Caution! If the temperature and level of
the water in the drum are too high, you
cannot open the door.
Open the appliance door when the delay
start operates:
1. Press the button
to pause the appli-
ance.
2. Wait some minutes until the door unlocks.
3. You can open the door.
4. Close the door and press the button
again. The delay start continues to operate.
Open the appliance door when the
programme operates:
1.
Turn the programme knob to
to deacti-
vate the appliance.
2. Wait for some minutes and then open the
appliance door.
3. Close the appliance door.
4. Set the programme again.
At the end of the programme
The appliance stops automatically.
•
The Start button
indicator goes off.
•
The End indicator
is on.
1.
Turn the programme knob to
to deacti-
vate the appliance.
2. Remove the laundry from the appliance.
Make sure that the drum is empty.
3. Keep the door ajar, to prevent the mildew
and odours.
4. Close the water tap.
The washing programme is completed, but
there is water in the drum:
– The drum turns regularly to prevent the crea-
ses in the laundry.
–
The door stays locked and the indicator
flashes.
– You must drain the water before you can
open the door.
To drain the water:
1. Set the Drain or the Spin programme.
2.
Press the button
. The appliance drains
the water and/or spins.
3. When the programme is completed:
–
The button indicator
goes off and the
indicator
is on.
– After some minutes you can open the
door.
4.
Turn the programme knob
deactivate
the appliance.
Stand-by
Some minutes after the end of the washing pro-
gramme, if you do not deactivate the appliance,
the energy saving status activates.
The energy saving status decreases the energy
consumption when the appliance is on the
stand by.
• All indicators go off.
•
The indicator of the
flashes slowly
• Press one of the options to deactivate the en-
ergy saving status.
12
www.zanussi.com

Hints and tips
The laundry load
• Divide the laundry in: white, coloured, syn-
thetics, delicates and wool.
• Obey the washing instructions that are on the
laundry care labels.
• Do not wash together white and coloured
items.
• Some coloured items can discolour with the
first wash. We recommend that you wash
them separately for the first times.
• Button up pillowcases, close zippers, hooks
and poppers. Tie up belts.
• Empty the pockets and unfold the items.
• Turn inside out multilayered fabrics, wool and
items with painted illustrations.
• Remove hard stains.
• Wash with a special detergent heavy soil
stains.
• Be careful with the curtains. Remove the
hooks or put the curtains in a washing bag or
pillowcase.
• Do not wash in the appliance :
– Laundry without hems or with cuts
– Underwired bras.
– Use a washing bag to wash small items.
• A very small load can cause balance prob-
lems with the spin phase. If this occurs, ad-
just manually the items in the tub and start the
spin phase again.
Stubborn stains
For some stains, water and detergent is not suf-
ficient.
We recommend that you remove these stains
before you put the items in the appliance.
Special stain removers are available. Use the
special stain remover that is applicable to the
type of stain and fabric.
Detergents and additives
• Only use detergents and additives specially
made for washing machines.
• Do not mix different types of detergents.
• To help the environment, do not use more
than the correct quantity of detergent.
• Obey the instructions that you find on the on
packaging of these products.
• Use the correct products for the type and
colour of the fabric, the programme tempera-
ture and the level of soil.
• If you use liquid detergents, do not set the
prewash phase.
• If your appliance has not the detergent dis-
penser with the flap device, add the liquid de-
tergents with a dosing ball.
Water hardness
If the water hardness in your area is high or
moderate, we recommend that you use a water
softener for washing machines. In areas where
the water hardness is soft it is not necessary to
use a water softener.
To know the water hardness in your area, con-
tact your local water authority.
Obey the instructions that you find on the pack-
aging of the products.
Care and cleaning
Warning!
Disconnect the appliance from the mains supply
before you clean it.
External cleaning
Clean the appliance only with soap and warm
water. Fully dry all the surfaces.
Caution! Do not use alcohol, solvents or
chemical products.
Descaling
The water we use contains limescale. If it be-
comes necessary, use a water softener to re-
move limescales.
13
www.zanussi.com

Use a special product made for washing ma-
chines. Obey the instructions that you find on
the packaging of the manufacturer.
Do this separately from the laundry wash.
Maintenance wash
With the low temperature programmes it is pos-
sible that some detergent stays in the drum.
Make regularly a maintenance wash. To do this:
• Empty the laundry from the drum.
• Set the hottest cotton wash programme
• Use a correct quantity of powder detergent
with biological properties.
After each wash, keep the door open for a while
to prevent mould and to let unpleasant smells
go out.
Drum
Regularly examine the drum to prevent limescale
and rust particles.
Only use special products to remove rust parti-
cles from the drum.
To do this:
• Clean the drum with special product for
stainless steel.
• Start a short programme for cotton at the
maximum temperature with a small quantity of
detergent.
Door seal
Regularly examine the
seal and remove all
objects from the inner
part.
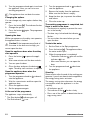
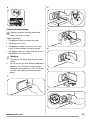
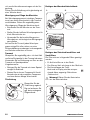
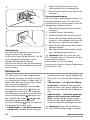
Cleaning the detergent dispenser
1.
2.
3.
Cleaning the inlet hose filter and the valve
filter
It could be necessary to clean the filters when:
• The appliance does not fill with water.
• The appliance fills with the water for a long
time.
• The indicator of button
flashes and the display shows the rela-
ted alarm. Refer to 'Troubleshooting'.
Warning! Disconnect the mains plug from
the mains socket.
1.
2.
14
www.zanussi.com

3.
45°
35°
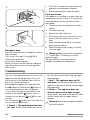
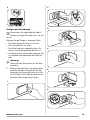
Cleaning the drain pump
Regularly examine the drain pump and
make sure that it is clean.
Clean the pump if:
• The appliance does not drain the water.
• The drum cannot turn.
• The appliance makes an unusual noise be-
cause of the blockage of the drain pump.
• The display shows an alarm code because of
the problem with water drain.
Warning!
1.
Disconnect the mains plug from the mains
socket.
2. Do not remove the filter while the appliance
operates. Do not clean the drain pump if
the water in the appliance is hot. The water
must be cold before you clean the drain
pump.
1.
2.
3.
4.
1
2
5.
6.
15
www.zanussi.com

7.
2
1
8.
Emergency drain
Because of a malfunction, the appliance cannot
drain the water.
If this occurs, do steps (1) through (8) of
'Cleaning the drain filter'.
If necessary, clean the pump.
When you drain the water with the emergency
drain procedure, you must activate again the
drain system:
1. Put 2 litres of water in the main wash com-
partment of the detergent dispenser.
2. Start the programme to drain the water.
Frost precautions
If the appliance is installed in an area where the
temperature can be less than 0° C, remove the
remaining water from the inlet hose and the
drain pump.
1. Disconnect the mains plug from the mains
socket.
2. Close the water tap.
3. Remove the water inlet hose.
4. Put the two ends of the inlet hose in a con-
tainer and let the water flow out of the
hose.
5. Empty the drain pump. Refer to the emer-
gency drain procedure.
6. When the drain pump is empty, install the
inlet hose again.
Warning! Make sure that the temperature
is more than 0 °C before you use the
appliance again.
The manufacturer is not responsible for
damages caused by low temperatures.
Troubleshooting
The start of the appliance does not occur or the
appliance stops during operation. First try to
find a solution to the problem (refer to the ta-
ble). If not, contact the Service.
During appliance operation it is possible that
the red indicator of Start button
flashes to
show that the appliance does not operate.
It is possible to recognize the problem by the
number of the indicator
flashes : press si-
multaneously the buttons
and for some
seconds.
The red indicator
flashes for a short time (do
not consider the green flash) :
• 4 flashes = ‘The washing machine does
not start’, do the checks indicated in the ta-
ble ‘Possible solution’ below and start again
the programme.
• 1 flash = ’The appliance does not fill
with water’, do the checks indicated in the
table ‘Possible solution’ below and start again
the programme.
• 2 flashes = ’The appliance does not
drain the water and/or does not spin’,
do the checks indicated in the table ‘Possible
solution’ below and start again the pro-
gramme.
Warning! Deactivate the appliance before
you do the checks.
16
www.zanussi.com

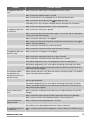
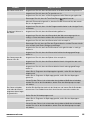
Problem Possible solution
The appliance does not
start.
Make sure that the mains plug is connected in the mains socket.
Make sure that the appliance door is closed.
Make sure that there is not a damaged fuse in the household fuse box.
Make sure that the button Start/Pause has been pressed.
If the delay start is set, cancel the setting or wait for the end of the countdown.
Make sure that the programme knob is in the correct position.
The appliance does not
fill with water.
Make sure that the water tap is opened.
Make sure that the pressure of the water supply is not too low. For this information,
contact your local water authority.
Make sure that the water tap is not clogged.
Make sure that the filter of the inlet hose and the filter of the valve are not clogged.
Refer to 'Care and cleaning'.
Make sure that the inlet hose has no kinks or bends.
Make sure that the connection of the water inlet hose is correct.
The appliance does not
drain the water.
Make sure that the sink spigot is not clogged.
Make sure that the water drain hose has no kinks or bends.
Make sure that the connection of the water drain hose is correct.
Set the drain programme if you set a programme without the drain phase.
Set the drain programme if you set an option which ends with water in the drum.
If above mentioned solutions do not help, contact the Service (as the filter of the
drain pump may be clogged).
The spin phase does
not operate or the
washing cycle lasts lon-
ger than usually.
Adjust manually the items in the drum and start the spin phase again. This problem
may be caused by balance problems.
Set the spin programme.
Set the drain programme if you set an option which ends with water in the drum.
If above mentioned solutions do not help, contact the Service (as the filter of the
drain pump may be clogged).
There is water on the
floor.
Make sure that the couplings of the water hoses are tight and there are no water
leakages.
Make sure that the water inlet hose and the water drain hose has no damages.
Make sure you use the correct detergent and the correct quantity of it.
You cannot open the
appliance door.
Make sure that the washing programme is finished.
Set the drain or the spin programme if there is water in the drum.
The appliance makes an
unusual noise.
Make sure that the levelling of the appliance is correct. Refer to 'Installation instruc-
tion'.
17
www.zanussi.com

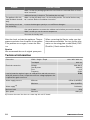
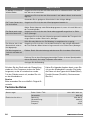
Problem Possible solution
Make sure that the packaging and/or the transit bolts are removed. Refer to 'Instal-
lation instruction'.
Add more laundry in the drum. The load may be too small.
The appliance fills with
water and drain immedi-
ately.
Make sure that the drain hose is in the correct position. The end of the hose may
be is too low. Refer to 'Installation instruction'.
The washing results are
not satisfactory.
Increase the detergent quantity or use a different detergent.
Use special products to remove the stubborn stains before you wash the laundry.
Make sure that you set the correct temperature.
Decrease the laundry load.
After the check, activate the appliance. The pro-
gramme continues from the point of interruption.
If the problem occurs again, contact the Serv-
ice.
Service
We recommend the use of original spare parts.
When contacting the Service, make sure that
these data are available. You can find the infor-
mation on the rating plate: model (Mod.), PNC
(Prod.No.), Serial number (Ser.No.).
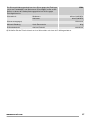
Technical information
Dimensions Width / Height / Depth 600 / 850 / 600 mm
Total depth 640 mm
Electrical connection: Voltage
Overall power
Fuse
Frequency
220-230 V
2000 W
10 A
50 Hz
Level of protection against ingress of solid particles and moisture ensur-
ed by the protective cover, except where the low voltage equipment has
no protection against moisture
IPX4
Water supply pressure Minimum 0,5 bar (0,05 MPa)
Maximum 8 bar (0,8 MPa)
Water supply
1)
Cold water
Maximum load Cotton 8 kg
Spin speed Maximum 1000 rpm
1) Connect the water inlet hose to a water tap with a 3/4'' thread.
18
www.zanussi.com

Inhalt
Sicherheitsinformationen _ _ _ _ _ _ _ _ _ _ 19
Sicherheitshinweise _ _ _ _ _ _ _ _ _ _ _ _ _ 20
Umwelttipps _ _ _ _ _ _ _ _ _ _ _ _ _ _ _ _ _ 22
Gerätebeschreibung _ _ _ _ _ _ _ _ _ _ _ _ 22
Bedienfeld _ _ _ _ _ _ _ _ _ _ _ _ _ _ _ _ _ _ 23
Programme _ _ _ _ _ _ _ _ _ _ _ _ _ _ _ _ _ 24
Verbrauchswerte _ _ _ _ _ _ _ _ _ _ _ _ _ _ 27
Vor der ersten Inbetriebnahme _ _ _ _ _ _ _ 28
Täglicher Gebrauch _ _ _ _ _ _ _ _ _ _ _ _ _ 28
Tipps und Hinweise _ _ _ _ _ _ _ _ _ _ _ _ _ 30
Reinigung und Pflege _ _ _ _ _ _ _ _ _ _ _ _ 31
Fehlersuche _ _ _ _ _ _ _ _ _ _ _ _ _ _ _ _ _ 34
Technische Daten _ _ _ _ _ _ _ _ _ _ _ _ _ _ 36
Änderungen vorbehalten.
Sicherheitsinformationen
Lesen Sie vor der Montage und dem Gebrauch des Geräts zuerst
die Gebrauchsanleitung. Der Hersteller übernimmt keine Verantwor-
tung für Verletzungen und Beschädigungen durch unsachgemäße
Montage. Bewahren Sie die Gebrauchsanleitung griffbereit auf.
Sicherheit von Kindern und schutzbedürftigen Personen
Warnung! Es besteht Erstickungsgefahr, Risiko von
Verletzungen oder permanenten Behinderungen.
• Das Gerät kann von Kindern ab 8 Jahren und Personen mit einge-
schränkten physischen, sensorischen oder geistigen Fähigkeiten
oder mit mangelnder Erfahrung und/oder mangelndem Wissen nur
dann verwendet werden, wenn sie durch eine für ihre Sicherheit
zuständige Person beaufsichtigt werden oder in die sichere Ver-
wendung des Geräts eingewiesen wurden und die mit dem Gerät
verbundenen Gefahren verstanden haben.
• Kinder dürfen nicht mit dem Gerät spielen.
• Alle Verpackungsmaterialien von Kindern fernhalten.
• Halten Sie alle Reinigungsmittel von Kindern fern.
• Halten Sie Kinder und Haustiere vom geöffneten Gerät fern.
• Falls Ihr Gerät mit einer Kindersicherung ausgestattet ist, empfeh-
len wir, diese einzuschalten.
• Wartung oder Reinigung des Geräts darf nicht von Kindern ohne
Aufsicht erfolgen.
19
www.zanussi.com

Allgemeine Sicherheit
• Schalten Sie vor Reinigungsarbeiten immer das Gerät aus und zie-
hen Sie den Netzstecker aus der Steckdose.
• Nehmen Sie keine technischen Änderungen am Gerät vor.
• Beachten Sie die maximale Beladungsmenge von 8 kg (siehe Ka-
pitel „Programmtabelle“).
• Wenn das Netzkabel beschädigt ist, muss es vom Hersteller, ei-
nem autorisierten Kundendienst oder einer gleichermaßen qualifi-
zierten Person ersetzt werden, um Gefahrenquellen zu vermeiden.
•Der Betriebswasserdruck (Mindest- und Höchstdruck) muss zwi-
schen 0,5 bar (0,05 MPa) und 8 bar (0,8 MPa) liegen.
• Die Lüftungsöffnungen im Gerätesockel (falls vorhanden) dürfen
nicht von einem Teppichboden blockiert werden.
• Das Gerät muss mit den mitgelieferten neuen Schläuchen an die
Wasserversorgung angeschlossen werden. Alte Schläuche dürfen
nicht wieder verwendet werden.
Sicherheitshinweise
Montage
• Entfernen Sie die Verpackungsmaterialien
und die Transportschrauben.
• Bewahren Sie die Transportschrauben auf.
Wenn Sie das Gerät umsetzen, müssen Sie
die Trommel blockieren.
• Stellen Sie ein beschädigtes Gerät nicht auf
und benutzen Sie es nicht.
• Stellen Sie das Gerät nicht an einem Ort auf,
an dem die Temperatur unter 0 °C absinken
kann, und benutzen Sie das Gerät nicht,
wenn die Temperatur unter 0 °C absinkt.
• Halten Sie sich an die mitgelieferte Montage-
anleitung.
• Stellen Sie sicher, dass der Boden, auf dem
das Gerät aufgestellt wird, eben, hitzebestän-
dig und sauber ist.
• Stellen Sie das Gerät nicht an einem Ort auf,
an dem die Tür nicht vollständig geöffnet
werden kann.
• Seien Sie beim Umsetzen des Geräts vor-
sichtig, denn es ist schwer. Tragen Sie stets
Sicherheitshandschuhe.
• Stellen Sie sicher, dass die Luft zwischen
Gerät und Boden zirkulieren kann.
• Stellen Sie die Füße so ein, dass der dazu er-
forderliche Abstand zwischen Gerät und Bo-
den vorhanden ist.
Elektrischer Anschluss
Warnung! Brand- und Stromschlaggefahr.
• Das Gerät muss geerdet sein.
• Stellen Sie sicher, dass die elektrischen Da-
ten auf dem Typenschild den Daten Ihrer
Stromversorgung entsprechen. Wenden Sie
sich andernfalls an eine Elektrofachkraft.
• Das Gerät darf ausschließlich an eine ord-
nungsgemäß installierte Schutzkontaktsteck-
dose angeschlossen werden.
20
www.zanussi.com
Seite laden ...
Seite laden ...
Seite laden ...
Seite laden ...
Seite laden ...
Seite laden ...
Seite laden ...
Seite laden ...
Seite laden ...
Seite laden ...
Seite laden ...
Seite laden ...
Seite laden ...
Seite laden ...
Seite laden ...
Seite laden ...
Seite laden ...
Seite laden ...
Seite laden ...
Seite laden ...
-
 1
1
-
 2
2
-
 3
3
-
 4
4
-
 5
5
-
 6
6
-
 7
7
-
 8
8
-
 9
9
-
 10
10
-
 11
11
-
 12
12
-
 13
13
-
 14
14
-
 15
15
-
 16
16
-
 17
17
-
 18
18
-
 19
19
-
 20
20
-
 21
21
-
 22
22
-
 23
23
-
 24
24
-
 25
25
-
 26
26
-
 27
27
-
 28
28
-
 29
29
-
 30
30
-
 31
31
-
 32
32
-
 33
33
-
 34
34
-
 35
35
-
 36
36
-
 37
37
-
 38
38
-
 39
39
-
 40
40


Zanussi ZWF1025 Benutzerhandbuch
- Kategorie
- Waschmaschinen
- Typ
- Benutzerhandbuch
in anderen Sprachen
- English: Zanussi ZWF1025 User manual