
WINDOWS & DOORS
DOORS
SK5
Locker Door
Installation and Operating Manual
Serviceklappe
Montage- und Bedienungsanleitung
Trappe de service
Instructions de montage
et de service
Sportello di servizio
Istruzioni di montaggio e d’uso
Serviceklep
Montagehandleiding en
gebruiksaanwijzing
Servicelucka
Monterings- och bruksanvisning
EN
DE
FR
IT
NL
SV
title_16s_A4.fm Seite 1 Dienstag, 18. Oktober 2016 2:00 14

title_16s_A4.fm Seite 2 Dienstag, 18. Oktober 2016 2:00 14

DOM_1061
MO / 1095/ 121114 RB/ 12 /2012_V13
Art.-Nr: 1412
D Serviceklappe SK 5 - Montage- und Bedienungsanleitung
GB SK 5 Service locker door - Installation and operating instructions
FR De la trappe de service SK 5 - Notice de montage d´emploi
I Dello sportello di servizio
SK 5 - Istruzioni d’ installazione e I’uso
NL
Serviceklep SK 5 - Installatie en gebruiksaanwijzing
SE Servicelucka SK 5 - Monterings- och användningsinstruktioner
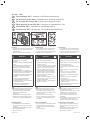
Hinweise
→ Überprüfen Sie vor Montage die Wandstärke Ihres
Fahrzeugs. Bei Fragen, wenden Sie sich an den
Fahrzeughersteller.
→ Klebstoff ist nicht im Lieferumfang enthalten.
Vorsicht
D
Beschädigungen!
Beschädigung durch unsachgemäße
Handhabung.
→ Montage- und Bedienungsanleitung sorgfältig
lesen!
→ Bei auftretenden Fehlern / Störungen ist um-
gehend eine Fachwerkstatt aufzusuchen.
→ Montage nur an ebene Innen- und Außen-
wände durchführen!
→ Einbauort so wählen, dass angrenzenden
Bauteile (Befestigungs- und Verstärkungsteile),
Leitungen und Einbau- oder Schränken im
Fahrzeuginnenraum, nicht beschädigt werden.
→ Klebehinweise des Klebstoffherstellers
beachten!
→ Für Beschädigungen oder Verletzungen
durch fehlerhaften Einbau und / oder
Bedienung übernimmt Fa. Dometic-Seitz keine
Gewährleistungshaftung!
→ Montagehinweis für Toilettenentlüftung zu
Dometic Kassettentoilette beachten!
Montagehinweis
→ Zum kleben dauerelastischen Kleber verwenden.
→ Die Vorbehandlungshinweise der jeweiligen
Klebstoffhersteller sind genau zu beachten
(insbesondere die Klebeflächen zur
Fahrzeugseite).
→ Nach Montage Funktionsprüfung durchführen.
→ bei Einsatz in Verbindung mit Dometic-Toilette
beachten Sie den separaten Montagehinweis!
Pflegehinweis
→ Zur regelmäßigen Pflege des Dichtgummis,
nur die von Dometic-Seitz empfohlen Produkte
verwenden.
→ Kunststoffteile mit handelsüblichen speziellen
Kunststoffreinigern behandeln.
→ Scharniere nicht ölen!
Instructions
→ Before installation, please check the thickness
of the walls of your vehicle. If you have any
questions, please contact your car manufacturer.
→ The delivery does not include adhesive
Attention
GB
Damage!
Damage caused by improper handling.
→ Please read the installation and operating
instructions carefully!
→ In the event of any faults / malfunctions, please
contact an authorised workshop immediately.
→ Only mount to even inner and outer walls !
→ Select an installation place that will ensure
that the neighbouring parts, attachment and
reinforcement parts, cables and installation
cabinets inside the vehicle are not damaged.
→ Observe the adhesion instructions of the
adhesive manufacturer !
→ Dometic Seitz will not recognise any warranty
claims for damage or injury caused by wrong
installation and/or operation.
→ Installation instructions for toilet ventilation for
Dometic cassette toilet
Installation instructions
→ Use permanent elastic adhesive to sticking.
→ Strictly observe the pre-treatment instructions
of the respective adhesive manufacturer (in
particular those relating to the adhered surfaces
toward the vehicle)
→ Perform a function check after assembly
→ If used in combination with a Dometic cassette
toilet, please refer to the separate assembly
instructions!
Care Instruktions
→ Only use the products recommended by Dometic
Seitz for regular care of the sealing rubber.
→ Treat plastic parts with standard special plastic
cleaners
→ Do not oil the hinges!
Remarques
→ Avant l’installation, veuillez contrôler l’épaisseur
de la paroi de votre véhicule. Si vous avez des
questions, contactez le constructeur du véhicule.
→ Les joints d’étanchéité ne sont pas livrés.
Attention
FR
Dégâts!
Dégâts causés par une mauvaise utilisation
→ Veuillez lire le mode d’emploi et les instructions
de montage attentivement !
→ En cas de défaut ou de mauvais
fonctionnement, veuillez contacter un atelier
agréé.
→ Montez seulement sur des parois droites et
lisses.
→ Assurez-vous qu’il n’y a pas de pièces
de renforts ou de câbles pouvant être
endommagés par l’installation de la trappe de
service.
→ Respectez les instructions d’installation du
fabricant de joints !
→ Tous dégâts causés par une mauvaise
installation ou utilisation entraîneront la non
validité de la garantie.
→ Instructions d’installation de la ventilation des
toilettes à cassette Dometic!
Instruction de montage
→ Pour le collage du cadre du portillon utilisez une
colle à élasticité permanente.
→ Respectez les conditions d’utilisation de chaque
fabricant de joints, en particulier celles qui
concernent les parois du véhicule de loisir.
→ Faites un contrôle de fonctionnement après
l’assemblage.
→ Si vous l’utilisez en combinaison avec les toilettes
à cassette Dometic, veuillez respecter les
instructions d’assemblage de chaque produit!
Precautions d‘entretien
→ utilisez seulement des produits recommandés
par Dometic Seitz pour l’entretien du joint en
caoutchouc.
→ Utilisez le nettoyant plastique spécial Dometic
pour l’entretien des pièces plastiques.
→ Ne pas huiler les charnières.

BISG_0002
DOM_1080
h
R
(1)
R
(2)
c
0
-2
g
e
+2
0
f
+1
0
d
0
-1
a
Istruzioni
→ Prima dell’installazione, verificare lo spessore
della parete del vostro veicolo. Per informazioni
tecniche , contattate il vostro costruttore.
→ La consegna non include l‘adesivo.
Attenzione
I
Danni!
Danni caustati da utilizzo impropio
→ Leggere attentamente le istruzioni di
installazione e funzionamento!
→ Nell’eventualità si verifichino difetti o
malfunzionamenti ,contattare prontamente
un’officina autorizzata.
→ Installare solo tra parete interna ed esterna.
→ Selezionare come punto di installazione una
posizione che non crei danneggiamenti a
giunzioni ,parti di rinforzo ,cablaggi o vani
interni al veicolo.
→ Attenersi alle istruzioni dell’adesivo del
produttore!
→ Per Danni causati da errata installazione
o utilizzo improprio la Dometic Seitz non
riconoscerà reclami in garanzia.
Istruzioni per l‘installazione
→ Per incollare, utilizzare un adesivo elastico
permanente.
→ Attenersi rigorosamente alle istruzioni di pre-
trattamento di messa in posa dell’adesivo (in
particolare per quanto riguarda le istruzioni di
trattamento delle superfici dove aderirà l’adesivo)
→ Effettuare una verifica di funzionamento dopo
l’assemblaggio
→ Se utilizzato in combinazione con toilet a cassetta
Domentic ,fare riferimento alle separate istruzioni
di montaggio !
Istruzioni per la pulizia
→ Utilizzare solo prodotti raccomandati da
Dometic Seitz per la manutenzione e cura delle
guarnizioni.
→ Trattare le parti in plastica solo con prodotti di
pulizia specifici per la plastica
→ Non lubrificare le cerniere!
Instructies
→ Controleer vóór montage de wandsterkte van het
voertuig. Voor vragen kunt u zich wenden tot uw
dealer.
→ Lijm wordt niet meegeleverd.
Attentie
NL
Beschadigingen!
Beschadiging door onjuist gebruik.
→ Installatie- en gebruiksaanwijzing goed
doorlezen!
→ Neem contact op met uw dealer, in geval van
storingen.
→ Installatie alleen bij vlakke binnen- en
buitenwand.
→ Inbouwplaats goed uitkiezen, zodat er
geen leidingen, versterkingspunten of
inbouwkoelkasten worden beschadigd.
→ Let goed op de lijmvoorschriften van de
fabrikant.
→ Voor beschadigingen of verwondingen door
foute inbouw en /of gebruik is Dometic Seitz
niet verantwoordelijk.
Installatie instructies
→ Voor het vastzetten, blijvend elastische lijm
gebruiken.
→ Volg de instructies van de lijm-fabrikant (m.n. voor
het oppervlak van de wagen)
→ Na montage de werking testen.
→ Bij gebruik in combinatie met het Dometic casette
toilet, volg tevens de installatie instructie voor het
toilet!.
Onderhoud instructies
→ Voor regelmatig onderhoud aan het afsluitrubber,
alleen de door Dometic aanbevolen producten
gebruiken.
→ Het kunststof alleen met aanbevolen producten
behandelen.
→ Geen olie op de scharnieren doen!
Instruktioner
→ Kontrollera fordonets väggtjocklek där luckan ska
monteras. Om det är osäkert vilken väggtjocklek
fordonet har, fråga tillverkaren.
→ Lim för fastsättning av karmen i väggen, ingår inte
i leveransen.
Observera
SE
Skador!
Skada genom felaktigt handhavande.
→ Läs noggrant monterings- och
skötselanvisningen!
→ Vid tydliga funktionsfel /felaktigheter kontakta
auktoriserad verkstad.
→ Serviceluckan kan bara monteras på en
plan/rak vägg!
→ Välj monteringsstället på fordonet så
att angränsande karossdelar, inbyggda
förstärkningsreglar, elledningar och invändiga
skåp inte skadas.
→ Följ rekommendationer från limtillverkaren för
karmens montering i väggen!
→ Dometic Seitz har inget garantiansvar för
skador som orsakats av felaktig montering
och/eller felaktigt handhavande.
Installationsanvisningar
→ Limma med permanent elastiskt lim.
→ Förbehandla limytorna (särskilt väggens limyta),
enligt anvisning från limtillverkaren.
→ Kontrollera serviceluckans funktion efter
monteringen.
→ När serviceluckan ska monteras i samband
med Dometic kassett-toalett, följ den
monteringsanvisning som medföljer toaletten.
Skötselinstruktioner
→ För skötsel av tätningslisten, använd produkter
som rekommenderas för gummilister.
→ Plastdetaljer behandlas med rengöringsmedel
speciellt avsedda för plast.
→ Gångjärnen ska inte smörjas.

DOM_1062
DOM_1078
6
7
8
9
10
11
12
13
14
15 16
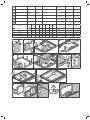
D
Klappennennmaß Gesamtmaß Wandausschnitt Maß Füllung
Radius Wand-
ausschnitt
Radius Türfüllung Wandstärke
GB
Door size Dimension
over all
W
all cut out Panel dimensions Radius wall cut
out
Radius panel Wall thick-
ness
F
Taille de la trappe de
visite
Dimension
totale
Découp de
paroi
Cote du replissage
Rayon découpe Rayon remplis-
sage
Epaisseur
I
Dimensioni sportello Misura totale Taglio dello
parete
Misura panello
Raggio di taglio
dello parete
Raggio del
panello
Spess.
parete
NL
Klepfoormaat Totale Massa Wanduitsparing
Vullingsmaar Doorsnede
wanduitsparing
Doorsnede
deurvulling
Wanddikte
S
Luckstorlek Total storlek Väggurtag Fyllningsmatt Radie väggur-
tag
Radie fyllning
Väggtjo-
cklek
mm x mm a b c d e f g h R
(1)
R
(2)
W
360x310
385
335
360
310
310
260
37
126
25 18,6 23-36
650x350 673 373 648 347 598 300 37 126 32 18,6 23-36
750x300
773
323
748
297
698
250
37
126
32 18,6 23-36
1000x420
1023
443
998
417
948
370
37
126
32 18,6 23-36
1070x300
1095
325
1070
300
1020
250
37
126
32 18,6 23-36
( 0)
(-2)
(+2)
( 0)
( 0)
(-1)
( 0)
(-1)

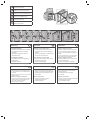
Bedienung
D
Serviceklappe öffnen:
→ Schlüssel in Türschloss einstecken und gegen
den Uhrzeigersinn drehen bis Knebelgriff
rausspringt.
→ Knebelgriff im Uhrzeigersinn drehen und
Serviceklappe öffnen.
Serviceklappe schließen:
→ Serviceklappe zudrücken, bis Verriegelung
hörbar einrastet.
→ Knebelgriff eindrücken.
Comandare
I
Aprire lo sportello di servizio:
→ Posizionare la chiave nella serratura e girare
in senso antiorario fino a far scattare il blocco
di chiusura.
→ Ruotare il blocco di chiusura in senso orario ed
aprire lo sportello .
Chiudere lo sportello di servizio:
→ Premere lo sportello contro la parete quindi far
rientrare il blocco di chiusura nella sua sede
fino ad udire il click di inserimento.
→ Premere il blocco di chiusura.
Operation
GB
Open the service locker door:
→ Put the key in the lock and turn in an anti-
clockwise direction until the locking toggle is
released
→ Turn the locking toggle in a clockwise direction
and open the service locker door
Close the service locker door
→ Press down the maintenance hatch until you
hear the lock click into place
→ Press in the locking toggle
Instructie
NL
Service luik openen:
→ Sleutel in het slot steken en tegen de klok in
draaien, tot de handgreep naar buiten springt.
→ Handgreep met de klok meedraaien en het
deurtje openen.
Service luik sluiten:
→ Service luik dicht drukken, totdat de
vergrendeling hoorbaar sluit.
→ Handgreep indrukken.
Commande
FR
Ouvrez la trappe de service.
→ Mettez la clé dans la serrure et tournez dans
le sens contraire des aiguilles d’une montre
jusqu’à ce que la poignée de verrouillage soit
libérée.
→ Tournez la poignée dans le sens des aiguilles
d’une montre et ouvrez la trappe de service.
Fermez la trappe de service.
→ Refermez la trappe de service jusqu‘à ce que
la serrure fasse un déclic.
→ Appuyez sur la poignée de verrouillage.
Operation
SE
Öppna serviceluckan:
→ Sätt in nyckeln i låset och vrid moturs tills
handtaget hoppar ut.
→ Vrid handtaget medurs för att öppna
serviceluckan.
Stänga serviceluckan:
→ Tryck på serviceluckan tills det hörs ett klickljud
när låset snäpper över karmen.
→ Tryck in handtaget i låsläge.
DOM_1063
3
2
1
DOM-1073.eps
D
Montagehinweis für Toilettenentlüftung zu
Dometic Kassettentoilette.
GB
Notice: Mounting installation for air
ventilation for Dometic cassette toilet.
FR
Remarque pour le montage de la
ventilation de la toilette Cassette Dometic.
I
Istruzione de Montaggio della Ventilazione
della Cassetta di toilette Dometic.
NL
Montagevoorschrift voor het Dometic
casette toilet ontluchting.
S
Monteringsråd fär toalettventilation till
Dometic kassett-toalett.

address_A4.fm Seite 22 Donnerstag, 23. Februar 2017 7:51 19

YOUR LOCAL
SALES OFFICE
dometic.com/sales-offices
YOUR LOCAL
DEALER
dometic.com/dealer
YOUR LOCAL
SUPPORT
dometic.com/contact
dometic.com
A complete list of Dometic companies, which comprise the Dometic Group, can be found in the public filings of:
DOMETIC GROUP AB Hemvärnsgatan 15 SE-17154 Solna Sweden
4445101876 08/2019 MO1095I02
-
 1
1
-
 2
2
-
 3
3
-
 4
4
-
 5
5
-
 6
6
-
 7
7
-
 8
8


in anderen Sprachen
- français: Dometic SK5 Guide d'installation
- italiano: Dometic SK5 Guida d'installazione
- Nederlands: Dometic SK5 Installatie gids
- svenska: Dometic SK5 Installationsguide
Verwandte Artikel
-
Dometic Saneo B, Saneo C, Saneo BLP, Saneo CLP, Saneo BS, Saneo CS, Saneo BW, Saneo CW Installationsanleitung
-
-
-
-
-
Dometic CT3110 Benutzerhandbuch
-
Dometic CT4050/4110, CTLP4050/4110, CTS4050/4110, CTW4050/4110 Bedienungsanleitung
-
-
-