Troubleshooting Guide
Guide de depannage
[English]
Issues Solutions
The screen keeps switching on
and off.
Check the cable connection between the product and PC, and ensure the
connectors are locked.
The power LED is off. The screen
will not switch on.
Check that the power cable is connected properly.
The message Check Signal Cable
appears.
Check that the cable is properly connected to the product.
Check that the device connected to the product is powered on.
Not Optimum Mode is displayed.
This message appears if the signal from the graphics card exceeds the
maximum resolution or frequency for the product.
Change the maximum resolution and frequency to suit the product
performance, referring to Standard Signal Mode Table.
[Français]
Problèmes Solutions
L’écran s’allume et s’éteint
continuellement.
Vériez que le câble est correctement branché entre le produit et le PC et que
les connecteurs sont bien verrouillés.
Le voyant d’alimentation est éteint.
L’écran ne s’allume pas.
Vériez que le câble d’alimentation est correctement branché.
Le message Vérif. câble signal
apparaît.
Vériez que le câble est correctement branché au produit.
Assurez-vous que le périphérique connecté à l’appareil est sous tension.
Mode non optimal est afché.
Ce message apparaît si le signal de la carte graphique dépasse la résolution
ou la fréquence maximale acceptée pour le produit.
Modiez la résolution et la fréquence maximales pour qu’elles correspondent
aux performances du produit, en vous référant au Tableau des modes de
signal standard.
[Deutsch]
Problem Lösungen
Der Bildschirm wird ständig ein- und
ausgeschaltet.
Prüfen Sie, ob das Kabel zwischen dem Gerät und PC ordnungsgemäß
angeschlossen ist und die Anschlüsse fest sitzen.
Die Netz-LED ist ausgeschaltet. Der
Bildschirm wird nicht eingeschaltet.
Prüfen Sie, ob das Netzkabel korrekt angeschlossen ist.
Die Meldung Signalkabel prüfen
wird angezeigt.
Prüfen Sie, ob das Kabel richtig am Gerät angeschlossen ist.
Überprüfen Sie, ob das angeschlossene Gerät eingeschaltet ist.
Die Meldung ungeeign. Modus
wird angezeigt.
Diese Meldung wird angezeigt, wenn das Grakkartensignal die maximale
Auösung oder Frequenz des Geräts übersteigt.
Ändern Sie die maximale Auösung und Frequenz auf einen der
möglichen Werte. Weitere Informationen nden Sie in der Tabelle mit
Standardsignalmodi.
[Italiano]
Problemi Soluzioni
Lo schermo si accende e si spegne.
Vericare che il cavo sia collegato correttamente al prodotto e al PC e che i
connettori siano inseriti saldamente.
Il LED di alimentazione è spento. Lo
schermo non si accende.
Vericare che il cavo di alimentazione sia collegato correttamente.
Viene visualizzato il messaggio
Control cavo segnale.
Vericare che il cavo sia collegato correttamente al prodotto.
Vericare che il dispositivo collegato al prodotto sia acceso.
Mod non ottimale viene
visualizzato a schermo.
Questo messaggio viene visualizzato se il segnale proveniente dalla scheda
graca supera la risoluzione o la frequenza massima supportata dal prodotto.
Modicare la risoluzione e la frequenza massima in modo appropriato rispetto
alle prestazioni del prodotto, facendo riferimento alla Tabella delle modalità
standard del segnale.
[Español]
Problemas Soluciones
La pantalla se enciende y se apaga
continuamente.
Compruebe que el cable esté bien conectado al producto y al PC, así como
que los conectores estén rmemente enchufados.
El LED de encendido está apagado.
La pantalla no se encenderá.
Compruebe que el cable de alimentación esté bien conectado.
Aparecerá el mensaje Comprobar
cable señal.
Compruebe que el cable esté bien conectado al producto.
Compruebe que el dispositivo conectado al producto esté encendido.
Se muestra Modo no óptimo.
Este mensaje aparece si la señal de la tarjeta gráca supera la resolución o la
frecuencia máximas del producto.
Cambie la resolución y la frecuencia máximas a n de adaptarlas al
rendimiento del producto mediante la consulta de la tabla de modos de señal
estándar.
[Svenska]
Problem Lösningar
Skärmen håller på att slås på och
av.
Kontrollera att kabeln är korrekt ansluten mellan produkten och datorn, och att
kontakterna är ordentligt fästa.
Strömlampan är släckt. Skärmen
slås inte på.
Kontrollera att strömsladden är ordentligt fastsatt.
Meddelandet Kontrollera signal
visas.
Kontrollera att kabeln är ordentligt ansluten till produkten.
Kontrollera att enheten som är ansluten till produkten som är påslagen.
Meddelandet Ej optimalt läge
visas.
Det här meddelandet visas om signalen för grakkortet överskrider den
maximala upplösningen eller frekvensen för produkten.
Ändra den maximala upplösningen och frekvensen efter produktens
prestanda i enlighet med tabellen över standarsignallägen.
[Magyar]
Problémák Megoldások
A képernyő felváltva be- és
kikapcsol.
Ellenőrizze, hogy a kábel megfelelően van-e csatlakoztatva a készülék és a PC
között, valamint azt, hogy a csatlakozók megbízhatóan reteszelve vannak-e.
A tápellátás jelzőfénye nem világít.
A képernyő nem kapcsol be.
Ellenőrizze, hogy a hálózati kábel megfelelően van-e csatlakoztatva.
Megjelenik az Ellenőrizze a
jelkábelt! üzenet.
Ellenőrizze, hogy a kábel megfelelően van-e csatlakoztatva a készülékhez.
Ellenőrizze, hogy be van-e kapcsolva a kijelzőhöz csatlakoztatott eszköz.
Megjelenik a Nem ez az optimális
mód üzenet.
Ez az üzenet akkor jelenik meg, ha a grakus kártyáról érkező jel maximális
felbontása vagy frekvenciája meghaladja a készülék jellemzőit.
Módosítsa úgy a maximális felbontást és a frekvenciát, hogy igazodjon a
készülék paramétereihez, a Normál jelmódok táblázata alapján.
[Polski]
Problem Rozwiązanie
Ekran naprzemiennie włącza się i
wyłącza.
Sprawdzić, czy kabel jest prawidłowo podłączony do produktu i do komputera
i czy złącza są mocno wciśnięte.
Nie świeci dioda LED zasilania.
Ekran się nie włącza.
Sprawdź, czy przewód zasilający jest podłączony prawidłowo.
Pojawia się komunikat Sprawdź
kabel sygnałowy.
Sprawdzić, czy kabel jest prawidłowo podłączony do produktu.
Sprawdź, czy urządzenie podłączone do monitora jest włączone.
Pojawia się komunikat Tryb
nieoptymalny.
Ten komunikat pojawia się wtedy, gdy sygnał z karty gracznej przekracza
maksymalną rozdzielczość lub częstotliwość produktu.
Zmienić maksymalną rozdzielczość i częstotliwość pod kątem parametrów
produktu, korzystając z Tabeli standardowych trybów sygnału.
[Português]
Problemas Soluções
O ecrã está continuamente a ligar e
a desligar.
Verique se o cabo está correctamente ligado ao produto e ao PC e se os
conectores estão rmemente encaixados.
O LED de alimentação está
desligado. O ecrã não liga.
Verique se o cabo de alimentação está correctamente ligado.
A mensagem Verif. cabo de sinal
é apresentada.
Verique se o cabo está correctamente ligado ao produto.
Verique se o dispositivo ligado ao produto está ligado.
A mensagem Modo não
otimizado é apresentada.
Esta mensagem é apresentada, se o sinal da placa gráca exceder a
resolução ou a frequência máxima do produto.
Altere a resolução e a frequência máximas para que se adeqúem ao
desempenho do produto, consultando a Tabela dos modos de sinal padrão.
[Türkçe]
Sorunlar Çözümler
Ekran açılıp kapanmaya devam
ediyor.
Kablonun ürünle PC arasında düzgün şekilde bağlandığını ve konektörlerin
sıkıca kilitlendiğini kontrol edin.
Güç LED’i kapalı. Ekran açılmıyor.
Güç kablosunun düzgün şekilde takıldığından
emin olun.
Kabloyu Kontrol Et iletisi
görüntülenir.
Kablonun ürüne düzgün şekilde bağlandığını kontrol edin.
Cihazın bağlı olduğu ürünün açık olduğunu kontrol edin.
Uygun Olmayan Mod
görüntüleniyor.
Bu ileti, grak kartından gelen sinyal ürünün maksimum çözünürlüğünü veya
frekansını aşarsa görüntülenir.
Standart Sinyal Modu Tablosu’ndan yararlanarak maksimum çözünürlük ve frekansı
ürünün performansına uygun olacak şekilde değiştirin.
[한국어]
문제 해결방안
화면이 나타났다 사라졌다 해요.
제품과 PC의 케이블 연결 상태를 확인하고, 커넥터의 잠금 상태를 확인하세요.
전원표시등이 꺼져 있어요. 화면이
안 나와요.
전원케이블이 바르게 연결되어 있는지 확인하세요.
화면에 케이블 연결 확인 메시지가
나타나요.
제품과 케이블이 바르게 연결되어 있는지 확인하세요.
제품과 연결된 기기의 전원이 켜져 있는지 확인하세요.
지원하지 않는 모드입니다. 라는
메시지가 나타나요.
그래픽 카드에서 나오는 신호가 제품의 최대 해상도 및 최대 주파수를 넘으면
발생합니다.
표준신호모드표를 참조하여 최대 해상도 및 최대 주파수를 제품 성능에 맞도록
설정하세요.
]ةيبرعلا[
.Check Signal Cable
.Not Optimum Mode
[English]
The power consumption level can vary in different operating conditions or when settings are changed.
[Français]
Le niveau de consommation affiché peut varier selon les conditions de fonctionnement ou lors de la modification des paramètres.
[Deutsch]
Der angezeigte Stromverbrauch kann je nach den Betriebsbedingungen oder wenn die Einstellungen geändert werden, unterschiedlich sein.
[Italiano]
Il consumo di energia elettrica visualizzato può variare a seconda delle condizioni operative o in caso di modifica delle impostazioni.
[Español]
El nivel de consumo de energía que se muestra puede variar en diferentes condiciones operativas o si se cambia la configuración.
[Svenska]
Den energiförbrukningsnivå som visas kan variera beroende på användningsförhållanden eller när inställningarna ändras.
[Magyar]
Az áramfogyasztás az eltérő működési feltételek és a beállítások módosítása esetén eltérhet a fent jelzett áramfogyasztástól.
[Polski]
Wyświetlony poziom zużycia energii może się różnić w zależności od warunków pracy lub z uwagi na zmianę ustawień.
[Português]
O nível de consumo de energia apresentado pode variar consoante as condições de funcionamento, ou caso as definições sejam alteradas.
[Türkçe]
Görüntülenen güç tüketimi düzeyi farklı çalışma koşullarında ya da ayarlar değiştirildiğinde çeşitlilik gösterebilir.
[한국어]
표기된 소비 전력은 사용 조건이 다르거나 설정을 변경하였을 때에는 달라질 수 있습니다.
]ةيبرعلا[
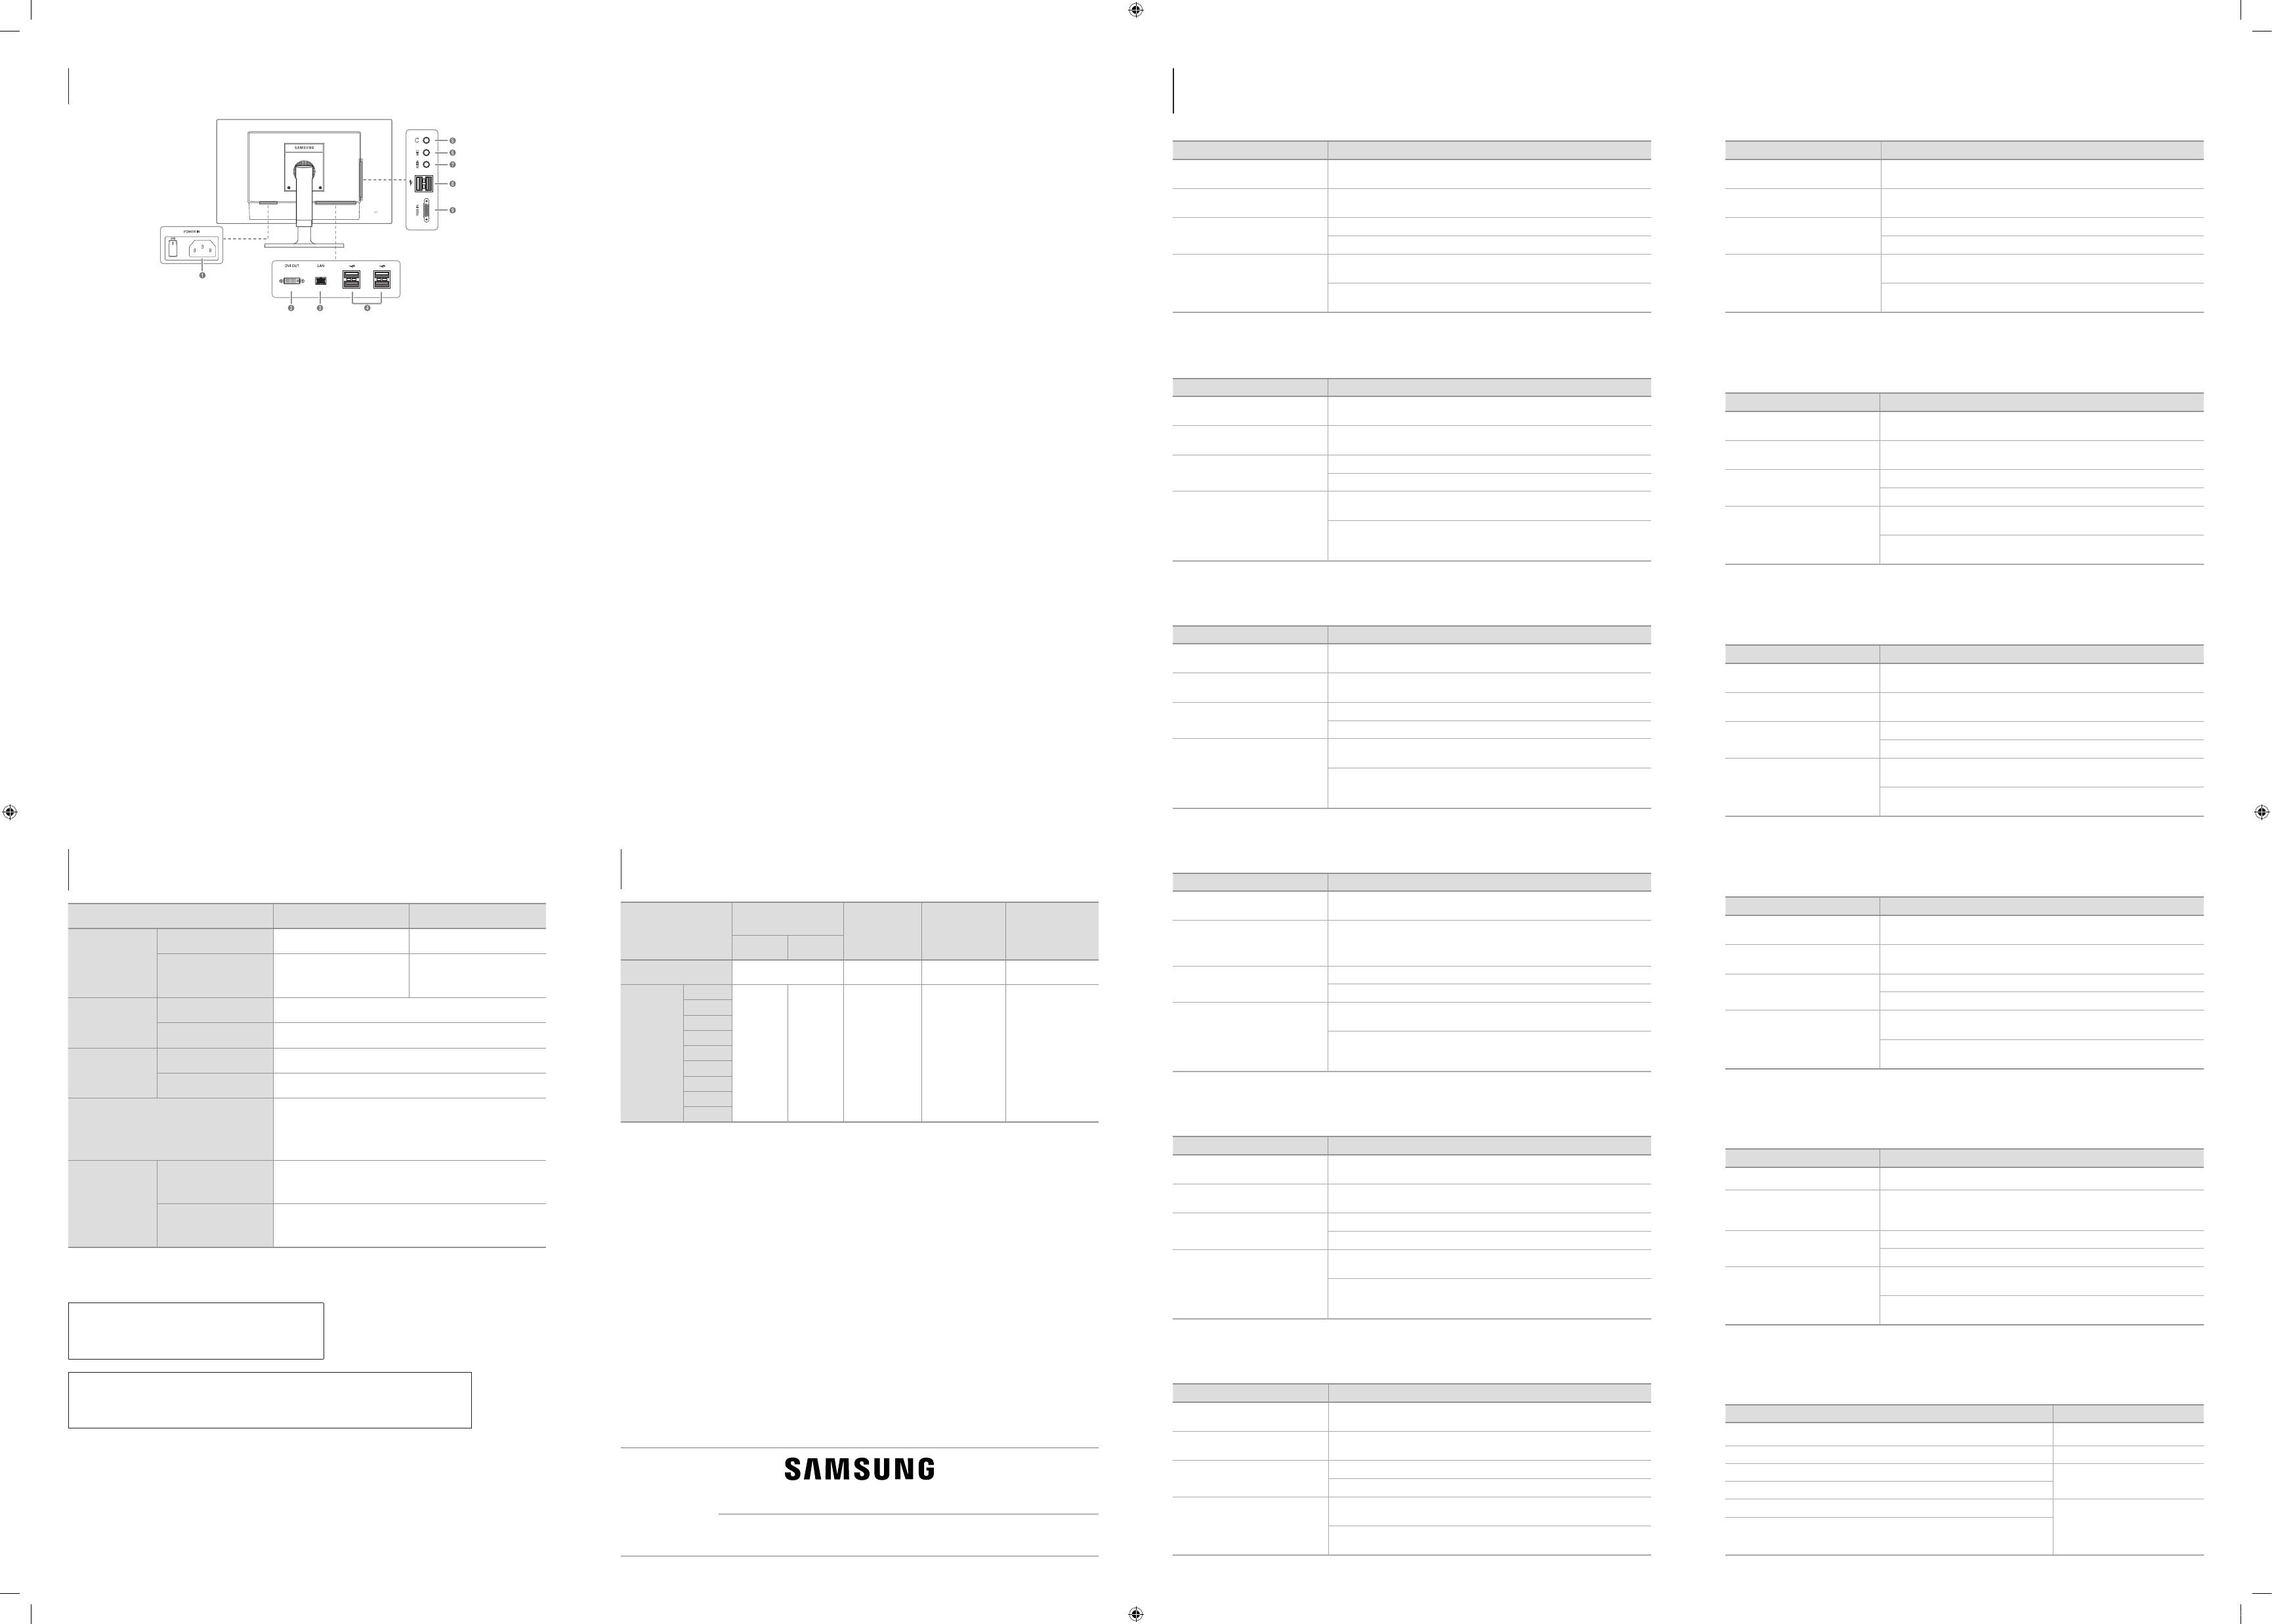
[English]
1
Connect to the power cable.
6
Connect to a microphone.
2
Connect to a secondary monitor using the DVI cable.
7
Connect to an audio-input source using an audio cable.
3
Connect to a network using the LAN cable.
8
Connect to a USB device.
4
Connect to a USB device.
9
Connect to a PC using the D-SUB cable.
5
Connect to an audio output device such as headphones.
[Français]
1
Connexion au câble d’alimentation.
6
Connexion à un microphone.
2
Connexion à un second moniteur à l’aide du câble DVI.
7
Permet le branchement à une source d'entrée audio via un câble audio.
3
Permet le branchement à un réseau via le câble LAN.
8
Connexion à un périphérique USB.
4
Connexion à un périphérique USB.
9
Permet le branchement à un PC via le câble D-SUB.
5
Permet le branchement à un périphérique de sortie audio tel qu'un casque.
[Deutsch]
1
Zum Anschluss des Netzkabels.
6
Verbinden mit einem Mikrofon.
2
Zum Anschluss eines zweiten Monitors mit dem DVI-Kabel.
7
Schließen Sie eine Audioeingangsquelle mithilfe eines Audiokabels an.
3
Zur Verbindung mit einem PC über ein LAN-Kabel.
8
Anschließen an ein USB-Gerät.
4
Anschließen an ein USB-Gerät.
9
Zur Verbindung mit einem PC über ein D-SUB-Kabel.
5
Zur Verbindung mit einem Audio-Ausgabegerät wie beispielsweise einem Kopfhörer.
[Italiano]
1
Consente il collegamento al cavo di alimentazione.
6
Collegamento a un microfono.
2
Consente il collegamento a un monitor secondario mediante il cavo DVI.
7
Consente il collegamento a una sorgente di ingresso audio mediante un cavo audio.
3
Consente il collegamento a una rete mediante il cavo LAN.
8
Collegare a un dispositivo USB.
4
Collegare a un dispositivo USB.
9
Consente di collegare il monitor a un PC mediante il cavo D-SUB.
5
Consente il collegamento a una periferica audio, ad esempio alle cuffie.
[Español]
1
Conecta con el cable de alimentación.
6
Conectar un micrófono.
2
Conecta con un monitor secundario mediante el cable DVI.
7
Conecta con una fuente de entrada de sonido mediante un cable de audio.
3
Conecta con una red mediante el cable LAN.
8
Conectar un dispositivo USB.
4
Conectar un dispositivo USB.
9
Conecta con un PC mediante el cable D-SUB.
5
Conecta con un dispositivo de salida de audio, como unos auriculares.
Reverse Side
Face arrière
Specifications
Caractéristiques techniques
Model Name / Nom du modèle
NC221 / NC221-S / NC221-TS /
NC221-TW / NC221W
NC241 / NC241-TS / NC241-TW /
NC241W
Panel / Panneau
Image Size /
Taille d'image
22 Class (21.5 Inches / 54.6 cm) /
Classe 22 (21,5 pouces / 54,6 cm)
24 Class (23.5 Inches / 59.8 cm) /
Classe 24 (23,5 pouces / 59,8 cm)
Display area /
Surface d'affichage
476.64 mm (H) x 268.11 mm (V)
18.8 inches (H) x 10.6 inches (V) /
476,64 mm (H) x 268,11 mm (V)
18,8 pouces (H) x 10,6 pouces (V)
521.28 mm (H) x 293.22 mm (V)
20.5 inches (H) x 11.5 inches (V) /
521,28 mm (H) x 293,22 mm (V)
20,5 pouces (H) x 11,5 pouces (V)
Synchronization /
Synchronisation
Horizontal Frequency /
Fréquence horizontale
31 – 80 kHz / 31 à 80 kHz
Vertical Frequency /
Fréquence verticale
56 – 75 Hz / 56 à 75 Hz
Resolution /
Résolution
Optimum Resolution /
Résolution optimale
1920 x 1080 @ 60 Hz / 1920 x 1080 à 60 Hz
Maximum Resolution /
Résolution maximale
1920 x 1080 @ 60 Hz / 1920 x 1080 à 60 Hz
Power Supply / Alimentation
This product uses 100 to 240V.
Refer to the label at the back of the product as the standard voltage can vary
in different countries. /
Ce produit utilise une tension comprise entre 100 et 240V.
Reportez-vous à l'étiquette apposée au dos du produit, car la tension
standard peut varier en fonction du pays.
Environmental
considerations /
Considérations
environnementales
Operating / Fonctionnement
Temperature : 50 °F – 104 °F (10 °C – 40 °C)
Humidity : 10 % – 80 %, non-condensing /
Température : 10 ˚C à 40 ˚C (50 ˚F à 104 ˚F)
Humidité : 10 % à 80 %, sans condensation
Storage / Stockage
Temperature : -4 °F – 113 °F (-20 °C – 45 °C)
Humidity : 5 % – 95 %, non-condensing /
Température : -20 ˚C à 45 ˚C (-4 ˚F à 113 ˚F)
Humidité : 5 % à 95 %, sans condensation
This device is a Class B digital apparatus.
Ce périphérique est un appareil numérique de Classe B.
For detailed device specications, visit the Samsung Electronics website.
Pour les spécications détaillées de l'appareil, veuillez visiter le site Web de Samsung Electronics.
PowerSaver
Economiseur d’énergie
PowerSaver /
Economiseur d'énergie
Normal operation mode /
Mode de fonctionnement
normal
Panel Off mode /
Mode Panneau
désactivé
Power off
(Power button off) /
Hors tension
(Bouton en mode
hors tension)
Power off
(Mechnical Switch off) /
Arrêt
(Mise hors tension
mécanique)
Typical /
type
Rating /
Nominal
Power lamp /
Voyant de mise sous tension
On / Activé Blinking / Clignotant Off / Arrêt Off / Arrêt
Power
Consumption /
Consommation
NC221
28 W 52 W
Less than 7.5 W /
Moins de 7,5 W
Less than 1.1 W /
Moins de 1,1 W
0 W
NC221-S
NC221-TS
NC221-TW
NC221W
NC241
NC241-TS
NC241-TW
NC241W
(USA only)
Dispose unwanted electronics through an approved recycler.
To nd the nearest recycling location, go to our website:
www.samsung.com/recyclingdirect or call, (877) 278 - 0799
CALIFORNIA USA ONLY (Applicable for networking models only.)
This Perchlorate warning applies only to primary CR(Manganese Dioxide) Lithium coin cells in the product sold or
distributed ONLY in California USA
"Perchloate Material - special handling may apply, See www.dtsc.ca.gov/hazardouswaste/ perchlorate."
[Svenska]
1
Anslut strömsladden.
6
Anslut till en mikrofon.
2
Anslut till en andra skärm med DVI-kabeln.
7
Anslut till en ljudingångskälla med en ljudkabel.
3
Anslut till ett nätverk med LAN-kabeln.
8
Anslut till en USB-enhet.
4
Anslut till en USB-enhet.
9
Anslut till en dator med D-SUB-kabeln
5
Anslut en ljudutmatningsenhet, t.ex. hörlurar.
[Magyar]
1
Csatlakoztatás a tápkábelhez.
6
Csatlakoztasson mikrofont.
2
Csatlakoztatás második monitorhoz a DVI-kábel segítségével.
7
Bemeneti hangforráshoz történő csatlakozás egy hangkábelen keresztül.
3
Csatlakozás egy hálózathoz LAN kábellel.
8
USB-eszköz csatlakoztatása.
4
USB-eszköz csatlakoztatása.
9
Csatlakozás egy PC-hez a D-SUB kábellel.
5
Csatlakozás egy kimeneti hangrendszerhez, például fejhallgatóhoz.
[Polski]
1
Umożliwia podłączenie przewodu zasilającego.
6
Gniazdo podłączenia mikrofonu.
2
Umożliwia podłączenie drugiego monitora przy pomocy kabla DVI.
7
Podłączyć do źródła wejściowego sygnału audio za pomocą kabla audio.
3
Podłączenie do sieci za pomocą kabla LAN.
8
Podłącz urządzenie USB.
4
Podłącz urządzenie USB.
9
Podłączenie do komputera za pomocą kabla D-SUB.
5
Podłączenie do wyjściowego urządzenia audio, na przykład słuchawek.
[Português]
1
Para ligar ao cabo de alimentação.
6
Ligar a um microfone.
2
Para ligar a um monitor secundário utilizando o cabo DVI.
7
Ligue a uma fonte de entrada áudio utilizando um cabo áudio.
3
Para ligar a uma rede utilizando um cabo LAN.
8
Ligue a um dispositivo USB.
4
Ligue a um dispositivo USB.
9
Para ligar a um PC utilizando o cabo D-SUB.
5
Para ligar a um dispositivo de saída de áudio, tal como auscultadores.
[Türkçe]
1
Güç kablosuna bağlanır.
6
Bir mikrofona bağlayın.
2
Bir ikincil monitöre DVI kablosu kullanarak bağlanır.
7
Ses kablosu kullanarak ses giriş kaynağına bağlanın.
3
LAN kablosuyla ağa bağlanır.
8
USB aygıtını takın.
4
USB aygıtını takın.
9
D-SUB kablosunu kullanarak PC'ye bağlanır.
5
Kulaklık gibi bir ses giriş aygıtına bağlanır.
[한국어]
1
전원 케이블을 연결할 때 사용합니다.
6
마이크를 연결할 때 사용합니다.
2
DVI 케이블을 사용하여 확장 모니터를 연결할 때 사용합니다.
7
오디오 케이블을 이용해 사운드를 입력할 때 사용합니다.
3
LAN 케이블을 이용해 네트워크를 연결할 때 사용합니다.
8
USB장치를 연결할 때 사용합니다.
4
USB장치를 연결할 때 사용합니다.
9
D-SUB케이블을 사용하여 PC와 연결할 때 사용합니다.
5
헤드폰 등의 음향기기를 연결할 때 사용합니다.
]ةيبرعلا[
6
1
7
.DVI
2
.USB
8
.LAN
3
.D-SUB
9
.USB
4
5
SOLO MÉXICO
IMPORTADO POR :
GENERAL MARIANO ESCOBEDO 476 PISO 8
COL. ANZURES, DELEGACIÓN MIGUEL HIDALGO, MÉXICO, DISTRITO FEDERAL, C.P. 11590
TEL : 01 (55) 5747-5100 / 01 800 726 7864
Neptune2_WW_QSG_BN68-03899E-04.indb 2 2016-09-20 오후 3:09:44

