Alesis RECIRAL PRO Benutzerhandbuch
- Kategorie
- Musikinstrumente
- Typ
- Benutzerhandbuch
Dieses Handbuch eignet sich auch für

User Guide
English ( 3 – 14 )
Guía del usuario
Español ( 15 – 26 )
Guide d’utilisation
Français ( 27 – 38 )
Guida per l’uso
Italiano ( 39 – 50 )
Benutzerhandbuch
Deutsch ( 51 – 62 )
Appendix
English ( 63 )

2

3
User Guide (English)
Introduction
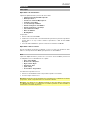
Box Contents
Recital Pro
Power Adapter
Music Rest
User Guide
Safety & Warranty Manual
Support
For the latest information about this product (system requirements, compatibility information,
etc.) and product registration, visit alesis.com.
For additional product support, visit alesis.com/support.
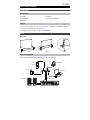
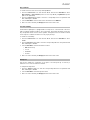
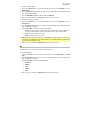
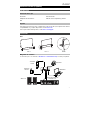
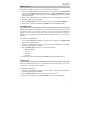
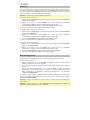
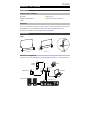
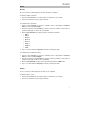
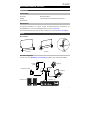
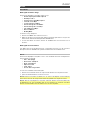
Setup
Music Rest:
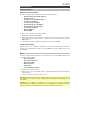
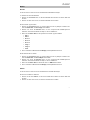
Connection Diagram
Items not listed in Introduction > Box Contents are sold separately.
Step 1 Step 2 Detail
Headphones
Computer
Speakers
Sustain
Pedal
Power
PA, Mixer, etc.

4
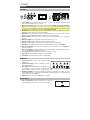
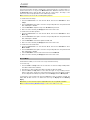
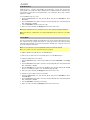
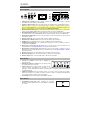
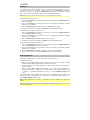
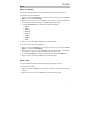
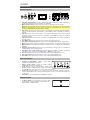
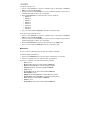
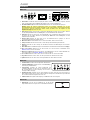
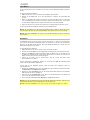
Features
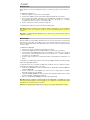
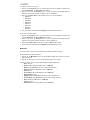
Top Panel
3 4
67
8
11
9
10
14
12 13
21
5
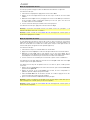
1. Power Switch: Turns the piano’s power on or off. To save energy, the piano will automatically
shut down after 30 minutes if it is not used.
2. Master Volume Knob: Adjusts the master volume for the Line Output and Headphone Output.
Note: If the internal speakers do not produce any sound, check that the Master Volume knob is
not set too low or if headphones are plugged into the Headphone Output. The speakers will be
muted if there are headphones plugged into the Headphone Output.
3. Demo Button: Press this button to start or stop Demo playback. Press the Demo button and the
Play button at the same time to enter Record Mode.
4. Play Button: Press this button to start or stop playback of the user-recorded song. Press the
Play button and the Demo button at the same time to enter Record Mode.
5. Function Button: Press this button to enter Function mode, which enables you to edit various
settings.
6. Metronome Button: Press this button to turn the metronome on or off.
7. Transpose Button: Press this button to edit the Transpose setting.
8. Display: Use this display to view Recital Pro’s menus, parameters, and settings.
9. Value Dial: Use this dial to navigate menus and change parameter values in the Display.
10. Voice Select Buttons: Press one of these buttons to select a preset voice. See Operation >
Voices to learn more.
11. Effect Select Buttons: Press these buttons to turn the Modulation, Chorus, and Reverb effects
on or off. See Operation > Effects to learn more.
12. Lesson Button: Press this button to turn the Lesson Mode on or off.
13. Layer Button: Press this button to enter or exit Layer Mode.
14. Split Button: Press this button to enter or exit Split Mode.
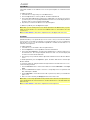
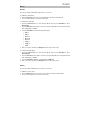
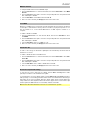
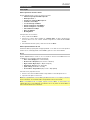
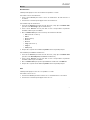
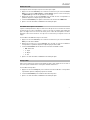
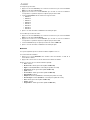
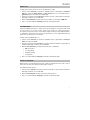
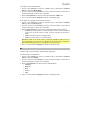
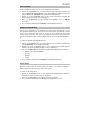
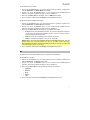
Rear Panel
1. Power Connector: Connect the included power
adapter here.
2. Sustain Pedal Input: Connect a standard 1/4” (6.35
mm) sustain pedal here.
3. Line Output: Connect external audio equipment such
as an amplifier, mixer, or recorder. Use the R and L
outputs for stereo output or just the L output for mono output.
4. Headphone Output: Connect stereo headphones with a 1/4” (6.35 mm) stereo (TRS) connector.
When headphones are connected, the internal speakers will automatically turn off and sound will
only be heard from the headphones.
5. USB Port: Allows for transfer of MIDI data to a computer.
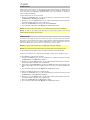
Bottom Panel
1. Battery Compartment: Install 6 “D” batteries here to power the
Recital digital keyboard if you are not using the power adapter.
3 4215
1

5
Operation
Quick Start
Playing Demo Songs
The Recital Pro digital piano features 10 demo songs:
• Fantaisie-Impromptu in C# Minor Opus 66
• Etude Opus 25 No. 1
• Polonaise No. 6 in A Flat Major Opus 53
• Sonata No. 16 in C Major
• Toccata and Fugue in D Minor
• Prelude and Fugue No. 30 in D Minor
• Prelude and Fugue No. 1 in C Major
• Suite of Minuets in F Major
• Danse des Mirlitons
• Wedding March
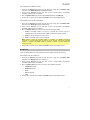
To play the demo songs:
1. Press and release the Demo button.
2. Select the Demo Song using the Value Dial. The piano will play the demo songs in a
continuous loop. While playing, the Demo button LED will flash.
3. To exit Demo Mode, press and release the Demo button again.
Playing Voice Demos
Each Voice button on the panel is preset with a voice demo. To play the voice demo, press
and hold the Demo button and then press one of the Voice buttons.
Voices
The Recital Pro digital piano features 12 voices. Each of the 6 Voice buttons has an Original
voice and a Variation voice to choose from:
• Piano / Piano (Bright)
• Electric Piano / Vibraphone
• Organ / Church Organ
• Harpsichord / Clavi
• Synth / Strings
• Acoustic Bass / Fingered Bass
To select and play a voice:
1. Press one of the Voice buttons. The corresponding LED will be lit for that voice.
2. Play the keys to hear the voice.
Note: Press a Voice button repeatedly to switch between the Original and the Variation voices
of the button. The corresponding LED will be lit for the selected voice.
Note: If you are using an Original voice, pressing another Voice button will select the Original
voice of the button. If you are using a Variation voice, pressing another Voice button will select
the Variation voice of the button.

6
Layer Mode
Layer Mode enables for two different voices to be layered together for a fuller and richer
sound.
To enable Layer Mode:
1. Select the first voice by pressing one of the Voice buttons.
2. Press the Layer button to enter Layer Mode. The button LED will be lit.
3. Press and hold the Layer button and then press a Voice button to select the second voice
you want to play. The corresponding LED will be lit for that voice, and the display will show
the name of the second voice with the indicator R2.
4. Play the keys to hear the two different voices layered together.
To disable Layer Mode, press the Layer button again.
Note: When you are selecting which voices will be layered, the first Voice button you press
will be set as the "Upper" voice, and the second Voice button you press will be set as the
"Lower" voice.
Note: See Voice Volume to learn how to adjust the levels of the Upper and Lower voices.
Split Mode
Split Mode enables you to split the 88 keys into two zones so that you can have two different
voices for each of your hands. For example, you may want the Piano voice for your right hand,
and the Bass voice for your left hand. When Split Mode is enabled, the left hand voice is
referred to as the Split voice.
To enable Split Mode:
1. Select the voice you would like to be in the right-hand zone.
2. Press the Split button to enter Split Mode. The button LED will be lit.
3. Press and hold the Split button, and then press a Voice button to select the Split voice for
the left-hand zone. The corresponding LED will be lit for that voice, and the display will
show the voice name with the indicator L.
4. Play the keys and you will hear that the right-hand and left-hand zones will have different
voices.
To disable Split Mode, press the Split button again. The button LED will turn off when Split
Mode is disabled.
To set the key where the split point between the right-hand voice and left-hand voice occurs,
use the following procedure:
1. Press the Function button to enter Function Mode, then turn the Value Dial to select Split
Point.
2. Press the Function button again to enter the corresponding menu. The parameter will
flash, indicating it is editable.
3. Use the Value Dial to set the value from 1 to 88, or press the key where you would like the
split to occur.
4. After 7 seconds of inactivity, the Display will return to the main screen.
Note: When you are using Split Mode and Layer Mode at the same time, the right-hand zone
of the split will play both of the layered voices, and the left-hand zone of the split will play the
Split voice only.
Note: See Voice Volume to learn how to adjust the level of the Split voice.

7
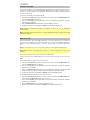
Voice Volume
To set the volume for each voice in Layer and Split Modes:
1. Press the Function button to enter Function Mode, then turn the Value Dial to select
Upper Volume or Lower Volume (for the voices in Layer Mode), or Split Volume (for the
split voice in Split Mode).
2. Press the Function button again to enter the corresponding menu. The parameter will
flash, indicating it is editable.
3. Turn the Value Dial to set the volume of the selected Voice from 000–127.
4. After 7 seconds of inactivity, the Display will return to the main screen.
Touch Sensitivity
The Recital Pro digital piano is equipped with touch response to control the level of the voice
with your playing strength—just like on an acoustic piano. That means the harder you play the
keys, the greater volume comes from the speakers. Turning this function off results in a fixed
touch response no matter how hard or how soft you play the keys.
To set the touch sensitivity:
1. Press the Function button to enter Function Mode, then turn the Value Dial to select
Touch.
2. Press the Function button again to enter the corresponding edit menu. The parameter will
flash, indicating it is editable.
3. Turn the Value Dial to select the desired touch level:
• Off: Fixed velocity
• 1: Soft
• 2: Medium
• 3: Hard
4. After 7 seconds of inactivity, the Display will return to the main screen.
Transpose
This function enables the overall pitch of the piano to be transposed up or down by a
maximum of one octave in semitone increments.
To change the transposition:
1. Press the Transpose button to enter the corresponding edit menu. The parameter will
flash, indicating it is editable.
2. Turn the Value Dial to set the transposition value.
3. After 7 seconds of inactivity, the Display will return to the main screen.

8
Metronome
The metronome feature provides a steady beat to aid in practicing at a consistent tempo. To
turn the metronome on or off, press the Metronome button. While the metronome is in use,
the Metronome button LED will flash along with the current tempo. The tempo of the
metronome can be freely adjusted from 30 to 280 beats per minute.
Note: The metronome cannot be used during Demo playback.
To set the metronome tempo:
1. Press the Function button to enter Function Mode, then turn the Value Dial to select
Tempo.
2. Press the Function button again to enter the corresponding edit menu. The parameter will
flash, indicating it is editable.
3. Turn the Value Dial to adjust the tempo from 30–280 beats per minute.
4. After 7 seconds of inactivity, the Display will return to the main screen.
To set the metronome time signature:
1. Press the Function button to enter Function Mode, then turn the Value Dial to select
Metro Sig.
2. Press the Function button again to enter the corresponding edit menu. The parameter will
flash, indicating it is editable.
3. Turn the Value Dial to set the time signature from 0, 2–9.
4. After 7 seconds of inactivity, the Display will return to the main screen.
To set the metronome volume level:
1. Press the Function button to enter Function Mode, then turn the Value Dial to select
Metro Volume.
2. Press the Function button again to enter the corresponding edit menu. The parameter will
flash, indicating it is editable.
3. Turn the Value Dial to set the volume of the metronome from 000–127.
4. After 7 seconds of inactivity, the Display will return to the main screen.
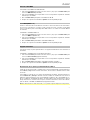
Record Mode
The Recital Pro enables you to record 1 user song to its internal memory.
To record a song:
1. Press the Demo and Play buttons at the same time to enter Recording Standby Mode.
The LEDs for both buttons will flash.
2. Play the keys to start recording. The LEDs for the buttons will be lit steadily.
3. Press the Demo and Play buttons at the same time again to stop recording. The two
buttons’ LEDs will no longer be lit. If the internal memory becomes full during recording,
the recording will automatically stop and be saved. The Display will show Memory Full.
To play back a user recorded song, press the Play button when recording is stopped. The
button LED will flash. If there is no data in the user song, the Display will show Memory
Empty.
Note: When you record a new song, the original data in the user song will be overwritten.
Note: See Restore Factory Default Settings to learn how to delete a user song.

9
Effects
Reverb
You can also add an adjustable reverb effect to your sound.
To enable the reverb effect:
1. Press the Reverb button to turn on the reverb effect. The button LED will be lit.
2. Press the button again to turn off the reverb effect.
To change the reverb type:
1. Press the Function button to enter Function Mode, then turn the Value Dial to select
Reverb Type.
2. Press the Function button again to enter the corresponding edit menu. The parameter will
flash, indicating it is editable.
3. Turn the Value Dial to select the desired reverb type:
• Hall 1
• Hall 2
• Room 1
• Room 2
• Room 3
• Stage 1
• Stage 2
• Plate
4. After 7 seconds of inactivity, the Display will return to the main screen.
To change the reverb depth:
1. Press the Function button to enter Function Mode, then turn the Value Dial to select
Reverb Depth.
2. Press the Function button again to enter the corresponding edit menu. The parameter will
flash, indicating it is editable.
3. Turn the Value Dial to adjust the reverb depth from 000–127.
4. After 7 seconds of inactivity, the Display will return to the main screen.
Chorus
You can also add an adjustable chorus effect to your sound.
To enable the chorus effect:
1. Press the Chorus button to turn on the chorus effect. The button LED will be lit.
2. Press the button again to turn off the chorus effect.

10
To adjust the chorus type:
1. Press the Function button to enter Function Mode, then turn the Value Dial to select
Chorus Type.
2. Press the Function button again to enter the corresponding edit menu. The parameter will
flash, indicating it is editable.
3. Turn the Value Dial to select the desired chorus type:
• Chorus 1
• Chorus 2
• Chorus 3
• Chorus 4
• Celeste 1
• Celeste 2
• Celeste 3
• Celeste 4
4. After 7 seconds of inactivity, the Display will return to the main screen.
To change the chorus depth:
1. Press the Function button to enter Function Mode, then turn the Value Dial to select
Chorus Depth.
2. Press the Function button again to enter the corresponding edit menu. The parameter will
flash, indicating it is editable.
3. Turn the Value Dial to adjust the chorus depth from 000–127.
4. After 7 seconds of inactivity, the Display will return to the main screen.
Modulation
You can also add an adjustable modulation effect to your sound.
To enable the modulation effect:
1. Press the Modulation button to turn on the modulation effect. The button LED will be lit.
2. Press the button again to turn off the modulation effect.
Each voice is matched with a preset modulation effect:
• Piano: Tremolo
• Electric Piano: Vibrato (Adjustable depth from 000–127)
• Organ: Rotary (Fast/Slow, controlled by Sustain Pedal)
• Harpsichord: Vibrato (Adjustable depth from 000–127)
• Synth: Tremolo
• Acoustic Bass: Vibrato (Adjustable depth from 000–127)
• Piano (Bright): Tremolo
• Vibraphone: Rotary (Fast/Slow, controlled by Sustain Pedal)
• Church Organ: Rotary (Fast/Slow, controlled by Sustain Pedal)
• Clavi: Vibrato (Adjustable depth from 000–127)
• Strings: Tremolo
• Fingered Bass: Vibrato (Adjustable depth from 000–127)

11
To change the vibrato depth:
1. Press the Function button to enter Function Mode, then turn the Value Dial to select
Vibrato Depth.
2. Press the Function button again to enter the corresponding edit menu. The parameter will
flash, indicating it is editable.
3. Turn the Value Dial to adjust the vibrato depth from 000–127.
4. After 7 seconds of inactivity, the Display will return to the main screen.
To change the rotary speed setting:
1. Press the Function button to enter Function Mode, then turn the Value Dial to select
Rotary Speed.
2. Press the Function button again to enter the corresponding edit menu. The parameter will
flash, indicating it is editable.
3. Turn the Value Dial to change the rotary speed setting:
• Pedal: The rotary speed is controlled by the Sustain Pedal. Press the pedal to set
the rotary speed to fast, and release the pedal to set the rotary speed to slow.
• Slow: The rotary speed is set to slow.
• Fast: The rotary speed is set to fast.
Note: When the rotary speed setting is set to Pedal, the Sustain Pedal cannot be used to
sustain the sound. When the rotary speed setting is set to Slow or Fast, the Sustain Pedal
can be used to sustain the sound.
4. After 7 seconds of inactivity, the Display will return to the main screen.
EQ
The EQ function controls the gain of different frequency bands.
To change the EQ type:
1. Press the Function button to enter Function Mode, then turn the Value Dial to select EQ
Type.
2. Press the Function button again to enter the corresponding edit menu. The parameter will
flash, indicating it is editable.
3. Turn the Value Dial to select the desired EQ type:
• Standard
• Modern
• Rock
• Classic
• Jazz
4. After 7 seconds of inactivity, the Display will return to the main screen.

12
Pedal Resonance
Pedal resonance is a function that simulates the reverberation of notes when pressing the
sustain pedal on an actual piano. With Pedal Resonance enabled, Recital Pro reproduces the
rich harmonics and unique sound characteristics of an actual piano when using a sustain
pedal (not included).
To turn Pedal Resonance on or off:
1. Press the Function button to enter Function Mode, then turn the Value Dial to select
Resonance.
2. Press the Function button again to enter the corresponding edit menu. The parameter will
flash, indicating it is editable.
3. Turn the Value Dial to turn Resonance on or off.
4. After 7 seconds of inactivity, the Display will return to the main screen.
Note: When Pedal Resonance is activated, the chorus effect will automatically be disabled.
Note: There may be a slight pause in sound if Pedal Resonance is turned on or off while
playing.
Lesson Mode
The Lesson Mode feature divides the keyboard into two zones with the same pitch and voice.
This enables both the student and teacher to easily watch and/or play together during
instruction without having to move away from the piano and take turns or having to reach over
each other to play the same pitch.
Note: In Lesson Mode, the Layer and Split Modes will be automatically disabled.
Note: Lesson Mode cannot be selected during Demo playback.
To enable or disable Lesson Mode, press the Lesson button.
To select a voice for both zones in Lesson Mode, press one of the Voice buttons.
To change the split point in Lesson Mode:
1. Press the Function button to enter Function Mode, then turn the Value Dial to select Split
Point.
2. Press the Function button again to enter the corresponding edit menu. The parameter will
flash, indicating it is editable.
3. Use the Value Dial to set the value from 28–64, or press the key between C3 and C6
where you would like the split to occur. The default split point is E3.
4. After 7 seconds of inactivity, the Display will return to the main screen.
To change the octave of both zones in Lesson Mode:
1. Press the Function button to enter Function Mode, then turn the Value Dial to select
Lesson Octave.
2. Press the Function button again to enter the corresponding edit menu. The parameter will
flash, indicating it is editable.
3. Turn the Value Dial to change the octave value.
4. After 7 seconds of inactivity, the Display will return to the main screen.

13
MIDI Out Channel
To change the MIDI channel for the USB MIDI output:
1. Press the Function button to enter Function Mode, then turn the Value Dial to select MIDI
Channel.
2. Press the Function button again to enter the corresponding edit menu. The parameter will
flash, indicating it is editable.
3. Turn the Value Dial to set the MIDI channel from 01–16.
4. After 7 seconds of inactivity, the Display will return to the main screen.
Local MIDI
When the Local MIDI function is turned off, the keyboard will be disconnected from the internal
sound engine so that Recital Pro will not produce sound when you play the keyboard. You can
then use Recital Pro to control external MIDI devices or MIDI sequencer software on a
computer.
To enable or disable Local MIDI:
1. Press the Function button to enter Function Mode, then turn the Value Dial to select
Local MIDI.
2. Press the Function button again to enter the corresponding edit menu. The parameter will
flash, indicating it is editable.
3. Turn the Value Dial to turn to Local MIDI on or off.
4. After 7 seconds of inactivity, the Display will return to the main screen.
Auto Power Off
In order to save energy, the Recital Pro digital piano will automatically shut down after 30
minutes if it is not used.
To enable or disable the Auto Power Off function:
1. Press the Function button to enter Function Mode, then turn the Value Dial to select Auto
Power Off.
2. Press the Function button again to enter the corresponding edit menu. The parameter will
flash, indicating it is editable.
3. Turn the Value Dial to turn to enable or disable Auto Power Off.
4. After 7 seconds of inactivity, the Display will return to the main screen.
Restore Factory Default Settings
To clear the user song to and reset it to default, hold the Demo and Play buttons while
powering on Recital Pro. This will delete all Song data.
To reset Recital Pro to factory default settings, hold the Metronome and Transpose buttons
while powering on. The following parameters will be reset to their default values: Reverb Type
and Depth, Chorus Type and Depth, EQ Type, Vibrato Depth, Rotary Speed, Metronome
Tempo, Metronome Time Signature, Metronome Volume, Upper Volume, Lower Volume, Split
Volume, Split Point, MIDI Channel, Touch Sensitivity, and Auto Power Off.
Note: All user data will be deleted and cannot be recovered after this operation.

14
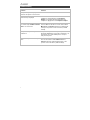
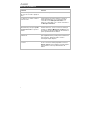
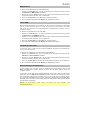
Troubleshooting
Problem Solution
The speakers produce a pop sound
whenever the power is turned on/off.
This is normal and is not cause for alarm.
The speakers do not produce sound
when the keys are played.
Check if the master volume is set too low or if
headphones are plugged into the Headphone
Output. The speakers will be muted if there are
headphones plugged into the Headphone Output.
The volume of the speakers is too
low even though the Master Volume
Knob is set to the max.
Check the volumes under Voice Volume in the
Function Menu. If that does not work, then hold the
Metronome and Transpose buttons together while
turning on the power to restore the factory default
settings.
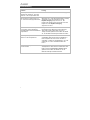
The speakers are producing noise or
interference.
Using a mobile phone in close proximity to the
Recital Pro digital piano may produce interference. To
prevent this, turn off the mobile phone or keep it
away from the piano.
Certain notes produce the wrong
pitch.
Make sure that the transpose value is set to 0. If that
does not work, then hold the Metronome and
Transpose buttons together while turning on the
power to restore the factory default settings.

15
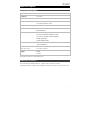
Guía del usuario (Español)
Introducción
Contenido de la caja
Recital Pro
Adaptador de alimentación
Atril
Guía del usuario
Manual sobre la seguridad y garantía
Soporte
Para obtener la información más completa acerca de este product (los requisitos del sistema,
compatibilidad, etc) y registro del producto, visite alesis.com.
Para soporte adicional del producto, visite alesis.com/support.
Instalación
Atril:
Diagrama de conexión
Los elementos que no se enumeran en Introducción > Contenido de la caja se venden por separado.
Auriculares
Ordenador
Altavoces
Sostenido
Pedal
Suministro
eléctrico
Paso 1 Paso 2 Detalle
Sistema de megafonía,
mezclador, etc.

16
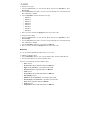
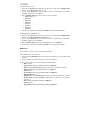
Características
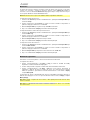
Panel superior
3 4
67
8
11
9
10
14
12 13
21
5
1. Interruptor de encendido: Enciende y apaga el teclado. Para ahorrar energía, el piano se apagará
automáticamente tras 30 minutos de inactividad.
2. Perilla de volumen maestro: Ajusta el volumen maestro de la salida de línea y la salida para auriculares.
Nota: Si los altavoces internos no emiten ningún sonido, compruebe si la perilla volumen maestro no
tiene un ajuste demasiado bajo o si los auriculares están conectados a la salida para auriculares. Los
altavoces se silenciarán si se conectan auriculares a la salida para auriculares.
3. Botón Demo (Demostración): Pulse este botón para iniciar o detener la reproducción en modo Demo.
Pulse los botones Demo y Play al mismo tiempo para activar el modo Record (Grabación).
4. Botón Play (Reproducción): Pulse este botón para iniciar o detener la reproducción de la canción grabada
por el usuario. Pulse los botones Play y Demo al mismo tiempo para activar el modo Record (Grabación).
5. Botón Function (Function): Pulse este botón para activar el modo Function (Función), que le permite
editar diversos ajustes.
6. Botón de metrónomo: Pulse este botón para encender o apagar el metrónomo.
7. Botón Transpose (Transposición): Pulse este botón para editar el ajuste Transpose.
8. Pantalla: Utilice esta pantalla para ver los menús, parámetros y ajustes del Recital Pro.
9. Cuadrante Value (Valor): Utilice este cuadrante para navegar por los menús y cambiar los valores de
los parámetros en la pantalla:
10. Botones Voice Select (Selección de voz): Pulse uno de estos botones para seleccionar una voz
predeterminada. Consulte Funcionamiento > Voces para más información.
11. Botones Effect Select (Selección de efecto): Pulse este botón para activar o desactivar los efectos
Modulation, Chorus y Reverb (Modulación, Coro y Reverberación). Consulte Funcionamiento > Efectos
para más información.
12. Botón de lección: Pulse este botón para activar o desactivar el modo de lección.
13. Botón Layer (Capas): Pulse este botón para activar o salir del modo Layer (Capas).
14. Botón de división: Pulse este botón para entrar o salir del modo de división.
Panel trasero
1. Conector de corriente: Conecte aquí el adaptador de
corriente incluido.
2. Entrada para pedal de sostenido: Conecte aquí un pedal
TS estándar de 6,35 mm (1/4 pulg.).
3. Salida de línea: Conecte aquí un equipo de audio externo,
como por ejemplo un amplificador, un mezclador o una
grabadora. Use las salidas R y L para obtener una salida estéreo o la salida L solamente para obtener
una salida monoaural.
4. Salida para auriculares: Conecte auriculares estéreo con conector estéreo de 6,35 mm (1/4 pulg.).
Cuando los auriculares se encuentran conectados, los altavoces internos se apagarán automáticamente
y el sonido solo podrá escucharse desde los auriculares.
5. Puerto USB: Permite la transferencia de datos MIDI al ordenador.
Panel inferior
1. Compartimiento para pilas: Instale 6 baterías "D" aquí para
alimentar el teclado digital Recital si no está utilizando el adaptador
de corriente.
3 4215
1

17
Funcionamiento
Inicio rápido
Cómo reproducir canciones demo
El piano digital Recital Pro cuenta con 10 canciones demo:
• Fantaisie-Impromptu in C# Minor Opus 66
• Etude Opus 25 No. 1
• Polonaise No. 6 in A Flat Major Opus 53
• Sonata No. 16 in C Major
• Toccata and Fugue in D Minor
• Prelude and Fugue No. 30 in D Minor
• Prelude and Fugue No. 1 in C Major
• Suite of Minuets in F Major
• Danse des Mirlitons
• Wedding March
Para reproducir canciones demo:
1. Pulse y suelte el botón Demo.
2. Seleccione la canción demo mediante el cuadrante Value. El piano reproducirá las
canciones demo en un ciclo continuo. Durante la reproducción, el LED del botón Demo
destella.
3. Para salir del modo Demo, pulse y suelte otra vez el botón Demo.
Cómo reproducir demos de voz
Cada botón Voice (Voz) del panel está preprogramado con un demo de voz. Para reproducir
el demo de voz, mantenga pulsado el botón Demo y pulse uno de los botones Voice.
Voces
El piano digital Recital Pro cuenta con 12 voces. Cada uno de los 6 botones Voice tiene una
voz Original y una voz Variation (Variación) para elegir:
• Piano / Piano (Bright) (Piano / Piano brillante)
• Electric Piano / Vibraphone (Piano eléctrico / Vibráfono)
• Organ / Church Organ (Órgano / Órgano de iglesia)
• Harpsichord / Clavi (Clavecín / Clavicordio)
• Synth / Strings (Sintetizador / Cuerdas)
• Acoustic Bass / Fingered Bass (Bajo acústico / Bajo digitado)
Para seleccionar y reproducir una voz:
1. Pulse uno de los botones Voice. El LED correspondiente se encenderá para esa voz.
2. Toque las teclas para escuchar la voz.
Nota: Pulse repetidamente un botón Voice para alternar entre las voces original y la variación
de la voz del botón. Se encenderá el LED correspondiente a la voz seleccionada.
Nota: Si está utilizando una voz original, al pulsar otro botón Voice se seleccionará la voz
original del botón. Si está utilizando una variación de voz, al pulsar otro botón Voice se
seleccionará la variación de voz del botón.

18
Modo de capas
El modo de capas permite tocar dos voces diferentes en capas para lograr un sonido más completo
y rico.
Para habilitar el modo de capas:
1. Seleccione la primera voz pulsando uno de los botones Voice.
2. Pulse el botón Layer para activar el modo de capas. Se encenderá el LED del botón.
3. Mantenga pulsado el botón Layer y pulse un botón Voice para seleccionar la segunda voz que
desea reproducir. Se encenderá el LED correspondiente a esa voz y la pantalla mostrará el
nombre de la segunda voz con el indicador R2.
4. Toque las teclas para oír las dos voces diferentes superpuestas en capas.
Para desactivar el modo de capas, presione el botón Layer otra vez.
Nota: La voz del primer botón Voice que pulse al seleccionar las voces para las capas será la voz
"superior" y la voz del segundo botón Voice que pulse será la voz "inferior".
Nota: Consulte Volumen de voz para saber cómo ajustar los niveles de las voces Upper (Superior) y
Lower (Inferior).
Modo de división
El modo de división le permite dividir las 88 teclas en dos zonas para que pueda tener dos voces
diferentes para cada una de sus manos. Por ejemplo, puede tener la voz de piano para su mano
derecha y la voz de bajo para su mano izquierda. Cuando el modo de división se encuentra
activado, la voz asignada a la mano izquierda se denomina la voz de división.
Para habilitar el modo de división:
1. Seleccione la voz que desea que esté en la zona derecha.
2. Pulse el botón Split para activar el modo Split (División). Se encenderá el LED del botón.
3. Mantenga pulsado el botón Split y pulse un botón Voice para seleccionar la voz dividida que
desea que esté en la zona izquierda. Se encenderá el LED correspondiente a esa voz y la
pantalla mostrará el nombre de la voz con el indicador L.
4. Toque las teclas y oirá que las zonas derecha e izquierda tienen voces diferentes.
Para desactivar el modo de división, pulse nuevamente el botón Split. El LED del botón Split se
apagará cuando se desactive el modo de división.
Para ajustar la tecla donde se produce el punto de división entre las voces de la derecha y la
izquierda, realice el siguiente procedimiento:
1. Pulse el botón Function para activar el modo de función y luego gire el cuadrante Value para
seleccionar Split Point (Punto de división).
2. Pulse el botón Function otra vez para abrir el menú correspondiente. El parámetro destellará,
indicando que está editable.
3. Utilice el cuadrante Value para ajustar el valor entre 1 y 88, o pulse la tecla donde desea que se
produzca la división.
4. Después de 7 segundos de inactividad, la pantalla volverá a la pantalla principal.
Nota: Cuando está utilizando el modo de división y el modo de capas al mismo tiempo, la zona
derecha de la división reproducirá las dos voces en capas y la zona izquierda de la división
reproducirá solo la voz dividida.
Nota: Consulte Volumen de voz para saber cómo ajustar el nivel de la voz dividida.

19
Volumen de voz
Para ajustar el volumen de cada voz en los modos de capas y de división:
1. Pulse el botón Function para activar el modo de función, luego gire el cuadrante Value
para seleccionar Upper Volume (Volumen de la voz superior) o Lower Volume (Volumen
de la voz inferior) (de las voces del modo de capas) o Split Volume (para la voz dividida
del modo de división).
2. Pulse el botón Function otra vez para abrir el menú correspondiente. El parámetro
destellará, indicando que está editable.
3. Gire el cuadrante Value para ajustar el volumen de la voz seleccionada entre 000–127.
4. Después de 7 segundos de inactividad, la pantalla volverá a la pantalla principal.
Sensibilidad táctil
El piano digital Recital Pro está equipado con una respuesta táctil para controlar el nivel de la
voz según la fuerza con la que toca—al igual que los pianos acústicos. Esto significa que
mientras más fuerte toque las teclas, mayor será el volumen que saldrá por los altavoces.
Apagar esta función genera una respuesta táctil fija, sin importar lo fuerte o suave que toque
las teclas.
Para ajustar la sensibilidad táctil:
1. Pulse el botón Function para activar el modo de función y luego gire el cuadrante Value
para seleccionar Touch (Táctil).
2. Pulse el botón Function otra vez para abrir el menú correspondiente. El parámetro
destellará, indicando que está editable.
3. Gire el cuadrante Value para seleccionar el nivel táctil deseado:
• Off: Velocidad fija
• 1: Suave.
• 2: Medio
• 3: Fuerte
4. Después de 7 segundos de inactividad, la pantalla volverá a la pantalla principal.
Transposición
Esta función permite transponer el tono general del piano hacia arriba o abajo en una octava
como máximo en incrementos de un semitono.
Para cambiar la transposición:
1. Pulse el botón Transpose para abrir el menú de edición correspondiente. El parámetro
destellará, indicando que está editable.
2. Gire el cuadrante Value para seleccionar el valor de transposición
3. Después de 7 segundos de inactividad, la pantalla volverá a la pantalla principal.

20
Metrónomo
La característica de metrónomo brinda un pulso constante para ayudar a practicar a un tempo
consistente. Para activar o desactivar el metrónomo, pulse el botón Metronome. Cuando el
metrónomo esté en uso, el LED del botón Metronome parpadeará al ritmo del tempo actual. El
tempo del metrónomo puede ajustarse libremente entre 30 y 280 beats por minuto.
Nota: Durante el modo de reproducción de demo no se puede utilizar el metrónomo.
Para ajustar el tempo del metrónomo:
1. Pulse el botón Function para activar el modo de función y luego gire el cuadrante Value para
seleccionar Tempo.
2. Pulse el botón Function otra vez para abrir el menú correspondiente. El parámetro destellará,
indicando que está editable.
3. Gire el cuadrante Value para ajustar el tempo entre 30–280 beats por minuto.
4. Después de 7 segundos de inactividad, la pantalla volverá a la pantalla principal.
Para ajustar la firma de tiempo del metrónomo:
1. Pulse el botón Function para activar el modo de función y luego gire el cuadrante Value para
seleccionar Metro Sig (Firma de tiempo).
2. Pulse el botón Function otra vez para abrir el menú correspondiente. El parámetro destellará,
indicando que está editable.
3. Gire el cuadrante Value para ajustar la firma de tiempo a 0, 2–9.
4. Después de 7 segundos de inactividad, la pantalla volverá a la pantalla principal.
Para ajustar el nivel de volumen del metrónomo:
1. Pulse el botón Function para activar el modo de función y luego gire el cuadrante Value para
seleccionar Metro Volume (Volumen del metrónomo).
2. Pulse el botón Function otra vez para abrir el menú correspondiente. El parámetro destellará,
indicando que está editable.
3. Gire el cuadrante Value para ajustar el volumen del metrónomo entre 000–127.
4. Después de 7 segundos de inactividad, la pantalla volverá a la pantalla principal.
Modo de grabación
El Recital Pro le permite grabar 1 canción del usuario en su memoria interna.
Para grabar una canción.
1. Pulse los botones Demo y Play al mismo tiempo para activar el modo Recording Standby
(Preparación para grabación). Destellarán los LED de ambos botones.
2. Toque las teclas para comenzar la grabación. Los LED de ambos botones se encenderán en
forma permanente.
3. Pulse los botones Demo y Play al mismo tiempo otra vez para detener la grabación. Se
apagarán los LED de los dos botones. Si la memoria interna se llena durante la grabación, ésta
se detendrá y se guardará automáticamente. Aparece en la pantalla Memory Full (Memoria
llena).
Para reproducir una canción grabada por el usuario, pulse el botón Play cuando la grabación está
detenida. Destellará el LED del botón. Si no hay datos en la canción del usuario, aparece en la
pantalla Memory Empty (Memoria vacía).
Nota: Cuando graba una nueva canción, se sobrescriben los datos originales de la canción del
usuario.
Nota: See Restauración de los ajustes predeterminado de fábrica para aprender cómo borrar
una canción del usuario.
Seite wird geladen ...
Seite wird geladen ...
Seite wird geladen ...
Seite wird geladen ...
Seite wird geladen ...
Seite wird geladen ...
Seite wird geladen ...
Seite wird geladen ...
Seite wird geladen ...
Seite wird geladen ...
Seite wird geladen ...
Seite wird geladen ...
Seite wird geladen ...
Seite wird geladen ...
Seite wird geladen ...
Seite wird geladen ...
Seite wird geladen ...
Seite wird geladen ...
Seite wird geladen ...
Seite wird geladen ...
Seite wird geladen ...
Seite wird geladen ...
Seite wird geladen ...
Seite wird geladen ...
Seite wird geladen ...
Seite wird geladen ...
Seite wird geladen ...
Seite wird geladen ...
Seite wird geladen ...
Seite wird geladen ...
Seite wird geladen ...
Seite wird geladen ...
Seite wird geladen ...
Seite wird geladen ...
Seite wird geladen ...
Seite wird geladen ...
Seite wird geladen ...
Seite wird geladen ...
Seite wird geladen ...
Seite wird geladen ...
Seite wird geladen ...
Seite wird geladen ...
Seite wird geladen ...
Seite wird geladen ...
-
 1
1
-
 2
2
-
 3
3
-
 4
4
-
 5
5
-
 6
6
-
 7
7
-
 8
8
-
 9
9
-
 10
10
-
 11
11
-
 12
12
-
 13
13
-
 14
14
-
 15
15
-
 16
16
-
 17
17
-
 18
18
-
 19
19
-
 20
20
-
 21
21
-
 22
22
-
 23
23
-
 24
24
-
 25
25
-
 26
26
-
 27
27
-
 28
28
-
 29
29
-
 30
30
-
 31
31
-
 32
32
-
 33
33
-
 34
34
-
 35
35
-
 36
36
-
 37
37
-
 38
38
-
 39
39
-
 40
40
-
 41
41
-
 42
42
-
 43
43
-
 44
44
-
 45
45
-
 46
46
-
 47
47
-
 48
48
-
 49
49
-
 50
50
-
 51
51
-
 52
52
-
 53
53
-
 54
54
-
 55
55
-
 56
56
-
 57
57
-
 58
58
-
 59
59
-
 60
60
-
 61
61
-
 62
62
-
 63
63
-
 64
64


Alesis RECIRAL PRO Benutzerhandbuch
- Kategorie
- Musikinstrumente
- Typ
- Benutzerhandbuch
- Dieses Handbuch eignet sich auch für
in anderen Sprachen
- français: Alesis RECIRAL PRO Mode d'emploi
- español: Alesis RECIRAL PRO Guía del usuario
- italiano: Alesis RECIRAL PRO Guida utente