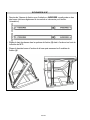
Thrustmaster F1 Wheel Add on Benutzerhandbuch
- Kategorie
- Spielsteuerung
- Typ
- Benutzerhandbuch


1/18
PC compatible
User Manual
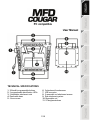
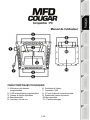
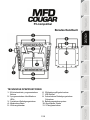
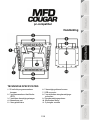
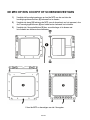
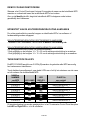
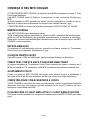
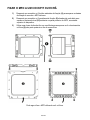
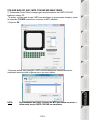
TECHNICAL SPECIFICATIONS
1. 28 backlit programmable buttons
2. 2 programmable identification LEDs
3. 2 adjustable attachment rods
4. Removable base
5. 4 bore covers
6. 2 attachment thumbscrews
7. USB connector
8. 2 removable rod attachment screws
9. Rod attachment system
10. Removable rod
11. 2 Plexiglas windows

2
/
18
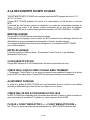
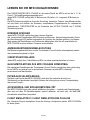
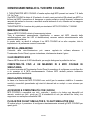
GETTING TO KNOW YOUR MFD COUGAR
The THRUSTMASTER MFD COUGAR is the exact replica of the MFDs equipping U.S. Air
Force F-16 fighters.
Each MFD COUGAR features 20 buttons and 4 switches, i.e. 28 buttons per MFD in total! The
MFD's features enable you to allocate advanced keyboard or mouse controls to the device and
to emulate various flight instruments, for enhanced gaming realism. THRUSTMASTER is the
creator of the HOTAS COUGAR and T.16000M simulation joysticks.
INTERNAL MEMORY
Each MFD COUGAR features an internal memory.
All personal settings (MFD identifier and number, backlighting intensity, identification LED
status) will automatically be saved in the device's memory.
This way, all settings and preferences are retained if you choose to connect your MFD
COUGAR to another computer.
BACKLIGHTING
The backlighting intensity can be software-adjusted, via the Thrustmaster Control Panel, or
hardware-adjusted, directly from within the game.
2 IDENTIFICATION LEDS
Each MFD features 2 identification LEDs, enabling you to tell the devices apart.
SIMULTANEOUSLY COMPATIBLE WITH UP TO 8 MFD COUGARS
The Thrustmaster Control Panel's advanced options enable you to adjust and control up to 8
MFDs simultaneously. Each MFD is therefore fully personalised and identifiable.
PHYSICAL ADJUSTMENT
The MFD COUGAR's base and window are mobile (for optimum comfort and visibility) and
removable (enabling users to attach them to a cockpit or a computer display).
ACCESSORIES AND GAMES COMPATIBILITY
The MFD COUGAR is compatible with all currently available controllers, joysticks and yokes,
as well as all PC simulation games (both military and civil) supporting multi-USB connectivity.
FLIGHT SIMULATOR X / FLIGHT SIMULATOR 2004 PLUG-INS
The included plug-ins enable you to instantly configure both MFD COUGARs for these games.

3/18
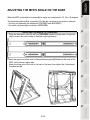
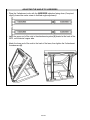
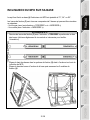
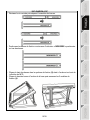
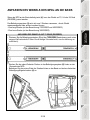
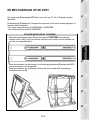
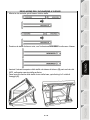
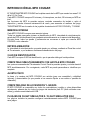
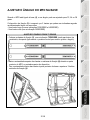
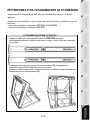
ADJUSTING THE MFD'S ANGLE ON THE BASE
When the MFD is attached to the base (4), its angle can be adjusted to 72, 54 or 39 degrees.
The attachment device (3) is comprised of 2 rods that can be set at an angle or removed:
- One long rod (featuring the indications 72DEGREE and 54DEGREE)
- One short rod (featuring the indication 39DEGREE)
ADJUSTING THE ANGLE TO 72 DEGREES
- Place the attachment rods (3), with the 72DEGREE indication facing down (if required,
slightly loosen the centre screw to facilitate angle adjustment).
- Insert the upper end of the rods in the attachment system (9) located at the back of the
MFD, on the device's upper side.
- Attach the lower end of the rods to the back of the base, then tighten the 2 attachment
thumbscrews (6).

4
/
18
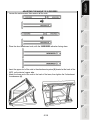
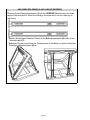
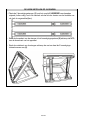
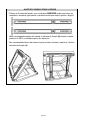
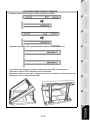
ADJUSTING THE ANGLE TO 54 DEGREES
- Place the 2 attachment rods, with the 54DEGREE indication facing down (if required,
slightly loosen the centre screw to facilitate angle adjustment).
- Insert the upper end of the rods in the attachment system (9) located at the back of the
MFD, on the device's upper side.
- Attach the lower end of the rods to the back of the base, then tighten the 2 attachment
thumbscrews (6).

5/18
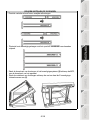
ADJUSTING THE ANGLE TO 39 DEGREES
- Loosen the centre screw, then remove all the rods.
- Place the short attachment rods, with the 39DEGREE indication facing down.
- Insert the upper end of the rods in the attachment system (9) located at the back of the
MFD, on the device's upper side.
- Attach the lower end of the rods to the back of the base, then tighten the 2 attachment
thumbscrews (6).

6
/
18
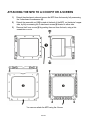
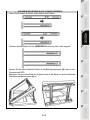
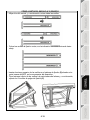
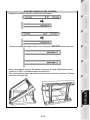
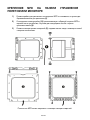
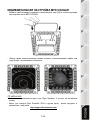
ATTACHING THE MFD TO A COCKPIT OR A SCREEN
1) Detach the attachment rods and remove the MFD from the base by fully unscrewing
the 2 attachment thumbscrews (6).
2) Detach the removable rod (10) located at the back of the MFD, on the device's upper
side, by fully unscrewing the 2 attachment screws (8) located to either side.
3) Remove the 4 bore covers (5) by pushing them out from the back, using a thin
screwdriver or a pin.
You can now attach the MFD using the 4 bores.

7/18
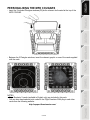
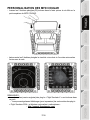
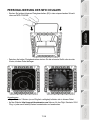
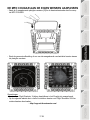
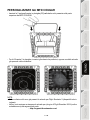
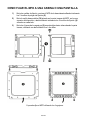
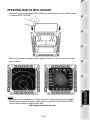
PERSONALISING THE MFD COUGARS
- Insert the 2 included Plexiglas windows (11) in the relevant slot located at the top of the
MFD COUGAR.
- Between the 2 Plexiglas windows, insert the relevant graphic or one of the cards supplied
with the pack.
NOTES:
- Flight Simulator X cards (available in English only) are included in this pack.
- You can also download and print cards for the Flight Simulator 2004 plug-in and other
cards from the following website:
http://support.thrustmaster.com/

8
/
18
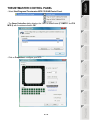
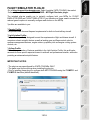
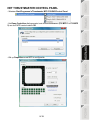
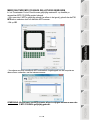
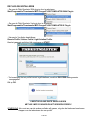
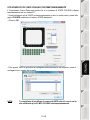
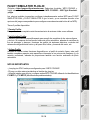
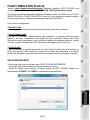
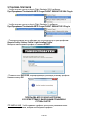
PC INSTALLATION
System requirements:
PC (Windows® Vista / 7 / 8 / 10) featuring 2 USB ports
1. Go to https://support.thrustmaster.com/. Select Joysticks / MFD COUGAR, then select
Drivers. Download and install the PC driver and its custom Windows Control Panel-based
interface.
2. After installing the PC driver, connect the USB connector to one of your PC’s USB ports.
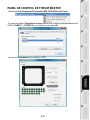
3. To access the Control Panel, select:
- Start / Applications / Thrustmaster MFD COUGAR / Control Panel or Start / Control
Panel (in Windows® 10 / 8.1 / 8)
- Start / All Programs / Thrustmaster MFD COUGAR / Control Panel or Start / Control Panel
(in Windows® 7 / Vista)
The Game controllers dialog box is displayed.
The device appears under the name F16 MFD, with the status OK.
4. In the Game Controllers dialog box, select Properties to test and view all functions.
T.A.R.G.E.T ADVANCED PROGRAMMING SOFTWARE
(Thrustmaster Advanced pRogramming Graphical EdiTor)
Go to https://support.thrustmaster.com. Select Joysticks / MFD COUGAR, then select
Software. Download and install the T.A.R.G.E.T advanced programming software.
T.A.R.G.E.T main specifications:
- Multiple configurations.
- Multiple programming levels: Basic, Advanced and Script.
- ‘Drag and Drop’ controls.
- Access to advanced profiles created by the Thrustmaster community.

9
/
18
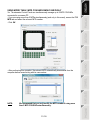
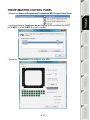
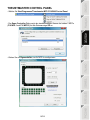
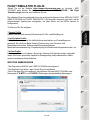
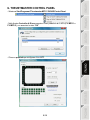
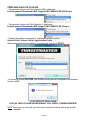
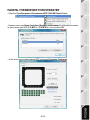
THRUSTMASTER CONTROL PANEL
- Select Start/Programs/Thrustmaster MFD COUGAR/Control Panel.
- The Game Controllers dialog displays the 2 MFD's default name (F16 MFD 1 and F16
MFD 2) with the status indication OK.
- Click on Properties to configure your MFD.

10
/
18
IDENTIFYING YOUR MFD COUGAR
When you open the Control Panel, the relevant MFD's name flashes for 2 seconds, enabling
you to tell it apart from the other devices.
If you click on the Identify tab, the relevant MFD starts flashing, allowing you to locate it
easily.
ADJUSTING THE BACKLIGHTING INTENSITY
All buttons' and identification LEDs backlighting can be software-adjusted or hardware-
adjusted.
ADJUSTING THE BACKLIGHTING FEATURE USING SOFTWARE
- In the Thrustmaster Control Panel, select the Backlit / LED Intensity tab.
ADJUSTING THE BACKLIGHTING FEATURE USING HARDWARE
(To adjust backlighting when playing)
- Simultaneously press buttons 14 + 15 + 25 to increase backlighting intensity
- Simultaneously press buttons 14 + 15 + 26 to increase reduce backlighting intensity
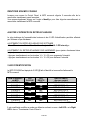
2 IDENTIFICATION LEDS
The MFD COUGAR features 2 LEDs (2), enabling users to easily identify and recognise the
relevant MFD.
Unless configured otherwise, both LEDs turn on or off according to the selected MFD's name
and number:
NAME and
NUMBER
of MFD LEFT-
HAND LED
LED
RIGHT
LOCATION
in a cockpit
F16 MFD 1 ON OFF LEFT-HAND MFD no. 1
F16 MFD 2 OFF ON RIGHT-HAND MFD no. 1
F16 MFD 3 ON ON LEFT-HAND MFD no. 2
F16 MFD 4 OFF OFF RIGHT-HAND MFD no. 2
F16 MFD 5 ON OFF LEFT-HAND MFD no. 3
F16 MFD 6 OFF ON RIGHT-HAND MFD no. 3
F16 MFD 7 ON ON LEFT-HAND MFD no. 4
F16 MFD 8 OFF OFF RIGHT-HAND MFD no. 4
This default mode can be modified by activating or deactivating the Left LED and Right LED
options in the Thrustmaster Control Panel.

11
/
18
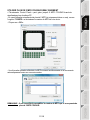
USING MORE THAN 2 MFD COUGARS SIMULTANEOUSLY
The Thrustmaster Control Panel can simultaneously manage up to 8 MFD COUGARs
connected to one same PC.
- If you are using more than 2 MFDs simultaneously (and only in this event), access the F16
MFD tab and select the relevant MFD number.
- Click OK.
- After performing this operation, the relevant MFD automatically disconnects from the
computer before reconnecting with its new number.
NOTE: We recommend that you only modify the MFD number if using more
than 2 MFD COUGARs simultaneously.

12
/
18
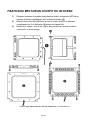
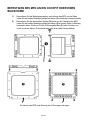
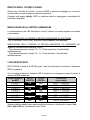
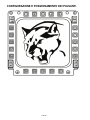
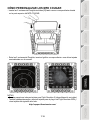
BUTTON CONFIGURATION AND LOCATION

13
/
18
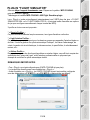
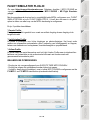
FLIGHT SIMULATOR PLUG-IN
Go to https://support.thrustmaster.com. Select Joysticks / MFD COUGAR, then select
Software. Download and install MFD COUGAR – MS Flight Simulator plugin.
The included plug-ins enable you to instantly configure both your MFDs for FLIGHT
SIMULATOR 2004 and FLIGHT SIMULATOR X (you therefore no longer need to access the
relevant game's options to manually configure each button on the MFDs).
3 profiles are available to you:
* Generic Profile:
This profile covers the most frequent requirements for both civil and military aircraft.
* Light Aviation Profile:
This profile is specifically designed to meet the requirements of light and leisure aircraft. It
comprises a basic autopilot feature as well as landing gear and flaps controls, electric
systems management features, engine mixture, propeller pitch and engine cooling system
controls, etc.
* Airliner Profile:
While offering a number of features available in the Light Aviation Profile, this profile also
accounts for more specific aspects inherent to airliners and professional aviation, while also
providing an advanced autopilot feature.
IMPORTANT NOTES
- The plug-ins are preconfigured for 2 MFD COUGARs ONLY!
- The game must not be running when installing the plug-ins.
- Prior to installing these plug-ins, configure both MFD COUGARs using the F16 MFD 1 and
F16 MFD 2 identifiers (default identifiers).

14
/
18
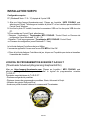
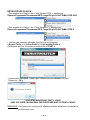
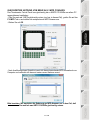
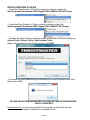
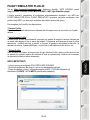
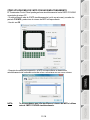
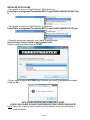
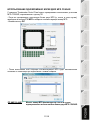
INSTALLING THE PLUG-INS
- To access the Flight Simulator 2004 plug-in, select:
Start/Programs/Thrustmaster MFD Cougar/FLIGHT SIMULATOR 2004 Plug-In
- To access the Flight Simulator X plug-in, select:
Start/Programs/Thrustmaster MFD Cougar/FLIGHT SIMULATOR X Plug-In
- After performing this operation, 3 profiles are available to you:
Generic Profile / Airliner Profile / Light Aviation Profile.
Choose the relevant profile, then click START.
- The SUCCESS pane displays, confirming that the profile has been installed correctly.
Click OK.
YOU ARE NOW READY TO PLAY
WITH YOUR 2 MFD COUGARS FEATURING THE RELEVANT PROFILE!
NOTE: To play with another profile, proceed as described above while selecting
the required profile.

15
/
18
IN OTHER GAMES
The MFD COUGAR is compatible with all PC simulation games (both military and civil
aviation simulators) supporting multi-USB connectivity.
To configure the MFD COUGAR in your game, access the game's Controller Options,
then manually allocate the required features to each of the MFD's buttons.
You only need to perform this operation once; the relevant setting will automatically be
saved in your game.
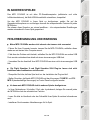
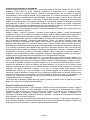
TROUBLESHOOTING AND WARNING
My MFD COUGARs are not recognised or disconnect unexpectedly.
- Shut down your computer, disconnect the MFD COUGARs, then reconnect them and
restart your computer.
- If this fails to solve the problem, connect the MFD COUGARs to other USB ports, or
connect them directly to a mains-powered USB hub.
- Avoid connecting your MFD COUGARs to an unpowered USB hub.
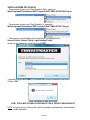
The Flight Simulator X and Flight Simulator 2004 plug-ins do not install or do not
operate correctly.
- Check that the game is not running prior to installing the plug-ins.
- Ensure that both MFD COUGARs have been configured with the identifiers F16 MFD 1
and F16 MFD 2 (default identifiers) in the Control Panel.
I can't configure my MFD COUGAR in other games.
- In your game's Options / Controllers / Pad or Joystick menu, manually allocate each of the
MFD's buttons to the required function.
- Please refer to your game's user manual or online help for more information.
- Install the latest updates for your game.

16
/
18
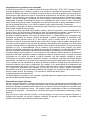
CONSUMER WARRANTY INFORMATION
Worldwide, Guillemot Corporation S.A., whose registered office is located at Place du Granier, B.P. 97143,
35571 Chantepie, France (hereinafter “Guillemot”) warrants to the consumer that this Thrustmaster product
shall be free from defects in materials and workmanship, for a warranty period which corresponds to the time
limit to bring an action for conformity with respect to this product. In the countries of the European Union, this
corresponds to a period of two (2) years from delivery of the Thrustmaster product. In other countries, the
warranty period corresponds to the time limit to bring an action for conformity with respect to the Thrustmaster
product according to applicable laws of the country in which the consumer was domiciled on the date of
purchase of the Thrustmaster product (if no such action exists in the corresponding country, then the warranty
period shall be one (1) year from the original date of purchase of the Thrustmaster product).
Notwithstanding the above, rechargeable batteries are covered by a warranty period of six (6) months from the
date of original purchase.
Should the product appear to be defective during the warranty period, immediately contact Technical Support,
who will indicate the procedure to follow. If the defect is confirmed, the product must be returned to its place of
purchase (or any other location indicated by Technical Support).
Within the context of this warranty, the consumer’s defective product shall, at Technical Support’s option, be
either replaced or returned to working order. If, during the warranty period, the Thrustmaster product is subject
to such reconditioning, any period of at least seven (7) days during which the product is out of use shall be
added to the remaining warranty period (this period runs from the date of the consumer’s request for
intervention or from the date on which the product in question is made available for reconditioning, if the date
on which the product is made available for reconditioning is subsequent to the date of the request for
intervention). If permitted under applicable law, the full liability of Guillemot and its subsidiaries (including for
consequential damages) is limited to the return to working order or the replacement of the Thrustmaster
product. If permitted under applicable law, Guillemot disclaims all warranties of merchantability or fitness for a
particular purpose.
This warranty shall not apply: (1) if the product has been modified, opened, altered, or has suffered damage as
a result of inappropriate or abusive use, negligence, an accident, normal wear, or any other cause unrelated to
a material or manufacturing defect (including, but not limited to, combining the Thrustmaster product with any
unsuitable element, including in particular power supplies, rechargeable batteries, chargers, or any other
elements not supplied by Guillemot for this product); (2) if the product has been used for any use other than
home use, including for professional or commercial purposes (game rooms, training, competitions, for
example); (3) in the event of failure to comply with the instructions provided by Technical Support; (4) to
software, said software being subject to a specific warranty; (5) to consumables (elements to be replaced over
the product’s lifespan: disposable batteries, audio headset or headphone ear pads, for example); (6) to
accessories (cables, cases, pouches, bags, wrist-straps, for example); (7) if the product was sold at public
auction.
This warranty is nontransferable.
The consumer’s legal rights with respect to laws applicable to the sale of consumer goods in his or her country
are not affected by this warranty.
Additional warranty provisions
During the warranty period, Guillemot shall not provide, in principle, any spare parts, as Technical Support is
the only party authorized to open and/or recondition any Thrustmaster product (with the exception of any
reconditioning procedures which Technical Support may request that the consumer carry out, by way of
written instructions – for example, due to the simplicity and the lack of confidentiality of the reconditioning
process – and by providing the consumer with the required spare part(s), where applicable).
Given its innovation cycles and in order to protect its know-how and trade secrets, Guillemot shall not provide,
in principle, any reconditioning notification or spare parts for any Thrustmaster product whose warranty period
has expired.
In the United States of America and in Canada, this warranty is limited to the product’s internal mechanism
and external housing. In no event shall Guillemot or its affiliates be held liable to any third party for any
consequential or incidental damages resulting from the breach of any express or implied warranties. Some
States/Provinces do not allow limitation on how long an implied warranty lasts or exclusion or limitation of
liability for consequential or incidental damages, so the above limitations or exclusions may not apply to you.
This warranty gives you specific legal rights, and you may also have other rights which vary from State to
State or Province to Province

17
/
18
Liability
If permitted under applicable law, Guillemot Corporation S.A. (hereinafter “Guillemot”) and its subsidiaries
disclaim all liability for any damages caused by one or more of the following: (1) the product has been
modified, opened or altered; (2) failure to comply with assembly instructions; (3) inappropriate or abusive use,
negligence, an accident (an impact, for example); (4) normal wear; (5) the use of the product for any use other
than home use, including for professional or commercial purposes (game rooms, training, competitions, for
example). If permitted under applicable law, Guillemot and its subsidiaries disclaim all liability for any damages
unrelated to a material or manufacturing defect with respect to the product (including, but not limited to, any
damages caused directly or indirectly by any software, or by combining the Thrustmaster product with any
unsuitable element, including in particular power supplies, rechargeable batteries, chargers, or any other
elements not supplied by Guillemot for this product).

18
/
18
FCC STATEMENT
1. This device complies with Part 15 of the FCC Rules. Operation is subject to the following two
conditions:
(1) This device may not cause harmful interference, and
(2) This device must accept any interference received, including interference that may cause undesired
operation.
2. Changes or modifications not expressly approved by the party responsible for compliance could void
the user's authority to operate the equipment.
COPYRIGHT
© 2017 Guillemot Corporation S.A. All rights reserved. Thrustmaster® is a registered trademark of
Guillemot Corporation S.A. Windows® is a registered trademark of Microsoft Corporation in the United
States and/or other countries. All other trademarks are the property of their respective owners. Illustrations
not binding. Contents, designs and specifications are subject to change without notice and may vary from
one country to another. Made in China.
ENVIRONMENTAL PROTECTION RECOMMENDATION
In the European Union: At the end of its working life, this product should not be
disposed of with standard household waste, but rather dropped off at a collection
point for the disposal of Waste Electrical and Electronic Equipment (WEEE) for
recycling.
This is confirmed by the symbol found on the product, user manual or packaging.
Depending on their characteristics, the materials may be recycled. Through recycling
and other forms of processing Waste Electrical and Electronic Equipment, you can
make a significant contribution towards helping to protect the environment.
Please contact your local authorities for information on the collection point nearest you.
For all other countries: Please adhere to local recycling laws for electrical and electronic equipment.
Retain this information. Colours and decorations may vary.
Plastic fasteners and adhesives should be removed from the product before it is used.
www.thrustmaster.com
*Applicable to EU and Turkey only
TECNICAL SUPPORT
https://support.thrustmaster.com
*
*

1
/
18
Compatible : PC
Manuel de l'utilisateur
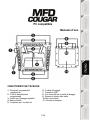
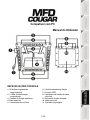
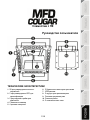
CARACTÉRISTIQUES TECHNIQUES
1. 28 boutons rétro-éclairés
programmables
2. 2 LED d’identification programmables
3. 2 barres de fixation ajustables
4. Base détachable
5. 4 caches « trou de vis »
6. 2 molettes de fixation
7. Connecteur USB
8. 2 Vis de fixation de la barre amovible
9. Système de fixation des barres
10. Barre amovible
11. 2 Fenêtres plexiglas
Seite laden ...
Seite laden ...
Seite laden ...
Seite laden ...
Seite laden ...
Seite laden ...
Seite laden ...
Seite laden ...
Seite laden ...
Seite laden ...
Seite laden ...
Seite laden ...
Seite laden ...
Seite laden ...
Seite laden ...
Seite laden ...
Seite laden ...
Seite laden ...
Seite laden ...
Seite laden ...
Seite laden ...
Seite laden ...
Seite laden ...
Seite laden ...
Seite laden ...
Seite laden ...
Seite laden ...
Seite laden ...
Seite laden ...
Seite laden ...
Seite laden ...
Seite laden ...
Seite laden ...
Seite laden ...
Seite laden ...
Seite laden ...
Seite laden ...
Seite laden ...
Seite laden ...
Seite laden ...
Seite laden ...
Seite laden ...
Seite laden ...
Seite laden ...
Seite laden ...
Seite laden ...
Seite laden ...
Seite laden ...
Seite laden ...
Seite laden ...
Seite laden ...
Seite laden ...
Seite laden ...
Seite laden ...
Seite laden ...
Seite laden ...
Seite laden ...
Seite laden ...
Seite laden ...
Seite laden ...
Seite laden ...
Seite laden ...
Seite laden ...
Seite laden ...
Seite laden ...
Seite laden ...
Seite laden ...
Seite laden ...
Seite laden ...
Seite laden ...
Seite laden ...
Seite laden ...
Seite laden ...
Seite laden ...
Seite laden ...
Seite laden ...
Seite laden ...
Seite laden ...
Seite laden ...
Seite laden ...
Seite laden ...
Seite laden ...
Seite laden ...
Seite laden ...
Seite laden ...
Seite laden ...
Seite laden ...
Seite laden ...
Seite laden ...
Seite laden ...
Seite laden ...
Seite laden ...
Seite laden ...
Seite laden ...
Seite laden ...
Seite laden ...
Seite laden ...
Seite laden ...
Seite laden ...
Seite laden ...
Seite laden ...
Seite laden ...
Seite laden ...
Seite laden ...
Seite laden ...
Seite laden ...
Seite laden ...
Seite laden ...
Seite laden ...
Seite laden ...
Seite laden ...
Seite laden ...
Seite laden ...
Seite laden ...
Seite laden ...
Seite laden ...
Seite laden ...
Seite laden ...
Seite laden ...
Seite laden ...
Seite laden ...
Seite laden ...
Seite laden ...
Seite laden ...
Seite laden ...
-
 1
1
-
 2
2
-
 3
3
-
 4
4
-
 5
5
-
 6
6
-
 7
7
-
 8
8
-
 9
9
-
 10
10
-
 11
11
-
 12
12
-
 13
13
-
 14
14
-
 15
15
-
 16
16
-
 17
17
-
 18
18
-
 19
19
-
 20
20
-
 21
21
-
 22
22
-
 23
23
-
 24
24
-
 25
25
-
 26
26
-
 27
27
-
 28
28
-
 29
29
-
 30
30
-
 31
31
-
 32
32
-
 33
33
-
 34
34
-
 35
35
-
 36
36
-
 37
37
-
 38
38
-
 39
39
-
 40
40
-
 41
41
-
 42
42
-
 43
43
-
 44
44
-
 45
45
-
 46
46
-
 47
47
-
 48
48
-
 49
49
-
 50
50
-
 51
51
-
 52
52
-
 53
53
-
 54
54
-
 55
55
-
 56
56
-
 57
57
-
 58
58
-
 59
59
-
 60
60
-
 61
61
-
 62
62
-
 63
63
-
 64
64
-
 65
65
-
 66
66
-
 67
67
-
 68
68
-
 69
69
-
 70
70
-
 71
71
-
 72
72
-
 73
73
-
 74
74
-
 75
75
-
 76
76
-
 77
77
-
 78
78
-
 79
79
-
 80
80
-
 81
81
-
 82
82
-
 83
83
-
 84
84
-
 85
85
-
 86
86
-
 87
87
-
 88
88
-
 89
89
-
 90
90
-
 91
91
-
 92
92
-
 93
93
-
 94
94
-
 95
95
-
 96
96
-
 97
97
-
 98
98
-
 99
99
-
 100
100
-
 101
101
-
 102
102
-
 103
103
-
 104
104
-
 105
105
-
 106
106
-
 107
107
-
 108
108
-
 109
109
-
 110
110
-
 111
111
-
 112
112
-
 113
113
-
 114
114
-
 115
115
-
 116
116
-
 117
117
-
 118
118
-
 119
119
-
 120
120
-
 121
121
-
 122
122
-
 123
123
-
 124
124
-
 125
125
-
 126
126
-
 127
127
-
 128
128
-
 129
129
-
 130
130
-
 131
131
-
 132
132
-
 133
133
-
 134
134
-
 135
135
-
 136
136
-
 137
137
-
 138
138
-
 139
139
-
 140
140
-
 141
141
-
 142
142
-
 143
143
-
 144
144
-
 145
145


Thrustmaster F1 Wheel Add on Benutzerhandbuch
- Kategorie
- Spielsteuerung
- Typ
- Benutzerhandbuch
in anderen Sprachen
- English: Thrustmaster F1 Wheel Add on User manual
- français: Thrustmaster F1 Wheel Add on Manuel utilisateur
- español: Thrustmaster F1 Wheel Add on Manual de usuario
- italiano: Thrustmaster F1 Wheel Add on Manuale utente
- Nederlands: Thrustmaster F1 Wheel Add on Handleiding
- português: Thrustmaster F1 Wheel Add on Manual do usuário