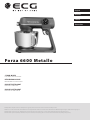
ECG FORZA 6600 Metallo Argento Stand Mixer Benutzerhandbuch
- Kategorie
- Küchenmaschinen
- Typ
- Benutzerhandbuch

Forza 6600 Metallo
English
Deutsch
Čeština
Slovenčina
Always read the safety&use instructions carefully before using your appliance for the rst time. The user´smanual must be always included.
Bitte lesen Sie vor der Inbetriebnahme des Produktes diese Anleitung und die darin enthaltenen Sicherheitshinweise aufmerksam durch. Die Bedienungsanleitung muss dem Gerät immer beigelegt sein.
Před uvedením výrobku do provozu si důkladně pročtěte tento návod abezpečnostní pokyny, které jsou vtomto návodu obsaženy. Návod musí být vždy přiložen kpřístroji.
Pred uvedením výrobku do prevádzky si dôkladne prečítajte tento návod abezpečnostné pokyny, ktoré sú vtomto návode obsiahnuté. Návod musí byť vždy priložený kprístroju.
STAND MIXER
INSTRUCTION MANUAL
KÜCHENMASCHINE
BEDIENUNGSANLEITUNG
KUCHYŇSKÝ ROBOT
NÁVOD KOBSLUZE
KUCHYNSKÝ ROBOT
NÁVOD NA OBSLUHU

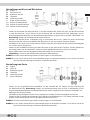
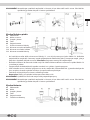
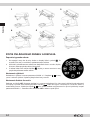
DESCRIPTION / BESCHREIBUNG / POPIS / POPIS

English
1. Head shaft
2. Release lever for multifunction
head
3. Touch control panel
4. Stainless steel bowl
5. Kneading hook
6. Mixing whisk
7. Beater
8. Removable bowl cover
9. Accessory bracket with locking
screw
10. Multifunctional head
11. Base
Meat grinder + accessories for
sausages and pasta
M1 Tamper
M2 Meat bowl
M3 Machine with funnel
M4 Screw conveyor
M5 Lock nut
M6 Blade
M7 Meat grinder sieves - ne (3
mm), medium (5 mm) and
coarse (8 mm)
S1 Sausage attachment holder
S2 S2-1 attachment for thick
sausages, S2-2 for medium size,
S2-3 for thin sausages
P1 Pasta shapes
Grater
V1 Tamper
V2 Grater machine with funnel
V3 Fine grater
V4 Coarse grater
V5 Slicer
Deutsch
1. Schachtkopf
2. Entriegelungshebel für
Multifunktionskopf
3. Berührungsdisplay
4. Schale aus rostfreiem Stahl
5. Knethaken
6. Rührbesen
7. Quirl
8. Abnehmbare
Schüsselabdeckung
9. Zubehörhalterung mit
Feststellschraube
10. Multifunktionaler Kopf
11. Gerätebasis
Fleischwolf + Zubehör für Wurst
und Nudeln
M1 Stopfer
M2 Fleischschüssel
M3 Mahlwerk mit Hals
M4 Schnecke
M5 Sicherungsmutter
M6 Klinge
M7 Fleischwolfsiebe - fein (3 mm),
mittel (5 mm) und grob (8 mm)
S1 Halter für Wurstaufsatz
S2 S2-1 Aufsatz für dicke Würste,
S2-2 für mittelgroße, S2-3 für
dünne Würste
P1 Pasta-Schablone
Reibe
V1 Stopfer
V2 Mahlwerk der Reibe mit Hals
V3 Feine Reibe
V4 Grobe Reibe
V5 Reibe für Scheiben
Čeština
1. Hřídel hlavy
2. Uvolňovací páčka multifunkční
hlavy
3. Dotykový ovládací panel
4. Nerezová mísa
5. Hnětací hák
6. Mísící metla
7. Šlehací metla
8. Odnímatelný kryt na mísu
9. Záslepka unašeče pro
příslušenství s aretačním
šroubem
10. Multifunkční hlava
11. Základna
Mlýnek na maso + příslušenství
na klobásy a těstoviny
M1 Pěchovadlo
M2 Miska na maso
M3 Strojek s jícnem
M4 Šnek
M5 Pojistná matice
M6 Čepel
M7 Sítka k mlýnku na maso – jemné
(3 mm), středně hrubé (5 mm) a
hrubé (8 mm)
S1 Držák nástavce na klobásy
S2 S2-1 nástavec na na tlusté
klobásy, S2-2 na střední
velikost, S2-3 na tenké klobásy
P1 Tvořítko na těstoviny
Struhadlo
V1 Pěchovadlo
V2 Strojek struhadla s jícnem
V3 Jemné struhadlo
V4 Hrubé struhadlo
V5 Struhadlo na plátky
Slovenčina
1. Hriadeľ hlavy
2. Uvoľňovacia páka
multifunkčnej hlavy
3. Dotykový ovládací panel
4. Misa z nehrdzavejúcej ocele
5. Hnetací hák
6. Miesiaca metla
7. Šľahacia metla
8. Odnímateľný kryt misy
9. Držiak príslušenstva s poistnou
skrutkou
10. Multifunkčná hlava
11. Základňa
Mlynček na mäso + príslušenstvo
na klobásy a cestoviny
M1 Zatláčadlo
M2 Miska na mäso
M3 Strojček smlecou komorou
M4 Závitovka
M5 Poistná matica
M6 Čepeľ
M7 Sitá na mletie mäsa - jemné (3
mm), stredné (5 mm) a hrubé (8
mm)
S1 Držiak nadstavca na klobásy
S2 Nástavec S2-1 na hrubé klobásy,
S2-2 na stredne hrubé klobásy,
S2-3 na tenké klobásy
P1 Formičky na cestoviny
Strúhadlo
V1 Zatláčadlo
V2 Strojček strúhadla smlecou
komorou
V3 Jemné strúhadlo
V4 Hrubé strúhadlo
V5 Strúhadlo na plátky

English
English
4
STAND MIXER
SAFETY INSTRUCTIONS
Read carefully and save for future use!
Warning: The safety measures and instructions, contained in this
manual, do not include all conditions and situations possible. The user
must understand that common sense, caution and care are factors
that cannot be integrated into any product. Therefore, these factors
shall be ensured by the user/s using and operating this appliance. We
are not liable for damages caused during shipping, by incorrect use,
voltage uctuation or the modication or adjustment of any part of
the appliance. To protect against a risk of re or electric shock, basic
precautions shall be taken while using electrical appliances, including
the following:
1. Make sure the voltage in your outlet corresponds to the voltage
provided on the appliance label and that the socket is properly
grounded. The outlet must be installed in accordance with
applicable electrical codes according to EN.
2. Never use the appliance if the power cable is damaged. All repairs,
including cord replacements, must be carried out at a professional
service centre! Do not remove the protective covers from the
appliance; there is a risk of electric shock!
3. Do not allow the power cord to touch hot surfaces or run the cord
over sharp edges.
4. Protect the appliance from direct contact with water and other
liquids to prevent electric shock.
5. Do not use the appliance outdoors and in wet environment and do
not touch the power cable or the appliance with wet hands. Risk of
electric shock.
6. The appliance is not intended for use with timers or other remote
control systems. There is a risk of re if the appliance is covered or
incorrectly positioned at the time of start-up.
7. Do not immerse the motor base and power cord in water or other
liquids. Do not rinse under running water. Prevent liquids getting
into the unit with the motor.
Stand mixer
English

English
English
5
8. Pay closer attention when using the appliance near children.
9. The appliance should not be left unattended during operation.
10. We recommend that you do not leave the appliance with plugged
in power cable unattended.
11. Before carrying out maintenance, assembly / disassembly, changing
accessories or when the appliance is no longer in use, switch o the
appliance and unplug it. Do not remove the power cord from the
outlet by yanking the cord. Unplug the power cord from the outlet
by grasping the plug.
12. Always wait for all parts to come to a complete stop before
disassembling. The appliance needs approximately 20 minutes to
cool down for safe handling and cleaning.
13. Do not use the appliance close to a source of heat, e. g. oven. Protect
it against direct sunlight.
14. Do not put the appliance on the wall or on top of other appliances.
Leave at least 10 cm of free space on the back and on the side and
10 cm of free space above the appliance.
15. Always use the appliance on an even and stable surface. Do not
place any objects on the appliance. Make sure that the appliance
is placed at least 10 cm from the edge of the kitchen counter. Also,
that no openings are blocked.
16. Before the rst use, we recommend washing all parts that come into
contact with food, see the section "Cleaning and maintenance".
17. Never cover the appliance during operation and do not use it close
to ammable materials, e. g. curtains, etc.
18. Do not touch the moving parts.
19. Long hair, loose clothing or accessories and jewelry can be caught
by the rotating parts of the appliance. Make sure that your hair,
clothing and accessories do not come in dangerous proximity to
rotating parts!
20. Do not switch on the appliance without food inserted (empty)!
21. Clean the appliance immediately after each use. Wipe the body
of the appliance only with a damp cloth when cleaning. Do not
immerse it in water.
Stand mixer
English

English
English
6
22. Use accessories only advised by the manufacturer, otherwise you
risk losing the warranty.
23. Do not exceed the maximum continuous running time of the
appliance. Allow the appliance to cool down suciently before
using it again. :Note for each accessory these times are determined
dierently, see the information in the manual below.
24. Use this appliance only in accordance with the instructions in this
manual.
25. This appliance is designed for domestic use only. It is also designed
for use in kitchen areas for employees, shops, oces and other
work environments. It also applies to hotels, motels, hostels and
residences. It is not intended for commercial use.
26. The manufacturer is not liable for any damage caused by the
improper use of this appliance.
27. Always use only one function of the appliance. Never start more
functions in the same time.
28. This appliance should not be used by children. Keep the appliance
and its power supply out of reach of children. The appliance may be
used by persons with reduced physical, sensory or mental capacities
or lack of experience and knowledge, if they are supervised or if they
were instructed how to use the appliance safely and understand
potential dangers. Children shall not play with the appliance.
29. Risk of property damage: The appliance may only be used if it is
properly and completely assembled.
30. Before replacing accessories that move during use, switch o the
appliance and disconnect it from the power supply.
31. Allow the appliance to cool down before cleaning and storing. Use
damp cloth for cleaning and maintenance. Do not use chemical
agents. Pay special attention to surfaces that come into direct
contact with food when cleaning.
32. Pay special attention when handling the cutting blades, especially
when removing the blades from the container and during cleaning.
Do not immerse in water!

English
English
7
DANGER TO CHILDREN: Children must not play with the packaging
material. Do not let the children play with
plastic bags. Risk of suocation.
SAFETY INSTRUCTIONS FOR ACCESSORIES
1. Assemble the accessory machines exactly according to the instructions in the manual; any other
combination of machine assembling is not permitted in terms of correct function!
2. Only fasten and remove the assembled accessory machine when the appliance is switched o and
unplugged.
3. Never use the accessory if it does not work properly, if it has fallen on the ground and been damaged. In
such cases, take the accessory machine to a service center to check that it is safe and working properly.
4. Never assemble accessory machines on the motor unit!
5. Take extra care when handling the cutting and mixing blades and graters (especially during cleaning); the
blades and graters are very sharp and can cause injuries.
Kneader and whisk
This accessory is intended for kneading leavened or poured dough and whipping foods.
• Due to the size of the work bowl, please note that the appliance cannot whip / knead very small amounts
of ingredients. For optimal results, choose ingredients with a total weight of at least 300 g. At the same
time, the maximum weight of all ingredients must not exceed 1.5 kg.
• Under no circumstances should any objects be inserted when the whisk / kneader is in operation. First
switch o the appliance and then you can remove the trapped food from the kneading hook or whisk with
a spatula. Always use the lid.
• Before replacing accessories that move during use, switch o the appliance and disconnect it from the
power supply.
• Pay special attention when handling the cutting blades, especially when removing the blades from the
container and during cleaning.
• Allow the appliance to cool down before cleaning and storing. Use damp cloth for cleaning and
maintenance. Do not use chemical agents.
Meat grinder / Sausage lling machine
These accessories are intended for processing meat without bones, tendons and fat. Do not try to grind bones,
poppy seeds, nuts or other hard objects. Never grind frozen meat.
• Take extra care when handling the cutting blades (especially when removing them and cleaning them),
the blades are very sharp and can cause injuries.
• Before replacing accessories that move during use, switch o the appliance and disconnect it from the
power supply.
• Pay special attention when handling the cutting blades, especially when removing the blades from the
container and during cleaning.
• Tighten the locking ring of the machine carefully before starting. Never overtighten the nut!
• Never use your ngers, kitchen utensils or other objects to stu food into the grinder! Use only the tamper
supplied with the accessories. Use reasonable force. Excessive pressure could damage the appliance.
• Grind meat with tendons and bones removed and cut into pieces about 2.5 cm large.
• If the grinder gets jammed, switch o the appliance immediately and disconnect it from the mains. Only
then disassemble and clean the grinder.
• Allow the appliance to cool down before cleaning and storing. Use damp cloth for cleaning and
maintenance. Do not use chemical agents.
Grater
This accessory is designed for slicing and grating fruits, vegetables, nuts, chocolate and hard cheeses. Not
suitable for slicing extremely hard products (such as nutmeg, coee beans or cereal grains).

English
English
8
• Never use your ngers, kitchen utensils or other objects to push food into the grater! Use only the tamper
supplied with the accessories. Use reasonable force. Excessive pressure could damage the appliance.
• If food residues get stuck in the grater, switch o the appliance immediately and disconnect it from the
mains. Only then remove and clean the grater.
• Before replacing accessories that move during use, switch o the appliance and disconnect it from the
power supply.
• Use damp cloth for cleaning and maintenance. Do not use chemical agents.
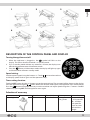
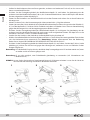
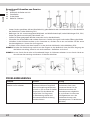
ASSEMBLING THE STAND MIXER
• Before rst use, clean all accessories with lukewarm water with detergent, rinse and dry thoroughly. Do not
immerse the body of the appliance in water. Wipe it with a damp cloth. Do not use any abrasive or other
aggressive cleaning agents.
• Place the appliance on a at, clean and dry table so that it has enough space around it.
• Press the multifunction head release lever (2) while lifting the multifunction head (10) with your other
hand until you hear a click. The head is now locked in the top position (see gure 2).
• Place a stainless steel bowl with ingredients on the base of the appliance and secure it in place by turning
it clockwise.
• Make sure that the total amount of ingredients does not exceed 1.5 kg.
• Insert the bowl cover (8) on the multifunction head rst and then the required accessories (5, 6, 7) on
the head shaft (1). Push the accessory up and then turn it a quarter turn counterclockwise to the locking
position (Figures 4 and 5).
• Press the multifunction head release lever (2) while lowering the multifunction head (10) to a horizontal
position. The head must "click" into the base.
• Insert the plug into the socket and the control panel display will light up.
• Select the speed and time on the control panel. After the set time has elapsed, the stand mixer
automatically shuts o. Note: For more information on operation, see the section "DESCRIPTION OF THE
CONTROL PANEL AND DISPLAY".
• Press the release lever of the multifunction head (2) and lift the head (10) (see gure 2), turn the bowl
counterclockwise, remove and remove the nished dough.
Note: When the head is tilted, the control panel display turns o. Lights up again when the head is tilted back.
Note: It is not possible to use two accessories at the same time (e.g. whisk with a grinder, etc.).
WARNING: Do not leave the appliance running continuously for more than 15 minutes. Allow it to cool for at
least 30 minutes before starting again.

English
English
9
1 2 3
4 5 6
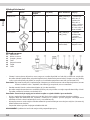
DESCRIPTION OF THE CONTROL PANEL AND DISPLAY
Turning the appliance on/o
1. When the appliance is plugged in, the symbol will ash on the
display. This means that the machine is in standby mode.
2. If it is in standby mode without any action for 1 minute, the display turns
o and the appliance enters hibernation mode.
3. Press the button in hibernation mode, the display will light up again
and the machine will enter standby mode.
Speed setting:
Set the required speed using the buttons +/-. Touch to start the machine
and display speed. Touch it again and the operation stops.
Timer setting function:
Touch the SET button. Use the +/- buttons to set the required time. The set speed will be shown on the display.
Start the appliance using the button. When the set timer time expires, the appliance stops automatically.
Press the button during operation to pause the machine and adjust speed using the +/- buttons. Conrm
selection by pressing SET and the appliance starts again.
Selection of accessory
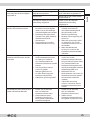
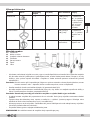
Use Picture Speed Time (min) Max. amount Instructions
Kneading hook 1–3 3–5 1000 g our and
538 g water
1st speed for 30
s, 2nd speed for
30 s and then
3rd speed for
2 min to 3 min
to knead the
dough.

English
English
10
Use Picture Speed Time (min) Max. amount Instructions
Mixing whisk 2–7 3–10 660 g our and
840 g water
2nd speed for
20s, 7th speed
at least 2 min.
and 40 s.
Beater 8–10 3–10 3 egg whites
(minimum)
8th /10th speed
at least 3 min.
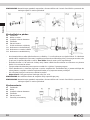
Meat grinder
M1 Tamper
M2 Meat bowl
M3 Machine with funnel
M4 Screw conveyor
M5 Lock nut
M6 Blade
M7 Hole plate
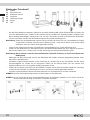
• To install the meat grinder, rst place the M6 blade on the M4 screw conveyor and insert it into the M3
machine. Insert the hole plate M7 (depending on whether you require coarse, medium or ne grinding).
Make sure that the grooves in the hole plate t correctly into the grooves in the machine and tighten
everything with the M5 lock nut (see gure PG1).
Note: Do not tighten the lock nut too hard. Make sure that the cutting blade is oriented correctly (at, sharp
edge towards the hole plate - forwards). If you put it on incorrectly, it will not grind the meat.
• Loosen the locking screw and remove the plug (9) (see gure PG2).
• Insert the machine into the multifunction head mechanism so that the groove on the machine ts into the
groove in the head. Secure with locking screw, see gure PG3.
Note: This step is the same for installing the sausage machine and the grater.
• Attach the M2 meat bowl to the M3 funnel. Place a suitable container under the grinder outlet.
• Connect the appliance to the mains, switch on and select the time and speed. Start the program. Insert
meat cleansed from tendons and bones cut into pieces about 2.5 cm.
• Put the meat in the bowl of the grinder. Use the M1 tamper to gently push the meat into the grinder's
funnel. (Grind the meat twice for tartar steak.)
• After use, switch o the appliance and disconnect it from the mains.
WARNING: Never use your ngers to push the mixture into the machine.
WARNING: Do not let the appliance running continuously for more than 5 minutes. Allow it to cool for at least
15 minutes before starting again.

English
English
11
Making sausages
M1 Tamper
M2 Meat bowl
M3 Machine with funnel
M4 Screw conveyor
M5 Lock nut
S1 Sausage attachment holder
S2-1 Attachment for thick sausages
S2-2 Medium size attachment
S2-3 Thin sausages attachment
• Place the S1 sausage attachment holder and the S2 sausage attachment on it on the M4 screw conveyor.
Tighten lock M5 to M3. Attach the assembled machine to the multifunction head. Proceed in the same way
as described in the "Meat grinder" section. Note: Do not tighten the lock nut too hard.
• Soak the sausage casing in lukewarm water for 10 minutes. Then thread the moist casing onto the S2
sausage lling attachment and close it with a knot.
• Connect the appliance to the mains, switch on and select the time and speed. Start the program.
• Prepare a mixture of minced meat and spices in an M2 bowl. With the M1 tamper, gently push it into the
funnel of the machine and at the same time hold the lled casing at the outlet opening.
• If the casing sticks to the attachment, moisten it with water.
• Recommendation: Allow the sausages dry for some time after lling.
WARNING: Never use your ngers to push the mixture into the machine.
WARNING: Do not let the appliance running continuously for more than 5 minutes. Allow it to cool for at least
15 minutes before starting again.
Making pasta
M1 Tamper
M2 Bowl
M3 Machine with funnel
M4 Screw conveyor
M5 Lock nut
P1 Pasta shapes
• Place the selected pasta template P1 on the M4 screw conveyor. Tighten lock M5 to M3. Note: Do not
tighten the lock nut too hard. Attach the assembled machine to the multifunction head. Proceed in the
same way as described in the "Meat grinder" section.
• Attach the M2 bowl.

English
English
12
• Connect the appliance to the mains. Set the speed and time
• Insert the dough, pre-cut into strips, into the funnel of the machine. Use the tamper if required. The
machine will push out the pasta in the desired shape.
WARNING: Never use your ngers to push the mixture into the machine.
WARNING: Do not let the appliance running continuously for more than 10 minutes. Allow it to cool for at least
30 minutes before starting again.
Grating and cutting vegetables
V1 Tamper
V2 Grater machine with funnel
V3 Fine grater
V4 Coarse grater
V5 Slicer
• Insert the selected attachment (ne grater V3, coarse grater V4 or slicer grater V5) into the grater V2 (see
gure PG1).
• Attach the assembled machine to the multifunction head (see gures PG2, PG3). Proceed in the same way
as described in the "Meat grinder" section.
• Place a suitable container under the grinder outlet.
• Cut the potatoes or other vegetables into pieces that are the same size as the grater feed.
• Connect the appliance to the mains, switch on and select the time and speed. Start the program.
• Use tamper V1 to push the vegetables into the funnel of the machine (see gure PG4).
WARNING: Never use your ngers to push the mixture into the machine. Be careful not to injure yourself when
handling the graters - the graters are sharp.
WARNING: Do not let the appliance running continuously for more than 5 minutes. Allow it to cool for at least
15 minutes before starting again.

English
English
13
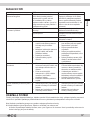
TROUBLESHOOTING
Problem Cause Solution
The appliance suddenly stops
working during use.
The appliance may have run
for too long or the ambient
temperature may be too high,
resulting in the appliance's motor
temperature being too high. The
overheat protection program and
automatic switch-o start.
Switch o the appliance and
disconnect the power supply, wait
for the appliance to cool down
to room temperature and restart
it (generally it is necessary to let
the appliance cool down for 15-30
minutes depending on the room
temperature).
The appliance will not start even
after setting the speed.
The plug is not properly inserted
into the socket.
Make sure the plug is rmly
inserted in the socket.
Power outage. Wait until the electricity is on
again.
The appliance's head is not seated
properly.
Check that the appliance head is
rmly seated.
Excessive noise when the
appliance is running.
1. At high speed level the
appliance will work louder
than at low level.
2. The amount of mixed food is
too large, which overloads the
appliance.
3. The voltage is unstable.
4. Operating time is too long.
1. Choose the right food mixing
accessories as recommended
in the manual.
2. Make less dough at one time.
3. If the voltage is unstable, wait
until it stabilizes before use.
4. If the operating time is too
long, let the appliance cool
down for a while.
The appliance speed is decreasing
or unstable.
1. Check that the room
temperature is not too low,
which causes the lubricant in
the appliance to solidify.
2. The dough is mixed at too
high speed and in too large
an amount, which overloads
the appliance.
3. There is a sudden drop in
voltage.
1. Remove the bowl and let the
appliance idle for 5 minutes
to loosen the lubricant in the
appliance and restore speed
stability.
2. Reduce the mixing volume
and let the appliance run
according to the normal
working speed.
3. Once the voltage is stable, try
restarting the appliance.
The appliance sways and shakes
during operation.
1. Make sure that the feet are
rmly attached to the base of
the appliance.
2. The appliance is not placed on
a smooth and level worktop.
1. Make sure that the feet are
rmly attached to the base of
the appliance.
2. Always place the appliance on
a smooth and level surface.
MAINTENANCE AND CLEANING
Clean immediately after each use. Always wait for all parts to come to a complete stop before disassembling.
The appliance needs approximately 20 minutes to cool down for safe handling and cleaning.
Before cleaning the appliance, rst switch it o and unplug it.
Take extra care when cleaning, the blades and graters are very sharp.
• Do not use thinner, petrol, vinegar or other aggressive or abrasive cleaners or sharp and coarse tools such
as wire scrapers.

English
English
14
• Protect from direct sunlight, humid and dusty environment.
Accessories
Roughly clean the meat caught in the grinder by grinding a bun or a slice of bread.
Disassemble all parts of the machines in individual parts, remove from the appliance whisks and kneading
hook incl. the plastic cover.
Wash the accessories in hot water with detergent. Rinse them with clean warm water and wipe them
immediately and let them dry properly.
We recommend coating the inside of the grinder, blades and sieves with edible oil, which prevents their
oxidation
Note: Do not wash any parts or accessories of this appliance (except the stainless steel bowl) in the dishwasher.
Appliance body
After it was used, wipe the body of the appliance with wet cloth and then dry thoroughly with dry cloth.
Protect the appliance
from water and high humidity! Do not immerse it in water.
The shaft (1) forms slightly black marks when the machine is operating due to high rotation speeds and friction.
Clean it immediately after each use and keep the part dry.
TECHNICAL DATA
Nominal voltage: 220-240 V~ 50-60 Hz
Nominal input power: 1800 W
Stainless steel bowl volume: 6.5 l
USE AND DISPOSAL OF WASTE
Wrapping paper and corrugated paperboard – deliver to scrapyard. Packing foil, PE bags, plastic elements – throw into plastic
recycling containers.
DISPOSAL OF PRODUCTS AT THE END OF LIFETIME
Disposal of electric and electronic equipment (valid in EU member countries and other European
countries with an implemented recycling system)
The represented symbol on the product or package means the product shall not be treated as domestic waste.
Hand over the product to the specied location for recycling electric and electronic equipment. Prevent negative
impacts on human health and the environment by properly recycling your product. Recycling contributes to
preserving natural resources. For more information on the recycling of this product, refer to your local authority,
domestic waste processing organization or store, where you purchased the product.
This product complies with the requirements of the EU directives on electromagnetic compatibility
and electrical safety and the issue of heavy metals in electrical and electronic equipment.
Furthermore, it meets the relevant energy requirements and requirements for direct contact with
food.
The operating manual is available at www.ecg-electro.eu.
Changes of text and technical parameters reserved.
08/05

Deutsch
Deutsch
15
KÜCHENMASCHINE
SICHERHEITSHINWEISE
Bitte aufmerksam lesen undgut aufbewahren!
Warnung: Die in dieser Anleitung angeführ ten Sicherheitsvorkehrungen
und Hinweise umfassen nicht alle Umstände und Situationen, zu denen
es kommen könnte. Der Anwender muss begreifen, dass der gesunde
Menschenverstand, Vorsicht und Sorgfalt zu Faktoren gehören, die
sich in kein Produkt einbauen lassen. Diese Faktoren müssen durch
den Anwender bzw. mehrere Anwender bei der Verwendung und
Bedienung dieses Gerätes gewährleistet werden. Wir haften nicht
für Schäden, die durch Transport, eine unsachgemäße Verwendung,
Spannungsschwankungen sowie eine Änderung oder Modikation
des Gerätes entstehen. Um das Risiko von Bränden oder Stromschlägen
zu vermeiden, sollten bei der Verwendung elektrischer Geräte immer
grundlegende Vorsichtsmaßnahmen befolgt werden, einschließlich
der folgenden:
1. Vergewissern Sie sich, dass die Spannung an Ihrer Steckdose mit
der Spannung auf dem Etikett übereinstimmt und die Steckdose
ordnungsgemäß geerdet wurde. Die Steckdose muss gemäß
geltender elektrotechnischer Norm (EN) installiert werden.
2. Gerät niemals verwenden, falls das Netzkabel beschädigt ist.
Sämtliche Reparaturen und das Auswechseln des Netzkabels
muss ein Fachservice durchführen! Demontieren Sie niemals die
Schutzabdeckungen des Gerätes. Dies könnte zu einem Stromunfall
führen!
3. Das Netzkabel darf nicht mit heißen Teilen in Berührung kommen
oder über scharfe Kanten führen.
4. Schützen Sie das Gerät vor direktem Kontakt mit Wasser und
sonstigen Flüssigkeiten, um Stromunfällen vorzubeugen.
5. Verwenden Sie das Gerät nicht im Freien oder in einer feuchten
Umgebung. Netzkabel oder Gerät nicht mit nassen Händen
berühren. Es könnte zu einem Stromunfall kommen.
6. Das Gerät ist nicht für die Verwendung mit einer Zeitschaltuhr
und anderen Fernbedienungssystemen vorgesehen. Es besteht
Küchenmaschine
Deutsch

Deutsch
Deutsch
16
Brandgefahr, wenn das Gerät bei der Inbetriebnahme abgedeckt
oder am falschen Ort aufgestellt ist.
7. Basis mit Motor und das Netzkabel nicht in Wasser oder andere
Flüssigkeiten tauchen. Nicht unter ießendem Wasser abwaschen.
Vermeiden Sie, dass Flüssigkeiten in die Motoreinheit gelangen.
8. Seien Sie aufmerksam, falls Sie das Gerät in der Nähe von Kindern
verwenden.
9. Das Gerät sollte während des Betriebes nicht unbeaufsichtigt
gelassen werden.
10. Das Gerät sollte nicht unbeaufsichtigt gelassen werden, falls dieses
an das Stromnetz angeschlossen ist.
11. Schalten Sie das Gerät aus und trennen Sie es vom Stromnetz, bevor
Sie Wartungs-, Montage oder Demontagearbeiten durchführen,
das Zubehör auswechseln oder wenn Sie das Gerät nicht mehr
benutzen. Ziehen Sie nicht am Kabel, um den Stecker aus der
Steckdose zu ziehen. Ziehen Sie am Stecker, um das Kabel aus der
Steckdose zu ziehen.
12. Warten Sie immer, bis alle Teile vollständig zum Stillstand gekommen
sind, bevor Sie sie demontieren. Der Verbraucher benötigt etwa 20
Minuten zum Abkühlen. Halten Sie diese Zeit ein, um eine sichere
Manipulation und Reinigung zu gewährleisten.
13. Gerät nicht in der Nähe von Wärmequellen verwenden (z.B.
Kochherd). Gerät vor direkter Sonnenstrahlung schützen.
14. Stellen Sie das Gerät nicht an die Wand oder auf andere Geräte.
Sorgen Sie für mindestens 10 cm Freiraum auf der Rück- und
Seitenseite und für 10 cm Freiraum über dem Verbraucher.
15. Gerät stets auf einer geraden und stabilen Oberäche verwenden.
Platzieren Sie auf den Verbraucher keine Gegenstände.
Vergewissern Sie sich, dass das Gerät mindestens 10 cm vom
Rand der Küchenarbeitsplatte aufgestellt ist. Auch sollten keine
Önungen blockiert sein.
16. Vor der Erstverwendung empfehlen wir, alle Teile, die mit
Lebensmitteln in Berührung kommen, zu waschen, siehe Kapitel
„Reinigung und Wartung“.

Deutsch
Deutsch
17
17. Gerät niemals während des Betriebs zudecken oder in der Nähe
von brennbaren Materialien verwenden (z.B. Gardinen).
18. Niemals die beweglichen Geräteteile berühren!
19. Lange Haare, lose Kleidung oder Accessoires und Schmuck können
durch die rotierenden Teilen des Geräts erfasst werden. Achten Sie
darauf, dass Ihre Haare, Kleidung und Accessoires nicht gefährlich
nahe an die rotierenden Teile kommen!
20. Gerät niemals ohne eingelegte Lebensmittel (leer) einschalten!
21. Reinigen Sie das Gerät unmittelbar nach jedem Gebrauch. Wischen
Sie den Gerätekörper nur mit einem feuchten Tuch ab. Tauchen Sie
es nicht in Wasser ein.
22. Verwenden Sie kein Zubehör, das nicht vom Hersteller empfohlen
wurde. Dies könnte zur Nichtanerkennung der Garantie führen.
23. Überschreiten Sie nicht die maximale Dauerbetriebszeit des Geräts.
Lassen Sie das Gerät vor dem nächsten Gebrauch gut abkühlen.
Bemerkung: für jedes Zubehör gelten andere Zeiten, siehe
Informationen im Handbuch unten.
24. Verwenden Sie das Gerät ausschließlich gemäß den in dieser
Bedienungsanleitung aufgeführten Anweisungen.
25. Dieses Gerät ist ausschließlich für den Haushaltsgebrauch
vorgesehen. Es ist auch für den Gebrauch in Küchenbereichen für
Mitarbeiter, Geschäften, Büros und anderen Arbeitsumgebungen
geeignet. Das Gilt auch für Hotels, Motels, Herbergen und
Wohnheime. Sie ist nicht für kommerzielle Zwecke bestimmt.
26. Der Hersteller übernimmt keine Haftung für Schäden, die auf eine
unsachgemäße Verwendung zurückzuführen sind.
27. Nutzen Sie immer nur eine Funktion des Geräts. Nutzen Sie niemals
mehr als eine Funktion gleichzeitig.
28. Dieses Gerät darf nicht von Kindern bedient werden. Gerät sowie
Netzkabel außer Reichweite von Kindern halten. Personen mit
verminderten physischen, sensorischen und mentalen Fähigkeiten
sowie mangelnden Erfahrungen und Kenntnissen, können dieses
Gerät nur unter Aufsicht benutzen, oder nachdem diese über
einen gefahrlosen Gebrauch belehrt und mit möglichen Gefahren

Deutsch
Deutsch
18
bekannt gemacht wurden. Kinder dürfen nicht mit dem Gerät
spielen.
29. Gefahr von Sachschäden: Das Gerät darf nur dann verwendet
werden, wenn es ordnungsgemäß und vollständig zusammengebaut
ist.
30. Schalten Sie das Gerät aus und trennen Sie es von dem Stromnetz,
bevor Sie Zubehör auswechseln, die sich während des Gebrauchs
bewegt.
31. Lassen Sie das Gerät vor der Reinigung oder Lagerung abkühlen.
Wartung und Reinigung sollten mit einem feuchten Tuch
durchgeführt werden. Verwenden Sie niemals chemische Präparate
und Reinigungsmittel. Achten Sie bei der Reinigung besonders auf
Oberächen, die direkt mit Lebensmitteln in Berührung kommen.
32. Gehen Sie während der Manipulation mit den Hackmessern
besonders vorsichtig vor, insbesondere beim Herausnehmen
Hackmesser aus dem Behälter und während der Reinigung.
Do not immerse in water! – Nicht ins Wasser tauchen!
GEFAHR FÜR KINDER: Kinder dürfen nicht mit dem
Verpackungsmaterial spielen. Kinder dürfen
nicht mit den Kunststobeuteln spielen.
Erstickungsgefahr.
SICHERHEITSHINWEISE ZUM ZUBEHÖR
1. Setzen Sie Zusatzgeräte genau nach den Angaben in der Betriebsanleitung zusammen, andere
Kombinationen beim Zusammensetzen der Zusatzgeräte sind für eine einwandfreie Funktionsweise nicht
zulässig!
2. Befestigen und entfernen Sie das Zusatzgerät nur dann, wenn das Gerät ausgeschaltet und vom Stromnetz
getrennt ist.
3. Verwenden Sie niemals ein Zusatzgerät, das nicht richtig arbeitet, zu Boden gestürzt ist oder beschädigt ist.
Bringen Sie das Zusatzgerät in solchen Fällen zu einer fachlichen Kundendienststelle, um seine Sicherheit
und richtige Funktionsweise zu überprüfen.
4. Setzen Sie die Zusatzgeräte niemals auf der Antriebseinheit zusammen!
5. Seien Sie beim Umgang mit den Hack- und Mixmessern und Reiben besonders vorsichtig (vor allem bei
der Reinigung), da die Messer und Reiben sehr scharf sind und Verletzungen verursachen können.
Knethaken und Schneebesen
Dieses Zubehör ist zum Kneten von Hefe- oder Backteig und zum Schlagen von Lebensmitteln vorgesehen.
• Bitte beachten Sie, dass das Gerät aufgrund der großen Arbeitsschüssel sehr kleine Mengen an Zutaten
nicht ausreichend schlagen/kneten kann. Damit Sie ein optimales Ergebnis erzielen, sollten Sie daher

Deutsch
Deutsch
19
Zutaten mit einem Gesamtgewicht von mindestens 300 g wählen. Gleichzeitig darf das maximale Gewicht
aller Zutaten nicht 1,5 kg überschreiten.
• Legen Sie niemals Gegenstände hinein, wenn der Schneebesen/Knethaken in Betrieb ist. Schalten Sie
zuerst das Gerät aus, bevor Sie die am Knethaken oder am Schneebesen aufgefangenen Lebensmittel mit
einer Spatel entfernen. Benutzen Sie immer den Deckel.
• Schalten Sie das Gerät aus und trennen Sie es von dem Stromnetz, bevor Sie Zubehör auswechseln, die
sich während des Gebrauchs bewegt.
• Gehen Sie während der Manipulation mit den Hackmessern besonders vorsichtig vor, insbesondere beim
Herausnehmen Hackmesser aus dem Behälter und während der Reinigung.
• Lassen Sie das Gerät vor der Reinigung oder Lagerung abkühlen. Wartung und Reinigung sollten mit einem
feuchten Tuch durchgeführt werden. Verwenden Sie niemals chemische Präparate und Reinigungsmittel.
Fleischwolf/Füllwolf für Wurst
Dieses Zubehör ist für die Verarbeitung von Fleisch ohne Knochen, Sehnen und Fett vorgesehen. Versuchen
Sie nicht, Knochen, Mohn, Nüsse oder andere harte Gegenstände zu zerkleinern. Zerkleinern Sie niemals
gefrorenes Fleisch.
• Seien Sie beim Umgang mit den Hackmessern besonders vorsichtig (vor allem beim Herausnehmen und
Reinigen), da die Messer sehr scharf sind und Verletzungen verursachen können.
• Schalten Sie das Gerät aus und trennen Sie es von dem Stromnetz, bevor Sie Zubehör auswechseln, die
sich während des Gebrauchs bewegt.
• Gehen Sie während der Manipulation mit den Hackmessern besonders vorsichtig vor, insbesondere beim
Herausnehmen Hackmesser aus dem Behälter und während der Reinigung.
• Ziehen Sie die Sicherungsmutter des Geräts vor der Inbetriebnahme sorgfältig an. Ziehen Sie die Mutter
niemals mit Gewalt an!
• Benutzen Sie niemals Ihre Finger, Küchenutensilien und andere Gegenstände, um Lebensmittel in das
Gerät zu stopfen! Verwenden Sie ausschließlich den mit dem Zubehör mitgelieferten Stopfer. Verwenden
Sie angemessene Kraft. Ein zu hoher Druck kann das Gerät beschädigen.
• Zerkleinern Sie Fleisch, das von Sehnen und Knochen befreit und in etwa 2,5 cm große Stücke geschnitten
wurde.
• Wenn das Mahlwerk stecken bleibt, schalten Sie das Gerät sofort aus und trennen Sie es vom Stromnetz.
Erst dann können Sie das Mahlwerk demontieren und reinigen.
• Lassen Sie das Gerät vor der Reinigung oder Lagerung abkühlen. Wartung und Reinigung sollten mit einem
feuchten Tuch durchgeführt werden. Verwenden Sie niemals chemische Präparate und Reinigungsmittel.
Reibe
Dieses Zubehör ist zum Schneiden und Reiben von Obst, Gemüse, Nüssen, Schokolade und Hartkäse geeignet.
Es ist nicht zum Schneiden von extrem harten Produkten geeignet (z.B. Muskatnüsse, Kaeebohnen oder
Getreide).
• Benutzen Sie niemals Ihre Finger, Küchenutensilien und andere Gegenstände, um Lebensmittel in die
Reibe zu stopfen! Verwenden Sie ausschließlich den mit dem Zubehör mitgelieferten Stopfer. Verwenden
Sie angemessene Kraft. Ein zu hoher Druck kann das Gerät beschädigen.
• Wenn Lebensmittel in der Reibe stecken bleiben, schalten Sie das Gerät sofort aus und trennen Sie es vom
Stromnetz. Erst dann können Sie die Reibe demontieren und reinigen.
• Schalten Sie das Gerät aus und trennen Sie es von dem Stromnetz, bevor Sie Zubehör auswechseln, die
sich während des Gebrauchs bewegt.
• Wartung und Reinigung sollten mit einem feuchten Tuch durchgeführt werden. Verwenden Sie niemals
chemische Präparate und Reinigungsmittel.
ZUSAMMENSETZEN DER KÜCHENMASCHINE
• Reinigen Sie vor der Erstverwendung sämtliches Zubehör mit lauwarmem Wasser und einem
Geschirrspülreiniger, waschen Sie es dann ab und wischen Sie es trocken. Tauchen Sie den Gerätekörper
nicht in Wasser. Wischen Sie ihn mit einem feuchten Tuch ab. Verwenden Sie keine abrasiven oder
aggressiven Reinigungsmittel.

Deutsch
Deutsch
20
• Stellen Sie die Küchenmaschine auf einen geraden, sauberen und trockenen Tisch auf, so dass sie um sich
herum ausreichend Platz hat.
• Drücken Sie den Entriegelungshebel des Multifunktionskopfes (2) und heben Sie gleichzeitig mit der
anderen Hand den Multifunktionskopf (10) an, bis Sie einen Klickton hören. Jetzt ist der Kopf in der oberen
Position abgesichert (siehe Abbildung 2).
• Setzen Sie die Gerätebasis auf die Edelstahlschüssel mit den Zutaten und sichern Sie sie durch Drehen im
Uhrzeigersinn.
• Achten Sie darauf, dass die Gesamtmenge der Lebensmittel nicht 1,5 kg überschreitet.
• Setzen Sie zuerst den Schüsseldeckel (8) auf den Multifunktionskopf und dann das gewünschte Zubehör (5,
6, 7) auf die Kopfwelle (1). Drücken Sie das Zubehör nach oben und drehen Sie es dann ein Vierteldrehung
gegen den Uhrzeigersinn in die Verriegelungsposition (Bilder 4 und 5).
• Drücken Sie den Entriegelungshebel des Multifunktionskopfes (2) und kippen Sie gleichzeitig mit der
anderen Hand den Multifunktionskopf (10) nach unten in die waagerechte Position. Der Kopf muss in die
Gerätebasis einrasten, so dass Sie einen Klickton hören.
• Stecken Sie den Stecker in die Steckdose, das Bedienfeld-Display leuchtet auf.
• Wählen Sie im Bedienfeld die Geschwindigkeit und Zeit aus. Nach Ablauf der voreingestellten Zeit schaltet
sich die Küchenmaschine automatisch aus. Bemerkung: Weitere Informationen über die Bedienung
nden Sie im Kapitel „BESCHREIBUNG DES BEDIENFELDES UND DES DISPLAYS“.
• Drücken Sie den Entriegelungshebel des Multifunktionskopfes (2) und heben Sie den Kopf (10) an (siehe
Abbildung 2), drehen Sie die Schüssel gegen den Uhrzeigersinn, entfernen Sie sie und nehmen Sie den
fertigen Teig heraus.
Bemerkung: Das Bedienfeld-Display erlischt, sobald der Kopf runtergekippt wird. Er leuchtet wieder auf, wenn
er wieder zurück in Position gekippt wird.
Bemerkung: Es ist nicht möglich, zwei Zubehörteile gleichzeitig zu verwenden (z.B. Schneebesen mit
Mahlwerk usw.).
HINWEIS: Lassen Sie das Gerät nicht im Dauerbetrieb länger als 15 Minuten arbeiten. Lassen Sie das Gerät vor
der nächsten Verwendung mindestens 30 Minuten abkühlen.
1 2 3
4 5 6
Seite wird geladen ...
Seite wird geladen ...
Seite wird geladen ...
Seite wird geladen ...
Seite wird geladen ...
Seite wird geladen ...
Seite wird geladen ...
Seite wird geladen ...
Seite wird geladen ...
Seite wird geladen ...
Seite wird geladen ...
Seite wird geladen ...
Seite wird geladen ...
Seite wird geladen ...
Seite wird geladen ...
Seite wird geladen ...
Seite wird geladen ...
Seite wird geladen ...
Seite wird geladen ...
Seite wird geladen ...
Seite wird geladen ...
Seite wird geladen ...
Seite wird geladen ...
Seite wird geladen ...
Seite wird geladen ...
Seite wird geladen ...
Seite wird geladen ...
Seite wird geladen ...
Seite wird geladen ...
Seite wird geladen ...
Seite wird geladen ...
Seite wird geladen ...
-
 1
1
-
 2
2
-
 3
3
-
 4
4
-
 5
5
-
 6
6
-
 7
7
-
 8
8
-
 9
9
-
 10
10
-
 11
11
-
 12
12
-
 13
13
-
 14
14
-
 15
15
-
 16
16
-
 17
17
-
 18
18
-
 19
19
-
 20
20
-
 21
21
-
 22
22
-
 23
23
-
 24
24
-
 25
25
-
 26
26
-
 27
27
-
 28
28
-
 29
29
-
 30
30
-
 31
31
-
 32
32
-
 33
33
-
 34
34
-
 35
35
-
 36
36
-
 37
37
-
 38
38
-
 39
39
-
 40
40
-
 41
41
-
 42
42
-
 43
43
-
 44
44
-
 45
45
-
 46
46
-
 47
47
-
 48
48
-
 49
49
-
 50
50
-
 51
51
-
 52
52


ECG FORZA 6600 Metallo Argento Stand Mixer Benutzerhandbuch
- Kategorie
- Küchenmaschinen
- Typ
- Benutzerhandbuch