
Start
Quick
www.philips.com/welcome
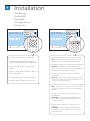
Installation
EN
Einstellung
DE
Installation
FR
Installatie
NL
Configuratione
IT
Instalación
ES
Register your product and get support at …

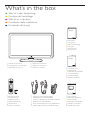
What’s in the box
Remote Control
Fernbedienung
Télécommande
Afstandsbediening
Telecomando
Mando a distancia
Was ist in der Verpackung
Contenu de l’emballage
Wat zit er in de doos
•
•
•
•
•
•
User manual
Bedienungsanleitung
Mode d’emploi
Gebruikershandleiding
Manuale di istruzioni
Manual del usuario
•
•
•
•
•
•
Start guide
Start guide
Guide de démarage
Start gids
Guida di avvio
Guía de inicio
•
•
•
•
•
•
Consumer care
Kundendienst
Assistance à la clientèle
Consumentenlijn
Assistenza clienti
Atención al cliente
•
•
•
•
•
•
Television and stand
Fernsehgerät und Standfuß
Téléviseur et support
•
•
•
Televisie en standaard
Televisione e supporto
Televisor y soporte
•
•
•
Start
Help
DE
FR
NL
Contenuto della confezione
IT
Contenido de la caja
ES
Power cord and antenna cable
Netzkabel und Antennenkabel
Cordon d’alimentation et câble d’antenne
Netsnoer en antennekabel
Cavo di alimentatione e cavo dell’antenna
Cable de alimentation y cable de antena
•
•
•
•
•
•
UK
Ireland

•
•
•
•
•
•
Remove the yellow brake at the back of
the stand to allow the TV to swivel.
Entfernen Sie die gelbe Sperre auf der
Rückseite des Standfußes, damit sich das
Fernsehgerät drehen lässt.
Retirez le frein jaune à l'arrière du support
afin de permettre au téléviseur de pivoter.
Verwijder de gele rem achterop de
standaard om het draaien toe te laten.
Rimuovere il blocco giallo sul retro del
supporto in modo che il TV possa girare.
Quite el freno amarillo de la parte
posterior del soporte para que el televisor
pueda girar.
1
Swivel stand
Drehbarer Standfuß
Support pivotant
Draaibare standaard
Supporto girevole
Soporte con pedestal
•
•
•
•
•
2
1
3

Die Fernbedienung
La télécommande
Afstandsbediening
Remote control
2
Il telecomando
Mando a distancia
•
•
•
•
•
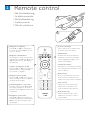
Navigation and OK key
Press o,œ or p,π to navigate the
TV menu. Press the OK key to con-
firm your choice.
Navigation und OK-Taste
Zur Navigation durch das TV-Menü
drücken Sie die Pfeiltasten o,œ oder
p,π. Drücken Sie zur Bestätigung
die OK-Taste.
Touches de navigation et OK
Appuyez o,œ ou p,π pour naviguer
dans le menu TV. Appuyez OK
pour activer un réglage.
Navigatie toetsen en OK
Druk op o,œ of p,π om in de TV
menu te navigeren. Druk op OK om
uw keuze te bevestigen.
Tasti di navigazione e tasto OK
Premere i tasti cursore
o,œ o p,π
per navigare all'interno dei menu.
Premere il tasto OK per confermare
la selezione.
Navegación y botón OK.
Pulse o,œ o p,π para navegar por
el menú del televisor. Pulse el botón
OK para confirmar la opción que
haya elegido.
•
•
•
•
•
•
Colour coded keys
Press a colour key to select a task
or choice shown on screen.
Farbentasten
Drücken Sie die entsprechende
Farbtaste, um eine auf dem Bild-
schirm angezeigte Aufgabe oder
Option auszuwählen.
Touches de couleur
Appuyez sur une touche de couleur
pour sélectionner une tâche ou une
option à l'écran.
Kleurtoetsen
Druk op een kleurtoets om een
taak uit voeren of een keuze te
maken die op het scherm verschijnt.
Tasti colorati
Premere un tasto colorato per
selezionare un'opzione o una
voce visualizzata sullo schermo.
Botones de color
Pulse un botón de color para
seleccionar una tarea u opción
de la pantalla.
•
•
•
•
•
•
v
SOURCE
1
2

Stromversorgung & Antenne
Alimentation et antenne
Stekker & antenne
3
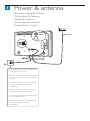
Power & antenna
Alimentazione e antenna
Alimentación y antena
•
•
•
•
•
Cable
The TV will switch on automatically when
you plug in the power cord.
Das Fernsehgerät schaltet sich automatisch
ein, wenn Sie den Stecker in die Steckdose
stecken.
Le téléviseur s’allumera automatiquement
lorsque vous brancherez le cordon
d’alimentation.
De TV schakelt automatisch in wanneer u
de stekker in het stopcontact steekt.
Il televisore viene acceso automaticamente
quando collegate il cavo.
El televisor se enciende automáticamente
cuando se conecta el cable de
alimentación.
•
•
•
•
•
•
AC IN
ANTENNA

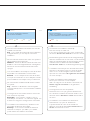
Einstellung
Installation
Installatie
Installation
4
Select your menu language with the cursor up / down.
Menu language
Select your language
with the cursor up / down
Next -
Nederlands
Español
Français
Hrvatski
Magyar
English
Italiano
Press OK or the green colour key on your remote control to continue
Menu language
Español
Français
Hrvatski
Italiano
Magyar
Nederlands
English
Select your language
with the cursor up / down
Next
Press œ or o to select your language.
Legen Sie die gewünschte Sprache fest,
indem Sie die Pfeiltasten œ oder o drücken.
Appuyez sur œ ou o pour choisir votre
langue.
Druk op de navigatietoetsen œ of o om uw
taal te selecteren.
Premere œ o o per selezionare la lingua.
Pulse œ o o para seleccionar el idioma.
•
•
•
•
•
•
Press the green key to proceed the installation.
Tip – Press the red key repeatedly to return to
a previous menu in case you made a mistake.
Drücken Sie die grüne Farbtaste um fortzufahren.
Hinweis – Drücken Sie mehrmals die rote
Taste, um zum vorherigen Menü zurückzukehren,
falls Sie einen Fehler gemacht haben.
Appuyez sur la touche verte pour continuer
l’installation.
Conseil – Appuyez plusieurs fois sur la touche
rouge pour revenir à un menu précédent, au cas
où vous avez fait une erreur.
Druk op de groene toets om verder te installeren.
Tip – Druk op de rode toets om terug te keren
naar een vorig menu mocht u een fout hebben
gemaakt.
Premere il tasto verde per procedere con
l'installazione.
Consiglio – Premere ripetutamente il tasto
rosso per tornare al menu precedente in caso
di selezioni errate.
Pulse el botón verde para continuar con la
instalación.
Consejo – Pulse varias veces el botón rojo
para volver al menú anterior en caso de que se
haya equivocado.
•
•
•
•
•
•
Configaratione
Instalación
•
•
•
•
•
�•••
v
SOURCE

Enjoy your television !
If later on you still want to change a setting, you can
go to the installation section in the menu.
-
Installation
Finish
You can now start automatic installation.
This can take a few minutes.
Start Skip StopPrevious
Television
The automatic installation will search and store all
available TV channels.
Tip – If you watch all TV channels with a cable box
or digital receiver, you can skip this automatic
installation.
Die automatische Sendersuche sucht und speichert
alle verfügbaren Fernsehsender.
Hinweis – Wenn Sie alle Fernsehsender über eine
Kabelbox oder einen Digital Receiver wiedergeben,
können Sie die automatische Sendersuche über-
springen.
Lors de l'installation automatique, toutes les chaînes
disponibles sont recherchées et mémorisées.
Conseil – Si vous réceptionnez toutes les chaînes
au moyen d'un décodeur ou d'un récepteur numéri-
que, l'installation automatique n'est pas nécessaire.
De automatische installatie zal alle zenders zoeken
en opslaan.
Tip – Wanneer u alle zenders met een digitale
ontvanger bekijkt, kunt u de automatische installatie
overslaan.
La configurazione automatica ricerca e memorizza
tutti i canali TV disponibili.
Consiglio – Se si guardano i canali TV con un
decoder per TV via cavo o un ricevitore digitale, non
è necessario eseguire la configurazione automatica.
La instalación automática busca y almacena todos
los canales de televisión disponibles.
Consejo – Si ve todos los canales de televisión
mediante un receptor por cable o por satélite,
puede saltarse la instalación automática.
•
•
•
•
•
•
You finished the installation succesfully.
Press the red key to watch TV.
If you want to change the order of the TV channels,
see section Reorder the channels of the user manual.
Die Einrichtung Ihres Geräts wurde erfolgreich abge-
schlossen. Drücken Sie die rote Taste, um fernzusehen.
Wenn Sie die Reihenfolge der Fernsehsender ändern
möchten, lesen Sie bitte unter Abschnitt Neu-
anordnen der Sender in der Bedieningsanleitung nach.
L'installation automatique s'est déroulée avec succès.
Appuyez sur la touche rouge pour regarder la télé-
vision. Si vous voulez changer l'ordre des chaînes,
reportez-vous à la section Réorganisation des chaînes
du mode d’emploi.
U heeft de installatie succesvol beëindigd.
Druk op de rode toets om TV te kijken.
Wilt u de volgorde van de zenders veranderen, zie
Zender volgorde veranderen in de gebruikers-
handleiding.
La configurazione è stata completata.
Premere il tasto rosso per guardare la televisione.
Se si desidera modificare l'ordine dei canali TV, con-
sultare la sezione Riordinare i canali del manuale di
istruzioni.
La instalación se ha realizado correctamente.
Pulse el botón rojo para ver la televisión.
Si quiere cambiar el orden de los canales de
televisión, consulte la sección Reordenación de los
canales del manual de usuario.
•
•
•
•
•
•
�•••

Blu-ray Disc player, HD game console
Blu-ray Disc-player, HD-Spiele
Lecteur Blu-ray Disc, console de jeux HD
Blu-ray Disc speler, HD spel console
Lettore Blu-ray Disc, HD videogiochi
Reproductor Blu-ray Disc, juegos HD
Caution
Disconnect the TV mains power
before you connect your devices.
Achtung
Ziehen Sie den Netzstecker des
Fernsehgeräts heraus, bevor Sie
Ihre Geräte anschließen.
Attention
Le téléviseur doit être hors tension
lorsque vous effectuez les branche-
ments.
Waarschuwing
Haal de TV stekker uit het stop-
contact, wanneer u randapparatuur
aansluit.
Attenzione
Scollegare il cavo di alimentazione
del televisore prima di scollegare gli
altri dispositivi.
Precaución
Desconecte la alimentación del tele-
visor antes de conectar otros dispo-
sitivos.
•
•
•
•
•
•
DE
FR
NL
IT
ES
Blu-ray Disc player
HD Game console
TV
OUT
HDMI

DVD Home Theater system
DIGITAL AUDIO
IN
DVD Home Theatre System
DVD Home Entertainment-System
Système Home Cinéma DVD
DVD Home Theatre systeem
Sistema Home Theatre DVD
Sistema de cine en casa con DVD
•
•
•
•
•
TV
IN
OUT
HDMI
TO TV
TV
Or use a Scart connection.
Oder benutzen Sie einen Scart-Anschluß.
Ou bien utiliser une prise péritel.
Of gebruik een Scart aansluiting.
O usi un collegamento di Scart.
O utilice una conexión de euroconector.
•
•
•
•
•
•

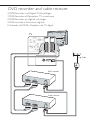
DVD recorder and cable receiver
DVD Recorder und Digital-TV-Empfänger
DVD Recorder et Récepteur TV numérique
DVD Recorder en digitale ontvanger
DVD recorder e Ricevitore digitale
Grabador de DVD y Receptor de TV digital
•
•
•
•
•
DVD recorder
Cable receiver
OUT
IN
AUX
TO TV
TO TV
AUX
ANTENNA
OUT
IN
ANTENNA
Cable
TV

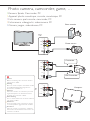
Photo camera, camcorder, game, …
Kamera, Spiele, Camcorder, PC
Appareil photo numérique, console, caméscope, PC
Foto camera, spel console, camcorder, PC
Fotocamera, videogiochi, videocamera, PC
Cámara, juegos, videocámara, PC
•
•
•
•
•
Computer
DVI
TV OUT
TV
Game console
Camcorder
HD Camcorder
•
•
•
•
•
•
Caution
Before connecting a PC, set the PC monitor
refresh rate to 60Hz.
Achtung
Bevor Sie einen Computer anschließen, stellen
Sie die Bildschirmaktualisierungsrate des
PC-Monitors auf 60Hz ein.
Attention
Avant de connecter un ordinateur personnel,
réglez la fréquence de rafraîchissement du
moniteur de l’ordinateur à 60Hz.
Waarschuwing
Voor u de PC aansluit, zet de refresh-snelheid
van de PV op 60Hz.
Attenzione
Prima di collegare il PC, impostare il monitor
su una frequenza di aggiornamento di 60 Hz.
Precaución
Antes de conectar un ordenador, establezca
la frecuencia de actualización del monitor del
ordenador en 60 Hz.
Photo camera
S VIDEO
VIDEO
AUDIO
L
R
L
USB
HDMI
SIDE
S VIDEO
VIDEO
AUDIO
L
R
L
USB
HDMI
SIDE
S VIDEO
VIDEO
AUDIO
L
R
L

Specifications are subject to change without notice
Trademarks are the property of Koninklijke Philips Electronics N.V. or their respective owners
2008 © Koninklijke Philips Electronics N.V. All rights reserved
www.philips.com
-
 1
1
-
 2
2
-
 3
3
-
 4
4
-
 5
5
-
 6
6
-
 7
7
-
 8
8
-
 9
9
-
 10
10
-
 11
11
-
 12
12


Philips 47PFL7403D/10 Schnellstartanleitung
- Typ
- Schnellstartanleitung
- Dieses Handbuch eignet sich auch für
in anderen Sprachen
- français: Philips 47PFL7403D/10 Guide de démarrage rapide
- español: Philips 47PFL7403D/10 Guía de inicio rápido
- italiano: Philips 47PFL7403D/10 Guida Rapida
- Nederlands: Philips 47PFL7403D/10 Snelstartgids
Verwandte Artikel
-
Philips 42PFL7623D/10 Benutzerhandbuch
-
Philips 42PFL9803H/10 Schnellstartanleitung
-
Philips 32PFL9613D/10 Schnellstartanleitung
-
Philips 37PFL9903H/10 Schnellstartanleitung
-
-
-
Philips 47PFL9532D/10 Schnellstartanleitung
-
Philips 19PFL5403D/10 Bedienungsanleitung