Bauknecht WA PURE XXL 34 BW Installationsanleitung
- Kategorie
- Waschmaschinen
- Typ
- Installationsanleitung

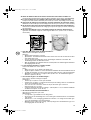
AUFSTELLANWEISUNG
GERÄUSCH, ZU STARKE VIBRATIONEN UND
WASSERLECKS KÖNNEN DURCH UNSACHGEMÄßE
INSTALLATION VERURSACHT WERDEN.
Falls die Waschmaschine KEIN Einbaumodell ist:
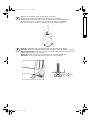
BEIM TRANSPORT DAS GERÄT NIEMALS AN DER
ARBEITSPLATTE ANHEBEN.
•
Diese “AUFSTELLANWEISUNG” vor der Inbetriebnahme durchlesen.
•
Die “AUFSTELLANWEISUNG” zum späteren Nachschlagen aufbewahren.
•
Bitte die Hinweise zur Entsorgung des Verpackungsmaterials in der
Bedienungsanleitung beachten.
INSTALLATION GUIDE
NOISE, EXCESSIVE VIBRATIONS AND WATER
LEAKAGES CAN BE CAUSED BY INCORRECT
INSTALLATION.
If your washing machine is NOT a built-in model:
NEVER MOVE THE APPLIANCE BY CARRYING IT AT
THE WORKTOP.
•
Read this “INSTALLATION GUIDE” before operating.
•
Keep this “INSTALLATION GUIDE” for future reference.
•
Read the general recommendations about disposing of packaging in the
Instructions for Use.
NOTICE D’INSTALLATION
LA PRÉSENCE DE BRUITS, DE VIBRATIONS
EXCESSIVES ET DE FUITES D’EAU PEUT ÊTRE DUE À
UNE MAUVAISE INSTALLATION.
Si votre lave-linge n’est PAS un modèle intégré:
DÉPLACEZ LA MACHINE, SANS LA TENIR PAR LE
PLAN DE TRAVAIL.
•
Veuillez lire ce “GUIDE D’INSTALLATION” avant d’utiliser la machine.
•
Conservez ce “GUIDE D’INSTALLATION” en cas de consultation ultérieure.
•
Lisez les recommandations générales sur l’utilisation de l’emballage dans
la Notice d’emploi.
D
GB
F
10200439.fm Page 1 Friday, June 6, 2008 4:29 PM
Black process 45.0° 130.0 LPI
Seite wird geladen ...

3
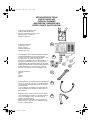
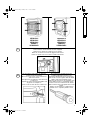
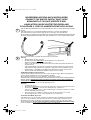
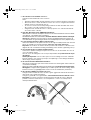
MITGELIEFERTE TEILE
PARTS SUPPLIED
PIÈCES FOURNIES
GELEVERDE ONDERDELEN
PEZZI FORNITI IN DOTAZIONE
•
Verpackung enthält Kleinteile
Package with small items
Sachet contenant les petites pièces
Zak met kleine onderdelen
Busta con minuteria
•
Bedienungsanleitung
Instruction for use
Notice d’emploi
Gebruiksaanwijzing
Istruzioni per l’uso
•
4 Plastikkappen (bei bestimmten Modellen befinden
sich die Plastikkappen an der Geräterückseite)
4 plastic caps (for certain models, the plastic caps
are attached to the back of the appliance)
4 bouchons en plastique (pour certains modèles, les
bouchons sont attachés à l’arrière de la machine)
4 plastic doppen (bij bepaalde modellen zijn de plastic
doppen bevestigd aan de achterkant van het apparaat)
4 tappi di plastica (per alcuni modelli, i tappi di
plastica sono attaccati al retro dell’apparecchio)
•
Schraubenschlüssel
Wrench
Clé
Sleutel
Chiave
•
Zulaufschlauch (in der Trommel oder bereits installiert)
Inlet hose (inside the machine or already installed)
Tuyau d’arrivée d’eau (à l’intérieur de la machine
ou déjà installé)
Toevoerslang (in de machine of al geïnstalleerd)
Tubo di alimentazione (all’interno della lavatrice o
già installato)
•
Krümmer (in der Trommel oder bereits installiert)
“U”-bend (inside the machine or already installed)
Crosse de vidange coudée (à l’intérieur de la
machine ou déjà installée)
Elleboogstuk (in de machine of al geïnstalleerd)
Gomito a “U” per tubo di scarico (all’interno della
lavatrice o già installato)
A
B
OU
ODER
OR
OF
O
C
D
E
10200439.fm Page 3 Friday, June 6, 2008 4:29 PM
Black process 45.0° 130.0 LPI

4
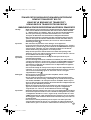
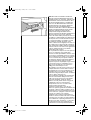
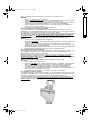
TRANSPORTSICHERUNGSSCHRAUBEN ENTFERNEN!
REMOVE TRANSPORT BOLTS!
ENLEVEZ LE BRIDAGE DE TRANSPORT !
VERWIJDER DE TRANSPORTSCHROEVEN!
RIMUOVERE LE STAFFE DI PROTEZIONE USATE PER IL TRASPORTO!
Wichtig: - Nicht entfernte Transportsicherungsschrauben können das Gerät beschädigen.
- Falls sich der Ablaufschlauch bei Ihrer Waschmaschine im Gerät befindet
(s. “Ablaufschlauch anschließen”, Abb. 10 / II), diesen VOR dem Entfernen
der Transportsicherungsschrauben herausziehen, da er sonst beim
Transport der Maschine zum Aufstellort beschädigt werden könnte.
- Die Transportsicherungsschrauben und den Schraubenschlüssel für den
späteren Transport des Gerätes aufbewahren und die Schrauben dann in
umgekehrter Reihenfolge einsetzen. (für “Version II” siehe zusätzliche
Anweisungen unter
.
Important: - Not removed transport bolts cause damages to the appliance!
- If your washer model has the drain hose inside the appliance (see “Connect
the Drain Hose”, picture 10 / II), pull out the drain hose BEFORE removing the
transport bolts, otherwise you risk to damage the drain hose inside the
washer while moving the appliance to its final position.
- Keep the transport bolts and the wrench for further transporting of the
appliance; in this case refit the transport bolts in reverse order (for “Version
II” see additional instructions under
.
Remarque
importante :
- Il faut impérativement enlever le bridage de transport afin de ne pas
endommager l’appareil!
- Si votre lave-linge renferme la conduite d’écoulement (voir “Raccorder la
conduite d’écoulement”, image 10 / II), sortez la conduite AVANT de déposer
le bridage de transport, sinon vous risqueriez d’endommager la conduite
d’écoulement à l’intérieur de la machine lors du déplacement de l’appareil
dans sa position définitive.
- Conservez le bridage de transport et la clé pour de futurs déplacements de
l’appareil ; si ce cas se présente, montez le bridage de transport en suivant le
sens inverse du démontage (pour la “Version II” voir les consignes
supplémentaires dans
.
Belangrijk: - Als de transportschroeven niet worden verwijderd, kan dit schade
veroorzaken aan het apparaat!
- Als uw model wasmachine de afvoerslang binnen het apparaat heeft (zie
“Aansluiten van de afvoerslang”, afbeelding 10 / II), trek de afvoerslang dan
naar buiten VOORDAT u de transportschroeven verwijdert. Anders loopt u
het risico dat u de afvoerslang binnen de wasmachine beschadigt terwijl u het
apparaat op zijn definitieve positie zet.
- Bewaar de transportschroeven en de sleutel voor later transport van het
apparaat; monteer de transportschroeven in dit geval in omgekeerde
volgorde (zie voor “Versie II” de aanvullende instructies onder
.
Importante: - Eventuali staffe di protezione non rimosse possono danneggiare la lavatrice!
- Se la lavatrice presenta il tubo di scarico all’interno dell’apparecchio (vedere
“Collegamento del tubo di scarico”, figura 10 / II), estrarre il tubo di scarico
PRIMA di rimuovere le staffe di protezione per il trasporto, per non rischiare
di danneggiare il tubo all’interno della lavatrice durante il trasporto nella sua
posizione finale.
- Conservare le staffe di protezione per il trasporto e la chiave per futuri
trasporti della lavatrice in questo caso, rimontare le staffe di protezione in
ordine inverso (per la “Versione II” vedere ulteriori istruzioni per l’uso al
.
2
2
2
2
2
10200439.fm Page 4 Friday, June 6, 2008 4:29 PM
Black process 45.0° 130.0 LPI
Seite wird geladen ...
Seite wird geladen ...
Seite wird geladen ...
Seite wird geladen ...
Seite wird geladen ...

10
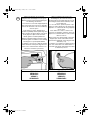
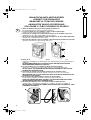
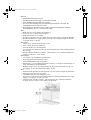
WASSEREINLAUFSCHLAUCH ANSCHLIEßEN
CONNECT THE WATER SUPPLY INLET HOSE
BRANCHEZ LE TUYAU D’ARRIVÉE D’EAU
AANSLUITEN VAN DE WATERTOEVOERSLANG
COLLEGARE IL TUBO DI ALIMENTAZIONE DELL’ACQUA
Falls der Wasserzulaufschlauch noch nicht installiert ist, muss er an das Gerät angeschraubt
werden.
If the water inlet hose is not already installed, it must be screwed to the appliance.
Si le tuyau d’arrivée d’eau n’est pas déjà en place, il doit être vissé à la machine.
Als de watertoevoerslang nog niet geïnstalleerd is, moet hij aan het apparaat worden geschroefd.
Se il tubo di alimentazione dell’acqua non è già installato, deve essere avvitato alla lavatrice.
Den Schlauchanschluss
von Hand am Wasserhahn festschrauben.
Achtung:
• Ablaufschlauch knickfrei verlegen!
• Die Waschmaschine
darf nicht
an die Mischbatterie eines drucklosen
Heißwasseraufbereiters angeschlossen werden.
• Prüfen, ob die Anschlüsse der Waschmaschine wasserdicht sind, indem der Hahn voll
aufgedreht wird.
• Falls Schlauchlänge nicht ausreicht, vorhandenen Schlauch durch einen ausreichend
langen Druckschlauch (mindestens 1000 kPa - freigegeben nach EN 50084) ersetzen.
• Zulaufschlauch regelmäßig auf Sprödigkeit und Risse prüfen und ggf. auswechseln.
• Das Gerät kann ohne Rückflussverhinderer angeschlossen werden.
Für Modelle mit Wasserstoppschlauch:
Falls die Schlauchlänge nicht ausreicht, durch einen drei Meter langen Wasserstoppschlauch
ersetzen (beim Kundendienst oder im Fachhandel erhältlich).
Dieser Austausch darf nur von einem Elektriker vorgenommen werden.
Im Zulaufschlauch und im Kunststoffgehäuse am Wasseranschluss sind je nach Ausstattung elektrische
Bauteile enthalten.
Deshalb den Schlauch nicht durchschneiden und das Kunststoffgehäuse
nicht in Wasser tauchen
. Bei beschädigtem Schlauch das Gerät sofort vom Netz trennen.
Screw by hand the inlet hose
onto the tap tightening the nut.
Attention:
• no kinks in the hose!
• The appliance
must not
be connected to the mixing tap of an un-pressurized water heater.
• Check water-tightness of connections by turning the tap completely on.
• If the hose is too short, replace it with a suitable length of pressure resistant hose (1000
kPa min, EN 50084 approved type).
• Check the inlet hose regularly for brittleness and cracks and replace if necessary.
• The washing machine can be connected without a non-return valve.
For models with Water Stop hose:
If the flexible hose is too short, replace it with a 3 m Water Stop hose (available from After-Sales
Service or from your dealer). This replacement is only to be carried out by a trained electrician.
Depending on the model, the inlet hose and the plastic enclosure at the tap connection contain
electrical components.
Do not cut the hose and do not immerse the plastic enclosure in water
.
Isolate the appliance from the mains immediately if the hose is damaged.
7
8
10200439.fm Page 10 Friday, June 6, 2008 4:29 PM
Black process 45.0° 130.0 LPI
Seite wird geladen ...
Seite wird geladen ...

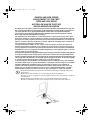
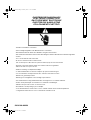
13
III. Wenn der Ablaufschlauch im oberen Teil der Waschmaschine installiert ist:
Von den beiden mit Pfeilen bezeichneten Haltern aushaken (siehe unten, modellabhängig).
III. In case the drain hose is installed in the upper part of the washing machine:
Unclip it from both holders marked by the arrows (see below, depending on the model).
III. Si le tuyau de vidange est installé dans la partie supérieure de la machine à laver :
Débranchez-le des deux clips comme indiqué par les flèches (voir ci-dessous, selon le modèle).
III. Als de afvoerslang in het bovenste gedeelte van de wasmachine geïnstalleerd is:
maak hem los uit beide klemmen die aangegeven zijn met de pijlen (zie onder, afhankelijk
van het model).
III. Se il tubo flessibile di scarico è installato nella parte superiore della lavatrice:
sganciarlo da entrambi i supporti contrassegnati dalle frecce (vedere sotto, in funzione
del modello).
I. Falls Ihre Waschmaschine ein Einbaumodell ist:
Ablaufschlauch am Siphon montieren.
Hinweise:
• Ablaufschlauch knickfrei verlegen.
• Siphonhöhe - der Ablaufschlauchanschluss muss zwischen 70 cm und 125 cm über
dem Fußboden liegen
• Für eine Schlauchverlängerung einen gleichartigen Schlauch verwenden. Die
Verbindungsstellen mit Schellen sichern.
• Max. Gesamtlänge des Ablaufschlauchs: 2,50 m (in diesem Fall beträgt die maximale
Befestigungshöhe 90 cm).
I. If your washing machine is a built-in model:
Connect the drain hose to the siphon.
Notes:
• Make sure there are no kinks in the drain hose.
• Height for siphon - drain hose connection must be minimum 70 cm and maximum 125 cm
• To make an extension, use a hose of the same type and secure the connections with clips.
• Maximum overall drain hose length: 2,50 m (in this case, the maximum height for
fixation to siphon is 90 cm).
I. Si votre lave-linge est un modèle intégré :
Raccordez le tuyau de vidange au siphon.
Remarques :
• Vérifiez que le tuyau ne forme pas de nœud.
• Hauteur pour le siphon - le branchement du tuyau de vidange doit être au minimum
70 cm et au maximum 125 cm
• Pour effectuer une extension, utilisez un tuyau du même type et fixez les
branchements avec les clips.
• Longueur maximale du tuyau de vidange : 2,50 m (dans ce cas, la hauteur maximum
de fixation du siphon est de 90 cm).
I. Als uw wasmachine een inbouwmodel is:
Sluit de afvoerslang aan op de sifon.
Opmerkingen:
• Let erop dat er geen knikken in de slang zitten.
• De hoogte van de aansluiting sifon - afvoerslang moet minimaal 70 cm en maximaal
125 cm zijn.
• Gebruik, als er een verlenging gemaakt moet worden, een slang van hetzelfde type
en zet de aansluitingen vast met klemmen.
• Maximale lengte van de afvoerslang: 2,50 m (in dit geval is de maximale hoogte voor
bevestiging aan de sifon 90 cm).
10
10200439.fm Page 13 Friday, June 6, 2008 4:29 PM
Black process 45.0° 130.0 LPI
Seite wird geladen ...
Seite wird geladen ...
Seite wird geladen ...
-
 1
1
-
 2
2
-
 3
3
-
 4
4
-
 5
5
-
 6
6
-
 7
7
-
 8
8
-
 9
9
-
 10
10
-
 11
11
-
 12
12
-
 13
13
-
 14
14
-
 15
15
-
 16
16


Bauknecht WA PURE XXL 34 BW Installationsanleitung
- Kategorie
- Waschmaschinen
- Typ
- Installationsanleitung
in anderen Sprachen
Verwandte Artikel
-
Ignis LOE 8056 Installationsanleitung
-
Bauknecht Super Eco 7615 Installationsanleitung
-
-
LADEN AWO 3761/5/S Bedienungsanleitung
-
Whirlpool AWO/D 7710 WP Bedienungsanleitung
-
-
LADEN WAP 8788/2 Bedienungsanleitung
-
-
-