Parkside PWSAP 20-Li A1 Operation and Safety Notes
- Kategorie
- Elektrowerkzeuge
- Typ
- Operation and Safety Notes

CORDLESS ANGLE GRINDER 20 V
Operation and Safety Notes
Translation of the original instructions
OWIM GmbH & Co. KG
Stiftsbergstraße 1
DE-74167 Neckarsulm
GERMANY
Model No.: HG02735-BS
Version: 08/2017
CORDLESS ANGLE GRINDER 20 V PWSAP 20-Li A1
IAN 289752IAN 289752
GB / IE / NI Operation and Safety Notes Page 5
DE / AT / CH Bedienungs- und Sicherheitshinweise Seite 20
AKKU-WINKELSCHLEIFER 20 V
Bedienungs- und Sicherheitshinweise
Originalbetriebsanleitung

A
3
5
6
7
8
9
1
12
10
11
13
15
14
2
4

Table of contents
List of pictograms used ......................................................................................................... Page 6
Introduction ............................................................................................................................... Page 6
Intended use .................................................................................................................................. Page 6
Parts description ............................................................................................................................. Page 6
Scope of delivery ........................................................................................................................... Page 6
Technical data ................................................................................................................................ Page 7
Safety warnings ...................................................................................................................... Page 7
General power tool safety warnings .............................................................................................. Page 7
Angle grinder warnings ................................................................................................................. Page 9
Vibration and noise reduction ........................................................................................................ Page 12
Behaviour in emergency situations ................................................................................................. Page 12
Residual risks .................................................................................................................................. Page 12
Battery charger safety warnings .................................................................................................... Page 12
Initial use ..................................................................................................................................... Page 13
Unpacking ..................................................................................................................................... Page 13
Accessories .................................................................................................................................... Page 13
Before use .................................................................................................................................. Page 13
Attaching / removing the battery pack .......................................................................................... Page 13
Charging the battery pack ............................................................................................................. Page 14
Checking the battery level ............................................................................................................. Page 14
Attaching / removing the auxiliary handle .................................................................................... Page 14
Adjusting the guard ........................................................................................................................ Page 14
Attaching / removing the accessory .............................................................................................. Page 15
Operation ................................................................................................................................... Page 16
Switching on and off ...................................................................................................................... Page 16
Trial run .......................................................................................................................................... Page 16
Grinding ......................................................................................................................................... Page 16
Wire brushing ................................................................................................................................ Page 16
After use ......................................................................................................................................... Page 16
Cleaning and care ................................................................................................................... Page 16
Cleaning ........................................................................................................................................ Page 16
Maintenance .................................................................................................................................. Page 17
Repair ............................................................................................................................................ Page 17
Storage .......................................................................................................................................... Page 17
Transportation ................................................................................................................................ Page 17
Troubleshooting ....................................................................................................................... Page 17
Disposal ....................................................................................................................................... Page 18
Service ......................................................................................................................................... Page 18
Warranty .................................................................................................................................... Page 18
Translation of original declaration of conformity ..................................................... Page 19
5 GB / IE / NI

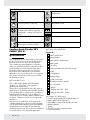
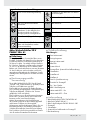
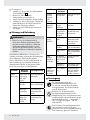
Q Parts description
Figure A:
1
Battery level button
2
Release button
3
Battery level indication light
4
Battery pack
5
Chuck key
6
Auxiliary handle with chuck key storage
7
Guard
8
Locking flange
9
Backing flange
10
Spindle lock button
11
Threads for auxiliary handle
12
On / off switch
13
Charger
14
Charging status LED – Red
15
Charging status LED – Green
Q Scope of delivery
1 Cordless angle grinder 20 V PWSAP 20-Li A1
1 Battery pack PWSAP 20-Li A1-1
1 Rapid battery charger PWSAP 20-Li A1-2-BS
1 Auxiliary handle
1 Guard
1 Chuck key stored in auxiliary handle
1 Instruction manual
Cordless Angle Grinder 20 V
PWSAP 20-Li A1
Q Introduction
We congratulate you on the purchase of your new
product. You have chosen a high quality product.
The instructions for use are part of the product.
They contain important information concerning
safety, use and disposal. Before using the product,
please familiarise yourself with all of the safety
information and instructions for use. Only use
the product as described and for the specified
applications. If you pass the product on to anyone
else, please ensure that you also pass on all the
documentation with it.
Q Intended use
This cordless angle grinder 20 V (hereinafter
“product” or “power tool”) is designed for
grinding and wire brushing.
The product is not intended for any other types of
applications (e.g. grinding with unsuitable grinding
tools, grinding with a coolant solution, grinding or
cutting hazardous materials such as asbestos).
The product is to be used by adults. Children under
the age of 16 may not use the tool except under
supervision.
Any other use or modification of the product are
considered improper use and can result in hazards
such as death, life-threatening injuries and damage.
The manufacturer is not liable for any damages
caused by improper use. The product is not intended
for commercial use or for any other application.
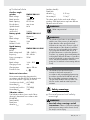
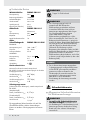
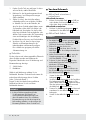
List of pictograms used:
Read the instruction manual. Protect the battery pack against water
and moisture.
Protect the battery pack from fire.
Use in dry indoor rooms only.
Alternating current
Switch the appliance off and remove
the battery pack before replacing
attachments, cleaning and when not
in use.
Direct current
T3.15A
Fuse
Protection class II (Double insulation) Wear eye protection!
Protect the battery pack against heat
and continuous intense sunlight.
Wear ear protection!
6 GB / IE / NI

Q Technical data
Cordless angle
grinder: PWSAP 20-Li A1
Rated voltage: 20 V
Rated speed n: 10000 min
-1
Rated capacity: Ø 125 mm
Disc thickness: max. 6 mm
Spindle thread: M14
Weight (incl.
accessories): 2.66 kg
Battery pack: PWSAP 20-Li A1-1
Type: Lithium ion
Rated voltage: 20 V
max.
Capacity: 5 Ah
Number of cells: 10
Rapid battery
charger: PWSAP 20-Li A1-2-BS
INPUT:
Rated voltage and
frequency:
100 – 240 V
~
,
50 – 60 Hz
Power consumption: 95 W
OUTPUT:
Rated voltage: 14.4 – 20 V
Charging current: 4 A
Charging time: approx. 90 min
Protection class:
II /
Noise emission value:
Noise measurement value determined in
accordance with EN 60745. The A-rated noise
level of the product is typically as follows:
Sound pressure level L
pA
: 68.7 dB(A)
Uncertainty K
pA
: 3 dB
Sound power level L
WA
: 79.7 dB(A)
Uncertainty K
WA
: 3 dB
Vibration values:
Total vibration values (vector total of three
directions) determined in accordance with
EN 60745:
(main handle)
Hand/arm
vibration a
h,AG
: 4.37 m/s
2
(auxiliary handle)
Hand/arm
vibration a
h,AG
: 5.23 m/s
2
Uncertainty K: 1.5 m/s
2
The values apply for the work mode surface
grinding. Other applications may have different
vibration emission values
WARNING!
Wear ear protection!
WARNING!
u The vibration level varies in accordance
with the use of the power tool and maybe
higher than the value specified in these
instructions in some cases. There is a risk of
underestimation of the vibration load if the
power tool is used regularly in this manner.
Try to keep the vibration loads as low as
possible. Measures to reduce the vibration
load are, e.g. wearing gloves and limiting the
working time. Wherein all states of operation
must be included (e.g. times when the power
tool is switched off and times where the
power tool is switched on but running without
load).
NOTE
u The vibration level specified in these
instructions has been measured in
accordance with a standardised measuring
procedure specified in EN 60745 and can
be used to make equipment comparisons.
The specified vibration emission value can
also be used to make an initial exposure
estimate.
Safety warnings
Q General power tool safety
warnings
WARNING!
u Read all safety warnings and all
instructions. Failure to follow the warnings
and instructions may result in electric shock,
fire and/or serious injury.
7 GB / IE / NI

Save all warnings and instructions for
future reference.
The term “power tool” in the warnings refers to
your mains-operated (corded) power tool or
battery-operated (cordless) power tool.
Work area safety
1. Keep work area clean and well lit.
Cluttered or dark areas invite accidents.
2. Do not operate power tools in
explosive atmospheres, such as in
the presence of flammable liquids,
gases or dust. Power tools create sparks
which may ignite the dust or fumes.
3. Keep children and bystanders away
while operating a power tool.
Distractions can cause you to lose control.
Electrical safety
1. Power tool plugs must match the
outlet. Never modify the plug in any
way. Do not use any adapter plugs
with earthed (grounded) power
tools. Unmodified plugs and matching
outlets will reduce risk of electric shock.
2. Avoid body contact with earthed or
grounded surfaces, such as pipes,
radiators, ranges and refrigerators.
There is an increased risk of electric shock if
your body is earthed or grounded.
3. Do not expose power tools to rain or
wet conditions. Water entering a power
tool will increase the risk of electric shock.
4. Do not abuse the cord. Never use
the cord for carrying, pulling or
unplugging the power tool. Keep
cord away from heat, oil, sharp
edges or moving parts. Damaged or
entangled cords increase the risk of electric
shock.
5. When operating a power tool
outdoors, use an extension cord
suitable for outdoor use. Use of a cord
suitable for outdoor use reduces the risk of
electric shock.
6. If operating a power tool in a
damp location is unavoidable, use
a residual current device (RCD)
protected supply. Use of an RCD reduces
the risk of electric shock.
Personal safety
1. Stay alert, watch what you are
doing and use common sense when
operating a power tool. Do not use
a power tool while you are tired or
under the influence of drugs, alcohol
or medication. A moment of inattention
while operating power tools may result in
serious personal injury.
2. Use personal protective equipment.
Always wear eye protection. Protective
equipment such as dust mask, non-skid
safety shoes, hard hat, or hearing protection
used for appropriate conditions will reduce
personal injuries.
3. Prevent unintentional starting.
Ensure the switch is in the off
-position before connecting to power
source and/or battery pack, picking
up or carrying the tool. Carrying
power tools with your finger on the switch or
energising power tools that have the switch
on invites accidents.
4. Remove any adjusting key or
wrench before turning the power
tool on. A wrench or a key left attached to
a rotating part of the power tool may result in
personal injury.
5. Do not overreach. Keep proper
footing and balance at all times.
This enables better control of the power tool
in unexpected situations.
6. Dress properly. Do not wear loose
clothing or jewellery. Keep your
hair, clothing and gloves away from
moving parts. Loose clothes, jewellery or
long hair can be caught in moving parts.
7. If devices are provided for the
connection of dust extraction and
collection facilities, ensure these are
connected and properly used. Use
of dust collection can reduce dust-related
hazards.
Power tool use and care
1. Do not force the power tool. Use
the correct power tool for your
application. The correct power tool will do
the job better and safer at the rate for which it
was designed.
2. Do not use the power tool if the
switch does not turn it on and off. Any
power tool that cannot be controlled with the
switch is dangerous and must be repaired.
8 GB / IE / NI

3. Disconnect the plug from the power
source and/or the battery pack from
the power tool before making any
adjustments, changing accessories,
or storing power tools. Such preventive
safety measures reduce the risk of starting the
power tool accidentally.
4. Store idle power tools out of the
reach of children and do not allow
persons unfamiliar with the power
tool or these instructions to operate
the power tool. Power tools are
dangerous in the hands of untrained users.
5. Maintain power tools. Check for
misalignment or binding of moving
parts, breakage of parts and any
other condition that may affect the
power tool’s operation. If damaged,
have the power tool repaired before
use. Many accidents are caused by poorly
maintained power tools.
6. Keep cutting tools sharp and clean.
Properly maintained cutting tools with sharp
cutting edges are less likely to bind and are
easier to control.
7. Use the power tool, accessories
and tool bits etc. in accordance
with these instructions, taking into
account the working conditions and
the work to be performed. Use of the
power tool for operations different from those
intended could result in a hazardous situation.
Battery tool use and care
1. Recharge only with the charger
specified by the manufacturer. A
charger that is suitable for one type of battery
pack may create a risk of fire when used with
another battery pack.
2. Use power tools only with
specifically designated battery
packs. Use of any other battery packs may
create a risk of injury and fire.
3. When battery pack is not in use,
keep it away from other metal
objects, like paper clips, coins, keys,
nails, screws or other small metal
objects, that can make a connection
from one terminal to another. Shorting
the battery terminals together may cause
burns or a fire.
4. Under abusive conditions, liquid
may be ejected from the battery;
avoid contact. If contact accidentally
occurs, flush with water. If liquid
contacts eyes, additionally seek
medical help. Liquid ejected from the
battery may cause irritation or burns.
Service
1. Have your power tool serviced by
a qualified repair person using only
identical replacement parts. This will
ensure that the safety of the power tool is
maintained.
Q Angle grinder warnings
Safety warnings common for grinding
and wire brushing operations:
1. This power tool is intended to
function as a grinder and wire
brush. Read all safety warnings,
instructions, illustrations and
specifications provided with this
power tool. Failure to follow all instructions
listed below may result in electric shock, fire
and/or serious injury.
2. Operations such as sanding,
polishing or cutting-off are not
recommended to be performed with
this power tool. Operations for which the
power tool was not designed may create a
hazard and cause personal injury.
3. Do not use accessories which
are not specifically designed
and recommended by the tool
manufacturer. Just because the accessory
can be attached to your power tool, it does
not assure safe operation.
4. The rated speed of the accessory
must be at least equal to the
maximum speed marked on the
power tool. Accessories running faster than
their rated speed can break and fly apart.
5. The outside diameter and the
thickness of your accessory must be
within the capacity rating of your
power tool. Incorrectly sized accessories
cannot be adequately guarded or controlled.
6. Threaded mounting of accessories
must match the grinder spindle
thread. For accessories mounted
by flanges, the arbour size hole of
the accessory must fit the locating
diameter of the flange. Accessories that
do not match the mounting hardware of the
power tool will run out of balance, vibrate
excessively and may cause loss of control.
9 GB / IE / NI

7. Do not use a damaged accessory.
Before each use inspect the
accessory such as abrasive wheels
for chips and cracks, backing pad
for cracks, tear or excess wear,
wire brush for loose or cracked
wires. If power tool or accessory
is dropped, inspect for damage or
install an undamaged accessory.
After inspecting and installing an
accessory, position yourself and
bystanders away from the plane
of the rotating accessory and run
the power tool at maximum no-
load speed for one minute. Damaged
accessories will normally break apart during
this test time.
8. Wear personal protective
equipment. Depending on
application, use face shield, safety
goggles or safety glasses. As
appropriate, wear dust mask,
hearing protectors, gloves and
workshop apron capable of stopping
small abrasive or workpiece
fragments. The eye protection must be
capable of stopping flying debris generated
by various operations. The dust mask or
respirator must be capable of filtrating
particles generated by your operation.
Prolonged exposure to high intensity noise
may cause hearing loss.
9. Keep bystanders a safe distance
away from work area. Anyone
entering the work area must wear
personal protective equipment.
Fragments of workpiece or of a broken
accessory may fly away and cause injury
beyond immediate area of operation.
10. Hold the power tool by insulated
gripping surfaces only, when
performing an operation where
the cutting tool may contact hidden
wiring. Contact with a “live” wire will also
make exposed metal parts of the power tool
“live” and could give the operator an electric
shock.
11. Never lay the power tool down
until the accessory has come to a
complete stop. The spinning accessory
may grab the surface and pull the power tool
out of your control.
12. Do not run the power tool while
carrying it at your side. Accidental
contact with the spinning accessory could
snag your clothing, pulling the accessory into
your body.
13. Regularly clean the power tool’s
air vents. The motor’s fan will draw
the dust inside the housing and excessive
accumulation of powdered metal may cause
electrical hazards.
14. Do not operate the power tool near
flammable materials. Sparks could
ignite these materials.
15. Do not use accessories that require
liquid coolants. Using water or other
liquid coolants may result in electrocution or
shock.
Further safety instructions for all
operations - Kickback and related
warnings
Kickback is a sudden reaction to a pinched or
snagged rotating wheel, backing pad, brush or
any other accessory. Pinching or snagging causes
rapid stalling of the rotating accessory which in
turn causes the uncontrolled power tool to be
forced in the direction opposite of the accessory’s
rotation at the point of the binding.
For example, if an abrasive wheel is snagged or
pinched by the workpiece, the edge of the wheel
that is entering into the pinch point can dig into
the surface of the material causing the wheel to
climb out or kick out. The wheel may either jump
toward or away from the operator, depending on
direction of the wheel’s movement at the point of
pinching. Abrasive wheels may also break under
these conditions.
Kickback is the result of power tool misuse and/or
incorrect operating procedures or conditions and
can be avoided by taking proper precautions as
given below.
¢ Maintain a firm grip on the power
tool and position your body and
arm to allow you to resist kickback
forces. Always use auxiliary handle,
if provided, for maximum control
over kickback or torque reaction
during start-up. The operator can control
torque reactions or kickback forces, if proper
precautions are taken.
¢ Never place your hand near the
rotating accessory. Accessory may
kickback over your hand.
10 GB / IE / NI

¢ Do not position your body in the
area where power tool will move
if kickback occurs. Kickback will propel
the tool in direction opposite to the wheel’s
movement at the point of snagging.
¢ Use special care when working
corners, sharp edges etc. Avoid
bouncing and snagging the
accessory. Corners, sharp edges or
bouncing have a tendency to snag the
rotating accessory and cause loss of control
or kickback.
¢ Do not attach a saw chain
woodcarving blade or toothed saw
blade. Such blades create frequent kickback
and loss of control.
Additional safety instructions for
grinding - Safety warnings specific for
grinding
1. Use only wheel types that are
recommended for your power tool
and the specific guard designed for
the selected wheel. Wheels for which
the power tool was not designed cannot be
adequately guarded and are unsafe.
2. The grinding surface of centre
depressed wheels must be mounted
below the plane of the guard lip.
An improperly mounted wheel that projects
through the plane of the guard lip cannot be
adequately protected.
3. The guard must be securely attached
to the power tool and positioned
for maximum safety, so the least
amount of wheel is exposed towards
the operator. The guard helps to protect
the operator from broken wheel fragments,
accidental contact with wheel and sparks that
could ignite clothing.
4. Wheels must be used only for
recommended applications. For
example: do not grind with the side
of cut-off wheel. Abrasive cut-off wheels
are intended for peripheral grinding, side
forces applied to these wheels may cause
them to shatter.
5. Always use undamaged wheel
flanges that are of correct size and
shape for your selected wheel.
Proper wheel flanges support the wheel thus
reducing the possibility of wheel breakage.
Flanges for cut-off wheels may be different
from grinding wheel flanges.
6. Do not use worn down wheels from
larger power tools. Wheel intended for
larger power tool is not suitable for the higher
speed of a smaller tool and may burst.
Additional safety instructions for wire
brushing operations - Safety warnings
specific for wire brushing operations:
1. Be aware that wire bristles are
thrown by the brush even during
ordinary operation. Do not
overstress the wires by applying
excessive load to the brush. The wire
bristles can easily penetrate light clothing
and/or skin.
2. If the use of a guard is recommended
for wire brushing, do not allow any
interference of the wire wheel or
brush with the guard. Wire wheel or
brush may expand in diameter due to work
load and centrifugal forces.
Additional angle grinder warnings
¢ Only use grinding discs where the indicated
rotational speed is at least as high as what
has been specified on the name plate of the
product.
¢ Carry out a visual inspection of the grinding
disc before use. Do not use any damaged or
deformed discs. Replace any damaged or
worn discs.
¢ Make sure that the sparks produced by
grinding do not present a danger, e.g. reach
people or ignite flammable substances.
¢ Always wear safety goggles, safety gloves,
respiratory protection and ear protection
when grinding.
¢ Never keep the fingers between the disc and
spark protection or in close proximity to the
protective hoods. There is a risk of crushing.
¢ The rotating parts of the product cannot be
covered due to functional reasons. Therefore,
proceed cautiously and hold the workpiece
firmly in order to avoid slipping which could
cause your hands to come into contact with
the disc.
¢ The workpiece gets hot during grinding.
Do not touch the machined area, allow it to
cool down. There is a risk of burning. Do not
use coolants or the like.
¢ Do not work with the product, if you are tired
or have consumed alcohol or tablets. Always
have a break on time.
¢ Turn off the product and, before doing any
servicing, remove the battery pack.
11 GB / IE / NI

Q Vibration and noise reduction
To reduce the impact of noise and vibration
emission, limit the time of operation, use low-
vibration and low-noise operating modes as well
as wear personal protective equipment.
Take the following points into account to minimise
the vibration and noise exposure risks:
¢ Only use the product as intended by its
design and these instructions.
¢ Ensure that the product is in good condition
and well maintained.
¢ Use correct cutting attachments for the
product and ensure they are in good
condition.
¢ Keep tight grip on the handles/grip surface.
¢ Maintain this product in accordance with
these instructions and keep it well lubricated
(where appropriate).
¢ Plan your work schedule to spread any high
vibration tool use across a longer period of
time.
Q Behaviour in emergency
situations
Familiarise yourself with the use of this product by
means of this instruction manual. Memorise the
safety warnings and follow them to the letter. This
will help to prevent risks and hazards.
¢ Always be alert when using this product, so
that you can recognise and handle risks early.
Fast intervention can prevent serious injury
and damage to property.
¢ Switch the product off and remove the battery
pack if there are malfunctions. Have the
product checked by a qualified professional
and repaired, if necessary, before you
operate it again.
Q Residual risks
Even if you are operating this product in
accordance with all the safety requirements,
potential risks of injury and damage remain. The
following dangers can arise in connection with the
structure and design of this product:
¢ Health defects resulting from vibration
emission if the product is being used over
long periods of time or not adequately
managed and properly maintained.
¢ Injuries and damage to property due to
broken cutting attachments or the sudden
impact of hidden objects during use.
¢ Danger of injury and property damage caused
by flying objects.
WARNING!
u This product produces an electromagnetic
field during operation! This field may under
some circumstances interfere with active or
passive medical implants! To reduce the risk
of serious or fatal injury, we recommend
persons with medical implants to consult their
doctor and the medical implant manufacturer
before operating this product!
Q Battery charger safety
warnings
¢ This appliance can be used
by children aged from 8 years
and above and persons with
reduced physical, sensory or
mental capabilities or lack of
experience and knowledge
if they have been given
supervision or instruction
concerning use of the
appliance in a safe way
and understand the hazards
involved.
¢ Children shall not play with
the appliance.
¢ Cleaning and user
maintenance shall not be
made by children without
supervision.
¢ Do not charge non-
rechargeable batteries.
Disregarding this instruction
may be hazardous.
12 GB / IE / NI

¢ If the supply cord is damaged,
it must be replaced by the
manufacturer, its service agent
or similarly qualified persons
in order to avoid a hazard.
¢ Protect the electrical parts
against moisture. Do not
immerse such parts in water
or other liquids to avoid
electrical shock. Never hold the
appliance under running water.
Pay attention to the instructions
provided for cleaning,
maintenance and repair.
¢ The appliance is suitable for
indoor use only.
¢ This appliance is only designed
for charging the battery pack
type: Parkside Performance
20 V battery.
CAUTION! RISK OF EXPLOSION
Never charge non-rechargeable
batteries! Protect the battery against
heat, e. g., against continuous intense
sunlight, fire, water and moisture.
Danger of explosion.
Q Initial use
Q Unpacking
WARNING!
u The product and the packaging are not
children’s toys! Children must not play with
plastic bags, sheets and small parts! There is
a danger of choking and suffocation!
1. Unpack all parts and lay them on a flat,
stable surface.
2. Remove all packing materials and shipping
devices if applicable.
3. Make sure the delivery contents are complete
and free of any damage. If you find that
parts are missing or show damage do not
use the product but contact your dealer. Do
not use the product unless missing parts have
been delivered in addition or defective parts
have been replaced. Using an incomplete
or damaged product represents a hazard to
people and property.
4. Ensure that you have all the accessories and
tools needed for assembly and operation.
This also includes suitable personal protective
equipment.
Q Accessories
To operate this product safely and correctly, the
following accessories, i. e. tools and attachments,
are necessary:
o Grinding disc
o Wire brush
Accessories and tools are available through your
authorised dealer. When buying always consider
the technical requirements of this product
(see “Technical data”).
If you are not certain, ask a qualified specialist and
get advice from your trusted dealer.
NOTE
u This instruction manual contains information
and suggestions for several attachments and
their uses. The attachments mentioned are
not necessarily included in the shipment, but
are meant to indicate additional possibilities
for using this product.
Q Before use
Q Attaching / removing the
battery pack
Attaching the battery pack:
1. Align the battery pack
4
to the handle and
slide it onto it. Ensure it clicks noticeably in
place.
13 GB / IE / NI

Removing the battery pack:
1. Press the release button
2
and remove the
battery pack
4
.
Q Charging the battery pack
NOTE
u The battery pack
4
comes partly charged.
Charge the battery pack
4
prior to first use,
ideally at least 90 minutes.
u Always pull out the plug of the charger
13
from the mains before removing or connecting
the battery pack
4
to the charger.
u Never charge the battery pack
4
when
the ambient temperature is below 10 °C or
above 40 °C.
u Rest the charger
13
for at least 15 minutes
between successive charging sessions.
u If no battery pack
4
is inserted into the
charger
13
and the charger is connected to
mains, the charging status LED
15
lights up
green.
1. Connect the battery pack
4
to the battery
charger
13
.
2. Insert the mains plug into the socket. The
charging status LED
14
lights up red.
Once the battery pack
4
is completely
charged, the green charging status LED
15
indicates that the charging process is complete.
3. Disconnect the charger
13
from the mains
and remove the battery pack
4
from the
charger.
4. Attach the battery pack
4
back to the product.
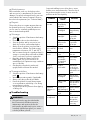
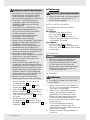
Charging status LEDs
Green LED lights up
without battery pack
Charger ready
Green LED lights up
with battery pack
Battery pack fully charged
Red LED lights up
with battery pack
Battery pack charging
Red LED flashes with
battery pack
Battery pack defect
Green LED flashes
with battery pack
Battery pack too cold or
warm
Q Checking the battery level
o Press the battery level button
1
to check the
charging level of the battery pack
4
. The
charging level will be shown on the battery
level indication light
3
.
3 Red LEDs light up maximum charging level
2 Red LEDs light up medium charging level
1 Red LEDs lights up low charging level
o Charge the battery pack
4
before operation
when it is at medium or low charging level.
Q Attaching / removing the
auxiliary handle
NOTE
u The product must only be operated with the
auxiliary handle mounted.
1. Screw the auxiliary handle
6
, depending
on the type of work, to the left, right or top of
the product using the threads for the auxiliary
handle
11
.
Q Adjusting the guard
WARNING!
u Always remove the battery pack from the
product before adjusting the guard in order
to avoid switching it on accidentally.
CAUTION! RISK OF INJURY!
u Wear protective gloves. Be careful when
gripping and turning the guard due to
potential finger squeezing hazard between
the guard and disc.
NOTE
u The product must only be operated with the
guard mounted.
14 GB / IE / NI

1. Adjust the guard
7
such that any sparks or
detached parts cannot hit either the user or
any bystanders.
2. The guard
7
must also be positioned such
that the sparks cannot ignite combustible
parts, including those in the surroundings.
3. Turn the guard
7
to the required position so
the clamp should match the notches on the
guard
7
.
Q Attaching / removing the
accessory
WARNING!
u Always remove the battery pack from the
product before changing the accessory in
order to avoid switching it on accidentally.
u Always use the correct accessories according
to the intended use! Observe the technical
requirements of this product (see section
Technical data) when purchasing and using
accessories!
u Accessories can be sharp and become hot
during use! Handle them carefully! Wear
safety gloves when handling accessories in
order to avoid injuries like burns and cuts!
u Never press the spindle lock whilst the
spindle is rotating!
u The arrow on the accessory must correspond
to the arrow showing the direction of rotation
(running direction shown on the product).
u Ensure that the accessory is suitable for the
rotational speed of the product.
u Do not use any saw blades.
CAUTION! RISK OF INJURY!
u Only use accessory recommended by the
manufacturer. Using other attachment tools
and other accessories can represent a risk of
injury for you.
u Only use accessory, which bear information
about the manufacturer, type of binding,
dimension and permitted number of
revolutions.
u Only use grinding discs where the printed
rotational speed is at least as high as what
has been specified on the product marking.
u Do not use any broken, cracked, or otherwise
damaged accessories.
u Only use flawless grinding discs (ringing
test: when you strike the disc with a plastic
hammer, it results in a clear sound).
u Ensure that the accessory dimensions match
those of the product.
u Never re-drill a locating hole which is too
small to make it larger.
u Never use separate bushings or adapters in
order to make discs with a hole that is too
large fit the product.
u Never operate the product without protective
equipment.
u Support plates or workpieces to reduce the
risk of kickback from a jammed disc. Large
workpieces may bend under their own
weight. The workpiece must be supported on
both sides of the disc, near the disc as well
as at the edge.
u Always reassemble the product completely
after replacing accessories.
1. Press and hold the spindle lock button
10
.
2. Release the locking flange
8
, with the chuck
key
5
.
3. Mount the desired accessory onto the
backing flange
9
. Label should always face
the product.
4. Mount the locking flange
8
on the spindle.
5. Press and hold the spindle lock button
10
and tighten the locking flange
8
tight again
using the chuck key
5
.
15 GB / IE / NI

Q Operation
CAUTION! RISK OF INJURY!
u Keep your hands away from the accessory
when the product is in operation.
Q Switching on and off
This power tool is to be switched on in two steps.
Switching on:
1. Push the rear part of the on / off
switch
12
down and slide it forward.
For continuous activation, now tilt the front
part downwards until it engages.
Switching off:
1. Press the rear part of the on / off switch
12
so that it snaps back into its off-position to
switch the product off.
Q Trial run
NOTE
u Always carry out a trial run before carrying
out your first grinding procedure and after
every accessory replacement. Switch the
product off immediately if the accessory is not
rotating smoothly, if considerable vibration
occurs or if you hear abnormal noises.
Q Grinding
WARNING!
u Never use a cutting disc for grinding!
1. Hold the product at a 10° to 15° angle for
easy handling and smooth grinding results.
2. Apply the grinding disc to the work surface
with a light, steady pressure for maximum
grinding efficiency. It should never be
necessary to force the product. The weight of
the product applies adequate pressure.
3. Excessive pressure will overload the motor,
slow the grinding action, put dangerous stress
on the grinding disc and causes breakage.
4. Move the product back and forth steadily.
Q Wire brushing
WARNING!
u Do not use brush that is damaged, or which
is out of balance. Use of damaged brush
could increase potential for injury from
contact with broken brush wires.
1. Avoid applying too much pressure which
causes over bending of wires, leading to
premature breakage.
2. Work with moderate feed, suited to the
material being worked.
3. Avoid bouncing and snagging the wire brush,
especially when working corners, sharp edges
etc. This can cause loss of control and kick-back.
Q After use
1. Switch the product off, remove the battery
pack
4
and let it cool down.
2. Check, clean and store the product as
described below.
Q Cleaning and care
WARNING!
Always switch the product off, remove
the battery pack and let the product
cool down before performing inspection,
maintenance and cleaning work!
Q Cleaning
o The product must always be kept clean, dry
and free from oil or grease. Remove debris
from it after each use and before storage.
o Regular and proper cleaning will help ensure
safe use and prolong the life of the product.
o Inspect the product before each use for worn
and damaged parts. Do not operate it if you
find broken and worn parts.
o Never allow fluids to get into the product.
o Clean the product with a dry cloth. Use a
brush for areas that are hard to reach.
o In particular clean the air vents after every
use with a cloth and brush.
o Remove stubborn dirt with high pressure air
(max. 3 bar).
NOTE
u Do not use chemical, alkaline, abrasive or
other aggressive detergents or disinfectants
to clean this product as they might be harmful
to its surfaces.
16 GB / IE / NI

Q Maintenance
Before and after each use, check the product
and accessories (or attachments) for wear and
damage. If required, exchange them for new ones
as described in this instruction manual. Observe
the technical requirements (see “Technical data”).
Q Repair
This product does not contain any parts that can
be repaired by the user. Contact an authorised
service centre or a similarly qualified person to
have it checked and repaired.
Q Storage
o Switch the product off and remove the battery
pack
4
.
o Clean the product as described above.
o Store the product and its accessories in a
dark, dry, frost-free, well-ventilated place.
o Always store the product in a place that is
inaccessible to children. The ideal storage
temperature is between 10 °C and 30 °C.
o We recommend using the original package for
storage or covering the product with a suitable
cloth or enclosure to protect it against dust.
o Regularly check the charge level of the
battery pack, if it is to be stored for an
extended period. Optimum storage conditions
are cool and dry.
o Grinding discs must be dry and stored
upright, and should never be stacked.
Q Transportation
o Switch the product off and remove the battery
pack
4
.
o Attach transportation guards, if applicable.
o Always carry the product by its handles.
o Protect the product from any heavy impact
or strong vibrations which may occur during
transportation in vehicles.
o Secure the product to prevent it from slipping
or falling over.
Q Troubleshooting
WARNING!
u Only perform the steps described within
these instructions! All further inspection,
maintenance and repair work must be
performed by an authorised service centre or
a similarly qualified specialist if you cannot
solve the problem yourself!
Suspected malfunctions are often due to causes
that the users can fix themselves. Therefore check
the product using this section. In most cases the
problem can be solved quickly.
Problem Possible
cause
Solution
Product does
not start
Battery pack
not properly
attached
Attach properly
Battery pack
discharged
Remove and
charge battery
pack
Battery pack
damaged
Check by
a specialist
electrician
Other electrical
defect to the
product
Check by
a specialist
electrician
Product does
not reach full
power
Air vents are
blocked
Clean the air
vents
Unsatisfactory
result
Accessory is
worn
Replace with a
new one
Accessory
not suitable
for intended
operation
Use suitable
accessory
Product
suddenly
stops
Product
overloaded
Remove the
product from
the workpiece
and switch it on
again
Battery pack
discharged
Remove and
charge battery
pack
Battery pack
too hot
Remove battery
pack and let it
cool down
Excessive
vibration or
noise
Accessory is
dull/damaged
Replace with a
new one
Bolts/nuts are
loose
Tighten bolts/
nuts
Guard cannot
be adjusted
Debris Clean the
product and
lubricate the
guard base if
necessary
17 GB / IE / NI

Q Disposal
The packaging is made entirely of
recyclable materials, which you may
dispose of at local recycling facilities.
The Green Dot is not valid for Germany.
Observe the marking of the packaging
materials for waste separation, which
are marked with abbreviations (a) and
numbers (b) with following meaning:
1 - 7: plastics / 20 - 22: paper and
fibreboard / 80 - 98: composite
materials
The product and packaging materials
are recyclable, dispose of it separately
for better waste treatment.
The Triman logo is valid in France only.
Contact your local refuse disposal
authority for more details of how to
dispose of your worn-out product.
To help protect the environment, please
dispose of the product properly when it
has reached the end of its useful life and
not in the household waste. Information
on collection points and their opening
hours can be obtained from your local
authority.
Faulty or used batteries / rechargeable
batteries must be recycled in accordance
with Directive 2006/66/EC and
its amendments. Please return the
batteries / rechargeable batteries
and / or the product to the available
collection points.
Environmental damage
through incorrect disposal of
the batteries / rechargeable
batteries!
Remove the batteries / battery pack
from the product before disposal.
Batteries / rechargeable batteries
may not be disposed of with the usual
domestic waste. They may contain
toxic heavy metals and are subject to
hazardous waste treatment rules and
regulations. The chemical symbols for
heavy metals are as follows:
Cd = cadmium, Hg = mercury,
Pb = lead.
That is why you should dispose of used
batteries / rechargeable batteries at a
local collection point.
Q Service
WARNING!
u Have your product repaired at the service
centre or an electrician, using only original
manufacturer parts. This will maintain the
safety of this product.
u Always have a plug or power cord replaced
by the product manufacturer or its service
centre. This will maintain the safety of this
product.
Q Warranty
The product has been manufactured to strict
quality guidelines and meticulously examined
before delivery. In the event of product defects
you have legal rights against the retailer of this
product. Your legal rights are not limited in any
way by our warranty detailed below.
The warranty for this product is 5 years from the
date of purchase. Should this product show any
fault in materials or manufacture within 5 years
from the date of purchase, we will repair or
replace it – at our choice – free of charge to you.
The warranty period begins on the date of
purchase. Please keep the original sales receipt
in a safe location. This document is required as
your proof of purchase. This warranty becomes
void if the product has been damaged, or used or
maintained improperly.
The warranty applies to defects in material
or manufacture. This warranty does not cover
product parts subject to normal wear, thus
possibly considered consumables (e.g. batteries)
or for damage to fragile parts, e.g. switches,
rechargeable batteries or glass parts.
The warranty for this rechargeable battery pack is
1 year from the date of purchase.
18 GB / IE / NI

Warranty claim procedure
To ensure quick processing of your case, please
observe the following instructions:
Please have the till receipt and the item number
(e.g. IAN 123456) available as proof of
purchase. You will find the item number on the
type plate, an engraving on the front page of the
instructions (bottom left), or as a sticker on the rear
or bottom of the product.
If functional or other defects occur, please contact
the service department listed either by telephone
or by e-mail.
You can return a defective product to us free of
charge to the service address that will be provided
to you. Ensure that you enclose the proof of
purchase (till receipt) and information about what
the defect is and when it occurred.
Service Great Britain
Tel.: 0871 5000 720
(£ 0.10/Min.)
E-Mail: [email protected]
Service Ireland
Tel.: 1890 930 034
(0,08 EUR/Min., (peak))
(0,06 EUR/Min., (off peak))
E-Mail: [email protected]
IAN 289752
Q Translation of original
declaration of conformity
We, OWIM GmbH & Co. KG, Stiftsbergstraße1,
DE-74167 Neckarsulm, GERMANY, hereby declare
under our sole responsibility that the product:
cordless angle grinder 20 V PWSAP 20-Li A1,
Model No.: HG02735-BS, Version: 08 / 2017,
to which this declaration refers, complies with the
standards / normative documents of 2006/42/EC,
2014/35/EU, 2014/30/EU, 2011/65/EU.
Applied harmonised standards:
EN 60745-1:2009/A11:2010
EN 60745-2-3:2011/A13:2015
EN 60335-1:2012/A11:2014
EN 62233:2008
EN 60335-2-29:2004/A2:2010
EN 55014-1:2006/A2:2011
EN 55014-2:2015
EN 61000-3-2:2014
EN 61000-3-3:2013
EN 50581:2012
Serial number: IAN 289752
Tobias König
Division Manager / Responsible for documentation
OWIM GmbH & Co. KG, Stiftsbergstraße 1,
DE-74167 Neckarsulm, GERMANY
Neckarsulm, 28.07.2017
The declaration of conformity can also be viewed
at: www.owim.com.
The object of the declaration described above
satisfies the provisions of Directive 2011/65/EU of
the European Parliament and the Council of
8 June 2011 on limiting the use of certain harmful
substances in electrical and electronic appliances.
19 GB / IE / NI

Inhaltsverzeichnis
Legende der verwendeten Piktogramme .................................................................... Seite 21
Einleitung .................................................................................................................................... Seite 21
Bestimmungsgemäße Verwendung ................................................................................................ Seite 21
Teilebeschreibung .......................................................................................................................... Seite 21
Lieferumfang .................................................................................................................................. Seite 21
Technische Daten ........................................................................................................................... Seite 22
Sicherheitshinweise ................................................................................................................ Seite 22
Allgemeine Sicherheitshinweise für Elektrowerkzeuge ................................................................... Seite 22
Sicherheitshinweise für Winkelschleifer .......................................................................................... Seite 25
Vibrations- und Geräuschminderung ............................................................................................. Seite 28
Verhalten im Notfall ....................................................................................................................... Seite 28
Restrisiken ...................................................................................................................................... Seite 28
Sicherheitshinweise für Ladegeräte ................................................................................................ Seite 29
Vor dem ersten Gebrauch ................................................................................................... Seite 29
Auspacken ..................................................................................................................................... Seite 29
Zubehör ......................................................................................................................................... Seite 30
Vor dem Gebrauch ................................................................................................................. Seite 30
Akku-Pack einsetzen / entnehmen ................................................................................................. Seite 30
Akku-Pack laden ............................................................................................................................ Seite 30
Akku-Ladezustand prüfen ............................................................................................................... Seite 31
Zusatzgriff anbringen / abnehmen ............................................................................................... Seite 31
Einstellen der Schutzhaube ............................................................................................................ Seite 31
Einsatzwerkzeug einsetzen / entnehmen ...................................................................................... Seite 31
Bedienung .................................................................................................................................. Seite 32
Ein- und Ausschalten ...................................................................................................................... Seite 32
Probelauf ....................................................................................................................................... Seite 32
Schleifen ........................................................................................................................................ Seite 32
Drahtbürsten .................................................................................................................................. Seite 33
Nach dem Gebrauch .................................................................................................................... Seite 33
Reinigung und Pflege............................................................................................................. Seite 33
Reinigung ....................................................................................................................................... Seite 33
Wartung ........................................................................................................................................ Seite 33
Reparatur ....................................................................................................................................... Seite 33
Lagerung ....................................................................................................................................... Seite 33
Transport ........................................................................................................................................ Seite 34
Störung und Behebung ......................................................................................................... Seite 34
Entsorgung ................................................................................................................................. Seite 34
Service ......................................................................................................................................... Seite 35
Garantie ...................................................................................................................................... Seite 35
Original-Konformitätserklärung....................................................................................... Seite 36
20 DE / AT / CH

Q Teilebeschreibung
Abbildung A:
1
Taste Ladezustand
2
Entriegelungstaste
3
Anzeige Ladezustand
4
Akku-Pack
5
Spannschlüssel
6
Zusatzgriff mit Spannschlüsselaufbewahrung
7
Schutzhaube
8
Spannflansch
9
Stützflansch
10
Taste für Spindelarretierung
11
Gewinde für Zusatzgriff
12
Ein- / Aus-Schalter
13
Akku-Schnellladegerät
14
Ladezustands-LED – Rot
15
Ladezustands-LED – Grün
Q Lieferumfang
1 Akku-Winkelschleifer 20 V PWSAP 20-Li A1
1 Akku-Pack PWSAP 20-Li A1-1
1 Akku-Schnellladegerät PWSAP 20-Li A1-2-BS
1 Zusatzgriff
1 Schutzhaube
1 Spannschlüssel aufbewahrt im Zusatzgriff
1 Betriebsanleitung
Akku-Winkelschleifer 20 V
PWSAP 20-Li A1
Q Einleitung
Wir beglückwünschen Sie zum Kauf Ihres neuen
Produkts. Sie haben sich damit für ein hochwertiges
Produkt entschieden. Die Bedienungsanleitung ist
Teil dieses Produkts. Sie enthält wichtige Hinweise
für Sicherheit, Gebrauch und Entsorgung. Machen
Sie sich vor der Benutzung des Produkts mit allen
Bedien- und Sicherheitshinweisen vertraut. Benutzen
Sie das Produkt nur wie beschrieben und für die
angegebenen Einsatzbereiche. Händigen Sie alle
Unterlagen bei Weitergabe des Produkts an Dritte
mit aus.
Q Bestimmungsgemäße
Verwendung
Dieser Akku-Winkelschleifer 20 V (nachfolgend
„Produkt“ oder „Elektrowerkzeug” genannt) ist zum
Schleifen und Drahtbürsten geeignet.
Das Produkt ist nicht geeignet für andere Einsätze
(z. B. Schleifen mit ungeeigneten Schleifwerkzeugen,
Schleifen mit Kühlmittel, Schleifen oder Trennen
gefährlicher Stoffe wie Asbest).
Das Produkt ist nur von Erwachsenen zu benutzen.
Kinder unter 16 Jahren dürfen das Produkt nicht
benutzen, außer unter Beaufsichtigung.
Andere Verwendungen oder Veränderungen
des Produkts gelten als nicht bestimmungsgemäß
und können zu Risiken wie Lebensgefahr,
Verletzungen und Beschädigungen führen. Für aus
bestimmungswidriger Verwendung entstandene
Schäden übernimmt der Hersteller keine Haftung.
Das Produkt ist nicht für den gewerblichen Einsatz
oder für andere Einsatzbereiche bestimmt.
Legende der verwendeten Piktogramme:
Lesen Sie die Bedienungsanleitung.
Schützen Sie den Akku-Pack vor Wasser
und Feuchtigkeit.
Schützen Sie den Akku-Pack vor Feuer.
Nur in trockenen Innenräumen
verwenden.
Wechselstrom
Schalten Sie das Produkt aus und
entnehmen Sie den Akku-Pack vor
dem Auswechseln von Zubehör,
Reinigung und bei Nichtgebrauch.
Gleichstrom
T3.15A
Feinsicherung
Schutzklasse II (Doppelisolierung) Tragen Sie eine Schutzbrille!
Schützen Sie den Akku-Pack vor
Hitze und dauerhaften, starken
Sonneneinstrahlung.
Tragen Sie Gehörschutz!
21 DE / AT / CH

Q Technische Daten
Winkelschleifer: PWSAP 20-Li A1
Nennspannung: 20 V
Bemessungsdrehzahl n: 10000 min
-1
Aufnahmefähigkeit: Ø 125 mm
Scheibenstärke: max. 6 mm
Spindelgewinde: M14
Gewicht (inkl. Zubehör) 2,66 kg
Akku-Pack: PWSAP 20-Li A1-1
Typ: Lithium-Ionen
Nennspannung: 20 V
max.
Kapazität: 5 Ah
Anzahl der Batteriezellen: 10
Akku-
Schnellladegerät: PWSAP 20-Li A1-2-BS
EINGANG:
Nennspannung und
-frequenz:
100 – 240 V
~
,
50 – 60 Hz
Leistungsaufnahme: 95 W
AUSGANG:
Nennspannung: 14,4 – 20 V
Ladestrom: 4 A
Ladedauer: ca. 90 min
Schutzklasse:
II /
Geräuschemission:
Messwert für Geräusch ermittelt entsprechend
EN 60745. Der A-bewertete Geräuschpegel des Produkts
beträgt typischerweise:
Schalldruckpegel L
pA
: 68,7 dB(A)
Unsicherheit K
pA
:
3 dB
Schallleistungspegel L
WA
: 79,7 dB(A)
Unsicherheit K
WA
:
3 dB
Schwingungswerte:
(Vektorsumme dreier Richtungen), ermittelt entsprechend
EN 60745:
(Haupthandgriff)
Hand- / Armvibration a
h,AG
: 4,37 m/s
2
(Zusatzhandgriff)
Hand- / Armvibration a
h,AG
:
5,23 m/s
2
Unsicherheit K:
1,5 m/
s
2
Die angegebenen Werte beziehen sich auf das
Oberflächenschleifen. Andere Anwendungen
können zu anderen Schwingungsemissionswerten
führen.
WARNUNG!
Tragen Sie Gehörschutz!
WARNUNG!
u Der Schwingungspegel wird sich
entsprechend dem Einsatz des
Elektrowerkzeugs verändern und kann
in manchen Fällen über dem in diesen
Anweisungen angegebenen Wert liegen.
Die Schwingungsbelastung könnte
unterschätzt werden, wenn das
Elektrowerkzeug regelmäßig in solcher
Weise verwendet wird. Versuchen Sie, die
Belastung durch Vibrationen so gering wie
möglich zu halten. Beispielhafte Maßnahmen
zur Verringerung der Vibrationsbelastung
sind das Tragen von Handschuhen beim
Gebrauch des Werkzeugs und die
Begrenzung der Arbeitszeit. Dabei sind alle
Anteile des Betriebszyklus zu berücksichtigen
(beispielweise Zeiten, in denen das
Elektrowerkzeug abgeschaltet ist, und solche,
in denen es zwar eingeschaltet ist, aber ohne
Belastung läuft).
HINWEIS
u Der in diesen Anweisungen angegebene
Schwingungspegel ist entsprechend einem
in EN 60745 genormten Messverfahren
gemessen worden und kann für den
Gerätevergleich verwendet werden. Der
angegebene Schwingungsemissionswert
kann auch zu einer einleitenden
Einschätzung der Aussetzung verwendet
werden.
Sicherheitshinweise
Q Allgemeine Sicherheitshinweise
für Elektrowerkzeuge
WARNUNG!
u Lesen Sie alle Sicherheitshinweise
und Anweisungen. Versäumnisse bei
der Einhaltung der Sicherheitshinweise und
Anweisungen können elektrischen Schlag,
Brand und/oder schwere Verletzungen
verursachen.
22 DE / AT / CH
Seite laden ...
Seite laden ...
Seite laden ...
Seite laden ...
Seite laden ...
Seite laden ...
Seite laden ...
Seite laden ...
Seite laden ...
Seite laden ...
Seite laden ...
Seite laden ...
Seite laden ...
Seite laden ...
-
 1
1
-
 2
2
-
 3
3
-
 4
4
-
 5
5
-
 6
6
-
 7
7
-
 8
8
-
 9
9
-
 10
10
-
 11
11
-
 12
12
-
 13
13
-
 14
14
-
 15
15
-
 16
16
-
 17
17
-
 18
18
-
 19
19
-
 20
20
-
 21
21
-
 22
22
-
 23
23
-
 24
24
-
 25
25
-
 26
26
-
 27
27
-
 28
28
-
 29
29
-
 30
30
-
 31
31
-
 32
32
-
 33
33
-
 34
34


Parkside PWSAP 20-Li A1 Operation and Safety Notes
- Kategorie
- Elektrowerkzeuge
- Typ
- Operation and Safety Notes
in anderen Sprachen
- English: Parkside PWSAP 20-Li A1
Verwandte Papiere
-
Parkside PWS 125 A1 ANGLE GRINDER Bedienungsanleitung
-
-
Parkside PWSAP 20-Li B2 Operation and Safety Notes
-
-
-
-
-
-
Parkside PWSA 20-Li A1 Bedienungsanleitung
-
Parkside PWS 125 F5 Translation Of The Original Instructions
Sonstige Unterlagen
-
BLACK+DECKER KG1202 Benutzerhandbuch
-
Bort BWS-910-P Benutzerhandbuch
-
-
Hitachi G13SR3 Bedienungsanleitung
-
Panasonic EY46A2 Bedienungsanleitung
-
Hitachi G23SS Bedienungsanleitung
-
-
Stanley FMEG210 Bedienungsanleitung
-
Hitachi G13SD Benutzerhandbuch
-
BLACK+DECKER BEG110 Bedienungsanleitung