Sony STR-DG720 Installationsanleitung
- Kategorie
- AV-Receiver
- Typ
- Installationsanleitung

STR-DG700 3-283-374-21(1) GB/FR/ES/DE
3-283-374-21(1)
Sony Corporation © 2008 Printed in Malaysia
Video components/ Eléments vidéo/ Componentes de vídeo/Videokomponenten
AM
HDMI
SAT IN DVDIN BDIN OUT
SA-CD
/
CD
/
CD-R
OUT IN IN
L
R
Y
P
B
/
C
B
P
R
/
C
R
DIGITAL
(ASSIGNABLE)
DMPORT
OPTICAL
OPTICAL
SAT
IN
DVD
IN
COAXIAL
ANTENNA
IN
TV
TV
SUB WOOFER
AUDIO
IN
VIDEO
IN
SAT
MONITOR
COMPONENT VIDEO
AUDIO
IN
VIDEO
IN
AUDIO
IN
VIDEO
IN
DVD
AUDIO
OUT
AUDIO
OUT
VIDEO
OUT
VIDEO
OUT
SAT IN DVD IN VIDEO 1 IN MONITOR OUT
VIDEO 1
SURROUND BACK SURROUND
LRLR
DC5V
0.7A MAX
OPTICAL
DIGITAL
OUTPUT
AM
HDMI
SAT IN DVDIN BDIN OUT
SA-CD
/
CD
/
CD-R
OUT IN IN
L
R
Y
P
B
/
C
B
P
R
/
C
R
DIGITAL
(ASSIGNABLE)
DMPORT
OPTICAL
OPTICAL
SAT
IN
DVD
IN
COAXIAL
ANTENNA
IN
TV
TV
SUB WOOFER
AUDIO
IN
VIDEO
IN
SAT
MONITOR
COMPONENTVIDEO
AUDIO
IN
VIDEO
IN
AUDIO
IN
VIDEO
IN
DVD
AUDIO
OUT
AUDIO
OUT
VIDEO
OUT
VIDEO
OUT
SAT IN DVD IN VIDEO 1 IN MONITOR OUT
VIDEO 1
SURROUND BACK SURROUND CENTER FRONT B
FRONT A
LRLRLR
SPEAKERS
L
R
DC5V
0.7A MAX
OUTPUT OUTPUT
INPUT
OUTPUT
C
C
C
C
D
AM
HDMI
SAT IN DVDIN BDIN OUT
SA-CD
/
CD
/
CD-R
OUT IN IN
L
R
Y
P
B
/
C
B
P
R
/
C
R
DIGITAL
(ASSIGNABLE)
DMPORT
OPTICAL
OPTICAL
SAT
IN
DVD
IN
COAXIAL
ANTENNA
IN
TV
TV
SUBWOOFER
AUDIO
IN
VIDEO
IN
SAT
MONITOR
COMPONENTVIDEO
AUDIO
IN
VIDEO
IN
AUDIO
IN
VIDEO
IN
DVD
AUDIO
OUT
AUDIO
OUT
VIDEO
OUT
VIDEO
OUT
SAT IN DVDIN VIDEO 1 IN MONITOROUT
VIDEO 1
SURROUND BACK SURROUND CENTER FRONT B
FRONT A
LRLRLR
SPEAKERS
L
R
DC5V
0.7A MAX
SURROUND BACK SURROUND
LRLR
SPE
A
LINE
IN
OUT
AM
HDMI
SAT IN DVD IN BDI N OUT
SA-CD
/
CD
/
CD-R
OUT IN IN
L
R
Y
P
B
/
C
B
P
R
/
C
R
DIGITAL
(ASSIGNABLE)
DMPORT
OPTICAL
OPTICAL
SAT
IN
DVD
IN
COAXIAL
ANTENNA
IN
TV
TV
SUBWOOFER
AUDIO
IN
VIDEO
IN
SAT
MONITOR
COMPONENTVIDEO
AUDIO
IN
VIDEO
IN
AUDIO
IN
VIDEO
IN
DVD
AUDIO
OUT
AUDIO
OUT
VIDEO
OUT
VIDEO
OUT
SAT IN DVDIN VIDEO 1 IN MONITOROUT
VIDEO 1
SURROUND BACK SURROUND CENTER FRONT B
FRONT A
LRLRLR
SPEAKERS
L
R
DC5V
0.7A MAX
SUB WOOFER
AUDIO
OUT
AM
HDMI
SAT IN DVDIN BDIN OUT
SA-CD
/
CD
/
CD-R
OUT IN IN
L
R
Y
P
B
/
C
B
P
R
/
C
R
DIGITAL
(ASSIGNABLE)
DMPORT
OPTICAL
OPTICAL
SAT
IN
DVD
IN
COAXIAL
ANTENNA
IN
TV
TV
SUBWOOFER
AUDIO
IN
VIDEO
IN
SAT
MONITOR
COMPONENTVIDEO
AUDIO
IN
VIDEO
IN
AUDIO
IN
VIDEO
IN
DVD
AUDIO
OUT
AUDIO
OUT
VIDEO
OUT
VIDEO
OUT
SAT IN DVDIN VIDEO 1 IN MONITOROUT
VIDEO 1
SURROUND BACK SURROUND CENTER FRONT B
FRONT A
LRLRLR
SPEAKERS
L
R
DC5V
0.7A MAX
FRONT A
L
R
AM
HDMI
SAT IN DVD IN BDIN OUT
SA-CD
/
CD
/
CD-R
OUT IN IN
L
R
Y
P
B
/
C
B
P
R
/
C
R
DIGITAL
(ASSIGNABLE)
DMPORT
OPTICAL
OPTICAL
SAT
IN
DVD
IN
COAXIAL
ANTENNA
IN
TV
TV
SUBWOOFER
AUDIO
IN
VIDEO
IN
SAT
MONITOR
COMPONENTVIDEO
AUDIO
IN
VIDEO
IN
AUDIO
IN
VIDEO
IN
DVD
AUDIO
OUT
AUDIO
OUT
VIDEO
OUT
VIDEO
OUT
SAT IN DVDIN VIDEO 1 IN MONITOROUT
VIDEO 1
SURROUND BACK SURROUND CENTER FRONT B
FRONT A
LRLRLR
SPEAKERS
L
R
DC5V
0.7A MAX
CENTER
A
KERS
FRONT B
LR
AM
HDMI
SAT IN DVD IN BDIN OUT
SA-CD
/
CD
/
CD-R
OUT IN IN
L
R
Y
P
B
/
C
B
P
R
/
C
R
DIGITAL
(ASSIGNABLE)
DMPORT
OPTICAL
OPTICAL
SAT
IN
DVD
IN
COAXIAL
ANTENNA
IN
TV
TV
SUBWOOFER
AUDIO
IN
VIDEO
IN
SAT
MONITOR
COMPONENTVIDEO
AUDIO
IN
VIDEO
IN
AUDIO
IN
VIDEO
IN
DVD
AUDIO
OUT
AUDIO
OUT
VIDEO
OUT
VIDEO
OUT
SAT IN DVDIN VIDEO 1 IN MONITOROUT
VIDEO 1
SURROUND BACK SURROUND CENTER FRONT B
FRONT A
LRLRLR
SPEAKERS
L
R
DC5V
0.7A MAX
SURROUND BACK SURROUND
LRLR
SPE
A
10 mm
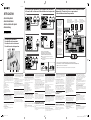
1: Installing the speakers/
1: Installation des enceintes/
1: Instalación de los altavoces/
1: Installieren der Lautsprecher
STR-DG720
Quick Setup Guide
Guide d’installation
Guía de instalación rápida
Kurzanleitung
2: Connecting the speakers/2: Raccordement des enceintes/
2: Conexión de los altavoces/2: Anschließen der Lautsprecher
3: Connecting other components/3: Raccordement d’autres
éléments/3: Conexión de otros componentes/
3: Anschließen anderer Komponenten
English
This Quick Setup Guide describes how to connect a
DVD player, satellite tuner or set-top box, Blu-ray
disc player, TV, speakers, and a sub woofer so that you
can enjoy multi channel surround sound. Refer to the
operating instructions supplied with the receiver for
details.
The illustrations in the guide designate speakers as
through
.
Front speaker (left)
Front speaker (right)
Center speaker
Surround speaker (left)
Surround speaker (right)
Surround back speaker (left)
Surround back speaker (right)
Sub woofer
1: Installing the speakers
The illustrations above show an example of a 7.1
channel speaker system (seven speakers and one
sub woofer) confi guration. Refer to the operating
instructions supplied with the receiver.
2: Connecting the speakers
Connect the speakers according to the number and type
of your speakers.
About speaker cords
• Use speaker cords, which are appropriate for the
width of the room.
• By deciding on the color or mark of the speaker
cord to be connected to the plus (+) or minus (–)
connector, you can always be sure of connecting the
cord correctly without mistaking plus or minus.
About speaker jacks
• Connect the
jack to the
jack of the receiver and
connect the
jack to the
jack of the receiver.
• Refer to the illustration above for details of
connecting speaker cords.
About the SPEAKERS (OFF/A/B) button
You can select the speaker system. Refer to “7: Selecting
the speaker system” in the operating instructions supplied
with the receiver for details.
3: Connecting other components
This is an example of how to connect this receiver and
your components. Refer to step 3 and 4 of “Getting
started” of the operating instructions supplied with
this receiver for details on other connections and other
components.
4: Connect all power cords last
Connect the AC power cord to a wall outlet.
Refer to “Connecting the AC power cord (mains
lead)” in the operating instructions supplied with the
receiver.
Français
Ce guide d’installation décrit comment raccorder un lecteur
DVD, un tuner satellite ou un décodeur, un lecteur de
disques Blu-ray, un téléviseur, des enceintes et un caisson
de graves afi n que vous puissiez bénéfi cier du son surround
multicanal. Reportez-vous au mode d’emploi fourni avec
l’ampli-tuner pour plus de détails.
Les illustrations du guide désignent les différentes
enceintes, de
à
.
Enceinte avant (gauche)
Enceinte avant (droite)
Enceinte centrale
Enceinte surround (gauche)
Enceinte surround (droite)
Enceinte surround arrière (gauche)
Enceinte surround arrière (droite)
Caisson de graves
1: Installation des enceintes
Les illustrations ci-dessus montrent un exemple
de confi guration d’un système à 7.1 canaux (sept
enceintes et un caisson de graves). Reportez-vous au
mode d’emploi fourni avec l’ampli-tuner.
2: Raccordement des enceintes
Raccordez les enceintes en fonction de leur nombre et
de leur type.
A propos des cordons d’enceintes
• Utilisez des cordons d’enceintes adaptés à la largeur
de la pièce.
• En choisissant la couleur ou la marque du cordon
d’enceinte à raccorder au connecteur plus (+) ou
moins (–), vous êtes certain de toujours raccorder
correctement le connecteur sans faire d’erreur sur
les bornes plus ou moins.
A propos des prises d’enceinte
• Raccordez la prise
à la prise
de l’ampli-tuner et
la prise
à la prise
de l’ampli-tuner.
• Reportez-vous à l’illustration ci-dessus pour plus de
détails sur le raccordement des cordons d’enceinte.
A propos de la touche SPEAKERS (OFF/A/B)
Vous pouvez sélectionner le système d’enceinte.
Reportez-vous à la section « 7: Sélection du système
d’enceintes » du mode d’emploi fourni avec l’ampli-
tuner pour plus de détails.
3: Raccordement d’autres
éléments
Ce guide donne un exemple de raccordement de cet
ampli-tuner et de vos éléments. Reportez-vous aux
étapes 3 et 4 de la section « Préparatifs » du mode
d’emploi fourni avec cet ampli-tuner pour plus de
détails sur le raccordement à d’autres éléments.
4: Raccordez tous les cordons
d’alimentation en dernier lieu
Raccordez le cordon d’alimentation secteur à la prise
murale.
Reportez-vous à la section « Raccordement du cordon
d’alimentation secteur » dans le mode d’emploi fourni
avec l’ampli-tuner.
Español
Esta guía de instalación rápida describe cómo conectar
un reproductor de DVD, un sintonizador v
ía satélite
o un decodifi cador, un reproductor de discos Blu-ray,
un televisor, los altavoces y un altavoz potenciador de
graves para que pueda disfrutar del sonido envolvente
multicanal. Consulte el manual de instrucciones
suministrado con el receptor para obtener más
información.
En las ilustraciones de la guía, los altavoces se
identifi can de
a
.
Altavoz frontal (izquierdo)
Altavoz frontal (derecho)
Altavoz central
Altavoz de sonido envolvente (izquierdo)
Altavoz de sonido envolvente (derecho)
Altavoz posterior de sonido envolvente (izquierdo)
Altavoz posterior de sonido envolvente (derecho)
Altavoz potenciador de graves
1: Instalación de los altavoces
Las ilustraciones anteriores muestran un ejemplo
de confi guración de un sistema de altavoces de 7.1
canales (siete altavoces y un altavoz potenciador
de graves). Consulte el manual de instrucciones
suministrado con el receptor.
2: Conexión de los altavoces
Conecte los altavoces en función del número y tipo de
altavoces de que disponga.
Acerca de los cables de los altavoces
• Utilice cables de altavoces que resulten apropiados
para la anchura de la habitación.
Deutsch
In dieser Kurzanleitung wird beschrieben, wie Sie
einen DVD-Player, eine Satellitentuner oder eine
Set-Top-Box, Blu-Ray-Disc-Player, ein Fernsehgerät,
Lautsprecher und einen Subwoofer so anschließen,
dass Sie Mehrkanal-Raumklang wiedergeben
lassen können. Einzelheiten fi nden Sie in der
Bedienungsanleitung zum Receiver.
In den Abbildungen in dieser Anleitung sind die
Lautsprecher mit
bis
gekennzeichnet.
Frontlautsprecher (links)
Frontlautsprecher (rechts)
Centerlautsprecher
Surroundlautsprecher (
links
)
Surroundlautsprecher (rechts)
Surround-Back-Lautsprecher
(
links
)
Surround-Back-Lautsprecher (rechts)
Subwoofer
1: Installieren der Lautsprecher
Die Abbildungen oben zeigen ein 7.1-Kanal-
Lautsprechersystem (fünf Lautsprecher und
ein Subwoofer). Schlagen Sie bitte in der
Bedienungsanleitung zum Receiver nach.
2: Anschließen der Lautsprecher
Nehmen Sie die Lautsprecheranschlüsse je nach Anzahl
und Typ der vorhandenen Lautsprecher vor.
Die Lautsprecherkabel
• Verwenden Sie für die Raumgröße geeignete
Lautsprecherkabel.
• Achten Sie beim Anschließen auf die Farbe
oder die Markierung der Lautsprecherkabel, um
sicherzustellen, dass Sie die positiven und negativen
Adern immer richtig mit dem positiven (+) und
negativen (–) Anschluss verbinden.
Die Lautsprecherbuchsen
• Verbinden Sie die Buchse
mit der Buchse
am
Receiver und die Buchse
mit der Buchse
am
Receiver.
• Näheres zum Anschließen der Lautsprecherkabel
entnehmen Sie bitte der Abbildung oben.
Die Taste SPEAKERS (OFF/A/B)
Damit können Sie das Lautsprechersystem auswählen.
Nähere Informationen fi nden Sie unter „7: Auswählen
des Lautsprechersystems“ in der Bedienungsanleitung
zum Receiver.
3: Anschließen anderer
Komponenten
Hier sehen Sie ein Beispiel für das Anschließen
anderer Komponenten an den Receiver. Nähere
Informationen zum Anschließen anderer
Komponenten fi nden Sie in Schritt 3 und 4 unter
„Vorbereitungen“ in der Bedienungsanleitung zum
Receiver.
4: Zum Schluss: Anschließen
der Netzkabel
Schließen Sie das Netzkabel an eine Netzsteckdose an.
Näheres dazu fi nden Sie unter „Anschließen des
Netzkabels“ in der Bedienungsanleitung zum
Receiver.
• Si se basa en el color o bien en la marca del cable
de altavoz que va a conectar al conector positivo
(+) o bien al negativo (–), se asegurará de conectar
correctamente siempre los cables sin confundir el
polo positivo o el negativo.
Acerca de las tomas de los altavoces
• Conecte la toma
a la toma
del receptor, y
conecte la toma
a la toma
del receptor.
• Consulte la ilustración anterior para obtener más
información sobre cómo conectar los cables de los
altavoces.
Acerca del botón SPEAKERS (OFF/A/B)
Es posible seleccionar el sistema de altavoces.
Consulte el apartado “7: Selección del sistema de
altavoces” del manual de instrucciones suministrado
con el receptor para obtener más información.
3: Conexión de otros
componentes
Este es un ejemplo de cómo conectar este receptor a
los componentes. Consulte los pasos
3 y 4 de “Procedimientos iniciales” del manual de
instrucciones suministrado con el receptor para
obtener más información sobre cómo realizar otras
conexiones y sobre otros componentes.
4: Conecte todos los cables de
alimentación en último lugar
Conecte el cable de alimentación de ca a una toma de
pared.
Consulte el apartado “Conexión del cable de
alimentación de ca” del manual de instrucciones
suministrado con el receptor.
A
A
TV/
Téléviseur
/
Televisor/Fernsehgerät
(1)
A
B
DVD player/
Lecteur DVD/
Reproductor de DVD/
DVD-Player
Satellite tuner or Set-top box/
Tuner satellite ou Décodeur/
Sintonizador vía satélite o decodifi cador/
Satellitentuner oder Set-Top-Box
C HDMI cable/Câble HDMI/Cable HDMI/HDMI-Kable
D Optical digital cord/Cordon numérique optique/Cable digital óptico/Optisches Digitalkabel
Blu-ray disc player/
Lecteur de disques Blu-ray/
Reproductor de discos Blu-ray/
Blu-Ray-Disc-Player
Cords used for connection (not supplied)/Cordons utilisés pour le raccordement (non fourni)/
Cables utilizados para la conexión (no suministrado)/Zum Anschließen verwendete Kabel (nicht mitgeliefert)
Note
Be sure to change the factory
setting of the DVD input button on
the remote so that you can use the
button to control your DVD player.
For details, see “Changing button
assignments” in the operating
instructions of the receiver.
Remarque
Changez les réglages par défaut
de la touche d’entrée DVD de la
télécommande afi n de pouvoir
l’utiliser pour commander votre
lecteur DVD. Pour plus de détails,
reportez-vous à la section
« Modifi cation de l’affectation des
touches » dans le mode d’emploi
fourni avec cet ampli-tuner.
Nota
Asegúrese de cambiar el ajuste
de fábrica del botón de la entrada
DVD del mando a distancia para
que pueda utilizar el botón para
controlar el reproductor de DVD.
Para más detalles, consulte “Cambio
de función en los botones” en
las manual de instrucciones del
receptor.
Hinweis
Ändern Sie die werkseitige
Einstellung der Eingangstaste DVD
auf der Fernbedienung unbedingt
so, dass damit der DVD-Player
gesteuert werden kann. Für
zusätzliche Informationen, siehe
„Ändern der Tastenbelegung“ in der
Bedienungsanleitung des Receivers.
Cords used for connection (not supplied)/
Cordons utilisés pour le raccordement (non fourni)/
Cables utilizados para la conexión (no suministrado)/
Zum Anschließen verwendete Kabel (nicht mitgeliefert)
A
Speaker cord/Cordons d’enceintes/Cables de los altavoces/
Lautsprecherkabel
B
Monaural audio cord/Cordon audio mono/Cable de audio mono/
Mono-Audiokabel
A
GBFRESDE+DG720_2UC.indd 1GBFRESDE+DG720_2UC.indd 1 12/6/2007 8:05:21 AM12/6/2007 8:05:21 AM

STR-DG700 3-283-374-21(1) GB/FR/ES/DE
English
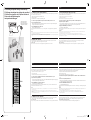
5: Calibrating the speaker settings automatically
You can set up the speakers to obtain the sound you want from all connected speakers automatically by using the Auto Calibration
function. The Auto Calibration function will:
• Check the connection between each speaker and the receiver.
• Adjust the speaker level.
• Measure the distance of each speaker from your listening position.
1 Connect the supplied optimizer microphone to the AUTO CAL MIC jack on the receiver.
2 Set up the optimizer microphone.
Place the optimizer microphone at your listening position.You can also use a stool or tripod so that the optimizer
microphone remains at the same height as your ears.
3 Press AMP MENU, then press AUTO CAL.
The Auto Calibration function starts.
For details on the Auto Calibration function, refer to step 8 of “Getting started” of the operating instructions supplied with this
receiver.
Notes
• If there are any obstacles in the path between the optimizer microphone and the speakers, the calibration cannot be performed correctly. Remove any obstacles from
the measurement area to avoid measurement error.
• The Auto Calibration function cannot detect the sub woofer. Therefore, all sub woofer settings will be maintained.
• If the bass frequency is lower than you prefer, use the SYSTEM menu to set the size of the speakers. For details, refer to the operating instructions supplied with this
receiver.
6: Setting up other components
You should set up each component so that the sound is output from the speakers correctly when you play back a connected
component. Refer to the operating instructions supplied with each component.
After the setting
The receiver is now ready to use. Refer to the operating instruction supplied with the receiver for details.
5: Calibrating the speaker settings automatically/
5: Calibrage automatique des réglages des enceintes/
5: Calibración automática de los ajustes del altavoz/
5: Automatische Kalibrierung der
Lautsprechereinstellungen
Français
5: Calibrage automatique des réglages des enceintes
Vous pouvez régler les enceintes afi n d’obtenir automatiquement le son souhaité pour toutes les enceintes raccordées en utilisant la
fonction Auto Calibration. La fonction Auto Calibration :
• Vérifi ez le raccordement entre chaque enceinte et l’ampli-tuner.
• Ajustez le niveau des enceintes.
• Mesure la distance entre chaque enceinte et votre position d’écoute.
1
Raccordez le microphone optimiseur fourni à la prise AUTO CAL MIC de l’ampli-tuner.
2 Réglez le microphone optimiseur.
Placez le microphone optimiseur au niveau de votre position d’écoute. Vous pouvez également utiliser une chaise ou
un trépied pour que le microphone optimiseur se trouve au niveau de votre position d’écoute.
3 Appuyez sur AMP MENU, puis sur AUTO CAL.
La fonction Auto Calibration démarre.
Pour plus de détails sur la fonction Auto Calibration, reportez-vous à l’étape 8 de la section « Préparatifs » du mode d’emploi fourni
avec cet ampli-tuner.
Remarques
• Si des obstacles se trouvent entre le microphone optimiseur et les enceintes, la calibration risque ne pas être effectuée correctement. Enlevez tous les obstacles se
trouvant dans la zone de mesure, afi n d’éviter toute erreur de mesure.
• La fonction Auto Calibration ne peut pas détecter le caisson de graves. Par conséquent, tous les réglages du caisson de graves seront conservés.
• Si la fréquence des graves est plus basse que ce que vous souhaitez, utilisez le menu SYSTEM pour régler la taille des enceintes. Pour plus de détails, reportez-vous
au mode d’emploi fourni avec cet ampli-tuner.
6: Paramétrage d’autres composants
Vous devez paramétrer chaque élément de sorte que le son soit émis correctement par les enceintes lorsque vous utilisez un
composant raccordé. Reportez-vous au mode d’emploi fourni avec chaque composant.
Après le paramétrage
L’ampli-tuner est maintenant prêt à l’emploi. Reportez-vous au mode d’emploi fourni avec l’ampli-tuner pour plus de détails.
Español
5: Calibración automática de los ajustes del altavoz
Puede instalar los altavoces para obtener automáticamente el sonido que desee a través de todos los altavoces conectados mediante la
función de calibración automática. La función de calibración automática:
• Compruebe las conexiones entre cada altavoz y el receptor.
• Ajuste el nivel del altavoz.
• Calculará la distancia existente entre cada altavoz y la posición de escucha.
1 Conecte el micrófono optimizador suministrado a la toma AUTO CAL MIC del receptor.
2 Ajuste el micrófono optimizador.
Coloque el micrófono optimizador en su posición de escucha. Puede utilizar también una banqueta o trípode para que
el micrófono optimizador quede a la altura de los oídos.
3 Pulse AMP MENU y, a continuación, AUTO CAL.
Se iniciará la función de calibración automática.
Para obtener más información sobre la función de calibración automática, consulte el paso 8 de “Procedimientos iniciales” del
manual de instrucciones suministrado con el receptor.
Notas
• Si hay obstáculos entre el micrófono optimizador y los altavoces, es posible que la calibración no se lleve a cabo correctamente. Retire los obstáculos de la zona de
medición para evitar errores.
• La función de calibración automática no puede detectar el altavoz potenciador de graves. Por lo tanto, todos los ajustes del altavoz potenciador de graves se
mantendrán.
• Si la frecuencia de graves es inferior a la deseada, utilice el menú SYSTEM para ajustar el tamaño de los altavoces. Para obtener más información, consulte el manual
de instrucciones suministrado con este receptor.
6: Confi guración de otros componentes
Es necesario confi gurar cada componente para que el sonido se emita correctamente a través de los altavoces al reproducir un
componente conectado. Consulte el manual de instrucciones suministrado con cada componente en cuestión.
Tras realizar el ajuste
El receptor está listo para utilizarse. Consulte el manual de instrucciones suministrado con el receptor para obtener más información.
Optimizer microphone (supplied)/
Microphone optimiseur (fournie)/
Micrófono optimizador (suministrada)/
Optimierungsmikrofon (mitgeliefert)
Deutsch
5: Automatische Kalibrierung der Lautsprechereinstellungen
Dank der automatischen Kalibrierung können Sie die Lautsprecher so einstellen, dass von allen angeschlossenen Lautsprechern
automatisch der gewünschte Ton ausgegeben wird. Funktionen der automatischen Kalibrierung:
• Überprüfen der Anschlüsse zwischen den einzelnen Lautsprechern und dem Receiver.
• Einstellen der Lautsprecherpegel.
• Messen des Abstands der einzelnen Lautsprecher von der Hörposition.
1 Schließen Sie das mitgelieferte Optimierungsmikrofon an die Buchse AUTO CAL MIC am Receiver
an.
2 Stellen Sie das Optimierungsmikrofon auf.
Stellen Sie das Optimierungsmikrofon an der Hörposition auf. Sie können einen Stuhl oder ein Stativ verwenden, um
das Optimierungsmikrofon auf Ohrenhöhe aufzustellen.
3 Drücken Sie AMP MENU und dann AUTO CAL.
Die automatische Kalibrierung beginnt.
Nähere Informationen zur automatischen Kalibrierung fi nden Sie in Schritt 8 unter „Vorbereitungen“ in der Bedienungsanleitung zum
Receiver.
Hinweise
• Wenn sich Hindernisse zwischen dem Optimierungsmikrofon und den Lautsprechern befi nden, wird die Kalibrierung nicht richtig durchgeführt. Entfernen Sie alle
Hindernisse aus dem Messbereich, um Messfehler zu vermeiden.
• Bei der automatischen Kalibrierung wird der Subwoofer nicht erkannt. Die Einstellungen für den Subwoofer bleiben daher unverändert.
• Wenn die Bassfrequenz für Ihren Geschmack zu niedrig ist, stellen Sie die Lautsprechergröße im Menü SYSTEM ein. Näheres dazu fi nden Sie in der
Bedienungsanleitung zum Receiver.
6: Einstellen anderer Komponenten
Sie müssen die einzelnen Komponenten einstellen, so dass der Ton bei der Wiedergabe der angeschlossenen Komponente über die
Lautsprecher richtig ausgegeben wird. Schlagen Sie dazu in der Bedienungsanleitung zur jeweiligen Komponente nach.
Wenn alle Einstellungen vorgenommen wurden
Der Receiver ist jetzt betriebsbereit. Einzelheiten fi nden Sie in der Bedienungsanleitung zum Receiver.
?/1
AUTO CAL MIC
SPEAKERS
(OFF/A/B)
PHONES
VIDEO 2 IN/PORTABLE AV IN
VIDEO L AUDIO R
MEMORY/
ENTER
SUR BACK
DECODING
DIMMER
SLEEP
TUNING
2CH A.F.D. MOVIE MUSIC
ANALOG
DIRECT
MUTING
DISPLAY INPUT MODE
INPUT SELECTOR
TUNING MODE
MASTER VOLUME
123
46
78
0/10
ENTER
9
SYSTEM STANDBY
TV INPUT
SLEEP
DMPORT
VIDEO1 VIDEO2 BD DVD
2CH A.F.D.
RETURN/EXIT
TV CH –
PRESET –
TV CH +
PRESET +
TUNING –
TV
TUNING +
FM MODE
MOVIE MUSIC
AMP MENU
CLEAR
DISPLAY
MUTING
TV VOL
MASTER VOL
DVD/BD
MENU
AUTO CAL
D.TUNING
D.SKIP
THEATRE
SAT TV SA-CD/CD TUNER
?/1
.
HmM
Xx
<
<
>
5
>10
REPLAY ADVANCE
MEMORY
MENU/HOME
TOOLS/
OPTIONS
TV
?/1
AV
?/1
O
AUTO CAL
AMP
MENU
-
GBFRESDE+DG720_2UC.indd 2GBFRESDE+DG720_2UC.indd 2 12/6/2007 8:05:24 AM12/6/2007 8:05:24 AM
-
 1
1
-
 2
2


Sony STR-DG720 Installationsanleitung
- Kategorie
- AV-Receiver
- Typ
- Installationsanleitung
in anderen Sprachen
- English: Sony STR-DG720 Installation guide
- français: Sony STR-DG720 Guide d'installation
- español: Sony STR-DG720 Guía de instalación
Verwandte Papiere
-
Sony HT-DDWG700 Installationsanleitung
-
Sony STR-DH500 Schnellstartanleitung
-
Sony HT-DDW890 Installationsanleitung
-
Sony STR-DG710 Installationsanleitung
-
Sony STR-DG820 Benutzerhandbuch
-
Sony STR-DG510 Benutzerhandbuch
-
-
Sony STR-DH810 Schnellstartanleitung
-
Sony STR-DH700 Installationsanleitung
-
Sony STR-DG500 Installationsanleitung