
Artikel Nr.: 846014
LED Mixit Set, RF RGBW 2,5 m
1 14.10.2019
Bedienungsanleitung

Bedienungsanleitung
Artikel Nr.: 846014
2 14.10.2019
Inhaltsverzeichnis
1. Sicherheitshinweise .................................................................................................... Seite 3
2. Einleitung .................................................................................................................... Seite 4
3. Lieferumfang ............................................................................................................... Seite 4
4. Technische Daten ........................................................................................................ Seite 4
5. LED Stripe - Sicherheits- und Montagehinweise......................................................... Seite 5
6. LED Stripe - Prolmontage ......................................................................................... Seite 6
7. LED Controller............................................................................................................. Seite 7

Bedienungsanleitung
Artikel Nr.: 846014
3 14.10.2019
1. Sicherheitshinweise
Dieses Gerät ist nur für die Verwendung in geschlossenen Räumen konzipiert.
Es erlischt der Garantieanspruch, bei manuellen Veränderungen des Gerätes.
Hinweise für den sicheren und einwandfreien Gebrauch:
Vorsicht bei Hitze und extremen Temperaturen! Stellen Sie das Gerät an einem Ort auf, wo es keinen extremen Temperaturen, Feuchtigkeit oder
Staub ausgesetzt ist. Betreiben Sie das Gerät nur in einer Umgebungstemperatur zwischen -5°C - +40°C.
Setzen Sie das Gerät nicht direkter Sonneneinstrahlung oder Wärmequellen aus.
Stellen Sie keine Flüssigkeiten auf oder in die Nähe des Gerätes.
Stellen Sie das Gerät immer auf festen Untergrund und vermeiden Sie Vibrationen.
Benutzen Sie keine chemischen Mittel zur Reinigung! Trennen Sie die Spannungsversorgung, bevor Sie das Gerät säubern.
Der Benutzer sollte nicht versuchen das Gerät eigenständig zu warten.
Alle Reparaturen und Servicearbeiten sollten von einem qualizierten Techniker durchgeführt werden.
Achtung!
Der Garantieanspruch erlischt, bei Schäden die durch Nichtbeachtung der Anleitung verursacht werden. Der Hersteller und Importeur
übernimmt für Folgeschäden, die daraus resultieren keinerlei Haftung. Nur ausgebildete und unterwiesene Fachkräfte dürfen den korrekten
elektrischen Anschluss durchführen.
Alle elektrischen und mechanischen Anschlüsse müssen der europäischen Sicherheitsnormen entsprechen.

Bedienungsanleitung
Artikel Nr.: 846014
4 14.10.2019
2. Einleitung
Vielen Dank für den Kauf unseres Produkts und das uns entgegengebrachte Vertrauen. Bitte prüfen sie die Verpackung sowie das Produkt auf
Transportschäden.
Lesen sie die Bedienungsanleitung aufmerksam durch, bevor sie das Produkt in Betrieb nehmen.
3. Lieferumfang
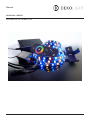
●LED Controller, RF Mini RGBW
●LED Stripe
●Fernbedienung
●Wandhalterung
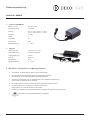
●Steckernetzteil
●Bedienungsanleitung
4. Technische Daten
1. LED Stripe
Maße (L x B x H): 2500 x 10 x 3 mm
Farbtemperatur: RGB + 2700 K
Eingangsspannung: 24V DC
Leistung: 35,00 W
LED Anzahl: 150
LED Bauform: 5050
Schnittmöglichkeit: 166 mm / 10 LED
Schutzklasse: IP 33
Betriebstemperatur: -5°- +40°C
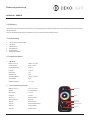
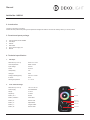
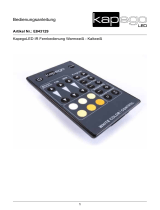
2. Touch Fernbedienung RF Single
Maße (L x B x H): 110 x 52 x 21 mm
Betrieb: 2x AAA Batterien
Reichweite: ca. 20 m
Frequenz: 2,4 GHz
Taste „O/—“: Ein/Ausschalten
Taste „Farbkreis“: Farbwahl
Taste „B“: Dimmer Farbe
Taste „S“: Geschwindigkeitswahl
Taste „P“: Programmwahl
Taste „W“: Dimmer Weiß
Ein/Ausschalten
Programmwahl
Geschwindigkeitswahl
Dimmer Farbe
Farbwahl
Dimmer Weiß

Bedienungsanleitung
Artikel Nr.: 846014
5 14.10.2019
3. Controller, RF RGBW Mini
Maße (L x B x H): 60 x 35 x 22 mm
Eingangsspannung: 12-24V DC
Leistung: max. 4x 1,5A / 12V DC - 4x 18 W
max. 4x 1,5A / 24V DC - 4x 36 W
Frequenz: 2,4 GHz
Kanäle: 4
Programme: 12
Schutzklasse: IP 20
Betriebstemperatur: -5°- +40°C
3. Netzgerät
Maße (L x B x H): 139,3 x 63,3 x 35,1 mm
Eingangsspannung: 220-240V AC/50-60Hz
Ausgangsspannung: 24V DC
Leistung: 60,00 W
Schutzklasse: IP 20
Betriebstemperatur: -5°- +40°C
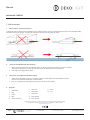
5. LED Stripe - Sicherheits- und Montagehinweise
a. Wir empfehlen für die Montage des Stripe in einem Aluminiumpro.
b. Der Stripe darf nicht an die Versorgungsspannung angeschlossen werden,
wenn dieser noch in der Verpackung oder auf einer Spule aufgerollt ist.
c. Den Stripe nicht verwenden, wenn er abgedeckt oder in einer Oberäche eingelassen ist.
Außer in dafür vorgesehenen Aluminumprolen.
d. Das Produkt darf nicht mit dem Produkt eines anderen Herstellers verbunden werden.
e. Die Verbindung darf nur mit geeigneten Verbindern erstellt werden.
Oene Enden sind vor dem Einsatz dicht zu verschließen.
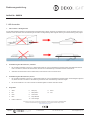
f. Den Stripe nicht önen oder aufschneiden/aufschlitzen, außerhalb der gekennzeichneten Markierung.
g. Zur Abdeckung mit Wärmedämm-Material nicht geeignet.

Bedienungsanleitung
Artikel Nr.: 846014
6 14.10.2019
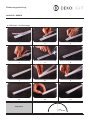
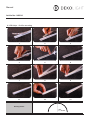
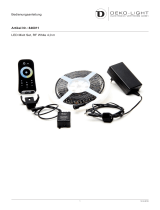
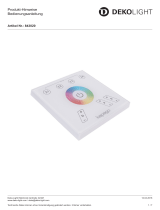
6. LED Stripe - Prolmontage
123
456
789
11 12 13
Biegeradius
max.
r = 10 mm

Bedienungsanleitung
Artikel Nr.: 846014
7 14.10.2019
Importeur Auf der Hub 2
D-76307 Karlsbad
Tel.: +49 7248 / 92 71 500
Fax: +49 7248 / 92 71 550
Web: www.deko-light.com
Mail: [email protected]
Das Produkt ist CE konform und erfüllt alle grundlegenden Anforderungen der Richtlinie 1999/5/EG R&TTE.
Die CE-Konformitätserklärung für dieses Produkt kann unter folgender Adresse bezogen werden.
https://shop.deko-light.com/
7. LED Controller
1. LED Controller - Montagehinweis
Um die Hitze abzuleiten empfehlen wir beim Einbau ausreichend Platz zu lassen, damit die Luft zirkulieren kann und der Controller somit nicht
überhitzt. Achten Sie darauf, dass alle Verbindungen fest sitzen. Die Signalleitung sollte möglichst weit weg von der Stromleitung (230V) liegen.
2. Fernbedienung mit LED Controller „verbinden“
1. RF Controller einschalten und nach ca. 1 Sekunde die Taste “Ein” (Touch-Fernbedienung) gedrückt halten anschließend blinken die
LED 3 mal weiß auf, dass ist das Zeichen dafür, dass die Touch-Fernbedienung mit dem RF Controller verbunden ist.
2. Sollte dies nicht beim ersten Versuch funktionieren, führen Sie den Punkt a nochmals durch.
3. Fernbedienung mit LED Controller „trennen“
1. RF Controller einschalten und nach ca. 1 Sekunde die Taste “Ein” (Touch-Fernbedienung) gedrückt halten, sobald erfolgreich getrennt
ist, blinken die LED 9 mal weiß auf. Die Steuerung ist über die Touch-Fernbedienung nicht mehr möglich.
2. Der RF Controller kann nun erneut mit einer Fernbedienung/WiFi Controller verbunden werden.
4. Programme
1. Weiß
2. Rot
3. Grün
4. Blau
5. Fade In Fade Out
6. Ramp Up
7. Ramp Down
8. Color Flash
9. Shop Window
10. Color Change
11. Disco
12. Fire

Manual
Article No.: 846014
LED Mixit Set, RF RGBW 2,5 m
1 14.10.2019

Manual
Article No.: 846014
2 14.10.2019
Contents
1. Security instructions ..................................................................................................... page 3
2. Introduction .................................................................................................................. page 4
3. Purachased parts package .......................................................................................... page 4
4. Technical specication ................................................................................................. page 4
5. LED Instructions for mounting and safety .................................................................... page 5
6. LED Stripe - Prole mounting....................................................................................... page 6
7. LED Controller.............................................................................................................. page 7

Manual
Article No.: 846014
3 14.10.2019
1. Security instructions
This Product is designed for indoor-use only.
Garantee expires, when manually changing or dismantling the product yourself.
Safety guideline for proper use:
Caution with heat and extreme temperatures! Keep product away from extreme temperatures, moisture or dust. Keep product away from direct
and diuse solar radiation and heat sources. Please notice that the operating temperature must be -5°C - +40°C.
Do not operate close to uids. Always operate on solid ground and avoid vibrations. Do not use chemical cleaning agents. Before cleaning the
product must be cut o from every power connection, (de-energize).
The user should not try to repair the product by itself.
All repairs and services should be handled by a qualied technician.
Caution!
Guarantee claims expire, when damage is caused, disregarding the user manual. The producer and importer do not assume any liability for
consequential loss, which results from this. Only trained and instructed specialists are allowed to do the correct electrical connection/installation.
All electrical and mechanical connections must be mounted conform to the European Safety standards.

Manual
Article No.: 846014
4 14.10.2019
2. Introduction
Thanks you for buying our product.
Please check the product and packing for transportation damage and read the user manual carefully, before you use the product.
3. Purachased parts package
●LED Controller, RF Mini RGBW
●LED Stripe
●Remote
●Wall holder
●Plug in Power supply unit
●Manual
4. Technical specication
1. LED Stripe
Dimensions (L x B x H): 2500 x 10 x 3 mm
Color temperature: RGB + 2700 K
Input voltage: 24V DC
Power: 35,00 W
LED quantity: 150
LED type: 5050
Cutting possibility (each): 166 mm / 10 LED
IP-Code: IP 33
Working temperature: -5°- +40°C
2. Touch remote RF Single
Dimensions (L x B x H): 110 x 52 x 21 mm
Power supply: 2x AAA Batteries
Range: ca. 20 m
Frequency: 2,4 GHz
Button „O/—“: On/O
Button „Farbkreis“: Color select
Button „B“: Dimmer color
Button „S“: Speed select
Button „P“: Program select
Button „W“: Dimmer white
On/Off
Program select
Speed select
Dimmer color
Color select
Dimmer white

Manual
Article No.: 846014
5 14.10.2019
3. Controller, RF RGBW Mini
Dimensions (L x B x H): 60 x 35 x 22 mm
Input voltage: 12-24V DC
Power: max. 4x 1,5A / 12V DC - 4x 18 W
max. 4x 1,5A / 24V DC - 4x 36 W
Frequency: 2,4 GHz
Channel: 4
Programs: 12
IP-Code: IP 20
Working temperature: -5°- +40°C
3. Netzgerät
Dimensions (L x B x H): 139,3 x 63,3 x 35,1 mm
Input voltage: 220-240V AC/50-60Hz
Output voltage: 24V DC
Power: 60,00 W
IP-Code: IP 20
Working temperature: -5°- +40°C
5. LED Instructions for mounting and safety
a. We recommend installing the stripe in an aluminum prole.
b. The stripe must not be connected to the supply voltage when it is in the package or rolled up on a reel.
c. Do not use the stripe when it is covered or set in a surface.
Exception: aluminum proles provided for this purpose.
d. The product is not compatible with the products of another manufacturer.
e. For connection use suitable connectors.
Open ends must be tightly closed before use.
f. Outside the marked signs do not open or slit the stripe, please refer enclosed data sheet „Cutting possibility“.
g. Not suitable for covering with thermal insulation material.

Manual
Article No.: 846014
6 14.10.2019
6. LED Stripe - Prole mounting
1 2 3
4 5 6
7 8 9
11 12 13
Bending Radius
min.
r = 10 mm

Manual
Article No.: 846014
7 14.10.2019
Importer Auf der Hub 2
D-76307 Karlsbad
Tel.: +49 7248 / 92 71 500
Fax: +49 7248 / 92 71 550
Web: www.deko-light.com
Mail: [email protected]
The product is CE compliant and meets all the essential requirements of Directive 1999/5/EC R&TTE.
The CE Declaration of Conformity for this product can be obtained at the following address.
https://shop.deko-light.com/
7. LED Controller
1. LED Controller - mounting instructions
To derive the heat, we recommend the installation to allow sucient space for the air to circulate and the driver will not be overheated. Make
sure that all connections are tight. The signal line should be as far away from the power line (230V).
2. „Connect“ Touch-Remote with LED Controller
1. Switch on the Power of the RF Controller and wait ca. 1s and then push the “ON” button on the Touch-Controller,
after that the LED ashes up 3 times, then the Touch-Controller and the Controller are connected.
2. If this step isn’t working please try again.
3. „Disconnect“ Touch-Remote with LED Controller
1. Switch on the LED stripe and wait ca. 1s and then hold the S+ button again till the stripe ashes up 9 times,
then the Touch-Controller and the bulb are disconnected.
2. Now you can address the stripe again with the same or another Touch-Controller.
4. Programs
1. White RGB
2. Red
3. Green
4. Blue
5. Fade In Fade Out
6. Ramp Up
7. Ramp Down
8. Color Flash
9. Shop Window
10. Color Change
11. Disco
12. Fire
-
 1
1
-
 2
2
-
 3
3
-
 4
4
-
 5
5
-
 6
6
-
 7
7
-
 8
8
-
 9
9
-
 10
10
-
 11
11
-
 12
12
-
 13
13
-
 14
14


in anderen Sprachen
- English: Deko-light 846014 Owner's manual
Verwandte Papiere
-
 Deko-light 846012 Bedienungsanleitung
-
 Deko-light 843005 Bedienungsanleitung
-
 Deko-light 846013 Bedienungsanleitung
-
 Deko-light 846011 Bedienungsanleitung
-
 Deko-light 846010 Bedienungsanleitung
-
 Deko-light 180040 Bedienungsanleitung
-
 Deko-light 843102 Bedienungsanleitung
-
 Deko-light 843020 Bedienungsanleitung
-
 Deko-light 843004 Bedienungsanleitung
-
 Deko-light 843018 Bedienungsanleitung


