Fantini Cosmi ASPIRVELO AIR ECOCOMFORT 2.0 Smart Schnellstartanleitung
- Typ
- Schnellstartanleitung

ASPIRVELO AIR
Serie ECOCOMFORT 2.0 SMART
ITIT UNITÀ DI VENTILAZIONE PUNTUALE CON RECUPERO DI CALORE.
DOTATA DI FUNZIONI SMART E INTELLIGENZA ARTIFICIALE.
MANUALE INSTALLAZIONE
ENEN PRECISE FAN UNIT WITH HEAT RECOVERY.
EQUIPPED WITH ARTIFICIAL INTELLIGENCE AND SMART FUNCTIONS.
INSTALLATION MANUAL
ESES UNIDAD DE VENTILACIÓN PUNTUAL CON RECUPERACIÓN DE CALOR.
DISPONE DE FUNCIONES SMART E INTELIGENCIA ARTIFICIAL.
MANUAL DE INSTALACIÓN
FRFR UNITÉ DE VENTILATION PONCTUELLE AVEC RÉCUPÉRATION DE CHALEUR.
ÉQUIPÉE DE FONCTIONS SMART ET INTELLIGENCE ARTIFICIELLE.
MANUEL D’INSTALLATION
DEDE PUNKTUELLE LÜFTUNGSEINHEIT FÜR EINZELRÄUME MIT WÄRMERÜCKGEWINNUNG.
AUSGESTATTET MIT SMART-FUNKTION UND KÜNSTLICHER INTELLIGENZ.
MONTAGEANLEITUNG
RURU УСТРОЙСТВО ТОЧЕЧНОЙ ВЕНТИЛЯЦИИ С РЕКУПЕРАЦИЕЙ ТЕПЛА.
ОСНАЩЕНО УМНЫМИ ФУНКЦИЯМИ И ИСКУССТВЕННЫМ ИНТЕЛЛЕКТОМ.
РУКОВОДСТВО ПО УСТАНОВКЕ

2
ECOCOMFORT 2.O SMART
• Questo manuale riporta le informazioni necessarie all’installazione ed alla messa in servizio del sistema di ventilazione.
Le informazioni necessarie all’utenza per l’utilizzo del sistema, sono riportate nel Manuale Uso ed Installazione scaricabile al seguente link: pdf.fantinicosmi.it,
inquadrando il quad core verrai indirizzato direttamente al link.
• This manual contains the information required for installing and putting into service the fan system.
The information the user requires to use the system is provided in the Use and Installation Manual,that can be downloaded at the following link: pdf.fantinicosmi.it,
framing the quad core you will be directed directly to the link.
• Este manual proporciona la información necesaria para la instalación y la puesta en servicio del sistema de ventilación.
La información necesaria para que los usuarios usen el sistema se proporciona en el Manual de uso e instalación, el cual se puede descargar en el siguiente enlace:
pdf.fantinicosmi.it, enmarcando el quad core se le dirigirá directamente al enlace.
• Ce manuel fournit les informations nécessaires à l’installation et à la mise en service du système de ventilation.
Les informations nécessaires à l’application pour l’utilisation du système, se trouvent dans le Manuel d’Utilisation et d’Installation qui peut être téléchargé à partir du lien
suivant: pdf.fantinicosmi.it, en encadrant le quad core, vous serez dirigé directement vers le lien.
• Diese Anleitung enthält die zur Montage und Inbetriebnahme des Lüftungssystems notwendigen Informationen.
Die für die Verwendung des Systems erforderlichen Informationen sind in der Gebrauchs- und Installationsanleitung zu finden, die unter dem folgenden Link
heruntergeladen werden kann: pdf.fantinicosmi.it, Wenn Sie den Quad-Core einrahmen, werden Sie direkt zum Link geleitet.
• В данном руководстве приведена информация, необходимая для установки решетки и ввода ее в эксплуатацию.
Информация, необходимая для пользователей для использования системы, приводится в Руководстве по Эксплуатации и Установке, которое можно скачать по
следующей ссылке: pdf.fantinicosmi.it, обрамляя четырехъядерник, вы будете перенаправлены прямо на ссылку.
• Messa in servizio
• Putting into service
• Puesta en servicio
• Mise en service
• Inbetriebnahme
• Ввод в эксплуатацию
pdf.fantinicosmi.it

3
ECOCOMFORT 2.O SMART
A
A
F
F
C
D B E
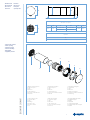
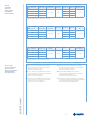
Unità ventilante con recuperatore
A B C C1 D E
23 cm 2 cm 16,2 cm (Ø esterno) 15,8 cm (Ø esterno) 28 ÷ 53 cm 5,4 cm
15,9 cm (Ø interno) 15,5 cm (Ø interno)
Griglia esterna
F
19 cm
C1
• Dati dimensionali
• Dimensional data
• Datos sobre las
dimensiones
• Dimensions
• Abmessungen
• Размерные
характеристики
• Contenuto della confezione
• Contents of package
• Contenido del paquete
• Contenu de l’emballage
• Packungsinhalt
• Содержимое упаковки
1. Griglia esterna pieghevole
2. Tubo telescopico
3. Filtro
4. Cartuccia
5. Unità elettronica
6. Coperchio unità elettronica
7. Coperchio
1. Klappbares Außengitter
2. Teleskoprohr
3. Filter
4. Kartusche
5. Elektronische Einheit
6. Abdeckung elektronische Einheit
7. Abdeckung
1. Rejilla externa plegable
2. Tubo telescópico
3. Filtro
4. Cartucho
5. Unidad electrónica
6. Carcasa de la unidad electrónica
7. Cubierta
1. Folding outdoor grille
2. Telescopic tube
3. Filter
4. Cartridge
5. Electronic unit
6. Electronic unit lid
7. Lid
1. Внешняя складная решётка
2. Раздвижная труба
3. Фильтр
4. Картридж
5. Электронный модуль
6. Крышка электронного модуля
7. Крышка
1. Grille externe pliable
2. Tuyau télescopique
3. Filtre
4. Cartouche
5. Unité électronique
6. Couvercle unité électronique
7. Couvercle
1
2
3
4
6
7
5

4
ECOCOMFORT 2.O SMART
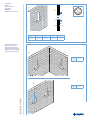
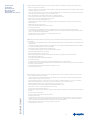
A B C D α
≥ 20 cm Ø 16,4 cm ≥ 230 cm 28 ÷ 53 cm 1 ÷ 3 °
CC
AA
BB
α
DD
• Foratura parete
• Wall bore
• Perforación en pared
• Forage du mur
• Wandbohrung
• Выполнение отверстия в стене
• Installazione di più dispositivi
• Installation of several devices
• Instalación de varios dispositivos
• Installation de plusieurs dispositifs
• Installation mehrerer Vorrichtungen
• Установка нескольких устройств
A≥ 120 cm
AAAA
B≥ 120 cm
BB

5
ECOCOMFORT 2.O SMART
5
6
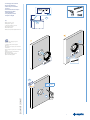
• Fori di ssaggio unità elettronica
• Electronic unit xing holes
• Oricios de jación de la unidad
electrónica
• Trous de xation unité électronique
• Befestigungslöcher für die
elektronische Einheit
• Отверстия для крепления
электронного модуля
• Dima per foratura a corredo.
• Drilling template supplied.
• Se suministra plantilla de perforación.
• Gabarit pour forage fourni.
• Inklusive Bohrschablone.
• Шаблон для сверления, входящий в комплект.
(*)
2
1
(*)
3
4
• Per il montaggio della griglia seguire le
istruzioni a corredo.
• To mount the grille, follow the supplied
instructions.
• Para el montaje de la rejilla, siga las instrucciones
suministradas.
• Pour le montage de la grille, suivre les instructions
fournies.
• Zur Montage des Gitters die mitgelieferten
Anweisungen befolgen.
• Для установки решётки следовать
прилагаемым инструкциям.
Ø5 mm

6
ECOCOMFORT 2.O SMART
• Montaggio
• Type of installation
• Montaje
• Montage
• Montage
• Монтаж
• Regolare secondo lo spessore del muro
perimetrale.
• Adjust according to the thickness of the
perimeter wall.
• Ajustar según el grosor de la pared perimetral.
• Régler selon l’épaisseur du mur périmétrique.
• Nach der Dicke der Außenwand einstellen.
• Настроить в зависимости от толщины
наружной стены.
(*)
7
AA
A (*)
A
> 28 cm < 53 cm
8
9
• Per il montaggio della griglia seguire le
istruzioni a corredo.
• To mount the grille, follow the supplied
instructions.
• Para el montaje de la rejilla, siga las
instrucciones suministradas.
• Pour le montage de la grille, suivre les
instructions fournies.
• Zur Montage des Gitters die mitgelieferten
Anweisungen befolgen.
• Для установки решётки следовать
прилагаемым инструкциям.
(*)
10
11
(*)
12

7
ECOCOMFORT 2.O SMART
• Montaggio
• Type of installation
• Montaje
• Montage
• Montage
• Монтаж
• L’apparecchio rispetta le norme del doppio
isolamento (Classe II).
Non necessita del cavo di terra.
• The unit complies with the double insulation
rules (Class II).
It does not require an earth cable.
• El aparato respeta las normas de doble
aislamiento (Clase II).
No precisa de cable de tierra.
• L’appareil respecte les normes de la double
isolation (Classe II).
Il ne nécessite pas du câble de terre.
• Das Gerät entspricht den Vorschriften zur
doppelten Isolation (Klasse II).
Es benötigt keine Erdungsleitung.
• Устройство соблюдает правила двойной
изоляции (Класс II).
Не нуждается в кабеле заземления.
15
• Non alimentare ECOCOMFORT 2.0 senza aver
prima montato il coperchio di copertura
dell’unità elettronica.
• Do not supply power to ECOCOMFORT 2.0
without first having mounted the electronic
unit lid.
• No alimentar ECOCOMFORT 2.0 sin antes haber
montado la cubierta de la carcasa de la unidad
electrónica.
• Ne pas mettre ECOCOMFORT 2.0 sous tension
sans avoir préalablement installé le couvercle
de l’unité électronique.
• ECOCOMFORT 2.0 erst anschließen, nachdem
die Abdeckung der elektronischen Einheit
montiert wurde.
• Не подключать электропитание на
ECOCOMFORT 2.0, если предварительно не
была установлена крышка для электронный
модуль.
(*)
16
(*)
• Collegare il cavo a 230V nel morsetto in basso a
sx passandolo nell’apposito antistrappo
• Connect the 230V cable in the lower left
terminal, passing it through the appropriate
tear-proof device
• Conecte el cable de 230V en el terminal
inferior izquierdo, pasándolo por el dispositivo
antidesgarro apropiado
• Branchez le câble 230V dans la borne
inférieure gauche en le faisant passer dans le
dispositif anti-déchirure approprié
• Schließen Sie das 230V-Kabel an der unteren
linken Klemme an und führen Sie es durch die
entsprechende reißfeste Vorrichtung
• Подключите кабель 230 В к нижнему
левому разъему, пропустив его через
соответствующее устройство защиты от
разрывов.
14A
13
x 4 x 4
14B
ATTENZIONE
In caso di prolungata mancanza di alimentazione dalla rete a 230V, potrebbe essere necessario
aggiornare data e ora del dispositivo dall’App Intelliclima+ come mostrato al capitolo 4.3.3.6
Giorno e Ora per ripristinare la funzione Reportistica.
WARNING
In case of a longer power supply failure at 230V, it could be necessary to update the date and the
hour from the Intelliclima+App, as shown in the chapter “4.3.3.6 Day and Time” to restore the
Reporting Function.
ATTENTIONEn cas de panne de courant prolongée à 230V, il pourrait être nécessaire de mettre
à jour la date et l’heure par l’APP Intelliclima+, comme montré dans le chapitre “4.3.3.6 Jour et
Heure” pour restaurer la fonction des Rapports.
ATTENCIÓN
En caso de un corte prolongado de la corriente eléctrica de 230V, podrìa ser necesario actualizar
la fecha y la hora del dispositivo desde l’APP Intelliclima+, como se muestra en el capítulo “4.3.3.6
Día y Hora” para restaurar la función de Reporte.
ACHTUNG
Im Falle eines längeren Stromausfalls des 230V-Netzes kann es notwendig, das Datum und
die Uhrzeit des Gerätes in der Intelliclima+App zu aktualisieren, wie im Kapitel “4.3.3.6 Tag und
Uhrzeit” im Handbuch beschrieben, um die Berichtsfunktion wiederherzustellen.
ПРЕДУПРЕЖДЕНИЕ
В случае более длительного сбоя питания на 230 В, для того чтобы восстановить Функцию
Отчетов, может потребоваться обновить дату и время из приложения Intelliclima+, как
показано в главе “4.3.3.6 День и Время”.

8
ECOCOMFORT 2.O SMART
17
x 3 x 3
• Messa in servizio
• Putting into service
• Puesta en servicio
• Mise en service
• Inbetriebnahme
• Ввод в эксплуатацию
18
19
• Montaggio
• Type of installation
• Montaje
• Montage
• Montage
• Монтаж
• Dopo aver installato e alimentato il dispositivo,
per poterlo comandare, è necessario eseguire
l’associazione con l’app Intelliclima + di Fantini Cosmi.
• After having installed and powered the device, it must
be associated to the Fantini Cosmi Intelliclima + app to
be able to control it.
• Tras haber instalado y enchufado el dispositivo, para
controlarlo, es necesario emparejarlo con la aplicación
Intelliclima + de Fantini Cosmi.
• Après avoir installé et mis le dispositif sous tension,
pour pouvoir le commander, il est nécessaire
d’effectuer l’association avec l’appli Intelliclima +
de Fantini Cosmi.
• Nach ihrer Installation und ihrem Anschluss muss die
Vorrichtung zur Steuerung mit der App Intelliclima +
von Fantini Cosmi verknüpft werden.
• После установки устройства и подключения к
нему питания, чтобы управлять им необходимо
присвоить приложение Intelliclima +
от Fantini Cosmi.
2
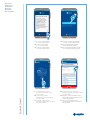
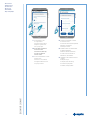
IT 1. Scarica l’app dagli store.
2. Tocca per iniziare l’installazione.
EN 1. Download the app from one of the stores.
2. Touch to start installation.
ES 1. Descargar la aplicación del store.
2. Pulsar para comenzar la instalación.
FR 1. Téléchargez l’appli depuis les stores.
2. Touchez pour démarrer l’installation.
DE 1. Die App aus den Stores herunterladen.
2. Berühren, um mit der Installation zu beginnen.
RU 1. Скачать приложение из магазина приложений.
2. Коснуться, чтобы начать установку.
Intelliclima+

9
ECOCOMFORT 2.O SMART
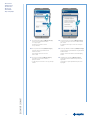
IT 3. Tocca per aprire l’app.
4. Inserisci i dati per la registrazione.
EN 3. Touch to open the app.
4. Enter the registration data.
ES 3. Pulsar para abrir la aplicación.
4. Introducir los datos para el registro.
FR 3. Touchez pour ouvrir l’appli.
4. Saisissez les données pour l’enregistrement.
DE 3. Berühren, um die App zu öffnen.
4. Zur Registrierung die Daten eingeben.
RU 3. Коснуться, чтобы открыть приложение.
4. Ввести данные для регистрации.
• Messa in servizio
• Putting into service
• Puesta en servicio
• Mise en service
• Inbetriebnahme
• Ввод в эксплуатацию
3
4
5
6
7
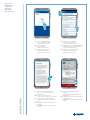
IT 5. Inserisci username e password.
6. Tocca per utilizzo in Wi-Fi.
7. Tocca per utilizzo in Bluetooth low energy.
EN 5. Enter the username and password.
6. Touch to use in Wi-Fi.
7. Touch to use in Bluetooth low energy.
ES 5. Introducir nombre de usuario y contraseña.
6. Pulsar para habilitar Wi-Fi.
7. Pulsar para habilitar Bluetooth de baja energía.
FR 5. Saisissez le nom de l’utilisateur et le mot de passe.
6. Touchez pour l’utilisation en Wi-Fi.
7. Touchez pour l’utilisation en Bluetooth low energy.
DE 5. Benutzernamen und Passwort eingeben.
6. Berühren, um im WLAN zu verwenden.
7. Berühren, um im Bluetooth low energy zu verwenden.
RU 5. Ввести имя пользователя и пароль.
6. Коснуться, для использования в Wi-Fi.
7. Коснуться, для использования в Bluetooth low energy.

10
ECOCOMFORT 2.O SMART
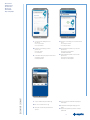
IT 8. Tocca per confermare (solo BLE).
9. Tocca per proseguire (solo BLE).
EN 8. Touch to confirm (only BLE).
9. Touch to continue (only BLE).
ES 8. Pulsar para confirmar (solo BLE).
9. Pulsar para continuar (solo BLE).
FR 8. Touchez pour confirmer (uniquement BLE).
9. Touchez pour continuer (uniquement BLE).
DE 8. Nur zum Bestätigen berühren (nur BLE).
9. Zum Fortfahren berühren (nur BLE).
RU 8. Коснуться для подтверждения (только BLE).
9. Коснуться для продолжения (только BLE)
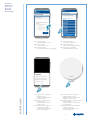
IT 10. Tocca per creare una nuova casa.
11. Inserisci il nome che vuoi dare alla casa
e poi tocca conferma.
EN 10. Touch to create a new home.
11. Enter the name you want to give the hom
and touch to confirm.
ES 10. Pulsar para crear una nueva casa.
11. Introducir el nombre que desee darle a la casa y
luego, pulsar en confirmar.
FR 10. Touchez pour créer une nouvelle maison.
11. Entrez le nom que vous souhaitez donner à la maison
puis touchez confirmer.
DE 10. Berühren, um eine neue Wohnung zu erstellen.
11. Den gewünschten Namen der Wohnung eingeben
und dann auf Bestätigen tippen.
RU 10. Коснуться, для создания нового дома.
11. Ввести выбранное имя дома и затем коснуться
для подтверждения.
• Messa in servizio
• Putting into service
• Puesta en servicio
• Mise en service
• Inbetriebnahme
• Ввод в эксплуатацию
8
9
10
11

11
ECOCOMFORT 2.O SMART
• Messa in servizio
• Putting into service
• Puesta en servicio
• Mise en service
• Inbetriebnahme
• Ввод в эксплуатацию
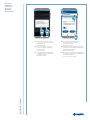
IT 12. Tocca per aggiungere un dispositivo.
13. Tocca per aggiungere una VMC.
14. Seleziona Ecocomfort 2.0 Smart.
EN 12. Touch to add a device.
13. Touch to add a VMC.
14. Select Ecocomfort 2.0 Smart.
ES 12. Pulsar para añadir un dispositivo.
13. Pulsar para añadir un VMC.
14. Seleccionar Ecocomfort 2.0 Smart.
FR 12. Touchez pour ajouter un dispositif.
13. Touchez pour ajouter un VMC.
14. Sélectionnez Ecocomfort 2.0 Smart.
DE 12. Berühren, um eine neue Vorrichtung hinzuzufügen.
13. Berühren, um einen neuen VMC hinzuzufügen.
14. Ecocomfort 2.0 Smart auswählen.
RU 12. Коснуться, чтобы добавить устройство.
13. Нажмите, чтобы добавить VMC.
14. Выбрать Ecocomfort 2.0 Smart.
IT 15. Tocca per accettare l’informativa Privacy.
16. Tocca per consentire l’accesso alla posizione
del tuo dispositivo.
EN 15. Touch to accept the Privacy policy.
16. Touch to allow access to the position of your device.
ES 15. Pulsar para aceptar la Política de Privacidad.
16. Pulsar para permitir el acceso a la ubicación de su
dispositivo.
FR 15. Touchez pour accepter la note d’information sur la
Confidentialité.
16. Touchez pour permettre l’accès à la localisation de
votre dispositif.
DE 15. Berühren, um die Datenschutzerklärung
anzunehmen.
16. Berühren, um den Zugriff auf den Standort Ihres
Geräts zuzulassen.
RU 15. Коснуться, чтобы согласиться с уведомлением о
конфиденциальности.
16. Коснуться, чтобы разрешить доступ к позиции
устройства.
12
14
13
15
16

12
ECOCOMFORT 2.O SMART
IT 17. Tocca per proseguire.
18. Seleziona il dispositivo da associare.
EN 17. Touch to continue.
18. Select the device to associate.
ES 17. Pulsar para continuar.
18. Seleccionar el dispositivo que se desea emparejar.
FR 17. Touchez pour continuer.
18. Sélectionnez le dispositif à associer.
DE 17. Zum Fortfahren berühren.
18. Die zuzuordnende Vorrichtung auswählen.
RU 17. Коснуться, чтобы продолжить.
18. Выбрать присваиваемое устройство.
IT 19. Tocca per iniziare la configurazione
(solo prima associazione).
20. Premi il pulsante blu sul dispositivo
(solo prima associazione).
EN 19. Touch to start the configuration
(only first association).
20. Press the blue button on the device
(only first association).
ES 19. Pulsar para iniciar la configuración
(solo antes del emparejamiento).
20. Pulsar el botón azul en el dispositivo
(solo antes del emparejamiento).
FR 19. Touchez pour démarrer la configuration
(uniquement première association).
20. Appuyez sur le bouton bleu sur le dispositif
(uniquement première association).
DE 19. Berühren, um mit der Konfiguration zu beginnen
(nur erste Zuordnung).
20. Die blaue Taste auf der Vorrichtung drücken
(nur erste Zuordnung).
RU 19. Коснуться, чтобы начать конфигурацию
(только перво присвоение).
20. Нажать синюю кнопку на устройстве
(только перво присвоение).
17
• Messa in servizio
• Putting into service
• Puesta en servicio
• Mise en service
• Inbetriebnahme
• Ввод в эксплуатацию
20
19
18

13
ECOCOMFORT 2.O SMART
IT 21. Tocca per mantenere il profilo esistente.
22. Tocca per sovrascrivere il profilo esistente.
23. Imposta data e ora.
24. Tocca per proseguire.
EN 21. Touch to maintain the existing profile.
22. Touch to overwrite the existing profile.
23. Set date and time.
24. Touch to continue.
ES 21. Pulsar para mantener el perfil existente.
22. Pulsar para sobreescribir el perfil existente.
23. Configurar fecha y hora.
24. Pulsar para continuar.
FR 21. Touchez pour maintenir le profil existant.
22. Touchez pour écraser le profil existant.
23. Réglez la date et l’heure.
24. Touchez pour continuer.
DE 21. Berühren, um das bestehende Profil beizubehalten.
22. Berühren, um das bestehende Profil zu überschreiben.
23. Datum und Uhrzeit einstellen.
24. Zum Fortfahren berühren.
RU 21.
Коснуться, чтобы оставить существующий профиль.
22. Коснуться, чтобы переписать существующий профиль.
23. Установить дату и время.
24. Коснуться, чтобы продолжить.
21 22
24
23
• Messa in servizio
• Putting into service
• Puesta en servicio
• Mise en service
• Inbetriebnahme
• Ввод в эксплуатацию

14
ECOCOMFORT 2.O SMART
• Messa in servizio
• Putting into service
• Puesta en servicio
• Mise en service
• Inbetriebnahme
• Ввод в эксплуатацию
IT 25.Seleziona Master o Slave.
26. Scegli la rotazione.
27.Seleziona la casa(Solo Master).
28. Imposta le soglie dei sensori.
29.Tocca per proseguire.
EN 25.Select Master or Satellite Unit.
26. Choose the rotation.
27.Select the house (Master only).
28. Set the sensor thresholds.
29.Touch to continue.
ES 25.Seleccione Unidad Maestra o Satélite.
26. Elija la rotación.
27.Seleccione la casa (solo Master).
28. Configure los umbrales del sensor.
29. Toque para continuar.
FR 25.Sélectionnez l’unité maître ou satellite.
26. Choisissez la rotation.
27.Sélectionnez la maison (Master uniquement).
28. Réglez les seuils du capteur.
29.Touchez pour continuer.
DE 25.Wählen Sie Master- oder Satelliteneinheit.
26. Wählen Sie die Drehung.
27.Wählen Sie das Haus aus (nur Master).
28. Stellen Sie die Sensorschwellen ein.
29.Berühren Sie , um fortzufahren.
RU 25. Выберите главное или вспомогательное
устройство.
26. Выберите поворот.
27. выберите дом (только Мастер).
28. Установите пороги датчика.
29. Нажмите, чтобы продолжить.
28
29
25
26
27

15
ECOCOMFORT 2.O SMART
IT 30. Seleziona la tua rete Wi-Fi. [2,4 GHz (802.11 b/g/n)]
31. Inserisci la password della tua rete Wi-Fi
e tocca per proseguire.
32 Verifica che la password sia corretta e
tocca per confermare.
EN 30. Select your Wi-Fi network.[2,4 GHz (802.11 b/g/n)]
31. Enter the password of your Wi-Fi network
and touch to continue.
32. Check that the password is correct and
touch to confirm.
ES 30. Seleccionar su red Wi-Fi.[2,4 GHz (802.11 b/g/n)]
31. Introducir la contraseña de su red Wi-Fi y
pulsar para continuar.
32. Comprobar que la contraseña sea correcta y pulsar para
confirmar.
FR 30. Sélectionnez votre réseau Wi-Fi.[2,4 GHz (802.11 b/g/n)]
31. Saisissez le mot de passe de votre réseau Wi-Fi et touchez
pour continuer.
32. Vérifiez que le mot de passe soit correct et touchez pour
confirmer.
DE 30 Das eigene WLAN-Netz auswählen.[2,4 GHz (802.11 b/g/n)]
31. Das Passwort des eigenen WLAN-Netzes eingeben und zum
Fortfahren berühren.
32. Prüfen, ob das Passwort korrekt ist, und zur Bestätigung
berühren.
RU
30. Выбрать вашу сеть Wi-Fi.[2,4 GHz (802.11 b/g/n)]
31. Ввести пароль вашей сети Wi-Fi и коснуться, чтобы
продолжить.
32. Проверить, что пароль правильный и коснуться, чтобы
подтвердить.
32
• Messa in servizio
• Putting into service
• Puesta en servicio
• Mise en service
• Inbetriebnahme
• Ввод в эксплуатацию
31
30

16
ECOCOMFORT 2.O SMART
• Messa in servizio
• Putting into service
• Puesta en servicio
• Mise en service
• Inbetriebnahme
• Ввод в эксплуатацию
IT Ora puoi comandare il dispositivo tramite l’app.
EN You can now control the device via app.
ES Ahora puede controlar el dispositivo mediante la
aplicación.
FR Vous pouvez désormais commander le dispositif par le
biais de l’appli.
DE Jetzt kann die Vorrichtung über die App gesteuert
werden.
RU Теперь можно управлять устройством с помощью
приложения.
IT 33. Inserisci il nome e l’immagine che vuoi
dare alla zona.
34. Tocca per proseguire.
35. Tocca per terminare.
EN 33. Enter the name and image you want to
give to the zone.
34. Touch to continue.
35. Touch to finish.
ES
33. Introducir el nombre y la imagen que desee darle a la zona.
34. Pulsar para continuar.
35. Pulsar para finalizar.
FR 33. Entrez le nom et l’image que vous souhaitez donner à
la zone.
34. Touchez pour continuer.
35. Touchez pour terminer.
DE
33. Ввести имя и изображение, которое вы хотите
присвоить зоне.
34. Коснуться, чтобы продолжить.
35. Zum Beenden berühren.
RU
33. Ввести имя и изображение, которое вы хотите
присвоить зоне.
34. Коснуться, чтобы продолжить.
35. Коснуться, чтобы завершить.
34
33
35

17
ECOCOMFORT 2.O SMART
• Dati tecnici
• Technical data
• Datos técnicos
• Données techniques
• Technische Daten
• Технические данные ITIT Velocità m³/h Potenza max
assorbita W
Tensione di
alimentazione D2mnTw (*) dB(A) 1,5 mt dB(A) 3 mt Temperatura di
funzionamento
V bassa 20,5 2,5
230 V~ 50 Hz 40 dB
18,5 12,5
(- 20) – (+ 50) °C;
V media 35 4 26,5 20,5
V alta 48,5 6,3 32,5 26,5
V sleep 8 2 ND ND
(*) Riduzione del rumore proveniente dall’esterno con kit cod. AP19881 (in conformità ai Criteri Ambientali Minimi per il comfort acustico).
ENEN Fan speed
m³/h
Maximum
power W Supply voltage D2mnTw (*) dB(A) 1,5 mt dB(A) 3 mt Operating
temperature
V low 20,5 2,5
230 V~ 50 Hz 40 dB
18,5 12,5
(- 20) – (+ 50) °C;
V medium 35 4 26,5 20,5
V high 48,5 6,3 32,5 26,5
V sleep 8 2 ND ND
(*) Noise reduction coming from outside with kit cod. AP19881.
ESES
Velocidad de
ventilación m³/h
Potencia
máxima W
Tensión de
alimentación D2mnTw (*) dB(A) 1,5 mt dB(A) 3 mt Temperatura de
funcionamiento
V baja 20,5 2,5
230 V~ 50 Hz 40 dB
18,5 12,5
(- 20) – (+ 50) °C;
V media 35 4 26,5 20,5
V alta 48,5 6,3 32,5 26,5
V sleep 8 2 ND ND
(*) Reducción de ruido procedente del exterior con kit bacalao. AP19881.

18
ECOCOMFORT 2.O SMART
• Dati tecnici
• Technical data
• Datos técnicos
• Données techniques
• Technische Daten
• Технические данные
FRFR
Vitesse de ven-
tilation m³/h
Puissance
maximale W. W
Tension
d’alimentation D2mnTw (*) dB(A) 1,5 mt dB(A) 3 mt Température de
fonctionnement
V basse 20,5 2,5
230 V~ 50 Hz 40 dB
18,5 12,5
(- 20) – (+ 50) °C;
V moyenne
35 4 26,5 20,5
V haute 48,5 6,3 32,5 26,5
V sleep 8 2 ND ND
(*) Réduction du bruit provenant de l’extérieur avec kit cod. AP19881.
DEDE
Gebläsedreh-
zahl m³/h
Maximale
Leistung W W
Versorgungs-
spannung
D2mnTw (*) dB(A) 1,5 mt dB(A) 3 mt Betriebstempe-
ratur
V niedrige 20,5 2,5
230 V~ 50 Hz 40 dB
18,5 12,5
(- 20) – (+ 50) °C;
V mittlere 35 4 26,5 20,5
V hoche 48,5 6,3 32,5 26,5
V sleep 8 2 ND ND
(*) Geräuschreduzierung von außen kommend mit kit cod. AP19881.
RURU
Скорость вен-
тиляции m³/h
максимальная
мощность W.
Напряжение
питания D2mnTw (*) dB(A) 1,5 mt dB(A) 3 mt Рабочая
Температура
V nizka 20,5 2,5
230 V~ 50 Hz 40 dB
18,5 12,5
(- 20) – (+ 50) °C;
V srednja 35 4 26,5 20,5
V visoka 48,5 6,3 32,5 26,5
V minimalna
8 2 ND ND
(*) Снижение шума извне с помощью комплекта трески. AP19881.
• Accessori e ricambi
• Accessories and spare parts
• Accesorios y repuestos
• Accessoires et pièces détachées
• Zubehör und Ersatzteile
• Аксессуары и запчасти
IT Filtri classe ISO Coarse secondo la UNI EN ISO 16890:2017 (AP1984);
Pannello per isolamento acustico, termico e anticondensa (AP1985);
Griglia antivento e antipioggia (cod. AP1612);
Kit riduzione rumore esterno (cod. AP19881).
EN ISO Coarse class filters according to UNI EN ISO 16890: 2017 (AP1984);
Panel for acoustic, thermal and anti-condensation insulation (AP1985);
Windproof and rainproof grille (code AP1612);
External noise reduction kit (code AP19881).
ES Filtros ISO de clase gruesa según UNI EN ISO 16890: 2017 (AP1984);
Panel para aislamiento acústico, térmico y anticondensación (AP1985);
Rejilla a prueba de viento y lluvia (código AP1612);
Kit de reducción de ruido externo (código AP19881)
FR Filtres ISO de classe grossière selon UNI EN ISO 16890:2017 (AP1984);
Panneau d’isolation acoustique, thermique et anti-condensation (AP1985) ;
Grille coupe-vent et anti-pluie (code AP1612) ;
Kit de réduction du bruit externe (code AP19881) .
DE ISO Grobklassenfilter nach UNI EN ISO 16890: 2017 (AP1984);;
Paneel für Schall-, Wärme- und Antikondensationsisolierung (AP1985);
Wind- und regendichtes Gitter (Code AP1612);
Kit zur externen Geräuschreduzierung (Code AP19881).
RU Фильтры грубой очистки ISO согласно UNI EN ISO 16890: 2017 (AP1984);
Панель для звуко-, термической и антиконденсационной изоляции (AP1985);
Ветрозащитная и непромокаемая решетка (код AP1612);
Комплект внешнего шумоподавления (код AP19881).

19
ECOCOMFORT 2.O SMART
IT Leggere attentamente le istruzioni d’installazione, le avvertenze sulla sicurezza, le istruzioni d’uso e di manutenzione contenute nel presente libretto, il quale va
conservato con cura per ogni ulteriore consultazione.
• L’installazione dell’apparecchio va eseguita esclusivamente da tecnici qualificati, nel rispetto delle norme vigenti ed interponendo un interruttore onnipolare con distanza
di apertura dei contatti uguale o superiore a 3 mm.
• L’apparecchio è destinato all’aerazione, con recupero di calore, di locali residenziali; impieghi diversi non sono ammessi ed esentano il costruttore da ogni responsabilità
per le conseguenze derivanti da un uso improprio, così come in caso di installazione errata.
• Dopo aver tolto l’imballaggio assicurarsi dell’integrità dell’apparecchio; in caso di dubbio non utilizzarlo.
• L’uso di un qualsiasi apparecchio elettrico comporta l’osservanza di alcune regole fondamentali. In particolare:
• NON toccare l’apparecchio con mani o piedi bagnati umidi oppure a piedi nudi.
• NON esporre l’apparecchio ad agenti atmosferici (pioggia, sole, ecc.).
• Prima di effettuare qualsiasi operazione di manutenzione o pulizia, disinserire l’apparecchio dalla rete di alimentazione elettrica, aprendo l’interruttore onnipolare
predisposto sulla linea.
• NON alimentare l’apparecchio con coperchio aperto.
• L’apparecchio e conforme alle Direttive Europee 2014/30/UE e 2014/35/UE.
• Non ostruire la griglia di aspirazione.
• In conformità alle vigenti leggi antinfortunistiche, assicurarsi che ad installazione avvenuta, non sia possibile accedere alle parti in movimento dell’unità.
Se nel locale da ventilare è installato un apparecchio a gas (o altri combustibili) accertarsi che vi sia un adeguato ricambio dell’aria, per garantire la perfetta combustione
dello stesso ed il corretto funzionamento dell’unità ventilante.
• Non installare l’aspiratore nello stesso condotto dove sono convogliati i fumi di un apparecchio a gas.
• L’installazione può essere eseguita solo a parete.
• Avvertenze generali
• General warnings
• Advertencias generales
• Mises en garde générales
• Allgemeine Hinweise
• Предупреждения общего характера
EN Carefully read the installation instructions, the safety warnings, and the use and maintenance instructions in this manual, which must be stored with care for any
future consultation.
• The unit should only be installed by qualified technicians, in compliance with current standards and interposing an all-pole switch with contact opening distance equal to
or greater than 3 mm.
• The unit is intended to ventilate residential premises with heat recovery; different uses are not permitted and shall exempt the manufacturer from any responsibilities for
the consequences resulting from improper use, as well as incorrect installation.
• After removing the packaging, ensure the product is intact; if in doubt do not use it.
• The use of any electrical appliance implies the observance of some fundamental rules. In particular:
• Do NOT touch the appliance with wet hands, or wet or bare feet.
• Do NOT expose the unit to atmospheric agents (rain, sun, etc.).
• Before performing any maintenance or cleaning, disconnect the unit from the mains power supply, opening the all-pole switch installed on the line.
• Do NOT power the appliance with the lid open.
• The unit complies with 2014/30/EU and 2014/35/EU European Directives.
• Do not obstruct the intake grille.
• In compliance with current accident prevention legislation, ensure that the unit moving parts cannot be accessed after installation.
If an appliance operating on gas (or other fuels) is installed in the room to be ventilated, make sure there is an adequate exchange of air to ensure the perfect combustion
thereof and proper operation of the fan unit.
• Do not install an extractor fan in the same duct where the fumes of a gas appliance are conveyed.
• The unit can be installed only on a wall.
ES Lea atentamente las instrucciones de instalación, las advertencias de seguridad y las instrucciones de uso y mantenimiento contenidas en este manual, que debe
conservarse cuidadosamente para cualquier consulta futura.
• La instalación del aparato debe ser realizada exclusivamente por técnicos cualificados, respetando las normas vigentes e interponiendo un interruptor omnipolar con
distancia de apertura de los contactos igual o superior a los 3 mm.
• El aparato está destinado para la aireación, con recuperación de calor, de locales residenciales; no se admiten usos diferentes a este y si se llevan a cabo, eximirán al
fabricante de toda responsabilidad por las consecuencias que se deriven de un uso inadecuado, así como en caso de instalación incorrecta.
• Después de haber quitado el embalaje, asegúrese de que el aparato esté íntegro; en caso de duda, no lo use.
• El uso de cualquier aparato eléctrico, conlleva el cumplimiento de algunas normas fundamentales. En concreto:
• NO toque el aparato con las manos o los pies mojados, húmedos ni con los pies descalzos.
• NO exponga el aparato a agentes atmosféricos (lluvia, sol, etc.).
• Antes de llevar a cabo cualquier operación de mantenimiento o limpieza, desenchufe el aparato de la red de alimentación eléctrica, abriendo el interruptor omnipolar que
lleva la línea.
• No enchufe el aparato con la cubierta abierta.
• El aparato es conforme a las Directivas Europeas 2014/30/UE y 2014/35/UE.
• No obstruya la rejilla de aspiración.
• De conformidad con las leyes vigentes para la prevención de accidentes, asegúrese de que una vez que se complete la instalación, no se pueda acceder a las piezas en
movimiento de la unidad. Si en el local que se deba ventilar hubiera instalado un aparato de gas (u otros combustibles), asegúrese de que haya un intercambio de aire
adecuado, para garantizar la perfecta combustión del mismo y el funcionamiento correcto de la unidad de ventilación.
• No instale el aspirador en el mismo conducto por el que se dirijan los humos de un aparato de gas.
• La instalación puede hacerse solo en pared.

20
ECOCOMFORT 2.O SMART
FR Lire attentivement les instructions d’installation, les mises en garde sur la sécurité et les instructions d’utilisation et de maintenance contenues dans ce manuel, qui
doit être conservé avec soin pour toute consultation ultérieure.
• L’installation de l’appareil doit être effectuée exclusivement par des techniciens qualifiés, dans le respect des normes en vigueur et en interposant un interrupteur
omnipolaire avec une distance d’ouverture des contacts égale ou supérieure à 3mm.
• L’appareil est destiné à l’aération, avec récupération de chaleur, de locaux résidentiels; les emplois différents ne sont pas autorisés et exonèrent le fabricant de toute
responsabilité pour les conséquences qui dérivent d’un usage impropre, tout comme en cas d’installation erronée.
• Après avoir enlevé l’emballage, s’assurer de l’intégrité de l’appareil; en cas de doute, ne pas l’utiliser.
• L’utilisation de tout appareil électrique implique le respect de certaines règles fondamentales. En particulier:
• NE PAS toucher l’appareil en ayant les mains ou les pieds mouillés ou en étant pieds nus.
• NE PAS exposer l’appareil aux agents atmosphériques (pluie, soleil, etc.).
• Avant d’effectuer toute opération de maintenance ou de nettoyage, désactiver l’appareil du réseau d’alimentation électrique, en ouvrant l’interrupteur omnipolaire prévu
sur la ligne.
• NE PAS mettre l’appareil sous tension avec le couvercle ouvert.
• L’appareil est conforme aux Directives Européennes 2014/30/UE et 2014/35/UE.
• Ne pas boucher la grille d’aspiration.
• Conformément aux lois en vigueur sur la prévention des accidents, s’assurer qu’il soit impossible d’accéder aux parties en mouvement de l’unité lorsque l’installation
est effectuée. Si dans le local à ventiler est installé un appareil à gaz (ou d’autres combustibles) s’assurer qu’il y ait un renouvellement d’air adéquat, pour garantir sa
combustion parfaite et le bon fonctionnement de l’unité de ventilation.
• Ne pas installer l’aspirateur dans le même conduit où sont envoyées les fumées d’un appareil à gaz.
• L’installation peut être effectuée uniquement au mur.
• Avvertenze generali
• General warnings
• Advertencias generales
• Mises en garde générales
• Allgemeine Hinweise
• Avvertenze generali
DE Die in dieser Anleitung enthaltenen Montageanweisungen, Sicherheits- Gebrauchs- und Wartungshinweise sind aufmerksam zu lesen. Diese Anleitung ist für späteres
Nachschlagen sorgfältig aufzubewahren.
• Die Montage des Geräts darf nur durch qualifizierte Fachkräfte unter Beachtung der geltenden Rechtsvorschriften und Installation eines allpoligen Schalters mit einem
Öffnungsabstand der Kontakte nicht unter 3mm durchgeführt werden.
• Das Gerät dient zur Lüftung von Wohnräumen mit Wärmerückgewinnung; andersartige Verwendung ist nicht zulässig und entbindet den Hersteller von jeglicher Haftung
für die Auswirkungen einer unsachgemäßen Verwendung sowie bei fehlerhafter Montage.
• Nach dem Auspacken ist das Gerät auf Unversehrtheit zu überprüfen; im Zweifelsfall darf es nicht verwendet werden.
• Bei der Verwendung aller Elektrogeräte müssen einige Grundregeln beachtet werden. Insbesondere:
• Das Gerät nicht mit feuchten Händen oder Füßen oder barfuß berühren.
• Das Gerät keinen Umwelteinflüssen (Regen, Sonne usw.) aussetzen.
• Vor dem Ausführen beliebiger Wartungs- oder Reinigungstätigkeiten ist das Gerät mit dem an der Leitung installierten allpoligen Schalter von der Spannungsversorgung
zu trennen.
• Das Gerät NICHT mit geöffneter Abdeckung einschalten.
• Das Gerät entspricht den europäischen Richtlinien 2014/30/EU und 2014/35/EU.
• Das Ansauggitter nicht verschließen.
• Gemäß den Unfallverhütungsvorschriften ist nach abgeschlossener Montage sicherzustellen, dass kein Zugang zu beweglichen Teilen möglich ist.
Wenn sich in dem zu belüftenden Raum ein mit Gas (oder anderen Brennstoffen) betriebenes Gerät befindet, ist sicherzustellen, dass ein angemessener Luftaustausch für
dessen vollständigen Verbrennungsvorgang und den korrekten Betrieb der Lüftungseinheit besteht.
• Das Lüftungsgerät nicht in derselben Rohrleitung installieren, wo Rauch/Abgase eines gasbetriebenen Geräts eingeleitet werden.
• Die Montage darf nur an der Wand durchgeführt werden.
RU Внимательно ознакомьтесь с инструкциями по установке, мерами предосторожности, инструкциями по эксплуатации и техобслуживанию, приведенными
в данной брошюре, которую следует бережно хранить для будущего пользования.
• Установка прибора может быть выполнена исключительно квалифицированным персоналом и при соблюдении действующих стандартов, а также,
устанавливая однополюсный выключатель с расстоянием открытия контактов, равным или превышающим 3 мм.
• Данный прибор предназначен для проветривания с рекуперацией тепла в жилых помещениях; любое другое использование является недопустимым и
снимает с изготовителя всякую ответственность за последствия использования не по назначению и неправильной установки.
• После снятия упаковки необходимо убедиться в целостности прибора. При возникновении сомнений не использовать его.
• При использовании любых электроприборов следует соблюдать некоторые основные правила. В частности:
• НЕ касаться прибора влажными руками или ногами, а также не ходить босиком.
• НЕ подвергать прибор воздействию атмосферных явлений (дождь, солнце и т.д.).
• Перед выполнением любой операции по техобслуживанию или очистке, отключить прибор от сети электропитания, открывая однополюсный выключатель,
установленный на линии.
• НЕ подключать прибор к электропитанию с открытой крышкой.
• Прибор соответствуют Европейским Директивам 2014/30/UE и 2014/35/UE.
• Нельзя загораживать вытяжную решетку.
• В соответствии с действующими требованиями по технике безопасности, проверить, что по завершению установки нет доступа к внутренним компонентам
в движении. Если в вентилируемом помещении установлен газовый прибор (или работающий на другом топливе) проверить, что есть достаточный обмен
воздуха, чтобы обеспечить горение и правильную работу вентиляционного устройства.
• Нельзя устанавливать аспиратор в том же трубопроводе, в который направляются дымы газового прибора.
• Установка может быть только настенной.
Seite wird geladen ...
Seite wird geladen ...
Seite wird geladen ...
Seite wird geladen ...
-
 1
1
-
 2
2
-
 3
3
-
 4
4
-
 5
5
-
 6
6
-
 7
7
-
 8
8
-
 9
9
-
 10
10
-
 11
11
-
 12
12
-
 13
13
-
 14
14
-
 15
15
-
 16
16
-
 17
17
-
 18
18
-
 19
19
-
 20
20
-
 21
21
-
 22
22
-
 23
23
-
 24
24


Fantini Cosmi ASPIRVELO AIR ECOCOMFORT 2.0 Smart Schnellstartanleitung
- Typ
- Schnellstartanleitung
in anderen Sprachen
Verwandte Artikel
Andere Dokumente
-
Miele Complete C3 Celebration EcoLine Plus Bedienungsanleitung
-
Miele 9840410 Benutzerhandbuch
-
K RCHER CR 214 Innovative Start and Benutzerhandbuch
-
Medisana Smart Baby Monitor Bedienungsanleitung
-
 Ulefone Armor 3T Benutzerhandbuch
-
GROHE Sense 22 505 Benutzerhandbuch
-
Miele COMPLETE C3 COMFORT ORANGE Bedienungsanleitung
-
GOCLEVER NANNY EYE 2 Schnellstartanleitung
