
SBC12 H
Bedienungsanleitung 2– 4
Operating instructions 5– 7
Mode d’emploi 8–10
Istruzioni d’uso 11–13
Gebruiksaanwijzing 14–16
Manual de instruções 17–19
Manual de instrucciones 20–22
Brugsanvisning 23–25
Käyttöohje 26–28
Bruksanvisning 29–31
Bruksanvisning 32–34
δηγιες ρησεως
35–37
Ръководство за обслужване 38–40
Upute za uporabu 41–43
Instrukcja obs
ł
ugi 44–46
Instructiuni de utilizare 47–49
Инструкция по зксплуатации 50–52
Návod na obsluhu 53–55
Navodila za uporabo 56–58
Návod k obsluze 59–61
Használati utasítás 62–64
65–67
68–72
73–75
*254900*
254900
Printed: 07.07.2013 | Doc-Nr: PUB / 5070509 / 000 / 00

EG-Konformitätserklärung
Bezeichnung: Stundenlader Seriennummern: XX/0000001 - 9999999/XX
Typenbezeichnung: SBC 12 H Konstruktionsjahr: 1995
Wir erklären in alleiniger Verantwortung, dass dieses Produkt mit den folgenden
Normen oder normativen Dokumenten übereinstimmt:
EN 60335-1, EN 60335-2-29, EN 55014-1, EN 55014-2, EN 61000-3-2, EN 61000-
3-3 gemäss den Bestimmungen der Richtlinien 73/23/EWG, 89/336/EWG
EC declaration of conformity
Description: One-hour charger Serial no.: XX/0000001 - 9999999/XX
Designation: SBC 12 H Year of design: 1995
We declare, under our sole responsibility, that this product complies with the
following standards or standardization documents:
EN 60335-1, EN 60335-2-29, EN 55014-1, EN 55014-2, EN 61000-3-2, EN 61000-
3-3 according to the provisions of the directives 73/23/EEC, 89/336/EEC
Déclaration de conformité CE
Designation: chargeur rapide
No. de série: XX/0000001 - 9999999/XX
Modéle/type: SBC 12 H Année de conception: 1995
Nous declarons sous notre propre responsabilité que ce produit est conforme avec
normes ou documents de normalisés:
EN 60335-1, EN 60335-2-29, EN 55014-1, EN 55014-2, EN 61000-3-2, EN 61000-
3-3
conformèment aux termes des directives 73/23/CEE, 89/336/CEE
Declaración de conformidad
Designacion: Cargador No. de serie: XX/0000001 - 9999999/XX
Modelo/Tipo: SBC 12 H Año de fabricacion: 1995
Declaramos bajo nuestra sole responsabilidad que este producto està en
conformidad con las normas o documentos normalizados siguientes:
EN 60335-1, EN 60335-2-29, EN 55014-1, EN 55014-2, EN 61000-3-2, EN 61000-
3-3 de acuerdo con las regulaciones 73/23/CEE, 89/336/CEE
D
GB
Declaração de conformidade
Descricão: Carregador de uma hora Nr. de série: XX/0000001 - 9999999/XX
Designacão: SBC 12 H Ano de fabrico: 1995
Declaramos sob nossa exclusiva responsabilidade que este producto cumpre as
seguintes normas ou documentos normativos:
EN 60335-1, EN 60335-2-29, EN 55014-1, EN 55014-2, EN 61000-3-2, EN 61000-
3-3 de acordo com as disposições das directivas 73/23/CEE, 89/336/CEE
Dichiarazione di conformità
Descrizione: Caricabatterie Nr. di serie: XX/0000001 - 9999999/XX
Modello/Tipo: SBC 12 H Anno di progettazione: 1995
Assumendone la piena responsabilità, dichiariamo che il prodotto è conforme alle
seguenti normative ed ai relativi documenti:
EN 60335-1, EN 60335-2-29, EN 55014-1, EN 55014-2, EN 61000-3-2, EN 61000-
3-3 in base alle prescrizioni delle direttive CEE 73/23, CEE 89/336
Konformiteitsverklaring
Omschrijving: Snellader Seriennummer: XX/0000001 - 9999999/XX
Type-aanduiding: SBC 12 H Constructie-jaar: 1995
Wij verklaren op eigen verantwoordelijkheid dat dit produkt voldoet aan de
volgende normen of normatieve documenten:
EN 60335-1, EN 60335-2-29, EN 55014-1, EN 55014-2, EN 61000-3-2, EN 61000-
3-3 volgens de bepalingen van de richtlijnen 73/23/EEG, 89/336/EEG
Konformitetserklæring
Betegnelse: Timeoplader Serienr.: XX/0000001 - 9999999/XX
Model/type: SBC 12 H Fremstillingsår: 1995
Vi påtager os det fulde ansvar for, at dette produkt er i overensstemmelse med
følgende normer og normative dokumenter:
EN 60335-1, EN 60335-2-29, EN 55014-1, EN 55014-2, EN 61000-3-2, EN 61000-
3-3 i henhold til bestemmelserne i direktiverne 73/23/EØF, 89/336/EØF
F
E
P
I
NL
DK
Printed: 07.07.2013 | Doc-Nr: PUB / 5070509 / 000 / 00

Samræmisyfirl´ysing
Heiti: Skrúfvél Ra
õ
nr.: XX/0000001 - 9999999/XX
Ger
õ
: SBC 12 H Framlei
õ
sluár: 1995
Vi
õ
tökum fulla ábyrg
õ
á pví a
õ
vara pessi sé í samræmi vi
õ
eftirfarandi sta
õ
la:
EN 60335-1, EN 60335-2-29, EN 55014-1, EN 55014-2, EN 61000-3-2, EN 61000-
3-3, sbr. reglur ESB-tilskipana nr. 73/23, 89/336
Hilti Aktiengesellschaft
Martin A.C. Messner Dr. Heinrich Schäperkötter
Leiter Division Bohrmontage Leiter Entwicklung Bohrmontage
Vice president D&ET division Development manager D&ET division
11/1995 11/1995
Försäkran om överensstämmelse
Beteckning: Batteriladdare
Tillverkningsnummer:
XX/0000001 - 9999999/XX
Typbeteckning: SBC 12 H Konstruktionsår: 1995
Vi intygar och ansvarar för att denna produkt överensstämmer med följande norm
och dokument:
EN 60335-1, EN 60335-2-29, EN 55014-1, EN 55014-2, EN 61000-3-2, EN 61000-
3-3 enligt bestämmelserna i riktlinjerna 73/23/EWG, 89/336/EWG
Erklæring av ansvarsforhold
Betegnelse: Batterilader Seriennummer: XX/0000001 - 9999999/XX
Typenbetegnelse: SBC 12 H Konstruktjonsår: 1995
Vi erklærer hervedtat at dette produktet er i overenstemmelse med følgende
normer eller standarder:
EN 60335-1, EN 60335-2-29, EN 55014-1, EN 55014-2, EN 61000-3-2, EN 61000-
3-3 i henhold til retningsbestemmelsene i direktivene 73/23/EØF, 89/336/EØF
Todistus standardinmukaisuudesta
Mimike: Tunilaturi Serjanumero: XX/0000001 - 9999999/XX
Tyyppimerkintä: SBC 12 H Suunnitteluvuosi: 1995
Todistamme täten ja vastaamme yksin siitä, että tämä tuote en allalueteltujen
standardien ja standardoimisasiakirjojen vaatimusten mukainen:
EN 60335-1, EN 60335-2-29, EN 55014-1, EN 55014-2, EN 61000-3-2, EN 61000-
3-3 seuraavien ohjeiden määräysten mukaisesti: 73/23/EWG, 89/336/EWG
S ISL
FIN
N
GR
CE Δηλωση συμδατικτητς
Περιγραή: ρτιστης 1-ωρας Αριθμς σειράς: XX/0000001 - 9999999/XX
Μντέλ-Τύπς: SBC 12 H Ετς Σεδιασμύ 1995
Δηλωνυμε υπευθυνα τι τ πριν αυτ ειναι σε συμωνια με τις
ακλυθες τυππιησεις ή διατα"εις τυππιησης:
EN 60335-1, EN 60335-2-29, EN 55014-1, EN 55014-2, EN 61000-3-2, EN 61000-
3-3 συμωνα με τις πρ#λεψεις των καννισμων 73/23/EEC, 89/336/EEC
Printed: 07.07.2013 | Doc-Nr: PUB / 5070509 / 000 / 00

Sicherheitshinweise
■
1
Halten Sie Ihren Arbeitsbereich in Ordnung.
Unordnung im Arbeitsbereich birgt Unfallge-
fahr.
■
2
Berücksichtigen Sie Umgebungseinflüs-
se. Setzen Sie Elektrowerkzeuge nicht dem
Regen aus. Benützen Sie Elektrowerkzeuge
nicht in feuchter oder nasser Umgebung. Sor-
gen Sie für gute Beleuchtung. Benützen Sie
Elektrowerkzeuge nicht in der Nähe von bren-
nenden Flüssigkeiten oder Gasen.
■
3
Schützen Sie sich vor elektrischem Schlag.
Vermeiden Sie Körperberührung mit geerde-
ten Teilen, z.B. Rohre, Heizkörper, Herde, Kühl-
schränke.
■
4
Halten Sie Kinder fern. Lassen Sie andere
Personen nicht das Werkzeug oder Kabel
berühren, halten Sie sie von Ihrem Arbeits-
bereich fern.
■
5
Bewahren Sie Ihre Elektrowerkzeuge si-
cher auf. Unbenutzte Werkzeuge sollen in
trockenen, verschlossenen Orten und ausser
Reichweite von Kindern aufbewahrt werden.
■
6
Überlasten Sie Ihr Elektrowerkzeug nicht.
Sie arbeiten besser und sicherer im angege-
benen Leistungsbereich.
■
7
Benützen Sie das richtige Elektrowerkzeug.
Verwenden Sie keine leistungsschwachen
Werkzeuge oder Vorsatzgeräte für schwere
Belastungen. Benützen Sie Werkzeuge nicht
für Zwecke und Arbeiten, wofür sie nicht be-
stimmt sind, z.B. benützen Sie keine Hand-
kreissäge, um Bäume zu fällen oder Äste zu
schneiden.
■
8
Tragen Sie geeignete Arbeitskleidung. Tra-
gen Sie keine weite Kleidung oder Schmuck.
Sie können von beweglichen Teilen erfasst
werden. Bei Arbeiten im Freien sind Gummi-
handschuhe und rutschfestes Schuhwerk
empfehlenswert. Tragen Sie bei langen Haa-
ren ein Haarnetz.
■
9
Benützen Sie eine Schutzbrille. Verwen-
den Sie auch Atemmasken bei stauberzeu-
genden Arbeiten.
■
10
Keine Zweckentfremdung des Kabels. Tra-
gen Sie das Werkzeug nicht am Kabel und
benützen Sie es nicht, um den Stecker aus
der Steckdose zu ziehen. Schützen Sie das
Kabel vor Hitze, Öl und scharfen Kanten.
■
11
Sichern Sie das Werkstück. Benützen Sie
Spannvorrichtungen oder Schraubstock, um
das Werkstück festzuhalten. Es ist damit si-
cherer gehalten als mit Ihrer Hand und es er-
möglicht die Bedienung der Maschine mit bei-
den Händen.
■
12
Beugen Sie sich nicht zu weit darüber. Ver-
meiden Sie abnormale Körperhaltung. Sor-
gen Sie für sicheren Stand und halten Sie je-
derzeit das Gleichgewicht.
■
13
Pflegen Sie Ihre Werkzeuge mit Sorgfalt.
Halten Sie Ihre Werkzeuge scharf und sau-
ber, um besser und sicherer arbeiten zu kön-
nen. Befolgen Sie die Wartungsvorschriften
und die Hinweise eines Werkzeugwechsels.
Kontrollieren Sie regelmässig das Kabel und
lassen Sie es bei Beschädigung von einem
anerkannten Fachmann erneuern. Kontrollie-
ren Sie Verlängerungskabel regelmässig und
ersetzen Sie sie, falls beschädigt. Halten Sie
Handgriffe trocken und frei von Öl und Fett.
■
14
Ziehen Sie den Netzstecker. Bei Nichtge-
brauch vor der Wartung und beim Werk-
zeugwechsel, wie z.B. Sägeblatt, Bohrer und
Maschinenwerkzeugen aller Art.
■
15
Lassen Sie keine Werkzeugschlüssel stecken.
Überprüfen Sie vor dem Einschalten, dass die
Schlüssel und Einstellwerkzeuge entfernt sind.
■
16
Vermeiden Sie unbeabsichtigten Anlauf.
Tragen Sie keine an das Stromnetz ange-
schlossene Werkzeuge mit dem Finger am
Schalter. Vergewissern Sie sich, dass der
Schalter beim Anschluss an das Stromnetz
ausgeschaltet ist.
■
17
Verlängerungskabel im Freien. Verwenden
Sie nur dafür zugelassene und entsprechend
gekennzeichnete Verlängerungskabel im Frei-
en.
■
18
Seien Sie stets aufmerksam. Beobachten
Sie Ihre Arbeit. Gehen Sie vernünftig vor, ver-
wenden Sie das Werkzeug nicht, wenn Sie
unkonzentriert sind.
■
19
Kontrollieren Sie Ihr Gerät auf Beschädi-
gungen. Vor weiterem Gebrauch des Werk-
zeugs müssen Sie Schutzeinrichtungen oder
beschädigte Teile sorgfältig auf ihre einwand-
freie und bestimmungsgemässe Funktion
überprüfen. Überprüfen Sie, ob die Funktion
beweglicher Teile in Ordnung ist, ob sie nicht
klemmen, ob keine Teile gebrochen sind, ob
sämtliche anderen Teile einwandfrei, richtig
montiert und alle anderen Bedingungen, die
den Betrieb des Gerätes beeinflussen können,
stimmen. Beschädigte Schutzvorrichtungen
und Teile sollen sachgemäss durch eine Kun-
dendienstwerkstatt repariert oder ausge-
wechselt werden, soweit nichts anderes in
den Betriebsanleitungen angegeben ist. Be-
schädigte Schalter müssen bei einer Kun-
dendienstwerkstatt ersetzt werden. Benutzen
Sie keine Werkzeuge, bei denen sich der Schal-
ter nicht ein- und ausschalten lässt.
■
20
Achtung: Zu Ihrer eigenen Sicherheit benüt-
zen Sie nur Zubehör und Zusatzgeräte, die in
der Bedienungsanleitung angegeben sind oder
im jeweiligen Katalog angeboten werden. Der
Gebrauch anderer als der in der Betriebsan-
leitung oder im Katalog empfohlener Ein-
satzwerkzeuge oder Zubehöre kann eine per-
sönliche Verletzungsgefahr für Sie bedeuten.
■
21
Reparaturen nur vom Elektrofachmann.
Dieses Elektrowerkzeug entspricht den ein-
schlägigen Sicherheitsbestimmungen. Re-
paraturen dürfen nur von einer Elektrofach-
kraft ausgeführt werden, anderenfalls können
Unfälle für den Betreiber entstehen.
■
22
Schliessen Sie die Staubabsaug-Einrich-
tung an. Wenn Vorrichtungen zum Anschluss
von Staubabzugs- und auffangeinrichtungen
vorhanden sind, überzeugen Sie sich, dass
diese angeschlossen und und richtig genutzt
werden.
Achtung: Beim Gebrauch von Elektrowerkzeugen
sind zum Schutz gegen elektrischen Schlag,
Verletzungs- und Brandgefahr, folgende
grundsätzlichen Sicherheitsmassnahmen im-
mer zu beachten.
Lesen und beachten Sie diese Hinweise, be-
vor Sie das Gerät benutzen.
Bewahren Sie diese Hinweise sorgfältig auf.
2 deutsch
Printed: 07.07.2013 | Doc-Nr: PUB / 5070509 / 000 / 00

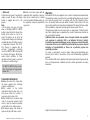
➀➁
➂
➃
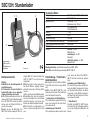
SBC12H: Stundenlader
Ladeanzeige
Akku Schacht
Wandhalterung
Netzkabel
Technische Daten:
Netzspannung: 100 / 110 / 115 / 220/230 / 240 Volt AC
Netzfrequenz: 50 Hz / 60 Hz
Ausgangsstrom: Ladestrom: 1,7 A
Erhaltungsstrom: 125 mA
Ladezeit: ca. 60 Minuten bei
2,0 Ah Zellenblock
Gewicht: 1,7 kg
Netzkabel: 2 m
Aufnahmeleistung: ca. 50 W
Elektr. Ladekontrolle und Steuerung: über Mikrocontroller
Temperaturüberwachung der Zellen: über Diode
Wandhalterung
Anzeige: am Netz - rot LED
Blinklicht lang
Ladeanzeige - rot LED
Dauerlicht
Akku Pack geladen - rot LED
Blinklicht kurz
Montageschrauber, siehe Bedienungsanleitung SB10 / SB12
Akku Pack, siehe Bedienungsanleitung SBP10 / SBP1 2
Betriebssicherheit:
Wichtig:
● Beachten Sie die beiliegenden Si-
cherheitshinweise
● ”Verwenden Sie das Produkt in
kei nem Fall anders, als es diese Be-
dienungsanleitung vorschreibt”
● Die Netzspannung muss mit der An-
gabe auf dem Typenschild übereinstim-
men. Mit 230 Volt bezeichnete Geräte
können auch an 220 und 240 Volt an-
geschlossen werden.
●
Laden Sie nur die Hilti Akku Pack
SBP 10
mit diesem Ladegerät. Das La-
degerät SBC 12 H und der Akku Pack
SBP10 / SBP12 sind aufeinander
abgestimmt.
●
Während dem Ladevorgang muss
das Gerät Wärme abgeben können,
deshalb müssen die Lüftungsschlitze
frei sein.
Nicht in geschlossenen Behältern laden.
●
Verhindern Sie, dass im Ladegerät,
und auch am Akku Pack die Kontakte
überbrückt werden, ansonsten eine
Brand- oder Explosionsgefahr besteht.
●
Der Standort des Ladegerätes soll
trocken, sauber und kühl aber frostfrei
sein
.
Handhabung / Funktionen /
Inbetriebnahme:
● Ladegerät mit dem Netz verbinden.
Rote LED muss blinken (lange Blink-
zeit)
● Akku Pack SBP10 / SBP1 2 in den
Ladeschacht einsetzen. Der Akku Pack
muss im Ladegerät einrasten.
➀ Ladeanzeige rot / Blinklicht lang
Die Ladeanzeige-Lampe blinkt lange,
wenn das Ladegerät mit dem Strom-
netz verbunden ist.
Ladeanzeige rot / Dauerlicht
Die Ladeanzeige-Lampe leuchtet dau-
ernd, wenn der Akku Pack SBP10 /
SBP12 mit dem Ladestrom geladen
wird.
Ladeanzeige rot / Blinklicht kurz
Die Ladeanzeige-Lampe blinkt kurz,
wenn der Akku Pack geladen ist. In die-
ser Geräteschaltung fliesst der Erhal-
tungsstrom – keine Gefahr, auch wenn
der Akku Pack über längere Zeit in die-
ser Ladeposition bleibt.
➁ Akku-Schacht
Der Akku Pack SBP10 / SBP1 2 rastet
im Schacht mit der Schnappvorrichtung
ein, um die richtige Kontaktposition zu
fixieren.
1
2
3
4
3
Doppelisoliert
Printed: 07.07.2013 | Doc-Nr: PUB / 5070509 / 000 / 00

➂ W andhalterung
Für die Montage des Ladegerätes an
die Wand sind die vorgesehenen Ösen
am Gehäuseboden zu verwenden.
Hinweise:
Beginnt der Ladevorgang nach dem
Einsetzen eines leeren Akku Pack
SBP10/SBP12 nicht mit dem
Ladestrom, dann ist er entweder zu kalt
oder zu warm. Der Akku Pack kann im
Ladegerät bleiben. Erreicht der Akku
Pack den Temperaturbereich (0°–
65°C), dann startet der Ladevorgang
automatisch. Das Ladegerät verfügt
über eine elektronische Temperatur-
überwachung. Der Akku Pack SBP10 /
SBP12 ist im Normalfall nach ca. 60
Minuten geladen, danach fliesst der Er-
haltungsladestrom, der der natürlichen
Selbstentladung entgegenwirkt.
Der Akku Pack SBP10 / SBP12
nimmt keinen Schaden, auch wenn
er im Ladegerät bleibt!
Pflege / Wartung / Service:
Bevor Sie mit der Pflege / Wartung
beim SBC 12 H beginnen, immer den
Netzstecker vom Stromnetz trennen.
● Die Kontaktflächen müssen frei von
Staub und Schmierstoff sein. Reinigen
Sie bei Bedarf die Kontaktflächen mit
einem sauberen Putztuch.
● Das Gerät darf im Bereich der Lüf-
tungsschlitze nicht verschmutzen. Bei
übermässigem Anfall von Staub, Gerät
durch Ausblasen reinigen.
● Beschädigte Netzkabel durch die
Hilti Servicestellen ersetzen lassen.
● Elektrowerkzeuge müssen den
einschlägigen Sicherheitsbestimmun-
gen entsprechen. Der Service darf nur
von einer Elektrofachkraft ausgeführt
werden. Die Verwendung von Hilti Ori-
ginal-Ersatzteilen gewährleistet die op-
timale Sicherheit.
4
Garantie
Hilti garantiert, dass das gelieferte Gerät frei von Material- oder Fertigungsfehlern
ist. Diese Garantie gilt unter der Voraussetzung, dass das Gerät in Übereinstim-
mung mit der Hilti Bedienungsanleitung richtig eingesetzt und gehandhabt, ge-
pflegt und gereinigt wird, dass alle Garantieansprüche innerhalb von 12 Monaten
ab dem Verkaufsdatum (Rechnungsdatum) erfolgen und dass die technische Ein-
heit gewahrt wird, d.h. dass nur Original Hilti Verbrauchsmaterial, Zubehör- und
Ersatzteile mit dem Gerät verwendet werden.
Diese Garantie umfasst die kostenlose Reparatur oder den kostenlosen Ersatz
der defekten Teile. Teile, die dem normalen Verschleiss unterliegen, fallen nicht
unter diese Garantie.
Weitergehende Ansprüche sind ausgeschlossen, soweit nicht zwingende
nationale Vorschriften entgegenstehen. Insbesondere haftet Hilti nicht für
unmittelbare oder mittelbare, Mangel- oder Mangelfolgeschäden, Verluste
oder Kosten im Zusammenhang mit der Verwendung oder wegen der Un-
möglichkeit der Verwendung des Gerätes für irgendeinen Zweck. Still-
schweigende Zusicherungen für Verwendung oder Eignung für einen be-
stimmten Zweck werden ausdrücklich ausgeschlossen.
Für Reparatur oder Ersatz sind Gerät und/oder betroffene Teile unverzüglich nach
Feststellung des Mangels an die zuständige Hilti Marktorganisation zu senden.
Die vorliegende Garantie umfasst sämtliche Garantieverpflichtungen seitens Hilti
und ersetzt alle früheren oder gleichzeitigen Erklärungen, schriftlichen oder münd-
lichen Verabredungen betreffend Garantien.
Technische Änderungen vorbehalten!
Printed: 07.07.2013 | Doc-Nr: PUB / 5070509 / 000 / 00

englisch 5
Safety precautions
■
1
Keep your place of work clean and tidy.
Disorder where you are working creates a po-
tential risk of accidents.
■
2
Make allowance for influence from the sur-
roundings. Don’t expose your electric tools/ma-
chines to rain. Don’t use electric tools/ma-
chines in damp or wet surroundings. Make
sure the work area is well lit. Don’t use elec-
tric tools/ machines near inflammable liquids
or gases.
■
3
Always protect yourself against electric
shock. Never touch grounding (earthing) parts
e.g. pipes, radiators, cookers, ovens, refrig-
erators.
■
4
Keep children away. Don’t let other per-
sons touch the electric tool/machine or sup-
ply cord. Keep them away from your work
area.
■
5
Keep your electric tool/machine in a safe
place. Electric tools/machines not in use should
be kept in a dry locked-up place out of the
reach of children.
■
6
Don’t overload your electric tools/machines.
You will do your work better and safer in the
specified performance/rating range.
■
7
Always use the right electric tool/machine
for the job. Don’t use underpowered tools/ma-
chines or attachments for heavier duty jobs.
Don’t use electric tools/ machines for work
and purposes for which they are not intend-
ed, e.g. don’t use a hand-held circular saw to
cut down trees or cut up branches.
■
8
Wear suitable clothing. Don’t wear loose
clothing or jewellery – they could be caught
up in moving parts. When working outside,
the use of rubber gloves and non-slip shoes
is recommended. Wear a helmet or cap if you
have long hair.
■
9
Always wear protective goggles. If work
causes dust, wear a mask as well.
■
10
Don’t use the supply cord for any other
purpose. Don’t carry the electric tool/ machine
by the supply cord and don’t pull the plug out
of the socket/receptacle by pulling the sup-
ply cord. Protect the cable from heat, oil and
sharp edges.
■
11
Secure the workpiece. Use a clamping de-
vice or vice to hold the workpiece. It is se-
cured more reliably in this way than in your
hand and you can then hold and operate your
electric tool/machine with both hands.
■
12
Don’t bend over too far when working.
Avoid an unusual stance. Make sure that you
are standing firmly and keep your balance at
all times.
■
13
Take good care of your electric tools/ma-
chines. Keep the drill bits, insert tools etc.
sharp and clean so that you can do your work
better, safer and more reliably. Observe the
cleaning and maintenance regulations and
the instructions for changing drill bits, insert
tools etc. Check the supply cord regularly and
have it renewed by a recognized specialist if
it is damaged. Check the extension supply
cord regularly and, if it is damaged, replace
it. Keep grips and side handles dry and free
from oil or grease.
■
14
Always pull out the plug from the mains if
the electric tool/machine is not in use, prior
to cleaning and maintenance work and when
changing a drill bit, saw blade or insert tools
of any kind.
■
15
Never leave a key in place. Always check
before switching on that the key or adjusting
tools have been removed.
■
16
Avoid any unintentional start-up. Never
carry a plugged-in electric tool/machine with
your finger on the switch. Always make sure
that the switch is off when plugging the elec-
tric tool/machine into the main electric sup-
ply.
■
17
If an extension supply cord is used out-
side, only use one which has been approved
for the purpose and is correspondingly marked.
■
18
Be attentive at all times. Keep your eye on
your work. Remain in a sensible frame of mind
and don’t use the electric tool/machine if you
cannot concentrate completely.
■
19
Check your electric tool/machine for dam-
age. You must check the safety devices or
damaged parts carefully for perfect function-
ing in keeping with the intended purpose be-
fore using the electric tool/machine further.
Check whether the moving parts function
properly, whether they aren’t sticking, whether
any parts are broken, whether all other parts
work properly and are fitted correctly, and
make sure that all other conditions which can
influence operation and running of the elec-
tric tool/machine are as they should be. Dam-
aged guards and protective devices and parts
must be repaired properly by an authorized
service workshop or replaced provided that
nothing else is stated in the operating in-
structions. Damaged switches must also be
replaced in the recognized service workshop.
Never use electric tools/machines which can-
not be switched on and off by the switch.
■
20
Caution ! For your own safety’s sake, on-
ly use accessories and attachments which are
specified in the operating instructions or in
the respective catalogue. The use of acces-
sories or insert tools or attachments other
than those specified in the operating instruc-
tions can result in personal injury to you.
■
21
Only have repairs carried out by recognized
electrical specialists. This electric tool/ma-
chine complies with respective safety regu-
lations. Repairs may only be carried out by
an electrical specialist otherwise an accident
hazard for the operator can exist.
■
22
Connect dust extraction equipment. If de-
vices are provided for the connection of dust
extraction and collection facilities ensure these
are connected and properly used.
Caution: The following fundamental safety
precautions must always be observed when
using electric tools/machines as protection
against electric shock, the risk of injury and
fire hazards.
Please read and take note of these precau-
tions before you use the tool/machine.
Please keep these safety precautions in a
safe place.
Printed: 07.07.2013 | Doc-Nr: PUB / 5070509 / 000 / 00

➀➁
➂
➃
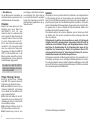
SBC12H one-hour charger
Charging indicator
Battery compartment
Wall mount
Supply cord
Technical data:
Mains voltage: 100 / 110 / 115 / 220230 / 240 V AC
Mains frequency: 50 Hz / 60 Hz
Output current: Charging current: 1.7 A
Trickle charge current: 125 mA
Charging time: Approx. 60 minutes for 2.0 Ah cells
Weight: 1.7 kg
Supply cord: 2 m
Power input: Approx. 50 W
Electronic control of charging function: By microcontroller
Battery cell temperature monitoring By Diode
Provision for wall mounting
Indicator: Connected to mains supply -
red LED blinks (long intervals)
Charging indicator - red LED
lit continuously.
Battery charged - red LED
blinks (short intervals)
Battery screwdriver - See SB1 0 / SB1 2 operating instructions.
Battery - See SBP10 / SBP1 2 operating instructions.
Safety:
Important:
● The enclosed list of safety precau-
tions must be observed!
● ”Do not use this product in any way
other than as directed by these
operating instructions“
● The mains supply voltage must cor-
respond to the information printed on the
rating plate. 230-volt units can also be
connected to 220 and 240-volt mains
supplies.
●
This charger should be used only for
Initial operation/
Operating functions:
●
Connect the charger to the mains sup-
ply. The red LED must blink (long intervals).
● Insert the SBP10 / SBP1 2 battery into
the battery compartment. The battery
must engage securely in the charger.
➀ Red LED charging indicator blinks
(long intervals)
The charging indicator LED blinks at
long intervals when the charger is con-
nected to the mains supply.
Red LED charging indicator lit continously.
The charging indicator LED lights con-
tinuously when the SBP10 / SBP1 2
battery is being charged.
Red LED charging indicator blinks
(short intervals)
The LED charging indicator blinks at short
intervals when the battery has been
charged. A trickle charging current flows
to the battery during this phase of the
charging cycle. The battery may be left in
the charger for long periods (1–2 weeks)
without risk.
➁ Battery compartment
The SBP 10 / SBP1 2 battery clicks into
position in the battery compartment
ensuring that correct contact is made.
1
2
4
3
charging the Hilti
SBP10 / SBP1 2 battery.
The SBC 12 H charger and the SBP10 /
SBP1 2 battery have been designed for
each other for optimum performance.
● The charger must be able to give off
heat during the charging procedure. The
ventilation slots must, therefore, always
be kept free.
Do not operate the charger in a closed
container!
● Do not short-circuit the contacts on the
battery charger or battery - this could
present a risk of fire or explosion!
● The battery charger should be stored
and operated in a clean, cool and dry
place where it is protected from frost.
6
Double insulation
Printed: 07.07.2013 | Doc-Nr: PUB / 5070509 / 000 / 00

➂ W all mount
Provision has been made for mounting the
charger on a wall. The base of the charger
housing is equipped with slots for this
purpose.
Note:
If the charging cycle does not begin
when a discharged SBP10 / SBP12
battery is inserted into the charger, then
battery will be either too cold or too
warm. The battery can be left in the
charger and the charging cycle will begin
automatically when the battery reaches
a temperature between 0°C – 65°C.
The charger is equipped with an
electronic temperature monitoring
circuit. The SBP10 / SBP12 battery will
be charged after approx. 60 minutes,
under normal conditions. A trickle
charge then flows in order to counteract
the tendency to self-discharger.
The SBP10 / SBP12 battery can be
left in the charger for long periods
without risk!
Care and maintenance:
● Always disconnect the charger from
the mains supply before beginning
cleaning or maintenance.
● The contacts in the battery
compartment must be kept free of oil
and grease. Clean the contacts, if
necessary, using a clean cloth.
● The ventilation slots should be kept
clean. If an excessive amount of dust
collects, clean the charger by blowing
out dust with a jet of compressed air.
● A damage supply cord should be
replaced only by a Hilti service centre.
● Electric tools must comply with the
applicable safety regulations. Servicing
may only be carried out by a trained
electrical specialist. Optimum safety can
be ensured by using only original Hilti
spare parts.
7
Warranty:
Hilti warrants that the tool supplied is free of defects in material and workmanship.
This warranty is valid so long as the tool is operated and handled correctly, cleaned
and serviced properly and in accordance with the Hilti Operating Instruc-
tions, all warranty claims are made within 12 months from the date of the sale
(invoice date), and the technical system is maintained. This means that only original
Hilti consumables, components and spare parts may be used in the tool.
This warranty provides free-of-charge repair or replacement of defective parts
only. Parts requiring repair or replacement as a result of normal wear and tear are
not covered by this warranty.
Additional claims are exccluded, unless stringent national rules prophibit
such exclusion. In particular, Hilti is not obligated for direct, indirect,
incidental or consequential damages, losses or expenses in connection with,
or by reason of, the use of, or inability to use the tool for any purpose. Implied
warranties of merchantability or fitness for a particular purpose are
specifically excluded.
For repair or replacement, send tool and/or related parts immediately upon
discovery of the defect to the address of the local Hilti marketing organization
provided.
This constitutes Hilti’s entire obligation with regard to warranty and supersedes all
prior or contemporaneous comments and oral or written agreements concerning
warranties.
Right of technical modifications reserved!
Printed: 07.07.2013 | Doc-Nr: PUB / 5070509 / 000 / 00

Hilti = registered trademark of Hilti Corp., Schaan W 1722 1200 10-Pos. 1 1 Printed in Liechtenstein © 2000
Right of technical and programme changes reserved S. E. & O.
254900/F
DEUTSCHLAND:
Hilti Deutschland GmbH
Hiltistraße 22, 86916 Kaufering
Ihr direkter Draht zu Hilti:
Bau/Holz/Metall: 0130/ 18 20 10
SHK/ Elektro: 0130/182020
Industrie/Behörden: 0 130/ 18 20 30
ÖSTERREICH:
Hilti Austria Gesellschaft m.b.H.
Zentrale
1231 Wien
Altmannsdorfer Straße 165
Telefon: 01/ 6 6101
Telefax: 01/66101 (DW 340)
Telex: 1-32562, BTX* 6123 #
SCHWEIZ:
Hauptverwaltung/Administration:
Hilti (Schweiz) AG
Soodstrasse 61
8134 Adliswil/ Zürich
Telefon 0844/848485
Telefax 0844/848486
GREAT BRITAIN:
Hilti (Gt. Britain) Limited
Hilti House
1 Trafford Wharf Road, Trafford Park
Manchester M171BY
Telephone 0161-8861000
Fax 0161-8488876
Credit Service Line: 0161-8861300
IRELAND:
Hilti (Fastening Systems) Limited
Dublin Office:
Dublin Industrial Estate
Finglas Road, Glasnevin
Dublin 11
Telephone (01) 303422
Telefax (01) 303569
FRANCE:
Hilti-France
Siège social:
1, Rue Jean Mermoz
Rond point Mérantais
78778 Magny-les-Hameaux cedex.
Tél.: 01 30.12.50.00
Télécopie: 01 30.12.50.12
Service Clients: 0800397397
BELGIE/BELGIQUE:
Hilti Belgium N.V.
Bettegem 12
B-1731 Asse/Zellik
Tel. 02/4677911, Telefax 02 /466 5802
ITALIA:
Hilti Italia s.p.a.
Via Flumendosa 16
20132 Milano
Tel. (02) 21 27 21
Fax (02) 25902189
NEDERLAND:
Hilti Nederland B.V.
Postbus 92 – Industrieweg 5
2650 AB Berkel en Rodenrijs
Tel. (010) 5191100 (General)
Tel. (010) 5191111 (Customer service)
Fax (010) 5191198 (General)
Fax (010) 5191199 (Customer service)
PORTUGAL:
Hilti (Portugal)
Produtos e Serviços, Lda.
Rua dos Fogueteiros, 341
Apartado 4085
4461-901 Senhora da Hora Codex
Tel. 29578110
Fax 29537696
ESPAÑA:
Hilti Española, S.A.
Isla de Java, 35
28034 Madrid
Teléfono 334.22.00, Fax 358.04.46
DANMARK:
Hilti Danmark A/S
Islevdalvej 100
2610 Rødovre
Telefon 44888000, Telefax 44 888084
SUOMI – FINLAND:
Hilti (Suomi) Oy
Kankiraudantie 1, PL45
00701 Helsinki
Puhelin (09) 478 700
Telefax (09) 478 70100
NORGE:
Motek A.S.
Hovedkontor
Østre Aker vei 61
Postboks 81, Økern
0508 Oslo
Telefon 23052500, Telefax 22 640063
SVERIGE:
Hilti Svenska AB
Box 123
Testvägen 1
23222 Arlöv
Telefon 040/539300
Telefax 040 / 4 3 51 96
GREECE:
Hilti Hellas SA
Sofokli Venizelou 47
14123 Likovrisi
Tel. 2835135, 2848787
Fax 2810603
BULGARIA:
Hilti (Bulgaria) GmbH
Tschavdartsche Str. Nr. 26
1225 Sofia
Tel. 00359/2395001, 2399009
Fax 00359/2396004
POLAND:
Hilti (Poland) Sp.zo.o.
ul. Taborowa 8
02-699 Warszawa
Tel. 644 97 99
Fax 6449196
ROMANIA:
Omnitech Trading S.A.
Str. Barbu Vàcarescu 162
Sector 2
71422 Bukuresti
Tel. (00 401) 2 30 60 91
Fax (00401) 2307633
SLOVENIJA:
Hilti Slovenija d.o.o.
Koprska 106b
1000 Ljubljana
Tel. (061) 1235287
Fax (061) 1235267
CZECH REPUBLIC:
Hilti ČR spol. s.r.o.
Antala Staška 30
14 620 Praha 4
Tel. 02 / 6121 26 30, 61 21 26 31
Fax 02 / 6921835, 69 20 272
SLOVAKIA:
Hilti Slovakia, spol. s.r.o.
Kopčianska 80
85101 Bratislava
Tel. 07 /68284 243, Fax 07/ 682 84215
HUNGARY:
Hilti (Hungária) Kft.
Service
Bojtár u. 58–60.
Postafiók 140
1037-Budapest
Tel. (1) 436-6300, Fax (1) 436-6390
RUSSIAN FEDERATION:
Hilti Distribution Ltd.
Str. Godovikova 9
129827 Moscow
Tel. 007 (501) 7925252
Fax 007 (501) 79252 53
USA:
Hilti, Inc.
5400 South 122
nd
East Avenue
Tulsa, Oklahoma 74146
Telephone (918) 252-6000
CANADA:
Hilti (Canada) Limited / Limitée
6790 Century Avenue, Suite 300
CDN - Mississauga, Ontario L5N 2V8
Telphone (905) 813 9200
LATIN AMERICA:
Hilti Latin America, Ltd.
5400 South 122
nd
East Avenue
P.O. Box 21148
Tulsa, Oklahoma 74146
Telephone (918) 252-6595
AUSTRALIA:
Hilti (Aust.) Pty Ltd
23 Egerton Street
Silverwater NSW 2128
Australia
Tel: 13 12 92
NEW ZEALAND:
Hilti (New Zealand) Ltd.
Unit B, 750 Great South Road
P. O.Box 11 20 30
Penrose
Auckland
Phone: (09) 571 99 44
Fax: (09) 5719943
Printed: 07.07.2013 | Doc-Nr: PUB / 5070509 / 000 / 00
-
 1
1
-
 2
2
-
 3
3
-
 4
4
-
 5
5
-
 6
6
-
 7
7
-
 8
8
-
 9
9
-
 10
10


in anderen Sprachen
Verwandte Artikel
-
Hilti SBC 12-H Bedienungsanleitung
-
-
-
-
-
-
-
-
-